
Welcome to Smart Home Forum by FIBARO
Dear Guest,
as you can notice parts of Smart Home Forum by FIBARO is not available for you. You have to register in order to view all content and post in our community. Don't worry! Registration is a simple free process that requires minimal information for you to sign up. Become a part of of Smart Home Forum by FIBARO by creating an account.
As a member you can:
- Start new topics and reply to others
- Follow topics and users to get email updates
- Get your own profile page and make new friends
- Send personal messages
- ... and learn a lot about our system!
Regards,
Smart Home Forum by FIBARO Team

.thumb.png.d4cdaed51f345b01992386e25e167dcc.png)


Scenes
The category contains scenes submitted by users.
Downloading and submission terms have to be accepted.
Types of scenes: magic, block, LUA.
Types of files accepted: PDF, JPG, JPEG, PNG, LUA, TXT.
Scenes have to be described properly, screen shots are optional.
Support topics are created automatically here Scenes
Report topics and files that are no longer supported by authors.
All the files submitted have to be approved by administrators.
42 files
-
ALL-IN-ONE Message Scene
By jompa68
--[[ ----------------------------------------------------------------------------- -- ALLINONE MESSAGE SCENE -- TELEGRAM/PUSH/POPUP/API.POST ----------------------------------------------------------------------------- ----------------------------------------------------------------------------- 0.0.9 Started with Telegram and push function 1.0.0 Added popup and api.post functions 1.0.1 Added support for TTS to your MUSAIC player. You need to set right language for you TTS string. 1.0.2 TelegramMessage function does now support if you resend same message many times another scene. 1.0.3 Added support for Sonos remote VD -- SCENE DESCRIPTION -------------------------------------------------------- This scene will send message to your smartphone, which function that will run depends on what string you send and to which variable. Example: -- TELEGRAM ----------------------------------------------------------------- Drop your message to TelegramMessage variable and this scene will send it to you Demands a telegram token and chatid -- fibaro:setGlobal("TelegramMessage", "YOUR MESSAGE") -- -- PUSHSMARTPHONE ----------------------------------------------------------- Drop your message to SmartPhoneMessage variable and this scene will send it to your smarthphone as push -- fibaro:setGlobal("SmartPhoneMessage", "YOUR MESSAGE") -- -- SENDPOPUP ---------------------------------------------------------------- Will send an popup message to fibaro app in your smartphone -- fibaro:setGlobal("popUpMessage", "Info:Test:From fibaro HC2:Test of string") -- String translate : (typeInfo, windowTitle, header, contentInfo) typeInfo = available types: ('Info', 'Success','Warning','Critical') windowTitle = pop-up window title header = pop-up content title contentInfo = pop-up content text -- API.POST ----------------------------------------------------------------- If you want to send an api.post message to your smartphone with the possibillity to start a scene you send this example string to apiPostMessage variable. -- fibaro:setGlobal("apiPostMessage","Activate alarm?:Nobody at home:RUN_CANCEL:283") -- String translate: (message, title, category, data) message = the message title = the title category = the value for what to do, can be RUN_CANCEL or YES_NO data = sceneID to run -- SONOS TTS ---------------------------------------------------------------- Drop your message to sonosTTS variable and this scene will send it to your Sonos player as TTS -- fibaro:setGlobal("sonosTTS", "YOUR MESSAGE") -- --]]186 downloads
(1 review)0 comments
Updated
-
All-in-One Scene
By cag014
This script is designated to control and monitor your home system. Script automatically identifies the type of elements in the system. (Z-wave device, virtual device, scene, automatic scene (Block, Magic or Lua). Any valid Z-wave device property and his value could be monitored, controlled and execute commands accordingly.
If you don’t want or need to use this script, but have issues with your system (like delays, z-wave devices don’t respond always, scene receives no triggers), it helpful to run this scene as is (without any changes) just to monitor and to identify z-wave “dead” and/or NACK occurrences in your system. You’ll receive on-line notifications about it.
The first time you use All-in-One Scene, you will need to define jM {} hash table. Each line in table has two mandatory and two optional fields.
jM={ { 15, "137|630",{timeSlot={“12:00~18:00”},state="value=true", trueAct={“|230|”, “turnOn”,””}}} }
time span IDs list Criteria & Rules Action tables
a) time span a period of time (in minutes) within which some activity must be performed by device or scene. Additional two option could be defined:
I. time span = 0 defines the line as activity only.
II. time span = ‘negative number’ line is suspended (remarked)
b) IDs list given list of devices/scenes/VD/global/keywords. Use under score for scene IDs. (“_45”).
a) global variable – add an ampersand sign & to global variable name: &varName
b) keyword – add a dollar sign $ to keyword variable: $name
Note: To use & and $ characters for other purpose , add % after the character.
c) Criteria & Rules (optional) property, state, time slot, vacation mode…
d) Action tables (optional) tables of commands to be executed.
By defining String-to-number table which converts device name to ID jS2n= {boiler=137, dryer=630}
jM{} above table will look like, device name must be included within back apostrophe sign.
jM={ { 15, "`boiler`|`dryer`",{timeSlot={“12:00~18:00”},state="value=true", trueAct={“|230|”, “turnOn”,””}}} }
1. Monitor option
There are so many times that scenes or Virtual devices are stuck w/o any understandable reason. Some devices suddenly stop to send reports or don’t change state. In most of the cases we don’t aware about the problem till something goes very wrong. The monitor option will send an alert in case of defined states are timed out.
Note: In order to monitor virtual devices, fibaro:log() command must be included in main loop or in button’s code. For example, just add fibaro:log(“done”) at end of your main loop and VD could be monitored.
Example to set watchdog timer for devices, scenes, virtual devices, global variables and keywords
jM={ {8, "_17|_545",{timeSlot=”10:00~22:00”}}, -- within every 8 min. between 10am to 10pm, scenes 17, 545 must be active. If not alert sent.
{3,"134|618|_556|_588"}, -- within every 3 min. devices 134,618 and scenes 556,588 must be active. If not auto-alert sent.
{10,”132|145”,{property=”power”}}, -- within every 10 min. devices in list must report new power value. If not auto-alert sent.
{5,”112”,{state=”value=true”}}, -- if device’s value is true over 5 minutes, auto-alert sent. (e.g. device stuck in breached state)
{30,”470”,{state=”power>10”}}, -- if device’s power greater than 10 over 30 minutes, auto-alert sent.
{20,”&HomeStatus|$iDoor”}} -- if global variable HomeStatus or keyword iDoor didn’t change within 20 min., auto-alert sent.
2. Control option
This part of the script enables execution of actions based on device state or value changes. Script supports many options, calculations, time modifications, if statement and other features to do almost everything that you need to control your home just with one scene (which even doesn’t trigger by the system).
Six action tables could be defined: (See AOS Advanced User’s Guide for more information.)
trueAct{} - executed when state status is true. Please do not confused between state and value. If state defined as “value=false”, state status is true when value of device is false.
falseAct{} - executed when state status is false. Please do not confused between state and value. If state defined as “value=false”, state status is false when value of device is true.
trigAct{} - executed on every value change at any mode, true or false
timeoutAct{} - Disables auto-alert notification and executed when elapsed time exceeds time span. Time span counting restarted after state status back to true.
timeLoopAct{} - Disables auto-alert notification and executed when elapsed time exceeds time span. Time counting restarted immediately even if status remains true (no back to true change required).
InitAct{} - Set of specific actions to be executed on startup only.
Here is an example of most common wanted scenario, to turn on light when motion sensor breached and turn off light when sensor back to safe after few minutes (3 min. in this example)
jM={0,”`mSensor`”,{state=”value=true”,trueAct={“`lightSw`”,”turnOn”,””},falseAct={“`lightSw`”,”turnOff”,”180”}}}
Since no need to turn on light during the day, timeslot could be defined
jM={0,”`mSensor`”,{state=”value=true”,timeslot=”18:00~07:00”,trueAct={“`lightSw`”,”turnOn”,””},falseAct={“`lightSw`”,”turnOff”,”180”}}}
But now could be an issue to turn off the light, if sensor breached few seconds before end of timeslot and back to safe out of time slot, falseAct{} table won’t be executed. In this case, turning light off should be part of trueAct{} table
jM={0,"`mSensor`”,{state=”value=true”,timeslot=”18:00~07:00”,trueAct={{“`lightSw`”,”turnOn”,””},{“`lightSw`”,”turnOff”,”180”}}}
Same Z-wave device, global variable and keyword could be defined at several lines (no limit). Scene and Virtual devices could be defined one time only.
Please download
1. AOS Advanced User’s Guide - complete instructions and information
2. AOS Quick Guide – syntax format reference and examples
3. AOS HC-WebEye Viewer Guide - AOS browser viewer guide
4. timeDrift – If you considering to use time drift correction, please download this scene and follow instructions at header.
Script Advantages:
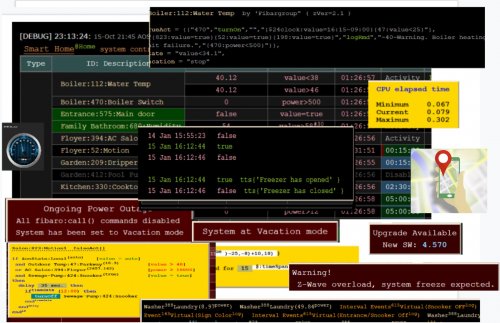
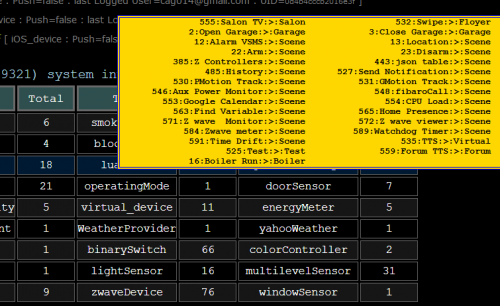
No Lua or any software knowledge required. Supports time drift correction. (download timeDrift scene) Supports vacation and power outage modes. Provides excellent view of all devices, global and keyword variables at a glance, including: status, current value, up to 20 last values & executed commands. (Defined by dataRecord variable) Each command to be executed with current variable values is shown All items displayed by their names, including VD buttons in human readable format (not just IDs) At the bottom of the table up to 50 last commands in execution order are displayed (defined by cnnLine variable) Commands executed much faster than using system’s standard triggering mechanism (Lua, Block or Magic) No limits of scene’s “Max. running instances” Complex operation could be executed by newbie users (like experts). Anti-ripple delay could be applied. (change status after specific delay according to latest value) Actions could be executed by/from Scenes and VDs. Add/Change/Suspend any action in few seconds of work. Z-Wave traffic always monitored and summary of the traffic displayed. Dead and NACK occurrences of entire system immediately reported, recorded and notification sent to user. Repeated commands and device’s reports (RPT) of entire system are recorded and displayed. Global variables names, elapsed time from last change and their current values are shown. (Variables used in table) Details of all actions and commands are displayed in popup menus. Keeps Z-wave traffic low as possible by verifying device state before sending command. If device ID changed (excluded/included), user needs to update device ID in one place only! No extra jSON tables. Keeps your RAM load low All data displayed as a table where all configured devices and their related data displayed in human readable format. Extra button 'Refresh' will appear and covers 'Clear' button. Press ‘Refresh’ or ‘Start’ buttons to refresh table data.
Table's header includes:
startup time stamp, script current version, scene Name, LED as displayed at HC2 front panel, sunrise/set hours.
System name – by hovering mouse over, system inventory shown
Current home mode (@home or @vacation)
system status - by hovering mouse over, last system's activities is shown
Elapsed time
Total Z-wave events - by hovering mouse over summary of all activities shown
Min, average and max Z-traffic, by hovering mouse over CPU elapsed time shown
By hovering mouse over column headers, quick guide is shown. Quick guide displayed during 5 minutes from startup. On every manual refresh, the guide displayed for next 5 minutes.
Table columns are:
Type – device type (Z.Device, G. Variable, V.Device, luaScene, blockScene, magicScene, Auto-luaScene, Auto-blockScene, Auto-magicScene). By hovering mouse over Z.dev type column, top active devices are shown. User configurable by setting topActive global variable. (0-30) default 15
ID: Description – room name: device ID: device name. Z-wave devices sorted by rooms, then by device ID.
Battery capable device have green background according to current battery level. If device armed, alarm icon appears.By hovering mouse over, inventory of devices in jM{} table are shown.
Value – items current value. By hovering mouse over, latest values, trigger value and command executed are shown.
Criteria – state of evaluation to determine true or false status. If formula included, the state displayed in Italic fonts and by hovering mouse over, popup menu shows the formula and calculations
Last seen – elapsed time since last status change.
Alert – by default this column isn’t shown. If any devices have been alerted the column will be shown. Please notice that in some cases the device could be alerted, but after while it could back to normal activity. For example, if motion sensor is breached over specified time-span, alert notification will be sent. But after a while the sensor back to safe and alert is canceled, “back to normal” notification will be sent. At header of alert column shown current number of alerts
Time Span – time span to monitor state of items. By hovering mouse over, maximum reached span time shown.
If time span set to 0, then this line acts as activity, no timeout alerts reported.
If time span set to negative number, this line is suspended and no actions executed.
Time Slot – Active time slot range to execute related actions. Timestamp to execute specific action at specific time.
trueAct – list of actions to execute when state is true.
falseAct – list of actions to execute when state is true.
trigAct – list of actions when value changes
timeoutAct – list of actions to execute when time-span reached. Timer will be restarted when device state changed again to true.
timeLoopAct – list of actions to execute when time-span reached. Timer restarted if state still true (no state changes required)
initAct – list of actions to execute when scene started.
By hovering mouse on actions cells, action’s details are shown
In shown example for trueAct{} actions:
a) time span of irrigation system calculated on line according to ambient temperature. min(max(floor(@47>value)-25,0)+10,18)
b) TTS message announced (Garden Dripper has started)
c) Irrigation is turned ON.
The entire execution process is shown including all calculations, so user could see what exactly will happened.
VacMode – vacation mode. In vacation mode by default timeSpan ignored and all Z-wave devices are converted to Activities, Scenes and VDs are not monitored. Non default vacation state could be defined in each line (vacation=”normal” or “stop”).
Device index in jM{} hash table – shows device location in jM{} hash table. By hovering mouse over cells, device description, manufacturer, zwave version and JM{} line shown.
At the bottom of the table list of up to 60 last executed actions (in order of execution) is displayed. (like CNN news line). If the device has same state as required by command, command isn’t executed and colored pink.
Table color code:
1. Value, Criteria and Last seen columns
green – state is true
pink – state is false
yellow – out of defined time slot, no actions or monitoring done.
gray – line suspended. To suspend the line, set time-span to negative value.
red - in alert-state, means this line exceeds time-span and auto-alert sent.
2. Time Slot
black background and Suspended/Disabled label in gray means this line is inactive.
Gray background and Activity label in green means the device assigned to control only. (Time span is zero).
green background and red progress bar, device is monitored. On timeout auto-alert sent.
blue background and purple progress bar, device is monitored and on timeout actions executed. (No alerts)
If global variable in use, following table will be displayed
Type – two types are available, Local and Global variable. Local means ‘global’ variable in use within the script (if global4local defined, those values are saved). Global is actual global variable of the system.
Name – variable name
Value – current variable value
Modified – elapsed time since last change
In case dead or nAck communication occurred following table will be displayed
ID - device ID and his description is shown.
nAck – number of “transfer failed” events occurred.
Dead – number of “dead” reports received
Is dead – current device dead status (true or false)
Events history – last nACk and/or Dead events received and time-stamp of each event.
Table of top active devices in your system is shown and could be used to analyze and reduce your Z-traffic. Up to 30 devices could be displayed by user configurable variable topZwave . Default is 15
ID - Since most of the devices has number of slaves, master device ID and his description is shown. By hovering on the line, slave devices and his number of events will be displayed.
# – number of events occurred.
% – Percentage of total events.
In case reminders are active following table displayed:
Rate – time interval to execute reminder
RunTerms – triggers list to active reminder
Note – send message as notification
Reminder – reminder message
By hovering mouse over “Run Terms” header, condition details displayed.
Following actions are built-in :
addRmd, logRmd, setRmd, delRmd, delAllRmd - reminders control
disableScene, enableScene, startScene, killScene – scene control
forceArm, setArmed – alarm control
pressButton , setSlider, setProperty– virtual device control
reboot, shutdown – system actions
sendEmail, sendPush, sendiPush, sendPopup, sendNote, sendSms*, tts* – notification control
setColor, setValue, turnOn, turnOff – Z-wave devices control
setTimeSpan, setTimeSlot, setTimeDrift, timeSpanOn - time control
setState, setStateValue, setStateDelay, setStateFormula -- parameters control
vacOn, vacOff, powerOutage– special modes
*not supported by the script. User defined functions.
All valid actions or properties of any Zwave, Plugin or VD devices are fully supported also.
By insert a new action in the tables, the action will be verified by the code and if it's valid will be in use.
Special features
If an error occurs during run time, it will be displayed on fixed type men. Scene will continue to run. By manual refreshing the table three times error is no longer displayed.
When power outage mode activated, fixed menu displayed
When vacation mode activated, fixed menu displayed
As mentioned at the beginning, scene stuck without any reason and it’s true for this scene as well.
To make sure that user will be notify if the scene is failed, weather triggers at the header of the script have been defined (these triggers exists by default at all systems and always work). When trigger received and the scene is failed, notification including last debug/error message sent to user. If autoRestart set to true, scene restarted automatically. Usually it takes awhile to receive weather trigger, so to speed up failure detection, recommended to add additional trigger (like motion sensor or any other device which is active often at your home)
Please do not remove weather triggers… during normal operation all triggers are ignored.
--[[
%% autostart
%% properties
%% weather
Temperature
Humidity
Wind
WeatherCondition
--]]
Using this script, I’m able to control over 95% percent of my needs, including irrigation system, heating system, bathrooms fans, all motion and door sensors, air conditioners and more. In my system then number of scenes reduced from 48 to 4 and virtual devices from 11 to 2. In addition my RAM consumption reduced from ~80% to 30%.
The script has many options and features, so any action could be executed in several ways therefore please feel free to ask about implementation.
The code is over 1,000 lines, but only ~15% of the code is actually running. Rest of the code is to display, initialize and to validate hash table data on startup. Code covers ~80 hash table syntax errors. Please read carefully displayed errors and follow instructions.
4,011 downloads
- cag014
- all-in-one
- (and 1 more)
-
Appliance monitoring scene
By Sankotronic
Holidays are almost here! So here is one more gift for you! Just maybe you will find it useful and it looks like this in HC webGUI:
SCENE DESCRIPTION
This scene can monitor any appliance for power consumption and send push and/or popup notification when appliance start working and/or when it is finished. You can also select to switch it off when is done or leave it under power. There are more and more smart appliances on the market but still suffering from "baby" problems. We also buy Candy washing machine with WiFi and smart app but it just refuses to connect, or if I manage to connect it disconnects itself after one wash. No need to mention that manufacturers of such appliances like to hide API. Because of that we are still using benefits of smart plugs and relay modules to monitor our appliances. So this is how this scene works. It is triggered by power consumption from smart plug or relay module to which appliance is connected. It is possible to set minimum power in watt and duration for how long will scene run until recognizes that appliance is finished. There are only two global variables to be defined. One is already known "HomeTable" and another one with name up to you which is set while appliance is working and reset when is finished as explained bellow:
GLOBAL VARIABLES SETUP
"HomeTable" - predefined global variable table with device and scene IDs. Recommended to use since z-wave devices can change their ID with re-inclusion and then is necessary to edit only scene which make this table and only device ID in scene headers. Much less time and effort is needed than without that option! But if you don't use this feature then you MUST delete following lines from scene:
-- get the table from global if not using then delete this line!!! local jT = json.decode(fibaro:getGlobalValue("HomeTable")) "applianceStatus" - you can use any name like "WashingMachine" or "DishWasher" depending on appliance you plan to monitor. There are two values "On" and "Off" that you can map with your values and then setup in scene code like this:
-- enter name of your global variable for monitoring state of appliance and -- map your values for "On" and "Off" local applianceStatus = "WashingMachine"; local applianceStatusMapping = {On="On", Off="Off"}; DEVICE, NOTIFICATION AND USERS SETUP
After setting up global variables you still need to setup several things like deviceID (ID number of smart plug or relay module), deviceMinPower which defines under what power in watt device stopped working and is in standby, some text for push and popup notifications and you can start using this scene to monitor your appliance. See bellow setup example for washing machine:
-- APPLIANCE CONTROL DEVICE SETUP ------------------------------------------- -- enter device ID which is used to control appliance and measure power -- consumption. Do not forget to put this ID in scene header under -- %% properties -- 100 power local deviceID = 100; -- enter minimum power in Watt bellow which appliance is stopped or in -- standby mode local deviceMinPower = 2; -- enter time in minutes after which scene will send message that appliance -- is done and stopped. This time delay is necessary for many modern washing -- machines due to electronic drive controls local deviceStopDuration = 3; -- enter here "Yes" if you want to switch off appliance when is done and -- stopped or "No" if you want to leave it on local deviceTurnOff = "No"; -- USERS, PUSH AND POPUP NOTIFICATION SETUP --------------------------------- -- define users to send push messages local userID = {jT.ios.wife, jT.ios.mistress}; -- flag for each user; if 1 then send notifications else if 0 do not -- send notifications. You can add code in function extraUserCodeFirst() -- where you can change user flags depending on some global variable. local userFlag = {1, 1}; -- PUSH MESSAGES SETUP ------------------------------------------------------ -- enter push message text for the appliance start and stop event local pushMessage = {start = "Washing machine is started", stop = "Washing machine is stopped"}; -- enter "Yes" if you want to receive push notification that appliance -- started working else put "No" local pushStart = "No"; -- enter "Yes" if you want to receive push notification that appliance -- finished working else put "No" local pushStop = "Yes"; -- POPUP MESSAGES SETUP ----------------------------------------------------- -- enter popup message text and button caption for the appliance start and -- stop local popupMainTitle = "WASHING MACHINE"; local popupTimeFormat = "%H:%M:%S | %d.%m.%Y."; local popupContentTitleStart = "Washing machine is started"; local popupContentTitleStop = "Washing machine finished"; local popupContentBodyStart = "Washing machine is working"; local popupContentBodyOn = "Washing machine is not turned Off"; local popupContentBodyOff = "Washing machine is turned Off"; local popupImgUrl = ""; local popupButtonCaption = "OK"; -- enter "Yes" if you want to receive popup notification that appliance -- started working else put "No" local popupStart = "No"; -- enter "Yes" if you want to receive popup notification that appliance -- finished working else put "No" local popupStop = "No"; It seems a lot but it is actually more of my comments and explanations than real code to setup . Just to mention that scene has two functions where you can add your own code to do something. Function extraUserCodeFirst() is executed before sending push/popup notification that appliance is started and function extraUserCodeLast() is executed just before sending push/popup notification that appliance is finished and stopping scene. I use them too For example I alway add code to change flags to whom push messages will be sent in function extraUserCodeFirst(). First I add two global variables under -- EXTRA GLOBAL VARIABLE SETUP --------- section of the code:
-- EXTRA GLOBAL VARIABLES --------------------------------------------------- -- here you can add your extra global variables to enhance features of this -- scene: -- for all those daddies and momies who work away from home to lower number of -- notifications while at work possible values: "Yes", "No" local dadAway = "DadAway"; local dadAwayMapping = {Yes="Yes", No="No"}; local momAway = "MomAway"; local momAwayMapping = {Yes="Yes", No="No"}; And then I add simple code to change userFlags in function extraUserCodeFirst() if we are at work and don't want to be disturbed by push messages from our Angelina:
-- EXTRA FUNCTION WHERE YOU CAN ADD YOUR CODE ---------------------------- -- use this function to add code that will be executed before loop is -- started and push adn popup notifications are sent function extraUserCodeFirst() -- your code goes here if dadAway ~= "" then if fibaro:getGlobalValue(dadAway) == dadAwayMapping.Yes then userFlag[1] = 0; end end if momAway ~= "" then if fibaro:getGlobalValue(momAway) == momAwayMapping.Yes then userFlag[2] = 0; end end if deBug then logbug("yellow", "User extra code before loop executed") end; end
Please, also check video from @MarcoTorino71:
314 downloads
-

-

Battery Check Scene
By Sankotronic
[SCENE] Battery Check scene v1.2.4
Hello all,
Here it is, scene that will check battery level on all your battery operated devices and inform you on time when replacement is needed. I wish to thank very much to @petergebruers and @szmyk for code that searches and sorts all battery devices included to HC! THANK YOU!
VERSION HISTORY:
28/09/2017 - v1.1 - first release 29/09/2017 - v1.1.1 - added translations for Dutch and Slovak 29/09/2017 - v1.2 - added possibility to define excluded and rechargeable devices. Added 3 new messages and added translations for German, Czech, Swedish, Danish and French, but need translation for new 3 messages. Also added emoji symbols to e-mail notification. 30/09/2017 - v1.2.1 - Corrected level for devices that report level 255 since Sensative strips can report battery level higher than 100%. Corrected translations for Polish, German, Dutch, Slovak, Croatian, Serbian, Bosnian, Slovenian, Chinese, Italian languages. Removed testing code that was accidentally left for checking devices with rechargeable batteries in v1.2 01/10/2017 - v1.2.1 - added Romanian translation 01/10/2017 - v1.2.2 - If HC reported battery level is 255 then it is shown as 0 % just to avoid any misunderstandings. 02/10/2017 - v1.2.2 - added missing Danish translation 10/10/2017 - v1.2.3 - added translations for Norwegian, French, Romanian, Russian and Ukrainian languages. 17/03/2018 - v1.2.4 - Corrected translation for Czech language.
SCENE DESCRIPTION:
This scene is searching for all battery powered devices included in your HC2 and then checks their battery levels. It will send one e-mail to users with list of all devices which battery level is as follows:
battery level 15% or lower will send WARNING to replace battery immediately battery level between 15% and 25% will send REMINDER that battery should be replaced soon battery level between 25% and 35% will send INFO to prepare or buy new battery for replacement rechargeable devices if battery level is 20% or less then will remind you to RECHARGE if all device batteries found with level above 35% then no e-mail will be sent
Above levels are set according to those used in most devices. Usually, battery is shown in red when device battery level drops to 35%, but there is still no e-mails sent by HC. Reminder 25% level is set according to my experience when it is last moment to order batteries if there are none in the drawer left. Replacement level of 15% is set because some devices can just stop working if level drops bellow. Since all battery operated devices most of the time sleep, it can happen that they might not be able to report back to the gateway due to rapid depletion of the battery at its end of life. Also, thanks to @I.Srodka to confirm that this levels are used by HC.
This scene supports multiple languages as in the list bellow:
HC included languages and for this you do not need to do setup English = "en" OK Polski = "pl" OK Deutsch = "de" OK Svenska = "sv" Portugues = "pt" Italiano = "it" OK Francais = "fr" OK Nederlands = "nl" OK Roman = "ro" OK Brazilian Portuguese = "br" Estonian = "et" Latvian = "lv" Chinese = "cn" OK Russian = "ru" OK Denmark = "dk" OK Finland = "fi" Czech Republic = "cz" US English = "us" OK Spanish = "es" Additional languages supported by this version: Set it up for local lng two letterrs between quotes Slovak = "sk" OK Croatian = "hr" OK Bosnian = "ba" OK Serbian = "rs" OK Slovenian = "si" OK Norwegian = "no" OK Ukrainian (NEW) = "ua" OK It is difficult for me to properly translate to all above languages so for now languages with OK are translated and the rest are still to be translated. I will really appreciate your help with translation for the rest of the languages. Please if you do translation of bellow messages you can post it here so that other know that it is already translated. I will also add OK for every language I receive translation and of course update scene code! THANK YOU!
Thanks to @gucio1234 for Polish translation!
Thanks to @Bodyart for Slovak German and Dutch translations!
Thanks to @MaTi for Dutch translation!
Thanks to @jakub.jezek for Czech translation!
Thanks to @sonnyboy for Swedish translation!
Thanks to @TurboWannaBe for Danish translation!
Thanks to @speedoxx007 for French translation!
Thanks to @Momos for Romanian translation!
Thanks to @olekenneth for Norwegian translation!
Thanks to @Momos for Romanian translation!
Thanks to @jack.daniels for Russian and Ukrainian translations!
NEW v1.2 (added 3 new messages marked with arrows) This are messages for translation in English. %s are insertion points for device names and battery levels:
["en"] = { title = "Battery check", subTitle = "Following devices need your attention:", info = "INFO! id: %s - %s %s battery is on %s %%", remind = "REMINDER! id: %s - %s %s battery is on %s %%", warning = "WARNING! id: %s - %s %s battery is on %s %%", ---> excluded = "EXCLUDED! id: %s - %s %s battery is on %s %%", ---> recharge = "RECHARGE! id: %s - %s %s battery is on %s %%", found = "Found %s battery operated devices", tobuy = "INFO! Please order replacement battery", soon = "REMINDER! Need to be replaced soon!", replace = "WARNING! Please replace battery as soon as possible", ---> charge = "RECHARGE! Please recharge battery!", lang = "English" },
SCENE SETUP:
This scene is very simple to setup. First select Scenes on main menu in HC web GUI and then add new scene. Select LUA scene. Download BC scene and open with PLAIN TEXT EDITOR (please do not use MS Word or similar programs because they will add formatting that will make scene inoperable). After you paste it to upper code window then you can check and set it up as follows:
LANGUAGE:
If your language is on the bellow list:
Slovak "sk" Croatian "hr" Bosnian "ba" Serbian "rs" Slovenian "si" Norwegian "no" Ukrainian "ua" You need to setup local lng with two letter abbreviation for your language:
local lng = "hr" but leave it empty of your language is set on HC.
USERS TO RECEIVE E-MAIL:
Scene by default is set to send e-mail to superuser ID=2, but you can add or replace it with other users. Users ID you can find with this link to your HC docs:
http://YOUR_HC_IP/docs/#!/users Just add users ID inside curled brackets separated by comma as in bellow example:
local userID = {2, 55, 128}
EXCLUDED DEVICES NEW v1.2
Now you can define devices to be ignored or excluded from report. Just add their ID numbers between curled brackets separated by coma:
local ignoreDevicesId = {100, 345} or leave brackets empty to check all devices.
DEVICES WITH RECHARGEABLE BATTERIES NEW v1.2
You can also define devices with rechargeable batteries by their type, like for example new Fibaro Thermostat which is by default already added in the scene:
local rechargeDevicesType = {"com.fibaro.FGT001"} You don't need to remove it even if you still don't have that thermostat. Scene is Fibaro thermostat ready!
RUNNING SCENE:
Scene is not set to automatically run so you need to setup whatever scheduling scene you use to start this scene once per day. If you use
then you can make following settings in Main scene FTBE:
-- SCHEDULED SCENES SETUP ------------------------------------------------ local runSceneSchedName = {"Battery check"} local runSceneSchedID = {Batt_check_sceneID}; local runSceneSchedHour = {{"10:00"}}; local runSceneSchedWeek = {{1, 1, 1, 1, 1, 1, 1}}; local runSceneSchedPushFlag = {0}; local runSceneSchedPushMessage = {""}; Of course, replace Batt_check_sceneID with ID number of this scene that will show up on General tab once scene is saved. And that's it! Enjoy!
HOW TO UPGRADE
From 1.1.1 or previous to 1.2 or higher: Just paste new code over previous one and setup as needed.
From 1.2.2 to 1.2.3: Upgrade only if you need one of the added translations. You can copy only part of the language you need or from line 120 to the end of code to preserve your settings.
From 1.2.2 to 1.2.Battery Check scene v1.2.4.lua4: Upgrade only if you need corrected Czech translation.
NOTE
LUA format of scene code is saved by ZeroBrane Studio v1.50. You can download it at this link: https://studio.zerobrane.com
TXT version please open with TextEdit on Mac or Notepad on Windows.
ICONS DOWNLOAD:
For battery icons please go here to download:
NOTE:
After installing this scene and make it running once per day you can remove battery low e-mail notification from all battery operated devices. Just remove tick for "Notify when battery low via e-mail" on Advanced tab and press save:
Battery Check scene v1.2.3.lua
Battery Check scene v1.2.3.txt
1,561 downloads
-
Blind Control
By Schopf16
INTRODUCTION
The script can control all blinds that are changed daily at the same time or at the same event. The script should be called cyclically every minute. For this purpose, for example, the script "Main scene FTBE" from Sankotronic can be used.
USAGE
In the blind_table add a new line for every blind and every event. The same blind may hold several events or several positions. Call the script cyclically every minute by your script which sets normally the TimeOfDay variable
PREREQUISITES
Fibaro Home Center 2
COPYRIGHT
THIS SOFTWARE IS PROVIDED 'AS-IS', WITHOUT ANY EXPRESS OR IMPLIED WARRANTY. IN NO EVENT WILL THE AUTHOR(S) BE HELD LIABLE FOR ANY DAMAGES ARISING FROM THE USE OF THIS SOFTWARE. Everyone is permitted to copy and distribute verbatim or modified copies of this license document. Permission is granted to anyone to use this software for any purpose, including commercial applications, and to alter it and redistribute it freely.
CREDITS
Scene Icon designed by Sankotronic and found at Sankotronic scene icon pack 1 1.0.0
Function calculateTime(..) copied from Sankotronic script Main scene FTBE
84 downloads
- blind
- blind open/close
- (and 1 more)
(0 reviews)0 comments
Updated
-
Clear Debug & Catching Errors
By cag014
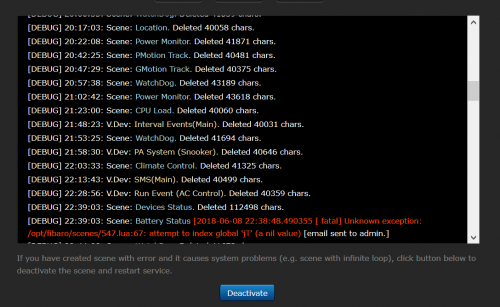
I have noticed that sometime scenes or virtual devices stuck without any visible error. Another observation, that when it happens I cannot see debug information/messages of the scene/VD. In addition the Chrome browser crushes - Ah, Snap.
The idea behind this scene is to monitor debug text of all scenes and virtual devices (including all buttons, sliders and etc.) in the system. In case the length of all messages over 40.000 characters, the scene clears the buffer. Since the code already reads debug messages, it checks the last message and if there is an error message (scene or virtual device) the code sends email to administrator with an error description. Note: In case of error the messages are not deleted! The purpose of that is to keep the error for user review and debugging. Currently this scene runs every 300 sec. (5 minutes) . In order to set different time, please change sleepTime variable. (sleepTime = xxx) By default scene clears debug buffer over 40.000 characters. In order to set different default length, please change txtLen variable. (txtLen = xxxxxx) In addition you have an option to set max. debug buffer length to any size for any scene or virtual device and its buttons. To do so please update txtLenTbl table as follow: Since the system could use same ID for VD and scene, this table has two elements of arrays, VD (vdLen) and scene (sceneLen) local txtLenTbl = { vdLen = {{30000,"|618|615b12|515b3|"}, {35000,"|134|163b13|"} }, sceneLen = {{35000,"|25|"},{30000,"|17|545|"} }, } --[[ Vitual Device table elemnt: 1st param. 30000 is the desired buffer length size. 2nd param. "|618|615b12|515b3|" is the list of VD ids and button number separated by "|". For main loop use device ID only, for VD's button use button number same as in fibaro:call(VDid, "pressButton", button_num) function. For example: 618 - means Virtual device id 618 main loop. 615b12 - means Virtual device id 615 button number 12. Scene table element: 1st paraam. 35000 is the desired buffer length size. 2nd param. "|34|25|" is the list of scene ids separated by "|". You can defined as many arrays as needed. --]]
The scene designed to run automatically, so please set "Max. running instances:" to 3 and "Run scene:" to automatic. . When the buffer cleared, the name of that scene/VD will be displayed at scene's debug window. This code should find all scenes and Virtual devices (including all buttons, sliders and etc.) at the system. To make sure that everything has found at your system, please press "Start" button to run second instance of scene. This "one-time" instance will be executed without loop. Means only one instance of automatic loop could be exist. After second instance execution you should see on scene's debug window printout of every scene/VD/VD button. its current buffer length size and max. allowed buffer size. Since this code runs in my system I didn't get any stuck issues and has successfully caught few unexpected errors in the scenes and VDs. I don't know if it somehow related to system freeze problem, but since this code runs I don't have system freeze or any CPU overloads. Hope it helps...
605 downloads
-
Consumption Monitoring Scene
By jompa68
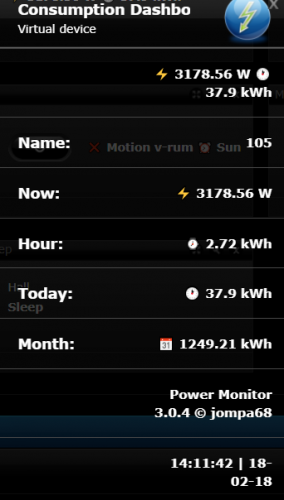
Consumption monitoring™ v3.0.4
CHANGES 2018-02-18 Added support for send push every hour. Added more emoijs to VD 2017-04-04 Corrected day, line 115 2017-04-13 Corrected selfRun function. Added 2 more labels with info. Added emoijs.
Monitor your energy consumption and if wanted it will send a daily push and month report with consumed energy
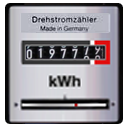
Supports AEON Labs energy meter (and more...?) Supports Autofrank's Smart Message Hub
Create an empty vd(virtual device) with 7 labels. ID of the label should be Label1 to Label5. Name you can set what you want.
Update - 2017-04-13 - To show the new info in VD then add 2 more labels. Label1 to Label7 Create an empty LUA scene and copy the LUA code into that scene. Change line 22 to your AEON LABS HEM id local energyMeterID = 319 Change line 26 to your vd id that you just created local vdID = 464 Change line 30 to false (local selfRun = true) if you want to run the scene from other scene like @Sankotronic Time Based Events Control Supports @AutoFrank SmartMessageHub, set line 38 to false if you want to use standard push (local SMsgH = true) set id of the SMsgH scene at line 40 local SMsgHid = 262 Does also support @AutoFrank HomeTable setup if you set local SMsgH = false remember to fill in id of the smartphones you want to have the push local pushUsersHC2 = {"449"} Separated with comma change line 59 to false if you don't want to have an daily report pushed. local sendPushDaily = true change line 62 to false if you don't want to have an monthly report pushed local sendPushMonthly = true change line 64 to wanted time you want to have the report to be sent local sendPushTime = "06:30"
EXTRA INFO
Can support more then just AEON HEM but that depends if Fibaro have the power info from the device. You can check that if you run this in your browser http://HC2_IP/api/energy/now-86400/now/single/devices/power/ID_OF_DEVICE. Result should be like the below picture So for example if you just want to have info about the dishwasher, fridge, washing machine etc it should be supported.
Consumption_Dashboard.vfib
366 downloads
(0 reviews)0 comments
Updated
-

CPU & RAM monitor
By cag014
The purpose of this scene is to monitor CPU and RAM performances. In case the performance decreased it will notify the user before the system becomes unresponsive and/or stuck. During introduction of last few releases many users have an issue with CPU overloaded and system stuck, so the idea is to catch and try to solve the problem before the system doesn't respond.
The program execution has two options:
1. Stand alone using local json table
2. Using global variable for json table
Using second option you can acces to current min, max, average values of CPU and current RAM load from any other sense or virtual device.
--================= User configurable parameters ============================
gVarName = "" ---------------------- Global Predefined Variable name.
eMail = true -------------------- send eMail notification to admin only
pushNote = true -------------------- send push notification to users in push list
popupNote = true -------------------- send popup notification to all mobiles
sleepTime = 60 ---------------------- time between samples in seconds.
batchNum = 2 ----------------------- batches/readings number per sample.
batchDelay = 10 ---------------------- time between batches in seconds.
ramHi = 75 ---------------------- RAM high limit.
highLim1 = 50; highLim2 = 50 ---- CPU 1,2 highest load limit.
normLim1 = 20; normLim2 = 20 ---- CPU 1,2 normal load limit.
sample2avg1 = 20; sample2avg2 = 20 ---- CPU 1,2 number of samples to average.
--============================================================================
How it works?: (based on default values of user configurable parameters)
The program checks if any global variable defined, if not local table in use.
Every 60 seconds (sleepTime) the program will get two readings (batchNum) within 10 seconds (batchDelay) of CPU 1 and 2 load.
After 20 samples (sample2avg1/sample2avg2) average load of each CPU and RAM is calculating and in case the CPU load is over 50% (highLim1/highLim2) and/or RAM is higher than 75% (ramHi) notification will be send out by eMail, push notification and popup mobile notification. Please note that popup notification will be received by all mobiles in list of the system. If after overload the CPU average load drops below 20% (normLim1/normLim2) and/or RAM drops below 75%, user will be notified as well.
Change default values according to your needs, but please pay attention if you reduce the sleepTime and number of samples (sample2avg1/sample2avg2) , the scene could catch momentary peak of load which is not necessarily represents system performances.
230 downloads
(1 review)0 comments
Updated
-
Device inventory scene v. 0.1.6
By jwi
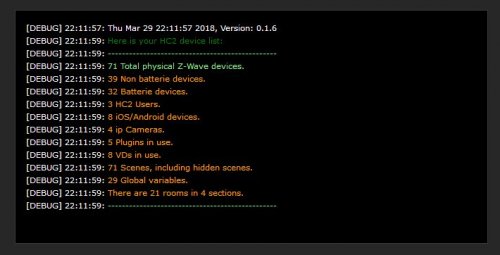
Device inventory scene
Hello everybody,
this is a simple scene that shows you all the objects in the HC2 and their number, no matter if zwave devices, users, virtual devices and so on.
See the attached screenshot.
The script does not need an autostart or other triggers, rather it is meant to be executed ad hoc.
In any case, it is no longer necessary to count the devices by hand in the future.
246 downloads
(0 reviews)0 comments
Updated
-
Device list and status
By cag014
Several times I've got lost in my system to identify specific device.
I believe many of us have old devices/scenes that have been hidden or disabled. After a while, finding them again is quite a headache and not an easy task.
I have written a scene that shows all existing devices, scenes, users and mobile devices with some extra data of properties.
The scene output has two formats:
a list of devices by rooms a plain list of all components in acceding order of IDs
In order to choose between two formats please change as following:
local plainList =false (for list by rooms) local plainList=true (for plain list in acceding order) Since the latest upgrade 4.503 there is a new type of warning "API: not found".
So during the execution you might see a lot of messages:
[DEBUG] 00:19:26: Gathering system information.....
[DEBUG] 00:19:26: [1;31m2018-07-03 00:19:26.358874 [ error] API: Not found
[DEBUG] 00:19:26: [1;31m2018-07-03 00:19:26.528578 [ error] API: Not found
[DEBUG] 00:19:26: [1;31m2018-07-03 00:19:26.669187 [ error] API: Not found
[DEBUG] 00:19:26: [1;31m2018-07-03 00:19:26.826398 [ error] API: Not found
....................................................
Please ignore the messages and wait...
I hope Fibaro team will fix it on stable release.
1,296 downloads
-

Door and window monitoring
By jwi
Scene description:
The script reads the temperature of an outdoor sensor to extend or shorten the message interval.
The status of windows and doors is checked every minute. The shortest reporting interval ist 5 minutes.
It's also possible to use the temperature of a plugin like Yahoo or Yr Weather. In this case, the variable has to look like this:
779 downloads
- monitoring
- window
- (and 1 more)
-
-
Energylogger for integration to Raspberry Pi
By perjar
This is a scene for Fibaro HC2 which sends energy consumption data for selected devices to a logger function at the end of each day. The logger runs on a Raspberry PI on the same network and simply saves the data in a .CSV file on the Pi for later import into a spreadsheet. Remember to chose UTF-8 format in Excel when you import it, or special and national characters will be lost.
The code running on Raspberry Pi is run as a service under systemd, hence the .service unit file.
You should drop the .txt file extension when copied to the Pi.
Tutorial about running services under systemd: https://tecadmin.net/setup-autorun-python-script-using-systemd/
88 downloads
(0 reviews)0 comments
Updated
-
HC-WebEye
By cag014
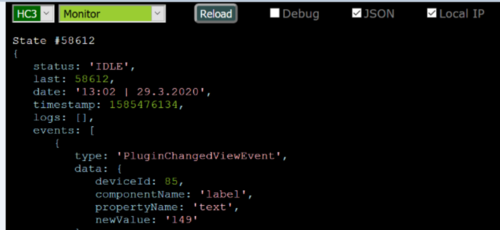
This is JavaScript code, which displays debug information (in parallel to code development) at full screen on desktop (supports HC2 and HC3 controllers)
Main purpose is to support scenes where debug information is in HTML format, like All-in-One Scene, Z-wave monitor/viewer, Z-Range analyzer . All other formats will be displayed in same format as in debugger window.
Since HTML format is not supported by HC3 and debugger window is too small, it could be a helpful alternative for better view and debug your code.
In many cases variables values include a lot of information (like jSON table) and it couldn't be reviewed by HC interface, this application offers to display Global variables (including QuickApp variables) on "big" screen.
Follow information and features are supported:
Display debug information of selected scene. (HC2) Display scenes debug information filtered by messages tags including levels (trace, warning,error). (HC3). Note: Currently all scenes print info in same debugger. Issue reported to Fibaro Group - in Progress. Start scene. (HC2/3) VD main and buttons' debug information. (HC2) Select and Press VD button. (HC2) Display current value of selected global variable. (HC2/3) QuickApp debug information. (HC3) . Note: Currently when debug info is loaded it clears debug info from HC3 debugger window. Display current value of selected QuickApp variable. (HC3) Turn On/Off (toggle method) QuickApp (HC3) Select and Press QuickApp button. (HC3) Note: Since HC3 doesn't support HTML format anymore, this is the only option to view and analyze information on upcoming All-in-One Scene and Z-wave monitor applications.
After downloading the file please remove .txt extension.
Currently supported browser are Firefox, Chrome or IE browsers.
Recently Java Scripts are blocked by Cross-Origin Resource Sharing (CORS) mechanism, please download Disable CORS file for further instructions how to disable CORS.
How it works:
Before execution, open the file to define HC IP-address and HC3 transfer protocol at User Configurable Parameters
// ============= USER CONFIGURABLE PARAMETERS ================ var hcip={"HC3":"192.68.0.10","HC2":"10.0.0.69"} var protocol={"HC3":"https"} On first run, login information will be required. (To keep your credentials secured, login data is not stored in file )
Application interface is very simple and self-guided.
Select controller: HC2 or HC3
Select item : Scene, V Device, Variable, QuicpApp...
Select item of previous selected section.
Press "Reload" button to load debug information.
By checking debug checkbox, API executed commands are shown.
1. If scene selected "Start" button appears.
2. If V Device selected list of available buttons shown and "Press" button appears.
3. If QuickAppDevice selected, list of available buttons shown.
"Press" and "Toggle" buttons appear. By pressing "Toggle" button, QuickApp will turned ON or OFF in sequential order.
4. If Variables selected,list of available variables shown. By selecting the variable, his current value displayed.
677 downloads
-

idlock_Notification.lua
By jompa68
Get a notification/push when IDLock is unlocked by code or RFID
Other possibilites
Instead of having default value for name (example ->> "name":"User 60") you can
easily change from User 60 to a real name instead.
In a new scene add this lines and Press Start to set the name
local ID = 1067 -- IDLock ID
fibaro:call(ID, "setUserName",60, "Jonny")
60 is the slotID you want to change.
57 downloads
- idlock150
- notification
- (and 1 more)
(0 reviews)0 comments
Submitted
-

List of device grouped by parent
By drboss
List of devices grouped by parentId (normally hidden). For check if device is good excluded or find subdevice of same parent device.
info='short' -- only device ID
info='full' -- device ID with name and list of phone
70 downloads
(0 reviews)0 comments
Submitted
-

Location Tracker
By cag014
Many users are trying to use GPS feature, but the functionality and use of HC2 location data are very confusing and most of the time don't work correctly.
The major advance of this scene that there is no use of HC2 defined locations and localization.
The scene triggered by location change, which received by HC2 and tracks users' presence according to predefined places. The scene sends notification (and could announce on user location in case TTS system has been defined and set) in three conditions:
User arrived to one of the predefined places. User approaching to one of the predefined places. User leaves one of the predefined places. You can define as many favorite places as you need. For example: Shopping Mall, School and etc. to track your family members. It helps to know if your kids are actually at school, and your wife at work and not at shopping mall.
Please note that in most of the time there is a gap of few minutes between user's actually location (physical) to location received by the system. Unfortunately in some cases no update received at all. I'm using this scene for few years and still don't have full understanding how the GPS mechanism works... when, how and why the location is updated by Fibaro mobile application and I believe if the application closed on your mobile, no updates sent at all.
Based on above facts, I do not suggest to execute any actions based on user location (like to open gate, lights), but I do suggest to turn on heating system (gap of few minutes better than nothing, or you already at home and your system anyway is ON)
--=========================== USER CONFIGURABLE PARAMETERS ===============================
eMailId = {2} -- user IDs to send email. To include more users use: eMailId={2,5,20}
eMail = true -- if true, email will send
popupNote = true -- if true, popup notification will send to all users.
pushNote = true -- if true, interactive push notification will send to users, which can receive Push notifications as defined at "Access Control" panel at "Mobile devices list" section.
_TTS = false -- text to speech message. Please before setting to true, make sure to update locationTts() function with your TTS setup. Default code in function based on Text to Speech - Android phone/Tablet scene and could be downloaded from https://forum.fibaro.com/files/file/180-text-to-speech-android-phonetablet/
--list of users ID and names (the reason to include names, is because the name could be email address in the system). Set scene %%properties accordingly to IDs in list. Please update according to your system
GPSuser = {{2,"Alex"},{190, "Tammy"},{457,"Leon"}}
--list of points of interest to follow users' arrival, approaching or leave. Please update/add according to your favorite locations. Make sure that place coordinates are few times more accurate than locAcc variable below.
GPSplace = {{"Home","62.1747177;64.8820022"},{"Work","62.244312;64.842668"}}
ignoreGps = 1 -- Amount of hours to consider the location is too old and ignored. Default to ignore over one hour old user location.
locAcc = 300 -- Defined GPSplace area in meters, to assume presence in place.
distGap=150 -- Distance between current and previous locations to avoid messages in case same location received several times.
By executing the scene manually, table with users' last location and their distance from predefined places will be displayed.
Please use this feature to verify that the users' location data is receiving and updating by HC2. hasGPS column shows if user has GPS (means if location has been ever sent from this user) and how frequently GPS position is collected.
When the scene is triggered, follow information on debug window displayed:
User name, his previous and current location and timestamps. Current distance of the user from all predefined places
I hope it will do the job for you.
598 downloads
-
Multi-room Call for Heat
By Dave_H
I have a number of Danfoss LC-13 valves around the house, together with a Secure SSR302 to turn the boiler on and off. The Danfoss valves are controlled by the Heating Panels, and I also have a Fibaro multi-sensor in each room. I've noticed from a number of posts on the forum that there are other people with the same or similar setup, and need a scene to control the boiler switch. The idea being that if any room needs heat, then the boiler will be turned on, and once all the rooms have reached the required temperature, then the boiler will be turned off.
Setup required:
Modify the device id for the Secure SSR302 (or whatever device is used to control the boiler) here:
local boilerSwitch = 84 You might also want to tweak this value:
local threshold = 0.3 This is used to build in some hysteresis into the system to prevent the boiler from being switched on and off too frequently. The boiler won't switch on until the temperature has dropped below the target temperature by this value or more.
The scene is triggered by a global 'timer' variable to run every 5 minutes. There are a number of timer scenes on the forum, but this is the scene that I use.
You should also change your Danfoss valves so that the Wake Up Interval is 300 seconds. I find that this doesn't have a detrimental effect on the battery but allows the devices to respond more quickly to the temperature change requests.
The scene works off the temperature sensor and thermostat that have been defined in your Room settings, so ensure that these are correct:
Note that this method of controlling the boiler assumes that your temperature sensors are working to the same temperatures as your Danfoss valves - ie: the Danfoss valves turn off once they've reached the target temperature, and that the temperature sensors are also reading this same value. You may need to tweak the temperature offset for the temperature sensors so that the two devices are in sync with each other. If in doubt then set the temperature offset so that the sensors read a slightly higher temperature. That way, the scene will think that the room has reached the desired temperature and turn off the boiler. Otherwise you may find that the boiler is not switching off because the room has reached the target temperature, but the Danfoss valve has already turned itself off.
Other types of boiler switch might not use the 'mode' property to determine whether they are on or off. Consequently, the following line may need to be changed, for example to use the 'value' property instead of 'mode':
local boilerOn = (fibaro:getValue(boilerSwitch, "mode") == "1")
Side topic:
Note that there is a school of thought that boilers should be left on all the time even if there aren't any rooms that require the heat, and that the boiler's control logic will detect this and modulate the water temperature accordingly. I don't necessarily uphold this view, but then I'm not a heating engineer either, so I'm happy to be persuaded either way. In my case, I believe that my condensing boiler operates most efficiently when there is a 20C difference between the output and input water temperatures, and as a result it needs the radiators to be drawing heat from the system. I also have radiators that aren't controlled by Danfoss valves (bathrooms and other small rooms), and I don't want to be heating them all the time, wasting energy. After all, the whole point of the Danfoss valves is to avoid having to heat rooms that you're not using, and thereby save some money. Maybe the more intelligent boilers that can regulate the water temperature according to the system's needs and outside temperature operate differently, and as a result more efficiently, and can be left on all the time. The general opinion, in the UK at least, appears to be that the heating should be turned off if not needed. Just my tuppence worth, but I know that views like this can be contentious so please don't shoot me down in flames.
As another side topic, it looks as though the new Fibaro TRVs are far superior to the Danfoss TRVs with the built in algorithms and the ability to cooperate with another sensor in the room. They should certainly avoid a lot of the problems that we get with the Danfoss valves. Pity I can't justify replacing them.
373 downloads
-
Netatmo Plugin - Restart Scene
By drboss
Due to the netatmo plugin often stop work without any info the attached scene reboot it. Please add the scene to any another time based scene (ex for 2 time call by day)
Explication of scene. After check mail.lua in plugin source:
if (netatmo:updateProperty('polling_time', config.polling_time) or netatmo:updateProperty('username', config.username) or netatmo:updateProperty('password', config.password) or netatmo:updateProperty('client_id', config.client_id) or netatmo:updateProperty('client_secret', config.client_secret)) then plugin.restart() end to force plugin restart the scene change pooling_time variable. It add to pooling time of netatmo plugin 5s or subtract 5s, alternately and after this check any change in plugin. Result of this is restart of netatmo plugin.
97 downloads
-
OWM_API.lua
By jompa68
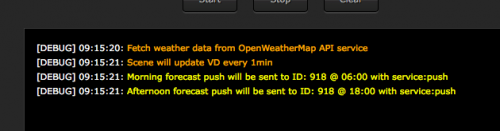
-- Fetch data from OpenWeatherMap API
-- Requires registration, free account. https://home.openweathermap.org/users/sign_up
-- List of city ID city.list.json.gz can be downloaded from http://bulk.openweathermap.org/sample/
-- 2019-03-20 - Beta version
You can use lang parameter to get the output in your language. OWM support the following languages that you can use with the corresponded lang values:
Arabic - ar, Bulgarian - bg, Catalan - ca, Czech - cz, German - de, Greek - el, English - en, Persian (Farsi) - fa, Finnish - fi, French - fr, Galician - gl, Croatian - hr, Hungarian - hu, Italian - it, Japanese - ja, Korean - kr, Latvian - la, Lithuanian - lt, Macedonian - mk, Dutch - nl, Polish - pl, Portuguese - pt, Romanian - ro, Russian - ru, Swedish - se, Slovak - sk, Slovenian - sl, Spanish - es, Turkish - tr, Ukrainian - ua, Vietnamese - vi, Chinese Simplified - zh_cn, Chinese Traditional - zh_tw.
Scene updates VD
169 downloads
(0 reviews)0 comments
Submitted
-
ping_shelly_vintage.lua
By Theo
v 1.1 22/05/2021 This scene polls if a Shelly Vintage bulb is online and sets its state. The default state is "opposite" which is converted to legal values "on" or "off". When state is a numeric value it is interpreted as brightness setting. Also, this scene can be called from another scene as fibaro:startScene(number_of_this_scene,{ip_number,a_state_as_described_above}); Things are complicated by the asynchronous character of the http call. With many thanks to jgab for the solution to this challenge. There is now also a VD based on this lua.
13 downloads
(0 reviews)0 comments
Updated
-
Presence Detector
By jompa68
Want to share my Geolocation and Presence Detector scene i use in my Fibaro setup
In wife's and my own smartphone i use both geofency app and wifi presence to check if we are home. A VD runs scheduled and will update a global variable with value "0" or "1" depends if smartphone is active or not.
Geofency app is the most reliable and correct app i use myself because the smartphones wifi turns into "sleep" mode often to save battery.. You could of course only run Geofency if you want.
Instructions for Geolocation setup
https://forum.fibaro.com/index.php?/topic/18383-tutorial-geofency-geo-location-based-fibaro-triggering-ioswindows-pc
This scene can be setup and scheduled in Sankotronics "Main scene timebased events"
https://forum.fibaro.com/index.php?/topic/23510-scene-main-scene-for-time-based-events-control-v-124/
Settings that can be changed by user:
-- USER SETTINGS --------------------------------------------------------- -- "PresentState" is predefined global value that determines if you are at home -- away or on holidays. This variable value is set by other scene or VD. -- Enter name of your global variable between "" or leave as it is local presentState = "PresentState"; local presentStateMapping = {Home="Hemma", Away="Borta", Holiday="Holiday"}; -- GuestState is predefined global variable with possible values: "Yes", "No". local guestState = "GuestState"; local guestStateMapping = {Yes="Yes", No="No"}; -- Geo is predefined global variable with possible values: "1", "0" -- and name of users. This variable value is set by other scene or VD. -- variable example setup: --> "Geo_Jonny_Home" local geoState = "Geo_"; local geoUserMapping = {User1="Jonny", User2="Mona"}; local usegeoState = true; -- Smartphone is predefined global variable with possible values: "1", "0" -- and name of users. This variable value is set by other scene or VD. -- variable example setup: --> "Phone_JL_Present" local wifiState = "Phone_"; local wifiUserMapping = {User1="JL", User2="ML",User3="SL", User4="SW",User5="MW", User6="DD"}; local useWifiState = true; -- Telegram settings local varTelegram = "Telegram"; local useTelegram = true;
184 downloads
(0 reviews)0 comments
Submitted
-
Print json string in readable format
By perjar
This function can come in handy if you want to print a json structure in readable form for debugging or inspection.
It takes a json string as input and returns a HTML formatted string which can be printed in the debug window using fibaro:debug();
Example
Input:
"{\"api_data\":{\"status\":\"online\",\"timestamp\":\"2019-01-18-18:01:32\",\"sensor_1\":[\"value_1\":125,\"value_2\":35],\"sensor_2\":[\"value_a\":34.5,\"value_b\":45]}}" Output:
{ "api_data" : { "status" : "online", "timestamp" : "2019-01-18-18:01:32", "sensor_1" : [ "value_1" : 125, "value_2" : 35 ], "sensor_2" : [ "value_a" : 34.5, "value_b" : 45 ] } }
48 downloads
(0 reviews)0 comments
Submitted
-
ReadAndSendGlobalVariables_HC3
By uwuertz
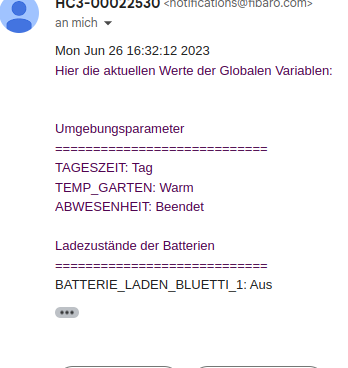
This script allows you to read out the global variables under HC3 and send them by mail.
In contrast to HC2, I did not find a way to read out all variables directly under HC3 and therefore created an array, which must be filled once with the existing variables (or when new ones are added or old ones are deleted) of YOUR HC3.
Then this works very reliably. Just create a scene with a timed trigger and paste the code on the right. Then adjust the variables and what title you want to give them. Then this is displayed easily readable in the eMail (see screenhot)
Suggestions for improvement are welcome.
31 downloads
-
Download Statistics
-
New reviews
-

-

-
 By SmartHomeEddy · PostedGreat QuickApp and excellent configuration manual. QuickApp works smooth. Thanks!
 -

-

-

-
 By OBewan · Posteding data from Gardena services... I am getting the following error from the installation script. Any idea how to fix it? Thanks [DEBUG] 21:35:13: 2022-04-11 21:35:13.093196 [ error] Handshake error: wrong version number [DEBUG] 21:35:13: 2022-04-11 21:35:13.093777 [ error] Handshake error: sslv3 alert handshake failure [DEBUG] 21:35:13: HTTP error: Transport endpoint is already connected
 -

-

-

-
-
Highest Rated Submitters
No ratings this week.
No ratings this month.
No ratings this year.
-
1

-
2

-
3

-
4

-
5

-