
Welcome to Smart Home Forum by FIBARO
Dear Guest,
as you can notice parts of Smart Home Forum by FIBARO is not available for you. You have to register in order to view all content and post in our community. Don't worry! Registration is a simple free process that requires minimal information for you to sign up. Become a part of of Smart Home Forum by FIBARO by creating an account.
As a member you can:
- Start new topics and reply to others
- Follow topics and users to get email updates
- Get your own profile page and make new friends
- Send personal messages
- ... and learn a lot about our system!
Regards,
Smart Home Forum by FIBARO Team

.thumb.png.d4cdaed51f345b01992386e25e167dcc.png)


Scenes
The category contains scenes submitted by users.
Downloading and submission terms have to be accepted.
Types of scenes: magic, block, LUA.
Types of files accepted: PDF, JPG, JPEG, PNG, LUA, TXT.
Scenes have to be described properly, screen shots are optional.
Support topics are created automatically here Scenes
Report topics and files that are no longer supported by authors.
All the files submitted have to be approved by administrators.
42 files
-
ALL-IN-ONE Message Scene
By jompa68
--[[ ----------------------------------------------------------------------------- -- ALLINONE MESSAGE SCENE -- TELEGRAM/PUSH/POPUP/API.POST ----------------------------------------------------------------------------- ----------------------------------------------------------------------------- 0.0.9 Started with Telegram and push function 1.0.0 Added popup and api.post functions 1.0.1 Added support for TTS to your MUSAIC player. You need to set right language for you TTS string. 1.0.2 TelegramMessage function does now support if you resend same message many times another scene. 1.0.3 Added support for Sonos remote VD -- SCENE DESCRIPTION -------------------------------------------------------- This scene will send message to your smartphone, which function that will run depends on what string you send and to which variable. Example: -- TELEGRAM ----------------------------------------------------------------- Drop your message to TelegramMessage variable and this scene will send it to you Demands a telegram token and chatid -- fibaro:setGlobal("TelegramMessage", "YOUR MESSAGE") -- -- PUSHSMARTPHONE ----------------------------------------------------------- Drop your message to SmartPhoneMessage variable and this scene will send it to your smarthphone as push -- fibaro:setGlobal("SmartPhoneMessage", "YOUR MESSAGE") -- -- SENDPOPUP ---------------------------------------------------------------- Will send an popup message to fibaro app in your smartphone -- fibaro:setGlobal("popUpMessage", "Info:Test:From fibaro HC2:Test of string") -- String translate : (typeInfo, windowTitle, header, contentInfo) typeInfo = available types: ('Info', 'Success','Warning','Critical') windowTitle = pop-up window title header = pop-up content title contentInfo = pop-up content text -- API.POST ----------------------------------------------------------------- If you want to send an api.post message to your smartphone with the possibillity to start a scene you send this example string to apiPostMessage variable. -- fibaro:setGlobal("apiPostMessage","Activate alarm?:Nobody at home:RUN_CANCEL:283") -- String translate: (message, title, category, data) message = the message title = the title category = the value for what to do, can be RUN_CANCEL or YES_NO data = sceneID to run -- SONOS TTS ---------------------------------------------------------------- Drop your message to sonosTTS variable and this scene will send it to your Sonos player as TTS -- fibaro:setGlobal("sonosTTS", "YOUR MESSAGE") -- --]]186 downloads
(1 review)0 comments
Updated
-
Presence Detector
By jompa68
Want to share my Geolocation and Presence Detector scene i use in my Fibaro setup
In wife's and my own smartphone i use both geofency app and wifi presence to check if we are home. A VD runs scheduled and will update a global variable with value "0" or "1" depends if smartphone is active or not.
Geofency app is the most reliable and correct app i use myself because the smartphones wifi turns into "sleep" mode often to save battery.. You could of course only run Geofency if you want.
Instructions for Geolocation setup
https://forum.fibaro.com/index.php?/topic/18383-tutorial-geofency-geo-location-based-fibaro-triggering-ioswindows-pc
This scene can be setup and scheduled in Sankotronics "Main scene timebased events"
https://forum.fibaro.com/index.php?/topic/23510-scene-main-scene-for-time-based-events-control-v-124/
Settings that can be changed by user:
-- USER SETTINGS --------------------------------------------------------- -- "PresentState" is predefined global value that determines if you are at home -- away or on holidays. This variable value is set by other scene or VD. -- Enter name of your global variable between "" or leave as it is local presentState = "PresentState"; local presentStateMapping = {Home="Hemma", Away="Borta", Holiday="Holiday"}; -- GuestState is predefined global variable with possible values: "Yes", "No". local guestState = "GuestState"; local guestStateMapping = {Yes="Yes", No="No"}; -- Geo is predefined global variable with possible values: "1", "0" -- and name of users. This variable value is set by other scene or VD. -- variable example setup: --> "Geo_Jonny_Home" local geoState = "Geo_"; local geoUserMapping = {User1="Jonny", User2="Mona"}; local usegeoState = true; -- Smartphone is predefined global variable with possible values: "1", "0" -- and name of users. This variable value is set by other scene or VD. -- variable example setup: --> "Phone_JL_Present" local wifiState = "Phone_"; local wifiUserMapping = {User1="JL", User2="ML",User3="SL", User4="SW",User5="MW", User6="DD"}; local useWifiState = true; -- Telegram settings local varTelegram = "Telegram"; local useTelegram = true;
184 downloads
(0 reviews)0 comments
Submitted
-
OWM_API.lua
By jompa68
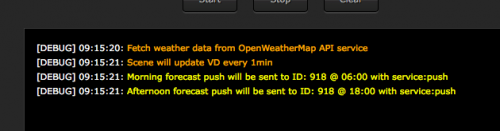
-- Fetch data from OpenWeatherMap API
-- Requires registration, free account. https://home.openweathermap.org/users/sign_up
-- List of city ID city.list.json.gz can be downloaded from http://bulk.openweathermap.org/sample/
-- 2019-03-20 - Beta version
You can use lang parameter to get the output in your language. OWM support the following languages that you can use with the corresponded lang values:
Arabic - ar, Bulgarian - bg, Catalan - ca, Czech - cz, German - de, Greek - el, English - en, Persian (Farsi) - fa, Finnish - fi, French - fr, Galician - gl, Croatian - hr, Hungarian - hu, Italian - it, Japanese - ja, Korean - kr, Latvian - la, Lithuanian - lt, Macedonian - mk, Dutch - nl, Polish - pl, Portuguese - pt, Romanian - ro, Russian - ru, Swedish - se, Slovak - sk, Slovenian - sl, Spanish - es, Turkish - tr, Ukrainian - ua, Vietnamese - vi, Chinese Simplified - zh_cn, Chinese Traditional - zh_tw.
Scene updates VD
169 downloads
(0 reviews)0 comments
Submitted
-

Sceny do Urządzeń
By wodzislawski
Kilka scen dedykowanych do określonych grup urządzeń.
135 downloads
(0 reviews)0 comments
Submitted
-
Netatmo Plugin - Restart Scene
By drboss
Due to the netatmo plugin often stop work without any info the attached scene reboot it. Please add the scene to any another time based scene (ex for 2 time call by day)
Explication of scene. After check mail.lua in plugin source:
if (netatmo:updateProperty('polling_time', config.polling_time) or netatmo:updateProperty('username', config.username) or netatmo:updateProperty('password', config.password) or netatmo:updateProperty('client_id', config.client_id) or netatmo:updateProperty('client_secret', config.client_secret)) then plugin.restart() end to force plugin restart the scene change pooling_time variable. It add to pooling time of netatmo plugin 5s or subtract 5s, alternately and after this check any change in plugin. Result of this is restart of netatmo plugin.
97 downloads
-
Room Thermostat Override
By Dave_H
Overview:
I have a Secure SRT321 room thermostat in my living room, and up until now the only function that it has performed is as a temperature sensor. Changing the temperature on the thermostat has had no effect. I haven't associated it with my boiler switch, as I've implemented a multi-room system. In theory, I should be able to associate the thermostat with the Danfoss LC-13 radiator valves in that room, but that doesn't seem to work. However, what I really wanted to do is to override the Heating Panel for that room. That way, any overrides will also be visible in my Heating Override Virtual Device.
This scene should work with any thermostat device (including the radiator valves), but is primarily designed to work with room thermostats. When the set point temperature on the thermostat is changed, then the corresponding Heating Panel for the room that the thermostat is located in will also be updated. If the temperature that is selected is not the same as the current scheduled temperature for that room, then it will put the Heating Panel in manual mode. If it's the same as the scheduled temperature, then the Heating Panel will revert to scheduled mode. By having it update the Heating Panel, then the radiator valves in the room will also be updated.
Setup required:
You will need to change the list of devices ids in the Scene Header, for each of the room thermostats:
--[[ %% properties 123 targetLevel 234 targetLevel --]] Ensure that you enter the device id for the thermostat and not the associated temperature sensor on the device, if there is one.
You can specify a fixed override duration (the number of minutes that the Heating Panel will be overridden) by changing this variable:
local overrideDurationMins = 0 -- Set to zero to override until next scheduled change However, if you leave this variable as zero, then it will override the Heating Panel until the time that the panel is next due to change, or for the Minimum Duration. The Minimum Duration can be specified here:
local minimumOverrideMins = 60 -- If the duration until the next scheduled change is less than this, then use this value Set the Minimum Duration to zero if you don't want use this feature.
You might need to increase the number of scenes that can run concurrently by changing the Max Running Instances in the scene properties. Changing the thermostat could trigger several occurrences of this scene. If there is a limit on the number of scenes that can run, then it's possible that the final setting of the thermostat will be ignored.
Code:
Download it from here: Room Thermostat Override 1.0.lua
90 downloads
(0 reviews)0 comments
Submitted
-
Energylogger for integration to Raspberry Pi
By perjar
This is a scene for Fibaro HC2 which sends energy consumption data for selected devices to a logger function at the end of each day. The logger runs on a Raspberry PI on the same network and simply saves the data in a .CSV file on the Pi for later import into a spreadsheet. Remember to chose UTF-8 format in Excel when you import it, or special and national characters will be lost.
The code running on Raspberry Pi is run as a service under systemd, hence the .service unit file.
You should drop the .txt file extension when copied to the Pi.
Tutorial about running services under systemd: https://tecadmin.net/setup-autorun-python-script-using-systemd/
88 downloads
(0 reviews)0 comments
Updated
-
Blind Control
By Schopf16
INTRODUCTION
The script can control all blinds that are changed daily at the same time or at the same event. The script should be called cyclically every minute. For this purpose, for example, the script "Main scene FTBE" from Sankotronic can be used.
USAGE
In the blind_table add a new line for every blind and every event. The same blind may hold several events or several positions. Call the script cyclically every minute by your script which sets normally the TimeOfDay variable
PREREQUISITES
Fibaro Home Center 2
COPYRIGHT
THIS SOFTWARE IS PROVIDED 'AS-IS', WITHOUT ANY EXPRESS OR IMPLIED WARRANTY. IN NO EVENT WILL THE AUTHOR(S) BE HELD LIABLE FOR ANY DAMAGES ARISING FROM THE USE OF THIS SOFTWARE. Everyone is permitted to copy and distribute verbatim or modified copies of this license document. Permission is granted to anyone to use this software for any purpose, including commercial applications, and to alter it and redistribute it freely.
CREDITS
Scene Icon designed by Sankotronic and found at Sankotronic scene icon pack 1 1.0.0
Function calculateTime(..) copied from Sankotronic script Main scene FTBE
84 downloads
- blind
- blind open/close
- (and 1 more)
(0 reviews)0 comments
Updated
-

TRV Boost
By Dave_H
Purpose: Fully open the radiator valves in order to heat up the rooms more quickly.
Notes:
One of the problems that I have with my Danfoss radiator valves is that they do not seem to fully open when required. For example, I have a radiator in a very cold room, which, let's say the room temperature is 10°C and I've set the TRV to 15°C, then the valve barely opens and as a result, the room doesn't reach the target temperature. It's almost as though the TRV isn't taking into account the current room temperature when determining how far to open the valve. There only seems to be a direct correlation between the target temperature and the valve opening. So for example, when the target temperature is 15°C then the valve is only open slightly, at 21°C then it's open half-way, and at 28°C it's fully open.
I want my rooms to heat up as quickly as possible when they need heat so I created this scene to monitor the room temperatures and control the valve opening as appropriate in order to fully open the valves when needed. When the room temperature is below a certain threshold lower than the heating panel zone temperature, then the valve target temperatures are boosted to 28°C in order to fully open them. Once the room temperatures are close to reaching the required zone temperature, then the valve temperatures are returned to normal.
Setup required:
Boost Temperature Set this to the temperature which causes the valves to fully open.
local boostTemp = 28
Boost Duration The maximum number of minutes that the valve target temperature will be boosted for. This should not need changing. Once the room has reached the desired temperature then the boost will be turned off. If the room has not reach the desired temperature within this duration, then the boost will be turned on again.
local boostDuration = 120
Turn on Threshold The temperature below the target room temperature defined in the Heating Panel Zone which will cause the TRV to go into boost mode.
local turnOnTrigger = 0.7
Turn off Threshold The temperature below the target room temperature which will cause the TRV to return to normal mode. We want to try to prevent overshoot as much as possible, so the boost mode is turned off before the desired room temperature has been reached. If your rooms heat up quickly, then you might want to increase this value.
local turnOffTrigger = 0.3
Valve device types The list of device types that are used to identify the TRV valves.
local valveTypes = {"com.fibaro.thermostatDanfoss", "com.fibaro.setPoint", "com.fibaro.FGT001"}
The device types can be found via the Fibaro API, eg: http://<Fibaro IP Address>/api/devices/123 where 123 is the device ID, or via the API documentation portal at http://<Fibaro IP Address>/docs/#!/devices/getDevice. The device type can be found in the response message:
{ "id": 123, "name": "Radiator Valve 1", "roomID": 4, "type": "com.fibaro.thermostatDanfoss", "baseType": "com.fibaro.hvac", "enabled": true, "visible": true, "isPlugin": false, "parentId": 129, "remoteGatewayId": 0, "interfaces": [ If you are not able to use the device types in order to identify your valves, then you can define a list:
local valveIDs = {123,234,345,876} And then remove the following code which builds the list of device IDs:
-- Get the list of TRV Ids using the list of types -- If non-TRV devices are returned then more filtering may be required -- or a hardcoded list of ids can be used. local valveIDs = {} for i, valveType in pairs(valveTypes) do local valveIDs1 = fibaro:getDevicesId({type = valveType, enabled=true, visible=true}) --print(valveType .. " " .. json.encode(valveIDs1)) valveIDs = array_concat({valveIDs, valveIDs1}) end
This scene needs to be triggered to run every few minutes using a timer scene. If you do not have one, then take a look at this scene or search for one in the downloads area of the forum:
70 downloads
(0 reviews)0 comments
Submitted
-

List of device grouped by parent
By drboss
List of devices grouped by parentId (normally hidden). For check if device is good excluded or find subdevice of same parent device.
info='short' -- only device ID
info='full' -- device ID with name and list of phone
70 downloads
(0 reviews)0 comments
Submitted
-

idlock_Notification.lua
By jompa68
Get a notification/push when IDLock is unlocked by code or RFID
Other possibilites
Instead of having default value for name (example ->> "name":"User 60") you can
easily change from User 60 to a real name instead.
In a new scene add this lines and Press Start to set the name
local ID = 1067 -- IDLock ID
fibaro:call(ID, "setUserName",60, "Jonny")
60 is the slotID you want to change.
57 downloads
- idlock150
- notification
- (and 1 more)
(0 reviews)0 comments
Submitted
-
Print json string in readable format
By perjar
This function can come in handy if you want to print a json structure in readable form for debugging or inspection.
It takes a json string as input and returns a HTML formatted string which can be printed in the debug window using fibaro:debug();
Example
Input:
"{\"api_data\":{\"status\":\"online\",\"timestamp\":\"2019-01-18-18:01:32\",\"sensor_1\":[\"value_1\":125,\"value_2\":35],\"sensor_2\":[\"value_a\":34.5,\"value_b\":45]}}" Output:
{ "api_data" : { "status" : "online", "timestamp" : "2019-01-18-18:01:32", "sensor_1" : [ "value_1" : 125, "value_2" : 35 ], "sensor_2" : [ "value_a" : 34.5, "value_b" : 45 ] } }
48 downloads
(0 reviews)0 comments
Submitted
-

Smart Fade out for Sonos VD
By J3R3M
Smart fade out for Sonos
First release on french board in April 2019
INTRODUCTION
This scene allow your HC2 to smoothly shut down your Sonos speakers. You can copy this scene with differents VD IDs as much as you want.
I personnaly use it for each room in my home, and one global with all IDs.
For example, I often use the scene in my bedroom to have a sleep mode, without beeing awaken by a hard shutdown of the speakers in the room.
WHAT DOES THIS SCENE?
Look into the IDs and retrieve the volume and the room affected to the VD Look for the masters speakers (Those which can manage others speakers) Fadeout step by step every speakers Press the Pause button on masters speakers Put the volume at an audible level for next playing
WHAT'S A MASTER SPEAKER?
When you use Sonos Controller, you can create a group of speakers by adding speakers to the actual. All the speakers may play the same program simutaneously.
The speaker that you first selected is the master. It's transparent in the Sonos Controller App, but to manage Play/Pause/Programs Buttons on your HC2 server, you have to manage it on the master speaker. Actions won't be taken into account on VD of slaves speakers.
SCENE SETTINGS
-- VD List local VD = {242,243,244}; -- Duration between to steps in the fadeout local StepDuration = 3 -- Speakers Volume will be set at the following volume after the fadeout local Volume = 15 If you have modified the original VD, it's possible to update the ids for Volume Slider and Pause Button here :
-- Slider Volume ID local SliderVol = "15" -- Pause Button ID local BtnPause = "8" SCENE ICON
REQUIREMENTS
Your HC2 Server have to run on version 4.xxx Using VD Sonos Remote by Krikroff45 downloads
(0 reviews)0 comments
Updated
-
Reduce Ztraffic - fibaro_call
By cag014
First of all, this is not scene or script. Just a function to use in scripts to avoid unnecessary Zwave traffic.
In many cases we send commands to devices without verifying the devices status, this function verifies device current status before sending command and in case the status of the device is not as required, command send.
This function supports "turnOn" and "turnOff" commands for switches and dimmers.
How to use?
Copy this function to your script and change all fibaro:call(...) to fibaro_call(...). Just replace the colon " : " by underscore " _ "
Function always returns Boolean variable true or false.
Two options to use the function:
fibaro_call ( devID, "trunOn" ) or fibaro_call ( devID, "turnOff" ) - verify device status and send "turnOn" if neccessary. fibaro_call ( devID, "?turnOn" ) or fibaro_call ( devID, "?turnOff" ) - checks device status only. Returns true or false according to status. No command sent. For example: Original scene which includes few scenarios of sending turnOff/turnOn .
--[[ %% properties 823 value 792 value --]] local devID = fibaro:getSourceTrigger()["deviceID"] if devID == 823 then -- no status verification at all fibaro:call(540,"turnOff") end if devID == 792 then -- including verification if tonumber(fibaro:getValue(540,"value"))==0 then fibaro:call(540,"turnOn") end end if tonumber(fibaro:getValue(540,"value"))==1 then -- checkin device status fibaro:setGlobal("test","lightOn") else fibaro:setGlobal("test","lightOff") end Now we add the function
--[[ %% properties 823 value 792 value --]] function fibaro_call(devId,param) local fStatus,act=true,{["turnOn"]=1,["turnOff"]=0,["?turnOn"]=1,["?turnOff"]=0} if not act[param] then fibaro:debug("fibaro_call.lua:\'<font color=firebrick><font size=2> "..param.." </font></font>\' not supported."); return false end if math.min(1,tonumber(fibaro:getValue(devId,"value"))) ~= act[param] then fStatus=false end if param:find("?") then return fStatus end if not fStatus then fibaro:call(devId,param);fStatus=true end return fStatus end local devID = fibaro:getSourceTrigger()["deviceID"] if devID == 823 then --verification done by fibaro_call() fibaro_call(540,"turnOff") end if devID == 792 then -- no need extra lines for verification fibaro_call(540,"turnOn") end if fibaro_call(540,"?turnOn") then -- checking device status by fibaro_call(). fibaro:setGlobal("test","lightOn") else fibaro:setGlobal("test","lightOff") end That's all.
Please use this function as a template and change it according to your needs.
In order to observe how much your Zwave traffic is loaded by repeated commands, please download Zwave monitor version 3.0
44 downloads
- fibaro:call
- cag014
- (and 3 more)
(0 reviews)0 comments
Updated
-
ReadAndSendGlobalVariables_HC3
By uwuertz
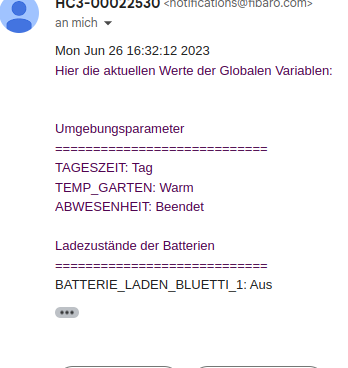
This script allows you to read out the global variables under HC3 and send them by mail.
In contrast to HC2, I did not find a way to read out all variables directly under HC3 and therefore created an array, which must be filled once with the existing variables (or when new ones are added or old ones are deleted) of YOUR HC3.
Then this works very reliably. Just create a scene with a timed trigger and paste the code on the right. Then adjust the variables and what title you want to give them. Then this is displayed easily readable in the eMail (see screenhot)
Suggestions for improvement are welcome.
31 downloads
-
ping_shelly_vintage.lua
By Theo
v 1.1 22/05/2021 This scene polls if a Shelly Vintage bulb is online and sets its state. The default state is "opposite" which is converted to legal values "on" or "off". When state is a numeric value it is interpreted as brightness setting. Also, this scene can be called from another scene as fibaro:startScene(number_of_this_scene,{ip_number,a_state_as_described_above}); Things are complicated by the asynchronous character of the http call. With many thanks to jgab for the solution to this challenge. There is now also a VD based on this lua.
13 downloads
(0 reviews)0 comments
Updated
-
 (0 reviews)
0 comments
Submitted
-
Download Statistics
-
New reviews
-

-

-
 By SmartHomeEddy · PostedGreat QuickApp and excellent configuration manual. QuickApp works smooth. Thanks!
 -

-

-

-
 By OBewan · Posteding data from Gardena services... I am getting the following error from the installation script. Any idea how to fix it? Thanks [DEBUG] 21:35:13: 2022-04-11 21:35:13.093196 [ error] Handshake error: wrong version number [DEBUG] 21:35:13: 2022-04-11 21:35:13.093777 [ error] Handshake error: sslv3 alert handshake failure [DEBUG] 21:35:13: HTTP error: Transport endpoint is already connected
 -

-

-

-
-
Highest Rated Submitters
No ratings this week.
No ratings this month.
No ratings this year.
-
1

-
2

-
3

-
4

-
5

-