
Welcome to Smart Home Forum by FIBARO
Dear Guest,
as you can notice parts of Smart Home Forum by FIBARO is not available for you. You have to register in order to view all content and post in our community. Don't worry! Registration is a simple free process that requires minimal information for you to sign up. Become a part of of Smart Home Forum by FIBARO by creating an account.
As a member you can:
- Start new topics and reply to others
- Follow topics and users to get email updates
- Get your own profile page and make new friends
- Send personal messages
- ... and learn a lot about our system!
Regards,
Smart Home Forum by FIBARO Team

.thumb.png.d4cdaed51f345b01992386e25e167dcc.png)


Virtual Devices
The category contains virtual devices submitted by users.
Downloading and submission terms have to be accepted.
Types of files accepted: LUA, VFIB, ZIP, TAR, RAR, JSON.
Virtual devices have to be described properly, screen shots are optional.
Support topics are created automatically here Virtual devices
Report topics and files that are no longer supported by authors.
All the files submitted have to be approved by administrators.
85 files
-
(0 reviews)
0 comments
Submitted
-
Honeywell_Lyric_API
By Guest
This is an API for Honeywell Lyric T6. The idea is based on Remco B's version for the Honeywell Evo.
Using a virtual device with API scene, you can change setpoint and set away, holiday and schedule modes. Because it is a virtual device, you can call these buttons from any other scene. For example I use it while tracking my phones location, this creates options for GeofenceMode in combination with ScheduleMode
You will need a webserver (or access to a webserver) for the initial setup. This is to retrieve some keys from Honeywell. As soon as you have the keys, you do not need the webserver anymore. For further details please follow instruction in the pdf and use at own risk.
release 1.1 added checkCertificate option to bypass https check.
Installation instructions Honeywell Lyric API.pdf
Fibaro_Lyric_API.lua
105 downloads
-

Helios KWL Modbus Integration
By hanswurst
Helios-KWL has a Modbussupport. I found an implementation in C for Loxone (https://www.loxwiki.eu/pages/viewpage.action?pageId=1639038)
and created a VirtualDevice for HC2,
104 downloads
-
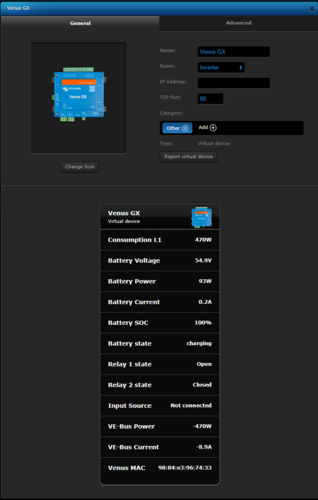
Venus_GX.vfib
By Pflug
Venus_GX.vfib
Please enter the local IP address of your Venus in the LUA "Main loop"
( under advanced settings of the virtual device)
vvvvvvvvvvv
local Venus_IP = "192.168.1.11"
Just replace the numbers with yours(keep the " characters)
94 downloads
(0 reviews)0 comments
Updated
-

Jakość Powietrza w/g Airly (API v2)
By mikloszx
Urządzenie wymaga podania tokena uzyskanego od airly: https://airly.eu/pl/api/ . Wystarczy się zarejestrować by bezpłatnie uzyskać ten kod. Nalezy go wpisac we wskazane miejsce w kodzie pętli głównej VM.
Urządzenie znajduje automatycznie najbliższy czujnik i wyświetla dane jak w załączonym zrzucie ekranu.
Ma możliwość ustawienia zmiennej globalnej o nazwie definiowanej w konfiguracji co daje możliwość na przyklad sterowania oczyszczaczem powietrza.
W konfiguracji znajdziecie tez możliwość zdefiniowania warunków wysyłania informacji PUSH na smartfona.
W załączonym pliku oprócz kodu urządzenia znajduje się komplet ikon, które należy najpierw dodać do centralki, a potem w kodzie urządzenia wpisać odpowiednie numerki. Te numery są indywidualne i niekoniecznie takie w każdej centrali. Żeby zobaczyć jaki numer odpowiada jakiej ikonie, w okienku zmiany ikony należy nacisnąć na ikonie prawy klawisz myszy i wybrać "otwórz grafikę w nowej karcie". Żądany numer zobaczymy w adresie strony. Jako główną ikonę przypisujemy tą szarą z numerkiem 0.
89 downloads
(0 reviews)0 comments
Submitted
-
Odczyt czujników jakości powietrza z AIRLY.EU
By gucio1234
Urządzenie wirtualne odczytująca parametry jakości powietrza z najbliższego czujnika sieci AIRLY.EU
Wirtualne urządzenie odczytuje z ustawień centralki jej współrzędne geograficzne i znajduje najbliższy czujnik w promieniu 5 km.
Jedynym ustawieniem użytkownika jest wpisanie klucza API dla AIRLY.EU w kodzie LUA (jest to odpowiednio opisane).
88 downloads
(0 reviews)0 comments
Submitted
-

[VD] Daily Triggers
By J3R3M
Daily Triggers
First release on french board in April 2018
INTRODUCTION
This VD was my first contribution on the french forum. I was so glad! I learnt to use LUA tables just before and I wanted to use them in a VD which can be useful.
This VD allows you to easily manage some one-time actions for each day in a week. With it, you quickly can change the time to trigg one or many actions, or see when an action will be done. It's possible to set one our per day, using a time shift if needed.
It's my first VD, I was learning how to program in LUA and I was beginning to work with time in LUA, so it's not perfect in the programming way, but it works! I used it for a long time and I have never met any issue!
INSTALLATION
Create a Global Variable called VD_TRIGGERS Import the VD Change the Icons ID in the Main Loop, using the icons below -- Icons IDs local icone_ok = 1156 local icone_wait = 1158 local icone_no_trigg = 1155 local icone_triggers_off = 1157 local icone_vd_off = 1160 Add your to-do actions for each day with the totrigg() function, into the Main Loop -- To do each day local function totrigg(day) -- Here actions for everyday if day == 1 then -- Actions for Monday elseif day == 2 then -- Actions for Tuesday elseif day == 3 then -- Actions for Wednesday elseif day == 4 then -- Actions for Thursday elseif day == 5 then -- Actions for Friday elseif day == 6 then -- Actions for Saturday elseif day == 7 then -- Actions for Sunday end end
VD CONFIGURATION AND USE
This VD is divided into 4 parts :
Information about the next trigger The Programmer View on all triggers set Enable/Disable VD
3 Sliders and the OFF button can be used to prepare trigger informations : Hours Sliders will convert 0-100 value to 1 - 23 in the programmer Minutes Sliders will convert 0-100 value to 1 - 59 in the programmer Time Shift Sliders will convert 0-100 value to -30 - +30 in the programmer Please take care to set 0 (Slider at 50) if you want to trigg your actions at the time set! OFF Button will replace all the programmer's informations by OFF If you want to set a new time information, you only need to click on any slider above After each slider move, check the Prog Label content to avoid any error Once the Prog content is correct and checked, you can affect its value for each day you want by simply clicking on its name! You will be able to see the affected times just 3 seconds after in the Triggers Views At this time, the actions set in the totrigg() function will be done Of course, if the VD is disabled, no actions will be triggered
ICONS
Waiting to trigg today's action Today's action triggered No action planned today (OFF) All triggers set at OFF VD OFF79 downloads
-
Konnected Alarm Panel
By Vangelis
Hello Everyone,
I 've tried Konnected alarm panel in parallel with my old alarm system, and it is working great. (Konnected)
My task that was assigned to myself was to integrate Konnected directly to my HC2.
So with a little LUA magic we have ready the Konnected Virtual Device for HC2.
You can find the Virtual Device Repository here.
Enjoy!
79 downloads
-

Nefit Easy thermostat VD
By ReneNL
A virtual device to interface with the Nefit Easy thermostat. First credits where credits are due: this VD leverages the cool stuff made by Robert Klep.So what you need is to
Install the nefit-easy-http-server developed by robertklep (see https://github.com/robertklep/nefit-easy-http-server) on another device. I use a raspberry pi. Follow the instructions on the site and check if the server is working properly Install the virtual device you can download here Add the IP address of the device where you run the nefiteasy server in the advanced setting of the VD Same for the port (standard setting of the server is 3000) You can use the icon provided if you like I use the two buttons at the bottom of the VD to lower the temperature when I am away (trigerred by a scene), and go back to the normal clock program when I'm back home By inspecting the code in the VD I guess you can see how you can read and write data to the server. There are many more info and settings you can extract or change from the server (see https://github.com/robertklep/nefit-easy-core/wiki/List-of-endpoints for the list of endpoints you can use). These are the ones I picked but I assume you understand how to change to your needs
Rene.
78 downloads
-
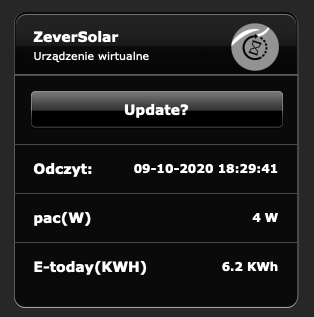
ZeverSolar Monitor
By Mieszko64
Poniżej pierwsza wersja kodu dla Fibaro VD odczytująca dane z falownika ZeverSolar -instalacji fotowoltaicznej dostępne po sieci lokalnej: adresIP/home.cgi.
VD ZeverSolar wymaga tylko wpisania swojego adresu IP
VD ZeverSolar umożliwia:
1. Prezentacje danych: czas odczytu, wartość chwilowa pacW, wielkość produkcji dziennej.
2. Przycisk wymuszający odczyt on demand "Update?".
3. Zapis zmiennych globalnych pacW, etodayKWh.
75 downloads
(1 review)0 comments
Updated
-

Smarter Coffee VD
By Sankotronic
Smarter Coffee VD
Hello friends of Fibaro and a good cup of coffee!!!
When I became proud owner of Smarter coffee machine, I didn't know that Smarter is making smart appliances that are actually not connectible to home automation. I have ask them several times if they plan to publish coffee machine API or what ever is needed so that it can became connected part of our every day smarter home. What is the use of smart coffee machine if you have to grab mobile phone every morning in bed to tell it that you want coffee to be brewed!! The answer was always "maybe soon". So I get tired of waiting!
I was intensively searching the wast land of internet and just few days ago finally stumble on at least some kind of solution provided by Simone Margaritelli the evilsocket and Aden Forshaw. Of course their solution is written in python but for me is unacceptable to have additional server even on small PI just to start coffee machine. So done little experimenting because this coffee machine has really simple commands in bytes where first byte is command and last byte is marking end of command. Here is what evilsocket and Aden found and I provide translation to our LUA language with this little knowledge I have just in case if you want to experiment further or do similar VD for iKittle 2:
-- Smarter coffee commands: command - hexadecimal - decimal format used in LUA -------------------------------------------------------------------------------------- brew = "7" = "7" reset = "\x10" = "\16" get wifi aps = "\xD" = "\13" toggle grind = "\x3c\x7e" = "\60\126" set strength = "\x35%\x7e" = "\53\%\126" where % = 0-2 (weak, mid, strong) set cups = "\x36%\x7e" = "\54\%\126" where % = 1-12 cups set config = "\x38\%1\%2\%3\%4\x7e" = "\56\%1\%2\%3\%4\126" where %1 = strength %2 = cups %3 = mode (grind, filter) %4 = warm time warm % min = "\x3e%\x7e" = "\62\%\126" where % = 1-30 min warm stop = "\x4a\x7e" = "\74\126" -- Smarter coffee response response - hex - decimal counterpart ------------------------------------------------------- brewing or OK = "\x03\x00~" = "\3\0~" already brewing = "\x03\x01~" = "\3\1~" invalid argument = "\x03\x04~" = "\3\4~" no carafe = "\x03\x05~" = "\3\5~" no water = "\x03\x06~" = "\3\6~" low water = "\x03\x07~" = "\3\7~" reset ok = "\x03i~" = "\3i~" -- In LUA backslash \ is used to mark byte in the string so it cannot stand alone or be -- last character in string like this: "\" or this "\56\". ''So this is problem if you want -- to combine different values in string commands like for changing number of cups -- since it is impossible to join "\54\" ..cups.. "\126". 'Only possibility that -- came across my mind is to use table with predefined strings for coffee strenght, -- number of cups and Keep wamring time as listed bellow. local comm = "\56"; local cups = {"\1", "\2","\3", "\4","\5", "\6","\7", "\8","\9", "\10", "\11", "\12"}; local stre = {"\0", "\1","\2"}; local mode = {"\0", "\1"}; local time = {"\5", "\10", "\15", "\20", "\25", "\30", "\35", "\40"} local endb = "\126" -- example of building command for setting coffee machine default settings local command = comm..stre[2]..cups[2]..mode[1]..time[1]..endb I should actually put this part in developer section but here it is for those of you who like to play with it.
So here it is SMARTER COFFEE VD V0.1 first release
Smarter_coffee.vfib.json
To be able to use this VD you will need following devices:
1) HC2 - VD will work only on HC2 due to LUA code (Will try to do HCL version but will not be with all possibilities as LUA version)
2) Smarter Coffee machine with latest firmware V 22.0 (will work with older version but you will not be able to stop Keep warming or set it to 40 min)
3) FGWP smart plug or any other similar. It is needed to monitor coffee machine consumption from which is determined if it is brewing, keep coffee warm or stopped
Also after importing VD to your system you need to setup IP address and TCP port. Since it is not possible to get IP address of your precious coffee machine from original app you will need some other app to find it for you. I used Fing on my iPhone. TCP port is 2081. And it should be entered on advanced tab of the VD:
Before you start using VD first you will need to define some global variables in global variable panel. I was planning to add code to do that part for you, but since Fibaro is constantly changing API on HC I decided to leave this part to you. Besides you can put values of global variables in your language but then you will also have to change few things in code of each button and main loop. Will explain later what to change.
So this are global variables that are needed for Smarter coffee VD to work properly:
First are variables (top part in panel):
Name of variable - possible value that you must enter when adding (DO NOT leave 0 if is not possible value!!)
-----------------------------------------------------------------------------------------------------------------------------
SmarterCups - possible values: between 1 and 12. Do not leave 0. Keeps number of cups of coffee.
SmarterStrength - possible values: 0 - Weak, 1 - Medium or 2 - Strong. Keeps value of coffee strength
SmarterWarm - possible values: 5, 10, 15, 20, 25, 30, 35 and 40. Keeps time for how long coffee will be kept warm
Following are predefined global variables (bottom part in panel):
Name of variable - possible values that you must enter in order I put them here bellow.
-----------------------------------------------------------------------------------------------------------------------------
SmarterBrewed - possible values: No, Yes. Used to prevent starting brewing twice in a row. This is filter coffee and filter is better to cleaned after each use.
SmarterDefaults - possible values: table that contains coffee machine default values for strength, number of cups, mode (Filter or Grind) and time to Keep warm. You need to define only one value with name Table and then save. Open again to edit and then delete Value2. VD will take care of the rest.
SmarterMode - possible values: Filter, Grind. It is self explanatory
SmarterPush - possible values: No, Yes. It is used to send push notification only ones from VD main loop when coffee is ready
SmarterStatus - possible values: Ready, Not ready, Brewing, Keep warm, Faulty, No carafe, No water, Low water. Status of the machine.
SmarterUseDef - possible values: No, Yes. If using default values then VD needs to restore to those values after brewing is finished.
For global variables SmarterBrewed, SmarterMode and SmarterStatus you can use words in your language but if you do then you will have to change in code as follows:
-- GLOBAL VARIABLES -- enter names and value mapping of your -- global variables or leave as it is and add to variables panel -- "SmarterStatus" is predefined global variable. Enter your -- name and mapping of values local smarterStatus = "SmarterStatus"; -- change value mapping to corresponds to your values in your global variable local smarterStatusMapping = {ready="Ready", notready="Not ready", brewing="Brewing", warming="Keep Warm", faulty="Faulty", nocarafe="No carafe", nowater="No water", lowater="Low water"}; -- "SmarterMode" is predefined global variable local smarterMode = "SmarterMode"; -- change value mapping to corresponds to your values in your global variable local smarterModeMapping = {filter="Filter", grind="Grind"}; -- "SmarterWarm" is global variable possible value 5 to 40 in -- step of 5 local smarterWarm = "SmarterWarm"; -- "SmarterBrewed" is predefined global variable used to change -- machine status local smarterBrewed = "SmarterBrewed"; -- change value mapping to corresponds to your values in your global variable local smarterBrewedMapping = {Yes="Yes", No="No"}; and this has to be done in all code for each button and main loop!
Next step is to add icons and then do mapping of their IDs in the code. Here are the icons in order and with their names in code:
Main icon that you will set as default on the VD and all buttons except on button Brew and Keep warm:
In code is named iconBrewing so you will need ID and also set it up on Brew button:
In code is named iconWarming so you will need ID and also set it up on Keep warm button:
in code is named iconNoCarafe so you will need ID:
in code is named iconLoWater and ID is needed:
in code is named iconNoWater and ID is needed:
in code is named iconFilter0 you need ID and it is showing setting for Weak strength and Filter mode:
in code is named iconFilter1 you need ID and it is showing setting for Middle strength and Filter mode:
in code is named iconFilter2 ID is needed and it is showing setting for Strong coffee and Filter mode:
in code is named iconGrind0 ID is needed and it is showing setting for Weak coffee and Grind mode:
in code is named iconGrind1 Id is needed and it is showing setting for Medium coffee and Grind mode:
and the last one is named in code iconGrind2 Id needed and is showing setting for Strong coffee and Grind mode:
How to get icon ID is explained many times here on forum so I will skip that. After you get ID of all icons then you need to replace them in main loop and for buttons Brew, Keep warm, Weak, Medium, Strong, Change mode, Reset machine and main loop. Code is well commented and looks like this:
-- VD ICONS ---------------------------------------------------- -- enter ID numbers of corresponding icons on your system local iconBrewing = 1041; local iconWarming = 1042; local iconNoCarafe = 1044; local iconFilter0 = 1045; local iconFilter1 = 1046; local iconFilter2 = 1047; local iconGrind0 = 1048; local iconGrind1 = 1049; local iconGrind2 = 1050; local iconLoWater = 1051; local iconNoWater = 1052; And before you can start enjoying your coffee there is one more touch that needs to be done. You need to go to main loop code and first setup smart plug ID. Look for this code in main loop:
-- SMART PLUG -------------------------------------------------- -- enter ID nuber of smart plug to which Smarter cofee is -- connected. Smart plug is the only way to check machine status -- at the present moment so it is needed for proper functioning -- of this VD local plugID = 135; Then if you want to be notified by VD when coffee is ready then find this code and enter ID of your mobile devices to which will be send. You can put as many as you like between brackets {} just separate them by comma eg. {2, 45, 121}:
-- PUSH NOTIFICATIONS ------------------------------------------ -- define users that will receive push notifications when -- coffee is ready if leaved empty no notification will be send local userID = {} -- enter default flags: 1 - will send, 0 - will not send -- must be same number of flas as users local userFlag = {}; -- enter push message text that will be sent when coffee is -- ready local pushMessage = "Coffee is ready!" -- here you can put code that will change flags to whom push -- notification will be sent function setupUsers() -- here you can put code to dynamically change which users -- will get push notifications if you use flags end If you want to change who will receive push notifications you can use variable userFlag for that. For each userID you can enter 1 to send push notification or 0 not to send. Then you can add some code in function setupUsers() where you can change flags as you wish. For example I use that code to stop receiving push notifications when I'm away from home. If you don't need this feature then just leave brackets empty. And of course you can change message for pushMessage to your language.
And if you want to completely translate VD to your language you just need to check all code for this part:
-- MESSAGES ---------------------------------------------------- -- enter messages in your language -- response messages from coffee machine local _respBrewing = "Brewing"; local _respAlready = "Already brewing"; local _respInvalid = "Invalid argument"; local _respNocarafe = "No carafe" local _respNowater = "No water"; local _respLowater = "Low water"; local _respResetOK = "Reset OK"; local _respCheck = "Check machine"; local _respFailed = "Transfer failed"; -- command sent by this button local _command = "Brew"; -- coffee machine status messages local _statReady = "Ready"; local _statNotready = "Not ready - fill in coffee"; local _statBrewing = "Already brewing!"; local _statWarming = "Warming coffee!"; local _statFaulty = "Faulty - check machine"; local _statNocarafe = "No carafe - put it back"; local _statLowater = "Warning! - Low water"; local _statNowater = "No water - fill tank"; I try to make it easier for you as much as I could in this four days of development so all messages I collected on beginning of the code. Some buttons have more messages, some don't so you better check them all.
At the end just short explanation how it works. Before first run, you will need to check if settings in VD corresponds to machine settings by checking display on the machine or original app. When this is synced you can start using it.
Before first brewing status of VD must be Ready. If it is not you can press button Reset status to just reset VD or Reset machine to reset all to factory settings. Reseting machine will clear all default settings so you will need to send them again by pressing button Set above as default after you make your favorite choice of strength, cups and mode. This default settings will be always set back after brewing coffee no matter what settings was for the last brew. After brewing coffee status of the VD will be always set to Not ready except if there is No carafe in place, or No water or Low water. After rectifying cause: placing carafe in place, filling water and cleaning filter you will need to press button Reset status to put it back into Ready state. If this is too annoying you can always setup some short scene that you will trigger with some switch, button or swipe or whatever and reset VD to Ready status. If you want to keep coffee warm after brewing you can do that by setting time and then pressing button Set above as default so warming will start immediately after brewing, or you can setup time and then press button Keep warm. If during Keep warm you press button Keep warm again this will stop warming but only with new machine firmware. Keep warming time can be set up to 40 minutes. And that's it!
Enjoy coding and coffee!!!
EDIT
Still working on 4.180
68 downloads
(1 review)0 comments
Updated
-

Inverter_AC2_On_Off.vfib
By Pflug
Inverter_AC2_On_Off.vfib
Switches Relais 2 on Venus GX.
67 downloads
(0 reviews)0 comments
Submitted
-
Shelly_IP101.vfib
By Theo
This VD is a interface to the ping_shelly.lua which can also be found here. The IP-address needs to be configured as shown in the image. The port value ("109") is used/misused to set the number of the lua script in your HC2 ("_lua").
As example here the code for the "on" button:
local _self=fibaro:getSelfId() local _addr=fibaro:getValue(_self,"IPAddress") local _lua=fibaro:getValue(_self,\"TCPPort\") fibaro:startScene(_lua,{_addr,"on"}) fibaro:sleep(1000) fibaro:startScene(_lua,{_addr}) fibaro:sleep(1000) local _slider = tonumber(fibaro:getGlobalValue("S" .. string.gsub(_addr,"%.","_"))) if (_slider <= 0) then _slider=10 fibaro:startScene(_lua,{_addr,_slider}) end fibaro:call(_self,"setProperty","ui.brightness.value",_slider)
62 downloads
(0 reviews)0 comments
Updated
-
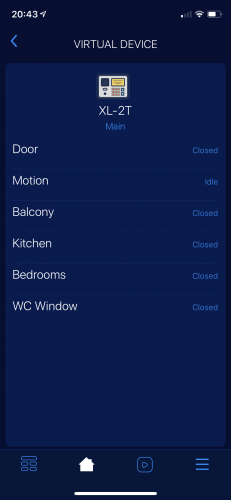
BLE Detector - Presence detector based on iNode LAN and BLE devices
By macjoker
Features
The virtual device communicates with iNode LAN, receives and decodes information about all BLE devices available nearby. This allows tracking user presence if small BLE tags are attached to their belongings (like notiOne with a bunch of keys, e.g.).
What you need
iNode LAN - it can detect any Bluetooth 4.0/4.1 device (Bluetooth Low Energy = BLE) BLE tag (iNode Beacon , TrackR , notiOne , etc.) Installation
Configure your iNode LAN to use unicast or broadcast for sending datagrams (UDP packets) Go to the Setup page. For "BLE IP address" put your HC2 IP address (unicast) or broadcast address (192.168.1.255e.g.). For "BLE IP port" you may leave the default value (20000). Create a new virtual device (BLE Detector). Update IP Address and TCP Port (use the same values as for iNode LAN in step 1). Create a new scene (BLE Users). Update config values in the scene (provide names and MAC addresses of persons and their belongings).
That's all to make it work!
Now you can use global variables you have defined in Lua scene (users variable) to check if a person is away or home.
Want to tweak it? Sure!
There are more options. Please read all the comments in the source code.
You may try to:
define MACs of devices to ignore in discovery (your iNode LAN itself), define signal values for IN/OUT events (separately for each user), define the timeout value for each device (this also makes user away), turn on/off debug messages. Zip file content
Virtual device: "BLE Detector". Lua scene with user detection configuration: "BLE Users". Device icon for iNode LAN. FAQ
What are these scripts missing?
Only basic information is decoded from BLE datagrams (counter, MAC address, and signal strength). If you use iNode Sensors you will not get additional values (like temperature, pressure, magnetic or movement changes).
Why is it better than other solution (x) of presence detection?
It does not depend on any movement in your house, which can make many false positives - a running dog e.g. (x = motion sensors) It is independent of other devices. HC2 communicates directly with iNode LAN. (x = RaspberryPi to read iNode and press some virtual buttons in HC2) More stable results (x = python script from iNode website; explained below).
The Python script published by iNode manufacturer for presence detection uses only signal strength. That means to detect that someone is leaving we need to use some (lower part) signal range to have the record of going away. This additionally reduces the signal range for detecting "being home" (higher part of the signal range) and can give effect to the person appearing and disappearing all the time.
To avoid that we also check the latest timestamp of the device activity. Owing to this feature we may extend range signal for "being home" to all possible values, and use only timeout to decide whether a person is home or not (set "-100" to both signalIn and signalOut in users config to achieve that).
What messages should I expect to get from working device?
Here are some logs of the working device...
[DEBUG] 23:29:58: No: 35216 MAC: 00:12:6F:E0:BB:DB Signal: -16 dBm [DEBUG] 23:30:03: No: 35217 MAC: C0:36:A0:DC:87:99 Signal: -79 dBm [DEBUG] 23:30:08: No: 35218 MAC: 00:12:6F:E0:BB:DB Signal: -16 dBm [DEBUG] 23:30:09: No: 35219 MAC: C0:36:A0:DC:87:99 Signal: -79 dBm [DEBUG] 23:30:12: No: 35220 MAC: C0:36:A0:DC:87:99 Signal: -69 dBm and the scene:
[DEBUG] 23:30:21: MAC: C0:36:A0:DC:87:99 Signal: -79 (dBm) Time ago: 0 (sec) [DEBUG] 23:30:21: MAC: DF:12:45:F7:40:65 Signal: -84 (dBm) Time ago: 30 (sec) [DEBUG] 23:30:21: Gienia is home [DEBUG] 23:30:21: Zenek is home [DEBUG] 23:30:24: MAC: DF:12:45:F7:40:65 Signal: -84 (dBm) Time ago: 0 (sec) [DEBUG] 23:30:24: MAC: C0:36:A0:DC:87:99 Signal: -79 (dBm) Time ago: 3 (sec) [DEBUG] 23:30:24: Zenek is home [DEBUG] 23:30:24: Gienia is home Is it a stable solution? Can you share any experience about it?
For my configuration, I am using two pieces of notiOne. They are really tiny, the batteries are supposed to stay alive for about a year (from my experience it was usually about 6 months). Additionally, you can track them whenever someone with BLE and their App is near.
The results I get in my flat, where walls are made of silicate blocks, are quite stable. iNode LAN can detect these notiOnes with the weakest signal (-90 to -88 dBm) from a distance of 7-8 meters even through two silicate walls (24cm + 12cm thick). So placing iNode LAN in the middle of the flat covers the whole area.
My iNode LAN works with firmware version published in December 2017 ("FW date: Dec 14 2017/09:10:32"). I had no issues about it for more than 18 months right now. It is stable. I even use it as a power failure indicator: it is not plugged to UPS (whereas HC2 and NAS are), so when the device disappears from my LAN, I know there is something wrong with the power line.
Is there any way to extend Bluetooth range for iNode LAN? My house is too large for a single device of that kind.
Well, the device range is connected to Bluetooth limitations. If you need a larger area to be covered with BLE devices detection you could use more then one iNode LAN device. Each device should use a different global variable for storing detected BLE events (BleDevicesA, BleDevicesB, ...). The best way to merge these results would be an updated Lua scene, which could analyze more variables and properly select best data (i.e. select stronger signal if the same BLE tag is seen in many iNode LAN devices). This is not supported with the current version of Lua scene.
Another (not so nice, but quicker to achieve) workaround for that could be duplicating not only the BLE Detector VD but also the BLE Users scene. Each scene copy should have different global variables for users (like: isZenekHomeA, isZenekHomeB, ...) and additional code can interpret these variables to get final detection value (local isZenekHome = isZenekHomeA or isZenekHomeB or ...)
61 downloads
(0 reviews)0 comments
Updated
-
 (0 reviews)
0 comments
Submitted
-
VD - Switch CCGX Relais .lua
By Pflug
VD - Switch CCGX Relais .lua
A VD that can switch the AC-Out2 relais of the Victron inverter
One can not directly switch the Quattro relais,
therefore I used the “Venus GX Relais 2” (currently NOT used) and connected it to the contacts of the “AUX inputs of the Quattro inverter
and you have to install an assistant on the Quattro to do the final switching o the Relays.
59 downloads
- victron
- modbus tcp
- (and 6 more)
(0 reviews)0 comments
Submitted
-
 (0 reviews)
0 comments
Submitted
-
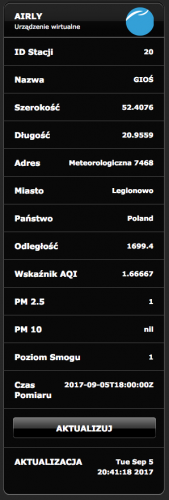
Jakość powietrza Głównego Inspektoratu Ochrony Środowiska
By drboss
VD wyświetlające jakość powietrza w Polsce wg. stacji GIOS. Poprzez GIOS dane są pobierane raz na godzinę z WIOS więc nie ma potrzeby częściej odpalać głównej pętli niż jest ( a przy większej niż kilka zapytań z jednego IP na godzinę blokują dostęp)
Konfiguracja - utworzyć zmienną globalną "powietrze". W polu IP VD wpisujemy adres serwera (obecnie api.gios.gov.pl), w polu PORT wstawić kod stacji pomiarowej z której interesują nas pomiary. Kody stacji pomiarowych są wysyłane na adres email administratora (id2) po wciśnięciu przycisku "Lista stacji". Ręczne pobieranie danych przycisk "Pomiar"
W VD pod przyciskiem "Pomiar" trzeba sobie ustawić ID do powiadomień przez PUSH i EMAIL po każdej zmianie warunków powietrza, oraz ID ikon do wyświetlania.
W pliku zip ikony do VD
/Wątek przeniesiony z FIBARO Aktualizacja/Rozwiązania Społeczności/Urządzenia Wirtualne/Jakość powietrza v0.2 wg Głównego Inspektoratu Ochrony Środowiska/
jakosc powietrza - ikony.zip
57 downloads
(0 reviews)0 comments
Submitted
-

Hydrawise Control VD standalone
By Sankotronic
Hydrawise Control VD v1.0 standalone
KNOWN ISSUES - BUGS
VD constantly sending messages about watering delay if rain is detected and stops functioning properly.
SOLUTION - Please download Main loop code and paste it over current code in VD main loop ---> Hydrawise Main loop v1.1.lua
INTRODUCTION
Hydrawise Control VD provides seamless integration of Hunter Hydrawise irrigation controllers with Fibaro Home Center 2. It uses Weather State and Forecast module made by same author in its latest version to automatically delay watering depending on current and forecast rain precipitation.
PREREQUISITES
Fibaro Home Center 2 with firmware 4.620 or greater with devices added to the Sprinklers panel
Hunter Hydrawise irrigation controller with account and generated API key
Sankotronic Lab Emoji VD v1.1 standalone
Sankotronic Lab Weather State & Forecast suite v2.8.1 or greater
Recommended Sankotronic lab Netatmo Weather Station suite v3.3.1 or Netatmo Public Weather Station suite v1.0
FEATURES
Automatic watering delay - Works with Weather State & Forecast suite and 7 most popular weather services on the planet to automatically delay watering depending on current and forecast rain precipitation. It is also recommended to use Netatmo Weather Station suite or Netatmo Public Weather station for more accurate measurements of rainfall. Manual watering - User can activate any selected watering zone or all zones manually with preselected duration. Manual watering delay – user can manually set watering delay for one, several or all zones. Watering state at a glance - VD icon shows current overall status of the watering system by changing VD main icon and label accordingly. Weather history – VD is recording weather state and forecast measurements for last 7 days by default. User can change number of history days. Multi-language support - VD has built in multi-language support with 27 languages included (see APPENDIX 1 for the list). VD can use HC selected language or user can select any other available language. E-mail and push messages are also translated
VD Icons setup - Easy setup for VD icons. User can download HC2 Icon Preview VD to easily
find icon ID numbers
Global variables - are automatically added, monitored, repaired and cleaned and does not require user intervention
INSTALLATION
Please check provided User Manual
PACKAGE CONTENT
Hydrawise Control VD v1.0 Icon packs User manual EN v1.0
TERMS AND CONDITIONS
Permission to use, copy, modify and distribute this software and its documentation for educational, research, personal use and non-profit purposes, without fee and without a signed licensing agreement is hereby granted, provided that the copyright notice, with "Terms and conditions" and "Disclaimer" appear in all copies, modifications and distributions. It is strictly forbidden to sell, rent, lease and/or lend this software for profit without prior consent from the Author.
DISCLAIMER
This software is provided by copyright owner "as is" and any express or implied warranties, including, but not limited to, the implied warranties of merchantability and fitness for a particular purpose are disclaimed. In no event shall the author and distributor be liable for any direct, indirect, incidental, special, exemplary, or consequential damages (including, but not limited to, procurement of substitute goods or services; loss of use, data, or profits; or business interruption) however caused and on any theory of liability, whether in contract, strict liability, or tort (including negligence or otherwise) arising in any way out of the use of this software, even if advised of the possibility of such damage.
Fibar Group S.A. and their employees are not responsible for support of the ABC VD. Please contact the author Sankotronic, on the Fibaro Forum, for any questions or support required.
VERSION HISTORY
1.0 - First public release
LOOK AND FEEL
Peek in spoiler:
Enjoy coding and your new Hydrawise Control!
Sankotronic
55 downloads
-
 (0 reviews)
0 comments
Submitted
-
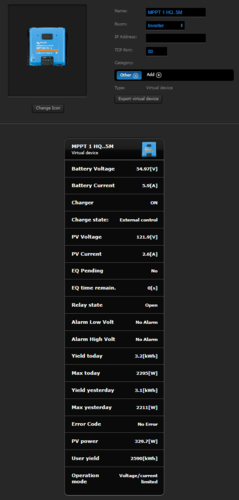
VD-Solar-Charger.lua
By Pflug
VD-Solar-Charger.lua
This extracts all available information from the MPPT charger.
-- Unit ID Instance in VRM
-- 245 258 Venus GX VE.Direct 1 port (ttyO2)
-- 243 260 Venus GX VE.Direct 2 port (ttyO4)
40 downloads
(0 reviews)0 comments
Submitted
-
[VD + APP + PHP] Text To Speach (TTS) solution for HC2 and Apple Mac (OS X) - version October 2017
By gucio1234
Text To Speach (TTS) solution for HC2 and Apple Mac (OS X) - version October 2017:
PREFACE :
I am happy to present my second approach for TTS (Text To Speech) and multi room audio for Fibaro HC2 and Apple OS X computer.
I call it “second approach” rather then second version because it uses different mechanism to control audio of the computer, however the goal remain the same.
That is also the reason why I decided to publish it in the new thread.
I hope that this guide let you setup TTS on your Fibaro HC2 and Mac computers.
INTRODUCTION :
I have noticed that wide used solution for TTS and multiroom is to use Sonos speakers (probably because of the Fibaro plugin available) and VoiceRSS (http://www.voicerss.org/).
My solution is different. It uses the text synthesizer (TTS) which we have already implemented in our computers and which can speak in variety of languages – also those not supported by VoiceRSS. To change text into speech I used “SAY” command of OS X. The other advantage is that we are independent on internet connection and there are no charges for TTS processing. It has also multiroom solution. You can have installed all over your place a number of speakers. The volume of each speaker can be individually adjusted from HC2 (Volume range from 0 to 100 %) so it is possible to select in which room/rooms you hear the voice announcement.
If you use the iTunes VD it is also possible to distribute music.
Integration of iTunes with and HC2 was discussed and published here :
The supported speakers/devices/protocols are as for now :
- Apple AirPlay
- Google Chromcast
- Bluetooth
- Windows computers (with installed app to become AirPlay compatible)
The supported languages/voices of OS X v. 10.12.2 (macOS Sierra) are listed in Paragraph 2 below.
WHAT WE NEED :
- Fibaro HC2
- Apple Mac computer
- Audio Mixer VD installed on HC2
- Some LUA experience to fine tune VD on HC2 and have your user defined TTS messages in your scenes
- Airfoil by Rouge Amoeba application installed on Mac - for TTS it is OK to use free demo version
- Fibaro TTS Bridge application for OS X by Marcin S. Milewski (gucio1234) installed on Mac
- Speakers/audio receivers (any from the list of compatible devices) :
. Apple AirPlay
. Google Chromcast
. Mac , Windows or Linux computer with Airfoil Satellite installed
( see https://rogueamoeba.com/airfoil/ )
. iOS or Android device with Airfoil Speakers installed
(if one wants to have TTS on mobile device)
. Bluetooth
The presented solution was tested with the following software versions / hardware :
- Fibaro HC 2 firmware 4.140
- Airfoil for Mac v. 5.5.1
- Airfoil Sattelite for Windows v.5.1.6
- OS X v. 10.12.2 (macOS Sierra) and OS X v. 10.13 (macOS High Sierra)
- Apple AirPort versions A1088, A1264, A1392
- JBL Flip 3 Bluetooth Speaker
- Fibaro TTS Bridge v. 0.1
- Fibaro HC 2 v. 4.110
It was not tested with Google Chromcast (as I do not have any) but this is supported by Airfoil.
IMPLEMENTATION :
Please read the whole instruction carefully before you start.
1.
Define the global variable “PAMessage” in your HC2 (top part of the Variables’ Panel):
This variable will store the text you want to convert to speech, whatever is there, the system will speak when you press TTS button of the VD
2.
Test and select desired language/voice for your TTS.
To change text into speech we used “SAY” command of OS X.
Open “Terminal “ application on your Mac.
Type ‘SAY –v ?’ to see the list of available voices/languages
Type ‘SAY –v <name of the voice>’ to select the voice of your preference
Type ‘SAY “THIS IS A TEST MESSGE IN MY LANGUAGE” ’ to test your selected voice
More details on this can be found here: https://developer.apple.com/legacy/library/documentation/Darwin/Reference/ManPages/man1/say.1.html
Here is the result of
‘SAY –v ?’ :
3.
Install “Airfoil” for Mac downloaded from https://rogueamoeba.com/airfoil/
NOTE: The free demo version lets to transmit audio up to 10 minutes long (which is more than enough for TTS). After that time the noise distortion will be added by the application.
If one wants to use Airfoil for transmission of music it is recommended to purchase a license.
4.
Setup web server with PHP Module running on our Mac computer.
In my case I have it on iMac and I followed this guide :
https://medium.com/@JohnFoderaro/how-to-set-up-apache-in-macos-sierra-10-12-bca5a5dfffba
I skipped "Configuring Virtual Hosts" as that was not working for me.
As my web server is accessible only by my devices, I did not care.
Important is that apache web server is managing PHP scripts .
NOTE: If you already implemented iTunes VD, you should have already running web server with PHP module installed.
5.
Install Audio Mixer VD on your HC 2.
Define parameters of this VD :
Set IP address of your Apple Mac computer
Set port number as 7000. The communication between HC2 and Mac will be on port 7000 and this is hard coded in “Fibaro TTS Bridge v..1” application.
Define in VD as many audio mixer sliders as you have audio devices to be linked with your multi room audio system.
In the VD attached FOR EACH SLIDER you have to define the PATH for your PHP script “airfoil.php”. Also for each slider the local variable ‘pokoj’ has to be defined as substring of the ID of the speakers defined in Airfoil app on Mac.
(see Paragraph 6 “How to know the IDs of your speakers defined for AirFoil”)
Example:
In my case I have my airfoil.php script placed as :
MacintoshHD/Users/username/Sites/airfoilremote/airfoil.php
and my path defined in the VD is :
Note : “LocalSpeaker” is the speaker connected to your Mac.
Example:
In my case I have the following local variables for each slider :
local pokoj = “WIATROLAP"
local pokoj = “LocalSpeaker"
local pokoj = "59-a7”
local pokoj = "POKOJ-3”
local pokoj = “JADALNIA"
local pokoj = “AppleTV"
local pokoj = “ANTRESOLA"
local pokoj = “MIODARNIA"
There are three buttons on Audio Mixer VD :
“Weather Outside” – to send current weather information to TTS system. In my VD it reads information from Netatmo VD.
This should be adjusted to user’s preferences.
User may adjust it to her/his needs at the end when all the rest is up and running.
NOTE: In the code of VD attached it reads the variable from my Netatmo device ID.
It will not work for you without fine tuning.
“Weekday / Time” – to send TTS with the text taken from HC2 system variables
“TTS” – to send TTS with the text taken from global variable “PAMessage”
6.
Place the „airfoil.php” file into you OS X computer. The path for it has to match whatever is defined as the path in your VD
(see example in paragraph 3.)
7.
How to know the IDs of your speakers defined for AirFoil
You have to use Apple Script Editor which is application delivered along with your OS X system. no need to purchase or install anything.
Just use your search bar of OS X system.
You have to write
into Apple Script Editor.
Here is the screen shot of the OS X script editor which shows you the complete IDs of your Airfoil Speakers.
You can see that part of each ID (after @) matches my local variables for each slider of VD.
8.
Setup Airplay/Chromecast/Bluetoth devices with your Mac
9.
If you want to have other computers to act as clients with speakers install Airfoil Sattelite for each of them. The app is to be downloaded from https://rogueamoeba.com/airfoil/
10.
If you want to have mobile devices to act as clients with speakers install Airfoil Speakers for each of them. The info on these apps can be found on https://rogueamoeba.com/airfoil/
11.
Copy the “Fibaro Text to Speech Bridge v.0.1” application to your Mac computer.
Attached is the zipped file. You have to unzip it to have .app file.
NOTE:
If it happens that HC2 needs to be restarted, it is required to restart “Fibaro Text To Speech Bridge v.0.1”also (Exit and Run).
Restart of “Fibaro Text To Speech Bridge v.0.1” is to be done after HC2 is back operational.
FILES TO DOWNLOAD :
Application for OS X (zipped) -> Fibaro_Text-To-Speech_Bridge_0.1.app.zip
VD for HC2 ------------------------> AUDIO_MIXER_+_TTS.vfib
ICON for VD of HC2 ------------>
AIRFOIL.PHP (zipped) ------>
airfoil.php.zip
39 downloads
(0 reviews)0 comments
Updated
-
IONIZING RADIATION LEVEL MONITOR
By gucio1234
This Virtual Device reads the information on the level of ionized
radiation from the http://radioactiveathome.org/map/ .
There are sensors distributed all over Europe, some in US,
Japan and other countries.
For the VD to be functional the following has to be adjusted:
The global variable 'temprad" has to be created
Icon of the slider has to be updated as ' yellow radiation with timer'
The code has to be adjusted in USER CONFIG Section (Values marked with ENTER in comments).
ThingSpeak API Key if one wants to push data to ThingSpeak
IDs of the Icons (green, yellow, orange, red, yellow with timer)
Coordiantes of the locaton of the sensor
How to know where are the sensors located and how to get their
coordinates :
The map of the sensors is at: http://radioactiveathome.org/map/
Click on the dot of the sensor you want to know the location ID
You will see the popup with the information of the sensor.
Note 'Details Sensor' number
You need to see the source of the http://radioactiveathome.org/map/
Enter 'view-source:http://radioactiveathome.org/map/'
into the browser (eg. Chrome)
Press Ctrl-F to find the sensor number you noted earlier
Next to the number found you will see the coordinates
Enter coordinates into the code below.
What is new in version 0.67:
- Multilangual support
What is new in version 1.67:
- The VD is not anymore auto-refreshed
with the time interval set by slider, but
it is refreshed by pressing a button.
This is to have it triggered by Main Timer Scene
What is new in version 1.68:
- German translation added (by gobbli of forum.fibaro.com)
What is new in version 1.69:
- Dutch and Slovak translation added (by Bodyart of forum.fibaro.com)
- Italian and Croatian translation added (by Sankotronic of forum.fibaro.com)
Credits to:
andre from forum.lic.pl - author of the idea
rusconidesigner from forum.fibaro.com - author of the multicolor radiation icons
gucio1234 from forum.fibaro.com & forum.lic.pl - who make final version of the VD
Sankotronic from forum.fibaro.com - who make some changes + Croatian and Italian translation
jompa68 from forum.fibaro.com - from whom I got multilangual concept
gobbli from forum.fibaro.com - author of Deutsch translation
Bodyart from forum.fibaro.com - author of Dutch and Slovak translation
38 downloads
(0 reviews)0 comments
Updated
-
Keyboard
By seiq
1. The TCP Port setting is used to store the input timeout in seconds. Adjust as required.
2. Change the myGlobal button and code to suit the name of the global you wish to set.
38 downloads
- virtual device
- keyboard
- (and 2 more)
(0 reviews)0 comments
Submitted
-
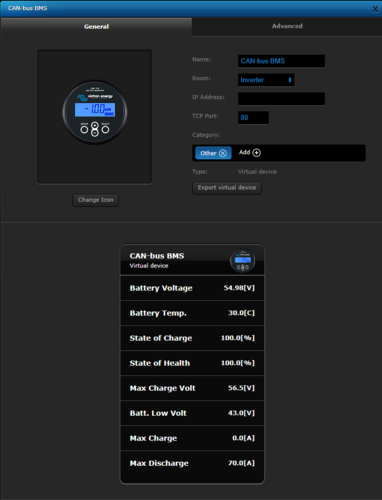
VD-Venus.lua
By Pflug
VD-Venus.lua
Extracts all info from Unit ID 100
-- READ Venus Register 840-846 UNIT ID 100
37 downloads
(0 reviews)0 comments
Submitted
-
Download Statistics
-
New reviews
-

-

-
 By SmartHomeEddy · PostedGreat QuickApp and excellent configuration manual. QuickApp works smooth. Thanks!
 -

-

-

-
 By OBewan · Posteding data from Gardena services... I am getting the following error from the installation script. Any idea how to fix it? Thanks [DEBUG] 21:35:13: 2022-04-11 21:35:13.093196 [ error] Handshake error: wrong version number [DEBUG] 21:35:13: 2022-04-11 21:35:13.093777 [ error] Handshake error: sslv3 alert handshake failure [DEBUG] 21:35:13: HTTP error: Transport endpoint is already connected
 -

-

-

-
-
Highest Rated Submitters
No ratings this week.
No ratings this month.
No ratings this year.
-
1

-
2

-
3

-
4

-
5

-