
Welcome to Smart Home Forum by FIBARO
Dear Guest,
as you can notice parts of Smart Home Forum by FIBARO is not available for you. You have to register in order to view all content and post in our community. Don't worry! Registration is a simple free process that requires minimal information for you to sign up. Become a part of of Smart Home Forum by FIBARO by creating an account.
As a member you can:
- Start new topics and reply to others
- Follow topics and users to get email updates
- Get your own profile page and make new friends
- Send personal messages
- ... and learn a lot about our system!
Regards,
Smart Home Forum by FIBARO Team

.thumb.png.d4cdaed51f345b01992386e25e167dcc.png)


Virtual Devices
The category contains virtual devices submitted by users.
Downloading and submission terms have to be accepted.
Types of files accepted: LUA, VFIB, ZIP, TAR, RAR, JSON.
Virtual devices have to be described properly, screen shots are optional.
Support topics are created automatically here Virtual devices
Report topics and files that are no longer supported by authors.
All the files submitted have to be approved by administrators.
85 files
-
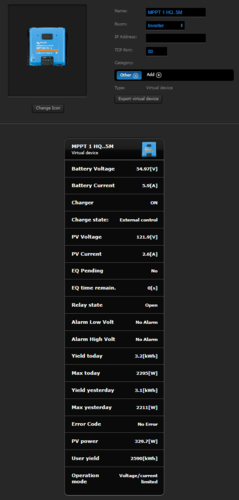
VD-Venus.lua
By Pflug
VD-Venus.lua
Extracts all info from Unit ID 100
-- READ Venus Register 840-846 UNIT ID 100
37 downloads
(0 reviews)0 comments
Submitted
-
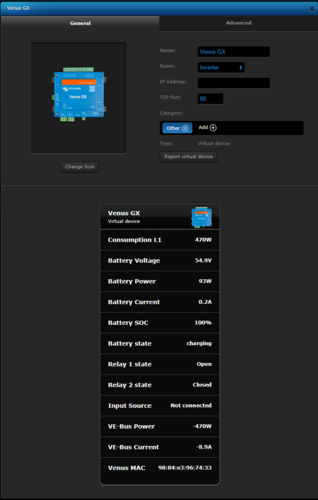
Venus_GX.vfib
By Pflug
Venus_GX.vfib
Please enter the local IP address of your Venus in the LUA "Main loop"
( under advanced settings of the virtual device)
vvvvvvvvvvv
local Venus_IP = "192.168.1.11"
Just replace the numbers with yours(keep the " characters)
95 downloads
(0 reviews)0 comments
Updated
-
 (0 reviews)
0 comments
Submitted
-
 (0 reviews)
0 comments
Submitted
-

Inverter_AC2_On_Off.vfib
By Pflug
Inverter_AC2_On_Off.vfib
Switches Relais 2 on Venus GX.
67 downloads
(0 reviews)0 comments
Submitted
-
 (0 reviews)
0 comments
Submitted
-
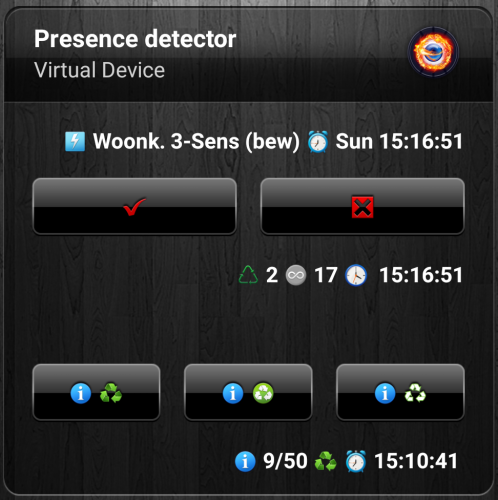
20180525 Presence_Detector (posted).vfib
By Lambik
20180525 (Stable) release
Added/Changed: - Added some code to the mainloop to detect critical error occurring when a device is forced-removed
[ERROR] line 195: attempt to perform arithmetic on a nil value
309 downloads
- presence detector
- vitual device
- (and 1 more)
-

Nefit Easy thermostat VD
By ReneNL
A virtual device to interface with the Nefit Easy thermostat. First credits where credits are due: this VD leverages the cool stuff made by Robert Klep.So what you need is to
Install the nefit-easy-http-server developed by robertklep (see https://github.com/robertklep/nefit-easy-http-server) on another device. I use a raspberry pi. Follow the instructions on the site and check if the server is working properly Install the virtual device you can download here Add the IP address of the device where you run the nefiteasy server in the advanced setting of the VD Same for the port (standard setting of the server is 3000) You can use the icon provided if you like I use the two buttons at the bottom of the VD to lower the temperature when I am away (trigerred by a scene), and go back to the normal clock program when I'm back home By inspecting the code in the VD I guess you can see how you can read and write data to the server. There are many more info and settings you can extract or change from the server (see https://github.com/robertklep/nefit-easy-core/wiki/List-of-endpoints for the list of endpoints you can use). These are the ones I picked but I assume you understand how to change to your needs
Rene.
78 downloads
-
(0 reviews)
0 comments
Submitted
-
(0 reviews)
0 comments
Submitted
-
BLE Detector - Presence detector based on iNode LAN and BLE devices
By macjoker
Features
The virtual device communicates with iNode LAN, receives and decodes information about all BLE devices available nearby. This allows tracking user presence if small BLE tags are attached to their belongings (like notiOne with a bunch of keys, e.g.).
What you need
iNode LAN - it can detect any Bluetooth 4.0/4.1 device (Bluetooth Low Energy = BLE) BLE tag (iNode Beacon , TrackR , notiOne , etc.) Installation
Configure your iNode LAN to use unicast or broadcast for sending datagrams (UDP packets) Go to the Setup page. For "BLE IP address" put your HC2 IP address (unicast) or broadcast address (192.168.1.255e.g.). For "BLE IP port" you may leave the default value (20000). Create a new virtual device (BLE Detector). Update IP Address and TCP Port (use the same values as for iNode LAN in step 1). Create a new scene (BLE Users). Update config values in the scene (provide names and MAC addresses of persons and their belongings).
That's all to make it work!
Now you can use global variables you have defined in Lua scene (users variable) to check if a person is away or home.
Want to tweak it? Sure!
There are more options. Please read all the comments in the source code.
You may try to:
define MACs of devices to ignore in discovery (your iNode LAN itself), define signal values for IN/OUT events (separately for each user), define the timeout value for each device (this also makes user away), turn on/off debug messages. Zip file content
Virtual device: "BLE Detector". Lua scene with user detection configuration: "BLE Users". Device icon for iNode LAN. FAQ
What are these scripts missing?
Only basic information is decoded from BLE datagrams (counter, MAC address, and signal strength). If you use iNode Sensors you will not get additional values (like temperature, pressure, magnetic or movement changes).
Why is it better than other solution (x) of presence detection?
It does not depend on any movement in your house, which can make many false positives - a running dog e.g. (x = motion sensors) It is independent of other devices. HC2 communicates directly with iNode LAN. (x = RaspberryPi to read iNode and press some virtual buttons in HC2) More stable results (x = python script from iNode website; explained below).
The Python script published by iNode manufacturer for presence detection uses only signal strength. That means to detect that someone is leaving we need to use some (lower part) signal range to have the record of going away. This additionally reduces the signal range for detecting "being home" (higher part of the signal range) and can give effect to the person appearing and disappearing all the time.
To avoid that we also check the latest timestamp of the device activity. Owing to this feature we may extend range signal for "being home" to all possible values, and use only timeout to decide whether a person is home or not (set "-100" to both signalIn and signalOut in users config to achieve that).
What messages should I expect to get from working device?
Here are some logs of the working device...
[DEBUG] 23:29:58: No: 35216 MAC: 00:12:6F:E0:BB:DB Signal: -16 dBm [DEBUG] 23:30:03: No: 35217 MAC: C0:36:A0:DC:87:99 Signal: -79 dBm [DEBUG] 23:30:08: No: 35218 MAC: 00:12:6F:E0:BB:DB Signal: -16 dBm [DEBUG] 23:30:09: No: 35219 MAC: C0:36:A0:DC:87:99 Signal: -79 dBm [DEBUG] 23:30:12: No: 35220 MAC: C0:36:A0:DC:87:99 Signal: -69 dBm and the scene:
[DEBUG] 23:30:21: MAC: C0:36:A0:DC:87:99 Signal: -79 (dBm) Time ago: 0 (sec) [DEBUG] 23:30:21: MAC: DF:12:45:F7:40:65 Signal: -84 (dBm) Time ago: 30 (sec) [DEBUG] 23:30:21: Gienia is home [DEBUG] 23:30:21: Zenek is home [DEBUG] 23:30:24: MAC: DF:12:45:F7:40:65 Signal: -84 (dBm) Time ago: 0 (sec) [DEBUG] 23:30:24: MAC: C0:36:A0:DC:87:99 Signal: -79 (dBm) Time ago: 3 (sec) [DEBUG] 23:30:24: Zenek is home [DEBUG] 23:30:24: Gienia is home Is it a stable solution? Can you share any experience about it?
For my configuration, I am using two pieces of notiOne. They are really tiny, the batteries are supposed to stay alive for about a year (from my experience it was usually about 6 months). Additionally, you can track them whenever someone with BLE and their App is near.
The results I get in my flat, where walls are made of silicate blocks, are quite stable. iNode LAN can detect these notiOnes with the weakest signal (-90 to -88 dBm) from a distance of 7-8 meters even through two silicate walls (24cm + 12cm thick). So placing iNode LAN in the middle of the flat covers the whole area.
My iNode LAN works with firmware version published in December 2017 ("FW date: Dec 14 2017/09:10:32"). I had no issues about it for more than 18 months right now. It is stable. I even use it as a power failure indicator: it is not plugged to UPS (whereas HC2 and NAS are), so when the device disappears from my LAN, I know there is something wrong with the power line.
Is there any way to extend Bluetooth range for iNode LAN? My house is too large for a single device of that kind.
Well, the device range is connected to Bluetooth limitations. If you need a larger area to be covered with BLE devices detection you could use more then one iNode LAN device. Each device should use a different global variable for storing detected BLE events (BleDevicesA, BleDevicesB, ...). The best way to merge these results would be an updated Lua scene, which could analyze more variables and properly select best data (i.e. select stronger signal if the same BLE tag is seen in many iNode LAN devices). This is not supported with the current version of Lua scene.
Another (not so nice, but quicker to achieve) workaround for that could be duplicating not only the BLE Detector VD but also the BLE Users scene. Each scene copy should have different global variables for users (like: isZenekHomeA, isZenekHomeB, ...) and additional code can interpret these variables to get final detection value (local isZenekHome = isZenekHomeA or isZenekHomeB or ...)
61 downloads
(0 reviews)0 comments
Updated
-

HC2 Icon Preview VD standalone
By Sankotronic
INTRODUCTION
HC2 Icon Preview VD provides easy way to search custom icons installed on Fibaro Home Center 2 to find their ID number. User can also use it to list through all virtual devices and set their main icon and also icon of all VD buttons and sliders. This capability greatly speeds up building of new virtual devices with many buttons and sliders since their icons can be set at once.
PREREQUISITES
Fibaro Home Center 2 with firmware 4.120 or greater
Any internet browser on computer locally connected to HC2
FEATURES
Provides simple preview of all room, scene and VD custom icons imported to HC2 what makes it great tool for developers and users to find icon ID numbers Provides easy way to setup main icon and icon of all buttons and sliders of all virtual devices installed with just one click on Setup VD icon button VD automatically updates list of the installed virtual devices and icons Multi-language support with 27 languages included (see APPENDIX 1 for the list in user manual). VD can use HC selected language or user can select any other available language. VD will be automatically translated to selected language (visible after refreshing page on browser or refreshing network data on Fibaro mobile application) Global variables are automatically added, monitored and repaired and does not require user intervention
INSTALLATION
Please check provided User Manual and this video by Mr Apple @MarcoTorino71:
PACKAGE CONTENT
HC2 Icon Preview VD v2.1 Standalone Beautiful main icon User manual EN
TERMS AND CONDITIONS
Permission to use, copy, modify and distribute this software and its documentation for educational, research, personal use and non-profit purposes, without fee and without a signed licensing agreement is hereby granted, provided that the copyright notice, with "Terms and conditions" and "Disclaimer" appear in all copies, modifications and distributions. It is strictly forbidden to sell, rent, lease and/or lend this software for profit without prior consent from the Author.
DISCLAIMER
This software is provided by copyright owner "as is" and any express or implied warranties, including, but not limited to, the implied warranties of merchantability and fitness for a particular purpose are disclaimed. In no event shall the author and distributor be liable for any direct, indirect, incidental, special, exemplary, or consequential damages (including, but not limited to, procurement of substitute goods or services; loss of use, data, or profits; or business interruption) however caused and on any theory of liability, whether in contract, strict liability, or tort (including negligence or otherwise) arising in any way out of the use of this software, even if advised of the possibility of such damage.
Fibar Group S.A. and their employees are not responsible for support of the ABC VD. Please contact the author Sankotronic, on the Fibaro Forum, for any questions or support required.
VERSION HISTORY
2.1 – VD completely redesigned and added possibility to set virtual devices main and all buttons and sliders icon. Added checking of global variables integrity and automatic repair. It also automatically updates list of available virtual devices on HC2 and list of custom icons after each change. 1.0 – Code optimized and resolved some bugs 0.1 – First release
Here is look of the HC2 Icon preview VD:
Enjoy coding and your new HC2 Icon Preview virtual device!
Sankotronic
1,505 downloads
-

Bluesound interface, first setup
By doezel
Hi,
here's a quick version to gain basic control of a bluesound device in your network.
Make sure to set up the correct IP address.
TCP port should be 11000
For now the following functions are supported:
- polling of the status, every second
- volume
- pause
- play
137 downloads
-
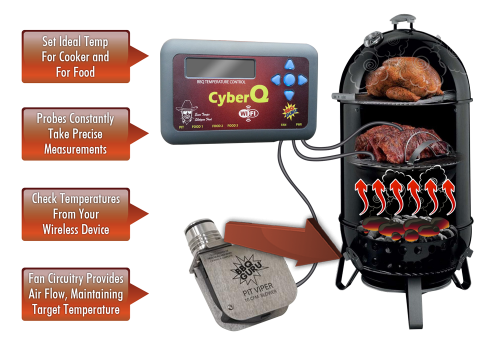
[VD] BBQ Guru CyberQ WIFI
By Barlow
Monitor:
Fan speed Temperature of the Pit and core temperatures of Food1, Food2 and Food 3 probes in Celsius or Fahrenheit. Status of each of the temperature sensors ("OK", "HIGH", "LOW", "DONE", "ERROR", "HOLD", "ALARM", "SHUTDOWN"). Status codes are also available as global variables for use in block scenes. Control:
1. Temperature setpoints for the Pit and Food1, Food2 and Food 3 cores.
2. Timer and timeout actions (none, sound alarm, hold pit at set temperature, shutdown fan; or any scene-based action you specify.
3. Ramp the pit temperature (cook and hold) from any selected food item.
Installation and configuration:
Install the CyberQ WIFI VD, which you can download below. I will also post it on Fibaro Marketplace.
Enter the CyberQ WIFI IP address and port number in the advanced settings. Scroll down to the main loop section to set the authentication details.
14 downloads
-

Automatic Icon Downloader
Automatic Icon Downloader
What does this device:
Device can automatically download from dedicated web-page all icons that you use to your HC2. The device can be used by installers to easily download their favorite sets of icons to new HC2, by end users to get back icons after recovery or any other purpose. Device before uploading any icon to your HC2 check if any of selected in IconSet already exists so it should be safe to click on "Download to HC2" button many times.
This solution has to separate parts: vd and portal.
Version history:
0.6 - first published version of AID
To Do VD:
- future version of virtual device will be updated automatically from internet if user agreed to do it, after HC2 restart
To Do portal:
- next version will support adding user device icon to library (on, off, state 1-10)
Manual
1. Download and install virtual device.
2. Go to: www.grace-land.pl/fibaro/aid portal to get your IconSet. Current version looks like below.
Please note some important things:
- HC2 keeps your icons in 4 separate groups: devices, virtual devices, scenes, rooms. It means that if you want to use one image as room image and virtual device image it needs to be added twice - that is why portal items are divided into four groups (for user convenience - each group has different color)
How the portal works?
You just check all icons in each group you want to add to your IconSet and then click "Get your IconSet".
Please remember that you can edit this IconSet later.
What if I have icon/s that is not in portal library?
There is option to upload your icons and make library bigger. In this case you click on "Add new icons" button. You will be redirected to new page.
Please note some important things:
- You can upload many files and many groups in the same time,
- All icons will be checked before upload. Icon needs to be: PNG file, 128x128 size, unique [portal checks if this icon exists in this group*], no bigger then 1MB (one icon),
- You will see preview of icons that you want to add but without category,
- For now there is no option to add "device" icons. I am working on it to make it simple,
- You will get status whats was added and what not.
How to edit my IconSet?
You need to know your IconSetID and then click on "Edit your IconSet" button. Page will refresh and all icons from your set will be automatically checked.
What you need to do is to check more icons or uncheck unwanted icons and then click "Update your IconSet".
Please note that VD doesn't delete icons from your HC2.
3. After you have your IconSetID there is time to configure virtual device. In this case you need to provide some information.
a) In VD information please provide IP and TCP port.
IP: grace-land.pl
TCP port: 80
b) In Advanced tab scroll to button and replace needed credentials.
c) click "Save".
Please note that virtual device only downloads data so there is no risk in providing credentials.
------------------------------------------------- -- PUT YOUR ADMIN CREDENTIALS ------------------------------------------------- sv_user = '[email protected]'; sv_password = 'Y0urP@ssword'; sv_automaticDownloaderId = 'iconSetID_from_website';
4. Your device is ready to use. You just click on "Download to HC2" and wait. All needed information is in debug for vd button.
Device before uploading any icon to your HC2 check if any of selected in IconSet already exists so it should be safe to click on "Download to HC2" button many times, but it will take a while.
Have fun!
Disclaimer:
Every of icons on portal [grace-land.pl/fibaro/] aid library are not my property.
The code wasn't inspired by the somebody mentioned in comment below - the first version of uploading I found in 2013 [https://github.com/rafikel/Fibaro/tree/master/ncplus] - and I went this way to make something usefull.
572 downloads
- icons
- automatic_download
- (and 1 more)
-

TIMER_RTV.vfib
By tefil
TIMER_RTV.vfib
Pozwala określić czas wyłączenia dane urządzenia, pokazuje jego aktualny stan, możliwość szybkiego wyłączenia, powiadomienie push na telefon, o zrealizowanym zadaniu.
130 downloads
-

Co_otwarte.vfib
By tefil
Co_otwarte.vfib
Polaczenie dwóch vd z następujące za zgodą autora
Urządzenie pokazuje stan otwarcia/zamknięcia drzwi i okien oraz stan czujników ruchu
134 downloads
(0 reviews)0 comments
Submitted
-

Jakość Powietrza w/g Airly (API v2)
By mikloszx
Urządzenie wymaga podania tokena uzyskanego od airly: https://airly.eu/pl/api/ . Wystarczy się zarejestrować by bezpłatnie uzyskać ten kod. Nalezy go wpisac we wskazane miejsce w kodzie pętli głównej VM.
Urządzenie znajduje automatycznie najbliższy czujnik i wyświetla dane jak w załączonym zrzucie ekranu.
Ma możliwość ustawienia zmiennej globalnej o nazwie definiowanej w konfiguracji co daje możliwość na przyklad sterowania oczyszczaczem powietrza.
W konfiguracji znajdziecie tez możliwość zdefiniowania warunków wysyłania informacji PUSH na smartfona.
W załączonym pliku oprócz kodu urządzenia znajduje się komplet ikon, które należy najpierw dodać do centralki, a potem w kodzie urządzenia wpisać odpowiednie numerki. Te numery są indywidualne i niekoniecznie takie w każdej centrali. Żeby zobaczyć jaki numer odpowiada jakiej ikonie, w okienku zmiany ikony należy nacisnąć na ikonie prawy klawisz myszy i wybrać "otwórz grafikę w nowej karcie". Żądany numer zobaczymy w adresie strony. Jako główną ikonę przypisujemy tą szarą z numerkiem 0.
89 downloads
(0 reviews)0 comments
Submitted
-

Stan urządzeń - wirtualka
By Kamol_
Bardzo proste urządzenie wirtualne pokazujące stan poszczególnych elementów w centralce. Urządzenie bazuje na:
local selfId = fibaro:getSelfId()
if fibaro:getValue(xxxx, 'value') == '1' then
fibaro:call(selfId, 'setProperty', 'ui.label1.value', 'ON' )
Długo szukałem i nie znalazłem nigdzie dlatego wrzucam dla początkujących.
Niebędne do wykorzystania w kumunikatach głosowych lub do zobrazowania stanu w innych aplikacjach np. demopad
128 downloads
(0 reviews)0 comments
Submitted
-
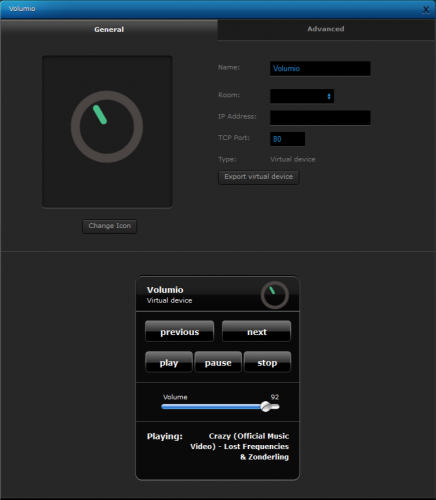
Volumio_VD_1.0
By KevCo
Here's a virtual device I created to control my Volumio Music Player, which is running on a Rasbperry Pi.
Volumio comes with an own built-in ReST API that I use for the this virtual device.
You must have your Volumio connected to your local area network (the same as Fibaro HC).
After importing the virtual device, set the IP address and the port (default port 80) to point at your Volumio.
Offical site of Volumio: www.volumio.org
Volumio ReST API documentation: www.volumio.github.io/docs/API/REST_API.html
Note: Tested on Fibaro HC2 4.180
Enjoy.
114 downloads
- virtual device
- volumio
- (and 1 more)
(0 reviews)0 comments
Updated
-

Yeelight Manager
By ojc
VD YEELIGHT MANAGER
Originally released on domotique-fibaro.fr
v. 1.3.0 - 14/01/2018
I present the VD Yeelight Manager which, as its name suggests, allows you to integrate Yeelight products with the HC2. To be very precise, I only have a Bedside Lamp and I have not tested this VD with other products. However, since the API is generic, there are no reasons that it does not work too. The only limit, I did not integrate in the DV management of the background light since the Bedside Lamp does not have such a light.
To use it, simply enter the IP of the Yeelight in the IP field of the DV, and the port in the Port field of the DV (the port used by the Yeelights is 55443). You can add or change elements of the virtual device according to your needs (the white light bulb does not need, for example, anything related to color management), as long as the TCP Connection and Transmission buttons keep their respective names (btnTCPConnection and btnTransmission). Yeelight Manager will find them himself by these names.
In order to be able to manage a Yeelight 'almost' like a module, simply insert in the scene or the code of the button or Main Loop the following code:
_y={credits='Yeelight Controller v. 1.3.0 - Copyright 2018 Olivier Meyer - GNU GPLv3',global='y_yeelight_global',item='y_yeelight_',props={power=true,bright=true,ct=true,rgb=true,hue=true,sat=true,color_mode=true,flowing=true,delayoff=true,flow_params=true,music_on=true,name=true,bg_power=true,bg_flowing=true,bg_flow_params=true,bg_ct=true,bg_lmode=true,bg_bright=true,bg_rgb=true,bg_hue=true,bg_sat=true,nl_br=true},f=fibaro,debug=function(s,m,c)s.f:debug(string.format('<span style="color:%s;">%s</span>', c, m))end,here=function(s)local h=type(s.f.getSelfId)=='nil' if h then return h,__fibaroSceneId else return h,s.f:getSelfId(),_elementID_ end end,log=function(s)local h=s:here()if h then local a=s.f:args()if a then if a[1].yeelight then s:debug(a[1].debug,a[1].color);s:debug(a[1].command,a[1].color);os.exit()end end end end,getBtn=function(s,i,n)local c,r=0,api.get('/devices/'..tostring(i))['properties']['rows'] local x=#r for a=1,x do local y=#r[a].elements for b=1,y do c=c+1 if n==r[a].elements[b].name then return c end end end s:debug('[Yeelight] Unable to locate button '..n..', check virtual device '..i,'Tomato');return nil end,build=function(s,m,p)local c='{"id":1, "method":"'..m..'", "params":['for i=1,#p do if type(p[i])=="number"then c=c..p[i]else c=c..'"'..p[i]..'"'end;if i~=#p then c=c..', 'end end;c=c..']}\r\n'return c end,load=function(s,v)local g=s.f:getGlobalValue(v)if string.len(g or '')>0 then local d=json.decode(g)if d and type(d)=='table'then return d else s:debug('[Yeelight] Unable to process data, check variable','Tomato')end else s:debug('[Yeelight] No data found!','Tomato')end return nil end,set=function(s,i,d)local g=s:load(s.global)if g[tostring(i)]then local a,b,c=s:here();g[tostring(i)].scene=a;g[tostring(i)].id=b;g[tostring(i)].button=c;g[tostring(i)].command=d;s.f:setGlobal(s.global,json.encode(g))end end,call=function(s,i,m,p)local b=s:getBtn(i,'btnTransmission')if b==nil then return nil end;local c=s:build(m,p)s:set(i,c)s.f:call(i,'pressButton',b)end,getValue=function(s,i,p,g)if s:checkP(p) then if type(g)~='table' then g=s:load(s.item..i)end if g.properties then if g.properties[p] then if g.properties[p].value then return g.properties[p].value end end end s:debug('[Yeelight] Unable to get value of '..tostring(p)..', please check variable.','Tomato');end return nil end,getModificationTime=function(s,i,p,g)if s:checkP(p) then if type(g)~='table' then g=s:load(s.item..i)end if g.properties then if g.properties[p] then if g.properties[p].modificationTime then return g.properties[p].modificationTime end end end s:debug('[Yeelight] Unable to get modification time of '..tostring(p)..', please check variable.','Tomato');end return nil end,get=function(s,i,p)local g=s:load(s.item..i);return s:getValue(i,p,g),s:getModificationTime(i,p,g)end,getStatus=function(s,i)local g=s:load(s.item..i)if g then if g.status then return g.status end end return nil end,getLastChange=function(s,i)local g=s:load(s.item..i)if g then if g.last then return g.last end end return nil end,checkP=function(s,p)if not s.props[p] then s:debug('[Yeelight] '..p..' is not an existing property!','Tomato') return false end return true end} _y:log() This code above offers the following functions:
_y:call(id, method, params) which allows to send a command to the lamp. The various buttons of the VD give examples. To go further, please have a look at the Yeelight API documentation : Yeelight_Inter-Operation_Spec.pdf _y:get(id, property) which does exactly the same thing as fibaro:get() _y:getValue(id, property) which does exactly the same thing as fibaro:getValue() _y:getModificationTime(id, property) which does exactly the same thing as fibaro:getModificationTime() _y:getStatus(id) which returns "online" if the lamp is connected to the wifi network, and "offline" otherwise _y:getLastChange(id) which returns a table containing the properties that have just been modified and their new value
The logs generated by the call () function are displayed in the debug zone of the scene (do not forget the _y: log () line and allow enough instances) or in the button or main loop of the virtual module from which the function was used.
To use these lamps as scene triggers, the VD automatically creates a global variable y_yeelight_XXX, where XXX is the ID of the VD. This global variable contains all the properties of the lamp and is updated in real time.
For example, to start a scene when a Yeelight is turned on:
--[[ %% globals y_yeelight_XXX --]] _y={credits='Yeelight Controller v. 1.3.0 - Copyright 2018 Olivier Meyer - GNU GPLv3',global='y_yeelight_global',item='y_yeelight_',props={power=true,bright=true,ct=true,rgb=true,hue=true,sat=true,color_mode=true,flowing=true,delayoff=true,flow_params=true,music_on=true,name=true,bg_power=true,bg_flowing=true,bg_flow_params=true,bg_ct=true,bg_lmode=true,bg_bright=true,bg_rgb=true,bg_hue=true,bg_sat=true,nl_br=true},f=fibaro,debug=function(s,m,c)s.f:debug(string.format('<span style="color:%s;">%s</span>', c, m))end,here=function(s)local h=type(s.f.getSelfId)=='nil' if h then return h,__fibaroSceneId else return h,s.f:getSelfId(),_elementID_ end end,log=function(s)local h=s:here()if h then local a=s.f:args()if a then if a[1].yeelight then s:debug(a[1].debug,a[1].color);s:debug(a[1].command,a[1].color);os.exit()end end end end,getBtn=function(s,i,n)local c,r=0,api.get('/devices/'..tostring(i))['properties']['rows'] local x=#r for a=1,x do local y=#r[a].elements for b=1,y do c=c+1 if n==r[a].elements[b].name then return c end end end s:debug('[Yeelight] Unable to locate button '..n..', check virtual device '..i,'Tomato');return nil end,build=function(s,m,p)local c='{"id":1, "method":"'..m..'", "params":['for i=1,#p do if type(p[i])=="number"then c=c..p[i]else c=c..'"'..p[i]..'"'end;if i~=#p then c=c..', 'end end;c=c..']}\r\n'return c end,load=function(s,v)local g=s.f:getGlobalValue(v)if string.len(g or '')>0 then local d=json.decode(g)if d and type(d)=='table'then return d else s:debug('[Yeelight] Unable to process data, check variable','Tomato')end else s:debug('[Yeelight] No data found!','Tomato')end return nil end,set=function(s,i,d)local g=s:load(s.global)if g[tostring(i)]then local a,b,c=s:here();g[tostring(i)].scene=a;g[tostring(i)].id=b;g[tostring(i)].button=c;g[tostring(i)].command=d;s.f:setGlobal(s.global,json.encode(g))end end,call=function(s,i,m,p)local b=s:getBtn(i,'btnTransmission')if b==nil then return nil end;local c=s:build(m,p)s:set(i,c)s.f:call(i,'pressButton',b)end,getValue=function(s,i,p,g)if s:checkP(p) then if type(g)~='table' then g=s:load(s.item..i)end if g.properties then if g.properties[p] then if g.properties[p].value then return g.properties[p].value end end end s:debug('[Yeelight] Unable to get value of '..tostring(p)..', please check variable.','Tomato');end return nil end,getModificationTime=function(s,i,p,g)if s:checkP(p) then if type(g)~='table' then g=s:load(s.item..i)end if g.properties then if g.properties[p] then if g.properties[p].modificationTime then return g.properties[p].modificationTime end end end s:debug('[Yeelight] Unable to get modification time of '..tostring(p)..', please check variable.','Tomato');end return nil end,get=function(s,i,p)local g=s:load(s.item..i);return s:getValue(i,p,g),s:getModificationTime(i,p,g)end,getStatus=function(s,i)local g=s:load(s.item..i)if g then if g.status then return g.status end end return nil end,getLastChange=function(s,i)local g=s:load(s.item..i)if g then if g.last then return g.last end end return nil end,checkP=function(s,p)if not s.props[p] then s:debug('[Yeelight] '..p..' is not an existing property!','Tomato') return false end return true end} _y:log() local function run() --executed on light on end local trigger = fibaro:getSourceTrigger() if trigger.type == "global" then if trigger.name == "y_yeelight_XXX" then if _y:getLastChange(XXX)["power"] == "on" then run() end end end423 downloads
(1 review)0 comments
Updated
-
(0 reviews)
0 comments
Submitted
-

LookO2 - Air Quality Sensor
By wronski3
———————————————————————————————————————————————————————
Current Version: 1.15
Fibaro Marketplace: https://marketplace.fibaro.com/items/looko2-air-quality-sensor
———————————————————————————————————————————————————————
Witajcie,
Jakiś czas temu poruszałem tu temat pomiaru Czystości Powietrza (szczególnie PM2.5) we własnym mieszkaniu lub na zewnątrz z określonej okolicy.
W założeniu chodziło o to aby Fibaro potrafiło pobierać dane z własnego czujnika a następnie wyświetlać je i wykorzystywać dalej w działaniu (np. uruchomienie oczyszczacza)
Nie znalazłem gotowego rozwiązania, a z dostępnych (w racjonalnej cenie) najsensowniejsze wydawało się zastosowanie własnego czujnika Looko2 - z obserwacji, dane wyglądają na dość dokładne,
stosują dobre czujniki i udostępniają API (tu wymagany token).
Jak dla mnie idealnie było by, gdyby, przynajmniej ostatnia średnia odczytu i podstawowe dane były dostępne bezpośrednio przez API Web interfejsu urządzenia, w lokalnym LANie
- ale podobno nie można mieć wszystkiego więc póki co zadowalam się API w chmurze
Tutaj podziękowania w stronę zespołu LOOKO2, który wykazał się otwartością na moje pytania dotyczące danych z czujnika a nawet dodał do API parametry, których pierwotnie tam nie było.
Wirtualka została przekazana również do nich, więc być może pojawi się także na stronie projektu.
Po cichu liczę, że na jej bazie FIBARO może przygotuje kiedyś jakiś plugin, być może ze statystyką danych na wykresach centralki
Jeśli chodzi o samo urządzenie to wygląda następująco:
Całość tzn. plik wirtualki, ikony, oraz opis parametrów znajdują się w dołączonym zipie.
Po imporcie urządzenia, należy dodać niezbędne ikony oraz dodać ich ID do configa wirtualki.
Ponadto należy podać tam ID interesującego nas czujnika - ja nie mam jeszcze własnego więc
pobieram dane z dostępnego w pobliżu, oraz token - można go uzyskać mailowo od suportu Looko2.
W celu działania PUSHy oraz dalszego wykorzystania jakości, należy dodać zmienną globalną
o nazwie określonej w konfiguracji. (W przypadku wielu urządzeń / czujników - dla każdego tworzymy nową zmienną), oraz określić ID urządzeń mobilnych/
Wszystkie parametry opisane są w dołączonym pliku oraz komentarzach w konfiguracji samego urządzenia.
Cała konfiguracja znajduje się w pierwszej części kodu urządzenia i nie powinna sprawiać żadnych problemów.
Czas odświeżania danych z API również można modyfikować w konfiguracji - wstępnie zdefiniowałem go na 15 minut.
W mojej ocenie jest to zupełnie wystarczające a częstsze odświeżanie danych nie ma sensu, bo prezentowane w API dane
to średnia ostatnich odczytów - co czyni odczyt bardziej poglądowym niż odczyt chwilowy.
Całość kodu znajduje się w pętli głównej, podczas testowania urządzenia (pewnie około 2 miesiące) zdarzyły mi się sporadyczne
zawieszenia - może 2 - dlatego nie zdecydowałem się na pakowanie kodu pod przycisk i wyzwalanie go sceną.
W przypadku interfejsu webowego urządzenie prezentuje jakość poprzez ikonę oraz nr indeksu jakości w dolnej belce pod ikoną urządzenia.
Po wyświetleniu szczegółów, prezentowane są dokładne dane o aktualnej jakości powietrza. Nazwa urządzenia oraz lokalizacja IN / OUT prezentowana w szczegółach urządzenia, pobierana jest z API czujnika,
natomiast pomieszczenie odzwierciedla umiejscowienie czujnika w strukturze pomieszczeń centralki FIBARO.
Procentowe zanieczyszczenie wyliczane jest w oparciu o dostępne normy (z wyjątkiem PM1 - tu nie znalazłem danych więc jako normę przyjąłem 20 µg/m3 - oczywiście można to zmienić w konfiguracji)
Do zmiennej globalnej zapisywana jest informacja o ogólnej jakości powietrza z ustawionego czujnika (0 najlepsza, 1 dobra, itd.) - zakres zgodny z dostępnymi normami i dostępny na stronie czujników
W przypadku urządzeń mobilnych występują drobne problemy z wyświetlaniem m.in z przejściem do nowej linii - szerzej problem opisałem tutaj:
Ogólnie po wprowadzeniu prawidłowego tokenu, wszystko powinno działać bez większych problemów.
Bez podania tokenu urządzenie będzie wyświetlało informacje o błędzie z tym związaną.
22 downloads
(0 reviews)0 comments
Submitted
-
Keyboard
By seiq
1. The TCP Port setting is used to store the input timeout in seconds. Adjust as required.
2. Change the myGlobal button and code to suit the name of the global you wish to set.
38 downloads
- virtual device
- keyboard
- (and 2 more)
(0 reviews)0 comments
Submitted
-
Daikin SkyFi
By seiq
Virtual device for control of Daikin air conditioners with the SKYFi addon. (untested)
125 downloads
- air conditioning
- daikin
- (and 3 more)
(0 reviews)0 comments
Submitted
-
Download Statistics
-
New reviews
-

-

-
 By SmartHomeEddy · PostedGreat QuickApp and excellent configuration manual. QuickApp works smooth. Thanks!
 -

-

-

-
 By OBewan · Posteding data from Gardena services... I am getting the following error from the installation script. Any idea how to fix it? Thanks [DEBUG] 21:35:13: 2022-04-11 21:35:13.093196 [ error] Handshake error: wrong version number [DEBUG] 21:35:13: 2022-04-11 21:35:13.093777 [ error] Handshake error: sslv3 alert handshake failure [DEBUG] 21:35:13: HTTP error: Transport endpoint is already connected
 -

-

-

-
-
Highest Rated Submitters
No ratings this week.
No ratings this month.
No ratings this year.
-
1

-
2

-
3

-
4

-
5

-