Welcome to Smart Home Forum by FIBARO
Dear Guest,
as you can notice parts of Smart Home Forum by FIBARO is not available for you. You have to register in order to view all content and post in our community. Don't worry! Registration is a simple free process that requires minimal information for you to sign up. Become a part of of Smart Home Forum by FIBARO by creating an account.
As a member you can:
- Start new topics and reply to others
- Follow topics and users to get email updates
- Get your own profile page and make new friends
- Send personal messages
- ... and learn a lot about our system!
Regards,
Smart Home Forum by FIBARO Team
Search the Community
Showing results for tags 'node-red'.
Found 8 results
-
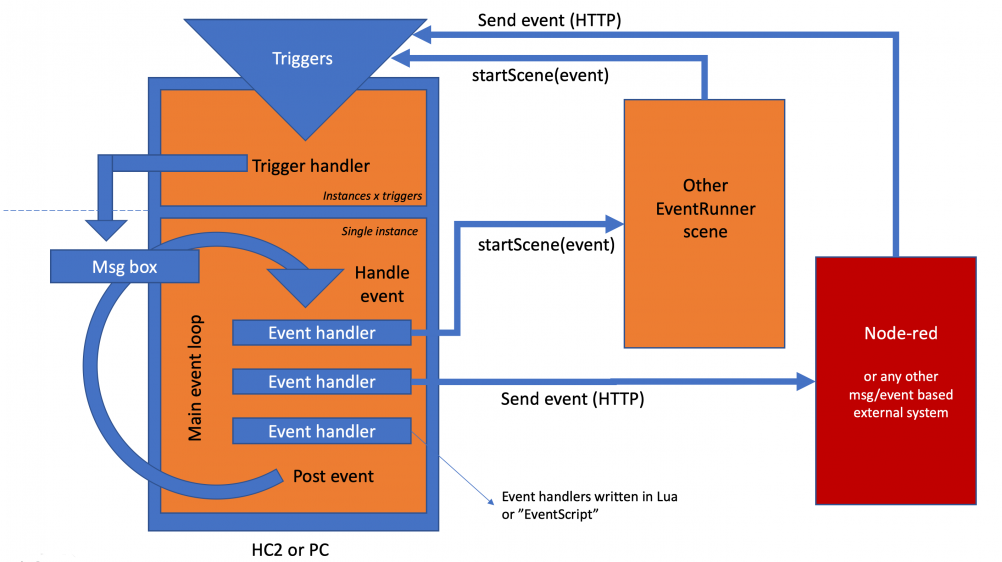
Note. The first ~2000 posts of this thread is mainly about EventRunner3 that is for the HC2. EventRunner3 is not developed further, but bugs are fixed as they are reported. For HC3, the version is EventRunner4, and is a QuickApp,. Here is a post introducing EventRunner4. Its EventRunner5, link <here> Most of the 'Event Script" syntax and commands are still valid and old posts can be of use for new HC3 owners. Link to EventRunner3.lua for the HC2 There is a QA that is used to download and install the EventRunner4 QA to your HC3 (and update to new versions) Here is an example of how to code in a "single instance / event" style. A style I'm using today for all of my scenes. The idea is that instead of having to deal with a new instance being spawned with every scene trigger, all triggers are dealt with from within a single scene instance that is continuously running. It becomes something close to a traditional event loop model found in most modern GUI frameworks. The advantages with coding scenes in this style are: Scene can keep state in local lua variables between scene invocations/triggers Easy to keep different rules/logic in the same scene without causing conflicts, e.g. combining continuous running loops/schedules with immediate reaction on incoming triggers Easy to distribute different rules/logic between different scenes and allow them to communicate Easy to schedule actions to do in the future - that can be easily cancelled if new information is gained. Because the scene is continuously running it doesn't matter if there is a heavy initialisation when the scene starts up (parsing HomeTables etc.) as it is only done once... The framework has extensive support to run and debug the scene offline on a PC/Mac to get things right before deploying the scene on the HC2 (uses HC2 emulator). Offline it is easy to simulate trigger/events to understand if the logic is correct, something that is not always easy to detect in a asynchronous environment. It has publish/subscribe mechanism allowing scenes to exchange events without having to know each other's names or IDs or rely on global variables. It has proven to be easy to integrate with external event/msg based systems like Node-red, where scenes can both send and receive events to node-red and thus extend functionality with Alexa, Google home, Hue etc etc. The framework is available in two version, a 'light' version and a full blow version with a lot of bells and whistles. The latter also supports writing rules in EventScript, a "simple", but very flexible and efficient approach to writing rules that need to trigger things at various times of the day, or trigger on sensors or switches changing states. The implementation of EventScript is built on-top of the single instance framework and the event model and would have been impossible to do in a traditional scene model. Ex of EventScript rules. --[[ %% properties 54 value 55 value 56 value 57 value 66 value 77 value 78 sceneActivation 88 ui.Slider1.value 88 ui.Label1.value %% events 100 CentralSceneEvent 120 AccessControlEvent %% globals Home %% autostart --]] myLightSensor1 = 54 -- do not declare local, script will not find them(!) myLightSensor2 = 55 myMotionSensor1 = 56 myMotionSensor2 = 57 myLight1 = 66 myLight2 = 67 myDoorSensor = 77 mySwitch = 78 myVD=88 myKeyFob = 100 myLock = 120 function main() -- Trigger rules Rule.eval("myLightSensor1:lux > 200 => myLight1:on") -- Turn on light1 if lux value goes above 200 Rule.eval("myLight1:isOn => myLight2:on") -- Turn on light2 if light1 is turned on Rule.eval("myDoorSensor:breached => myLight1:on") -- Turn on light1 if door sensor is breached Rule.eval("mySwitch:scene == S2.click => myLight1:on") -- Turn on light1 if S2 is clicked once Rule.eval("slider(myVD,'Slider1') == 50 => myLight1:on") -- Turn on light1 if slider is set to 50 Rule.eval("label(myVD,'Label1') == 'ON' => myLight1:on") -- Turn on light1 if label is set to 'ON' Rule.eval("myKeyFob:central.keyId==4 => myLight1:on") -- Turn on light1 if key 4 is pressed on keyFob Rule.eval("myLock:access.status=='Unlock' => log('Door unlocked by %s',myLock:access.name)") -- Door unlocked Rule.eval("$Home == 'AWAY' => myLight1:on") -- Turn on light1 if fibaro global variable 'Home' is set to 'AWAY' Rule.eval("#AccessControlEvent{data={name='$name',slotId='$slot',status='Unlock',id=myLock}} => log('Door unlocked by %s',name)") -- more rules -- Turn on lamp at 15min before sunset Rule.eval("@sunset-00:15 => myLight1:on") -- Turn on 2 lamps 15min past sunrise on weekdays Rule.eval("@sunrise+00:15 & wday('mon-fri') => {myLight1,myLight2}:on") -- Turn on lamp if sensor breached Rule.eval("myMotionSensor1:breached => myLight1:on") -- Turn off lamp if sensor safe for 5min Rule.eval("trueFor(00:05,myMotionSensor1:safe) => myLight1:off") -- Turn on lamp if doubleclick on switch S2 Rule.eval("mySwitch:scene==S2.double => myLight1:on") -- Toggle lamp if key '1' pressed on keyfob Rule.eval("myKeyfob:central.keyId=='1' => myLight1:toggle") -- Turn on lamp if average lux is less than 200 Rule.eval("sum({myLightSensor1,myLightSensor2}:lux)/2<200 => myLight1:on") -- Turn on lamp if any of motion sensor myMotionSensor1,myMotionSensor2 are breached Rule.eval("{myMotionSensor1,myMotionSensor2}:breached => lamp:on") -- ..and turn off lamp all motion sensors are safe for 10min Rule.eval("trueFor(00:10,{myMotionSensor1,myMotionSensor2}:safe) => lamp:off") -- Turn on lamp if any of motion sensor myMotionSensor1,myMotionSensor2 is breached -- but not if it's daytime, and only at dimmed level during night Rule.eval([[{myMotionSensor1,myMotionSensor2}:breached => || 24:00..sunrise >> myLight1:value=30 || sunset-00:30..24:00 >> myLight1:on ]]) end More on EventScript and the full blown version is available in the posts listed below: Here is a post on setting up the framework (works for EventRunnerLite too) Here is a post on the EventRunnerLite version - a bare bone version of the framework Here is a post on writing schedulers using EventScript. Here is a post on writing trigger rules using EventScript. Here is a post on EventScript syntax and rules (here is a new version under development) Here is a post on writing Lua event handlers Here is a post on debugging the framework Here is a post on the publish/subscribe mechanism Here is a post on enabling Hue support - mapping of Hue devices to standards z-wave/fibaro:* calls Here is a post on integrating the event model with Node-red - sending/receiving events from node-red, with extendable, example flow. Gives support for Sonos TTS and Alexa input...Updated flow <here>. (and here is another thread, 1,2,.) Here is a thread on the HC2 emulator used to debug EventRunner offline Here is a post on creating VDs from an ER scene and handle the VD logic with EventScript rules (and a calculator example) There will also be some services based on the EventFramework posted iOSLocator - a service that checks with iClod for people at places and sends events to other EventFramework services iCalendar - a service that fetches evens from Apple's iCloud calendar or Google calendar and post them to scenes. (latest iCalendar) Logger service - part of Supervisor Alarm service - TBD CronRunner - a UNIX like crontab service other scenes can register call-backs with Supervisor - A scene that pings EventRunner scenes and makes sure they stay alive. Best practices rules - TBD Implementation notes Notes on the basic EventRunner framework Notes on the EventScript implementation - TBD ChangeLog for the EventRunner framework. The lastest version of the code is kept in my GitHub. The background of this framework and a thread discussing it can be found here, however the code has evolved a bit from when originally posted there. If you are new to EventRunner I don't encourage you to read the posts in the thread chronological, as it contains a lot of outdated information. Instead, the best way to get an understanding of the capabilities of EventRunner is to browse the links in the list above.
- 4,679 replies
-
- 11
-

-

-
- events
- rule engine
- (and 8 more)
-

[How-to] Add your Ring Doorbell to the Fibaro HomeCenter
Joep posted a topic in Tutorials and Guides
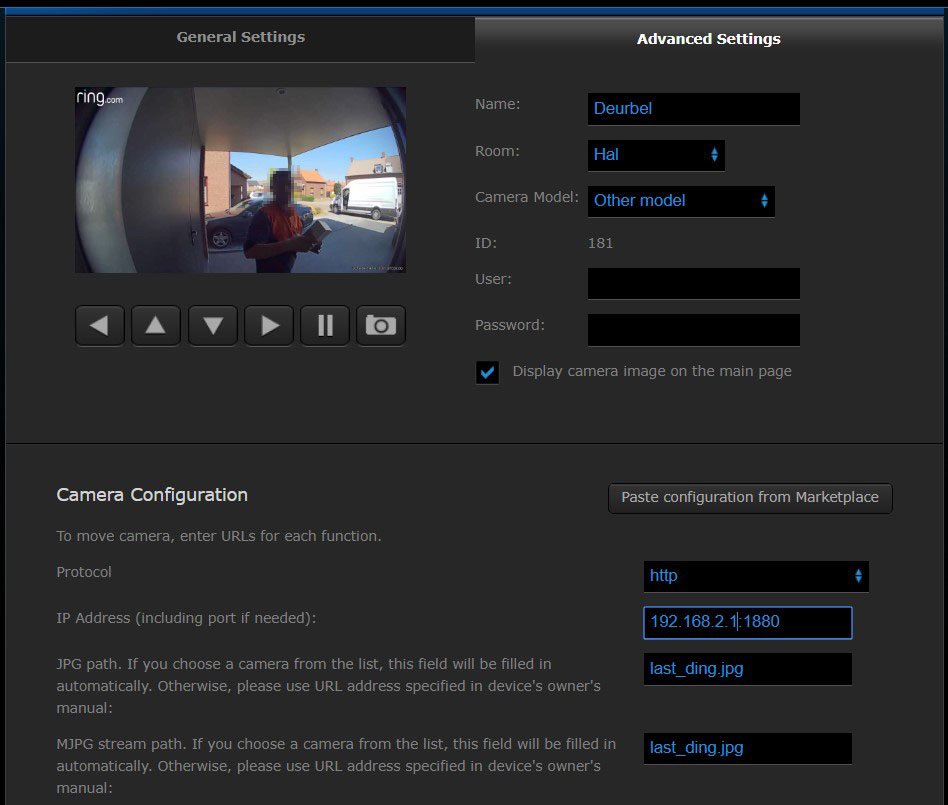
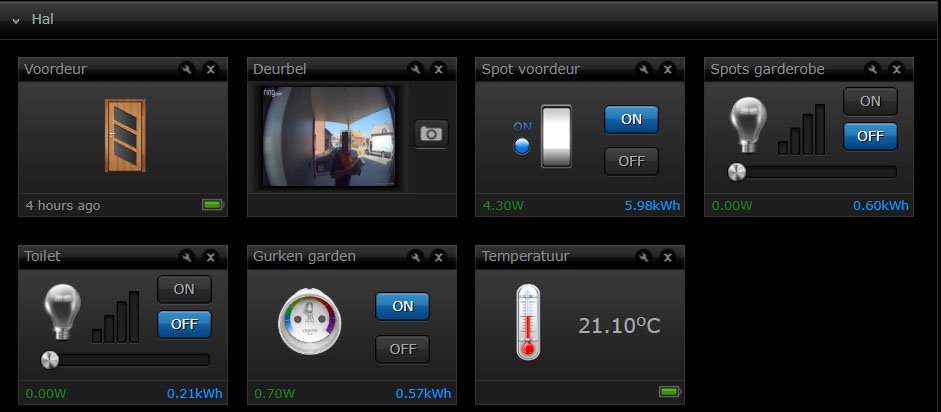
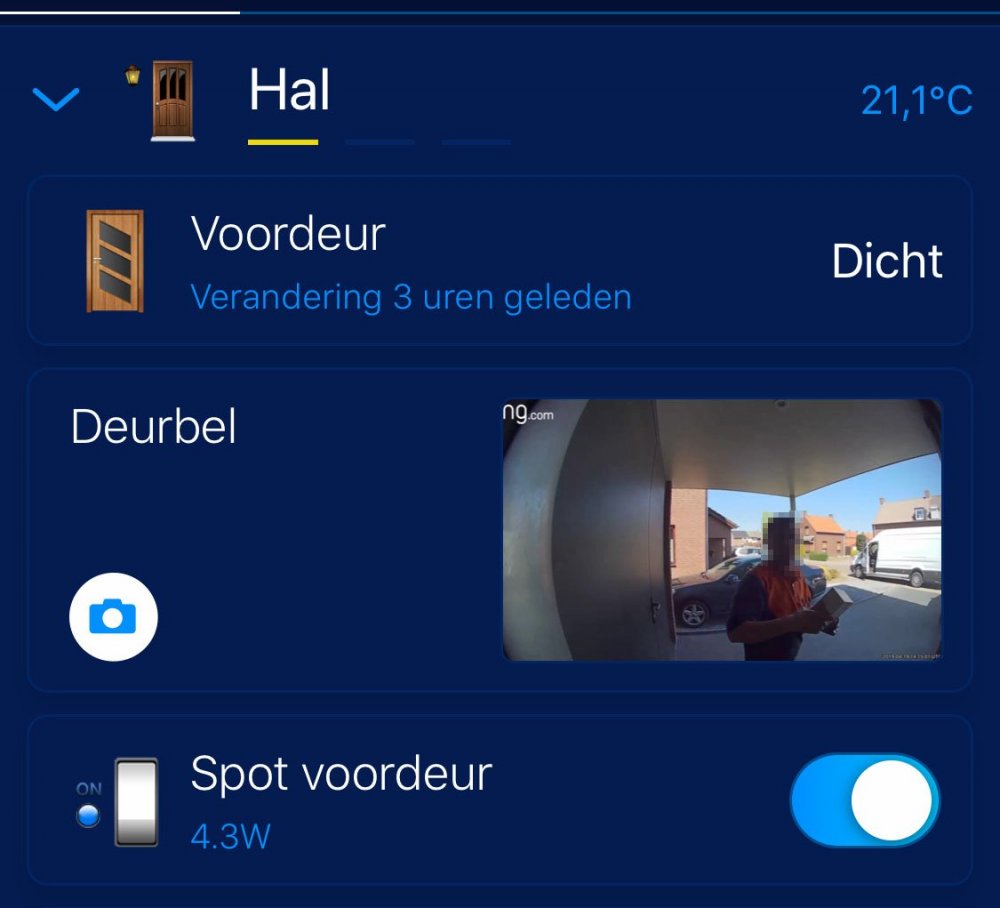
Is it allowed to post an integration to Home Center with third party support tools? I hope so, because this is awesome! My goal: Show the latest ringer at my front door in the Fibaro Home Center App when using my Ring Doorbell. The Challenge: Ring.com has no official API and snapshots are not possible at the moment. Fibaro does not support Ring Doorbell and Home Center and LUA code is not able to download a video and extract a frame from it. How I fixed it? I run a Node-RED box on (Debian) Linux. I installed Python with the Python Ring Door Bell Library to download the latest ringer video and ffmpeg to create a snapshot image. I use Node-RED to serve this snapshot with HTTP to the Home Center. You can also use NGINX, Apache or whatever webserver you like! This post is for experienced users, I skip a lot Linux stuff. A more detailed approach is on my website (see my signature). 1. Install Python, pip and ffmpeg (of not already present) on your Linux (Raspberry/NUC/etc..) box: sudo apt-get install python python-pip ffmpeg 2. Install the Python Ring Door Bell Library: pip install ring_doorbell 3. Create a folder and download my FibaroRingCam.py script to it: mkdir FibaroRingCam cd FibaroRingCam wget https://github.com/joepv/fibaro/blob/master/FibaroRingCam.py 4. In the script you have to edit the following lines with your own (login) information: myring = Ring('[email protected]', 'password') mypath = '/home/joep/FibaroRingCam/' 5. Now run the file. You can run it as a service, but that is out of the scope of this topic. 6. Serve the snapshot with Node-RED to the Home Center. Add the following node to Node-RED and edit the path of the file node to the path of the last_ding.jpg snapshot. If you want to use another webserver configure it to serve the snapshot: [{"id":"d1f4395b.cd0778","type":"comment","z":"30de6047.723c","name":"Fibaro Ring Camera Snapshot","info":"","x":160,"y":180,"wires":[]},{"id":"e42e6aeb.e610e8","type":"http in","z":"30de6047.723c","name":"[get] /last_ding.jpg","url":"/last_ding.jpg","method":"get","upload":false,"swaggerDoc":"","x":130,"y":220,"wires":[["9329fca.9bf87"]]},{"id":"9329fca.9bf87","type":"file in","z":"30de6047.723c","name":"last_ding.jpg","filename":"/home/joep/FibaroRingCam/last_ding.jpg","format":"","chunk":false,"sendError":false,"x":350,"y":220,"wires":[["5dd8cb15.ea08b4"]]},{"id":"5dd8cb15.ea08b4","type":"http response","z":"30de6047.723c","name":"serve last_ding.jpg","statusCode":"","headers":{"content-type":"image/jpeg"},"x":590,"y":220,"wires":[]}] 7. Add a new camera in Fibaro Home Center 2: 8. Give the camera a useful name and change the advanced settings to the following settings: IP address: node-red ip address:port JPG path: last_ding.jpg MJPG stream: last_ding.jpg Note! The MJPG stream does not work, you have NO video! I’m still searching for a solution to play the last Ring video as camera stream. The result in Home Center 2: And in the Home Center App: What the Python script does? It logs in at the Ring.com servers and checks every 15 seconds if there is a new ring. It saves a local file to know if the last ring is a new one. If the ring is new, it downloads the lastest video and feeds it to ffmpeg to extract 1 frame to create a snapshot.

- 9 replies
-
- 4
-
-
- http server
- ring
- (and 5 more)
-
Hi can anyone help me please? I want to send a value from my Node-red and assign it to a Global variable value on my HC2. The Global variable i wish to update is "message" and the value is "Connection established". Tried some flows from here but always get JSON error. Hop someone can help ... Thanks
-
Can someone help me with Node-Red? I need to tell node-Red to change a global value in HC2. Thanks for the Help
-

Communication between amazon echo and Fibaro using Node-RED
matispf84 posted a question in Amazon Alexa
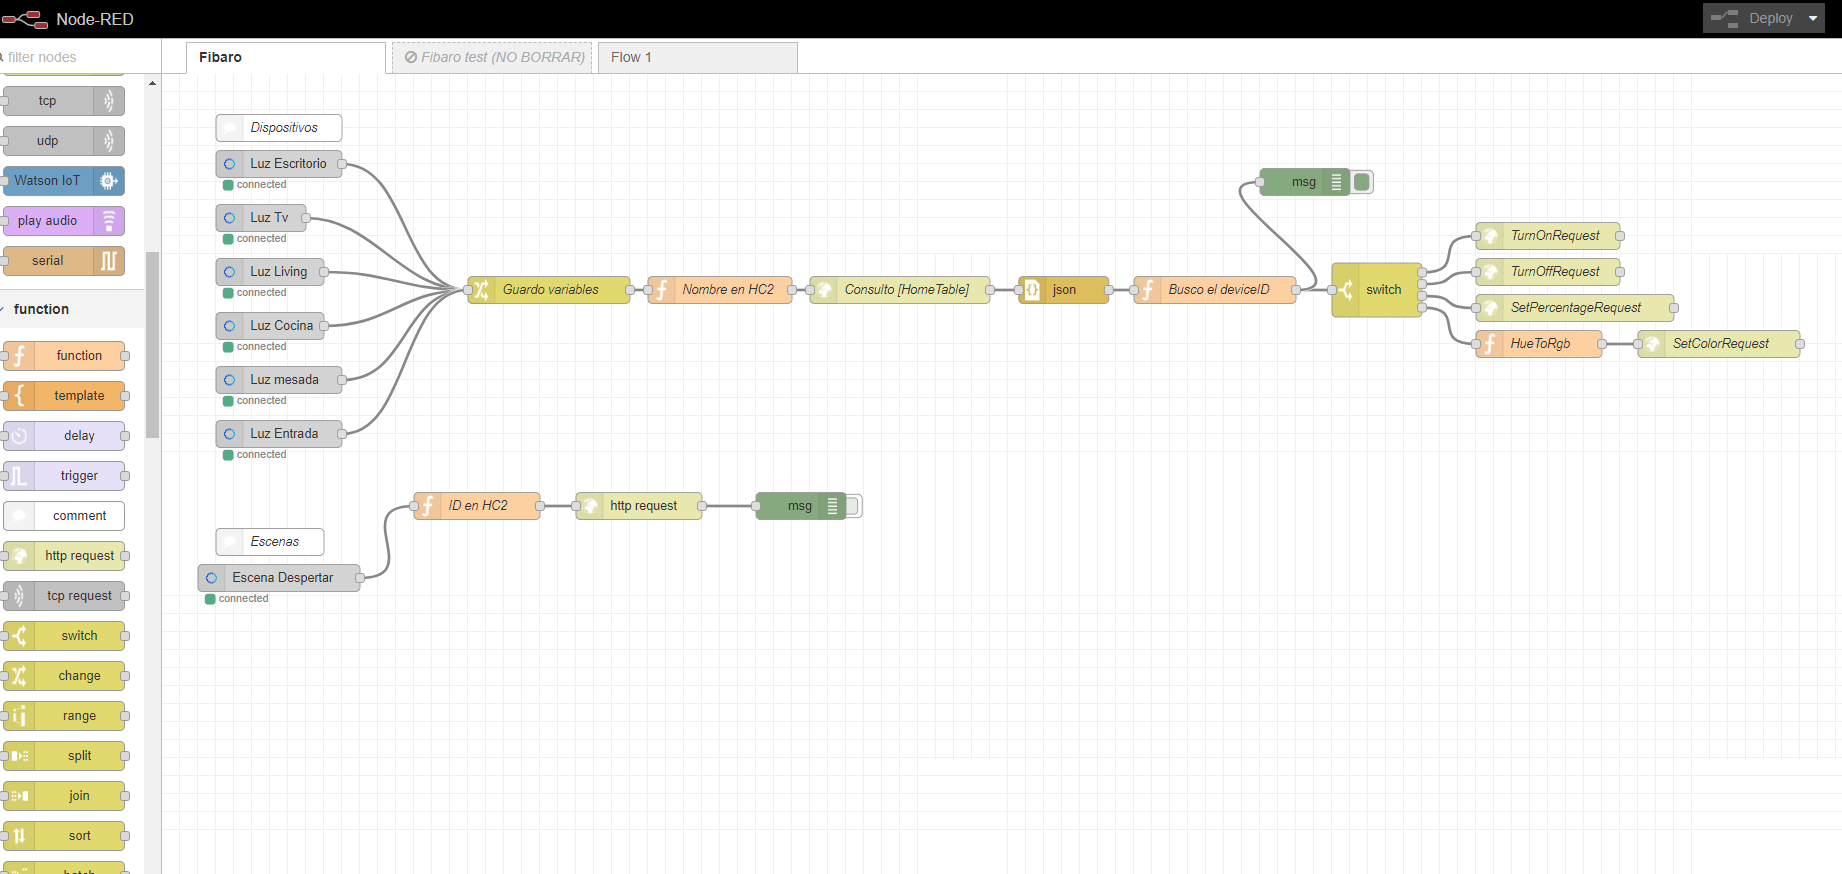
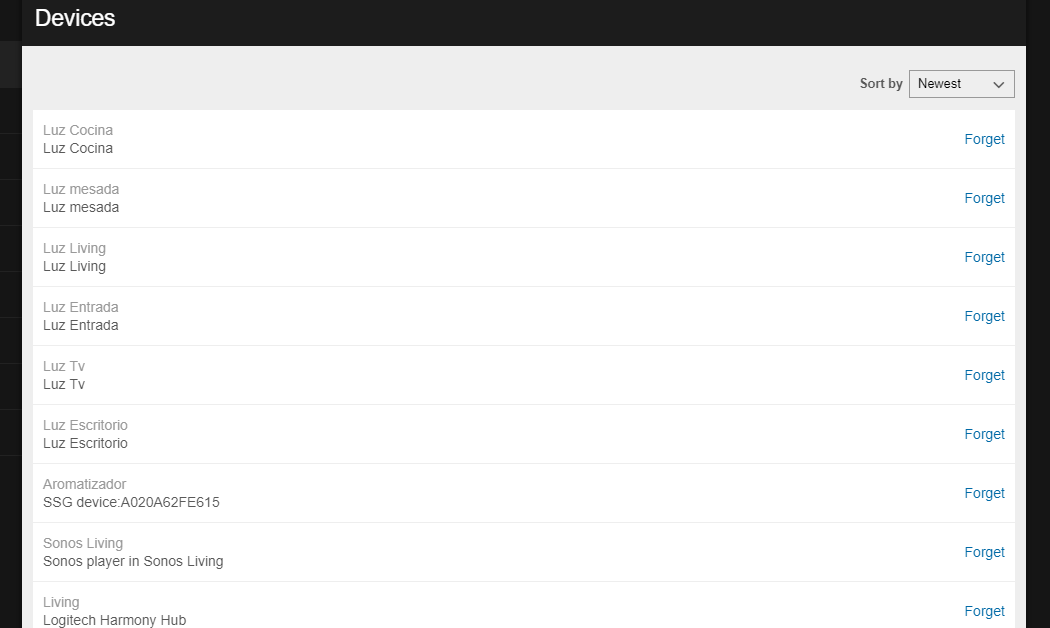
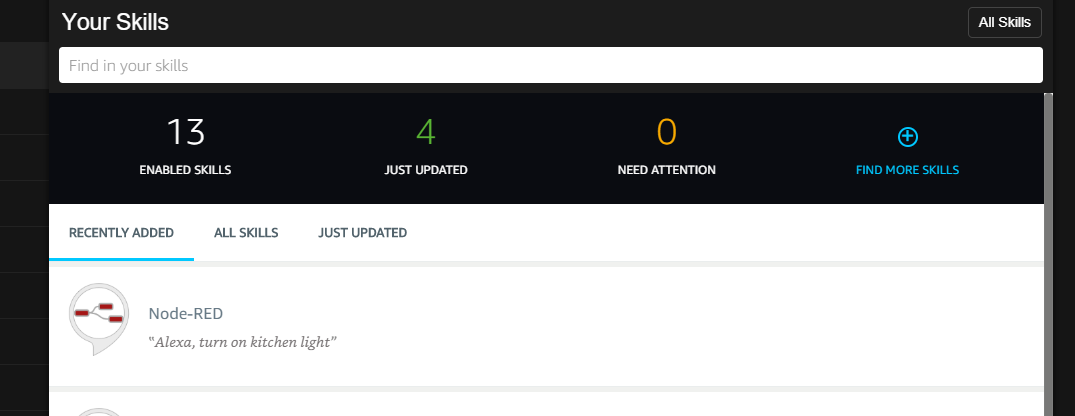
Hi, tired of Fibaro's poor skill at Amazon Alexa (never connect, it's slow) and the HABridge (we must pray for Alexa to find the devices, it is very random, it works when it wants, it duplicates devices). For all that I decided to try and do tests with Node-RED. And now I can say that it is fantastic, there are no limits to create. If you are interested I leave more info. Now I can control the lights, turn on and off, change the intensity, change the color, execute scenes of Fibaro and many things, all without depending on the official skill or any third party Bridge. I used: * https://nodered.org (Installed in Raspberry) * https://www.amazon.com/Ben-Hardill-Node-RED/dp/B01N0D97FZ (Node-RED alexa skill) * https://alexa-node-red.bm.hardill.me.uk (You have to create user and then create all the devices and scenes) * "HomeTable" global variables in HC2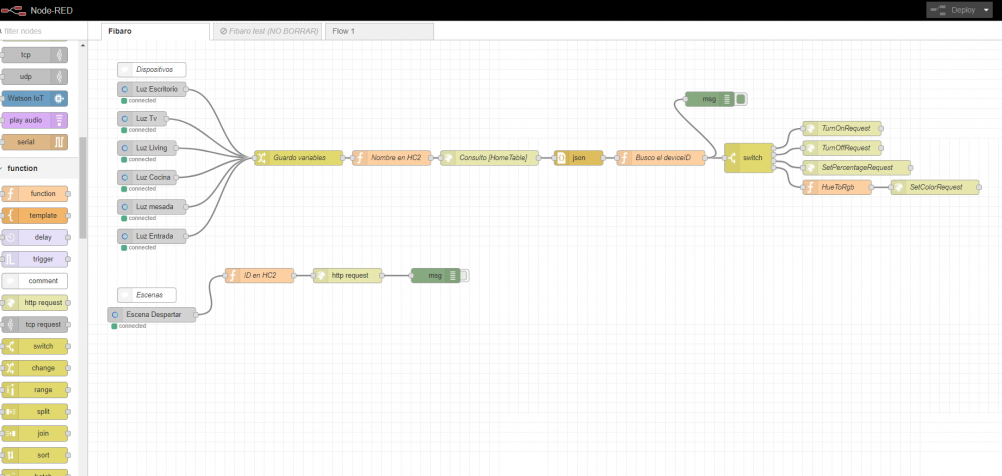


-
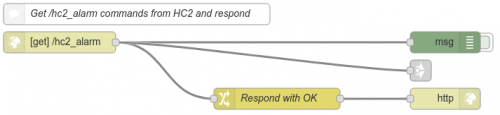
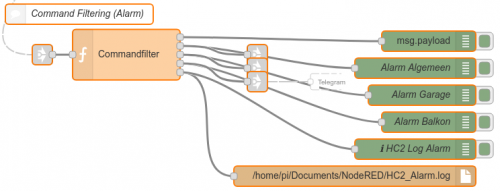
 Hi to you all! Maybe you know that I'm a critical HC2 user since 2013. In short, as I mention here I was feeling the Fibaro was holding me back in possibilities, privacy and security. So I started to investigate to get more control over what I think was important to me. I said I would abandon the HC2. The good news, I will not (for now). After extensive testing and trying to find a proper configuration, I found a way to implement the HC2, demanding my needs and wishes concerning: Security Privacy Possibilities Time to spend (re-configuring 200+ devices, 50 scenes and 30 Virtual Devices) The solution I'm implementing is a Raspberry Pi 3 with Node-Red for all communications from the HC2. In short, this means using the HC2 solely as a Z-wave controller and automation gateway. Setup: - The Node-Red will receive commands from the HC2 by an encrypted (https) and password protected connection. At this point it's still one way by sending from the HC2 to Node-Red. - The HC2 is (will be) blocked from internet access. Internet access to the HC2 will be done by VPN. - All other domotica devices are on a separate subnet (VLAN). - All messages (email/push/Telegram) is processed by Node-Red. (disabling all Fibaro 'services'). Example: An alarm is breached: - HC2 will send a message by https to Node-Red. - Node-Red sends IP-Camera snapshots to own email-server, push-account or private Telegram-bot. - Node-Red will check my Ubiquiti manage-switch to check if someone is at home (Mobile phone present in LAN) at will send result to push or Telegram. For sending data to Node-Red a scene is used with content of 5 Global Variable, triggered by one: SC_Nred_VarName (Name variable to send. used as trigger, must be written as last) SC_Nred_VarVal (Value to send) SC_Nred_VarType (not used yet, could be used for sending the type of value, like string, date, time etc.) SC_Nred_VarLog (data for storing data in Node-Red logfiles) SC_Nred_VarPath (path to the Node-Red http-receive-node, default /hc2) The scene code (Beta code 20170526): --[[ %% properties %% events %% globals SC_Nred_VarName --]] -- -- Initialisation of user settings (change if necessary) -- -- Global variables (has to be added manually in HC2 variables panel) local globVarName = 'SC_Nred_VarName'; -- Name of global variable to send (trigger!) local globVarValue = 'SC_Nred_VarVal'; -- Value of global variable to send local globVarType = 'SC_Nred_VarType'; -- Type of global variable to send local globVarLog = 'SC_Nred_VarLog'; -- Logmessage to send local globVarPath = 'SC_Nred_VarPath'; -- Node-Red http-node path to interact with -- Node-Red server connections credentials local nredIp = '192.168.x.x'; -- Node-RED server IP-address local nredPort = 1880; -- Node-Red server port number local nredUser = 'HC2'; -- Node-Red user used to change variables local nredPass = 'XXXXXXXXXXXXXXXX'; -- Node-Red password of used user -- Node-Red server credentials options: true = Enable, false = Disable local nredUseLogin = false; -- TODO!! Option to use user/password login (default = false) local nredUseSecure = true; -- Option to use secure https connections (default = true) -- Node-Red http-node settings local nredPathDefault = 'hc2'; -- Default Node-Red http-node path to interact with local nredVarName = 'name'; -- Node-Red http-node option for variable name local nredVarValue = 'value'; -- Node-Red http-node option for variable value local nredVarType = 'type'; -- Node-Red http-node option for variable type local nredVarLog = 'log'; -- Node-Red http-node option for variable log -- Debug options: true = Enable (default), false = Disable local debug = true; -- -- Funtions (do not change) -- -- Debug and Log local function log(str) if debug then fibaro:debug('<font color="yellow">'..str..'</font>'); end; end local function errorlog(str) fibaro:debug('<font color="red">'..str..'</font>'); end -- -- Code (do not change) -- -- Prevents the scene from running when command is 0 if (tonumber(fibaro:getGlobalValue(globVarName)) == 0) then fibaro:abort(); end -- Get variable content from global variable and convert to usable values -- Name value content local nredName = fibaro:getGlobalValue(globVarName); local nredName = string.gsub(nredName,'%s','%%20'); -- Replace <space> with %20 local nredName = string.gsub((nredName),'?','%%3F'); -- Replace ? with %3F --local nredName = string.gsub((nredName),'%','%%25'); -- TODO! Replace % with %25 -- Value content local nredValue = fibaro:getGlobalValue(globVarValue); local nredValue = string.gsub((nredValue), '%s', '%%20'); -- Replace <space> with %20 local nredValue = string.gsub((nredValue),'?','%%3F'); -- Replace ? with %3F --local nredValue = string.gsub((nredValue),'%','%%25'); -- TODO! Replace % with %25 -- Type value content local nredType = fibaro:getGlobalValue(globVarType); local nredType = string.gsub((nredType), '%s', '%%20'); -- Replace <space> with %20 local nredType = string.gsub((nredType),'?','%%3F'); -- Replace ? with %3F --local nredType = string.gsub((nredType),'%','%%25'); -- TODO! Replace % with %25 -- Log value content local nredLog = fibaro:getGlobalValue(globVarLog); local nredLogIsChanged = ''; if nredLog == '' or nredLog == nil then nredLogIsChanged = ' is changed to'; nredLog = os.date("%d/%m/%Y %X ")..': '..nredName..' --> '..nredValue; end if debug then fibaro:debug('Logcontent'..nredLogIsChanged..': '..nredLog) end; local nredLog = string.gsub((nredLog), '%s', '%%20'); -- Replace <space> with %20 local nredLog = string.gsub((nredLog),'?','%%3F'); -- Replace ? with %3F -- Node-Red http-node path value local nredPath = fibaro:getGlobalValue(globVarPath); if debug then fibaro:debug('Node-RED Path: '..nredPath) end; if nredPath == '' or nredPath == nil then nredPath = nredPathDefault; end local nredPath = string.gsub((nredPath), '%s', '%%20'); -- Replace <space> with %20 local nredPath = string.gsub((nredPath),'?','%%3F'); -- Replace ? with %3F -- Construct API URL if nredUseSecure then urlPre = 'https'; else urlPre = 'http'; end local apiURL = urlPre..'://'..nredIp..':'..nredPort..'/'..tostring(nredPath)..'?'..tostring(nredVarName)..'='..tostring(nredName)..'&'..tostring(nredVarValue)..'='..tostring(nredValue)..'&'..tostring(nredVarType)..'='..tostring(nredType)..'&'..tostring(nredVarLog)..'='..tostring(nredLog); if debug then log(apiURL) end; -- Initialisation of communication to Node-Red local selfHttp = net.HTTPClient(); -- Sending HTTP apiURL selfHttp:request(apiURL, { options={ headers = selfHttp.controlHeaders, data = requestBody, method = 'GET', timeout = 5000 }, success = function(status) local result = json.decode(status.data); if result.status == 'OK' then if debug then log('<font color="green">Respond is OK</font>') end; else errorlog('failed'); if debug then log(status.data) end; end end, error = function(error) errorlog("ERROR"); if debug then log(error) end; end }) -- Reset the global command variable to 0 and empty all other global variables fibaro:setGlobal(globVarValue, ''); fibaro:setGlobal(globVarType, ''); fibaro:setGlobal(globVarLog, ''); fibaro:setGlobal(globVarPath, ''); fibaro:setGlobal(globVarName, '0'); -- Trigger variable, write as last To actually send data, a Virtual Device can be used with buttons to write values to the proper global variables. For example (when balcony security is breached, VD report-label name = RedNodeAlarmLabel): -- -- Initialisation of user settings (change if necessary) -- -- Global variables (has to be present in HC2 variables panel) local globVarName = 'SC_Nred_VarName'; -- Global variable used for Node-RED variable name local globVarValue = 'SC_Nred_VarVal'; -- Global variable used for Node-Red variable value local globVarType = 'SC_Nred_VarType'; -- Global variable used for Node-Red variable type local globVarLog = 'SC_Nred_VarLog'; -- Global variable used for Node-Red variable Log (String) local globVarPath = 'SC_Nred_VarPath'; -- Node-Red http-node path to interact with -- Symbol and text table local symbolTable = { -- Symbols to show in this VD buttonIcon = 'Balcony', -- Symbol representing activating this button (for VD Label) buttonText = 'Alarm', -- Text representing activating this button (for external log) timeLastRun = 'Time: ' -- Symbol representing time of last run } -- Node-Red http-node values to send local sendName = 'HC2_Alarm_Balcony'; -- Node-Red variable name to use local sendValue = 'Balcony'; -- Node-Red variable value to use local sendType = '2'; -- Node-Red variable type to use -- Types: 0 = Integer, e.g. -1, 1, 0, 2, 10 -- 1 = Float, e.g. -1.1, 1.2, 3.1 -- 2 = String -- 3 = Date in format DD/MM/YYYY -- 4 = Time in 24 hr format HH:MM -- 5 = DateTime (but the format is not checked) local sendLog = tostring(symbolTable.buttonText.. os.date(" %d/%m/%Y %X ")..symbolTable.buttonText..' --> '..sendValue); local sendPath = 'hc2_alarm'; -- Debug options local debug = true; -- Enable (default, true) or disable (false) general debug output local debugCommands = true; -- Enable (true) or disable (false, default) debug output of command sending to Homey -- ------------------------------------------------------------------------------------------ -- Initialisation of code (do not change unless you know what you are doing!) -- ------------------------------------------------------------------------------------------ local selfId = fibaro:getSelfId(); local selfLabel = 'RedNodeAlarmLabel'; local function debugLog(_logString, _logStringColor, _logValue, _logValueColor) fibaro:debug('<span style="color:'.._logStringColor..'"> '..tostring(_logString)..' </span><span style="color:'.._logValueColor..'"> '..tostring(_logValue)..'</span>'); end -- ------------------------------------------------------------------------------------------ -- Code (do not change) -- ------------------------------------------------------------------------------------------ -- store values (store scene-trigger as the last) fibaro:setGlobal(globVarValue, sendValue); fibaro:setGlobal(globVarType, sendType); fibaro:setGlobal(globVarLog, sendLog); fibaro:setGlobal(globVarPath, sendPath); fibaro:setGlobal(globVarName, sendName); -- Scene-trigger fibaro:call(selfId, "setProperty", "ui."..selfLabel..".value", symbolTable.buttonIcon..' '..symbolTable.timeLastRun.. os.date(" %d/%m/%Y %X ")); fibaro:log(symbolTable.buttonIcon); if debugCommands then debugLog(symbolTable.buttonIcon..' '..symbolTable.timeLastRun.. os.date(" %d/%m/%Y %X. "), 'orange', 'Variable name: '..sendName..', type: '..sendType..', value: '..sendValue, 'yellow') end; Node-Red Nodes examples: Receiving data and respond with 'OK' Processing content of received values: Example Commandfilter code with 5 outputs: var input = { payload: msg.payload }; // Output 1 (msg.payload) var hc2AlarmAlgemeen; // Output 2 (HC2_Alarm_Generic) var hc2AlarmGarage; // Output 3 (HC2_Alarm_Garage) var hc2AlarmBalkon; // Output 4 (HC2_Alarm_Balcony) var add2Log; // Output 5 (add2Log) // --> Output 1 (msg.payload) // Content of payload: // Name: msg.payload.name // Value: msg.payload.value // Type: msg.payload.type // Log: msg.payload.log // --> Output 2 (HC2_Alarm Generic) if (msg.payload.name === "HC2_Alarm_Generic") { hc2AlarmAlgemeen = { payload: msg.payload.value }; add2Log = { payload: msg.payload.log }; } // --> Output 3 (HC2_Alarm Garage) if (msg.payload.name === "HC2_Alarm_Garage") { hc2AlarmGarage = { payload: msg.payload.value }; add2Log = { payload: msg.payload.log }; } // --> Output 4 (HC2_Alarm Balcony) if (msg.payload.name === "HC2_Alarm_Balcony") { hc2AlarmBalkon = { payload: msg.payload.value }; add2Log = { payload: msg.payload.log }; } // Set to proper outputs return [ input, hc2AlarmGeneric, hc2AlarmGarage, hc2AlarmBalcony, add2Log ]; How to get snapshots from IP-camera and send to Telegram: https://github.com/guidone/node-red-contrib-chatbot/wiki/Examples Updates, changes and additional info: 20170527 Setup Raspberry Pi with Node-Red Short Guide 20171017 Setup Raspberry Pi with MQTT (Mosquitto) Short Guide Beware, this is not out-of-a-box solution. Just want to share this example because the possibilities are huge! Greetings, Lambik
-
Hi2Uall! I configured a (working) Raspberry Pi 3 Raspbian with Node-Red and MQTT (see this excellent YouTube video for explanation). Now on working, and learning (a lot) how to implement this. So far it is very useful to connect several IoT services. Did anyone have an idea how to connect the HC2 to an MQTT server?
-
I wonder if there is any plans on expanding the functionality of the virtual device in Fibaro HC2. As it works now it´s most suitable to use for controlling some other device with buttons, slider etc, and if you want to display data from another device all you can use is the label. My wish is that you should be able to choose the type of the virtual device. For example, if you want it to appear as a thermometer or humidity device, and be able to set the value of this device via http api and lua. This would open up the possibility to add virtual devices that gets updated via for example node-red or http from other sources. And in the user interface they will show up as a "common" sensor. That would be really nice. I think this functionality would make the platform more attractive for many people, and open up the integration between different protocols and vendors. Is it just me or is anybody else missing this functionality?