Welcome to Smart Home Forum by FIBARO
Dear Guest,
as you can notice parts of Smart Home Forum by FIBARO is not available for you. You have to register in order to view all content and post in our community. Don't worry! Registration is a simple free process that requires minimal information for you to sign up. Become a part of of Smart Home Forum by FIBARO by creating an account.
As a member you can:
- Start new topics and reply to others
- Follow topics and users to get email updates
- Get your own profile page and make new friends
- Send personal messages
- ... and learn a lot about our system!
Regards,
Smart Home Forum by FIBARO Team
Search the Community
Showing results for tags 'qa'.
-
Czy ktoś może pomóc w wykonaniu QA? Potrzebne aby QA : - po naciśnięciu przycisku wykonało - "open" danego urządzenia - sprawdziło stan czujnika binarnego i zwróciło jego wartość w formie "otwarte" gdy true lub "zamknięte" gdy false - wpisało stan czujnika w etykiecie QA Przykład: function QuickApp:wjazd_open() -- nazwa przycisku QA hub.call(1955, "open") -- otwarcie bramy (smart implant zwiera styki) self:updateView("wjazd_label", "text", "Brama wjazdowa: " .. tostring(hub.getValue(152, "value")) ) -- 152 to czujnik otwarcia bramy end
-
Version 1.0
16 downloads
Nanoleaf Aurora QA standalone v1.0 INTRODUCTION Nanoleaf Aurora QA brings complete integration of Nanoleaf Aurora light panels to HC3, HC3Lite and Yubii Home. PREREQUISITES Fibaro HC3, HC3Lite or Yubii Home with firmware 5.150 or greater Nanoleaf Aurora light panels FEATURES Enables HC3, HC3Lite and Yubii Home to control Nanoleaf Aurora lights and show their status Can control brightness, hue, saturation, color temperature and activate color effects QA automatically updates list of the available effects when added or deleted with Nanoleaf mobile application Has buttons for light effects selection and activation Selected and running effect type can be recognized by emoji icon in front of the of the effect name. If Nanoleaf Aurora light has attached Rhythm module this QA will recognize it and enable selection between built in microphone or AUX input. Rhythm module is automatically activated when rhythm effect is activated Has button for generating authorization token for easy connection to the Nanoleaf Aurora light QA has built in multi-language support with 32 languages included. QA can use HC selected language or user can select any other available language. AVAILABLE DOWNLOAD Nanoleaf Aurora QA v1.0 Nanoleaf Aurora QA User manual v1.0 TERMS AND CONDITIONS Permission to use, copy, modify and distribute this software and its documentation for educational, research, personal use and non-profit purposes, without fee and without a signed licensing agreement is hereby granted, provided that the copyright notice, with "Terms and conditions" and "Disclaimer" appear in all copies, modifications and distributions. It is strictly forbidden to sell, rent, lease and/or lend this software for profit without prior consent from the Author. DISCLAIMER This software is provided by copyright owner "as is" and any express or implied warranties, including, but not limited to, the implied warranties of merchantability and fitness for a particular purpose are disclaimed. In no event shall the author and distributor be liable for any direct, indirect, incidental, special, exemplary, or consequential damages (including, but not limited to, procurement of substitute goods or services; loss of use, data, or profits; or business interruption) however caused and on any theory of liability, whether in contract, strict liability, or tort (including negligence or otherwise) arising in any way out of the use of this software, even if advised of the possibility of such damage. Fibar Group S.A. and their employees are not responsible for support of this QA. Please contact the author Sankotronic, on the Fibaro Forum, for any questions or support required. VERSION HISTORY 1.0 - first public release as open source. LOOK & FEEL Enjoy coding and your new Nanoleaf Aurora QA! Sankotronic-
- 3
-

-

-
- sankotronic
- nanoleaf
- (and 4 more)
-

Version 1.0
16 downloads
Nanoleaf Shapes QA standalone v1.0 INTRODUCTION Nanoleaf Shapes QA brings complete integration of Nanoleaf Canvas, Shapes, Lines and Elements lights to HC3, HC3Lite and Yubii Home. PREREQUISITES Fibaro HC3, HC3Lite or Yubii Home with firmware 5.150 or greater Nanoleaf Canvas, Shapes, Lines or Elements light FEATURES Enables HC3, HC3Lite and Yubii Home to control Nanoleaf lights and show their status Can control brightness, hue, saturation, color temperature and activate color effects QA automatically updates list of the available effects when added or deleted with Nanoleaf mobile application Has buttons for light effects selection and activation Selected and running effect type can be recognized by emoji icon in front of the of the effect name. Nanoleaf Canvas, Shapes, Lines and Elements light control panel has built in Rhythm module and there is no AUX input available. Rhythm module is automatically activated when rhythm effect is activated Has button for generating authorization token for easy connection to the Nanoleaf light QA has built in multi-language support with 32 languages included. QA can use HC selected language or user can select any other available language. AVAILABLE DOWNLOAD Nanoleaf Shapes QA v1.0 Nanoleaf Shapes QA User manual v1.0 TERMS AND CONDITIONS Permission to use, copy, modify and distribute this software and its documentation for educational, research, personal use and non-profit purposes, without fee and without a signed licensing agreement is hereby granted, provided that the copyright notice, with "Terms and conditions" and "Disclaimer" appear in all copies, modifications and distributions. It is strictly forbidden to sell, rent, lease and/or lend this software for profit without prior consent from the Author. DISCLAIMER This software is provided by copyright owner "as is" and any express or implied warranties, including, but not limited to, the implied warranties of merchantability and fitness for a particular purpose are disclaimed. In no event shall the author and distributor be liable for any direct, indirect, incidental, special, exemplary, or consequential damages (including, but not limited to, procurement of substitute goods or services; loss of use, data, or profits; or business interruption) however caused and on any theory of liability, whether in contract, strict liability, or tort (including negligence or otherwise) arising in any way out of the use of this software, even if advised of the possibility of such damage. Fibar Group S.A. and their employees are not responsible for support of this QA. Please contact the author Sankotronic, on the Fibaro Forum, for any questions or support required. VERSION HISTORY 1.0 - first public release as open source. LOOK & FEEL Enjoy coding and your new Nanoleaf Shapes QA! Sankotronic-
- 3
-
-
- sankotronic
- nanoleaf
- (and 4 more)
-
Version 1.1
45 downloads
Netatmo Indoor Air Quality Monitor QA standalone v1.1 INTRODUCTION Netatmo Indoor Air Quality Monitor QA brings complete integration of Netatmo Indoor Air Quality Monitor (coach) to HC3, HC3Lite and Yubii Home users with support for more than one monitor. PREREQUISITES Fibaro HC3, HC3Lite or Yubii Home with firmware 5.150 or greater One or more Netatmo Indoor Air Care Monitor (coach) FEATURES Complete integration of Netatmo Indoor Air Quality Monitor(s) Only one QA is needed for multiple Netatmo Indoor Air Quality Monitors Smart update system that follows Netatmo Indoor Air Quality Monitors cloud updates Netatmo Indoor Air Quality Monitor measurements are shown on child devices added for each measurement of all monitors QA has built in multi-language support with 32 languages included. QA can use HC selected language or user can select any other available language. AVAILABLE DOWNLOAD Netatmo Indoor Air Quality Monitor QA v1.1 Netatmo Indoor Air Quality Monitor QA User manual v1.1 TERMS AND CONDITIONS Permission to use, copy, modify and distribute this software and its documentation for educational, research, personal use and non-profit purposes, without fee and without a signed licensing agreement is hereby granted, provided that the copyright notice, with "Terms and conditions" and "Disclaimer" appear in all copies, modifications and distributions. It is strictly forbidden to sell, rent, lease and/or lend this software for profit without prior consent from the Author. DISCLAIMER This software is provided by copyright owner "as is" and any express or implied warranties, including, but not limited to, the implied warranties of merchantability and fitness for a particular purpose are disclaimed. In no event shall the author and distributor be liable for any direct, indirect, incidental, special, exemplary, or consequential damages (including, but not limited to, procurement of substitute goods or services; loss of use, data, or profits; or business interruption) however caused and on any theory of liability, whether in contract, strict liability, or tort (including negligence or otherwise) arising in any way out of the use of this software, even if advised of the possibility of such damage. Fibar Group S.A. and their employees are not responsible for support of this QA. Please contact the author Sankotronic, on the Fibaro Forum, for any questions or support required. VERSION HISTORY 1.1 - first public release as open source. LOOK & FEEL Enjoy coding and your new Netatmo Indoor Air Care Monitor QA! Sankotronic -

Version 1.1
91 downloads
Netatmo Weather Station QA standalone v1.1 INTRODUCTION Netatmo Weather station QA brings complete integration of Netatmo weather station to HC3, HC3Lite and Yubii Home users including rain and wind gauges and support for more than one station. PREREQUISITES Fibaro HC3, HC3Lite or Yubii Home with firmware 5.150 or greater One or more Netatmo Weather station FEATURES Complete integration of Netatmo weather station with HC3, HC3Lite and Yubii Home including rain gauge and anemometer Only one QA is needed for any number of Netatmo Weather stations and their included modules. Support for Netatmo weather station main module without outdoor module included Support for maximum 3 additional indoor modules per station Smart update system that follows Netatmo weather station cloud updates Netatmo weather station measurements are shown on child devices added for each measurement of all stations and their modules found QA has built in multi-language support with 32 languages included. QA can use HC selected language or user can select any other available language. AVAILABLE DOWNLOAD Netatmo Weather station QA v1.1 Netatmo Weather station QA User manual v1.1 TERMS AND CONDITIONS Permission to use, copy, modify and distribute this software and its documentation for educational, research, personal use and non-profit purposes, without fee and without a signed licensing agreement is hereby granted, provided that the copyright notice, with "Terms and conditions" and "Disclaimer" appear in all copies, modifications and distributions. It is strictly forbidden to sell, rent, lease and/or lend this software for profit without prior consent from the Author. DISCLAIMER This software is provided by copyright owner "as is" and any express or implied warranties, including, but not limited to, the implied warranties of merchantability and fitness for a particular purpose are disclaimed. In no event shall the author and distributor be liable for any direct, indirect, incidental, special, exemplary, or consequential damages (including, but not limited to, procurement of substitute goods or services; loss of use, data, or profits; or business interruption) however caused and on any theory of liability, whether in contract, strict liability, or tort (including negligence or otherwise) arising in any way out of the use of this software, even if advised of the possibility of such damage. Fibar Group S.A. and their employees are not responsible for support of this QA. Please contact the author Sankotronic, on the Fibaro Forum, for any questions or support required. VERSION HISTORY 1.1 - first public release as open source. LOOK & FEEL Enjoy coding and your new Netatmo weather station QA! Sankotronic- 2 comments
-
- 4
-
-
- sankotronic
- netatmo
- (and 5 more)
-
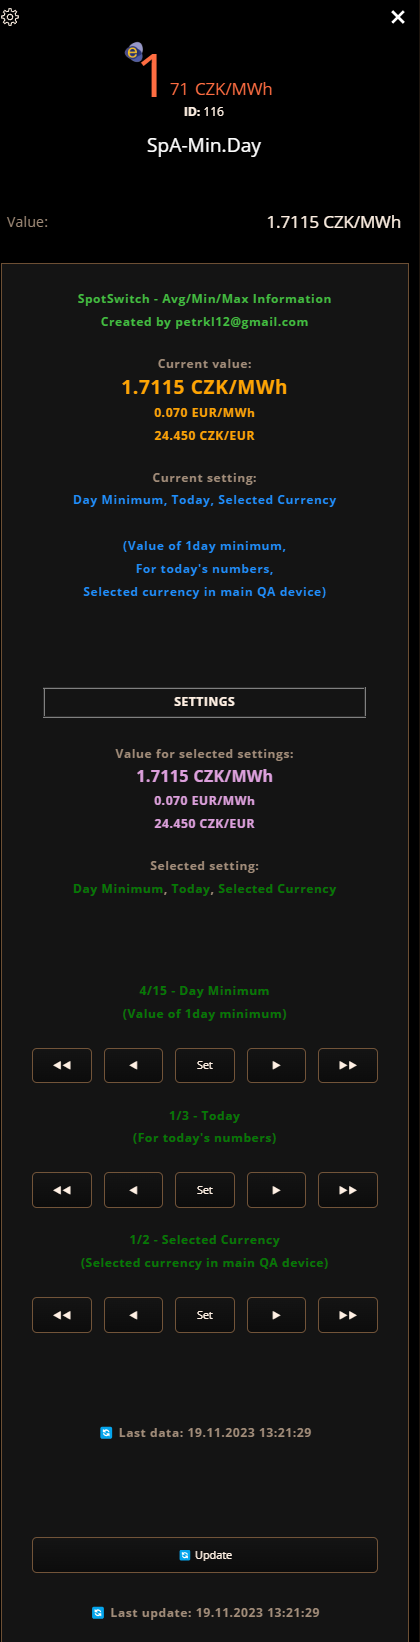
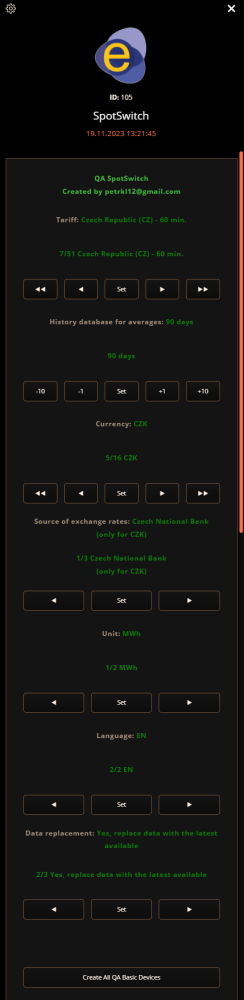
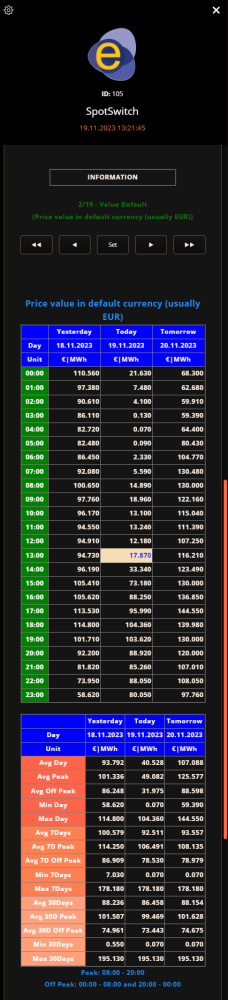
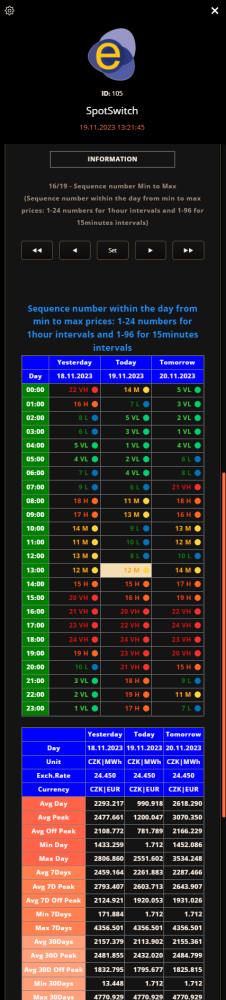
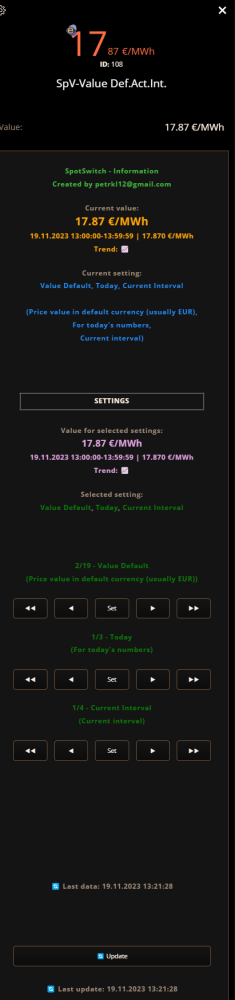
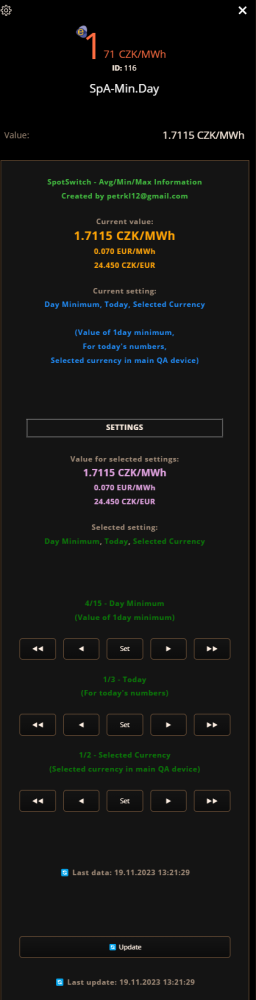
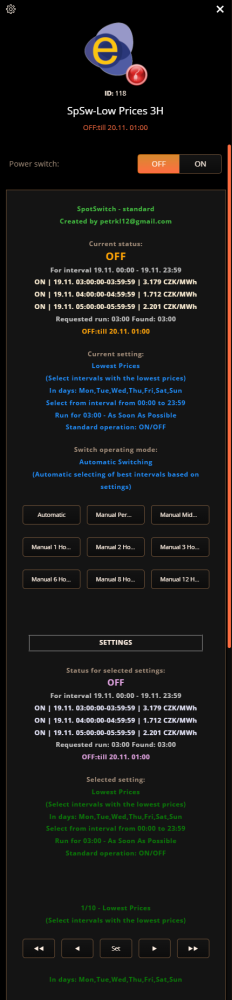
QA SpotSwitch - save your money with this QA QA loads data about spot electricity prices for a selected country (EU), can display them according to selected parameters, and can create switches for the lowest or highest prices in various intervals. It's possible to create any number of switches and informative child devices. Settings in child devices can be changed by the user and the impact of any changes can be immediately seen before saving of new settings. Source for electricity spot prices is Entsoe database. With SpotSwitch, you can control the most suitable times, for example, for charging an electric car, electric heating, heating hot water or selling electricity from solar panels. All my QAs have auto update mechanism so you don't need to any copy+paste exercise with source codes or button/label layouts including update of child devices! 30 days trial period - than you need license key: 50EUR via Paypal account https://paypal.me/petrkl12 For license key I need your HC3 (or HC3L or Yubii) serial number: HC3-xxxxxxxx Ideally include your device serial number and QA name in the payment note. QA: SpotSwitch.fqa Icons: In Main QA you can select: - Country Tariff for spot prices (60min or 15min intervals) from Entsoe - Currency - Language (currently: EN, CZ - for translators to other languages license will be free of charge) - Number of days in history for spot prices - Source of exchange rates (ExchangeRate.host - European Central Bank, Czech National Bank for CZK, Polish National Bank for PLN) - Unit (MWh or kWh) - Data replacement – how to replace data in case of unavailability (3 options: do not replace data, replace data with the latest available, replace date from the last same day in week) Instalation: 1. upload QA to Fibaro 2. select your country/language/currency/unit in main QA 3. press button Create All QA Basic Devices 4. you can create any number of child devices (Switches, Price Information, Averages/Min/Max) 5. detail settings can be done via user interface in child devices (6. select icon for main QA and all other information child devices will have same icon (after some time or restart QA), select icon for one switch and icons in other switches will be replaced after QA restart) There can be 3 types of child devices: 1. Informative devices about prices (SpV) 2. Informative devices about averages, minimums, and maximums for a given period (SpA) 3. Spot switch devices (SpSw) 1. Informative child devices about prices (SpV) - the following options can be combined: - Data for Today or Tomorrow or Yesterday - Current Interval - Next Interval - Exact time during day [HH:MM] - Selected hour during day in [HH] - Price value in selected currency in main QA device - Price value in default currency in downloaded data (usually EUR) - Rating against day average (VH - VeryHigh, H - High, M - Medium, L - Low, VL - VeryLow) - as in Fibaro main value can be only in numbers: 100=VeryHigh, 10=High, 1=Medium, -10=Low, -100=VeryLow - Rating against 7 days average (VH,H,M,L,VL) - Rating against 30 days average (VH,H,M,L,VL) - Rating against day min/max numbers (VL=Min,L,M,H,VH=Max) - Rating against 7 days min/max numbers (VL=Min,L,M,H,VH=Max) - Rating against 30 days min/max numbers (VL=Min,L,M,H,VH=Max) - Value against day average in percent (100%=Average) - Value against 7 days average in percent (100%=Average) - Value against 30 days average in percent (100%=Average) - Value against day min/max numbers in percent (0%=Min,100%=Max) - Value against 7 days min/max numbers in percent (0%=Min,100%=Max) - Value against 30 days min/max numbers in percent (0%=Min,100%=Max) - Fix day rating - 5hours very high (VH), 5hours high (H), 4hours medium (M), 5hours low (L), 5hours very low (VL) - Sequence number within the day from min to max prices: 1-24 numbers for 1hour intervals and 1-96 for 15minutes intervals - Sequence number within the day from max to min prices: 1-24 numbers for 1hour intervals and 1-96 for 15minutes intervals - Data availability for selected interval (Yes=1, No=0) - Value based on formula in QA child variable 2. Informative child devices about averages, minimums, and maximums for a given period (SpA) - the following options can be combined: - Data for Today or Tomorrow or Yesterday - Selected currency in main QA device - Default currency in downloaded data (usually EUR) - 1day average - 1day peak average (8:00-20:00) - 1day off peak average (0:00-8:00,20:00-24:00) - 1day minimum - 1day maximum - 7days average - 7days peak average (8:00-20:00) - 7days off peak average (0:00-8:00,20:00-24:00) - 7days minimum - 7days maximum - 30 days average - 30days peak average (8:00-20:00) - 30days off peak average (0:00-8:00,20:00-24:00) - 30days minimum - 30days maximum 3. Spot switch child devices (SpSw) - the following options can be combined: - Intervals with the lowest prices - Intervals with the highest prices - Continuous interval with the lowest prices - Continuous interval with the highest prices - Select intervals with prices less than zero - Select intervals with prices less than or equal to zero - Results based on formula in QA variables with lowest prices - Results based on formula in QA variables with highest prices - Results based on formula in QA variables with continuous interval with lowest prices - Results based on formula in QA variables with continuous interval with highest prices - Interval when switch should run – ie. from 00:00 to 23:59 - Days in week when switch should run – ie. Monday-Sunday - How long (maximum) switch should run in case of fulfilled all conditions ie. 4 hours and 35 minutes - If you prefer run As Soon As Possible or As Late As Possible (in case of same prices) - Standard operation ON/OFF or Reversed operation OFF/ON - Device can be temporarily or permanently switch off from automatic operation For advaced users: In formulas you can use following variables: price avgDay avgDayPeak avgDayOffPeak minDay maxDay avg7Days avg7DaysPeak avg7DaysOffPeak min7Days max7Days avg30Days avg30DaysPeak avg30DaysOffPeak min30Days max30Days exchRate units $DEVID:1025 (reads value from device number 1025) $DEVID:1025:value (reads value from device number 1025) $DEVID:545:state (reads state from device number 1025 - state False is 0, state True is 1) By default, all values are in MWh and in the original currency according to Entsoe (usually in EUR) Can be converted via the _EXCH and _UNIT expressions behind the given variable E.g. avgDay_EXCH_UNIT (converts the average daily price according to the current exchange rate and according to the selected unit (MWh or kWh) price_EXCH (converts the Price value to the selected currency according to the current exchange rate) price_UNIT (converts the Price value according to the selected unit) Example of expressions – in QA child variables - item Formula (Price-100)*$DEVID:545:state (when the switch id 545 is turned on (it has a value of 1) then 100 is subtracted from the current value in MWh and this value is displayed. If the switch is turned off, the value will always be 0, because we multiply 0) Example of expressions - for switches, there are items FormulaLeft, FormulaCompare and FormulaRight in QA child variables FormulaLeft, FormulaRight are expressions similar to the previous one, and FormulaCompare expresses how the expressions in FormulaLeft and FormulaRight should be compared, i.e. =,==, <, >, <=,=<, >=,=>, A separate number, e.g. 200, can also be used as a Formula, then it will be FormulaLeft: price FormulaCompare: <= FromulaRight: 200 I.e. evaluates to Price <= 200 - The condition will be met if the Price is less than or equal to 200 Other example of formula in QA child switch: Brackets, numbers, basic mathematical expressions + - * / and mathematical functions from the math library can be used In this way, you can practically create any combination for turning switches on and off, even outside the given scope 😊 for example, you can define that if the temperature in the room via $DEVID will be less than 23, then the switch will turn on 😊


-
- 6
-
-
- spotswitch
- entsoe
- (and 3 more)
-
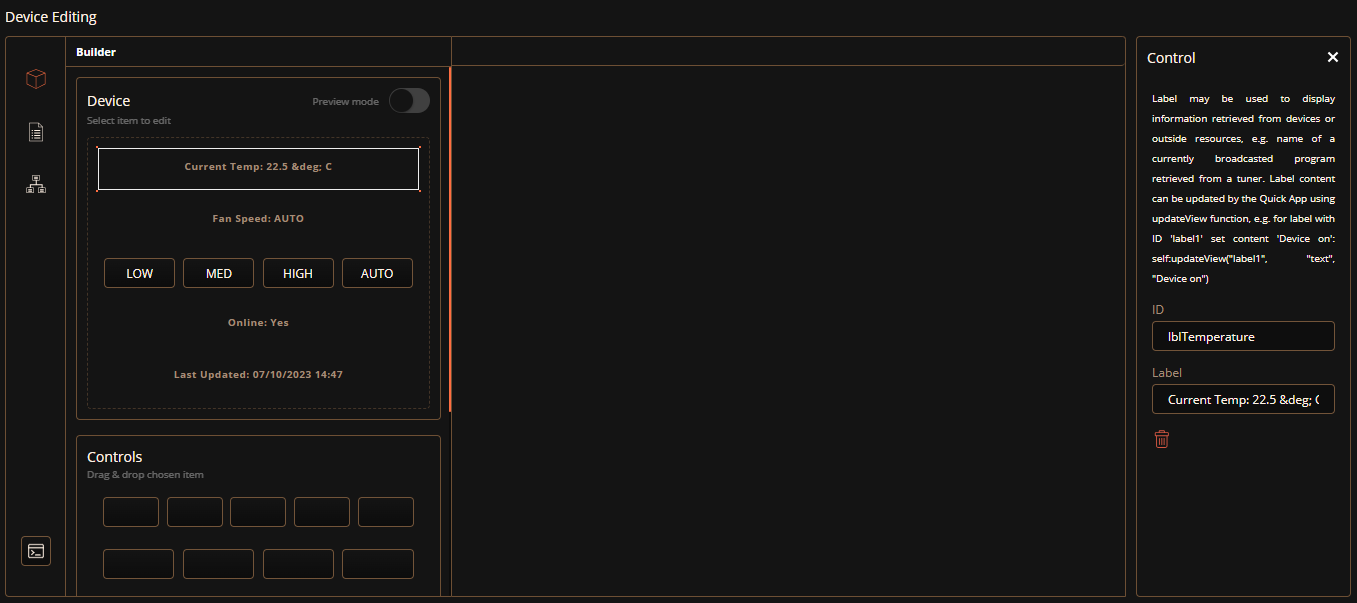
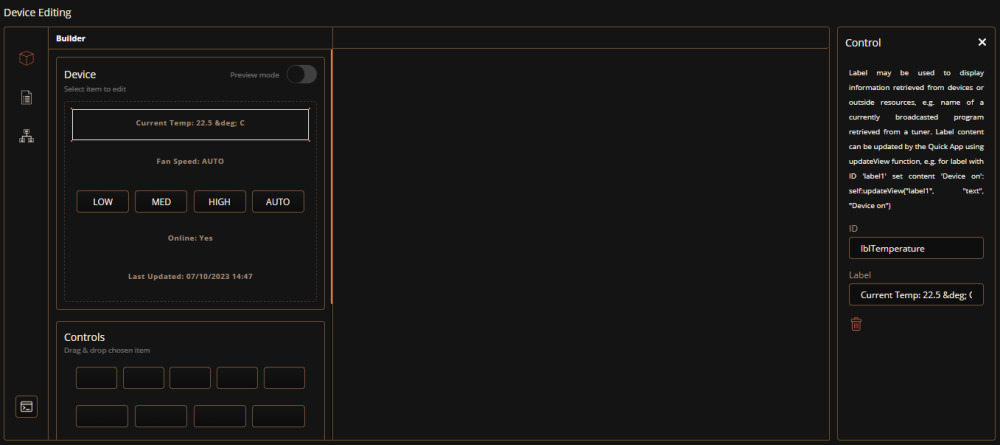
Hi everyone, So I have a Skaro automation bridge which connects my iZone HVAC system to my HC3. On the quickapp is a label representing the current temperature in the zone: I cannot seem to reference the lblTemperature value in LUA. I am actually trying to get the actual temperature into a global variable within a scene but cannot work out the syntax. I downloaded the device file under advanced to see if I can see any other references to lblTemperature but cannot see how it gets the value from the device. I assume it is part of the API. So for the scene action I just have local MST = hub.getValue(99, "lblTemperature") print(MST) where the QA device is 99 and the debug screen displays: [07.10.2023] [15:08:11] [DEBUG] [SCENE74]: nil I'd really appreciate any ideas you may have. Thanks. Anth
-
Here is a link to a set of QAs to control Shelly devices. https://www.smarthome.com.au/free-shelly-quick-apps-for-fibaro-home-center-3/ It's both gen 1 and gen 2 devices. Gen 2 devices are easier to integrate with the web socket API than the gen 1 where we need to poll the device with regular interval. Battery operated devices are in general a pain to support as they sleep and wake up now and then - which makes polling difficult. So, battery devices are not in focus The QAs support the basic features expected from a device of that QA type so they fit into the fibaro model of handling devices. Extra features like setting timers etc that Shelly support is better handled with the pretty good mobile/cloud Shelly app. There are a lot of devices that are potentially supported but not all have been tested. Please give us feedback here or in https://www.smarthome.com.au/free-shelly-quick-apps-for-fibaro-home-center-3/ so we can come out with an 1.1 update... (gen 1 Shelly 1 and Shelly 1PM have issues but will be fixed in next release) The suite contains 5+1 different QAs that each support different Shelly devices. The devices tested, and devices not tested but we expect they could work are: ShellyMultiDevice v1.0 com.fibaro.deviceController + child devices Supported Shelly devices: - Shelly 3EM (Gen1). Note: untested Children: - com.fibaro.binarySwitch - com.fibaro.energyMeter - com.fibaro.energyMeter - com.fibaro.energyMeter - Shelly EM (Gen1). Note: tested Children: - com.fibaro.binarySwitch - com.fibaro.energyMeter - com.fibaro.energyMeter - Shelly Plus 2PM (Switch) (Gen2). Note: tested Children: - com.fibaro.binarySwitch - com.fibaro.binarySwitch - Shelly Pro 2 (Gen2). Note: untested Children: - com.fibaro.binarySwitch - com.fibaro.binarySwitch - Shelly Pro 2M (Switch) (Gen2). Note: tested Children: - com.fibaro.binarySwitch - com.fibaro.binarySwitch - Shelly Pro 3 (Gen2). Note: tested Children: - com.fibaro.binarySwitch - com.fibaro.binarySwitch - com.fibaro.binarySwitch - Shelly Pro 4PM (Gen2). Note: tested Children: - com.fibaro.binarySwitch - com.fibaro.binarySwitch - com.fibaro.binarySwitch - com.fibaro.binarySwitch Supported HC3 QuickAppMethods: - <com.fibaro.binarySwitch>:turnOn() - <com.fibaro.binarySwitch>:turnOff() - <com.fibaro.binarySwitch>:toggle() ShellySingleColor v1.0 com.fibaro.colorController Supported Shelly devices: - Shelly Color Bulb (Gen1). Note: tested, only color mode for now - Shelly RGBW2 Color (Gen1). Note: tested Supported HC3 QuickAppMethods: - QuickApp:turnOn() - QuickApp:turnOff() - QuickApp:setValue(val) - QuickApp:setColor(r,g,b,w) - QuickApp:startLevelIncrease() - QuickApp:startLevelDecrease() - QuickApp:stopLevelChange() ShellySingleCover v1.0 com.fibaro.rollerShutter Supported Shelly devices: - Shelly Plus 2PM (Cover) (Gen2). Note: tested - Shelly Pro 2M (Cover) (Gen2). Note: tested Supported HC3 QuickAppMethods: - QuickApp:open() - QuickApp:close() - QuickApp:stop() - QuickApp:setValue(value) ShellySingleDimmer v1.0 com.fibaro.multilevelSwitch Supported Shelly devices: - Shelly Dimmer 1 (Gen1). Note: tested - Shelly Dimmer 2 (Gen1). Note: tested - Shelly Vintage (Gen1). Note: tested Supported HC3 QuickAppMethods: - QuickApp:turnOn() - QuickApp:turnOff() - QuickApp:setValue(val) - QuickApp:startLevelIncrease() - QuickApp:startLevelDecrease() - QuickApp:stopLevelChange() ShellySingleSwitch v1.0 com.fibaro.binarySwitch Supported Shelly devices: - Shelly 1 (Gen1). Note: untested - Shelly 1L (Gen1). Note: untested - Shelly 1PM (Gen1). Note: tested, not working yet...TBD - Shelly Plus 1 (Gen2). Note: tested - Shelly Plus 1 PM (Gen2). Note: tested - Shelly Plus Plug IT (Gen2). Note: untested - Shelly Plus Plug S (Gen2). Note: tested - Shelly Plus Plug UK (Gen2). Note: untested - Shelly Plus Plug US (Gen2). Note: untested - Shelly Pro 1 (Gen2). Note: tested - Shelly Pro 1 PM (Gen2). Note: tested Supported HC3 QuickAppMethods: - QuickApp:turnOn() - QuickApp:turnOff() - QuickApp:toggle() ShellyPlusHT v1.0 com.fibaro.temperatureSensor + com.fibaro.humiditySensor child Supported Shelly devices: - Shelly Plus H&T (Gen2). Note: tested, experimental, only wakes up when new data is available Children: - com.fibaro.temperatureSensor - com.fibaro.humiditySensor Supported HC3 QuickAppMethods:
-
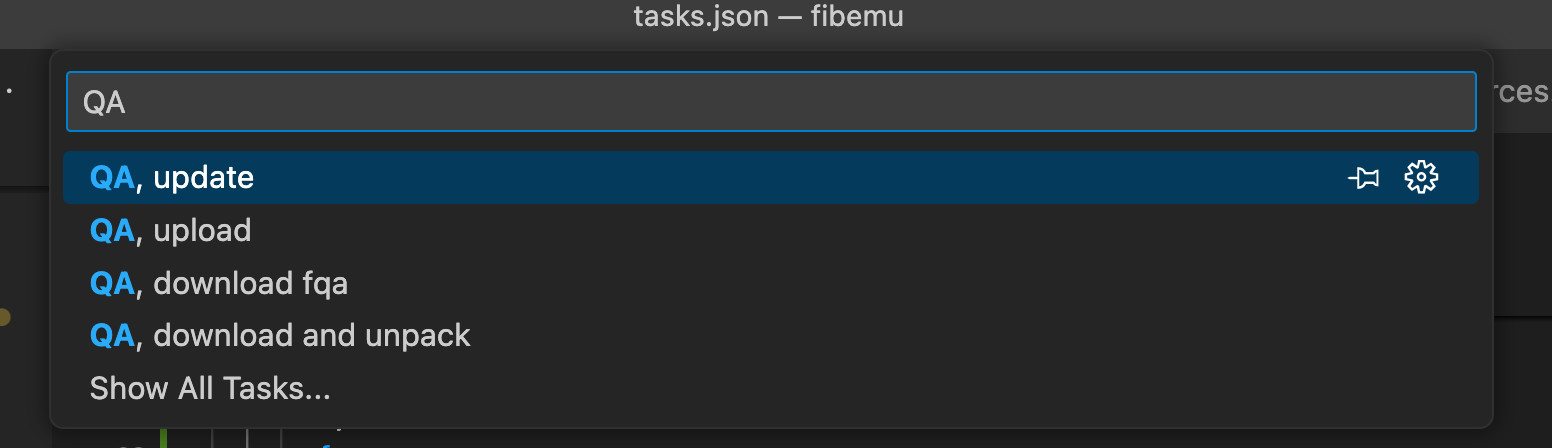
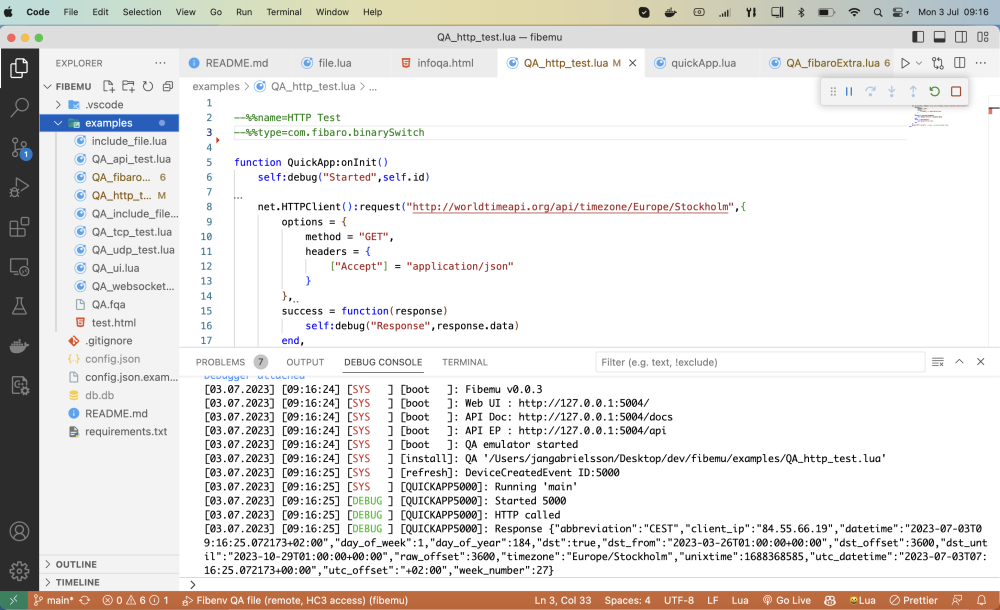
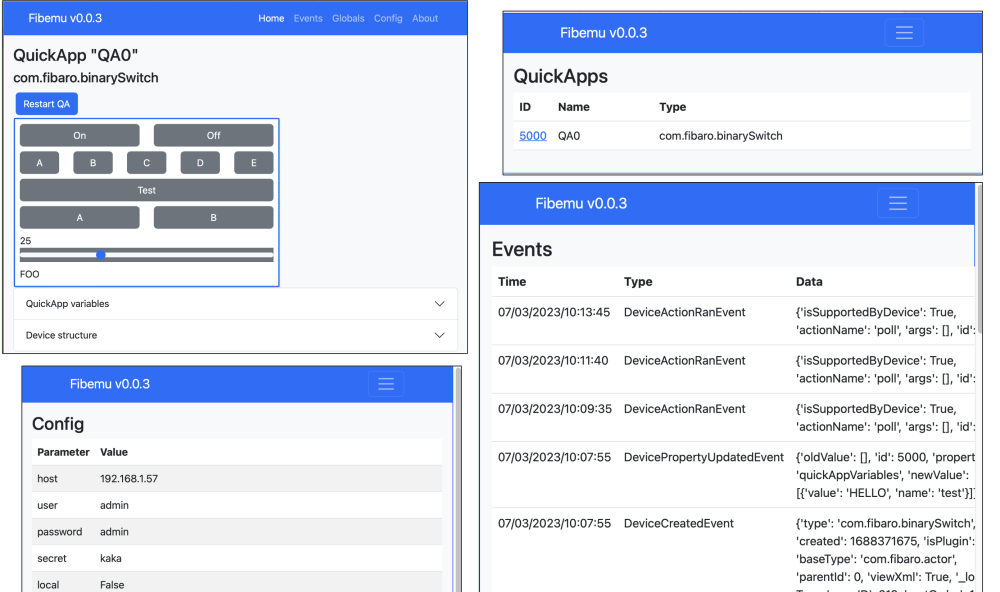
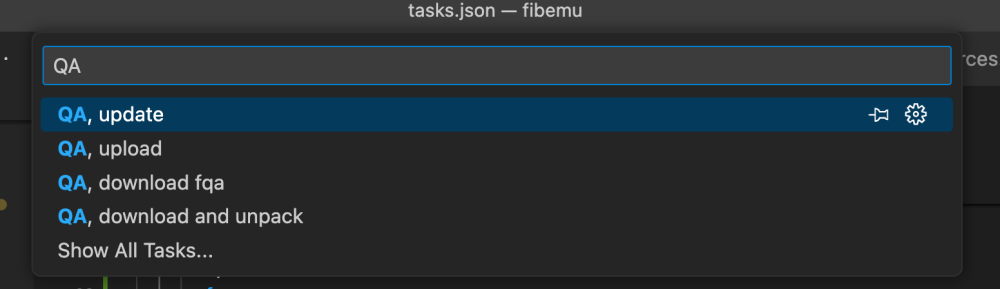
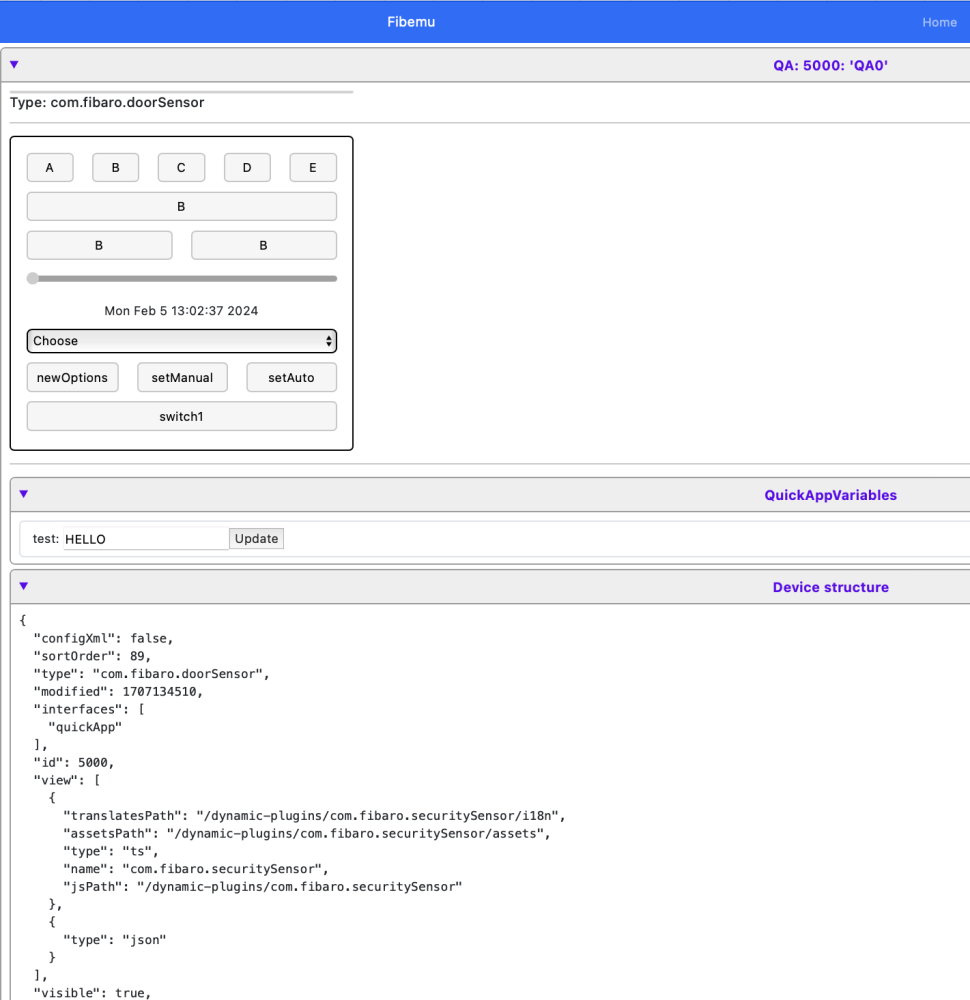
This setup is designed for QA development using Visual Studio Code (VSCode). It includes an emulator, allowing you to run and debug QAs directly in VSCode. This setup is compatible with HC3, offering features such as code completion, syntax highlighting, and workflow tasks for downloading, editing, packaging, and uploading QAs to/from HC3. Tested on Windows 11 and MacOS, this setup should also work on Linux. You can download the repository from here. Documentation, still in progress, is available here. Additionally, there's a video tutorial on installing this setup on Windows 11. The setup in VSCode looks as shown in the image. This configuration allows you to develop and run a QuickApp (QA) offline on your PC, Mac, or Linux system, and interact with the HC3 in a controlled manner. There's also a simple Web user interface for interacting with the QAs and monitoring events (available at http://127.0.0.1:5004/frontend) To get started: Install Python 3 on your machine. NOTE! Only Python v3.11 is supported currently (3.12 will come later). To test if the installation is ok , in the vscode terminal window, type >python3 ...and see if it starts the interpreter. Install the required Python libraries from requirements.txt using >pip install -r requirements.txt. Create a config.json file with credentials to access the HC3, based on the config.json.example. Install the VSCode extension "Local Lua Debugger" by Tom Blind. Create a QA file in the directory, choose the launcher "Fibenv QA file (remote)," and start debugging with F5. For more examples, refer to the files in the examples/ directory. The included .gitignore file excludes the ./dev and ./test subdirectories, allowing you to test your own code without affecting the rest of the repository. For installing Python libraries, it's recommended to create a virtual environment in the folder first. This setup includes a Python wrapper for the Lua runtime (Lupa), addressing dependencies on luasocket and others, eliminating the need for Lua installation on your machine. To instruct the emulator about the type of QA, directives similar to TQAE can be used in the QA file, but with slight differences, as shown in the example. Ex. --%%name=MyQA --%%type=com.fibaro.binarySwitch --%%file=qa3_1.lua,extra; --%%remote=devices:788,790 --%%remote=globalVariables:myVar,anotherVar --%%debug=libraryfiles:false,userfilefiles:false function QuickApp:onInit() self:debug(self.name,self.type,self.id) fibaro.call(788,"turnOn") end Note the --%%remote directive It instructs the emulator that it's ok to call device 788,789 o the HC3. As a default, the emulator treats all resources as local (we can read from HC3 but then treat them as local copies) and we enable resources we want to interact with on the HC3 as 'remote'. This goes for other resources also like 'globalVariables'. The setup integrates with the Lua debugger, allowing for breakpoint setting and more. Note that this project is still in progress, and updates will be provided as improvements are made. The emulator UI can be accessed at http://127.0.0.1:5004/, with a Swagger page for implemented APIs at http://127.0.0.1:5004/docs. The port (5004) can be changed as needed. Supported APIs include various fibaro and net functions, along with api calls and plugin functions. The setup also includes classes for QuickApp development and management. Supported APIs fibaro.debug(tag,str) fibaro.warning(tag,str) fibaro.trace(tag,str) fibaro.error(tag,str) fibaro.call(deviceID, actionName, ...) fibaro.getType(deviceID) fibaro.getValue(deviceID, propertyName) fibaro.getName(deviceID) fibaro.get(deviceID,propertyName) fibaro.getGlobalVariable(varName) fibaro.setGlobalVariable(varName ,value) fibaro.getRoomName(roomID) fibaro.getRoomID(deviceID) fibaro.getRoomNameByDeviceID(deviceID) fibaro.getSectionID(deviceID) fibaro.getIds(devices) fibaro.getAllDeviceIds() fibaro.getDevicesID(filter) fibaro.scene(action, sceneIDs) fibaro.profile(profile_id, action) fibaro.callGroupAction(action,args) fibaro.alert(alert_type, user_ids, notification_content) fibaro.alarm(partition_id, action) fibaro.setTimeout(ms, func) fibaro.clearTimeout(ref) fibaro.setInterval(ms, func) fibaro.clearInterval(ref) fibaro.emitCustomEvent(name) fibaro.wakeUpDeadDevice(deviceID) fibaro.sleep(ms) ...and corresponding hub.* functions net.HTTPClient() net.TCPSocket() net.UDPSocket() net.WebSocketClient() net.WebSocketClientTLS() --mqtt.Client.connect(uri, options) --no yet --<mqttclient>:addEventListener(message,handler) --no yet --<mqttclient>:subscribe(topic, options) --no yet --<mqttclient>:unsubscribe(topics, options) --no yet --<mqttclient>:publish(topic, payload, options) --no yet --<mqttclient>::disconnect(options) --no yet api.get(call) api.put(call <, data>) api.post(call <, data>) api.delete(call <, data>) setTimeout(func, ms) clearTimeout(ref) setInterval(func, ms) clearInterval(ref) json.encode(expr) json.decode(string) plugin.mainDeviceId ---plugin.deleteDevice(deviceId) --not yet plugin.restart(deviceId) plugin.getProperty(id,prop) plugin.getChildDevices(id) plugin.createChildDevice(prop) class QuickAppBase class QuickApp class QuickAppChild class RefreshStateSubscriber class <name> property(get,set) QuickApp:onInit() -- called at startup if defined QuickApp - self:setVariable(name,value) QuickApp - self:getVariable(name) QuickApp - self:debug(...) QuickApp - self:trace(...) QuickApp - self:warning(...) QuickApp - self:error(...) QuickApp - self:updateView(elm,type,value) QuickApp - self:updateProperty(name,value) QuickApp - self:createChildDevice(props,device) QuickApp - self:removeChildDevice(id) QuickApp - self:initChildDevices(table) QuickApp - self:isTypeOf(typ) QuickApp - self:callAction(name, ...) QuickApp - self:setName(name) QuickApp - self:setEnabled(bool) QuickApp - self:setVisible(bool) getHierarchy() For your own QA development have the repo 'fibemu' downloaded in a separate directory. Then create your own vscode development directory, and initialise that as a git repo if you want. With that open, do File->Add Folder to Workspace, and add the fibemu folder. This is what Vscode calls a "multi-root" workspace and it. Create a lua (QuickApp file) in your directory. First line in your QuickApp file should be the offset to your directory --%%root=../<name of your dir>/ So if you have a multi-root workspace now that looks like o fibemu o myDirectory You set the root to ../myDirectory/ Then press F5 to start to debug. The launch commands and other will be taken from the fibemu folder. This way you can pull down new version of fibemu without messing up your own directory and development. Also, don't forget to setup your config.json with credentials (copy from fibemu/config.json.example) Here is a link to the multi-project setup instructions (may include a video in the future) Implementation Some implementation notes. Supported REST APIs. Workflow There are some defined vscode Tasks that help in remotely uploading and updating the QA on the HC3 from within the vscode environment "QA, download fqa" downloads an QA from the HC3 and saves it as a .fqa file. The task will prompt for deviceID and path where to store. The path/dir needs to exist "QA, download and unpack" downloads an QA from the HC3 and saves all QA files as .lua files. It also adds fibemu headers in the main file so it can be opened and run with the emulator . The task will prompt for deviceId and path where to store. The path/dir needs to exist "QA, upload" will upload the QA to the HC3. It will prompt for QA file. If '.' is given as argument it will upload the current opened file. This will create a new QA, with a new deviceId on the HC3. "QA, update" will try to update QA files, viewLayout, uiCallbacks, and quickAppVariables of an existing QA on the HC3. If '.' is given as argument the file must have set the fibemu header --%%id=<ID> so it knows what QA to update. One can also give the deviceId of the QA on the HC3 that should be updated. This is convenient when developing and avoiding new IDs being "consumed". Sometimes when you update a QA you would not like to update the quickAppVariables. In that case give '-' instead '.' for the current opened file, or -deviceId for an exiting QA on the HC3. Scripts An advantage with the emulator is that we have access to more lua functions than on the HC3 which allow us to write some maintenance scripts QA backup. Backs up QAs from the HC3 to a local directory, keeping the 3 last versions QA distribution. Packs a development file to a .fqa, initialises some quickAppVariables, adds readme.txt file and zips it to an archive. Known issues While the QA is running, break-points can't be added. This is a limitation of the debugger used. Just add the break-point and restart the QA. When the emulator crashes, it may leave a process open that keeps the port 5004 in use. The emulator will complain at restart that the port is already bound. You may need to manually kill the process. On Mac: >kill -9 $(lsof -ti:5004)
- 287 replies
-
- 7
-
-
-
- visual studio code
- quickapp
- (and 3 more)
-

Detect KeyID and/or keyAttribute in a QA Loop from a device
Apax posted a question in Scenes and Interface
Hi All! I have created a loop in a QA and need to detect if a button (from a 8-button device, Scene Master - ZRC-90 - Remotec) has been singleclick or dubbleclick and which one Normaly I simple use this: { conditions = { { id = 162, isTrigger = true, operator = "anyValue", property = "centralSceneEvent", type = "device" } }, operator = "any" } local trigger = sourceTrigger if (trigger.value.keyId==1 and trigger.value.keyAttribute=="Pressed" ) But in this case we do not have this device as a "sourceTrigger" I have tried diffrent ways but can not get it to work function QuickApp:loop(KeyCodeQA) local trigger = hub.getValue(162, "value") if (trigger.keyId==1 and trigger.keyAttribute=="Pressed" ) end -
HomeWizard Wi-Fi Water Meter Quick App for HC3 The HomeWizard Water Meter gives you live insight into your water consumption. It reads your analog water meter. With the supplied adapter you can place the water meter on most existing Itron, Elster or Sensus analog water meters within 2 minutes. I got a lot of questions if I would create a Quick App for the HomeWizard Wi-Fi Water Meter. So I decided to build it, despite not owning the device. The Quick App reads the total and active water usage and it calculates the daily usage: Feel free to test and post your findings in this topic. Download You can download the beta Quick App v1.0b1 release from my GitHub repository (direct link to Wi-Fi_Water_Meter_v1.0b1.zip). If it's out of beta I'll upload it to the FIBARO Marketplace. You can download the Wi-Fi Water Meter from the FIBARO Marketplace.

-
I have started to code a Hue QA that uses the new V2 api. It's still early beta... (v0.11) It's available via the QAUpdater QA. The QA is a standalone QA that keeps an updated state of the Hue resources and accept commands to change them - like turning on/off lights. It only provides an API (fibaro.call, fibaro.getValue) and no QuickAppChild devices (the latter can be built relatively easy built using HueConnector...) To use the QA you create a your own client QA that calls the HueConnector QA. Example client: local devices = { "9222ea53-37a6-4ac0-b57d-74bca1cfa23f", -- Sensor "3ab27084-d02f-44b9-bd56-70ea41163cb6", -- Tim "a007e50b-0bdd-4e48-bee0-97636d57285a", -- Switch } function QuickApp:hueInited() local function printf(...) print(string.format(...)) end -- local map = self.hue.getRsrc("deviceMap") -- Setup custom mapping from room+name to Hue ID. -- for id,info in pairs(map) do -- local name = ((info.room and (info.room.."_") or "")..info.name):gsub("[%-%s]","_") -- self.hue.idMap[name]=id -- print(name,"=>",id) -- end print(("-"):rep(40)) print("Mapping table:") -- Print out default mapping for name,id in pairs(self.hue.idMap) do printf("'%s' => '%s'",name,id) end print(("-"):rep(40)) self.hue.subscribeTo(devices) self.hue.listSubscribedDevices() self.hue.listAllDevices() -- setTimeout(function() fibaro.call("3ab27084-d02f-44b9-bd56-70ea41163cb6","setColor","white") end, 0) -- setTimeout(function() fibaro.call("3ab27084-d02f-44b9-bd56-70ea41163cb6","turnOff") end, 0) -- setTimeout(function() fibaro.call("3ab27084-d02f-44b9-bd56-70ea41163cb6","turnOn") end, 3000) -- setTimeout(function() fibaro.call("3ab27084-d02f-44b9-bd56-70ea41163cb6","turnOff") end, 5000) -- setTimeout(function() fibaro.call("3ab27084-d02f-44b9-bd56-70ea41163cb6","turnOn") end, 7000) -- setTimeout(function() fibaro.call("3ab27084-d02f-44b9-bd56-70ea41163cb6","setDim",0,4000) end, 10000) -- setTimeout(function() fibaro.call("3ab27084-d02f-44b9-bd56-70ea41163cb6","setDim",100,4000) end, 15000) -- setTimeout(function() fibaro.call("Guest_room_Tim","setColor","green") end, 17000) -- setTimeout(function() print(fibaro.get("3ab27084-d02f-44b9-bd56-70ea41163cb6","on")) end, 19000) end function QuickApp:hueEvent(id,event) self:debug("Event:",uid," ",json.encode(event)) end function QuickApp:onInit() self:debug(self.name, self.id) self:setupUpHue() end This example uses 3 Hue devices, a motion/lux/temp sensor, a light (Tim), and a switch. The QA supports devices, rooms, zones and scenes. We can send command to the Hue light with fibaro.call. Note that the id is the Hue uid and not a device number. When a device changes state there is a callback to QuickApp:hueEvent with the uid and the event. There is a deviceMap (more about that later) accessible with self.hue.getRsrc("deviceMap") that maps Hue ids to the various properties of the device/resource. In particular, name and room. This allows us to build a map from our own IDs to hue ids as they may be easier to deal with. In the example above we map the light "3ab27084-d02f-44b9-bd56-70ea41163cb6" that has the name "Tim" and room "Guest room" to "Guest_room_Tim"="3ab27084-d02f-44b9-bd56-70ea41163cb6" in the self.hue.deviceMap[] table. That table is used by fibaro.call so if the id is in the self.hue.deviceMap table it will use that mapping. This allows us to call fibaro.call("Guest_room_Tim","setColor","green") in our example. but it also works with fibaro.call("3ab27084-d02f-44b9-bd56-70ea41163cb6","setColor","green") Only lights, rooms, zones and scenes can take commands: fibaro.call(uid,"turnOn"[,transition]) -- transition in ms. fibaro.call(uid,"turnOff"[,transition]) -- transition in ms. fibaro.call(uid,"toggle"[,transition]) -- transition in ms. fibaro.call(uid,"setDim",value[,transition])). -- value 0-100, transition in ms. fibaro.call(uid,"setTemperature",value[,transition]) -- value in mirek fibaro.call(uid,"setColor",<string> | {x=x, y=y} | {r=r,g=g,b=b}[,transition]) -- color string, ex "green" or x,y float values. (RGB support tbd) fibaro.call(uid,"recall"[,transition]) -- Recall scene for scene with uid. fibaro.call(uid,"sendRaw",<table>) -- POST raw command to Hue device with uid Sensor properties motion -- true/false temperature -- temperature light -- lux status -- connected/reachable power_state -- battery Buttons/switches properties button -- button pressed status -- connected/reachable power_state -- battery Lights properties on -- true/false dimming -- 0-100 color_temperature -- mirek color -- x,y status -- connected/reachable To use this there is a small Hue client library that needs to be included in the QA On top of this it would be relatively easy to create ex. childDevices for each device etc. So, there is some setup that needs be done for the HueConnector QA too. There are quickApp variables with "Hue_IP" and "Hue_User". The latter is the api key you get from the hub. You can dump the current devices, rooms, zones and scenes (the resources we can work with) When I log my resources looks like [12.08.2022] [10:02:42] [DEBUG] [QUICKAPP1001]: ['1c10e485-e52b-4144-9991-46dbb2eedafa'] = { type='device', name='Middle window', model='LCT012', room='Living room', }, [12.08.2022] [10:02:42] [DEBUG] [QUICKAPP1001]: ['21fc2e2f-05e6-4fbd-ad3b-a12762c88e72'] = { type='device', name='Hue white lamp 1', model='LWA001', room='Guest room', }, [12.08.2022] [10:02:42] [DEBUG] [QUICKAPP1001]: ['2219eadd-9464-4149-b52d-073ed1d9754a'] = { type='device', name='Köksö2', model='LCG002', room='Köksö', }, [12.08.2022] [10:02:42] [DEBUG] [QUICKAPP1001]: ['2d7bfac8-688b-4889-b813-b927e875b533'] = { type='device', name='Star right', model='LCT012', room='Guest room', }, [12.08.2022] [10:02:42] [DEBUG] [QUICKAPP1001]: ['3ab27084-d02f-44b9-bd56-70ea41163cb6'] = { type='device', name='Tim', model='LCT015', room='Guest room', }, [12.08.2022] [10:02:42] [DEBUG] [QUICKAPP1001]: ['429ee799-9b86-43e5-bf31-ce3d06b45cc7'] = { type='device', name='Roof3', model='LCT012', room='Hall', }, [12.08.2022] [10:02:42] [DEBUG] [QUICKAPP1001]: ['598e4796-be01-482f-99c1-92f95fa8a18c'] = { type='device', name='Roof2', model='LCT012', room='Hall', }, [12.08.2022] [10:02:42] [DEBUG] [QUICKAPP1001]: ['59cbfb37-eba9-4746-9e64-ded409857abc'] = { type='device', name='Left window', model='LCT012', room='Living room', }, [12.08.2022] [10:02:42] [DEBUG] [QUICKAPP1001]: ['5ddcb36b-f985-4876-88b6-a238c58b9dbf'] = { type='device', name='Star left', model='LCT012', room='Guest room', }, [12.08.2022] [10:02:42] [DEBUG] [QUICKAPP1001]: ['721e69c5-bc75-4e99-b3ea-c05038ffa1af'] = { type='device', name='Star middle', model='LCT012', room='Guest room', }, [12.08.2022] [10:02:42] [DEBUG] [QUICKAPP1001]: ['8a453c82-0072-4223-9c42-f395b5cb0c40'] = { type='device', name='Hue smart plug 1', model='LOM007', room='Guest room', }, [12.08.2022] [10:02:42] [DEBUG] [QUICKAPP1001]: ['8dddf049-0a73-44e2-8fdd-e3c2310c1bb1'] = { type='device', name='Roof1', model='LCT012', room='Hall', }, [12.08.2022] [10:02:42] [DEBUG] [QUICKAPP1001]: ['9222ea53-37a6-4ac0-b57d-74bca1cfa23f'] = { type='device', name='Living room sensor', model='SML001', }, [12.08.2022] [10:02:42] [DEBUG] [QUICKAPP1001]: ['932bd43b-d8cd-44bc-b8bd-daaf72ae6f82'] = { type='device', name='Living room wall switch', model='RDM001', }, [12.08.2022] [10:02:42] [DEBUG] [QUICKAPP1001]: ['93d49902-6ce5-4383-9037-bfaeec8cd538'] = { type='device', name='Right window', model='LWO003', room='Living room', }, [12.08.2022] [10:02:42] [DEBUG] [QUICKAPP1001]: ['9be444b2-1587-4fbe-89ac-efb809d7e629'] = { type='device', name='Roof lamp', model='LCT015', room='Bedroom', }, [12.08.2022] [10:02:42] [DEBUG] [QUICKAPP1001]: ['a001f510-48dd-47fc-b9ff-f779c40dd693'] = { type='device', name='Table1', model='LCA001', room='Living room', }, [12.08.2022] [10:02:42] [DEBUG] [QUICKAPP1001]: ['a007e50b-0bdd-4e48-bee0-97636d57285a'] = { type='device', name='Dimmer switch', model='RWL021', }, [12.08.2022] [10:02:42] [DEBUG] [QUICKAPP1001]: ['a2b30b76-f044-46b6-9e1c-c8156baf00ab'] = { type='device', name='Table2', model='LCA001', room='Living room', }, [12.08.2022] [10:02:42] [DEBUG] [QUICKAPP1001]: ['c4bef7c5-0173-4d57-ae6a-d7f8a14b4dde'] = { type='device', name='Roof5', model='LCT012', room='Hall', }, [12.08.2022] [10:02:42] [DEBUG] [QUICKAPP1001]: ['d3b04b72-c2f0-401f-85d7-a65f2db5c48e'] = { type='device', name='Roof4', model='LCT012', room='Hall', }, [12.08.2022] [10:02:42] [DEBUG] [QUICKAPP1001]: ['e82c2285-20f3-401f-9621-9dc356feb694'] = { type='device', name='Köksö1', model='LCG002', room='Köksö', }, [12.08.2022] [10:02:42] [DEBUG] [QUICKAPP1001]: ['f2a231b4-9c27-466f-8344-05c4012c742b'] = { type='device', name='Philips hue', model='BSB002', }, [12.08.2022] [10:02:42] [DEBUG] [QUICKAPP1001]: ['795959f5-9313-4aae-b930-b178b48249e0'] = { type='room', name='Guest room', model='bedroom', }, [12.08.2022] [10:02:42] [DEBUG] [QUICKAPP1001]: ['9ab242fb-fae1-47e5-a54f-51bb8e80ac31'] = { type='room', name='Köksö', model='kitchen', }, [12.08.2022] [10:02:42] [DEBUG] [QUICKAPP1001]: ['bbe472e6-8ea8-477b-a116-ca345452e056'] = { type='room', name='Hall', model='living_room', }, [12.08.2022] [10:02:42] [DEBUG] [QUICKAPP1001]: ['bcd3daec-82a9-4de7-813a-3464beee0090'] = { type='room', name='Living room', model='living_room', }, [12.08.2022] [10:02:42] [DEBUG] [QUICKAPP1001]: ['cc309f30-d0f4-4ab5-a31f-39cd2206be57'] = { type='room', name='Bedroom', model='bedroom', }, [12.08.2022] [10:02:42] [DEBUG] [QUICKAPP1001]: ['03541e04-3481-47e7-ad22-c167437ca905'] = { type='scene', name='Bright', model='unknown', room='Kitchen table', }, [12.08.2022] [10:02:42] [DEBUG] [QUICKAPP1001]: ['29d8ba67-980a-4ab9-9fa6-50a0f994b273'] = { type='scene', name='Bright', model='unknown', room='Window lights', }, [12.08.2022] [10:02:42] [DEBUG] [QUICKAPP1001]: ['dd2cef77-e4fb-455b-867f-bad85f8f846c'] = { type='scene', name='Miami', model='unknown', room='Guest room', }, [12.08.2022] [10:02:42] [DEBUG] [QUICKAPP1001]: ['f1677f3f-db72-45b2-a922-97046cdbff9d'] = { type='scene', name='Bright', model='unknown', room='Guest room', }, [12.08.2022] [10:02:42] [DEBUG] [QUICKAPP1001]: ['39e1fc25-e926-42e5-a840-b2d21aaa08f3'] = { type='zone', name='Stars', model='recreation', }, [12.08.2022] [10:02:42] [DEBUG] [QUICKAPP1001]: ['79e44c37-15e0-4d93-8d89-230b14822270'] = { type='zone', name='Gymet', model='gym', }, [12.08.2022] [10:02:42] [DEBUG] [QUICKAPP1001]: ['9bfda4bf-b17e-4ec9-9123-a97afbcca814'] = { type='zone', name='Window lights', model='recreation', }, [12.08.2022] [10:02:42] [DEBUG] [QUICKAPP1001]: ['b5f12b5f-20c7-47a5-8535-c7a20fb9e66d'] = { type='zone', name='Kitchen island', model='kitchen', }, [12.08.2022] [10:02:42] [DEBUG] [QUICKAPP1001]: ['fe101c36-3dcc-4831-90f1-5052fc54e08b'] = { type='zone', name='Kitchen table', model='kitchen', }, That table is the one used when creating a custom mapping between names and Hue uids There will be improvements in the coming week and also hoping the V2 API will mature a bit more. There are some speed improvements that I know about that will improve the QA significantly...
- 43 replies
-
- 8
-
-
-
- qa
- development
- (and 1 more)
-
Anyone that can give some assistance with coding WebSockets in a QA?? Trying to build a really simple QA to collect data from my “Tibber Pulse”. The intention is to capture live energy consumption and put the code in a Energy Meter QA. In the Tibber iPhone app I get updated values every 10’s second from my Tibber Pulse and to get similar in a Fibaro HC3 QA would be ideal. Have never worked with WebSockets in the past so have no clue to how to do this…. But as a general concept it looks doable, but my attempt so far have only failed. General simple idea is to create a QA (Energy Meter type) with WebSocket code that listens to data from my “Tibber Pulse” and simply store the data received to the QA with self:updateProperty("value", TibberDataRecieved). There are some information in regards to WebSockets on the Tibber development pages: https://developer.tibber.com/docs/guides/graphql-concepts https://developer.tibber.com/docs/guides/calling-api Subscriptions GraphQL Subscriptions is the mechanism that is used for streaming data. It is basically a layer built on top of standard web sockets. A client starts a subscription by issuing a subscription query: subscription{ liveMeasurement(homeId:"c70dcbe5-4485-4821-933d-a8a86452737b"){ timestamp power accumulatedConsumption accumulatedCost currency minPower averagePower maxPower } } The server will then push results conforming to this query over the socket that is kept open between client and server. GraphQL Subscriptions Endpoint wss://api.tibber.com/v1-beta/gql/subscriptions Subscribing to data While queries and mutations are typically handled over HTTP some data are better suited to handled as streams over a persistent connection (web socket). Subscriptions follows the same semantics as queries and mutations - the shape of what is returned/sent from the server is determined by the client when invoking the api: subscription{ liveMeasurement(homeId:"c70dcbe5-4485-4821-933d-a8a86452737b"){ timestamp power accumulatedConsumption accumulatedCost currency minPower averagePower maxPower } } Since subscriptions are handled over web sockets they can be a bit more challenging to handle from the client’s perspective. Many GraphQL client libraries provide good abstractions for this though. Note that the maximum number of open websockets is limited to two. Streaming live data from Tibber Pulse Python example to get live streaming data from your Tibber Pulse over GraphQl. This also works for any other type of smart energy meter supported by Tibber, such as Watty. Requires ‘Python GraphQL Client’ package: pip install python-graphql-client from python_graphql_client import GraphqlClient import asyncio def print_handle(data): print(data["data"]["liveMeasurement"]["timestamp"]+" "+str(data["data"]["liveMeasurement"]["power"])) client = GraphqlClient(endpoint="wss://api.tibber.com/v1-beta/gql/subscriptions") query = """ subscription{ liveMeasurement(homeId:"c70dcbe5-4485-4821-933d-a8a86452737b"){ timestamp power } } """ asyncio.run(client.subscribe(query=query, headers={'Authorization': "476c477d8a039529478ebd690d35ddd80e3308ffc49b59c65b142321aee963a4"}, handle=print_handle)) Tibber GraphiQL example from (https://developer.tibber.com/explorer) subscription{ liveMeasurement(homeId:"cc83e83e-8cbf-4595-9bf7-c3cf192f7d9c"){ timestamp power accumulatedConsumption accumulatedCost currency minPower averagePower maxPower } }
-
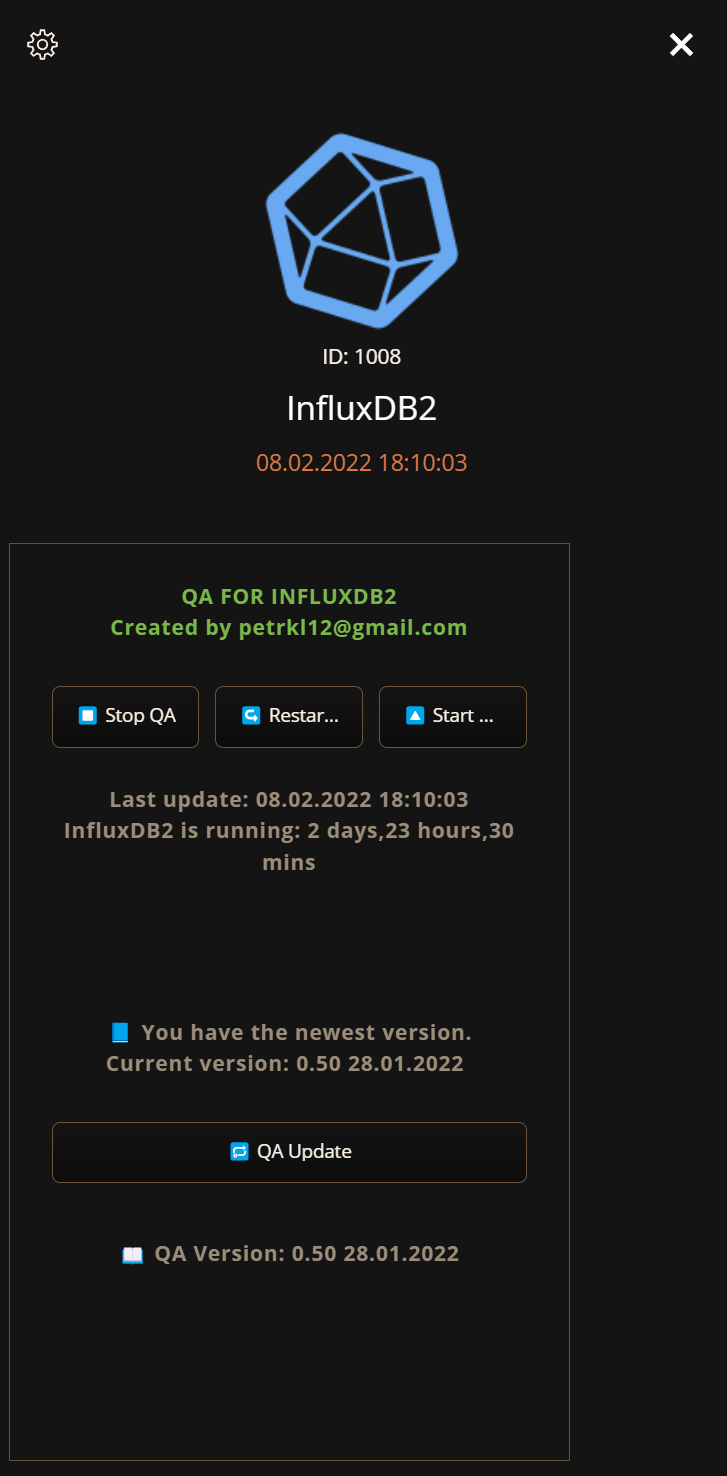
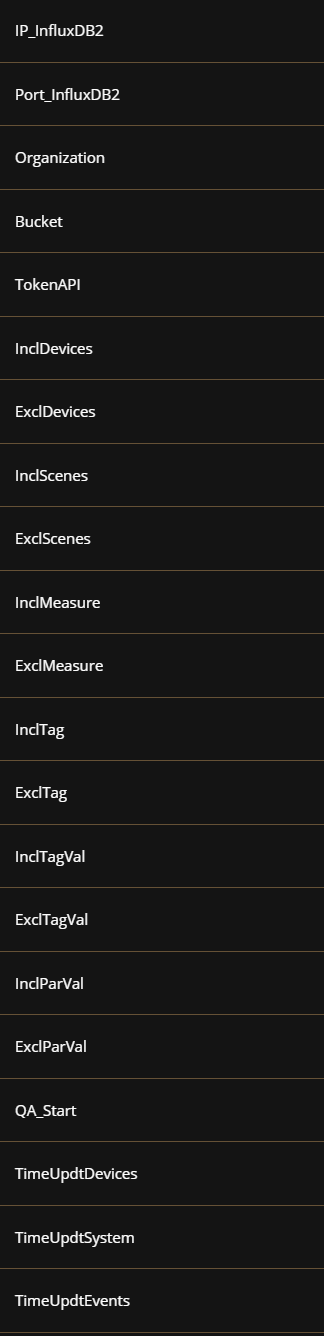
QA for regular exporting data from HC3 to InfluxDB 2.x 30 days trial period - than you need license key: 30EUR via Paypal account https://paypal.me/petrkl12 For license key I need your HC3 (or HC3L or Yubii) serial number: HC3-xxxxxxxx Ideally include your device serial number and QA name in the payment note. QA is sending data based on events and also in regular intervals from HC3/HCL/Yubii to InluxDB 2.x. It generates data to Influx with minimum delay. There is data about HC3 system (cpu,ram), info about scenes (start, stop), geofence events and a lot of details about devices. In QA variables there is possibility to define include/exclude measurements/IDs/… (default all data are sent to Influx) QA: InfluxDB2.fqa Icon: QA variables - you have to setup - IP_InfluxDB2 ie. 192.168.1.111 (or server/database address without https:// or http:// ) Port_InfluxDB2 ie. 8086 (for cloud database usually 443) HttpType ie. http (defaul value http, for cloud usually https) Organization ie. YourOrganizationFromInfluxDB2 Bucket ie. YourBucketFromInfluxDB2 TokenAPI ie. YourTokenAPIFromInfluxDB2


-
Hello, Does anyone have and would like to share a QA that would work as an alarm clock (turn on a specific device or scene at a set time and day of the week, from the interface and application)?
-
 Hi when I add the powerview QA from fibaro HC3 (the built in one) it grabs my scenes from powerview and all is good. I can activate the scenes in "preview" and via lua. But.. the next day.. they don't work anymore.. I can then remove the QA and readd it.. then everything works again. Does anyone outthere use the powerview QA? have same experience? found a solution? Right now my only idea is that because I had automations running natively in powerview they ..for some reason.. break the link.. so after an automation has run in powerview.. something happens. I've now turned off my automations in powerview app and created a simple lua script to close the curtains tonight 30 minutes after sunset. tomorrow we'll see if they still work.
 -
Hi all ! I would like to update another QA's label. In this case, it's QA with ID 95 and the label is called Doors. Does anyone know if this is possible and what that code might look like. function QuickApp:onInit() self:debug("QuickApp:OnInit") self:updateView("Doors open", "text", Doors) -- would like to update QA ID 95 end
-
Hello, I have an empty QA device (temperature device). What's the easiest way to set the value (temperature) using HTTP call (from outside HC3) to the API? Or do I need to provide some method in QA that i.e. the `callAction` REST API will use? I'd prefer to have empty QA and do everything via REST API.
-
Hi all I am really fan of the Fibaro marked - and i im thinking of an extra option. There are so few products working out of the box with Fibaro HC3 I would like to have integration for these products - and NO mittleware - and i have no problem paying for a working integration For my the fun is doing the automations and not the integrations. I guess there is other people like me that dont have all the time in the world just for creating integrations - and i can also see that several people have coding skills that would take me years to reach. What should it cost? I miss a place to trade with integration. Where people can request and - people having the time, energy and skills can do the programming. Roth Touchline - underfloor heating iRobot Nilan Velux KLF200 siemens home connect
-
Hi there! I am messing around with MQTT for integration with a third party device (Logic Machine 5) that has MQTT broker built in. I have successefully connected a QA with MQTT and it commands a KNX group address just fine. But, when I add a different QA to control another group address, subscibing a different topic of course, it behaves a bit strange. When I edit the QA (I endup triggering it's OnInit function) it is normal and keeps working on the home menu but, the other QA I created before stops working. Then, if I go to edit the other QA (OnInit debug message comes in the console), this one takes the place of the previous QA, starts to work, but then the previous QA that was working stops responding. I see a pattern here, that tells me the OnInit function of each device is not called at system startup (I rebooted to check). Wouldn't it be best to create a scene at startup that could subscribe all the topics at the broker? About that... is there anyone that can tell me how to use MQTT on scenes, instead of only on QA's? Thanks in advance!
-

fibaro.call can't sent a class object to another QuickDevice
NLWaard posted a question in Home Center 3
Locally I can place the current class (self) in a variable and call an Object in this class. This code is working (localy): function QuickApp:onInit() local sender = {value='Yes', class=self} sender.class:localPrintValue(sender.value) end function QuickApp:localPrintValue(value) if value == nil then value = 'No' end self:debug('Can I print this : '..value) end [15.09.2020] [13:22:42] [DEBUG] [QUICKAPP105]: Can I print this : Yes If I send this variable to another class using fibaro.call(id, 'action', variable) , the call disappears into the darkness. Calling the Object in the other class(QuickApp) results in calling the nil value? !!! This next code is (because of the class=self) not working: fibaro.call(qaID,"updateMyProperty", {value=newValue, class=self}) function QuickApp:updateMyProperty (sender) local value = 0 if type(sender) == 'table' then -- Call comes from elsewhere.. value = sender.value self:debug('Device updated from: '..tostring(sender.class.id)..'.'..tostring(sender.class.name)..' with value: '..tostring(value)) else value = sender self:debug('local call, with value: '..tostring(value)) end end This is a pity because I would like to indicate in the called class where the call was coming from. Now I solve this by sending a table with : sender = {id=self.id, name=self.name, value=newValue}. Do I do something wrong? or has Fibaro disabled the oop function for sending object classes? -
Is it possible to create a child QA on an existing Fibaro device?
NLWaard posted a question in Home Center 3
Is it possible to create a child QuickApp of which the parent is an existing Fibaro device? What I want to do is, to create a child on a Fibaro Binary Switch 2. The child is of the Multilevel switch type. You have those light bulbs that dim according to the number of switch clicks (1click = 100%, 2clicks = 50% and 3clicks =15%). Now I have this in a separate QA, but I want this as an extension to the Binary switch on which the light bulb is mounted. Is this possible? thanks. -
Has anyone written a link for the 'Atag One' thermostat? There is an ATAG One API that works with Java.
-
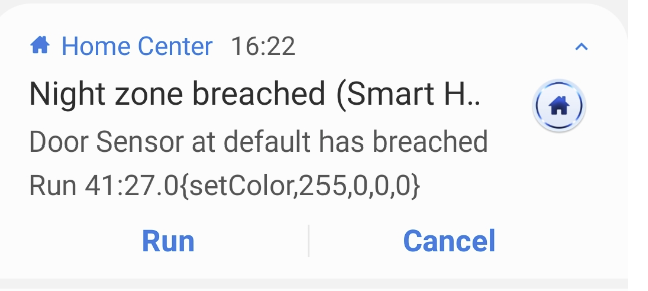
Alarm Control HC3 new alarm concept could be used very efficiently by AOQ: For example: Assuming we have defined "nightSleep" which includes 1 doors and 2 window sensors. The zone is activated during the night (23:00~06:30). When the zone has breached we can send notification and/or send notification for breached device. When sensor has breached it will stay in breach mode and not monitored by alarm anymore, so additional breach is not identified. In order to monitor all sensors again, entire zone must be re-armed. Here is an example how to do it: jS2n={door=300, wSense1=410,wSense2=420, rgb=500} jM={ {0,"$blank",{timeSlot="06:30~23:00,23:00~,~06:30",initAct={"nightSleep","disarmAlarm",""}, trueAct={"nightSleep","armAlarm",""},falseAct={"nightSleep","disarmAlarm",""}}}, {0,"`door`|`wSense1`|`wSense2`",{state="alarm=breached",trueAct={{"Night Sleep Zone breached","sendEmail","$name at $room has breached"}}}}, {0,"$nightSleep",{state="value=breached",trueAct={{"nightSleep","disarmAlarm",""},{"nightSleep","armAlarm","5"}}}}, If you need visual indication of alarm status, we can add trigAct{} to set RGB Bulb according to alarm state by change last line as following: jS2n={door=300, wSense1=410,wSense2=420, rgb=500} jM={ {0,"$blank",{timeSlot="06:30~23:00,23:00~,~06:30",initAct={"nightSleep","disarmAlarm",""}, trueAct={"nightSleep","armAlarm",""},falseAct={"nightSleep","disarmAlarm",""}}}, {0,"`door`|`wSense1`|`wSense2`",{state="alarm=breached",trueAct={{"Night Sleep Zone breached","sendEmail","$name at $room has breached"}}}}, {0,"$nightSleep",{state="value=breached",trueAct={{"nightSleep","disarmAlarm",""},{"nightSleep","armAlarm","5"}}, trigAct={{"`rgb`","setColor,255,0,0,0","","{$nightSleep:value=breached}"},{"`rgb`","setColor,0,255,0,0","","{$nightSleep:value=armed}"},{"`rgb`","setValue,0","","{$nightSleep:value=disarmed}"}}}, You can use sendEmail, sendPush or sendiPush notification. Note: Using sendiPush you can define to execute scene or an action on any device (and any command) in the system. By pressing "RUN" button on iPush notification you can do follow: {"Night Sleep Zone breached","sendiPush,run_30","$name at $room has breached"} run scene 30 {"Night Sleep Zone breached","sendiPush,run85{turnOn}","$name at $room has breached"} turn ON device 85 {"Night Sleep Zone breached","sendiPush,run90{setColor,255,0,0,0}","$name at $room has breached"} set red color on device 90
-
Version 16.4
3,475 downloads
AOQ can control any other Fibaro system HC3, HC2, HCL (master/slave concept) Before migrating your devices to HC3, AOQ could be the solution to make it smooth and simple. If you've found yourself with too many Lua and Block scenes and need more automation, this QA is the right solution for you. The QA is designated to control and monitor your home system. QA automatically identifies the type of elements in the system. (Z-wave device, Nice, QA device, scene, automatic scene (Block and Lua). Any valid Z-wave,Nice and QA devices property and their values could be monitored, controlled and execute commands accordingly AOQ supports custom events, active profile setup and controls alarm zones while every breached zone or sensor in the zone could be identified and execute actions accordingly. The first time you use All-in-One QA, jM {} hash table must be defined. Each line in the table has two mandatory and two optional fields. jM={ { 15, "137|630", {timeSlot={“12:00~18:00”},state="value=true", trueAct={“|230|”, “turnOn”,””}}} } Time span IDs list Criteria & Rules Action tables Time span a period of time (in minutes) within which some activity must be performed by device or scene. Additional two options could be defined: time span = 0 defines the line as activity only. time span = ‘negative number’ line is suspended (remarked) IDs list given list of devices/scenes/QA/global/keywords. Use under score for scene IDs. (“_45”). global variable – add an ampersand sign & to System, QA and Local variable names: &varName keyword – add a dollar sign $ to keyword variable: $name Note: To use & and $ characters for other purpose , add % after the character. Criteria & Rules (optional) property, state, time slot, active rules… Action tables (optional) tables of commands to be executed. To avoid using device IDs jS2n{} array could be defined. If device ID changed because of re-inclusion it requires to change ID in one place only. for example: jS2n= {boiler=137, dryer=630, light=230} device name must be included within back apostrophe sign in jM{} hash table. Now jM{} hash table above will look like that: jM={ { 15, "`boiler`|`dryer`",{timeSlot={“12:00~18:00”},state="value=true", trueAct={“`light`”, “turnOn”,””}}} } 1. Monitor option Some time the scenes or QA devices are stuck w/o any understandable reason. Some devices suddenly stop to send reports or don’t change state. In most of the cases we don’t aware about the problem till something goes very wrong. The monitor option will send an alert in case of defined states are timed out. Example to set watchdog timer for devices, scenes, QA devices, global variables and keywords jM={ {8, "_17|_545",{timeSlot=”10:00~22:00”}}, -- within every 8 min. between 10am to 10pm, scenes 17, 545 must be active. If not alert sent. {3,"134|618|_556|_588"}, -- within every 3 min. devices 134,618 and scenes 556,588 must be active. If not auto-alert sent. {10,”132|145”,{property=”power”}}, -- within every 10 min. devices in list must to report new power value. If not auto-alert sent. {30,”470”,{state=”power>10”}}, -- if device’s power greater than 10 over 30 minutes, auto-alert sent. {20,”&HomeStatus|$iDoor”}} -- if global variable HomeStatus or keyword iDoor didn’t change within 20 min., auto-alert sent. 2. Control option Execute actions based on device state, status or value changes. QA supports option like on-line calculations, time modifications, IF THEN and WHEN THEN statements and other features for fully home automation just with one QA (which even doesn’t trigger by the system). Following action tables are available: trueAct{} - executed when state status is true. falseAct{} - executed when state status is false. trigAct{} - executed on every value change at any mode, true or false timeoutAct{} - Disables auto-alert notification and executed when elapsed time exceeds time span. Time span counting restarted after state status back to true. timeLoopAct{} - Disables auto-alert notification and executed when elapsed time exceeds time span. Time counting restarted immediately. InitAct{} - Set of specific actions to be executed on startup only. errAct{} - Set of specific actions to be executed if verification failed. okAct{} - Set of specific actions to be executed if verification succeded. Here is an example of most common scenario, to turn on light when motion sensor breached and turn off light when sensor back to safe after few minutes (3 min. in this example) jM={0,”`mSensor`”,{state=”value=true”,trueAct={“`lightSw`”,”turnOn”,””},falseAct={“`lightSw`”,”turnOff”,”180”}}} Since no need to turn on light during the day, timeslot could be defined jM={0,”`mSensor`”,{state=”value=true”,timeslot=”18:00~07:00”,trueAct={“`lightSw`”,”turnOn”,””},falseAct={“`lightSw`”,”turnOff”,”180”}}} But now could be an issue to turn off the light, if sensor breached few seconds before end of timeslot and back to safe is out of defined time slot, falseAct{} won’t be executed. In this case, turning light off action should be part of trueAct{} table jM={0,"`mSensor`”,{state=”value=true”,timeslot=”18:00~07:00”,trueAct={{“`lightSw`”,”turnOn”,””},{“`lightSw`”,”turnOff”,”180”}}} Z-wave devices, global variables and keywords could be defined at several lines (no limit). Scene could be defined one time only. For more details please download AOQ Advanced User’s Guide - complete instructions and information AOQ Quick Guide – syntax format reference and examples AOQ HC-WebEye Viewer – AOQ browser viewer guide QA Advantages: Debug window view: On the first run follow information will be displayed at debugger During normal operation every executed command showed at debugger. following data shown for every command: jM line number: device name: state value and status by color (green - true | pink - false); command executed. The debug information has special tag "AOQ<QA-ID>" and "TRACE" / "WARNING" / "ERROR" type for filtering. AOQ table preview: Table's header includes: startup time stamp, script current version, scene Name, LED as displayed at HC3 front panel, sunrise/set hours. Current home mode (@home or @vacation) System's current profile mode. Elapsed time Total Z-wave events Min, average and max Z-traffic Table columns are: Type – device type (Z.Device, G. Variable, Keyword, QA, luaScene, blockScene). ID: Description – room name: device ID: device name. Z-wave devices sorted by rooms, then by device ID. Battery capable device have green background according to current battery level. If device included in alarm circle icon appears before name. green circle - armed, red circle - breached Value – items current value. Criteria – state of evaluation to determine true or false status. If formula included, the state displayed on green background. in State– elapsed time since last status change. Alert – by default this column isn’t shown. If any devices have been alerted the column will be shown. Please notice that in some cases the device could be alerted, but after while it could back to normal activity. For example, if motion sensor is breached over specified time-span, alert notification will be sent. But after a while the sensor back to safe and alert is canceled, “back to normal” notification will be sent. At header of alert column shown current number of alerts Time Span – time span to monitor state of items. If time span set to 0, then this line acts as activity, no timeout alerts reported. If time span set to negative number, this line is suspended and no actions executed. Time Slot – Time slot range to execute related actions. Timestamp to execute specific action at specific time. Active (in range) time slot shown in green fonts. trueAct – list of actions to execute when the state is true. falseAct – list of actions to execute when the state is true. trigAct – list of actions when the value changes timeoutAct – list of actions to execute when time-span reached. Timer will be restarted when device state changed again to true. timeLoopAct – list of actions to execute when time-span reached. Timer restarted immediately after actions table executions. initAct – list of actions to execute on QA startup. Active Rules – non default defined rules (initOnStartup, Vacation, timeSpanOn, onClock, lineState, trigAll) jM{#} - line number in jM{} hash table jM{ hash table line} – shows device location in jM{} hash table. At the bottom of the table two execution lines show: list of up to 60 last executed actions (in order of execution) are displayed. (like CNN news line). list of delayed commands to be executed (and time left to execute) All global variables, their values and last modification time shows below the table.