Welcome to Smart Home Forum by FIBARO
Dear Guest,
as you can notice parts of Smart Home Forum by FIBARO is not available for you. You have to register in order to view all content and post in our community. Don't worry! Registration is a simple free process that requires minimal information for you to sign up. Become a part of of Smart Home Forum by FIBARO by creating an account.
As a member you can:
- Start new topics and reply to others
- Follow topics and users to get email updates
- Get your own profile page and make new friends
- Send personal messages
- ... and learn a lot about our system!
Regards,
Smart Home Forum by FIBARO Team
Search the Community
Showing results for tags 'quickapp'.
-
This QuickApp gets your energy consumption and production data from Tibber Live. This QuickApp can be used in combination with the Tibber Monitor to get the Tibber Prices. Based on the Fibaro WebSockets/GraphQL demo by Peter Gebruers If you use Tibber for your Energy Panel, you can use this Tibber Live QuickApp for your energy consumption and production combined with the Tibber Monitor QuickApp to provide the Energy Panel with the hourly prices. Main device with positive or negative actual power consumption Child devices are available for: power (Actual consumption with maxPower in log text) powerProduction (Actual production with maxPowerProduction in log text) accumulatedConsumption (Todays consumption, also the child device for the Energy Panel) accumulatedProduction (Todays production) accumulatedCost (Todays cost) accumulatedConsumptionLastHour (Consumed since since last hour shift) accumulatedProductionLastHour (Produced since last hour shift) lastMeterConsumption (Total consumption) lastMeterProduction (Total production) voltagePhase1 voltagePhase2 voltagePhase3 currentL1 currentL2 currentL3 Available information: power (Consumption at the moment (Watt)) maxPower (Peak consumption since midnight (Watt)) powerProduction (Net production (A-) at the moment (Watt)) maxPowerProduction (Max net production since midnight (Watt)) accumulatedConsumption (kWh consumed since midnight) accumulatedProduction (net kWh produced since midnight) accumulatedCost (Accumulated cost since midnight; requires active Tibber power deal) currency (Currency of displayed cost; requires active Tibber power deal) lastMeterConsumption (Last meter active import register state (kWh)) lastMeterProduction (Last meter active export register state (kWh)) voltagePhase1 (Voltage on phase 1) * voltagePhase2 (Voltage on phase 2) * voltagePhase3 (Voltage on phase 3) * currentL1 (Current on L1) * currentL2 (Current on L2) * currentL3 (Current on L3) * accumulatedConsumptionLastHour (kWh consumed since since last hour shift) accumulatedProductionLastHour (net kWh produced since last hour shift) accumulatedReward (Accumulated reward since midnight; requires active Tibber power deal) minPower (Min consumption since midnight (Watt)) averagePower (Average consumption since midnight (Watt)) powerReactive (Reactive consumption (Q+) at the moment (kVAr)) * powerProductionReactive (Net reactive production (Q-) at the moment (kVAr)) * minPowerProduction (Min net production since midnight (Watt)) maxPowerProduction (Max net production since midnight (Watt)) powerFactor (Power factor (active power / apparent power)) * signalStrength (Device signal strength (Pulse - dB; Watty - percent)) * timestamp (Timestamp when usage occurred) * on Kaifa and Aidon meters the value is not part of every HAN data frame therefore the value is null at timestamps with second value other than 0, 10, 20, 30, 40, 50. There can be other deviations based on concrete meter firmware. In this QuickApp "null" values are replaced by their previous values. To communicate with the API you need to acquire a OAuth access token and pass this along with every request passed to the server. A Personal Access Token give you access to your data and your data only. This is ideal for DIY people that want to leverage the Tibber platform to extend the smartness of their home. Such a token can be acquired here: https://developer.tibber.com When creating your access token or OAuth client you’ll be asked which scopes you want the access token to be associated with. These scopes tells the API which data and operations the client is allowed to perform on the user’s behalf. The scopes your app requires depend on the type of data it is trying to request. If you for example need access to user information you add the USER scope. If information about the user's homes is needed you add the appropriate HOME scopes. If you have more than one home in your subscription, you need to fill in your home number the change between your homes. If the Tibber server disconnects the webSocket, the QuickApp wil do a re-connect for the amount in the QuickApp variable reconnect. If the re-connect fails for that amount, there will be a timeout for the seconds in the QuickApp variable timeout. Use this QuickApp at your own risk. You are responsible for ensuring that the information provided via this QuickApp do not contain errors. Tibber is a registered trademark being the property of TIBBER. TIBBER reserves all rights to the registered trademarks. Information which is published on TIBBER’s websites belongs to TIBBER or is used with the permission of the rights holder. Making of copies, presentations, distribution, display or any other transfer of the information on the website to the public is, except for strictly private use, prohibited unless done with the consent of TIBBER. Published material on dedicated TIBBER press websites, intended for public use, is exempt from the consent requirement. Also see: https://tibber.com/en/legal-notice Guide Communicating with the Tibber API: https://developer.tibber.com/docs/guides/calling-api Tibber API Explorer: https://developer.tibber.com/explorer Tibber gitHub: https://github.com/tibber Tibber SDK NET: https://github.com/tibber/Tibber.SDK.NET/tree/master/src/Tibber.Sdk Fibaro webSocket manual: https://manuals.fibaro.com/knowledge-base-browse/hc3-quick-apps-websocket-client/ Fibaro Forum - Headers in webSocket: https://forum.fibaro.com/topic/60307-added-support-for-headers-in-websocket-connections-any-documentation WebSocket++ Documentation: https://docs.websocketpp.org GraphQL over WebSocket Protocol: https://github.com/enisdenjo/graphql-ws/blob/master/PROTOCOL.md GraphQL query language: https://spec.graphql.org/June2018/#sec-Language Version 3.0 (8th March 2023) Removed Tibber old Websocket code Prepared, not enabled: Check home.features.realTimeConsumptionEnabled has a true value always before reconnecting Prepared, not enabled: Added button to disconnect or re-connect the Tibber webSocket Prepared: Added quickapp variable homeNr (most of the time 1) to be able to check the response realTimeConsumptionEnabled Version 2.3 (beta 8th December 2022) Improved the 60 seconds interval child devices update, it now never skips a beat Added translation for English (en), Dutch (nl), Swedish (se), Norwegian (no) Changed the json response for the debugLevel=4 Offline Simulation mode, the date/time format was wrong Added random (jitter) reconnection handleDisconnected and handleError between 10 and 15 seconds Added random (jitter) reconnection interval handleDisconnected and handleError plus between 1 and 10 seconds Added exponential backoff (increasing delay) between each timeout. The increase is limited to 10 times the value in the quickapp reconnect variable. Version 2.2 (20th November 2022) Changed to new Tibber webSocket requirements, required from December 2022 Version 2.1 (15th October 2022) Child devices are now updated every (whole) minute to reduce CPU load Replaced zero values for Voltage L1 L2 L3 with the previous value Version 2.0 (5th August 2022) Added two child devices, Hourly Consumption and Hourly Production Added re-connect routine to handleError. If an Tibber error occurs, the QuickApp will try to re-connect. Thanks @JcBorgs for testing. Improved routine to handle Tibber null values. Thanks @Darquan for testing. Changed labels a bit to save some space Changed "volt" and "amp" text in the labels. Thanks @Morten22 for mentioning. Changed kWh device types from com.fibaro.electricMeter to com.fibaro.energyMeter Version 1.0 (19th June 2022) Initial webSocket version Tibber Live Thanks @JcBorgs for testing all beta versions and great suggestion to improve the quickapp Based on the Fibaro WebSockets/GraphQL demo by @petergebruers Variables (mandatory and created automatically): token = Authorization token (see the Tibber website: https://developer.tibber.com) homeId = Tibber Home ID (see the Tibber website: https://developer.tibber.com) homeNr = Tibber home (nodes) number if you have more than one home (default = 1) language = Preferred language (default = en) (supported languages are English (en), Swedisch (se), Norwegian (no) and Dutch (nl)) reconnect = Amount of re-connects after disconnect from Tibber server (default = 10) timeout = Pause after maximum amount of re-connects (default = 300 seconds) debugLevel = Number (1=some, 2=few, 3=all, 4=Offline Simulation Mode, 5=Live Test Mode) (default = 1) Fibaro Firmware: Minimal version 5.111.48 (beta) Download the QuickApp here (download the file and un-zip): https://github.com/GitHub4Eddy/tibber_live/archive/refs/tags/tibber-live-30.zip or from the Fibaro Marketplace: https://marketplace.fibaro.com/items/tibber-live How to install: Open the Configuration Interface Go to Settings > Devices Click + Choose Other Device Choose Upload File Choose file from your computer with .fqa


-
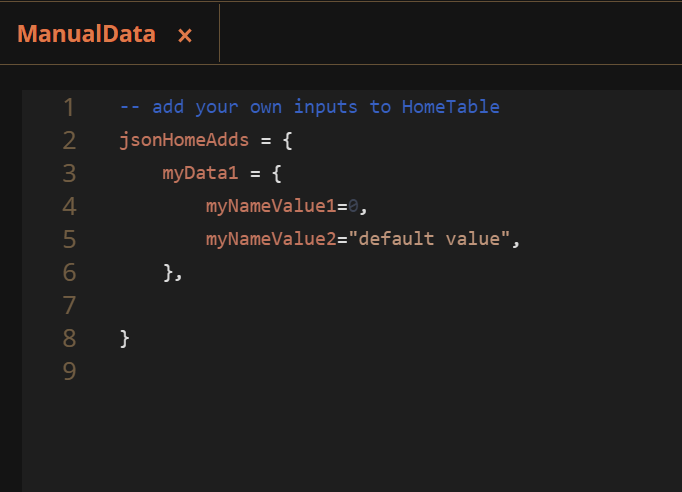
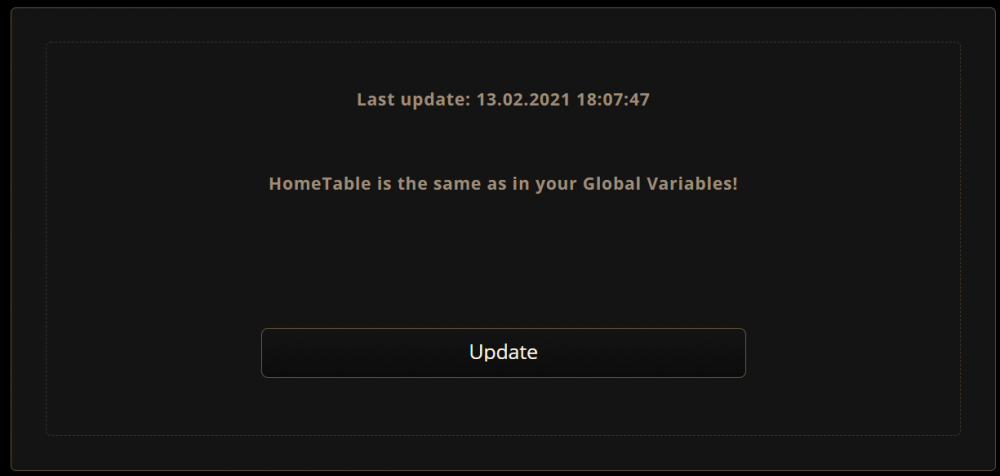
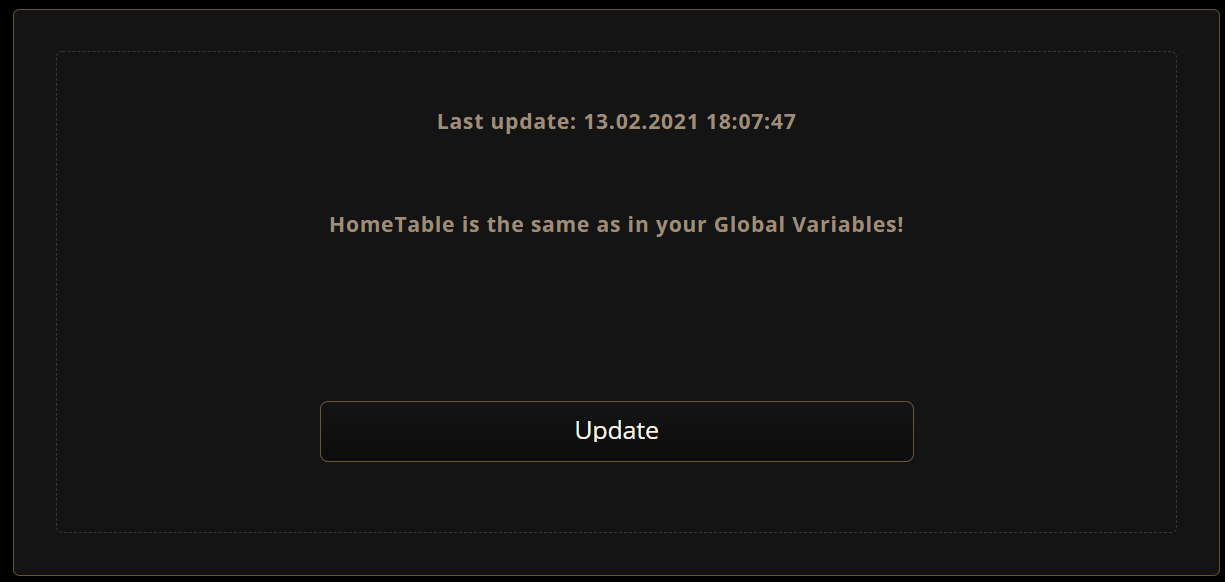
QA for creating HomeTable in global variables in HC3. Why using hometable? Instalation: 1. upload this QA 2. In QA variables you can change name for hometable, name for scenes and time for regular update of hometable 3. In QA -> source files -> ManualData you can add your own data (it will be also saved in final hometable in global variables) How to read data from hometable: -- in case that your name for hometable is default=HomeTable local tbl = fibaro.getGlobalVariable("HomeTable") local HT = json.decode(tbl) -- structure for devices is <room>.<deviceName> local idQA_TV=HT.LivingRoom.TV -- structure for scenes is <ScenesName>.<sceneName> -- default value for <ScenesName> is Scenes local idSc_Lights=HT.Scenes.Lights -- structure for your own inputs from ManualData local myValue1=HT.myData1.myNameValue1 -- 0 local myValue2=HT.myData1.myNameValue2 -- "default value" Names for rooms, devices and scenes are corrected by following replaces: {["%."]="",["-"]="",["%("]="",["%)"]="",["&"]="",[":"]="",["%["]="",["%]"]="",["%+"]="",["%%"]="",["%/"]="",["%$"]=""} {["Á"]="A",["Ä"]="A",["Ą"]="A",["À"]="A",["Â"]="A",["Č"]="C",["Ć"]="C",["Ç"]="C",["Ď"]="D",["É"]="E",["Ě"]="E",["Ë"]="E",["Ę"]="E",["È"]="E",["Ê"]="E",["Í"]="I",["Ï"]="I",["Î"]="I",["Ĺ"]="L",["Ľ"]="L",["Ł"]="L",["Ň"]="N",["Ń"]="N",["Ó"]="O",["Ô"]="O",["Ö"]="O",["Ő"]="O",["Œ"]="O",["Ŕ"]="R",["Ř"]="R", ["Š"]="S",["Ś"]="S",["Ť"]="T",["Ú"]="U",["Ů"]="U",["Ü"]="U",["Ű"]="U",["Ù"]="U",["Û"]="U",["Ý"]="Y",["Ÿ"]="Y",["Ž"]="Z",["Ż"]="Z",["Ź"]="Z",["á"]="a",["ä"]="a",["ą"]="a",["à"]="a",["â"]="a",["č"]="c",["ć"]="c",["ç"]="c",["ď"]="d",["é"]="e",["ě"]="e",["ë"]="e",["ę"]="e",["è"]="e",["ê"]="e",["í"]="i",["ï"]="i",["î"]="i",["ĺ"]="l",["ľ"]="l",["ł"]="l",["ň"]="n",["ń"]="n",["ó"]="o",["ö"]="o",["ô"]="o",["ő"]="o",["œ"]="o",["ř"]="r",["ŕ"]="r",["š"]="s",["ś"]="s",["ť"]="t",["ú"]="u",["ů"]="u",["ü"]="u",["ű"]="u",["ù"]="u",["û"]="u",["ý"]="y",["ÿ"]="y",["ž"]="z",["ż"]="z",["ź"]="z"} Hometable in global variables will be overwrite only if newly generated hometable will be different. Version of QA HomeTable: 0.12 - 21.1.2021 HomeTable.fqa

-
So I have been working on integrating my ceiling fan & light into my HC3 hub. I want to treat the fan control as a device and the light control as a device. But the problem is that I need buttons and sliders for user interaction. I get that the focus is primarily on z-wave integration but it is very shortsighted to imagine that everything the user installs in his/her Smart Home will be z-wave enabled. Furthermore, it seems that Fibaro does not have much market share in the United States. Consequently we are left in the dust having to integrate our devices ourselves. The Fibaro tech support seems very non-responsive to its community of owners and simply patches bugs without sharing new and updated features. For example, I noticed there is a new thermostat UI that appeared recently. Or at least I did not see it before a certain recent FW update. I presume it was made available because Fibaro needed it to sell their own thermostat device. Truly, I love my hub. The use of a web interface is far superior to using a smart phone app, IMHO. And, if I cannot easily find a z-wave enabled device, I can create or help someone else create a device handler for this device. I use and enjoy my Alexa but home automation is far more than telling Alexa to turn on my lights. And why should I rely on an internet device for more sophisticated control strategies? Right now my z-wave continues to operate even when my ISP goes offline. My ceiling fan will rely on my WiFi operating but it does not have to go to the cloud to be controlled. Only my Nest Thermostat will lose connection to my hub when my internet goes offline. When the time (and money) comes, I will replace it with something z-wave or maybe WiFi but not cloud controlled. I think the biggest takeaway from this rant is that there needs to be a means to create custom UIs for child devices. An added bonus would be a few different control objects. Things like a select box, a multi-select box, a check box (or something that looks like a pushbutton?), ways to group things (a container) or a means to draw a line between sections. Granted that images may be memory hogs so adding a bunch of icons or other small pictures would be memory intensive but small icons that could be added to a global list in the device might mitigate some of that. It seems that many of these structures are integral to the HTML world and a part of the web client. We just need a way to safely use them in the UI. Also, a comprehensive list of Lua methods that we can use along with simple descriptions of their use. Fibaro relies too heavily on its community so leverage that community to learn and share their knowledge on use. Fibaro need not shy away from providing this list because they don't want to write extensive descriptions of each and every method. Reward your faithful users with better tools to take advantage of your systems and you may be rewarded with an increase in sales. You could think of it as hiring a huge team of unpaid integrators who develop creative ways to solve problems. I was impressed with one user who described his sophisticated solution to control his home energy use based on the hourly electric rates that his utility company makes available each day. We don't have that need in North America (yet) but I am aware of a niche market that could be tapped for remote locations who exist off-grid and use solar energy exclusively. Thank you for your time in reading this. I feel better having expressed myself even though I figure this will be ignored or looked at as impractical. Have a great day (or night). Peter
-
 Witam, szukam odpowiedzi na uważam dość szczegółowe pytanie dotyczące QuickApp. Otóż postawiłem sobie cel by z pomocą QuickApp "Termostat auto" zrobić sterowanie prędkością wentylatora od klimatyzacji. W termostacie MCO Home MH8-FC spotkałem się z czymś takim że ma on taką wbudowaną opcję w interface służącą do tego, dodatkowo ma też sekcję pokazującą w jaki jest stan jego pracy, wygląda to tak: Zależy mi na tym żeby stworzyć QuickApp, który też będzie miał te dwie sekcje, chodzi o to żeby nie tworzyć tego ręcznie za pomocą kontrolek i etykiet.
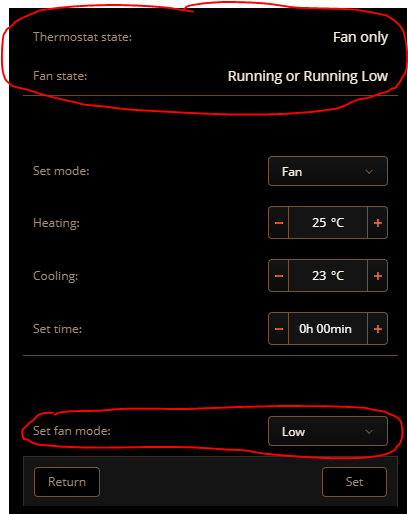
-
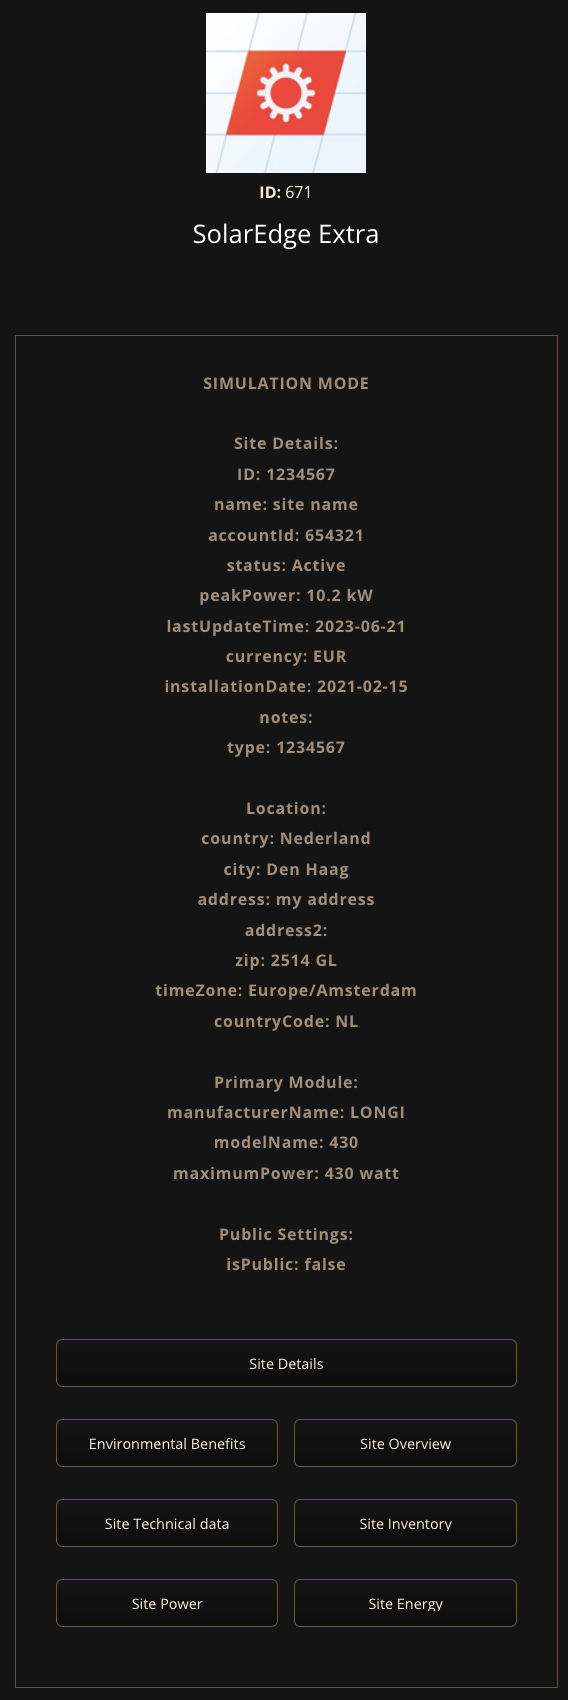
This QuickApp gets extra information from your SolarEdge managed Solar Panels to give you the most insight of your SolarEdge installation. Site Details: Site details, such as name, location, status, etc. Site Overview: Site overview data. Inventory: Inventory of SolarEdge equipment in the site, including inverters/SMIs, batteries, meters, gateways and sensors. Inverter Technical Data: Return specific inverter data for a given timeframe. Site Power: Site power measurements in 15 minutes resolution. Site Energy: Site energy measurements in 15 minutes resolution. Site Environmental Benefits: All environmental benefits based on site energy production: CO2 emissions saved, equivalent trees planted, and light bulbs powered for a day. Use of the monitoring server API is subject to a query limit of 300 requests for a specific account token and a parallel query limit of 300 requests for each specific site ID from the same source IP. The monitoring server API allows up to 3 concurrent API calls from the same source IP. Any additional concurrent calls will return HTTP 429 error – too many requests. See API documentation on https://www.solaredge.com/sites/default/files/se_monitoring_api.pdf Site Details: id – the siteID name – the site name account id – the account this site belongs to status – the site status (see Site Status on page 53) peak power – site peak power currency - e.g. EUR installationDate – site installation date (format: yyyy-MM-DD hh:mm:ss ) ptoDate – permission to operate date notes type – site type location: country state city address secondary address zip time zone alertQuantity - number of open alerts in this site * alertSeverity – the highest alert severity in this site * publicSettings: isPublic - if this site is public (true or false) public name - name * Alert information is only available when using an API_KEY generated by an account. API_KEY generated at the site level does not return this information. Inventory: Inverter name – the inverter name e.g. Inverter 1 manufacturer – manufacturer name (SolarEdge) model name e.g. SE16K Firmware version e.g. 2.52.311 communicationMethod – the communication interface used to connect to server. e.g.: Ethernet or WIFI. serialNumber – the equipment serial number e.g.: 7F123456-00 connectedOptimizers – number of optimizers connected to the inverter Meters name – the inverter name e.g. “FeedInMeter” Manufacturer – e.g. “WattNode” Model – meter model number SN – serial number (if applicable) Type – metertype, e.g. “Production” Firmware Version (if applicable) Connected To – Name of SolarEdge device the meter is connected to connectedSolaredgeDeviceSN – serial number of the inverter/gateway the meter is connected to form – physical for a HW meter or virtual if calculated by arithmetic between other meters Sensors (Irradiance/wind/temperature sensors) connectedSolaredgeDeviceSN – the S/N of the device it is connected to e.g. 12345678-00 Id – e.g. “SensorDirectIrradiance” connectedTo – name of the device it is connected to e.g. “Gateway 1” Category – e.g.IRRADIANCE Type – e.g. “Plane of array irradiance” Gateways name – the inverter name e.g. Inverter 1 serialNumber – the equipment serialnumber e.g. 7F123456-00 Firmwareversion Batteries Name SerialNumber Manufacturer - the battery manufacturer name Model - the battery model name Nameplate capacity - the nameplate capacity of the battery as provided by the manufacturer Firmwareversion ConnectedTo – Name of SolarEdge device the battery is connected to connectedSolaredgeDeviceSN – serial number of the inverter/gateway the battery is connected to Interver Technical data: timestamp AC current (divided per phase) AC voltage (divided per phase) AC frequency (divided per phase) QRef (divided per phase) CosPhi (divided per phase) TotalActivePower apparentPower - Supported starting communication board version 2.474 activePower - Supported starting communication board version 2.474 reactivePower DC voltage groundFaultResistance powerLimit % Lifetime energy - Supported starting communication board version 2.474 totalEnergy temperature - Celsius inverterMode SLEEPING – night mode STARTING – pre-production MPPT – production THROTTLED – Forced power reduction SHUTTING_DOWN – Shutdown procedure FAULT – error mode STANDBY – maintenance LOCKED_STDBY – standby mode lock LOCKED_FIRE_FIGHTERS – firefighters lock mode LOCKED_FORCE_SHUTDOWN – forced shutdown from server LOCKED_COMM_TIMEOUT – communication timeout LOCKED_INV_TRIP – inverter self-lock trip LOCKED_INV_ARC_DETECTED – inverter self-lock on arc detection LOCKED_DG – inverter lock due to DG mode enable LOCKED_PHASE_BALANCER – inverter lock due to phase imbalance (1ph, Australia only) LOCKED_PRE_COMMISSIONING – inverter lock due to pre-commissioning LOCKED_INTERNAL – inverter lock due to an undisclosed internal reason operationMode 0 – On-grid 1 – Operating in off-grid mode using PV or battery 2 - Operating in off-grid mode with generator (e.g. diesel) is present apparentPower - VA (divided per phase) activePower - VA (divided per phase) reactivePower - VAR (divided per phase) cosPhi (divided per phase) vL1ToN - 1ph only vL2ToN - 1ph only vL1To2 - 3ph only vL2To3 - 3ph only vL3To1 - 3ph only Environmental Benefits: CO2 - quantity of CO2 emissions that would have been generated by an equivalent fossil fuel system SO2 - quantity of SO2 emissions that would have been generated by an equivalent fossil fuel system NOX - quantity of NOX emissions that would have been generated by an equivalent fossil fuel system treesPlanted - equivalent planting of new trees for reducing CO2 levels lightBulbs - number of light bulbs that could have been powered by the site for a day Site Power Detailed: timeUnit - the time unit (QUARTER_OF_AN_HOUR) unit - the measurement units (e.g. Watt) type - i.e. Production, Consumption, SelfConsumption, FeedIn (export) or Purchased (import) date - date and time value - power in Watt at that time of the day Site Energy Detailed: timeUnit - the time unit (QUARTER_OF_AN_HOUR) unit - the measurement units (e.g. Wh) type - i.e. Production, Consumption, SelfConsumption, FeedIn (export) or Purchased (import) date - date and time value - power in Wh at that time of the day Overview: id currentPower lastDayData energy lastDayData revenue lastMonthData energy lastMonthData revenue lastYearData energy lastYearData revenue lifeTimeData energy lifeTimeData revenue lastUpdateTime Changes version 0.1 (25th June 2023) - First (development) version Variables (mandatory and created automatically): - siteID = Site ID of your SolarEdge Inverter (see your Inverter Site Details) - apiKey = API key of your SolarEdge Inverter (contact your installer if you don't have one) - serialNumber = Short serialNumer of your SolarEdge Inverter (see your Inverter Inventory Details) - language = Preferred language (default = English (en)) - debugLevel = Number (1=some, 2=few, 3=all, 4=simulation mode) (default = 1) Download the QuickApp here (download the file and un-zip): https://github.com/GitHub4Eddy/solaredge_extra/archive/refs/tags/solaredge_extra-01.zip or from the Fibaro Marketplace: https://marketplace.fibaro.com/items/solaredge-extra How to install: Open the Configuration Interface Go to Settings > Devices Click + Choose Other Device Choose Upload File Choose file from your computer with .fqax


- 4 replies
-
- 2
-

-
- solarenergy
- solaredge
- (and 2 more)
-
 What I normally do is to have a QuickApp for a particular function. For example Blinds_Controller, Gate_Controller or Bathroom_Controller. Where all the business logic is inside the QA. Then other scenes or users or Alexa just press the buttons in the QA to execute something. A few of the Logic examples in the Blinds Controller Will not open a blind in the Movie Room if someone is watching a movie. Will not close the blinds at night if there is a storm forecast, in case we lose power and cant activate them next morning Will not close blinds on Doors or Windows if they are open/ajar This way, I don't have to replicate the logic everywhere. BTW, there is an override button for the user, so they can bypass the restrictions if so desired. For some of the logic, it would be nice to know if a user pressed the button or a scene. I see this in the logs, but there is nothing there. Can I determine if a user or a scene pressed a button What is the "values":[null] in the event. [2023-06-05] [01:00:05] [TRACE] [QA-GATE]: UIEvent: {"eventType":"onReleased","values":[null],"elementName":"bnt_Lock","deviceId":1757}
 -
I made the mistake of buying the wrong model of the Nice Gate controller - it doesnt interface with Fibaro. It only has one input, the rest are coded. To make everything work I have cannibalized one remote and attached it to a raspberry pi with relays. This is working fine. But the QA on Yubii seems to crash when being used, and I have to go back and open the QA again. I suspect that I should be creating the HTTPClient class when required instead of creating it at startup. If so, I don't know how to free it when done. --[[Gate Controller Written by Rohit Gupta No copyright, use freely Versions 3.00 20230505 Created for HC3 --]] __TAG = 'GATE' local Lock = 0955 local Bool = {[false]='LOCKED', [true]='UNLOCKED'} GOpen = '/gate/open' GClose = '/gate/close' GPed = '/gate/pedestrian' -- These show messages conditional on flags and in colour in the Log function Error (Msg) end function Debug (Msg) end function Warning (Msg) end function Trace (Msg) end function Status (Msg) end function Device_State (Device) return fibaro.get (Device, 'value') end function Turn_Device_On (Device) fibaro.call (Device, "turnOn") end function Turn_Device_Off (Device) fibaro.call (Device, "turnOff") end function QuickApp.Show_Gate_Status (Msg) self:updateView ('lblStatus', 'text', Msg) end function QuickApp:Show_Lock_Status () local State = Device_State (Lock) self:updateView ('lbl_Lock', 'text', 'External Access = '..Bool[State]) end function QuickApp:Post (Param, Action) Status (Action) self.Http:request(self.Address..Param, { options = {data = 'text', method = 'POST'}, success = function(response) Update (Action) self.Posted = true Debug ('response:'..response.status) end, error = function(message) Show_Gate_Status (Action..' '..message) self:updateProperty ('value', Action == 'Open') Debug ('error:', message) end}) end function QuickApp:onOpen () Update_Gate_Status ('Opening') self:Post (GOpen, 'Open') end function QuickApp:onClose () Update_Gate_Status ('Closing') self:Post (GClose, 'Close') end function QuickApp:onPed () Update_Gate_Status ('Pedestrian') self:Post (GPed, 'Pedestrian') end function QuickApp:onLock () Turn_Device_On (Lock) self:Show_Lock_Status () end function QuickApp:onUnlock () Turn_Device_Off (Lock) self:Show_Lock_Status () end function QuickApp:onInit() Status ('Started') self.Address = self:getVariable("Address") Status (self.Address) self.Http = net.HTTPClient () self:Show_Lock_Status () end Lock/Unlock address a separate Fibaro relay that kills power to the Gate Controller. The interface has 5 buttons - Open, Close, Pedestrian, Lock and Unlock. And there is only one variable Address which is the ipaddress of the Pi. What have I stuffed up ?
-
In the past I have used fibaro.sleep. As I am migrating from HC2 to HC3, I have started using setInterval. People seem to insist it is better, even though it destroys the readability of the code. I am finding that it doesn't always work. Sometimes it does not wait at all. Here Loop_Secs is 15, and it shows that in the log. Sometimes it works for two iterations and then just does not wait. At other times, it does not wait at all. While I was building it up and Main was empty, it was whizzing so fast, I could not get in from the browser and had to restart the HC. What am I missing ? function QuickApp:Loop () self:Main () Debug ('Waiting for '..Loop_Secs..' secs') setInterval (self:Loop(), Loop_Secs*1000) end
-
Hey Is any one has solution for controlling QA with alexa voice command i build quick apps for my devices as binary switch so i can control them from alexa to turn on/off only but nothing else i want to be able to control and set all option and buttons i created in QA, I can't find any solutions
-
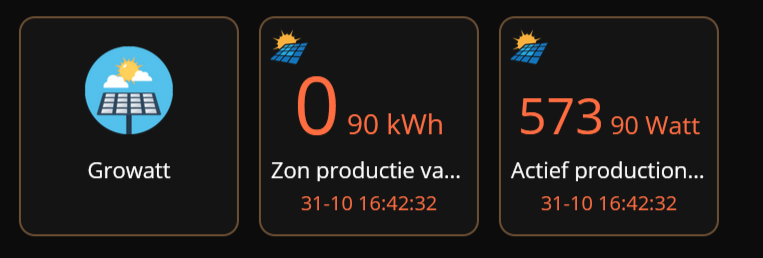
Hi, I currently have my hc3 setup with the quickapp p1 meter for house energy metering and made my own quickapp for metering the solarpanels. I used most of the code from the p1 quickapp to make sure it would work simply because I am not a coding wizard sadly :). I started running my quickapp and it worked like a charm, except for the energy panel aspect. I was producing megawatt houres of energy... The consumption also was acting up wierd at the same time. The child app resposible for reading the kwh data from the Growatt inverter is setup as an energyMeter like this: {name="Zon productie vandaag", className="ProductionToday", type="com.fibaro.energyMeter"} some more code of this child: class 'ProductionToday'(QuickAppChild) function ProductionToday:__init(device) QuickAppChild.__init(self, device) self:updateProperty("rateType", "production") end function ProductionToday:updateValue(devicedata) self:updateProperty("value", tonumber(devicedata.epvtotal)) --tonumber(devicedata.epvtotal) self:updateProperty("unit", "kWh") self:updateProperty("log", devicedata.update_timestamp) end When I noticed it starting to register megawatts I removed the line of code responsible for saving the data. self:updateProperty("storeEnergyData", true) While coding this quickapp I came across multiple "special" ways of fibaro to register certain types of data. My question now is, how does fibaro read this kwh data and process it?

-
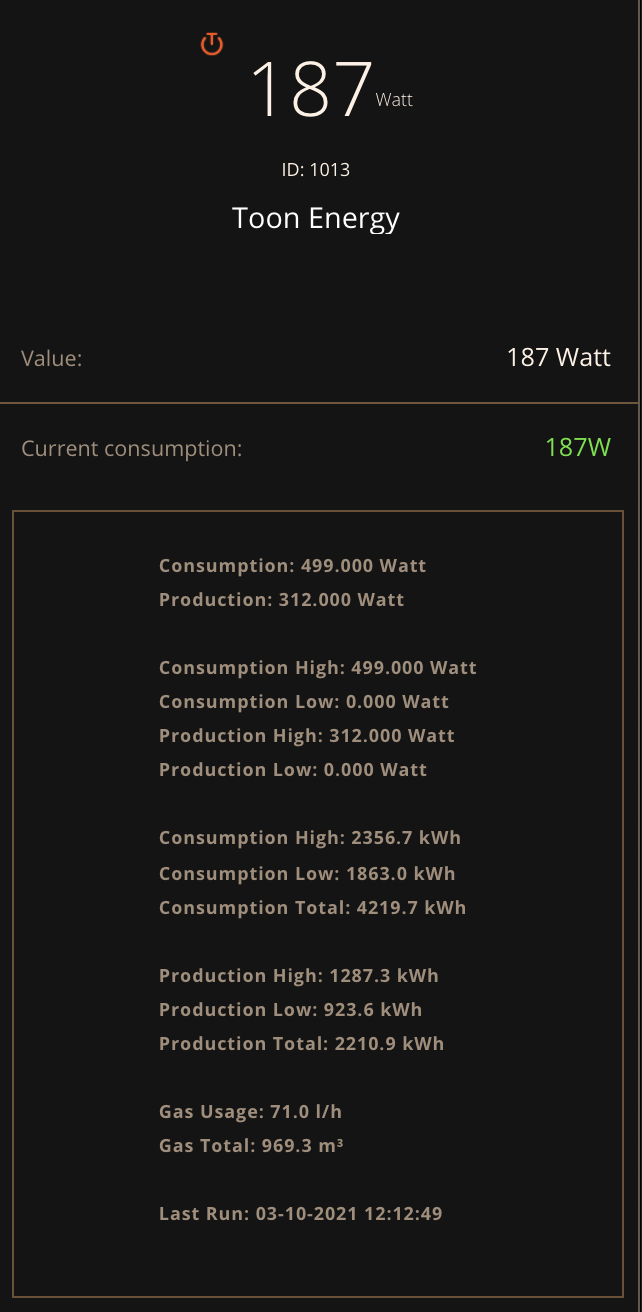
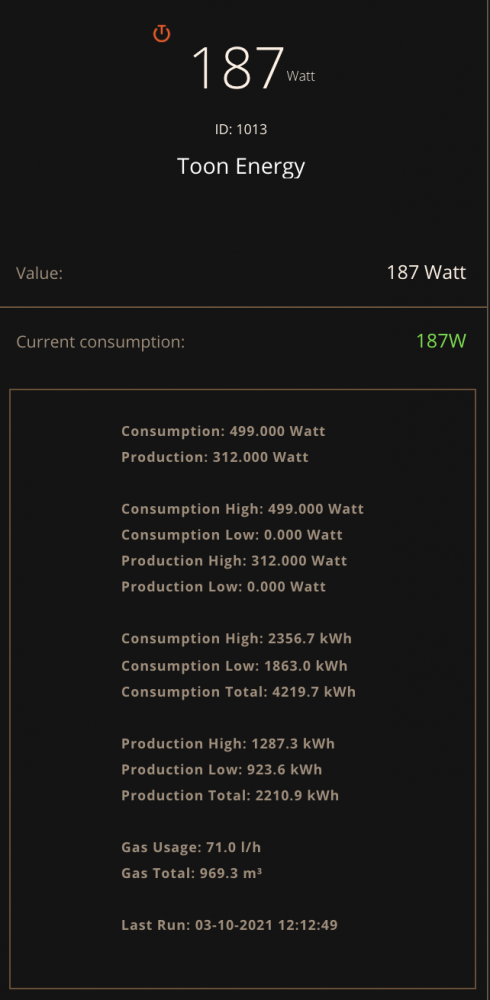
This Quickapp retrieves energy consumption, energy production and gas usage from the Toon Energy meter version 1 or 2. This QuickApp has Child Devices for Consumption (Watt), Production (Watt), Consumption High (kWh), Consumption Low (kWh), Production High (kWh), Production Low (kWh), Production Actual (Watt), Gas Usage (l/h) and Total Gas (m³) The Energy Usage from the Child devices Consumption High, Consumption Low, Production High and Production Low can be used for the HC3 Energy Panel Your Toon Energy Meter needs to be rooted, see: https://github.com/JackV2020/Root-A-Toon-USB-Stick. This is the recommended all in one solution with a one time boot from USB stick, 10 minutes of work and done. After rooting you don't need a subscription anymore and you have access to a ToonStore with a growing number of apps. For more technical people there is a possibility to ssh into the Toon if they want with username root and password toon. Rooting is at your own risk, look here for further support and info: See also: https://github.com/ToonSoftwareCollective/Root-A-Toon (if you already have a running Linux environment) See also: https://toonforum.nl/ See also: https://www.domoticaforum.eu/ Version 2.0 (22th April 2023) Changed to multifile Changed powerSensor to powerMeter and multiSensor to gasMeter Added translation for English and Dutch Added support for Toon version 2v6 (for example firmware version V5.49.19) Added support for Toon version 2v5 Added support for Toon version 2v4 Added support for Toon version 2v3 Improved debug messages Version 1.3 (20th February 2022) Solved issue with "NaN" responses or other bad responses from Toon Energy Added child device voor actual solar production Version 1.2 (27th December 2021) Solved code error with toonVersion Version 1.1 (27th December 2021) Added support for Toon version 1 Added Simulation notice in labels Version 1.0 (3th October 2021) Ready for download Version 0.2 (30th September 2021) Gas from m³/h to l/h Splashed a bug Version 0.1 (29th September 2021) Initial version Variables (mandatory): IPaddress = IP address of your Toon Meter toonVersion = Version 1 or 2 (default) Interval = Number in seconds debugLevel = Number (1=some, 2=few, 3=all, 4=simulation mode) (default = 1) Download the QuickApp here (download the file and un-zip): https://github.com/GitHub4Eddy/toon_energy/archive/refs/tags/toon_energy-20.zip or from the Fibaro Marketplace: https://marketplace.fibaro.com/items/toon-energy How to install: Open the Configuration Interface Go to Settings > Devices Click + Choose Other Device Choose Upload File Choose file from your computer with .fqa


- 24 replies
-
- 2
-
-

-
- toon from eneco
- download
- (and 5 more)
-
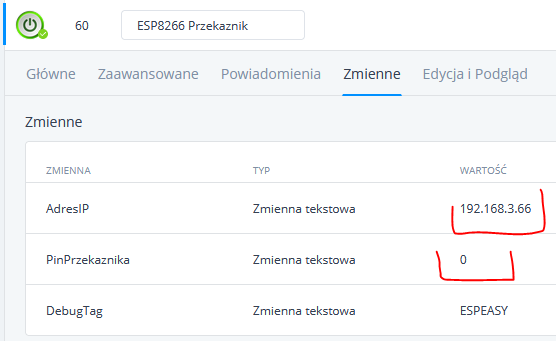
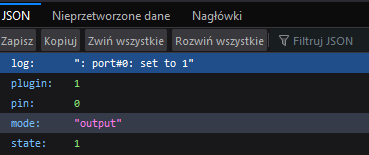
Integracja Fibaro HC3 QuickAPP z ESP8266 Cześć, nie znalazłem nigdzie działającej integracji hc3 quickapp i esp8266, więc postanowiłem sam taką stworzyć. Instalacja Instalujemy ESPEASY po szczegóły odsyłam na https://www.letscontrolit.com/wiki/index.php/ESPEasy Konfigurujemy połączenie Wi-Fi do naszej sieci domowej Na routerze musimy zarezerwować adres IP który dostało ESP8266 Dodajemy QuickAPP: -> -> -> Wskazujemy plik z załącznika ESP8266_Przekaznik.fqa W zakładce zmienne edytujemy adres IP urządzenia oraz pin na którym znajduje się przekaźnik Jak działa kod Po otwarciu strony http://adresip/control?cmd=GPIO,0,1 zmienia się stan na naszym pinie Kod napisałem w ten sposób, że LUA analizuje zwrotny kod JSON z ESP8266 przez co mamy potwierdzenie że polecenie włączenia lub wyłączenia zostało wykonane. ESP8266_Przekaznik.fqa


-
Hi, I already found lots of LUA scripts and other "inserts" for Bose Soundtouch but I can't find anything that works on HC3. Is someone already working on a QuickApp or some kind of VD for the Bose Soundtouch ? I don't have the proper skills to make something myself and I would love to integrate my Bose …. Thank you
-
I have seen somewhere in documentation a reference to some garage door openers. But when I look in swagger for the device in the /devices/hierarchy listing there is no entry. So my question is this, is there a mechanism to create a new device type? There probably isn't much to change and it could be built on an existing device type, I expect. I envision having four states (open, close, opening, closing) as well as an error state of some sort. I would also prefer to tell Alexa or Google Assistant or Siri to "Open the garage" not "Turn on the garage" but that may be asking a bit much, I fear. I will say that having taken the plunge into this adventure I am starting to understand things better. @jgab's TQAE has helped immensely. Thank you @jgab. Further, the tutorials that he has put on here are very helpful. I grow a bit frustrated that there are no "official" references for QAs and I haven't found a good way to find the relevant information quickly. Someday, when I grow up, I hope to be just like @jgab 😁 Thanks for any guidance on the above. PeterV959
-

Error 403 on QuickApp http request
edouardc posted a question in Other Devices / Third-party devices
Hi Team, I try to develop some QuickApp on my HC3, but I have an problem with the http request : When I call an API (here switchbot api), the external API respond me an 403 error... The probleme isn't the API because the same request with an little php script works... I have tried much methods but I get only the response code 403. Recently, I have downloaded an quickapp on the marketplace. All review on it are good but for me, it's doesn't work. When I see the console logs, I can see the 403 error code from this downloaded QuickApp too. Do you have an idea for my problem ? You can find my function code here : function QuickApp:GetDeviceList() self.http = net.HTTPClient({timeout=10*1000}) local apikey = self:getVariable("apikey"); self:debug(apikey); --For debug an my token is successfuly loaded local address = "https://api.switch-bot.com/v1.0/devices" --local address = "http://10.0.10.10:1880/debug" self.http:request(address, { options = { headers = { ["Authorization"] = apikey, ["Content-Type"] = "application/json; charset=utf8", ["Accept"] = "application/json", ["User-agent"] = "Mozilla/5.0" --For try but no change }, checkCertificate = false, method = 'POST' }, success = function(response) self:debug(response.status); --return : 403 self:debug(response.data); --return: nothing self:debug(response.headers);--return: array self:debug(message); --return: nil end, }); end -
This is a Quickapp script for HC3. I am trying to get this to work in a VD on HC2. Is it possible, or do I have to do it together with a scene to make it work? Can anyone help? function QuickApp:onInit() self:updateProperty("unit", "kr/kWh") self.refresh = 60 -- in seconds local function loop() self:webrequest(); setTimeout(loop,self.refresh * 1000) end if self.username ~= "changeme" then loop() end end function QuickApp:webrequest() local tid = os.date("%R") local minutt = os.date("%M") --OPPDATERER STRØMPRIS OG SNITT HVER TIME if (minutt == "00") then self:OppdaterPris(); self:OppdaterSnitt(); end end function QuickApp:OppdaterPris() --Opprette lokale variable local GammelStrompris = fibaro.get(126,"value") local NyStrompris --Definerer http local http = net.HTTPClient(); --Definerer strengen Payload til å være kommando til tibber local payload = '{"query": "{viewer {homes {currentSubscription{priceInfo{current{total}}}}}}", "variables": null, "operationName": null}'; --API.POST til Tibber-- http : request('https://api.tibber.com/v1-beta/gql', { options = { method = "POST", headers = { ['Authorization'] = '.........', --Min Tibber ID her. ['Content-Type'] = 'application/json' }, data = payload -- Query. }, success = function(response) --fibaro.debug (response.data) --Verifiser at en har fått response.data. Dette er data som en har fått fra Tibber local data = json.decode(response.data); --fjernet local under??? NyStrompris = json.encode(data.data.viewer.homes[1].currentSubscription.priceInfo.current.total); self:updateProperty("value", tonumber(NyStrompris)) --print("OK") end, error = function(err) fibaro.debug ("Error:" .. err) end }); end function QuickApp:OppdaterSnitt() --Definerer http local http = net.HTTPClient(); --Definerer strengen average til å være kommando til tibber local average = '{"query": "{viewer {homes {currentSubscription{priceRating{daily{entries{total}}}}}}}", "variables": null, "operationName": null}'; --API.POST Til Tibber http : request ('https://api.tibber.com/v1-beta/gql', { options = { method = "POST", headers = { ['Authorization'] = '...............', --Min Tibber ID her. ['Content-Type'] = 'application/json' }, data = average -- Query }, success = function(response) --fibaro.debug(response.data) --Verifiser at en har fått response.data. Dette er data som en har fått fra Tibber local data = json.decode(response.data); local Nypris = tostring(json.encode(data.data.viewer.homes[1].currentSubscription.priceRating.daily.entries[31].total)); self:updateProperty("log", tostring(Nypris)) end, } ) end
-
 I recently switched from the HC2 to the HC3. I am using the Eventrunner4 Quickapp with complete satisfaction! The HC3 has the ability to create profiles. I would like to know the best method to turn a Quickapp on/off for a certain profile. Or is this already built into Eventrunner4? I can't figure it out.
 -
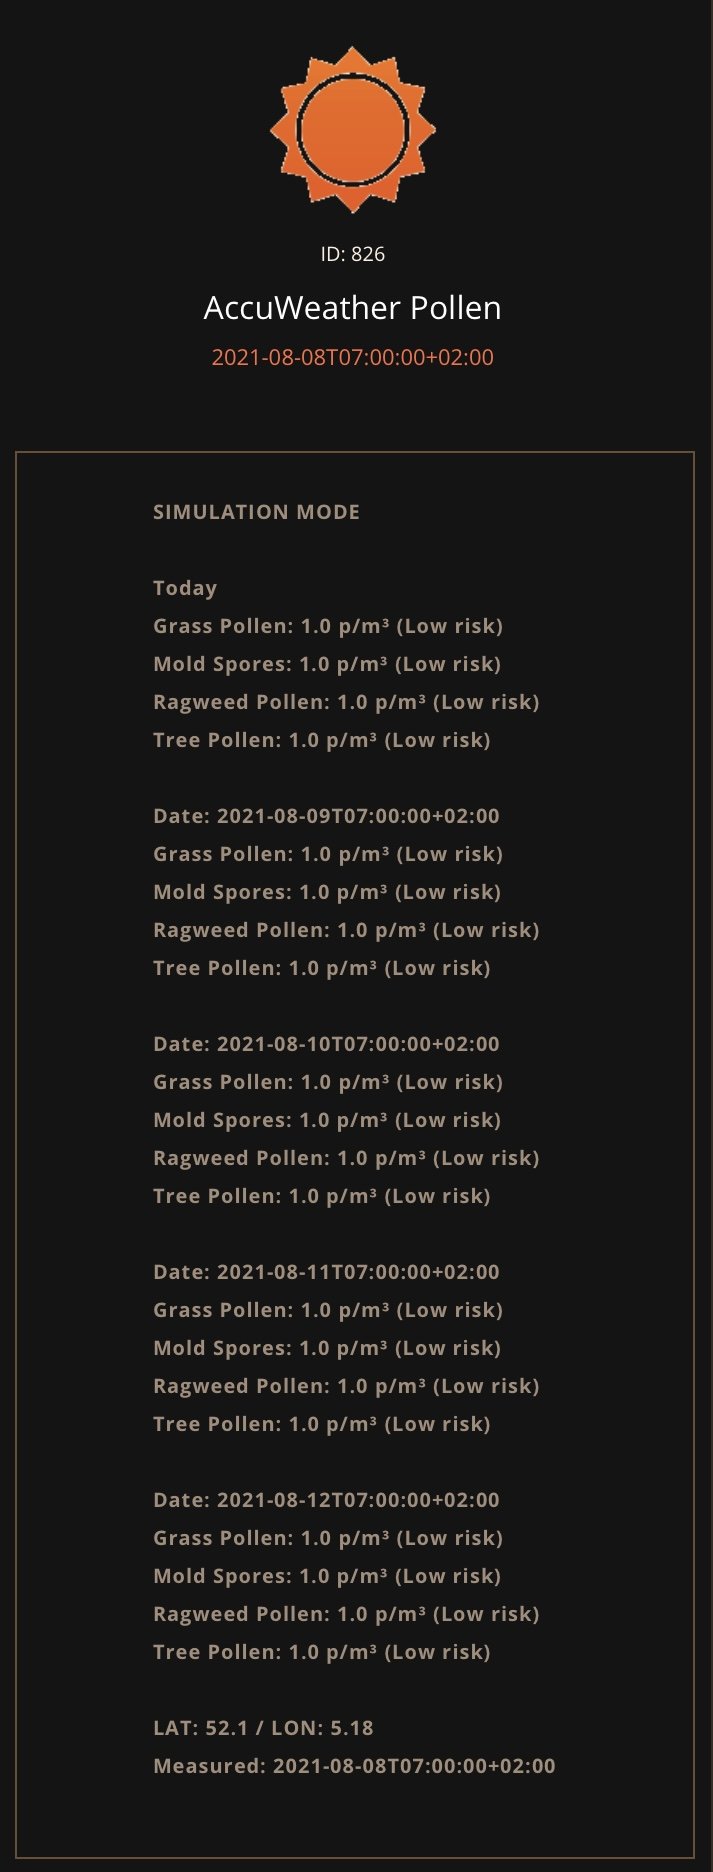
This QuickApp gives access to real-time and 5-day forecast pollen count and risk category for grass pollen, mold spores, ragweed pollen and tree pollen of any location from AccuWeather.com Pollen is a fine powder produced by trees and plants Pollen can severely affect people, especially those with different ailments such as asthma and respiratory issues. It can aggravate these existing conditions or cause these issues in high risk groups Grass Pollen: Pollen grains from grasses Mold Spores: The fungus produces spores that can become airborne Radweed Pollen: Ragweeds are annual and perennial herbs and shrubs. A single plant may produce about a billion grains of pollen per season. Tree Pollen: Pollen from trees such as Birch and Oak The QuickApp provides a risk evaluation with levels in particles/m³ Grass Pollen Risk Begin Range End Range Low 0 4.99 Moderate 5 19.99 High 20 199.99 Very High 200 299.99 Extreme 300 1000000 Mold Spores Risk Begin Range End Range Low 0 6499.99 Moderate 6500 12999.99 High 13000 49999.99 Very High 50000 64999.99 Extreme 65000 1000000 Ragweed Pollen Risk Begin Range End Range Low 0 9.99 Moderate 10 49.99 High 50 499.99 Very High 500 649.99 Extreme 650 1000000 Tree Pollen Risk Begin Range End Range Low 0 14.99 Moderate 15 89.99 High 90 1499.99 Very High 1500 2999.99 Extreme 3000 1000000 IMPORTANT You need an API key from https://developer.accuweather.com The API is free up to 50 API calls/day, one key Variables (mandatory): apiKey = Get your free API key from AccuWeather locationKey = AccuWeather number from your HC3 Lon/Lat interval = [number] in seconds time to get the data from the API timeout = [number] in seconds for http timeout debugLevel = Number (1=some, 2=few, 3=all, 4=simulation mode) (default = 1) icon = [numbber] User defined icon number (add the icon via an other device and lookup the number) ownload the QuickApp here (download the file and un-zip): https://github.com/GitHub4Eddy/accuweather_pollen/archive/refs/tags/accuweather_pollen-01.zip How to install: Open the Configuration Interface Go to Settings > Devices Click + Choose Other Device Choose Upload File Choose file from your computer with .fqa


-
I was looking for a solution to get my Fibaro HC3 to trigger an Alexa routine, it appears that only devices such as a contact or a motion sensor can be used as an Alexa routine trigger. Then I watched a YouTube video by Brian from “Automate Your Life” where he makes a virtual device to interface between SmartThings and Alexa, in SmartThings it’s called a “Device handler” which I presume is similar to a Fibaro QuickApp. This consisted of a switch combined with a contact, when the switch is triggered the contact closes, this contact can be used to trigger an Alexa routine. https://www.youtube.com/watch?app=desktop&v=BqJ3cHHcNyc&feature=youtu.be As I don’t know much about virtual devices in Fibaro controllers I thought maybe I can do the same with a physical device, such a Smart Implant FGBS-222 which incorporates switches and contacts. Out of the box triggering an input causes the output switch to change state, what I needed was the other way around. In the setup I disconnected the inputs from the outputs then hard wired the inputs to the outputs so when the output relay switch is turned on from within HC3 the input is pulled to ground. It works ! the input contact is now visible in Alexa routines as a trigger, now I can use a scene to turn on the output relay switch and this in turn activates the input contact and the Alexa routine. The possibilities created by this are endless only limited by your imagination, from getting Alexa to read out messages to controlling other devices which Alexa has access to but Fibaro does not. BUT Smart Implant devices are expensive currently £35 on Amazon here in the UK SO All you programmers out there, is it possible to make a QuickApp with the same functionality ?
-
Version 1.0.2
92 downloads
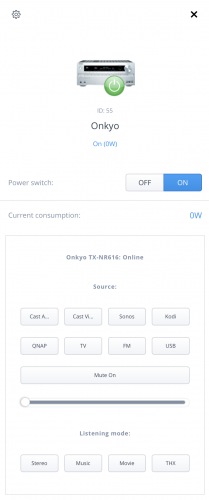
About This File Onkyo QuickApp INTRODUCTION Onkyo has a range of network connected Audio/Video receivers that can be controlled via a network UTP connection. This QuickApp provides basic control of the A/V receiver. Tested on an Onkyo TX-NR616. QuickApp should be easy to adapt to other models if required. This is my first QuickApp, any suggestion to make it better highly appreciated. PREREQUISITES Tested on Fibaro Home Center HC3L and Yubii Home with firmware 5.071.52 An Onkyo AV Receiver FEATURES Basic On/Off Volume Control Mute On/Off toggle switch 8 Input selectors, label can be customised using variables 4 Listening Modes On/off line status indicator INSTALLATION Please check provided User Manual. Upload file in the device section. AVAILABLE DOWNLOAD Onkyo 2021-06-23.fqa Icons - found on the forum and slightly adapted TERMS AND CONDITIONS Permission to use, copy, modify and distribute this software and its documentation for educational, research, personal use and non-profit purposes, without fee and without a signed licensing agreement is hereby granted, provided that the copyright notice, with "Terms and conditions" and "Disclaimer" appear in all copies, modifications and distributions. It is strictly forbidden to sell, rent, lease and/or lend this software for profit without prior consent from the Author. DISCLAIMER This software is provided by copyright owner "as is" and any express or implied warranties, including, but not limited to, the implied warranties of merchantability and fitness for a particular purpose are disclaimed. In no event shall the author and distributor be liable for any direct, indirect, incidental, special, exemplary, or consequential damages (including, but not limited to, procurement of substitute goods or services; loss of use, data, or profits; or business interruption) however caused and on any theory of liability, whether in contract, strict liability, or tort (including negligence or otherwise) arising in any way out of the use of this software, even if advised of the possibility of such damage. Fibar Group S.A. and their employees are not responsible for support of the ABC VD. VERSION HISTORY 1.0.2 - First public release -

Remove percentage from slider or make it whatever I want
carlosdr02 posted a question in FIBARO Mobile
Is it possible to change the range of a slider, I mean, instead of going from 0% to 100%, can I make it go from 15ºC to 30ºC somehow, if not, can I remove the percentage tag of the slider completely? Thx -
Quick question: How can I update the value of a slider? I've tried self:updateProperty, self:updateView, fibaro:call, etc, and none of them seem to work.
-
How can I add the custom controls that appear on templates
carlosdr02 posted a question in FIBARO Mobile
There is supposed to be only three types of controls: buttons, sliders and labels, but if I create a Quick App with a template (thermostat auto for instance), I has other controls, like combo boxes. How can I add those custom controls or create them myself. And why can I not delete the controls of the templates, I mean, if I use a template, I can only delete the controls that I add on top of the default ones, in fact, those templates controls don't even show up in the preview window. whut ?¿?¿ -
I need to send commands to a Modbus router to turn on a thermostat. I've heard that the commands need to be sent in hexadecimal format, as shown in this example I found online: function QuickApp:turnOn() comand = string.char(0x00,0x01,0x00,0x00,0x00,0x06,0x01,0x06,0x00,0x64,0x00,0x01); self:send(comand) -- sending data to the device. In a normal implementation it will be a code with an appropriate command. self:updateProperty("value", true) end But how can I know how to encript the commands I want in this format, I mean, how many characters it needs to be, in what order, etc. I can't find any info online so any help is appreciated. Thx.
-
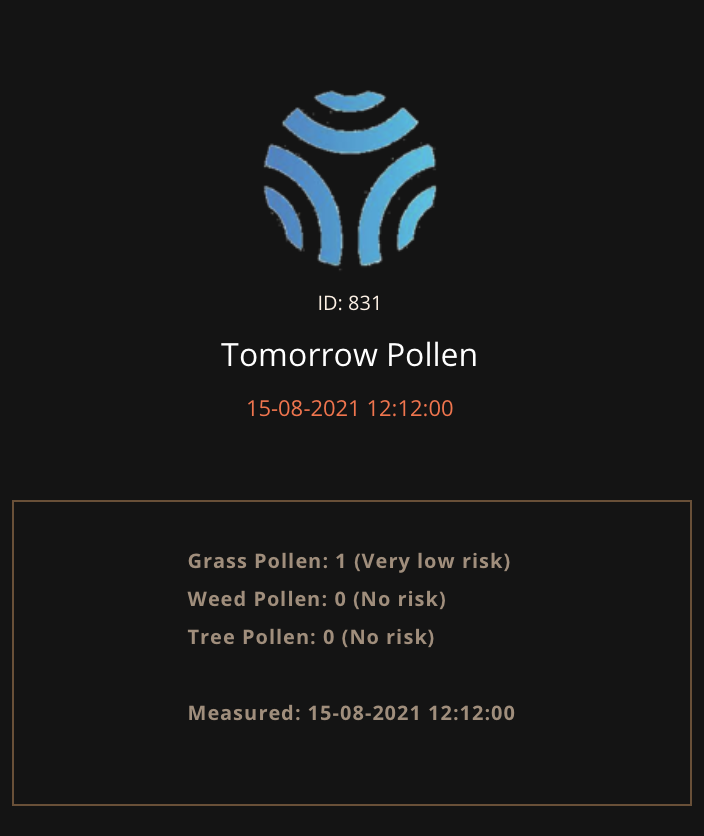
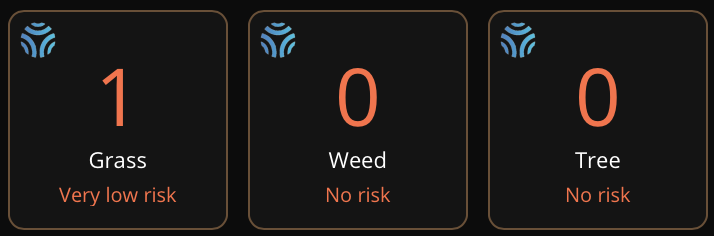
This QuickApp gives access to real-time pollen count and risk category for grass pollen, weed pollen and tree pollen of any location from Tomorrow.io Pollen is a fine powder produced by trees and plants Pollen can severely affect people, especially those with different ailments such as asthma and respiratory issues. Version 0.1 (15th August 2021) Initial working version Pollen: Grass Pollen: Pollen grains from grasses Weed Pollen: Weeds are annual and perennial herbs and shrubs. A single plant may produce about a billion grains of pollen per season. Tree Pollen: Pollen from trees such as Birch and Oak Risk: 0: None 1: Very low 2: Low 3: Medium 4: High 5: Very High IMPORTANT You need an API key from https://app.tomorrow.io The API is free up to 500 calls / per day, 25 calls / per hour, 3 calls / per second (Pollen is 5% of rate limit) You need to create your location in https://app.tomorrow.io/locations to get a location ID and copy it to the QuickApp variable Variables (mandatory): Variables (mandatory): apiKey = Get your free API key from Tomorrow.io location = Tomorrow.io location ID (created in https://app.tomorrow.io/locations) interval = [number] in seconds time to get the data from the API timeout = [number] in seconds for http timeout debugLevel = Number (1=some, 2=few, 3=all, 4=simulation mode) (default = 1) icon = [numbber] User defined icon number (add the icon via an other device and lookup the number) Download the QuickApp here (download the file and un-zip): https://github.com/GitHub4Eddy/Tomorrow.io_Pollen/archive/refs/tags/tomorrow_io_pollen-01.zip How to install: Open the Configuration Interface Go to Settings > Devices Click + Choose Other Device Choose Upload File Choose file from your computer with .fqa


.thumb.jpg.8b37241215f4fd55d340c14f7bd3cba4.jpg)