Welcome to Smart Home Forum by FIBARO
Dear Guest,
as you can notice parts of Smart Home Forum by FIBARO is not available for you. You have to register in order to view all content and post in our community. Don't worry! Registration is a simple free process that requires minimal information for you to sign up. Become a part of of Smart Home Forum by FIBARO by creating an account.
As a member you can:
- Start new topics and reply to others
- Follow topics and users to get email updates
- Get your own profile page and make new friends
- Send personal messages
- ... and learn a lot about our system!
Regards,
Smart Home Forum by FIBARO Team
Search the Community
Showing results for tags 'quickapp'.
-
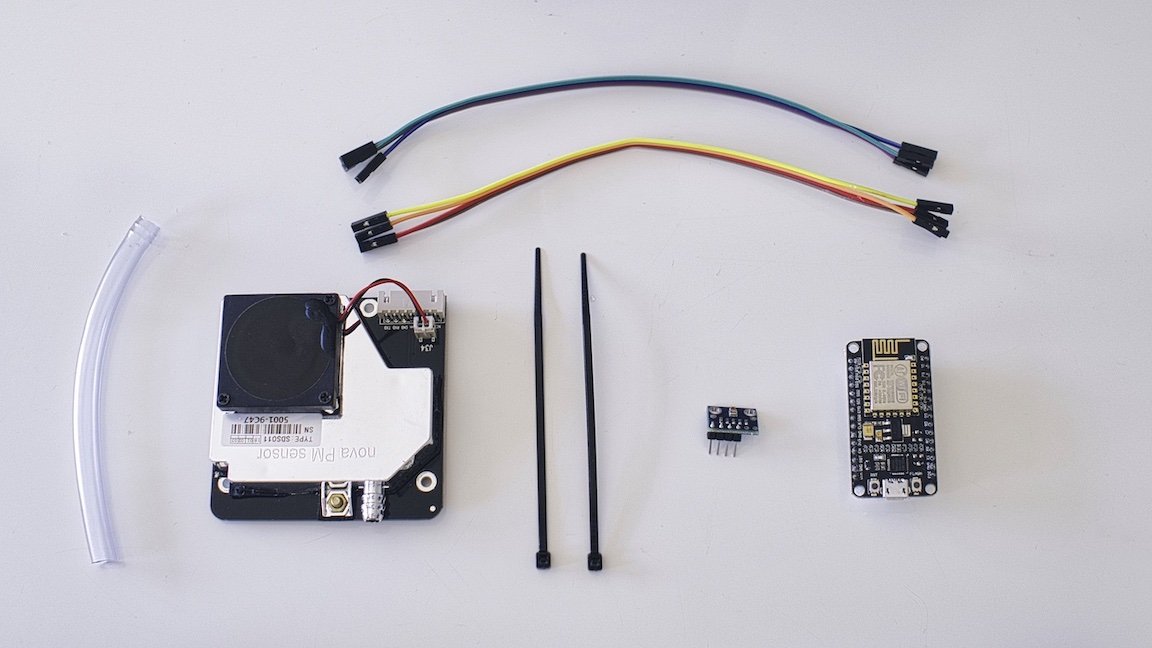
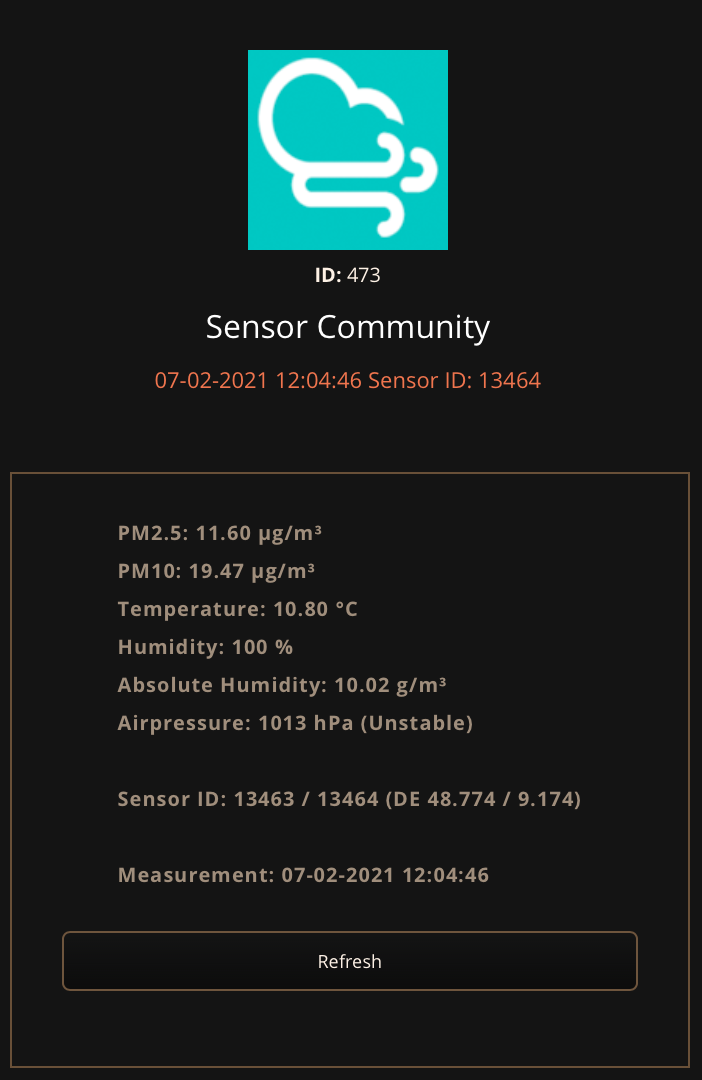
This QuickApp reads the PM1, PM2.5, PM4, PM10, Temperature, Humidity and Air Pressure (and calculated absolute Humidity) values directly from a sensor. With this sensor you can measure air quality yourself. This QuickApp will send notifications when PM2.5 or PM10 readings reach a breakpoint. The Air Quality sensor is a DIY setup for less than 50 euro. It is very easy to assemble and ready to make kits are available, see also https://sensor.community/en/sensors/airrohr/ for more info. You can order seperate items from for example AliExpress for the lowest prices, or order a complete set from: https://nettigo.eu/products/sensor-community-kit-sds011-bme280-english-language or https://www.tinytronics.nl/shop/nl/luchtwachters-delft-maak-zelf-een-fijnstofmeter-workshop-kit The Air Quality Sensor has a WiFi interface and Application Programming Interface (API). This QuickApp uses the API to get the measurements available to the Fibaro Homecenter. Changes version 1.2 (11th April 2021) Added support (child devices) for PM1 and PM4 levels (Plantower and Sensirion sensors) Added support for BMP280 sensor Changes version 1.1 (31th Januari 2021) Added support for Plantower Air Quality Sensor (for now without PM1.0) Added Airpressuretext to log of Child Device Airpressure Added Quickapp variable for debug level (1=some, 2=few, 3=all). Recommended default value is 1. Removed QuickApp Variable bme280Sensor (no need for that anymore, works without it) Removed QuickApp Variable path (is now fixed) Changes version 1.0 (23rd January 2021) Added Child Device for Absolute Humidity Added "Refresh" button Changes version 0.5 (23rd October) With the new firmware and API function, solved a small bug in presenting WiFi dBm Changed humidity and air pressure values to zero decimals Added air pressure unit text "hPa" Changed the master device to "Generic Device" Added QuickApp Variable for user defined icon master device Solved a bug preventing creation of QuickApp Variable bme280Sensor Changes version 0.4 (17th October 2020) Added support for BME280 sensor (temperature, humidity and air pressure) Added QuickApp Variable bme280Sensor (true or false) to indicate the presence of a BME280 sensor otherwise a DHT22 sensor is assumed Reduced the amount of labels, now only one label Removed the firmware version from the log under the icon Changes version 0.3 Error message instead of debug message in case of an error Changed method of adding QuickApp variables, so they can be edited Added network error to log (under icon) Changes version 0.2 Changed label6 from "age" to time of the measurement Added automatic creation of child devices for Temperature, Humidity, PM2.5 and PM10 (with great help from @jgab from forum.fibaro.com) Added the value (Temperature, Humidity, PM2.5 and PM10) to the child devices, This can be used in, for instance, extra scenes and shows in the mobile app and dashboard. Added a short text of the air quality (GOOD, SATISFACTORY, etc.) to the icons in the dashboard (with great help of @petergebruers and @10der from forum.fibaro.com) Added the trend (up, down, equal) to the sort text of the air quality My configuration of the DIY air quality sensor: Nova SDS011 air quality sensor NodeMCU ESP8266 V2 opensource WiFi board BME280 temperature, humidity and air pressure sensor See how to simply assemble the air quality sensor yourself: https://sensor.community/en/sensors/airrohr/ See for general informatie about the Air Quality Sensor: https://luftdaten.info See for a map of measurements: https://sensor.community/en/ See for CVS files: https://archive.luftdaten.info See for sources: https://github.com/opendata-stuttgart/ QuickApp variables (mandatory, they will be automatically added with the default values): IPaddress = IP address of your sensor Path = Path behind the IP address, normally /data.json Interval = Number in seconds, the sensor normally is updated every 145 seconds UserID = User id to notify of PM2.5 / PM10 breakpoints bme280Sensor = Use of BME280 temperature, humidity and air pressure sensor, true or false PM2.5 breakpoints 0 - 30 GOOD (Minimal) 31 - 60 SATISFACTORY (Minor breathing discomfort to sensitive people) 61 - 90 MODERATELY POLLUTED Breathing discomfort to asthma patients, elderly and children 91 - 120 POOR (Breathing discomfort to all) 121 - 250 VERY POOR (Respiratory illness on prolonged exposure) 250+ SEVERE (Health impact even on light physical work. Serious impact on people with heart/lung disease) PM10 breakpoints 0 - 50 GOOD (Minimal) 51 - 100 SATISFACTORY (Minor breathing discomport to sensitive people) 101 - 250 MODERATELY POLLUTED Breathing discomfoort to asthma patients, elderly and children 251 - 350 POOR (Breathing discomfort to all) 351 - 430 VERY POOR (Respiratory illness on prolonged exposure) 430+ SEVERE (Health impact even on light physical work. Serious impact on people with heart/lung disease) Download the QuickApp here (download the file and un-zip): https://github.com/GitHub4Eddy/air_quality_sensor/archive/refs/tags/Air_Quality_Sensor_12.zip Or Fibaro Marketplace: https://marketplace.fibaro.com/items/air-quality-sensor How to install: Open the Configuration Interface Go to Settings > Devices Click + Choose Other Device Choose Upload File Choose file from your computer with .fqa


-
Here is a link to a set of QAs to control Shelly devices. https://www.smarthome.com.au/free-shelly-quick-apps-for-fibaro-home-center-3/ It's both gen 1 and gen 2 devices. Gen 2 devices are easier to integrate with the web socket API than the gen 1 where we need to poll the device with regular interval. Battery operated devices are in general a pain to support as they sleep and wake up now and then - which makes polling difficult. So, battery devices are not in focus The QAs support the basic features expected from a device of that QA type so they fit into the fibaro model of handling devices. Extra features like setting timers etc that Shelly support is better handled with the pretty good mobile/cloud Shelly app. There are a lot of devices that are potentially supported but not all have been tested. Please give us feedback here or in https://www.smarthome.com.au/free-shelly-quick-apps-for-fibaro-home-center-3/ so we can come out with an 1.1 update... (gen 1 Shelly 1 and Shelly 1PM have issues but will be fixed in next release) The suite contains 5+1 different QAs that each support different Shelly devices. The devices tested, and devices not tested but we expect they could work are: ShellyMultiDevice v1.0 com.fibaro.deviceController + child devices Supported Shelly devices: - Shelly 3EM (Gen1). Note: untested Children: - com.fibaro.binarySwitch - com.fibaro.energyMeter - com.fibaro.energyMeter - com.fibaro.energyMeter - Shelly EM (Gen1). Note: tested Children: - com.fibaro.binarySwitch - com.fibaro.energyMeter - com.fibaro.energyMeter - Shelly Plus 2PM (Switch) (Gen2). Note: tested Children: - com.fibaro.binarySwitch - com.fibaro.binarySwitch - Shelly Pro 2 (Gen2). Note: untested Children: - com.fibaro.binarySwitch - com.fibaro.binarySwitch - Shelly Pro 2M (Switch) (Gen2). Note: tested Children: - com.fibaro.binarySwitch - com.fibaro.binarySwitch - Shelly Pro 3 (Gen2). Note: tested Children: - com.fibaro.binarySwitch - com.fibaro.binarySwitch - com.fibaro.binarySwitch - Shelly Pro 4PM (Gen2). Note: tested Children: - com.fibaro.binarySwitch - com.fibaro.binarySwitch - com.fibaro.binarySwitch - com.fibaro.binarySwitch Supported HC3 QuickAppMethods: - <com.fibaro.binarySwitch>:turnOn() - <com.fibaro.binarySwitch>:turnOff() - <com.fibaro.binarySwitch>:toggle() ShellySingleColor v1.0 com.fibaro.colorController Supported Shelly devices: - Shelly Color Bulb (Gen1). Note: tested, only color mode for now - Shelly RGBW2 Color (Gen1). Note: tested Supported HC3 QuickAppMethods: - QuickApp:turnOn() - QuickApp:turnOff() - QuickApp:setValue(val) - QuickApp:setColor(r,g,b,w) - QuickApp:startLevelIncrease() - QuickApp:startLevelDecrease() - QuickApp:stopLevelChange() ShellySingleCover v1.0 com.fibaro.rollerShutter Supported Shelly devices: - Shelly Plus 2PM (Cover) (Gen2). Note: tested - Shelly Pro 2M (Cover) (Gen2). Note: tested Supported HC3 QuickAppMethods: - QuickApp:open() - QuickApp:close() - QuickApp:stop() - QuickApp:setValue(value) ShellySingleDimmer v1.0 com.fibaro.multilevelSwitch Supported Shelly devices: - Shelly Dimmer 1 (Gen1). Note: tested - Shelly Dimmer 2 (Gen1). Note: tested - Shelly Vintage (Gen1). Note: tested Supported HC3 QuickAppMethods: - QuickApp:turnOn() - QuickApp:turnOff() - QuickApp:setValue(val) - QuickApp:startLevelIncrease() - QuickApp:startLevelDecrease() - QuickApp:stopLevelChange() ShellySingleSwitch v1.0 com.fibaro.binarySwitch Supported Shelly devices: - Shelly 1 (Gen1). Note: untested - Shelly 1L (Gen1). Note: untested - Shelly 1PM (Gen1). Note: tested, not working yet...TBD - Shelly Plus 1 (Gen2). Note: tested - Shelly Plus 1 PM (Gen2). Note: tested - Shelly Plus Plug IT (Gen2). Note: untested - Shelly Plus Plug S (Gen2). Note: tested - Shelly Plus Plug UK (Gen2). Note: untested - Shelly Plus Plug US (Gen2). Note: untested - Shelly Pro 1 (Gen2). Note: tested - Shelly Pro 1 PM (Gen2). Note: tested Supported HC3 QuickAppMethods: - QuickApp:turnOn() - QuickApp:turnOff() - QuickApp:toggle() ShellyPlusHT v1.0 com.fibaro.temperatureSensor + com.fibaro.humiditySensor child Supported Shelly devices: - Shelly Plus H&T (Gen2). Note: tested, experimental, only wakes up when new data is available Children: - com.fibaro.temperatureSensor - com.fibaro.humiditySensor Supported HC3 QuickAppMethods:
-
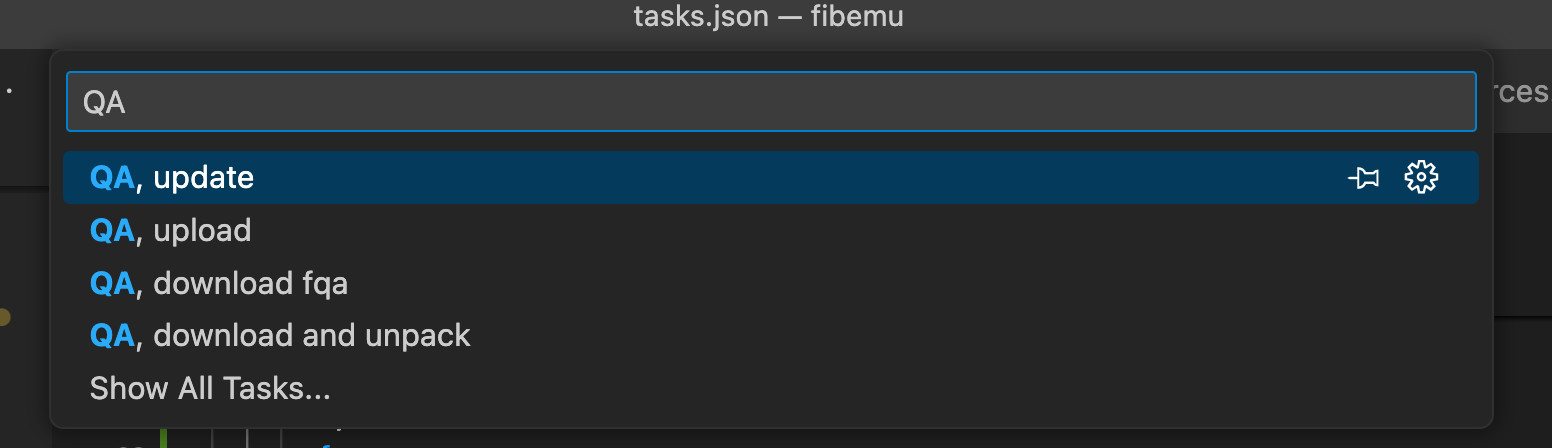
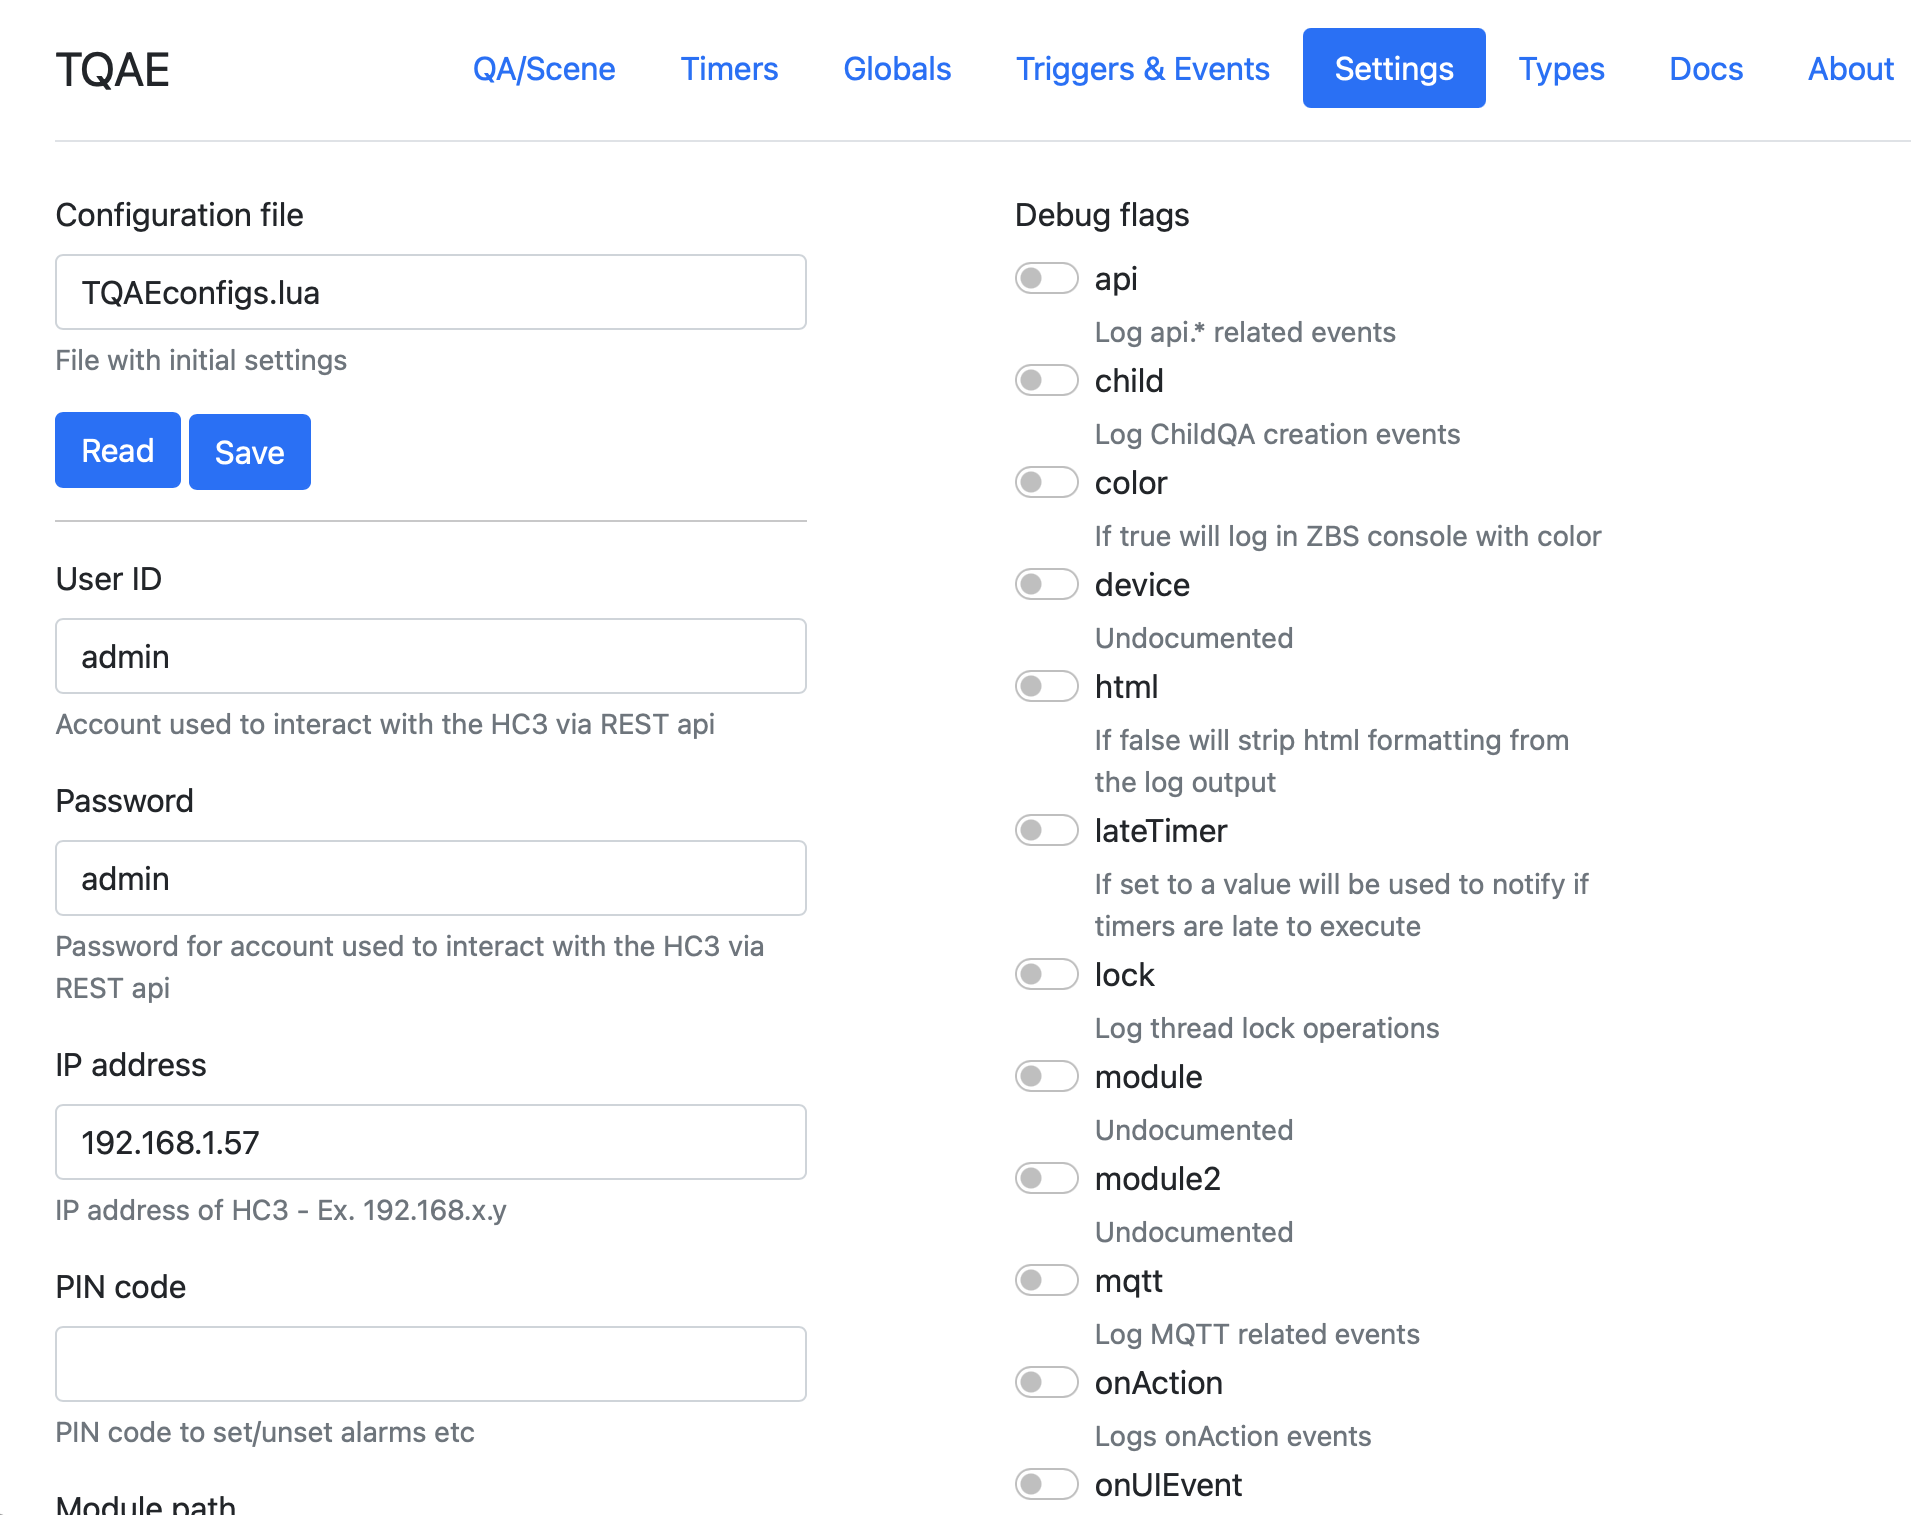
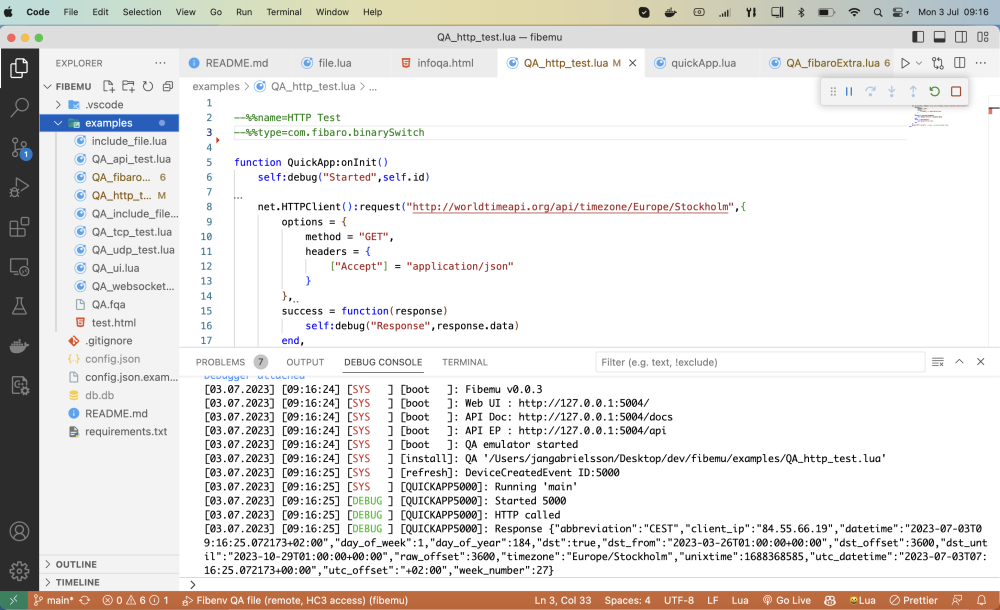
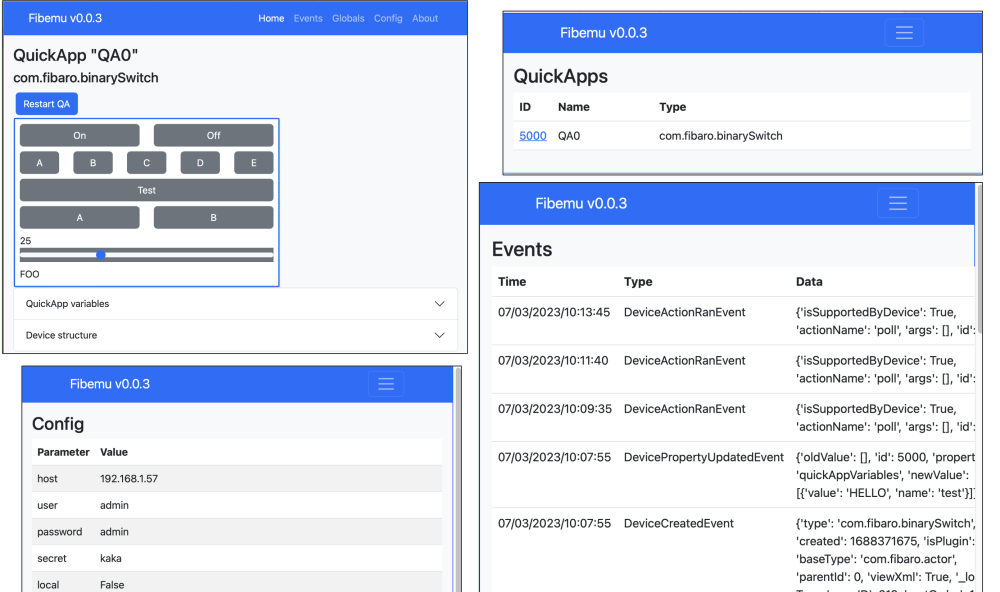
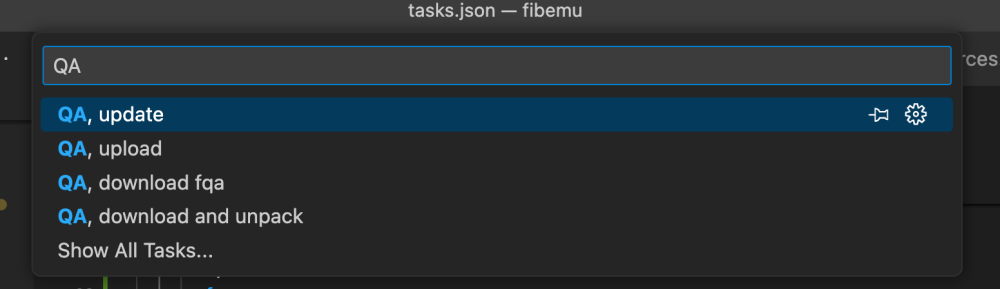
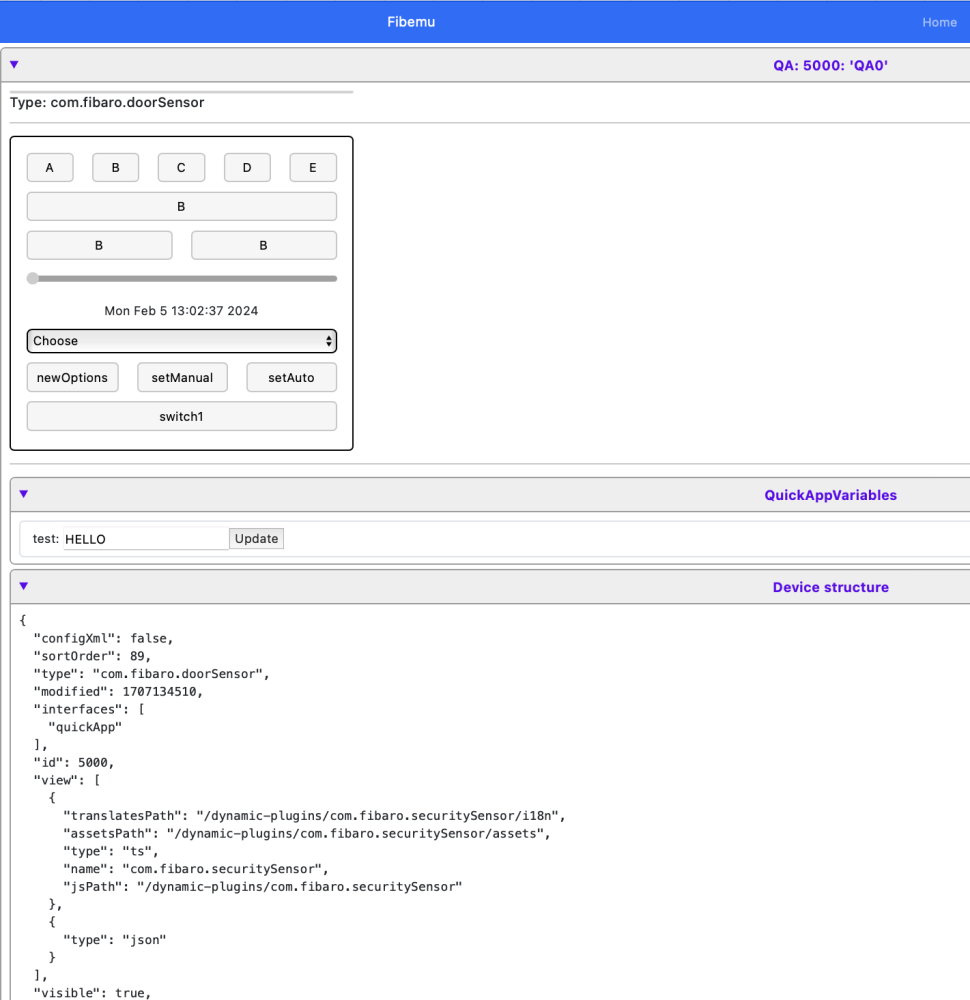
This setup is designed for QA development using Visual Studio Code (VSCode). It includes an emulator, allowing you to run and debug QAs directly in VSCode. This setup is compatible with HC3, offering features such as code completion, syntax highlighting, and workflow tasks for downloading, editing, packaging, and uploading QAs to/from HC3. Tested on Windows 11 and MacOS, this setup should also work on Linux. You can download the repository from here. Documentation, still in progress, is available here. Additionally, there's a video tutorial on installing this setup on Windows 11. The setup in VSCode looks as shown in the image. This configuration allows you to develop and run a QuickApp (QA) offline on your PC, Mac, or Linux system, and interact with the HC3 in a controlled manner. There's also a simple Web user interface for interacting with the QAs and monitoring events (available at http://127.0.0.1:5004/frontend) To get started: Install Python 3 on your machine. NOTE! Only Python v3.11 is supported currently (3.12 will come later). To test if the installation is ok , in the vscode terminal window, type >python3 ...and see if it starts the interpreter. Install the required Python libraries from requirements.txt using >pip install -r requirements.txt. Create a config.json file with credentials to access the HC3, based on the config.json.example. Install the VSCode extension "Local Lua Debugger" by Tom Blind. Create a QA file in the directory, choose the launcher "Fibenv QA file (remote)," and start debugging with F5. For more examples, refer to the files in the examples/ directory. The included .gitignore file excludes the ./dev and ./test subdirectories, allowing you to test your own code without affecting the rest of the repository. For installing Python libraries, it's recommended to create a virtual environment in the folder first. This setup includes a Python wrapper for the Lua runtime (Lupa), addressing dependencies on luasocket and others, eliminating the need for Lua installation on your machine. To instruct the emulator about the type of QA, directives similar to TQAE can be used in the QA file, but with slight differences, as shown in the example. Ex. --%%name=MyQA --%%type=com.fibaro.binarySwitch --%%file=qa3_1.lua,extra; --%%remote=devices:788,790 --%%remote=globalVariables:myVar,anotherVar --%%debug=libraryfiles:false,userfilefiles:false function QuickApp:onInit() self:debug(self.name,self.type,self.id) fibaro.call(788,"turnOn") end Note the --%%remote directive It instructs the emulator that it's ok to call device 788,789 o the HC3. As a default, the emulator treats all resources as local (we can read from HC3 but then treat them as local copies) and we enable resources we want to interact with on the HC3 as 'remote'. This goes for other resources also like 'globalVariables'. The setup integrates with the Lua debugger, allowing for breakpoint setting and more. Note that this project is still in progress, and updates will be provided as improvements are made. The emulator UI can be accessed at http://127.0.0.1:5004/, with a Swagger page for implemented APIs at http://127.0.0.1:5004/docs. The port (5004) can be changed as needed. Supported APIs include various fibaro and net functions, along with api calls and plugin functions. The setup also includes classes for QuickApp development and management. Supported APIs fibaro.debug(tag,str) fibaro.warning(tag,str) fibaro.trace(tag,str) fibaro.error(tag,str) fibaro.call(deviceID, actionName, ...) fibaro.getType(deviceID) fibaro.getValue(deviceID, propertyName) fibaro.getName(deviceID) fibaro.get(deviceID,propertyName) fibaro.getGlobalVariable(varName) fibaro.setGlobalVariable(varName ,value) fibaro.getRoomName(roomID) fibaro.getRoomID(deviceID) fibaro.getRoomNameByDeviceID(deviceID) fibaro.getSectionID(deviceID) fibaro.getIds(devices) fibaro.getAllDeviceIds() fibaro.getDevicesID(filter) fibaro.scene(action, sceneIDs) fibaro.profile(profile_id, action) fibaro.callGroupAction(action,args) fibaro.alert(alert_type, user_ids, notification_content) fibaro.alarm(partition_id, action) fibaro.setTimeout(ms, func) fibaro.clearTimeout(ref) fibaro.setInterval(ms, func) fibaro.clearInterval(ref) fibaro.emitCustomEvent(name) fibaro.wakeUpDeadDevice(deviceID) fibaro.sleep(ms) ...and corresponding hub.* functions net.HTTPClient() net.TCPSocket() net.UDPSocket() net.WebSocketClient() net.WebSocketClientTLS() --mqtt.Client.connect(uri, options) --no yet --<mqttclient>:addEventListener(message,handler) --no yet --<mqttclient>:subscribe(topic, options) --no yet --<mqttclient>:unsubscribe(topics, options) --no yet --<mqttclient>:publish(topic, payload, options) --no yet --<mqttclient>::disconnect(options) --no yet api.get(call) api.put(call <, data>) api.post(call <, data>) api.delete(call <, data>) setTimeout(func, ms) clearTimeout(ref) setInterval(func, ms) clearInterval(ref) json.encode(expr) json.decode(string) plugin.mainDeviceId ---plugin.deleteDevice(deviceId) --not yet plugin.restart(deviceId) plugin.getProperty(id,prop) plugin.getChildDevices(id) plugin.createChildDevice(prop) class QuickAppBase class QuickApp class QuickAppChild class RefreshStateSubscriber class <name> property(get,set) QuickApp:onInit() -- called at startup if defined QuickApp - self:setVariable(name,value) QuickApp - self:getVariable(name) QuickApp - self:debug(...) QuickApp - self:trace(...) QuickApp - self:warning(...) QuickApp - self:error(...) QuickApp - self:updateView(elm,type,value) QuickApp - self:updateProperty(name,value) QuickApp - self:createChildDevice(props,device) QuickApp - self:removeChildDevice(id) QuickApp - self:initChildDevices(table) QuickApp - self:isTypeOf(typ) QuickApp - self:callAction(name, ...) QuickApp - self:setName(name) QuickApp - self:setEnabled(bool) QuickApp - self:setVisible(bool) getHierarchy() For your own QA development have the repo 'fibemu' downloaded in a separate directory. Then create your own vscode development directory, and initialise that as a git repo if you want. With that open, do File->Add Folder to Workspace, and add the fibemu folder. This is what Vscode calls a "multi-root" workspace and it. Create a lua (QuickApp file) in your directory. First line in your QuickApp file should be the offset to your directory --%%root=../<name of your dir>/ So if you have a multi-root workspace now that looks like o fibemu o myDirectory You set the root to ../myDirectory/ Then press F5 to start to debug. The launch commands and other will be taken from the fibemu folder. This way you can pull down new version of fibemu without messing up your own directory and development. Also, don't forget to setup your config.json with credentials (copy from fibemu/config.json.example) Here is a link to the multi-project setup instructions (may include a video in the future) Implementation Some implementation notes. Supported REST APIs. Workflow There are some defined vscode Tasks that help in remotely uploading and updating the QA on the HC3 from within the vscode environment "QA, download fqa" downloads an QA from the HC3 and saves it as a .fqa file. The task will prompt for deviceID and path where to store. The path/dir needs to exist "QA, download and unpack" downloads an QA from the HC3 and saves all QA files as .lua files. It also adds fibemu headers in the main file so it can be opened and run with the emulator . The task will prompt for deviceId and path where to store. The path/dir needs to exist "QA, upload" will upload the QA to the HC3. It will prompt for QA file. If '.' is given as argument it will upload the current opened file. This will create a new QA, with a new deviceId on the HC3. "QA, update" will try to update QA files, viewLayout, uiCallbacks, and quickAppVariables of an existing QA on the HC3. If '.' is given as argument the file must have set the fibemu header --%%id=<ID> so it knows what QA to update. One can also give the deviceId of the QA on the HC3 that should be updated. This is convenient when developing and avoiding new IDs being "consumed". Sometimes when you update a QA you would not like to update the quickAppVariables. In that case give '-' instead '.' for the current opened file, or -deviceId for an exiting QA on the HC3. Scripts An advantage with the emulator is that we have access to more lua functions than on the HC3 which allow us to write some maintenance scripts QA backup. Backs up QAs from the HC3 to a local directory, keeping the 3 last versions QA distribution. Packs a development file to a .fqa, initialises some quickAppVariables, adds readme.txt file and zips it to an archive. Known issues While the QA is running, break-points can't be added. This is a limitation of the debugger used. Just add the break-point and restart the QA. When the emulator crashes, it may leave a process open that keeps the port 5004 in use. The emulator will complain at restart that the port is already bound. You may need to manually kill the process. On Mac: >kill -9 $(lsof -ti:5004)
- 287 replies
-
- 7
-

-

-
- visual studio code
- quickapp
- (and 3 more)
-
The EventRunner QuickApp makes it easy to write home automation rules, but also allows for development of very advanced rules Schedule actions at specific times with additional conditions Trigger actions when complex conditions are met Interact with other QuickApps and systems A complete event based programming language "eventscript" that is concise and powerful to describe concurrent automation rules. Example -- Setup some variables to use in rules (We could also use a "home-table") rule("xmas={ tree = 122, light = 166 }") -- xmas tree and light deviceIds rule("kitchen = {}") rule("kitchen.lamps = { 77, 98, 101 }"). -- deviceIds of lights in kitchen rule("kitchen.sensors = { 56, 33}") -- deviceIds of motion sensors in kitchen -- Define rules rule("kitchen.sensors:breached => kitchen.lamps:on") -- If any sensor is breached, turn on lights rule("trueFor(00:10,kitchen.sensors:safe) => kitchen.lamps:off") -- If all sensors are safe for 10 minutes, turn off lights rule("@sunset-01:00 & wday('sat-sun') => xmas.tree:on") -- 1 hour before sunsets on Saturday and Sunday turn on xmas tree rule("remote:key == '2:Pressed' => xmas.light:toggle") -- Key 2 on remote toggles xmas light on/off rule("kitchen.sensors:breached & once(06:00..08:00) => fibaro.call(RadioQA,'play')") -- Start radio when someone enters kitchen between 6 and 8, but only once Many more possibilities, with rules triggering on temperatures, alarm states, global variables etc etc... The rule language "event script" is designed to be reasonable easy to read. If condition before '=>' is true, then do the actions after the '=>'. If we don't have a '=>' it's just an expression that is computed, ex. for setting up variables like in the example. An beta of EventRunner5 is available now at https://github.com/jangabrielsson/EventRunner5 I will also publish versions available via the UpdaterQA which is probably the easiest way to install/update. Here is v1.03EventRunner5-1_03.fqa for download Many thanks to the bug hunters that helped me find problems @Sjakie @Neo Andersson @ChristianSogaard @Pica2017 @chelson @minsad79 Goals with EventRunner5 Backwards compatibility for rules from ER4 (as much as possible...) Better error messages Better debug possibilities Easier to extend with custom functions Some new cool scripting functions Much cleaner code - which will allow me to sleep better at nights... Current version is almost on feature parity with ER4. There are some bloat in ER4 I would like to skip unless people really need it... There are most likely bugs lurking in ER5 as it is not tested as much yet (However, I'm eating my own dogfood and have started to use it...) Introduction EventScript basics Variables EventScript in depth... Functions and properties Time scheduling rules - scheduling rules for time of day and dates Interval rules - rules running at given intervals during the day Trigger rules Event rules Alarm rules - arming/disarming and triggering on alarms Http and Nodered - integration with http requests and nodeRed flows Working with rules Settings and options Debugging and finding faults with rules... Terminal 5 - interactive web based terminal to play with rules on the HC3/ER5 Custom property functions - define your own :<property> functions Custom objects Advanced topics Recipes - common rules... Known changes from ER4: ER5 is not based on fibaroExtra so a lot of extra functions are not available. Especially functions defined for QuickApp. Ex. self:debugf etc. '=' has less priority than '&'. In ER4 we could write rule("@sunset => lamp:isOn & flag = true") which, if lamp was on set flag to true. In ER5 the priority makes this being interpreted as rule("@sunset => (lamp:isOn & flag) = true") which is not what we want and generates a runtime error. Instead, in cases like this, wrap the assignment in parenthesis rule("@sunset => lamp:isOn & (flag = true)") Alarms for partitions works differently Function to define rule is eval(...). They way eval is defined is differently. Most of this functions comes from the table 'er' that is passed to main(...). See declarations in the beginning of the main() function. A variable 'rule' is defined in the beginning of main(er) that points to the eval function so we can use rule("rule string") for backward compatibility... Nodered integration is slightly different. to be continued...
- 1,010 replies
-
- 6
-
-
- rule engine
- eventrunner4
- (and 1 more)
-
A thread to share some coding techniques for QuickApps? Because QAs are "long running scenes" (they don't have to be loaded and restarted for every event) - it is actually worthwhile to build up a library of "nice to have" code and include them in QAs. Here is Fibaro's manual for QuickApps. Here is Fibaro's manual for creating QuickAppChild devices Here is Fibaro's manual for using MQTT client Here is Fibaro's manual for WebSocket client List of posts: Introduction to the QuickApp anatomy - tutorial Part 1. Lua functions and object-oriented programming. (QuickApp is a OO class, so we need that base) Part 2. The basic QuickApp functions and what they do... and how. Part 3. More on QuickApp event handling - interaction with the UI and fibaro.call(<quickApp>,"name",...) Part 4. QuickAppChildren and how to raise them... what makes them tick? Also a tutorial on using classes in QuickApps here... All functions and variables available in the QuickApp Lua environment Logging functions (replacement for color/html tags + tostring for customised data structure) Shared functions calls between QuickApps (Here is an improved version) Off-line HC3api to use fibaro.* calls on PCs/Linux/Mac (fibaroapiHC3.lua) Polling for triggers in a QuickApps (like fibaro.getSourceTrigger()) Here is another method using a helper QA Patching 'setTimeout' so you get an error message if the function crashes A generic template for a QuickApp A simple code-lock QuickApp (demonstrating the UI with buttons) A QuickApp for scheduling user profiles (demonstrates UI buttons that change labels/text to present options) It doesn't' actually schedules the profile yet. (here is a working version) Structuring a QuickApp using event handlers to cope with asynchronous calls - like when using net.HTTPClient() instead of FHTTP(). looping with setInterval (without drifting) A QD reporting if other QDs are crashing (leveraging the "polling for triggers" code) Coding and debugging HC3 QuickApps offline using PC/Mac/Linux and a Lua IDE (and auto-creating a proxy on the HC3) An example of a QuickApp that download and installs scenes and QuickApps from a repository (files in a flat format) Coding and debugging of HC3 scenes using fibaroapiHC3.lua (not strictly about QuickApps but related) - can speed-up time A more complex QD that reads Google calendars or iPhone calendars and schedule custom events (uses the QuickApp structure for asynchronous calls in a previous tip) A substitute for Lua's loadstring() Here is another method of loading code dynamically into a QA Creating proxy devices on the HC3 to share devices between HC2 and HC3 A "webhook" QD - pushing events to external apps Adding interfaces to QA's - ex. power and battery and updating the properties (updates the little battery and power icon UI) @tinman Using '/plugin/publishEvent' to emit 'centralSceneEvent' (and a few other) .... Ex. keyfob QA by @tinman QA Toolbox. A modular toolbox of add-on functions to QAs that makes it easier to develop QAs 'basic' - Generic QA functions for loggin, loading modules, and management - used by all other modules. (some documentation) 'childs' - QA functions to easily manage quickAppChild devices. Loading, saving state, getting UI events etc. 'events' - QA functions for defining event handlers and structuring your code accordingly. Makes it easy to setup timers in various ways... 'triggers' QA functions for recieving triggers like Scenes do. The events module will receive triggers if loaded, but own handler can be defined. 'rpc' - QA functions for declaring (synchronous) remote functions from other QAs files - QA functionality for copying files between QAs pubsub - QA functions for event publish/subscribe... ui - QA functions for manipulation the UI elements of a QA lua parser/compiler - QA function for emulating loadstring and evaluating Lua expression from strings profiler - Functions for timing code used in QA Reading label/button/slider values. Sha2.lib crypto libs for HC3 (MD5, HMAC, SHA-1, SHA-224, SHA-256, SHA-512/224, SHA-512/256, SHA-384, SHA-512, SHA3-224, SHA3-256, SHA3-384, SHA3-512, SHAKE128, SHAKE256) @tinman aes crypto lib @tinman List of HC3 device types and interfaces @tinman Readers note. I started to call QuickApp devices for QDs (as in QuickApp Device, thought QAs sounded like Question and Answers). So, I use the word QD here and there but I'm not religious about it...
-
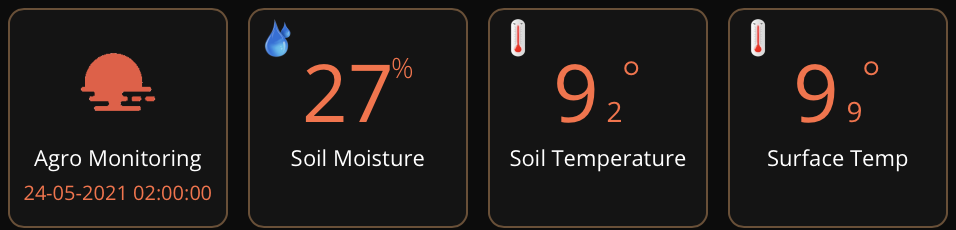
This QuickApp contains devices of soil moisture, soil temperature and surface temperature, from accumulated temperature and precipitation data from OpenWeather via Agro Monitoring. Soil temperature and moisture are essential indices that allow your customer to adjust irrigation work and prevent crop roots damage. Accumulated temperature and precipitation is essential to make a right decision depends on a threshold setting. Temperature quantity index calculated as the sum of daily temperatures. Humidity quantity index expressed as the sum of daily precipitation. Current soil data is updated 2 times a day. The soil temperature is provided in Kelvins and in this quickapp converted to Celsius (C = K - 273.15) IMPORTANT You need an API key and Polygon ID from https://agromonitoring.com You need to create your Api key and Polygon ID at https://agromonitoring.com/dashboard/dashboard-start After your registration click the "New" button in the top of the "Create polygon" screen. Click on the polygon icon or square icon on the map. Draw your polygon. If you choose a polygon shape icon do not forget to merge the first and last points to finish your polygon. Fill in the "Name" field and click the "Create" button to save your polygon. The API is free up to 60 calls per minute and a total area of polygons of 1000ha See: https://agromonitoring.com/dashboard/dashboard-start See: https://openweathermap.medium.com/dashboard-update-current-and-historical-soil-data-24422fc75c5b What is soil moisture? The science behind the measurement: https://www.metergroup.com/environment/articles/what-is-soil-moisture-science-behind-the-measurement/ Version 0.2 (24th May 2021)) Changed Soil Moisture (child) device from multilevelSensor to humiditySensor with percentage presentation Version 0.1 (22 May 2021) Initial version Variables (mandatory): apiKey = Get your free API key from https://agromonitoring.com polygon = Create your Polygon ID at https://agromonitoring.com/dashboard/dashboard-start or look it up with https://api.agromonitoring.com/agro/1.0/polygons?appid=apiKey interval = [number] in seconds time to get the data from the API timeout = [number] in seconds for http timeout debugLevel = Number (1=some, 2=few, 3=all, 4=simulation mode) (default = 1) icon = [numbber] User defined icon number (add the icon via an other device and lookup the number) Download the QuickApp here (download the file and un-zip): https://github.com/GitHub4Eddy/agro_monitor/archive/refs/tags/agro_monitor-02.zip or from the Fibaro Marketplace: https://marketplace.fibaro.com/items/agro-monitor-soil-moisture How to install: Open the Configuration Interface Go to Settings > Devices Click + Choose Other Device Choose Upload File Choose file from your computer with .fqa


-
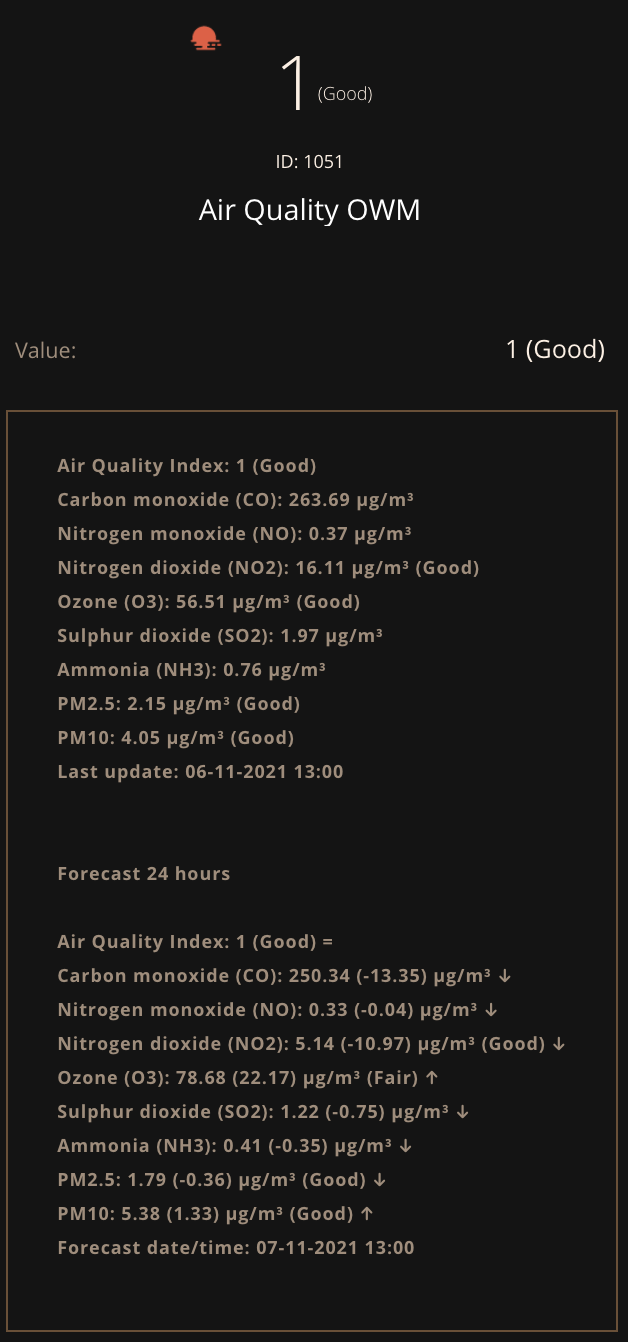
The QuickApp Air Quality OpenWeatherMap provides the current and forecast measurements for your location on Air Quality. Besides basic Air Quality Index the QuickApp provides also data about polluting gases such as Carbon monoxide (CO), Nitrogen monoxide (NO), Nitrogen dioxide (NO2), Ozone (O3), Sulphur dioxide (SO2), Ammonia (NH3), and particulates (PM2.5 and PM10). This QuickApp has Child Devices for Carbon monoxide (CO), Nitrogen monoxide (NO), Nitrogen dioxide (NO2), Ozone (O3), Sulphur dioxide (SO2), Ammonia (NH3), PM2.5 and PM10 for current measurement. This QuickApp has also Child Devices for Air Quality Index, Carbon monoxide (CO), Nitrogen monoxide (NO), Nitrogen dioxide (NO2), Ozone (O3), Sulphur dioxide (SO2), Ammonia (NH3), PM2.5 and PM10 for forecast measurement. This QuickApp has Child Devices for Carbon monoxide (CO), Nitrogen monoxide (NO), Nitrogen dioxide (NO2), Ozone (O3), Sulphur dioxide (SO2), Ammonia (NH3), PM2.5 and PM10. Common Air Quality Index (CAQI) The Common Air Quality Index (CAQI) is an air quality index used in Europe since 2006. In November 2017, the European Environment Agency announced the European Air Quality Index (EAQI) and started encouraging its use on websites and for other ways of informing the public about air quality. As of 2012, the EU-supported project CiteairII argued that the CAQI had been evaluated on a "large set" of data, and described the CAQI's motivation and definition. CiteairII stated that having an air quality index that would be easy to present to the general public was a major motivation, leaving aside the more complex question of a health-based index, which would require, for example, effects of combined levels of different pollutants. The main aim of the CAQI was to have an index that would encourage wide comparison across the EU, without replacing local indices. CiteairII stated that the "main goal of the CAQI is not to warn people for possible adverse health effects of poor air quality but to attract their attention to urban air pollution and its main source (traffic) and help them decrease their exposure." The CAQI is a number on a scale from 1 to 100, where a low value means good air quality and a high value means bad air quality. The index is defined in both hourly and daily versions, and separately near roads (a "roadside" or "traffic" index) or away from roads (a "background" index). As of 2012, the CAQI had two mandatory components for the roadside index, NO2 and PM10, and three mandatory components for the background index, NO2, PM10 and O3. It also included optional pollutants PM2.5, CO and SO2. A "sub-index" is calculated for each of the mandatory (and optional if available) components. The CAQI is defined as the sub-index that represents the worst quality among those components. Here is a description of Air Quality index levels Pollutant concentration in μg/m3: Index NO2 PM10 O3 PM25 (optional) Good 1 0-50 0-25 0-60 0-15 Fair 2 50-100 25-50 60-120 15-30 Moderate 3 100-200 50-90 120-180 30-55 Poor 4 200-400 90-180 180-240 55-110 Very Poor 5 >400 >180 >240 >110 See more on CAQI: https://en.wikipedia.org/wiki/Air_quality_index IMPORTANT You need an API key from https://home.openweathermap.org The API is free up to 60 calls per minute Version 1.1 (10th November 2022) Added extra check for partly empty response ("coord" not empty but "list" is empty) Added extra message to the labels and de log text if there is no response Warning added in case the "forecast measurements" are not available Version 1.0 (7th November 2021) Added forecast measurements with hours you want your forecast. The forecast is shown in child devices and labels for all measurements. Version 0.1 (9th October 2021) Initial version Variables (mandatory): apiKey = Get your free API key from https://home.openweathermap.org latitude = latitude of your location (Default is the latitude of your HC3) longitude = longitude of your location (Default is the longitude of your HC3) interval = [number] in seconds time to get the data from the API timeout = [number] in seconds for http timeout debugLevel = Number (1=some, 2=few, 3=all, 4=simulation mode) (default = 1) Download the QuickApp here (download the file and un-zip): https://github.com/GitHub4Eddy/air_quality_openweathermap/archive/refs/tags/air_quality_owm-11.zip or from the Fibaro Marketplace: https://marketplace.fibaro.com/items/air-quality-openweathermap How to install: Open the Configuration Interface Go to Settings > Devices Click + Choose Other Device Choose Upload File Choose file from your computer with .fqa


- 18 replies
-
- 6
-
-
-
- air quality data
- air quality
- (and 3 more)
-
Hi guys! I would like to say that I am a beginner on Fibaro. I would like to integrate my LED strip on HC3. I have the API Key, I downloaded the fqa file (from here https://marketplace.fibaro.com/items/govee-colorled-controller-qa) but I don't know how to proceed. I have created the Quick App, but I don't know what I have to do to configure it. Can anyone help me?
-
 Hello I am making an app that gets todays electric price hour by hour. I added an event for highest and lowest hour. Problems is that the setInterval(function() fibaro.emitCustomEvent("Lowpris") end, 3660*1000) and setInterval(function() fibaro.emitCustomEvent("Highprice") end, 3660*1000) emits one hour to late. setInterval sends 3660(one hour and 60 seconds after it should) and not sends it and then wait 3660 like intention was. The idea was to send then after 3660 the hour does not match the lowest hours so then the As now it does send after one hour and 60 seconds and it then send event emit every 10 seconds within the hour since the app restarts every 10 seconds do to because of. function QuickApp:onInit() fibaro.installFibaroExtra() setInterval(function() self:stromm() end, 10*1000) --10 = hvert 10 sekund oppdatering --fibaro.setTimeout(3660*1000, function() print("Kommer tilabkke om en time") end) end Is there any suggestions how to send and then wait over an hour to next check if current hour and lowest hour matches ? if not fibaro.existCustomEvent("HighPrice") then fibaro.createCustomEvent("HighPrice", tostring(highestPriceHour)) end --fibaro.emitCustomEvent("HighPrice") if not fibaro.existCustomEvent("Lowpris") then fibaro.createCustomEvent("Lowpris", tostring(lowestPriceHour)) end -- fibaro.emitCustomEvent("Lowpris") if fixtime == highestPriceHour then fibaro.createCustomEvent("HighPrice", tostring(highestPriceHour)) -- fibaro.setTimeout(3660*1000, function() fibaro.emitCustomEvent("Highprice") end) setInterval(function() fibaro.emitCustomEvent("Highprice") end, 3660*1000) print("high event made") else print("ingen høy event") end if fixtime == lowestPriceHour then --if local hour equals the lowest price hour then emit a signal fibaro.createCustomEvent("Lowpris", tostring(lowestPriceHour)) --fibaro.setTimeout(3660*1000, function() fibaro.emitCustomEvent("Lowpris") end) setInterval(function() fibaro.emitCustomEvent("Lowpris") end, 3660*1000) print("low event made") else print("ingen lav event") end end, -- success error = function(msg) self:debug('Error:'..msg) end -- error }) print("Klokken er nu "..timetest) end function fibaro.installFibaroExtra()local a="fibaroExtra"if fibaro.FIBARO_EXTRA then return end;local b="https://raw.githubusercontent.com/jangabrielsson/TQAE/main/lib/"..a..".lua"net.HTTPClient():request(b,{options={method='GET',checkCertificate=false,timeout=20000},success=function(c)if c.status==200 then local d={isMain=false,type='lua',isOpen=false,name=a,content=c.data}fibaro.debug(__TAG,"Installing ",a)local e,c=api.post("/quickApp/"..plugin.mainDeviceId.."/files",d)if c~=200 then fibaro.error(__TAG,"Installing ",a," - ",c)end else fibaro.error(__TAG,"Error ",c.status," fetching ",b)end end,error=function(c)fibaro.error(__TAG,"Error ",c," fetching ",b)end})end function QuickApp:onInit() fibaro.installFibaroExtra() setInterval(function() self:stromm() end, 10*1000) --10 = hvert 10 sekund oppdatering --fibaro.setTimeout(3660*1000, function() print("Kommer tilabkke om en time") end) end
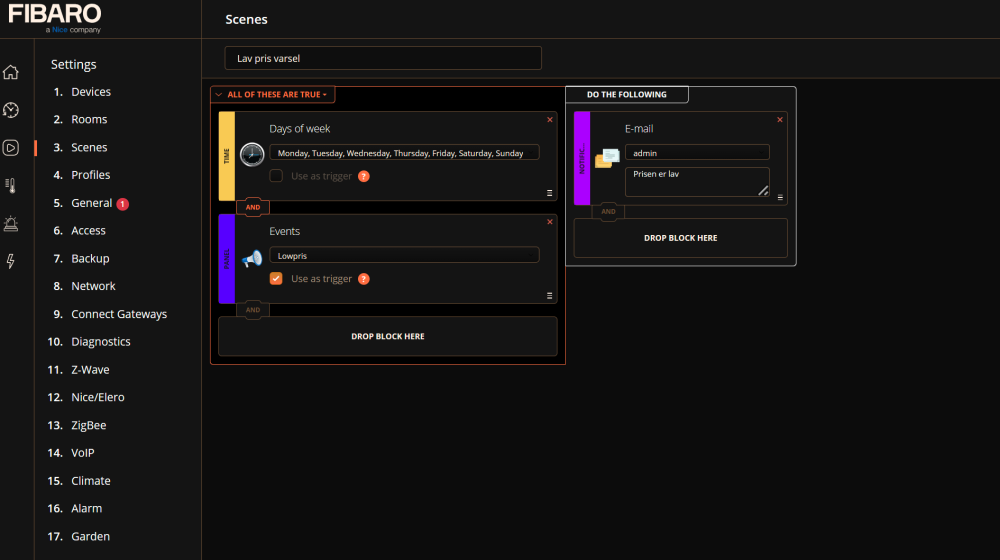
-
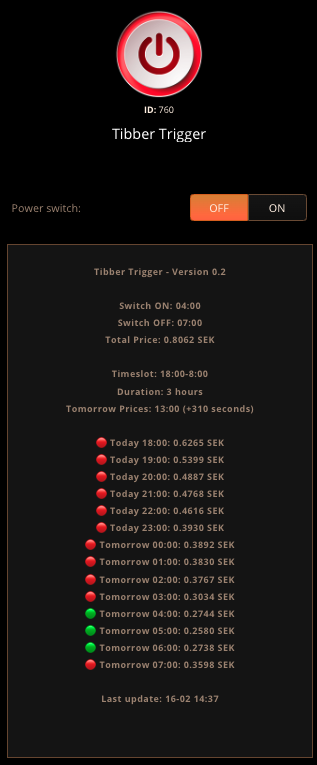
This QuickApp calculates the cheapest prices for using appliances based on the hourly Tibber energy prices. This QuickApp is especially useful for appliances (like charging your car and washing the dishes) that need to run once a day, within a timeframe and during some hours. You can use more than one instance of this QuickApp if you need more than one appliance to start in the cheapest hour but not within the same timeslot. Tibber today and tomorrow prices The tomorrow prices are available from 13:00 hour. If the tomorrow prices aren't available yet and the timeslot is (partially) tomorrow, a temporary calculation and start-stop plan is made with the today prices, until the tomorrow prices are available. If the start time plus duration is (partially) tomorrow, for example start time 18:00 and duration 7 hours, the calculation can be made from 13:00 hour when the tomorrow prices are available. At 04:00 the binary switch will turn ON and at 07:00 the binary switch will turn OFF. You would still have to create a script, triggers by this binary switch, to actually turn on the charging of your car, or turn on the dishwasher. IMPORTANT This QuickApp needs the Tibber Monitor QuickApp to run on your HC3. It is important to synchonise this QuickApp with the timing of your Tibber Monitor QuickApp. This QuickApp works at its best, if you setup the interval with the intervalOffset just after the Tibber Monitor runs. If you Tibber Monitor runs at 5 minutes (300 seconds) after the whole hour, run this QuickApp 5 minutes and 10 seconds (310 seconds) after the whole hour to be sure to get the prices from Tibber Monitor. This QuickApp runs every whole hour to turn the switch on and off. If it is time to get the prices from the Tibber Monitor QuickApp, this QuickApp runs every whole hour plus the seconds set in the intervalOffset. QuickApp logics onInit() getQuickAppVariables() createVariables() checkPrice() missionControl() If tibberChild0000 (Tibber Monitor Child devicenumber for "Today 00:00") doesn't exists --> disable QuickApp If current hour is hour to start --> turn the switch ON If current hour is hour to stop --> turn the switch OFF If current hour is 13:00 (tomorrowPrices) --> checkPrice() to check the prices again to calculate with the tomorrow prices and to plan a new start and stop hour If current hour is the end of the timeslot --> checkPrice() to check the prices again to plan a new start and stop hour updateLabels() every whole hour missionControl() (see above) etc DISCLAIMERS Use this QuickApp at your own risk. You are responsible for ensuring that the information provided via this QuickApp do not contain errors. Tibber is a registered trademark being the property of TIBBER. TIBBER reserves all rights to the registered trademarks. Information which is published on TIBBER’s websites belongs to TIBBER or is used with the permission of the rights holder. Making of copies, presentations, distribution, display or any other transfer of the information on the website to the public is, except for strictly private use, prohibited unless done with the consent of TIBBER. Published material on dedicated TIBBER press websites, intended for public use, is exempt from the consent requirement. Also see: https://tibber.com/en/legal-notice Tibber API documentation: https://developer.tibber.com/docs/guides/calling-api Tibber API explorer: https://developer.tibber.com/explorer Tibber status: https://status.tibber.com Variables (mandatory and created automatically) tibberChild0000 = The Tibber Monitor Child devicenumber for "Today 00:00" durationHours = How many hours should the switch be ON (not more than 23 hours) timeSlotStart = At which hour should the timeslot start timeSlotEnd = At what hour should the timeslot end tomorrowPrices = At what hour are the Tibber tomorrow prices available (default = 13) intervalOffset = The offset time in seconds to the interval of every whole hour (default 310 seconds) debugLevel = Number (1=some, 2=few, 3=all (default = 1) language = Preferred language (default = English (en)) (supported languages are English (en), Dutch (nl), German (de), Swedish (se) and Norwegian (no)) Changes version 0.3 (19th March 2024) Solved a small bug when timeslot end was greater than 23 hours Changes version 0.2 (15th February 2024) Optimized calculations and turnOn/TurnOff Added translations for Dutch (nl), German (de), Swedish (se) and Norwegian (no) Initial (beta) version 0.1 (11th February 2024) Initial beta version How to install Open the Configuration Interface Go to Settings > Devices Click + Choose Other Device Choose Upload File Choose file from your computer with .fqax Tibber_Trigger-03.fqax
- 6 replies
-
- 2
-
-
- tibber monitor
- quick apps
- (and 4 more)
-
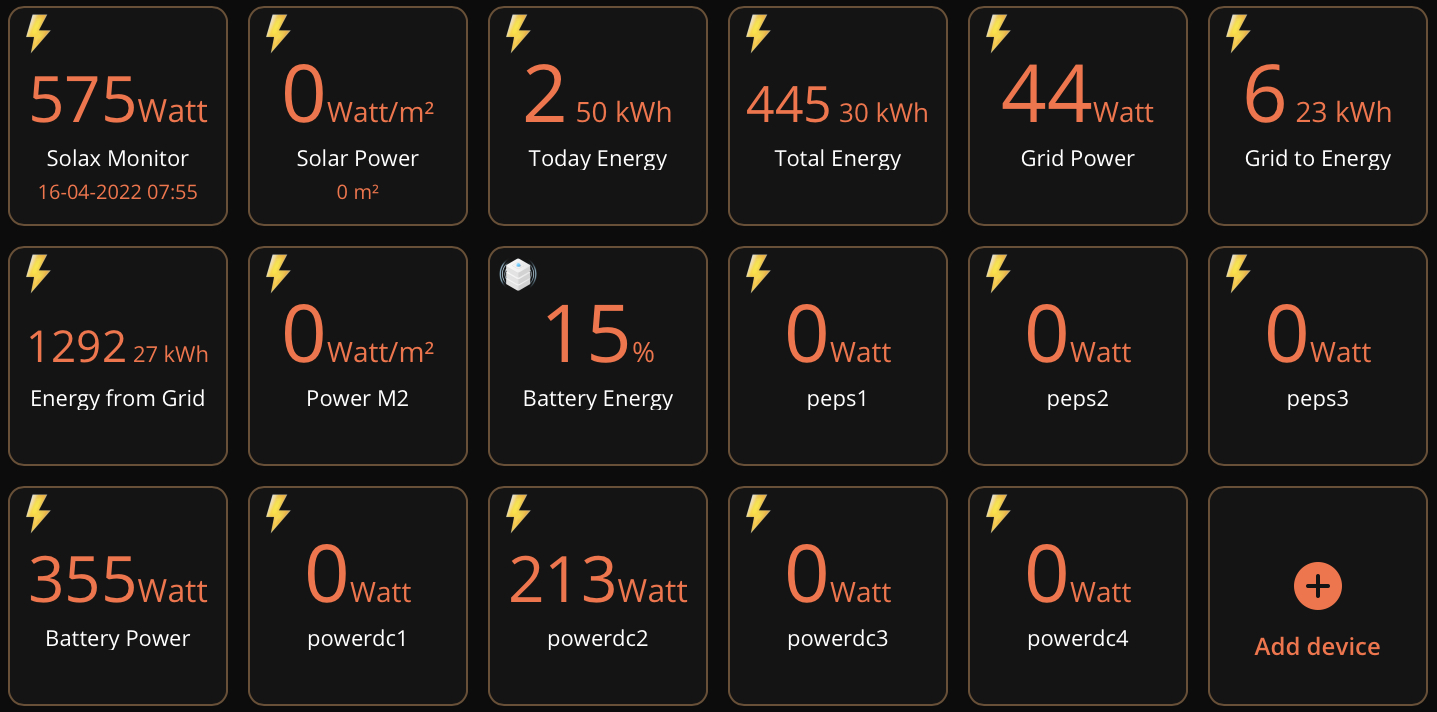
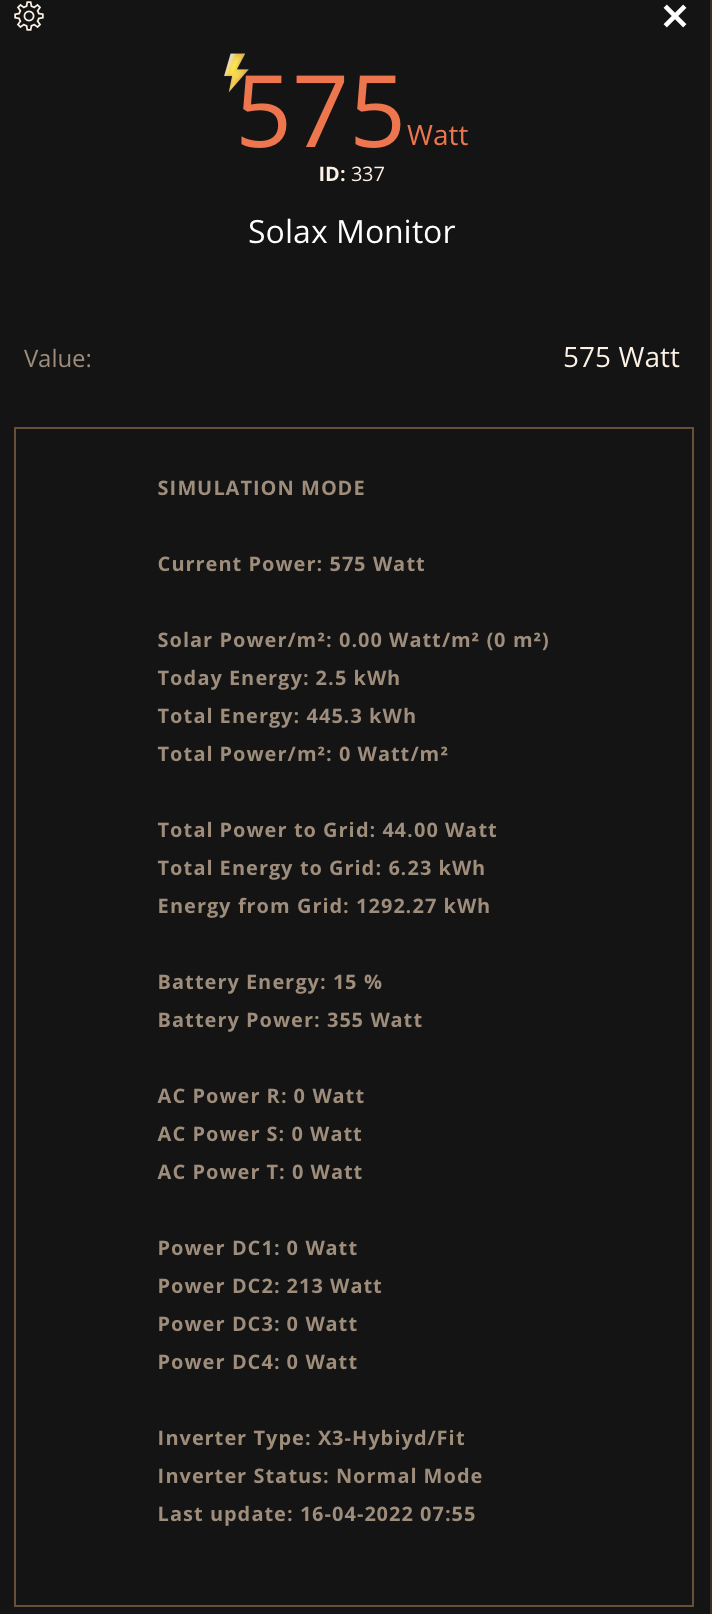
This QuickApp monitors your Solax managed Solar Panels The QuickApp has (child) devices for Solarpower/m², Today production, Total production, Total Power to Grid, Total Energy to Grid, Energy from Grid, Total Power/m², Battery Energy, AC Power R, AC Power S, AC Power T, Battery Power, Power DC1, Power DC2, Power DC3 and Power DC4 The rateType interface of child device Today Energy is automatically set to "production" The readings from the child device Today Energy will be shown in the new energy panel The readings from the child device Total Energy is automatically set to the right Wh unit (Wh, kWh, MWh or GWh) See API documentation on https://www.eu.solaxcloud.com/phoebus/resource/files/userGuide/Solax_API_for_End-user_V1.0.pdf User can get a specific range of information through the granted tokenID. Please obtain your tokenID on the API page of Solaxcloud for free. The tokenID can be used to obtain real-time data of your inverter system. The obtain frequency need to be lower than 10 times/min and 10,000 times/day. Version 3.0 (19th February 2023) Changed the descriptions of the Solax Cloud values Converted the feedinpower value from positive to negative or from negative to positive Added translation for English, Dutch and Portugese Added child device for consumeenergy Version 2.1 (4th December 2022) Prevented almost empty responses like these: {"success":false,"exception":"Query success!","result":"this sn did not access!"} Added log text to main device if no data from Solax Cloud Version 2.0 (16th April 2022) Added Child Devices for feedinpower, feedinenergy, consumeenergy, feedinpowerM2, soc, peps1, peps2, peps3, batPower, powerdc1, powerdc2, powerdc3, powerdc4 Added all values returned from the Solax Cloud to the labels Changed all the device types to the most current ones Changed the handling of bad responses from the Solax Cloud Replaced null values in responses with 0.0 Optimized some code Version 1.0 (17th November 2021) Tested, ready for release Version 0.2 (15th November 2021) Changed json response Version 0.1 (13th November 2021) First (test) version Variables (mandatory): tokenId = token ID of your Solax Inverter, obtain your tokenID on the API page of Solaxcloud for free inverterSN = Unique identifier (Serial No.) of your Solax inverter solarM2 = The amount of m2 Solar Panels (use . for decimals) for calculating Solar Power m² (default = 0) interval = The default is 300 seconds (5 minutes), the daily API limitation is maximum 10 times/min and 10,000 times/day debugLevel = Number (1=some, 2=few, 3=all, 4=simulation mode) (default = 1) API items: Description (Accuracy) (Unit) inverterSN: Unique identifier of inverter (Serial No.) sn: Unique identifier of communication module (Registration No.) acpower: Inverter.AC.power.total (1) (W) yieldtoday: Inverter.AC.energy.out.daily (0.1) (KWh) yieldtotal: Inverter.AC.energy.out.total (0.1) (KWh) feedinpower: Grid.power.total (1) (W) feedinenergy: Grid.energy.toGrid.total (0.01) (KWh) consumeenergy: Grid.energy.fromGrid.total (0.01) (KWh) feedinpowerM2: Inverter.Meter2.AC.power.total (1) (W) soc: inverter.DC.battery.energy.SOC (1) (%) peps1: Inverter.AC.EPS.power.R (1) (W) peps2: Inverter.AC.EPS.power.S (1) (W) peps3: Inverter.AC.EPS.power.T (1) (W) inverterType: Inverter type, details refer to Table 4 in appendix inverterStatus: Inverter status, details refer to Table 5 in appendix uploadTime: Update time (format 2016-10-26 17:33:01) batPower: Inverter.DC.Battery.power.total (1) (W) powerdc1: Inverter.DC.PV.power.MPPT1 (1) (W) powerdc2: Inverter.DC.PV.power.MPPT2 (1) (W) powerdc3: Inverter.DC.PV.power.MPPT3 (1) (W) powerdc4: Inverter.DC.PV.power.MPPT4 (1) (W) Download the QuickApp here (download the file and un-zip): https://github.com/GitHub4Eddy/solax_monitor/archive/refs/tags/solax-monitor-30.zip or from the Fibaro Marketplace: https://marketplace.fibaro.com/items/solax-monitor How to install: Open the Configuration Interface Go to Settings > Devices Click + Choose Other Device Choose Upload File Choose file from your computer with .fqa


-
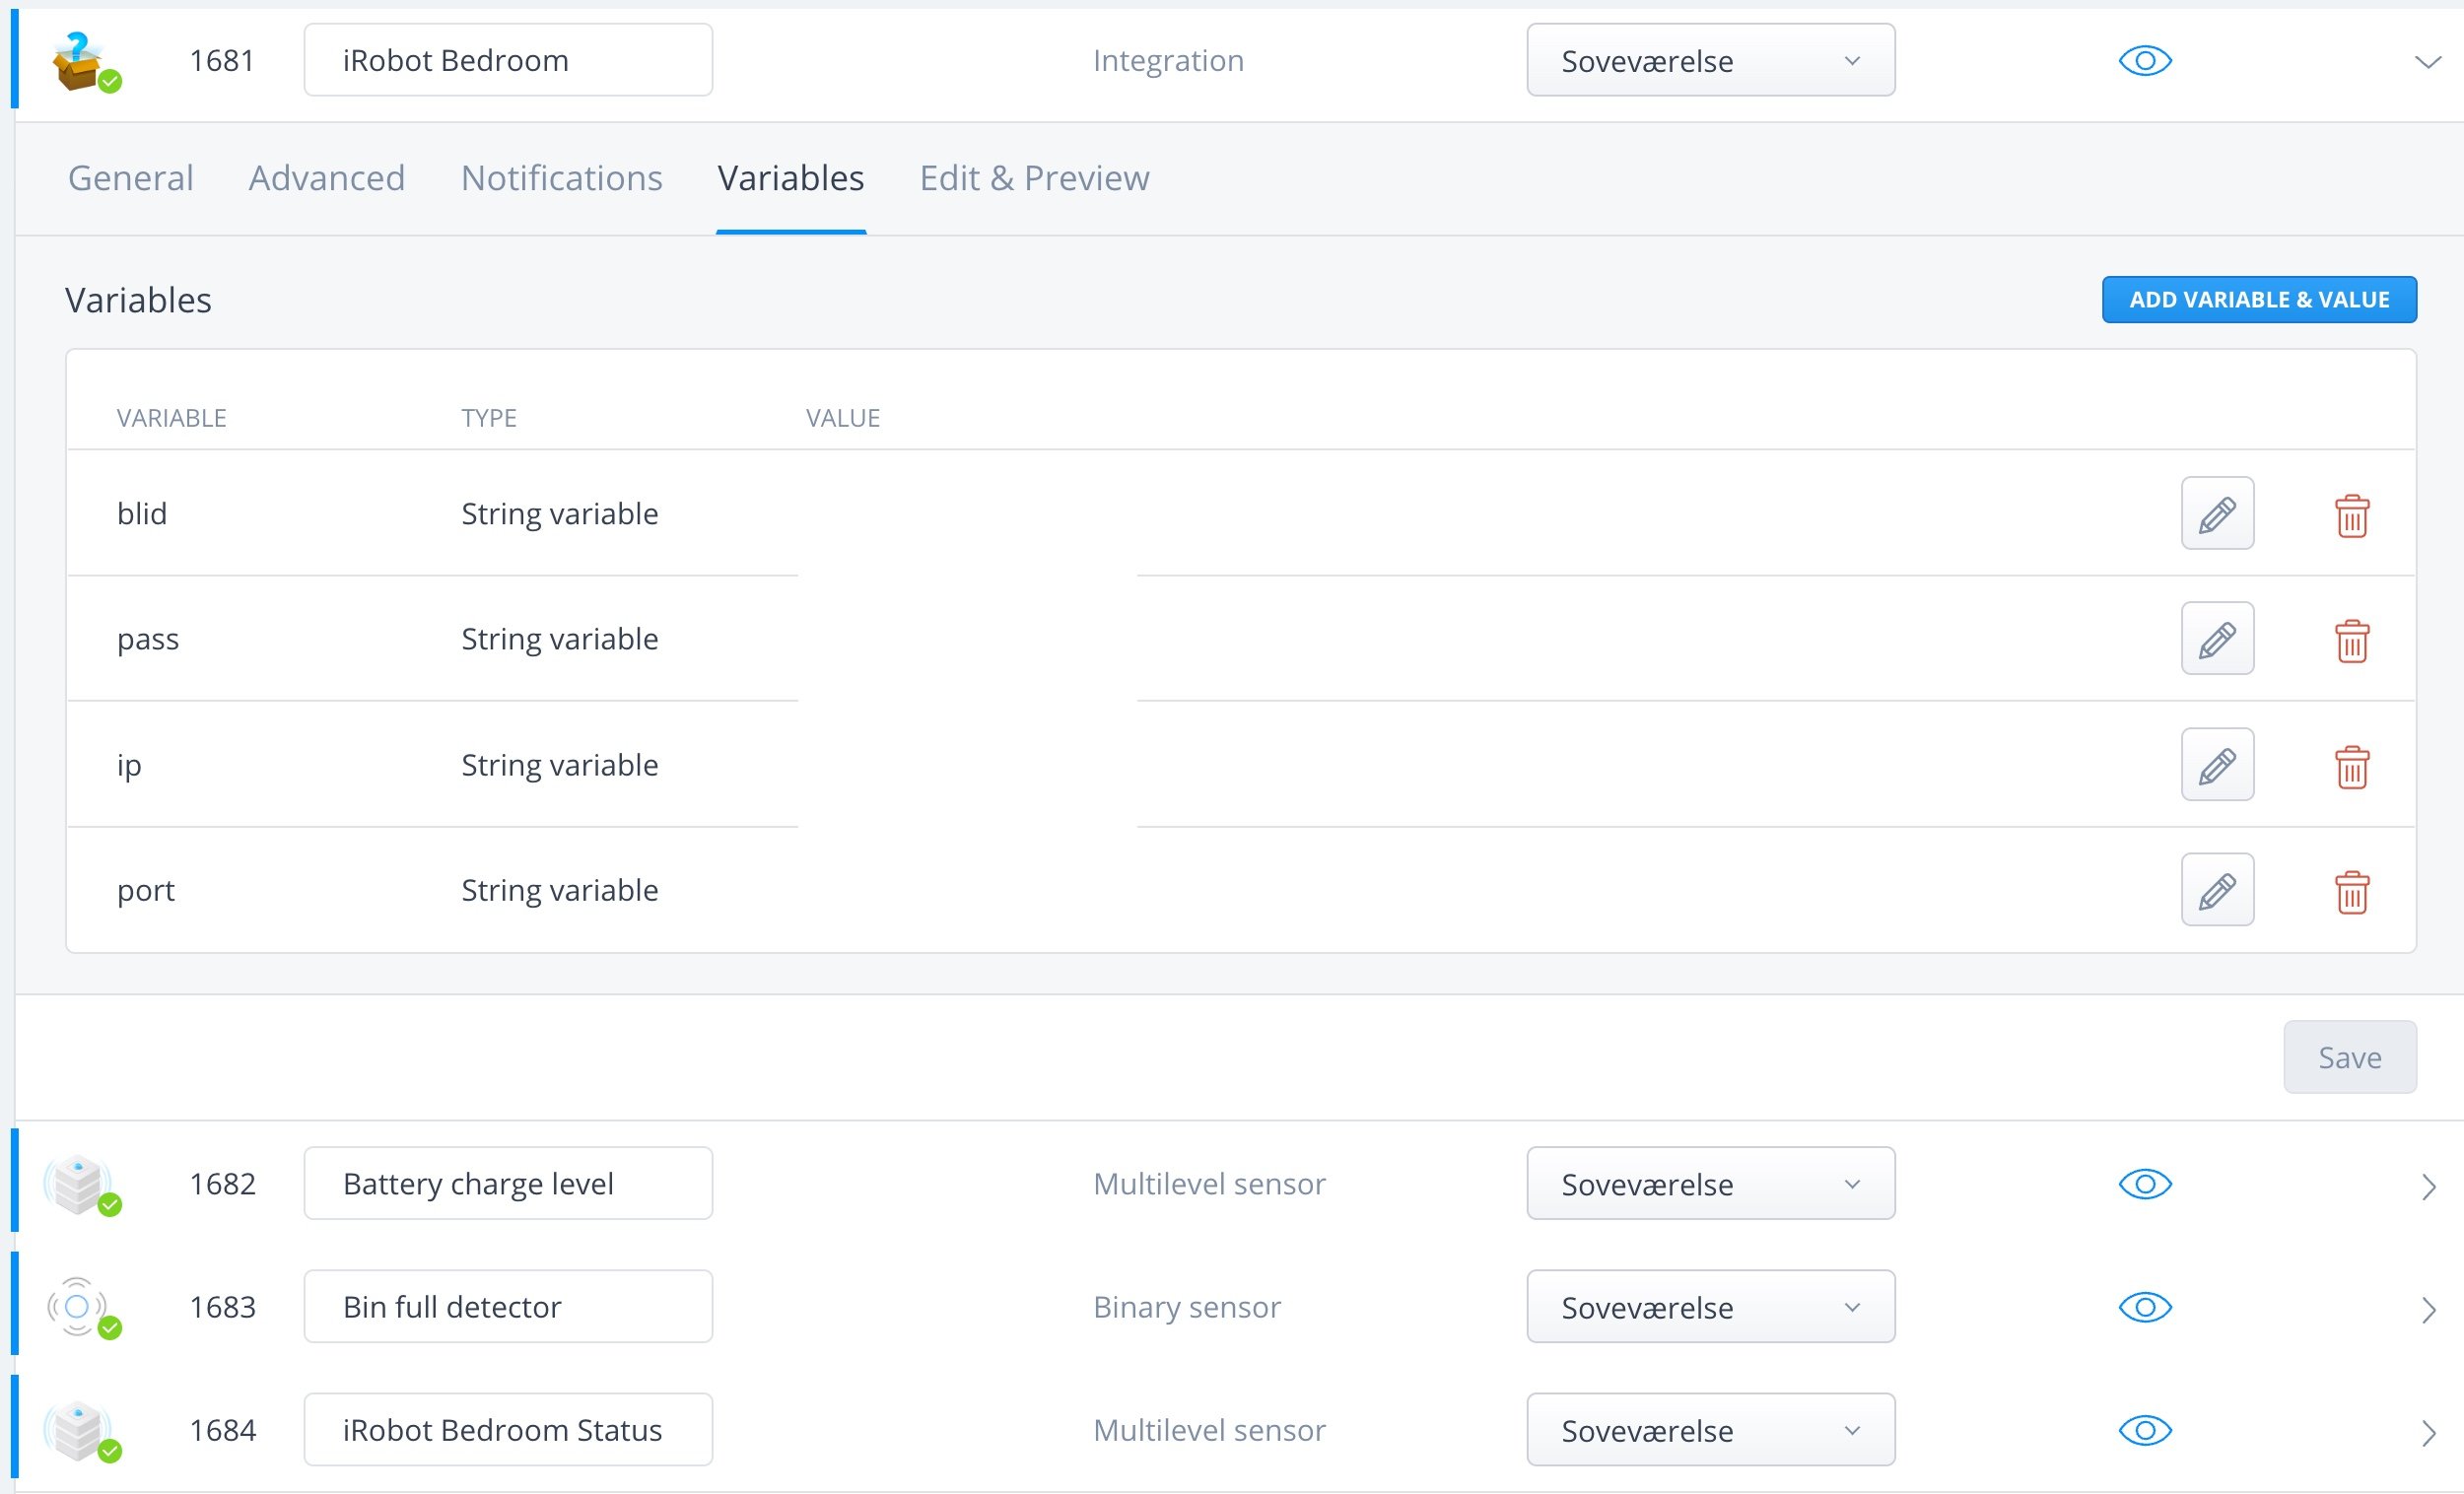
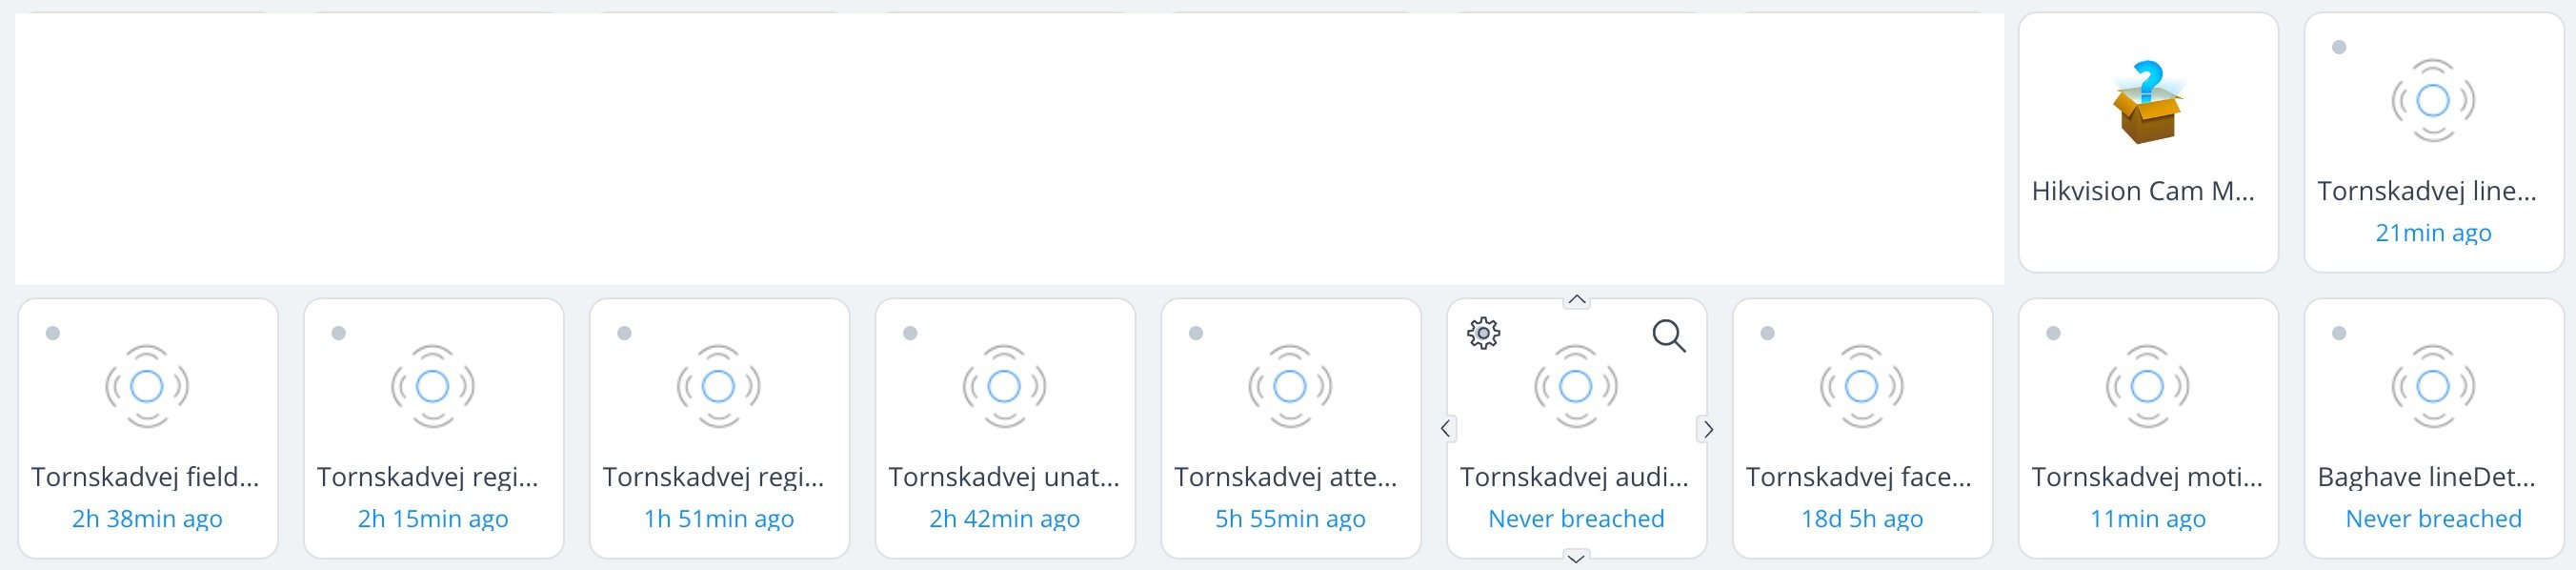
 Hi @m.roszak Is there any update for providing Encryption of Quick Apps? Fibaro have the marketplace All over the wold a marketplace is a place where people buy and sell stuff - but neither is possible at Fibaro Marketplace. In my opinion Fibaro forces professional programmers to share their work for free, with no way to protect their work. I am not a programmer myself, so i pay for other people's work or get it for free from those that grateful provide that. I have paid for the following QA Irobot Roomba, Home connect, Hikvision NVR, Text to speak TTS - and they amazing guys who did those can only beg that people will donate if they choose to share them public. So if the donations is the only way to go, is this ok with Fibaro guidelines posting it at the "Marketplace" with a beg for donations??? I spoke with Roth Nordic and other companies, and they will not provide API information to their systems, if its not possible to protect the API commands. So with Fibaro's missing strategy for protecting QA is blocking for a lot integrations. When do you provide Encryption / remove Edit function of Quick Apps? To anyone else - dont ask me for the QAs - ask Fibaro for a way protecting QA, and I predict they will come soon after. Irobot Boomba HIKVision - creating a binary sensors for all enabled SmartEvents in Hikvision NVR Siemens Home Connect using Bearer token


-
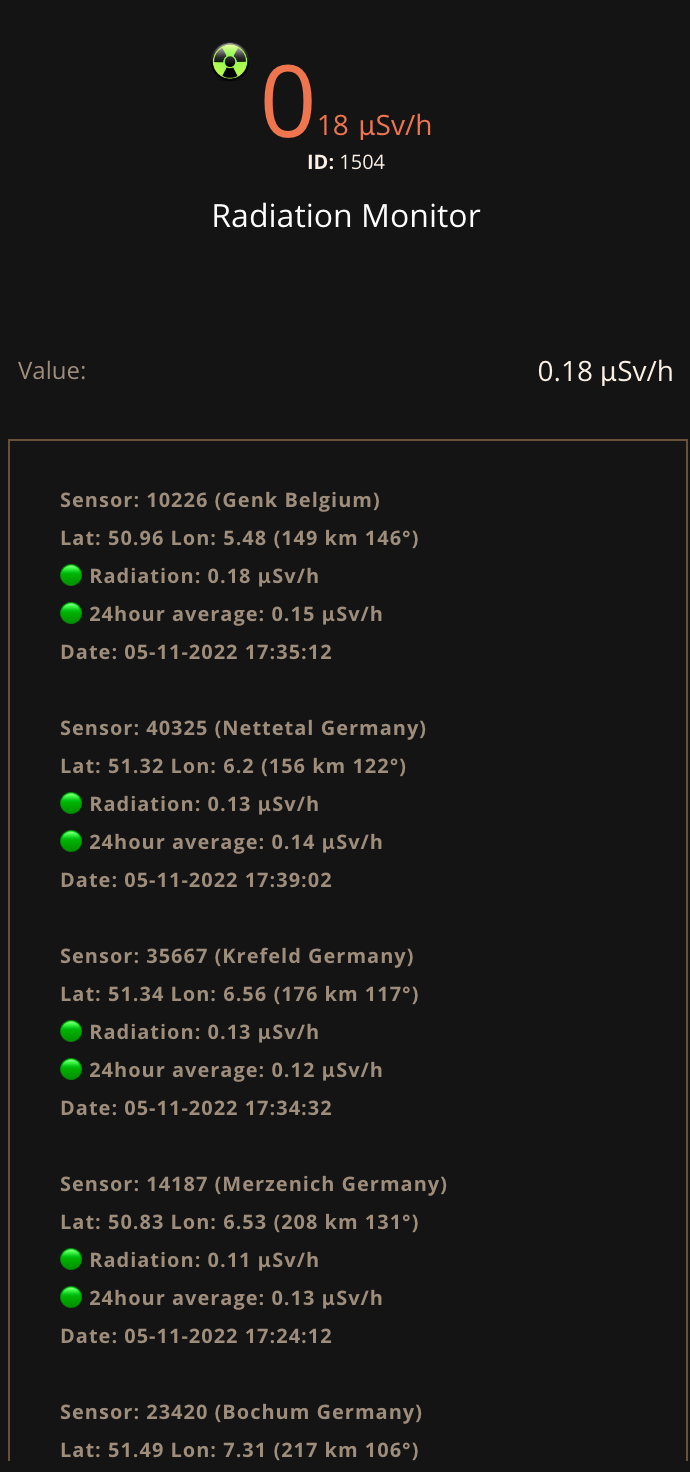
The Radiation Monitor collects radiation levels from all available stations around the world and shows 5 nearest stations to your location and one station with highest current readings and one station with the highest 24 hour average readings. The QuickApp uses the location (latitude and ongitude) of your Homecenter to measure the distance to the stations and to get the nearest stations. The bearings in degrees from your location to the stations is shown. Next to the measurements, the five nearest reactors are shown. The languages English, French, Polish and Duth are supported. Thanks to @Sankotronic for his work for his HC2 Virtual Device version and ideas. The main device shows the nearest measurement μSv/h. There are Child Devices for: Nearest sensor 24h average μSv/h 2nd, 3rd, 4th, 5th nearest sensor measurement with the 24 average in the log text Nearest maximum measurement Nearest maximum 24h average measurement The nearest five reactors are retrieved once at startup of the QuickApp or at the next interval if you click on the button. Radioactive@Home is a Polish science project using the distributed computing capabilities of the BOINC platform. The main goal of the project is to create a free and continuously updated map of radiation levels available for everyone, by gathering information about gamma radiation using sensors connected to the computers of volunteers willing to participate in the project. Project is completely non-commercial, participating will be free of charge (excluding cost of detector) and the software will be licensed under the GNU General Public License (GPL). μSv/h: The sievert (symbol: Sv) is a unit in the International System of Units (SI) intended to represent the stochastic health risk of ionizing radiation. In land navigation, a 'bearing' is ordinarily calculated in a clockwise direction starting from a reference direction of 0° and increasing to 359.9 degrees. Measured in this way, a bearing is referred to as an azimuth by the US Army but not by armies in other English speaking nations, which use the term bearing. The human population is continuously exposed to ionizing radiation from several natural sources (cosmic and terrestrial contributions). For most individuals, exposure to natural sources exceeds that from all man-made (artificial) sources combined. The man-made sources arise from peaceful (e.g. medical use, energy generation, and associated fuel cycle facilities, radioisotope production, waste management) and military purposes (nuclear tests and their fallout or radioactive release, nuclear explosions). Radiation levels: Green: Radiation up to 0.3 μSv/h Yellow: Radiation between 0.3 and 0.8 μSv/h Red: Radiation above 0.8 μSv/h 1.14 µSv/h - Shelter population 5.7 µSv/h - Evacuation of population 11.4 µSv/h - Issue Iodine tablets 0.114 µSv/h - Max daily dose == 1 mSv/year Reverse Geocoding by Nominatim Reverse geocoding generates an address from a latitude and longitude. The reverse geocoding API does not exactly compute the address for the coordinate it receives. It works by finding the closest suitable OSM object and returning its address information. This may occasionally lead to unexpected results. QuickApp code logics: onInit() Initialise the QuickApp getQuickAppVariables() Get all Quickapp Variables or create them createVariables() Setup the global variables setupChildDevices() -- Setup all child devices loadMap() Get the webpage from http://radioactiveathome.org/map/ (This is the main loop of the QuickApp) extractData() Extract the data from the webpage source-code geoDistance() Calculate the distance from the HC3 (QuickApp variables) lat/lon to the sensors lat/lon geoBearing() Calculate the bearing from the HC3 (QuickApp variables) lat/lon to the sensors lat/lon Check for the values to give the right dot colours for the sample and average measurements Store the values of all sensors in a table and sort the table on distance Run through the table to get the maximum sample and maximum average measurements. If there are more than one, get the one that is the nearest-by updateIcon() Set the icon (colour) based on the sensor measurement getCity() Get the cities and countries for the seven selected sensors from https://nominatim.openstreetmap.org/ and store them in a table updateLabels() Update the labels updateProperties() Update the properties updateChildDevices() Update the Child Devices Return to the main loop loadMap() Links: Radioactive@Home Map: http://radioactiveathome.org/map/ Status servers: http://radioactiveathome.org/boinc/server_status.php Reverse geocoding: https://nominatim.org/release-docs/latest/api/Reverse/ licence:Data © OpenStreetMap contributors, ODbL 1.0. https://osm.org/copyright Nominatim Usage Policy (aka Geocoding Policy): https://operations.osmfoundation.org/policies/nominatim/ Variables (mandatory and created automatically): latitude = Latitude of your location (Default is the latitude of your HC3) longitude = Longitude of your location (Default is the longitude of your HC3) language = Preferred language (default = en) (supported languages are English (en), French (fr), Polish (pl), Croatian (hr) and Dutch (nl)) interval = Interval in seconds to get the data from the Radioactive@Home website debugLevel = Number (1=some, 2=few, 3=most, 4=all) (default = 1, debugLevel 4 is only recommended for solving difficult issues) icon_refresh = User defined icon number for refresh status icon_green = User defined icon number for values less than 0.3 μSv/h icon_yellow = User defined icon number for values between 0.3 and 0.8 μSv/h icon_red = User defined icon number for values greater than 0.8 μSv/h icon_error = User defined icon number in case of an error gettng the data Version 1.4 (6th February 2024) Added extra check for an empty response in the address from Geocity (thanks to @Sankotronic from the Fibaro forum) Version 1.3 (17th July 2023) Added extra check for the right response from Geocity (in case of response {"error":"Unable to geocode"}) Version 1.2 (11th January 2023) Added support for Croatian language thanks to @Sankotronic Version 1.1 (9th January 2023) Changed handling of negative values for dots and icons: if tonumber(num) >= 0 and tonumber(num) <= 0.3 then Added a better translation for French (thanks to @fredokl) Version 1.0 (5th November 2022) Added the nearest five reactors to the labels with distance and bearing Added a button to refresh the list of (five nearest) reactors Added a warning at startup if the latitude or longitude differs from the setup of your HC3 Replaced the creation of the dots 🟢🟡🔴 to the labels, so no longer for all sensors Added some extra notifications to the labels in case the website is down Extended the http timeout a bit, to give the reverse geocoding some more time to respond Added translations for new functions Version 0.5 (29th October 2022) Added translation to the Reverse API geocoding response (city and country) Changed calculation of the bearings only for the 7 selected sensors, not all sensors Optimized the code and added more structure by using multi file code (main, childs and i18n) Version 0.4 (22nd October 2022) Added six Child devices for the nearest sensor 24h average, 2nd, 3rd, 4th, 5th nearest sensor sample, the nearest sensor maximum sample and the nearest sensor maximum 24h average Added icons based on sensor measurements to all Child Devices Added translations for the labels and properties from English to French, Polish and Dutch. (Thanks to @ppeterr and @fredokl for help with the translation) Limited the details of the response of the Reverse Geocoding with zoom=10 (address detail = city) Version 0.3 (16th October 2022) Added the City and Country also for worst sample and worst average sensors Added all debug information and set the debug levels Optimised the code Version 0.2 (15th October 2022) Added the City and Country for all 5 sensors, not only the first one Version 0.1 (15th October 2022) Initial version Download the QuickApp here (download the file and un-zip): https://github.com/GitHub4Eddy/radiation_monitor/archive/refs/tags/radiation-monitor-14.zip or from the Fibaro Marketplace: https://marketplace.fibaro.com/items/radiation-monitor How to install: Open the Configuration Interface Go to Settings > Devices Click + Choose Other Device Choose Upload File Choose file from your computer with .fqa Icons thanks to @Sankotronic


- 95 replies
-
- 6
-
-
-
- quickapp
- radioactive@home
- (and 3 more)
-
Tiny QuickApp Emulator (TQAE) started out as a simple modular QuickApp emulator but have evolved into a pretty good development environment. (Great intro to TQAE <here> from @Joep - thanks!) If you want to use vscode, I recommend this project that I'm currently focusing my development efforts on. /TQAE.lua v0.60 -- Main emulator, loads other modules /modules/sync.lua -- timers with fake asynchronous IO /modules/async.lua -- timers with asynchronous IO based on copas /modules/copas.lua -- copas.* functions /modules/net.lua -- net.* functions /modules/api.lua -- api.* and web api /modules/json.lua -- json library /modules/fibaro.lua -- fibaro.* functions /modules/class.lua -- class function /modules/files.lua -- support for loading files, *.lua and *.fqa files /modules/QuickApp.lua -- QuickApp classes /modules/devices.json -- device templates /modules/webserver.lua -- web server for remote calls (ex. from proxy) /modules/proxy.lua -- creates QA proxy on the HC3 for funnelling back onAction and UIevents /modules/ui.lua -- Local Web UI for QA /modules/time.lua -- Time manipulation - changing start time... /modules/refreshStates.lua -- /refreshStates support /modules/Scene.lua -- Initial support /modules/offline.lua -- Support for local shadowing resources. Currently /globalVariables /modules/stdQA.lua -- Standard (simulated) devices /web/main.html -- Web - Main emulator page /web/qa.html -- Web - QuickApp info /web/ui.html -- Web - QuickApp UI /web/timers.html -- Web - list of active timers /web/settings.html -- Web - editor for configuration file examples/MyQuickApp.lua -- Simple QuickApp examples/Hue.lua -- Hue QuickApp with QuickAppChildren examples/Scheduler.lua -- Simple minute based scheduler examples/Ping.lua -- Ping QuickApp that loads Pong QuickApp and exchanges fibaro.calls... examples/Pong.lua examples/TestScene.lua -- Test scene examples/TestSceneCron.lua -- Test scene with Date condition examples/Backup.lua -- Non-QA code that backs up QuickApps from the HC3 to the local filesystem as *.fqa files examples/SamsunWebSocket.lua -- WebSocket example controlling my Samsung TV examples/TestTCPSocket.lua -- TCPSocket example with emulated responses setup/TQAEplugin.lua -- ZBS plugin to give editor help and fibaro command completion. TQAE.gz -- Every file in one archive Installation First time download the archive, TQAE.tar.gz and unpack it in a suitable directory on your PC/Mac/Linux. On Linux: >tar xvf TQAE-main.tar On PC/Mac use suitable archive program to unpack the archive. ../TQAE/TQAE.lua ../TQAE/TQAE_QA.lua ../TQAE/modules/* ../TQAE/web/* ../TQAE/examples/* ../TQAE/... Alternatively, and preferred, clone the GitHub repository >git clone https://github.com/jangabrielsson/TQAE The setup procedure would be EMB-31KYQ6LT:~ erajgab$ mkdir development # Create new directory to develop in EMB-31KYQ6LT:~ erajgab$ cd development/ EMB-31KYQ6LT:development erajgab$ git clone https://github.com/jangabrielsson/TQAE # Clone repository Cloning into 'TQAE'... remote: Enumerating objects: 1790, done. remote: Counting objects: 100% (192/192), done. remote: Compressing objects: 100% (135/135), done. remote: Total 1790 (delta 118), reused 122 (delta 57), pack-reused 1598 Receiving objects: 100% (1790/1790), 1.75 MiB | 7.28 MiB/s, done. Resolving deltas: 100% (1198/1198), done. EMB-31KYQ6LT:development erajgab$ ls # We got the code... TQAE EMB-31KYQ6LT:development erajgab$ cd TQAE/ EMB-31KYQ6LT:TQAE erajgab$ ls LICENSE TQAE.tar.gz examples modules README.md TQAE_QA.lua jgabs_QAs setup TQAE.lua TQAEconfigs.example lib web EMB-31KYQ6LT:TQAE erajgab$ mkdir test # Create 2 directories to do your own development in EMB-31KYQ6LT:TQAE erajgab$ mkdir dev So both directories dev and test are in .gitignore, so you can update the TQAE code with the command (while standing in the TQAE directory) EMB-31KYQ6LT:TQAE erajgab$ git fetch This will update the TQAE code (it's usually updated quite often) but will leave your test and dev directories untouched. You can also link dev to some other directory where you do your development. I will do my best to keep the repository clean. This way it's easy to keep up with updates of the code. Download ZeroBrane studio <link> Open ZBS and open the TQAE_QA.lua file Set project directory in ZBS to the current file, TQAE_QA.lua (Project->Project Directory->Set From Current File) Also set Lua interpreter to Lua 5.3 (Project->Lua Interpreter->Lua 5.3) Now, run TQAE_QA.lua (F5 in ZBS). The output will look something like: ---------------- Tiny QuickAppEmulator (TQAE) v0.30 ------------- [11.10.2021] [08:33:23] | SYS|: No connection to HC3 [11.10.2021] [08:33:23] | SYS|: Created WebAPI at 192.168.1.18:8976 [11.10.2021] [08:33:23] | SYS|: sunrise 07:43, sunset 19:50 Note first that there is no connection to the HC3 - we are missing user, password, and IP for the HC3. Secondly, note the WebAPI address. 192.168.1.18 is my machine, your IP address may be different. The port is 8976. While TQAE_QA.lua is running open http://192.168.1.18:8976/web/main in your browser. (the Web UI only works while the emulator is running) Goto [Settings] in the web page menu (upper right). Fill in User ID, Password, and IP address for the HC3. Click "Save" Hopefully there is now a TQAEconfigs.lua file with the HC3 credentials that the emulator can use. Go back to ZBS and stop the program (Shift-F5) and run it again: ---------------- Tiny QuickAppEmulator (TQAE) v0.30 ------------- [11.10.2021] [09:13:43] | SYS|: Using config file TQAEconfigs.lua [11.10.2021] [09:13:43] | SYS|: Created WebAPI at 192.168.1.18:8976 [11.10.2021] [09:13:43] | SYS|: sunrise 07:14, sunset 17:52 It loads the config file and doesn't complain that there is no connection to the HC3 anymore. If you run ZBS I strongly encourage you to download the copy the TQAE/setup/TQAEplugin.lua file to your home directory ~/.zbstudio/packages/TQAEplugin.lua Also create directory ~/.zbstudio/tqae and move the files TQAE/setup/codeTemplates.lua and TQAE/setup/fileDownloads.lua to that directory. It will give you tooltips for the fibaro lua functions and some shortcuts to download updates to TQAE. Restart ZBS after installing the files. Great we are up and running! Supported functions (v0.33) fibaro.debug(tag,str) fibaro.warning(tag,str) fibaro.trace(tag,str) fibaro.error(tag,str) fibaro.call(deviceID, actionName, ...) fibaro.getType(deviceID) fibaro.getValue(deviceID, propertyName) fibaro.getName(deviceID) fibaro.get(deviceID,propertyName) fibaro.getGlobalVariable(varName) fibaro.setGlobalVariable(varName ,value) fibaro.getRoomName(roomID) fibaro.getRoomID(deviceID) fibaro.getRoomNameByDeviceID(deviceID) fibaro.getSectionID(deviceID) fibaro.getIds(devices) fibaro.getAllDeviceIds() fibaro.getDevicesID(filter) fibaro.scene(action, sceneIDs) fibaro.profile(profile_id, action) fibaro.callGroupAction(action,args) fibaro.alert(alert_type, user_ids, notification_content) fibaro.alarm(partition_id, action) fibaro.setTimeout(ms, func) fibaro.clearTimeout(ref) fibaro.setInterval(ms, func) fibaro.clearInterval(ref) fibaro.emitCustomEvent(name) fibaro.wakeUpDeadDevice(deviceID) fibaro.sleep(ms) net.HTTPClient() net.TCPSocket() net.UDPSocket() net.WebSocketClient() net.WebSocketClientTLS() mqtt.Client.connect(uri, options) <mqttclient>:addEventListener(message,handler) <mqttclient>:subscribe(topic, options) <mqttclient>:unsubscribe(topics, options) <mqttclient>:publish(topic, payload, options) <mqttclient>::disconnect(options) api.get(call) api.put(call <, data>) api.post(call <, data>) api.delete(call <, data>) setTimeout(func, ms) clearTimeout(ref) setInterval(func, ms) clearInterval(ref) json.encode(expr) json.decode(string) plugin.mainDeviceId plugin.deleteDevice(deviceId) plugin.restart(deviceId) plugin.getProperty(id,prop) plugin.getChildDevices(id) plugin.createChildDevice(prop) class QuickAppBase class QuickApp class QuickAppChild class <name> property(get,set) QuickApp:onInit() -- called at startup if defined QuickApp - self:setVariable(name,value) QuickApp - self:getVariable(name) QuickApp - self:debug(...) QuickApp - self:trace(...) QuickApp - self:warning(...) QuickApp - self:error(...) QuickApp - self:updateView(elm,type,value) QuickApp - self:updateProperty(name,value) QuickApp - self:createChildDevice(props,device) QuickApp - self:initChildDevices(table) The idea and reason that I implement an offline emulator for the HC3 is that it is generally speaking a pain to debug a moderately complex QuickApp on the HC3. You are left to using debug statements and it slow you down as you can not set breakpoint and step through the code to understand what logic it is following. With an offline emulator running on a PC/Mac you can use a modern IDE like ZeroBrane or VisualStudio to develop your QA. You can quickly put together 99.9% of your QA and the speed/productivity tripples. When it works in the emulator you can move the code to the HC3 and it will work. No need to develop on the HC3 and accidentally crash the whole box and make your family upset. Here is a video showing a typical workflow. (Note that the Web UI now has a button "Upload" that uploads the QuickApp when it's ready to the HC3) Writing HC3 (HC2) emulators seems to be a hobby for me - but what better thing to do on a vacation? So far I have HC2 Scene emulator - quite ok and feature complete, not actively developed anymore but still works well (not much has happened to the HC2 scene framework lately) HC3 emulator (fibaroapiHC3.lua) - gazillion of features, 9.5k lines - haven't come across any QA it can't run. Also some basic Scene support HC3 micro emulator - ~70 lines of Lua that can run QAs in parallel but have a very limited function support. Developed to prove that we could enhance the call model of QAs without much work Well, the micro emulator got my interest and I have evolved it to a more full featured emulator - Tiny QuickApp Emulator (TQAE). Runs multiple QAs in parallel - can test fibaro.calls between them Supports net.HTTPClient, setTimeout, clearTimeout, setInterval, clearInterval, json.*, class, property Supports QuickApp methods - self:setVariable, self.getVariable, self:updateProperty, self:updateView Supports fibaro.* functions Supports QuickAppChild devices Supports simple web UI to test QuickApp buttons/sliders Supports proxy QA on the HC3 to make to emulated QA interact with QAs running on the HC3 - Real HC3 QAs can call the QA you are running in the emulator. (and you get a real UI too) The main idea is that the emulator could be used as a light weight playground for testing out QAs The main logic is still under 1000 lines with current modules but stuff like json support and the whole fibaro.* sdk requires quite some code so it tends to swell - in any case it's modular. Dependencies on luasocket. (I recommend the free ZeroBrane Studio as it comes with the necessary libraries and is a specialised development environment for Lua) local http = require("socket.http") local socket = require("socket") local ltn12 = require("ltn12") It has an easy structure (I think). There are very few differences between TQAE and fibaroapiHC3.lua so I mainly work with TQAE these days. Advantages compared to fibaroapiHC3.lua. Easier to debug as code is not as asynchronous as it is in the fibaroapiHC3 scheduler (possibility to use a sync scheduler). Uses a vanilla fibaro.* implementation only leveraging api.* and __fibaro_* calls, so it should be easy to upgrade if we get new fibaro.* calls. Module structure makes it easy to add new libraries etc. It's modular. Include it in your QA code _=loadfile and loadfile("TQAE.lua"){ user="admin", pwd="admin", host="192.168.1.57" } --%%name='Test' --%%id=99 --%%quickVars={x=88,y=99} function QuickApp:onInit() self:debug(self.name,self.id) self:debug("y=",self:getVariable("y")) local n = 5 setInterval(function() n=n-1 if n <= 0 then os.exit() end self:debug("PING") end,1000) end The loadfile at the top loads in the emulator and run your QA. The { ... } table after loadfile("TQAE.lua") is a table with configuration options to the emulator. The emulator needs ip, user and password to access the HC3. If you don't want to type that you can store a config file for TQAE with you standard settings. The default name for the file is "TQAEconfigs.lua" and it can look like return { user="admin", pwd="admin", host="192.168.1.57", verbose=false, modPath = "TQAEmodules/", temp = "temp/" --localModules = {"myModule.lua"} --globalModules = {"UDP.lua"} } However, you still need to call loadfile("TQAE.lua"){} with and empty table. If you would like to have another name of the file you can specify that loadfile("TQAE.lua"){ config = "myTQAEconfigfile.lua" } The config is parameters for the emulator. Then you can also set "parameters" for the individual QAs that you run using --%% directives The --%% directives in your QA code are collected into a Lua table. In the case above { name='Test', id=99, quickVars = { x=88, y=99 } } and if present will be used to add fields to the QA. This is the way to tell what name, id and type you want your QA to have. A special field is quickVars that will be inserted as quickAppVariables of the QA at startup. Note that each field can only be one line. It's easy to startup another QA from within your code _=loadfile and loadfile("TQAE.lua"){ user="admin", pwd="admin", host="192.168.1.57" } --%%name='Test' --%%id=99 hc3_emulator.installQA{id=444,file='MyOtherQA.lua'} -- Load in another QA and set id to 444 function QuickApp:onInit() self:debug(self.name,self.id) fibaro.call(444,"test",5,6) -- call other QA end If the other file is open in the IDE you can set breakpoints in it and jump between the QAs. In fact, hc3_emulator.installQA{id=444,file='MyThirdQA.fqa'} will load in a .fqa file directly. In that case temporary files are stored for each of the files in the .fqa. This means we can do trick like this, downloading a QA from the HC3 and run it in the emulator with one line of code _=loadfile and loadfile("TQAE.lua"){ user="admin", pwd="admin", host="192.168.1.57" } hc3_emulator.installQA{id=700,code=api.get("/quickApp/export/700")} -- Load in QA 700 from HC3 and run it function QuickApp:onInit() self:debug(self.name,self.id) fibaro.call(700,"test",5,6) -- call QA 700 end Another useful directive is --FILE:<filename>,<name>; that allow us to include extra files in our QA. A QA can consist of several files but it must have a 'main' file. The QA code you run in the emulator will always be the main, and then you can include extra files that will be added to the QA as "files". Ex. _=loadfile and loadfile("TQAE.lua"){ user="admin", pwd="admin", host="192.168.1.57" } --FILE:myUtilities.lua,utilities; function QuickApp:onInit() self:debug(self.name,self.id) LOG("This is a test") -- Using global LOG function defined in myUtilities.lua end Running and logs When running there will be output of two types. Standard logging that the QA does with fibaro.debug, self:debug etc,. System debugs, that are the emulators way to inform on what is ongoing. How much the system logs depends on the configuration parameter .logLevel. ---------------- Tiny QuickAppEmulator (TQAE) v0.5 ------------- [29.07.2021] [11:17:34] |SYS |: Loading QA:TestQA1 - ID:1001 Start [29.07.2021] [11:17:34] |SYS |: Starting QA:TestQA1 - ID:1001 [29.07.2021] [11:17:34] [DEBUG] [QUICKAPP1001]: TestQA1 - 1001 Here we se the system log (|SYS |) that the QA is loading and then the log that it's running. The first is when the QA code is loaded and all functions are defined. Also if you do something on top-level, outside functions it will run here. In the example the QA does a print("Start") on top-level of the QA so that is executed when loading. Then, if the QA is successfully loaded, it will be "started, meaning that the function QuickApp:onInit() will be called if it's defined. That's the second SYS log. It's good to pay notice to this. If you get an error before Loading it typically means that you have a syntactic error in the QA code - non-valid Lua code. If you get an error after Loading but before Starting it's something on top-level that is run, outside of function QuickApp:onInit() If you get an error after Starting, well, then it's just something wrong with your code when it runs. A run-time error will look like: [29.07.2021] [12:27:47] [ERROR] [QUICKAPP1002]: [string "temp/main_16546.lua"]:5: attempt to call a nil value (global 'foo') This tells us that the error was in the QA with id 1002 (unless you have changed __TAG) The QA file is 'main'. A QA can consist of many files and this gives us the clue in what file the error was. If you only have one file, its name is 'main'. Then it tells us that is was line 5 where the error occurred ([string "temp/main_16546.lua"]:5:) and then that we tried to call a global variable 'foo' that didn't have a value (a function) So, in the main file look for a foo() call on line 5 - that's the error... Turning up logLevel will also log modules loaded etc. It also sets a Lua global in the QA, LOGLEVEL to the level, so that variable can be used by you to also allow your code to log more or less. Other features The Web UI allows the file to be saved as a *.fqa file that can be uploaded manually to the HC3. It you have included multiple files with the --FILE: directive they will also be included. A simple way to code and create multi-file QAs. The Web UI can also upload the QA directly to the HC3. The directive 'interfaces' Ex. --%%interfaces={"power"} will add the interfaces as the initialInterfaces property of the .fqa. An easy way to include and extra interface in the ready .fqa. Emulator options: (set in the header _=loadfile and loadfile("TQAE.lua"){...} ) user=<user> Account used to interact with the HC3 via REST api pwd=<Password> Password for account used to interact with the HC3 via REST api host=<IP address> IP address of HC3 configFile = <filename> File used to load in emulator options instead of specifying them in the QA file. Great place to keep credentials instead of listing them in the QA code, and forget to remove them when uploading codeto forums... Default "TQAEconfigs.lua" debug={ traceFibaro=<boolean> -- default false QA=<boolean>, --default true module=<boolean>, --defaul false module2=<boolean>, --defaul false lock=<boolean>, --default false child=<boolean>, --default true device=<boolean>, --default true refreshStates=<boolean> -- default false } modPath = <path>, Path to TQAE modules. Default "TQAEmodules/" temp = <path> Path to temp directory. Default "temp/" startTime=<time string> Start date for the emulator. Ex. "12/24/2024-07:00" to start emulator at X-mas morning 07:00 2024. Default, current local time. htmlDebug=<boolean>. If false will strip html formatting from the log output. Default true colorDebug=<boolean>. If true will log in ZBS console with color. Default true copas=<boolean> If true will use the copas scheduler. Default true. noweb=<boolean> If true will not start up local web interface. Default false lateTimers=<seconds> If set to a value will be used to notify if timers are late to execute. Default false timerVerbose=<boolean> If true prints timer reference with extended information (expiration time etc) QuickApp options: (set with --%% directive n file) --%%name=<name> --%%id=<number> --%%type=<com.fibaro.XYZ> --%%properties={<table of initial properties>} --%%interfaces={<array of interfaces>} --%%quickVars={<table of initial quickAppVariables>} --%%proxy=<boolean> --%%save=<boolean> Documentation Emulator parameters and QA parameters Web UI - and QA UI Some implementation notes Notes and ToDos Mostly developed as a playground for my own coding and it fits my workflow. I may add features/fix bugs if others are using it - but no more than 500 lines of code
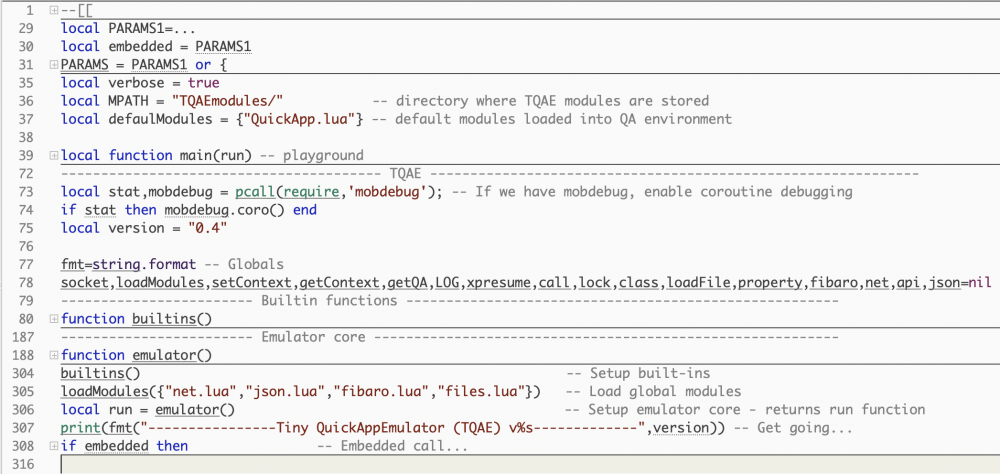
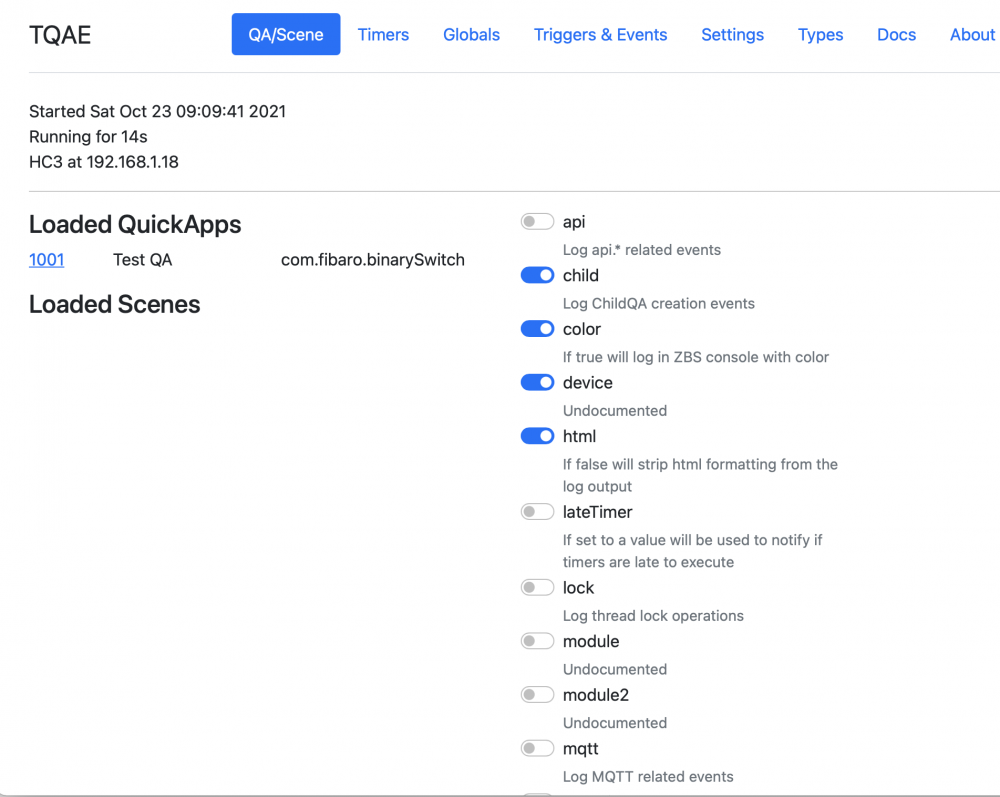
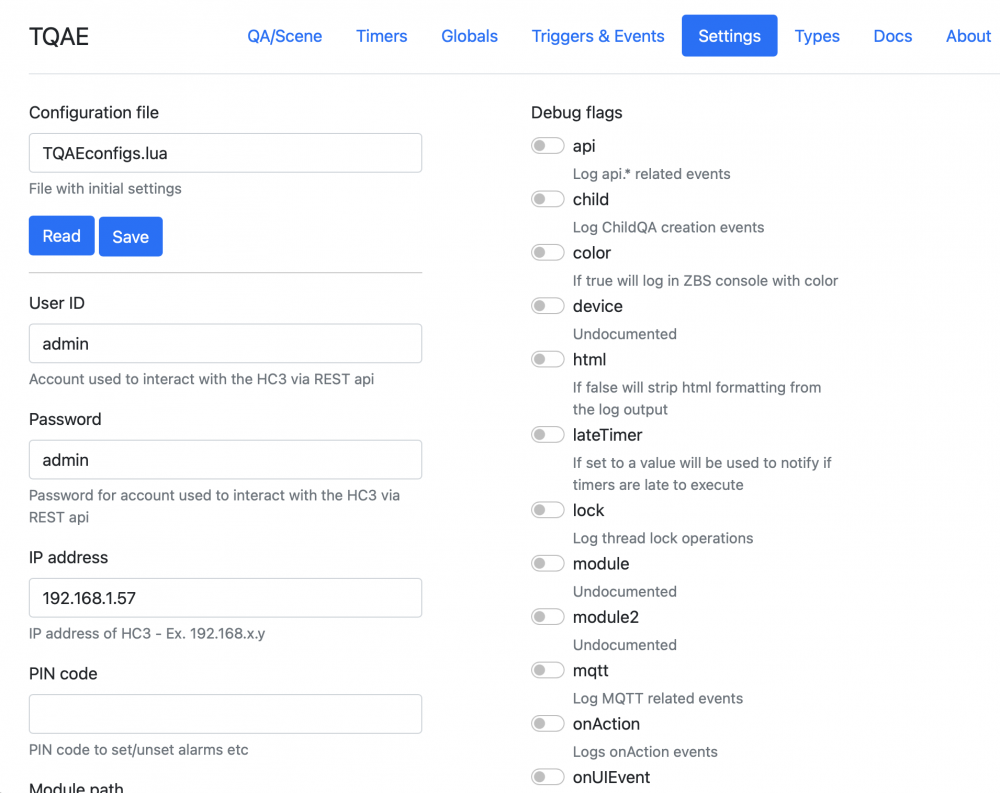
-
 I want to do some normal validation of the UI (normal for people other than Fibaro which doesn't seem to understand the finer things of the user interface concepts). My immediate desire is to take two values from the UI and pass them both to the API where they will be processed. The device is a thermostat and is using the com.fibaro.hvacSystemAuto device type. This presents the user a heating setpoint and a cooling setpoint when the thermostat is in Auto mode. But when the "Set" button is pressed, it sends the heat setpoint as an action, then it sends the cool setpoint. But the API expects both setpoints when the device is in Auto. Further, it burps if the heat setpoint is hotter than the cool setpoint. Even worse, the device control is in the cloud so the round trip is quite slow. It appears that the heat setpoint property I retrieve using fibaro.getValue(self.id, "heatingThermostatSetpoint") doesn't appear to be the value which was just sent (and passed to the cloud) during the heat setpoint onAction() method [remember, BOTH values are sent to the API on each call]. My original idea was to adjust the current setpoints so that the cooling setpoint was 2° higher than the heating setpoint when that setpoint is about to be set if they are not already in a valid state. Then, during the cooling setpoint adjustment, I would change the heating setpoint to be 2° cooler than the cooling setpoint if they are not already in a valid state. Of course an even better solution would be to be able to peek at the other setpoint in the UI and send it. And ideally, I would like to be able to keep the state of the two setpoints in a valid state at all times. The app used by the thermostat adjusts the heating down if the cooling setpoint is adjusted down too much or it adjusts the cooling up if the heating setpoint is adjusted up too much. So it would be good practice to do something similar in the Fibaro UI. 🙄 But that's not likely to happen anytime in my lifetime or my children's lifetimes either. The code I'm using is: elseif (self.properties.thermostatMode == "Auto") then self:debug('Original coolingThermostatSetpoint ' .. self.properties.coolingThermostatSetpoint) -- The coolingThermostatSetpoint must be greater than the heatingThermostatSetpoint. -- Since both the heating and cooling setpoints are updated individually but the -- API must be adjusted for both values at the same time, there are problems when -- the heating setpoint is hotter than the cooling setpoint. Solution (for now) is to -- adjust the coolingThermostatSetpoint to be 2° higher than the new heatingThermostatSetpoint. -- **Note: If the user has not set these two setpoints correctly, the actual heating and cooling -- setpoints will reflect a 2° difference from whichever setpoint has been called last. local coolValue = fibaro.getValue(self.id, 'coolingThermostatSetpoint') self:debug(string.format("getValue() returned %f", coolValue)) if coolValue <= roundedHeatValue then coolValue = roundedHeatValue + 2 end My first pass used the self.properties.coolingThermostatSetpoint value. Then I tried the call to fibaro.getValue() but that didn't seem to help either. The code to set the cooling setpoint is a duplicate of the above except the heating setpoint is adjust downward by 2 vs. the cooling setpoint being adjusted upward. So what am I doing wrong? Thanks in advance to any ideas or solutions. Peter PS: After working on this some more I FINALLY recognized this is a symptom of the async nature of web communication. Both setpoints are called back to back (duh). But the first call gets all the way to sending the API command out and then yields while that happens asynchronously. Then the other setpoint is changed and does the same thing. EXCEPT, the original heating setpoint has not been updated in the hub because that process is not executed until the success of the API call. I know how basic this is to people but I'm something of a dinosaur and cannot get it through my pea-sized, dinosaur brain that things have to happen asynchronously because of the latency of internet communications. Ok....now I'm back on board with all of this and I must find some elegant solution to resolve this. Forgive me for showing my ignorance but I learned a valuable lesson (again, but maybe it will stick this time).
 -

What is they Type "Switch" for Button in QuickApps
RohitNz posted a question in Scenes and Interface
When you drop any of the buttons on the designer and then select a button. On the right hand side you can chose the type Choose Type to be Button or Switch. When I make it a switch, I expect it to look like a ON/Off switch. But it still looks like a button. What is the purpose of this and how do you use it ? -
This QuickApp retrieves power consumption, solar production, energy usage, gas and water usage from the Iungo Monitor, Solarpanel Analog Gasmeter and Watermeter. (Child) Devices for Consumption, Production, Solar Power, Gas usage, Water Flow, Consumption High, Consumption Low, Production High, Production Low, Total Netting, Total Gas, Total Water FLow, Ampere L1-L2-L3, Voltage L1-L2-L3, Import L1-L2-L3 (in kW) and Export L1-L2-L3 (in kW). The QuickApp works with the standalone Iungo or Iungo with BreakOutBox (max. extra 3 devices for Solar, Water and Gas analog). Version 2.0 (3rd January 2024) Added support for the newest API Changed device types to the newest powerSensor --> powerMeter, multilevelSensor --> gasMeter or waterMeter Added Child devices for Total Netting, Gas usage, Ampere L1-L2-L3, Voltage L1-L2-L3, Import L1-L2-L3 (kW), Export L1-L2-L3 (kW) Added extra values to the labels: Total Netting, Ampere L1-L2-L3, Voltage L1-L2-L3, Import L1-L2-L3 kW, Export L1-L2-L3 kW, Cost consumption low and high, Cost production low and high, Cost gast, metername, type, version and serial number Improved the calculations of grid consumption and house consumption Changed the Gas en Water labels to L/min Changed to multi-file Added translations for English, Dutch, French and Polish Added a separate Gas analog meter for those who have an Analog Gas Meter and Iungo addon Added support for the Iungo Modbus addon Added the ability to change the OID's Meter measurement now can also be used for adding up the readings for Consumption High and Low, Production High and Low, Gas and Water to reset the measurements also upwards Version 1.1 (11th September 2021) Changed the Child Devices Consumption High, Consumption Low, Production High and Production Low to device type energyMeter to facilitate the new Energy Panel Added automaticaly change rateType interface of Child device Consumption High and Low to "consumption" and Production High and Low to "production" Changed the Main Device to device type powerSensor to show the power graphs Added Net Consumption to the value of the Main Device Changed the Child Devices Consumption, Production and Solar Power to device type powerSensor to show the power graphs Changed the Water Flow unit text from m³ to Litre Added the amount of m2 Solar Panels to the log text ot the Child Device Solar Power and to the labels Changed meterreading to automatically kWh, MWh of GWh Moved tarif informatie to main device log text Added Meter measurement for Consumption High, Consumption Low, Production High, Production Low, Gas and Water to reset the measurements Added Meter measurement Date for Consumption High, Consumption Low, Production High, Production Low, Gas and Water Removed Refresh button Added some extra debug information when debug level = 3 Version 1.0 (6th February 2021) Now also supports Iungo Solarpanel and Iungo Watermeter Added a lot of Child devices Added QuickApp Variable for user defined icon Mother Device Added QuickApp Variable for Solar Power m2 Removed calculation and storage of energy consumption of Fibaro devices Version 0.6 (22nd January 2021) Now also supports Iungo basic version Version 0.5 (21 January 2021) Initial version QuickApp variables (mandatory, they will be automatically added with the default values): IPaddress = IP address of your Iungo Monitor interval = Number in seconds, the Lungo Monitor normally is updated every 10 seconds (the interval gets devided by the amount of addons you have (next to the Iungo monitor, solarpanel, gasmeter analog or water meter)) debugLevel = Number (1=some, 2=few, 3=all, 4=simulation mode) (default = 1) language = Preferred language (default = en) (supported languages are Engish (en), French (fr), Polish (pl) and Dutch (nl)) solarPanel = true or false for use of the SolarPanel module (default is false) gasMeterAnalog = true or false for use of the analog Gasmeter module (default is false) waterMeter = true or false for use of the Watermeter module (default is false) monitorOID = monitor objectID (default is 538d72d9 or if you have the Modbus version: 06f6c748) solarOID = solar objectID (default is 95778a43) gasAnalogOID = analog gas meter objectID (default is 0, but if you have one, use 06e869e1) waterOID = water meter objectID (default is 82ec52ad or use 40c3afff) solarM2 = The amount of m² Solar Panels (use . (dot) for decimals) for calculating Solar Power m² meterConsHigh = Last meter measurement Consumption High (kWh) meterConsLow = Last meter measurement Consumption Low (kWh) meterProdHigh = Last meter measurement Production High (kWh) meterProdLow = Last meter measurement Production Low (kWh) meterGas = Last meter measurement Gas (m³) meterWater = Last meter measurement Water (L/min) meterEnergyD = Date last Energy meter measurement meterGasD = Date last Gas meter measurement meterWaterD = Date last Water meter measurement Tested with: Iungo version 1.5, revision 4444, date Nov 17 2023 with the help of @twanve (thanks) Download the QuickApp here (download the file and un-zip): https://github.com/GitHub4Eddy/iungo_monitor/archive/refs/tags/iungo_monitor-20.zip or Fibaro Marketplace: https://marketplace.fibaro.com/items/iungo-monitor How to install: Open the Configuration Interface Go to Settings > Devices Click + Choose Other Device Choose Upload File Choose file from your computer with .fqa


-
Czy ktoś może pomóc w wykonaniu QA? Potrzebne aby QA : - po naciśnięciu przycisku wykonało - "open" danego urządzenia - sprawdziło stan czujnika binarnego i zwróciło jego wartość w formie "otwarte" gdy true lub "zamknięte" gdy false - wpisało stan czujnika w etykiecie QA Przykład: function QuickApp:wjazd_open() -- nazwa przycisku QA hub.call(1955, "open") -- otwarcie bramy (smart implant zwiera styki) self:updateView("wjazd_label", "text", "Brama wjazdowa: " .. tostring(hub.getValue(152, "value")) ) -- 152 to czujnik otwarcia bramy end
-
 This QuickApp reads the PM2.5, PM10, Temperature, Humidity and Airpressure values directly from a sensor somewhere in this world That sensor doesn't have to be your own sensor, any sensor can be used, just find one in your neighborhood For locating the sensor(ID's) in your neighborhood see: https://sensor.community/en/ Select two (!) SensorID's, one for PM2.5 and PM10 values and one for Temperature, Humidity and Airpressure values The PM2.5, PM10, Temperature, Humidity, Absolute Humidity and Airpressure readings are stored in the value of six (child) devices, so you can read the value from your own scenes This QuickApp will send notifications when PM2.5 or PM10 readings reach a breakpoint (if userID ~= 0) Absolute humidity is the measure of water vapor (moisture) in the air, regardless of temperature. It is expressed as grams of moisture per cubic meter of air (g/m3) See also https://luftdaten.info See also for CVS files: https://archive.luftdaten.info See also https://github.com/opendata-stuttgart/ API documentation: https://github.com/opendata-stuttgart/meta/wiki/EN-APIs QuickApp variables (mandatory, they will be automatically added with the default values): sensorID1 = [number] SensorID for PM2.5 and PM10 values, your own sensor or from someone else, 13463 is an example sensorID2 = [number] SensorID for Temperature, Humidity and Airpressure values, your own sensor or from someone else, 13464 is an example interval = [number] in seconds time to get the sensor data from sensor.community timeout = [number] in seconds for http timeout userID = [number] userID to notify of PM2.5 / PM10 breakpoints debugLevel = [number] Debug logging (1=some, 2=few, 3=all) (default = 1) icon = [numbber] User defined icon number (add the icon via an other device and lookup the number) Version 1.0 (7th February 2021) Added Child Devices for Temperature, Humidity, Absolute Humidity and Airpressure Changed the quickapp variable SensorID to two variables, one for PM values and one for Temperature, Humidity and Airpressure values Added Quickapp variable for debug level (1=some, 2=few, 3=all). Recommended default value is 1. Added QuickApp Variable for user defined icon master device-- Added Airpressure Text in log of Airpressure Child Device Removed QuickApp Variable address, there was no need to change it by user Added values for Temperature, Humidity, Absolute Humidity and Airpressure to the lables Added values for Country, Latitude and Longitude to the labels Added Sensor ID to the log below the value Added "Refresh" button Added extra check for empty data return from Sensor Community Version 0.4 (19th August 2020] Added child devices for PM2.5 and PM10 Added time of measurement, adjusted to your timezone Added Timeout QuickApp variable with high http timeout value to prevent errors Error message instead off debug message in case of an error Changed method of adding QuickApp variables, so they can be edited Version 0.3 (15th June 2020) Link to CVS files added in comment Fixed some typos Fixed breakpoint check 0 - 30 and 0 - 50 notifications Fixed retrieve of json data Version 0.2 (14th June 2020) Link to API documentation added Solved bug / crash: Better selection of the first part of the apiResult Changed some debugging logica Added UserID (mandatory) for sending push notifications Added push notifications based on the PM2.5 and PM10 breakpoints Solved bud / crash if there only was one reading from the api, most of the time there are two readings (last 5 minutes) Version 0.1 (13th June 2020) Initial version Suggestions are welcome. If someone feels the need to improve the QuickApp, you are very welcome. Download the QuickApp here (download the file and un-zip): https://github.com/GitHub4Eddy/sensor_community/archive/sensor_community_1.zip or Fibaro Marketplace: https://marketplace.fibaro.com/items/sensor-community How to install: Open the Configuration Interface Go to Settings > Devices Click + Choose Other Device Choose Upload File Choose file from your computer with .fqa

-
How to press a QuickApp button from another QuickApp
RohitNz posted a question in Scenes and Interface
Whats the call to press a QAuickApp button from another QuickApp ? -
HomeWizard Wi-Fi Water Meter Quick App for HC3 The HomeWizard Water Meter gives you live insight into your water consumption. It reads your analog water meter. With the supplied adapter you can place the water meter on most existing Itron, Elster or Sensus analog water meters within 2 minutes. I got a lot of questions if I would create a Quick App for the HomeWizard Wi-Fi Water Meter. So I decided to build it, despite not owning the device. The Quick App reads the total and active water usage and it calculates the daily usage: Feel free to test and post your findings in this topic. Download You can download the beta Quick App v1.0b1 release from my GitHub repository (direct link to Wi-Fi_Water_Meter_v1.0b1.zip). If it's out of beta I'll upload it to the FIBARO Marketplace. You can download the Wi-Fi Water Meter from the FIBARO Marketplace.

-
This QuickApp can be used as your Fibaro Homecenter 3 Weather Provider (Settings - 6. General - Main - Main Devices - Weather Provider) The Buienradar Weather QuickApp contains the current Dutch weather measurements, the weather forecast and the 5-day forecast The 5-days forecast is shown in the labels and the tomorrow forecast is shown in the child devices The current observations are measured by KNMI weather stations spread across The Netherlands and are updated every 10 minutes The weather report is updated several times a day by the Buienradar meteorologists The QuickApp has child devices for: Temperature °C Feel temperature °C Ground temperature °C Humidity % Absolute humidity g/m³ Airpressure hPa Windspeed m/s Windspeed km/h Winddirectiondegrees ° (plus wind direction and arrow) Windspeed Bft Windgusts km/h Rain mm/h Rain Last 24h mm Sunpower Watt/m² Visibility km Sunset (time) Sunrise (time) Sun Chance tomorrow % Min Temp tomorrow °C Max Temp tomorrow °C Rain Chance tomorrow % Min Rain tomorrow mm/h Max Rain tomorrow mm/h Wind tomorrow m/s (plus wind direction and arrow) Wind tomorrow km/h (plus wind direction and arrow) This QuickApp is plug-and-play. The only thing you can do, is change the Station ID to a weather-station nearby from the list or add some nice icons to the devices. Wind Chill (based on the JAG/TI-method) and is only valid for temperatures between -46 C and +10 C and is only valid for wind speed between 1.3 m/s and 49 m/s Windspeed is shown in m/s (km/3.6) Absolute humidity is the measure of water vapor (moisture) in the air, regardless of temperature. It is expressed as grams of moisture per cubic meter of air (g/m3) conditionCodes = {unavailable = 3200, clear = 32, rain = 40, snow = 43, storm = 38, cloudy = 30, fog = 20,} The time shown in the QuickApp, is the last time of the measurement from Buienradar (not the system time) Changes version 3.0 (23rd March 2022) Added 5-days forecast to the labels Addded child devices for: Feel temperature °C Ground temperature °C Windspeed km/h Windspeed Bft Windgusts km/h Rain Last 24h mm Sun Chance tomorrow % Min Temp tomorrow °C Max Temp tomorrow °C Rain Chance tomorrow % Min Rain tomorrow mm/h Max Rain tomorrow mm/h Wind tomorrow m/s (plus wind direction and arrow) Wind tomorrow km/h (plus wind direction and arrow) Changed SunPower device type to powerSensor Changed all Wind devices types to windSensor Converted date-times to more nice format Quickapp variable setGlobalVar changed to boolean Added Quickapp variable stationWarning to show a warning (once) if your station hasn't got some weather value (default is true) Optimised some code Changes version 2.1 (15th January 2021) Added weatherdescription: "Mix van opklaringen en hoge bewolking" to conditioncode "cloudy" "Half bewolkt" to conditioncode "cloudy" "Opklaring en lokaal nevel of mist" to conditioncode "fog" "Zwaar bewolkt met lichte sneeuwval" to conditionCode "snow" "Zwaar bewolkt met regen en winterse neerslag" to conditioncode "snow" "Afwisselend bewolkt met lichte sneeuwval" to conditioncode "snow" "Zware sneeuwval" to conditioncode "snow" "Opklaringen en kans op enkele pittige (onweers)buien" to conditioncode "rain" "Bewolkt en kans op enkele pittige (onweers)buien" to conditioncode "rain" Added Airpressure Text in log of Airpressure Child Device Changes version 2.0 (3rd January 2021) Added Child Devices for: Temperature °C (including feeltemperature and groundtemperature) Humidity % Absolute humidity g/m³ Airpressure hPa Windspeed m/s (including windspeedBft and Windgust km/h) Winddirectiondegrees ° (including winddirection and arrow) Rain mm/h (including rainFallLast24Hour mm) Sunpower watt/m² Visibility km Sunset (time) Sunrise (time) Re-arranged the labels Added backup station functionality for weather stations that don't have all the data, the data from 6260 Meetstation De Bilt is used. Improved check for missing data Added Quickapp variable for debug level (1=some, 2=few, 3=all). Recommended default value is 1. Changes version 1.0 (25th October 2020) Added weatherdescription "Zwaar bewolkt met wat lichte regen" to conditionCode "rain" Changes version 0.6 (9th September 2020) Changed conditionCodes storm = 38 snow = 43 and unknown = unavailable Added weatherdescription "Afwisselend bewolkt met (mogelijk) wat lichte regen" to conditionCode "rain" and and "Afwisselend bewolkt met lokaal mist(banken)" to conditionCode "fog" Changes version 0.5 (4th September 2020) Added wind direction, air pressure and feel temperature to QuickApp labels Changed stationname to regio in labels and log Changed the names of the Global Variables to meet the Fibaro standards and shortened them (please manually delete your old ones and change the names in your scenes) Added an extra check for response of Buienradar (jsonTable) Changes version 0.4 (22nd August 2020) Completely renewed code Several Global Variables are available for personal use Added QuickApp variable SetGlobalVar true or false, whether you want to use the Global Variables Added QuickApp variable Timeout for finetuning waiting for response Changes version 0.3 (11th August 2020) error message instead of debug message in case of an error Changed method of adding QuickApp variables, so they can be edited Weather conditions: The Buienradar weather description is converted to the right Fibaro condition codes, with the icons: Fibaro Dashboard: The Fibaro properties Temperature, Humidity and Wind values are updated to show in your dashboard: Mobile App: For the Mobile app these values are available: For the most accurate measurements you can select a Station in your neighborhood: 6391 Meetstation Arcen / 6275 Meetstation Arnhem / 6249 Meetstation Berkhout / 6308 Meetstation Cadzand / 6260 Meetstation De Bilt / 6235 Meetstation Den Helder / 6370 Meetstation Eindhoven / 6377 Meetstation Ell / 6321 Meetstation Euro platform / 6350 Meetstation Gilze Rijen / 6323 Meetstation Goes / 6283 Meetstation Groenlo-Hupsel / 6280 Meetstation Groningen / 6315 Meetstation Hansweert / 6278 Meetstation Heino / 6356 Meetstation Herwijnen / 6330 Meetstation Hoek van Holland / 6279 Meetstation Hoogeveen / 6251 Meetstation Hoorn Terschelling / 6258 Meetstation Houtribdijk / 6285 Meetstation Huibertgat / 6209 Meetstation IJmond / 6225 Meetstation IJmuiden / 6277 Meetstation Lauwersoog / 6320 Meetstation LE Goeree / 6270 Meetstation Leeuwarden / 6269 Meetstation Lelystad / 6348 Meetstation Lopik-Cabauw / 6380 Meetstation Maastricht / 6273 Meetstation Marknesse / 6286 Meetstation Nieuw Beerta / 6312 Meetstation Oosterschelde / 6344 Meetstation Rotterdam / 6343 Meetstation Rotterdam Geulhaven / 6316 Meetstation Schaar / 6240 Meetstation Schiphol / 6324 Meetstation Stavenisse / 6267 Meetstation Stavoren / 6229 Meetstation Texelhors / 6331 Meetstation Tholen / 6290 Meetstation Twente / 6313 Meetstation Vlakte aan de Raan / 6242 Meetstation Vlieland / 6310 Meetstation Vlissingen / 6375 Meetstation Volkel / 6215 Meetstation Voorschoten / 6319 Meetstation Westdorpe / 6248 Meetstation Wijdenes / 6257 Meetstation Wijk aan Zee / 6340 Meetstation Woensdrecht / 6239 Meetstation Zeeplatform F-3 / 6252 Meetstation Zeeplatform K13 QuickApp variables (mandatory, they will be automatically added with the default values): interval = Number in seconds to update the data (defaul = 601) timeout = Number in seconds to wait for a response (default = 5) stationID = Number of the station you want to use for weather measurements (default = 6260 Meetstation De Bilt) backupstationID = Number of the backup station for missing weather data from stations that don't have all the data (default = 6260 Meetstation De Bilt). Don't change this ID unless you know what you are doing. setGlobalVar = true or false, whether you want tu use the Global Variables (default = false) stationWarning = true or false, whether you want to receive warnings if your station hasn't got some weather value (default is true) debugLevel = Number (1=some, 2=few, 3=all) (default = 1) Download the QuickApp here (download the file and un-zip): https://github.com/GitHub4Eddy/buienradar_weather/archive/refs/tags/buienradar_weather_30.zip or Fibaro Marketplace: https://marketplace.fibaro.com/items/buienradar-weather How to install: Open the Configuration Interface Go to Settings > Devices Click + Choose Other Device Choose Upload File Choose file from your computer with .fqa JSON data copyright: (C)opyright Buienradar / RTL. All rights reserved JSON data terms: This feed may be used freely under condition of source reference buienradar.nl including a hyperlink to https://www.buienradar.nl. The feed cannot be derived from users or other persons.


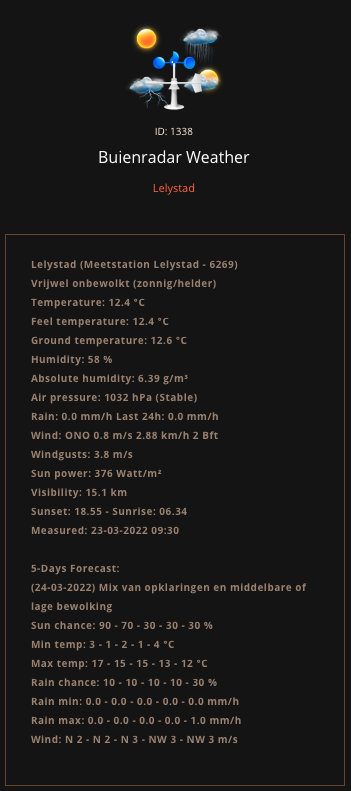

-
fibaroapiHC3.lua Note, I currently only support my new emulator, TQAE, and have moved all my development to that - please check it out... It's a rewrite with the learnings I have made coding fibaroapiHC3.lua... (Note: The new version of the emulator has gone through extensive rewrite and is stabilising (0.300). The old version of the emulator is here fibaroapiHC3_classic.lua.) This is a thread for the fibaroapiHC3.lua sdk that is under development (keeping it separate from the HC3 QuickApps coding - tips and tricks thread) I've started to run and test HC3 QuickApps offline and have made a fibaroapi.lua file that can be included to emulate the fibaro calls and call out to the HC3. This means that a whole QA can be developed offline, debugged and verified before deploying to the HC3. Something that significantly reduces the development process. It's an emulation so it's not 100% but it will cater for 99.99% of the needs to catch bugs, get decent error messages when things doesn't work (like timers). Be able to set breakpoints and inspect states etc. It's complete enough to run the most demanding QuickApps that I have found on the forum so far... If it runs in the emulator and it doesn't run on the HC3 or vice versa I will prioritise to fix it. Latest version here fibaroapiHC3.lua (v0.311) The code is updated weekly so please make sure you have the latest... It was inspired by the old fibaroapi for the HC2 in a thread started by @riemers but has evolved with more extensive support to create a better debugging and "offline experience"... in fact, it's really an HC3 emulator now. The video is an earlier version of the emulator but the principles are more or less the same. Note the nice tooltip and autocompletion of fibaro commands we get with the fibaroapiHC3plugin for ZBS. Enable English subtitles to see instructions... Some benefits: Use a modern development environment such as ZeroBrane Studio (free for Mac/PC/Linux, HC3 plugin here) on your laptop/PC to develop and debug QuickApps and Scenes. Here is a good introduction to Lua (using ZeroBrane) Step through code, inspect Lua variables, set break-points etc - all that is possible in a good IDE. Faster to pin-point errors as the error messages are better than on the HC3 - stack-traces etc. Advanced timer info (setTimeout) warning of late timers and from where the offending function was called if a timer function crashes. Info from where an eronous json.encode was called from in your code so you can easily find the error (instead of seeing a line from deep inside the json encoder) Use the whole Fibaro API fibaro.call etc and net.HTTPClient(), setTimeout(), json.ecode/decode, QuickApp self:functions like self:getVariable, self:updateView Support for MQTT client and QuickApp child devices Both QuickApps and Scenes are supported. Scenes support most conditions and are triggered by real triggers from the HC3 or simulated triggers. Speed up clock to run faster than real time, to watch a Scene or QuickApp over days/weeks/months in seconds. Start at any given time and date - test if your scene behaves on week-ends ? Automatically create a proxy QuickApp on the HC3 that sends UI clicks back to the code your are running and displays self:updateView updates. This way you can test the QuickApp UI (buttons etc) and still debug the main code on your PC. Develop and run multi-file QuickApps, allowing you to build up a library of common code to share between your QAs. Run completely disconnected from the HC3 simulating devices and other resources (now you can take your coding with you on your vacation ) There is a possibility to download resource definitions from the HC3 and use them (devices, globals etc) while running disconnected. Load multiple QAs/Scenes into the emulator at the same time to debug interaction patterns between QAs (or just run all your QAs offline and use the HC3 as a wave GW ) Telnet into the running emulator to capture logs or issue Lua commands like turning on/off devices at runtime to test you QA/Scene. Move the code as-is over to the HC3 when it runs in the emulator - and it will most likely run on the HC3. Scenes needs to be moved to conditions/actions part on the HC3 - may automat that in the future. Oh, and an emulated Web GUI for the quickApp so you can try out button/slider clicks without connecting to the HC3. And lastly, it makes it fun to develop code for the HC3 To get going download the fibaroapiHC3.lua and put in in the working directory where you code your QA(s) If you run ZerobraneStudio (recommended) paste this and run if dofile and not hc3_emulator then dofile("fibaroapiHC3.lua") end--hc3 hc3_emulator.downloadPlugin() hc3_emulator.downloadAssets() Please note the 'end--hc3' that ends the 'if dofile and not hc3_emulator then' statement. It requires the '--end' comment so I can recognise it. Also, you need to set the Lua interpreter to version 5.3 (In ZBS, Menu ; Project -> Lua Interpreter -> Lua 5.3) It will install the. ZBS plugin in ~/.zbstudio/packages and some code templates in ~/.zbstudio/hc3emu/ (Restart ZBS for the plugin to. be installed) Create a Lua file and create a header + QA/scene code. An example of a minimal QA can look like if dofile and not hc3_emulator then hc3_emulator = { name = "My QA", poll=1000, -- Poll for triggers from the HC3 every 1s credentials = {ip="192.168.1.X", user="<user>", pwd="<password>"} } dofile("fibaroapiHC3.lua") end--hc3 function QuickApp:onInit() fibaro.call(88,"turnOn") -- turns on device 88 on your HC3 end We wrap the emulator specific stuff inside "if dofile and not hc3_emulator then .... end" as the symbol 'dofile' is not defined on the HC3 and will thus be false and not include the code - This means that we can take the code as-is and paste it into the HC3 and it works. Note the credentials that contains the IP, username and password so that the emulator can access the HC3 box. If you use ZBS and the plugin there is an Edit-HC3 SDK templates-> menu that will insert a standard QA and Scene header + code in the current buffer. Most of the functions are there and will be improved over time. There are support for net.HTTPClient() and setTimeout/clearTimeout and api.* There are support for getting triggers and events from the HC3 Support for auto-creating a QuickApp proxy with UI elements that sends events back to the code being debugged. There are support for both QuickApps and Scenes (with conditions) Currently supported (v 0.300) fibaro.debug(type,str) fibaro.warning(type,str) fibaro.trace(type,str) fibaro.error(type,str) fibaro.call(deviceID, actionName, ...) fibaro.getType(deviceID) fibaro.getValue(deviceID, propertyName) fibaro.getName(deviceID) fibaro.get(deviceID,propertyName) fibaro.getGlobalVariable(varName) fibaro.setGlobalVariable(varName ,value) fibaro.getRoomName(roomID) fibaro.getRoomID(deviceID) fibaro.getRoomNameByDeviceID(deviceID) fibaro.getSectionID(deviceID) fibaro.getIds(devices) fibaro.getAllDeviceIds() fibaro.getDevicesID(filter) fibaro.scene(action, sceneIDs) fibaro.profile(profile_id, action) fibaro.callGroupAction(action,args) fibaro.alert(alert_type, user_ids, notification_content) fibaro.alarm(partition_id, action) fibaro.setTimeout(ms, func) fibaro.clearTimeout(ref) fibaro.setInterval(ms, func) fibaro.clearInterval(ref) fibaro.emitCustomEvent(name) fibaro.wakeUpDeadDevice(deviceID) fibaro.sleep(ms) net.HTTPClient() net.TCPSocket() net.UDPSocket() net.WebSocketClient() -- needs extra download net.WebSocketClientTLS() -- needs extra download api.get(call) api.put(call <, data>) api.post(call <, data>) api.delete(call <, data>) setTimeout(func, ms) clearTimeout(ref) setInterval(func, ms) clearInterval(ref) mqtt.Client.connect(uri, options) -- needs extra download <mqttclient>:addEventListener(message,handler) <mqttclient>:subscribe(topic, options) <mqttclient>:unsubscribe(topics, options) <mqttclient>:publish(topic, payload, options) <mqttclient>::disconnect(options) plugin.mainDeviceId plugin.deleteDevice(deviceId) plugin.restart(deviceId) plugin.getProperty(id,prop) plugin.getChildDevices(id) plugin.createChildDevice(prop) class QuickAppBase class QuickApp class QuickAppChild json.encode(expr) json.decode(string) QuickApp:onInit() -- called at startup if defined QuickApp - self:setVariable(name,value) QuickApp - self:getVariable(name) QuickApp - self:debug(...) QuickApp - self:updateView(elm,type,value) QuickApp - self:updateProperty() QuickApp - self:createChildDevice(props,device) QuickApp - self:initChildDevices(table) sourceTrigger - scene trigger Supported scene events: {type='alarm', id=<id>, property='armed', value=<value>} {type='alarm', id=<id>, property='breached', value=<value>} {type='alarm', property='homeArmed', value=<value>} {type='alarm', property='homeBreached', value=<value>} {type='weather', property=<prop>, value=<value>, old=<value>} {type='global-variable', property=<name>, value=<value>, old=<value>} {type='device', id=<id>, property=<property>, value=<value>, old=<value>} {type='device', id=<id>, property='centralSceneEvent', value={keyId=<value>, keyAttribute=<value>}} {type='device', id=<id>, property='accessControlEvent', value=<value>} {type='device', id=<id>, property='sceneActivationEvent', value=<value>} {type='profile', property='activeProfile', value=<value>, old=<value>} {type='location', id=<uid>,property=<locationId>, value=<geofenceAction>, timestamp=<timestamp>} {type='custom-event', name=<name>} {type='UpdateReadyEvent', value=_} {type='onlineEvent', value=<bool>} Some of the parameters that affect the behaviour of the emulator and can be set in the header are: hc3_emulator.name=<string> -- Name of QuickApp, default "QuickApp" hc3_emulator.id=<QuickApp ID> -- ID of QuickApp. Normally let emulator asign ID. (usually 999 for non-proxy QA) hc3_emulator.poll=<poll interval> -- Time in ms to poll the HC3 for triggers. default false hc3_emulator.type=<type> -- default "com.fibaro.binarySwitch" hc3_emulator.speed=<speedtime> -- If not false, time in hours the emulator should speed. default false hc3_emulator.proxy=<boolean> -- If true create HC3 procy. default false hc3_emulator.UI=<UI table> -- Table defining buttons/sliders/labels. default {} hc3_emulator.quickVars=<table> -- Table with values to assign quickAppVariables. default {}, hc3_emulator.offline=<boolean> -- If true run offline with simulated devices. default false hc3_emulator.autocreate=<boolean> -- Autocreate local resources hc3_emulator.apiHTTPS=<boolean> -- If true use https to call HC3 REST apis. default false hc3_emulator.deploy=<boolean>, -- If true deploy code to HC3 instead of running it. default false hc3_emulator.assetDirectory=<string> -- Directory where assets shoud be downloaded (ZBS). Default ~/.zbstudio/hc3emu hc3_emulator.resourceFile=<string> -- When doing a resource download, use this file as default. hc3_emulator.db=<boolean/string>, -- If true load a "resource download" from hc3_emulator.resourceFile or string hc3_emulator.htmlDebug=<boolean> -- Try to convert html tags to ZBS console cmds (i.e. colors) hc3_emulator.terminalPort=<boolean> -- Port used for socket/telnet interface hc3_emulator.webPort=<number> -- Port used for web UI and events from HC3 hc3_emulator.HC3_logmessages=<boolean> -- Defult false. If true will push log messages to the HC3 also. hc3_emulator.supressTrigger -- Make the emulator ignore certain events from the HC3, like = PluginChangedViewEvent hc3_emulator.negativeTimeout=<boolean> -- Allow specification of negative timeout for setTimeout (will fire immediatly) hc3_emulator.strictClass=<boolean> -- Strict class semantics, requiring initializers hc3_emulator.consoleColors=<table> -- Maps fibaro.debug/self:debug etc to color (debug.color enables color debugging) hc3_emulator.sysConsoleColors=<table> -- Maps colors used for system logs hc3_emulator.userdataType=<boolean> -- If true intercepts type(...) to return 'userdata' for our Lua classes. Some apps checks this... Some useful emulator functions: hc3_emulator.setOffline(<boolean>,<boolean>) -- hc3_emulator.getIPaddress() -- Return HC3 IP address hc3_emulator.prettyJsonFormat(<table>) -- Return json formatted string of Lua table hc3_emulator.postTrigger(<event>,[<time ms>]) -- Posts a trigger to the emulator... hc3_emulator.loadScene(...) -- Load scene from file or HC3... hc3_emulator.loadQA(...) -- Load QA from file or HC3... hc3_emulator.downloadPlugin() -- (ZBS). Default ~/.zbstudio/packages hc3_emulator.downloadAssets() -- (ZBS). Default ~/.zbstudio/hc3emu hc3_emulator.downloadResources([<filename>]) -- Downloads a "backup" of HC3 resources hc3_emulator.loadResources([<filename>]) -- ...that can be loaded as "local" resources for the emulator. Some debug flags that can be set with hc3_emulator.debug.<flag>=<value> fibaro=false, -- Logs calls to fibaro api trigger=true, -- Logs incoming triggers from HC3 or internal emulator timers=nil, -- Logs low level info on timers being called, very noisy. refreshloop=false, -- Logs evertime refreshloop receives events mqtt=true, -- Logs mqtt message and callbacks http=false, -- Logs all net.HTTPClient():request. ALso includes the time the request took api=false, -- Logs all api request to the HC3 onAction=true, -- Logs call to onAction (incoming fibaro.calls etc UIEvent=true, -- Logs incoming UIEvents, from GUI elements zbsplug=true, -- Logs call from ZBS plugin calls webServer=false, -- Logs requests to /web/ including headers webServerReq=false, -- Logs requests to /web/ excluding headers files=false, -- Logs files loaded and run color=true, -- Logs in console using ANSI colors (see hc3_emulator.consoleColors for mapping) locl=true, -- Log creation of local devices breakOnInit=<boolean> -- Tries to set breakpoint on QuickApp:onInit (mobdebug) breakOnLoad=<boolean> -- Tries to set breakpoint on first line in loaded file (mobdebug) breakOnError=<boolean> -- Tries to break after error (makes it easier to look at call stack etc) ctx=false, -- Logs Lua context switches timersSched=false, -- Logs when timers are scheduled timersWarn=0.500, -- Logs when timers are called late or setTimeout with time < 0 timersExtra=true, -- Adds extra info to timers, like from where it's called and definition of function (small time penalty) In the example in the beginning, the HC3 credentials are listed in the header. If you don't want that (it's easy to forget it and share the code with your passwords in plain sights<9 you can create a credentials.lua file with your secret stuff and it will be automatically included by the SDK. The format should be return { ip="2912.168.77", user="admin", pwd="admin", mySecret="hgskjfhgjhgkdfh" } It returns a Lua table with the relevant keys. ip, user,and pwd is used to log into the HC3. We have added another key here to 'mySecret'. Assume that you want you QA to have a defined quickAppVariable with the value of mySecret. It could be the password to log into an external services. Then you can do like this if dofile and not hc3_emulator then hc3_emulator = { name="My QA", quickVars = {["password"]="$CREDS.mySecret"}, This define a quickAppVariable with the name 'password' and it fetches the key 'mySecret' from the credentials table and uses that as the value. When you QA starts up you can do self:getVarible('password') and it will return the credential. This is useful as not to litter your code with visible credentials. NOTE. Be aware that if you deploy the real QA with hc3_emulator.deploy=true or using the menu commands with the plugin, the deployed QA will have the quickAppVariable defined and if you upload that for sharing people will see your credential. If someone wants to try this in another IDE than Zerobrane that I use (like Visual Studio) the only thing that could be an issue is to have access to the Lua libraries require("socket") -- LuaSocket require("socket.url") -- LuaSocket require("socket.headers") -- LuaSocket require("ltn12") -- LuaSocket require("mime") -- LuaSocket require("lfs") -- LuaFileSystem They are pretty standard lua libraries - based on LuaSocket. @10der has managed to run it under Visual Studio on Windows. Here is an updated library/project map to work with the latest version of the emulator vscode_fibaro_bin.zip. Note that you should update the fibaroapiHC3.lua file provided i the archive when new are released as I will not update this archive for every new release. @petergebruers also have some tips. Any improvements are happily received (in code) and credits will be due granted. Links to notable post Here is a description of the various way to use the emulator when developing code (high-level) Some in-depth posts Running "Offline" (TBD) Running in "Mix mode". Mixing real devices and locally emulated devices (TBD) Running with a "Proxy QA" (TBD) Using real QA as "Proxy" (TBD) Downloading HC3 resources to file and emulate them locally (TBD) Running standard Lua with access to HC3 functions (developing management scripts etc) (TBD) Loading multiple QAs/Scenes and run them in parallel in the emulator (also getting QAs/Scenes from the HC3 and install them in emulator on the fly...) (TBD) Running faster than real-time and manipulating start dates (TBD) A ZeroBrane plugin to make life easier while debugging A post introducing the SDK with QuickApps. A post introducing the SDK with Scenes. Scene support is not complete. Creating and debugging multi-file QuickApps The debug flags that can be set are described The new dynamic load functions to run multiple QAs/Scenes in the emulator are described Telneting into the emulator to capture logs and issuing Lua calls <here> (nice way to test your code) Using the Web GUI Debugging setTimeout code and tracking timers. MQTT support. Another post with running a scene completly without being connected to the HC3. Some notes on the implementation of the SDK - if you would like to hack on it A collection of QA's I developed with the SDK - which means that they can be run offline ChildrenOfHue. A QA that creates QA children devices for your Hue devices (It's the Hue QA I use myself these day) iOSLocator. An iOS geopresence QA. iCal (iOS,Google) QA Telegram QA. Event watcher QA. Helper QA to get/subscribe on event triggers Vonage/Nexmo SMS service. Send SMS. Changelog: v 0.67 - numerous bug fixes caused by the restructuring. hc3_emulator.start{startTime="07:00 4/5/2000"} - will start the simulation at the given time. v 0.68 - fibaro.debug behaves more like original. v 0.70 - better offline support and speeding. v 0.72 - More offline and support for downloading HC3 resources to be used while running disconnected from the HC3 v 0.73 - Various speed-time related bugs v 0.75 - Better http sync behaviour. Set hc3_emulator.asyncHTTP=true to get some pseudo asynchronous behaviour v 0.77 - Support for 5.030.45. Initial support for childDevices and fixes for the changed handling of UI events v 0.78 - UI fix. Name of callbacks defaults to button.."Clicked", unless you have a onReleased=name or onChanged=name in the UI table struct. v 0.80 - Fixed bug in self:getVariable and self:setVariable v 0.81 - Better quickVariables handling for proxies, and self.childDevices list updated when children are deleted. v 0.83 - self:getVariable returns the empty string "" if the variable does not exists according to the latest behaviour on the HC3... 'class' is not redefined if available from Luabind... However, I've not had a chance to test if it's 100% compatible yet... v 0.84 - Initial support for mqtt. You need to have installed https://github.com/xHasKx/luamqtt so that require("mqtt") works from fibaroapiHC3.lua. I have tried to mimic the HC3 mqtt api but I have not really used mqtt that much so if someone uses it with fibaroapiHC3.lua and discovers if stuff is not compatible with the HC3 implementation please let me know and we fix it. v 0.85 - Compatibility fix for function 'class' to adhere more closely to the HC3/luabind version v 0.90 - Cleanup of code, Better handling of children and QuickApps, ZBS color output with ansi escapes; hc3_emulator.colorDebug=true v 0.93 - New model for QuickApp proxies. Better child device compatibility. v 0.95 - Various bug fixes - log prints more in line with HC3 log console. fibaro.emitCustomEvent bug fix. v 0.98 - First support for backup/download/upload with the ZeroBrane plugin (another post here) v 0.99 - Better trigger handling and new way to include SDK in your QA/scene code. No hc3_emulator.start at the end. v 0.100 - Web GUI emulator for QuickApps. New format for using credentials.lua. Bug fixes... v 0.102 - Better handling of children and their quickAppVariables v 0.104 - Rewrite of offline mode. Better web UI support. v 0.105 - Support for new QA file format (proxies work again) v 0.106 - Added support for net.UDPSocket() v 0.109 - UDPSocket bug fix. ( @10der), property() support for class() - much harder than it looks... v 0.110 - Oops, serious bug in 'class' affecting ...everything. Hopefully fixed. v 0.111 - Removed unnecessary os.exit(). urlencode api calls ( @10der) v 0.112 - UDP fixes. ( @10der) v 0.114 - Bug fix (global 'self' escaped) v 0.115 - Bug in url encode for api calls. UDPSocket :bind(ip,port) function added. v 0.116 - :bind(ip,port) really fixed.... v 0.117 - startup fix v 0.119 - "Softer os.exit()" - better compatibility with Visual Studio (thanks @10der) v 0.120 - Debugger friendly QuickApp class (no __index). First version of file/backup v 0.121 - api.get bug fix. Faster proxy/deploy. v 0.123 - QuickApp:setVariable bug (thanks @10der) v 0.124 - fibaro.clearTimeout added, MQTT fixes. v 0.125 - fibaro.alarm() was buggy - fixed. Set self.USERPIN to pincode to allow fibaro.alarm("disarm") to be allowed from emulator. v 0.126 - fix __fibaro_get_device() ( @10der) v 0.128 - fix sort order of triggers. Default room in offline mode ( @10der) v 0.130 - fix UI handling ( @rangee. More UI options. v 0.131 - fix uiCallbacks not always updating when updating proxy v 0.135 - fixes... v 0.137 - TCPSocket fixes v 0.138 - setTimeout for negative times are inserted in the queue.... i.e. will execute as soon as possible. v 0.140 - fixed bug with setInterval (clearInterval within a setInterval function didn't work...) v 0.141 - fix bug in net.TCPClient() v 0.145 - bug in printout of sockets... stricter class constructor requirements v 0.148 - MQTT event format bug ( @jayrock) v 0.150 - Initial websocket support. Need to download wsLua_ER.lua from my github and put in project directory. v 0.152 - support fibaroapiHC3plug.lua v0.4 v 0.155 - bugfixes. v 0.156 - html color bugfix v 0.198 - New version of emulator with better support for everything. Thanks to @petrkl12 that has been a guinea pig and helped in debugging the code. v 0.200 - Fixed bug in speedTime. plugin.restart() now restarts the QA in a correct way. v 0.299 - Major rewrite of the HC3 API - cleaner architecture and prepared for being split into sub-files (I'm approaching 10k lines now). Note 'end--hc3' required to end header. v 0.300 - Bugfixes from v0.299 v 0.301 - Better/simpler class definition - easier to debug/step into classes (avoiding __index unless class uses property() )

-
Hi, need to controll Epson projector (send PWR On, PWR Off, PWR?) messages For controllinhg Epson, need to send a command for establishing connection (0x450x530x430x2F0x560x0500x2E0x6E0x650x740x100x030x000x000x000x00) and after that send the command for interogating power status (0x500x570x520x3f0x0d) Testing this from Hercules utility, works great When coding in LUA, after sending first command, when trying to send second command I get Connection reset by peer error If sending just first command, I get a proper response, so, no error in connection or command string Here is my code: function QuickApp:onInit() self:debug("onInit") self.ip = self:getVariable("ip") self.port = tonumber(self:getVariable("port")) self.sock = net.TCPSocket() end function QuickApp:parseData(str) while true do if string.find(str, '0x') then i,j = string.find(str, '0x') str = string.sub(str, 1, i - 1) .. self:fromhex(string.sub(str, i + 2, j +2)) .. string.sub(str, j + 3) else return str end end end function QuickApp:fromhex(str) return (str:gsub('..', function(cc) return string.char(tonumber(cc, 16)) end)) end function QuickApp:connect(successCallback) print("connecting:", self.ip, self.port) self.sock:connect(self.ip, self.port, { success = function() self:debug("connected") successCallback() end, error = function(err) self.sock:close() self:debug("connection error connect", err) end, }) end function QuickApp:init(event) --self:connect() self:send("0x450x530x430x2F0x560x0500x2E0x6E0x650x740x100x030x000x000x000x00", true, "0x500x570x520x3f0x0d") end function QuickApp:send(dataToSend, waitForResponse, pwr) self:connect(function() local dataConverted = self:parseData(dataToSend) local pwrConverted = self:parseData(pwr) self.sock:write(dataConverted) fibaro.setTimeout(1000, function() self.sock:write(pwrConverted) end) self.sock:read({ success = function(data) self:debug("response data:", data) --self.sock:close() end, error = function(err) self:debug("response error wait ", err) --self.sock:close() end }) fibaro.setTimeout(1000, function() self.sock:write(pwrConverted) end) self.sock:read({ success = function(data) self:debug("response data:", data) --self.sock:close() end, error = function(err) self:debug("response error wait ", err) --self.sock:close() end }) end) end Looks like the connection is closed after frist call, but do not know how to keep alive, tried everything Can anybody help me? Regards
-
This Quickapp retrieves energy consumption, energy production, gas and water usage from the (P1 Monitor) energy, gas and water meter. This Quickapp uses the software of ztatz.nl to get the values from your smart energymeter. The ztatz plug-and-play software can run on a Raspberry Pi or in a Docker container. The Energy consumption and energy production are added to the HC3 energy panel. Use the child devices Todays Consumption and Todays Production to store energy data (kWh) in the Energy Panel. And use the child devices Consumption and Production for instantaneous power (Watt) in the Energy Panel calculations. Child Devices for: Consumption (Watt) (input for instantaneous power in Energy Panel calculations) Production (Watt) (input for instantaneous power in Energy Panel calculations) Todays Consumption (kWh) (input for energy panel) Todays Production (kWh) (input for energy panel) Waterflow (Liter) Consumption High (kWh) Consumption Low (kWh) Production High (kWh) Production Low (kWh) Consumption L1 (Watt) Consumption L2 (Watt) Consumption L3 (Watt) Production L1 (Watt) Production L2 (Watt) Production L3 (Watt) Ampere L1 (Amp) Ampere L2 (Amp) Ampere L3 (Amp) Voltage L1 (Volt) Voltage L2 (Volt) Voltage L3 (Volt) Total Gas (m³) Total Waterflow (m³) Interval: It is possible to process messages from the smart meter every second. Of course, this is only possible if the smart meter actually sends a message every second. This can be turned on via the ztatz software P1 port configuration page via the "maximum processing speed" option. Note that this gives a higher load on the Rpi (or Docker). It has been tested on the Rpi3/Rpi4 and works well on it. Older or other RPIs have not been tested. The P1 Monitor QuickApp uses 2 API calls each cycle, and if you also use Waterflow, 3 API calls each cycle. With an interval setting of 10 seconds there is an API call every 5 seconds (and with Waterflow enabled, every 3.33 seconds). So the fastest interval setting will probably be 3 seconds with Waterflow and 2 seconds without Waterflow. Ztatz software: https://www.ztatz.nl Docker container based on the ztatz.nl software: The container version has the same functionality as the full version for the Raspberry Pi. Docker container: https://hub.docker.com/r/mclaassen/p1mon I use a Raspberry Pi Smart Meter Cable Starter Kit Raspberry Pi 4 Model B Rev 1.1 2GB 32GB Micro SDHC Smart Meter cable P1 Monitor software from: https://www.ztatz.nl Water Flow Sensor (M18 8mm sensing DC 5V NPN NO LJ18A3-8-Z/BX-5V cylinder inductive proximity sensor switch work voltage 5VDC special for MCU) Version 2.0 (8th January 2023) Changed child device types for optimal support of the Energy Panel: kWh -> com.fibaro.energyMeter ampere/voltage -> com.fibaro.electricMeter Watt -> com.fibaro.powerMeter gas -> com.fibaro.gasMeter water -> com.fibaro.waterMeter Removed Power device calculation Removed child devices for gross consumption and device consumption Changed code to multi file Added for translations for English, French, Polish and Dutch Version 1.6 (8th January 2022) Changed the waterflow algoritme to show more stable and more acurate measurements Small change in the code for checking existance of waterflow sensor Changed the Waterflow unit from Liter to L/min Added experimental net consumption to power Added Lasthour gas to labels Changed the API request for status to json output Version 1.5 (4th September 2021) Support of new Energy Panel: Changed Child device Net Consumption to Main device with type com.fibaro.powerSensor (value can be positive or negative) Added Child device Todays Consumption to show the daily energy consumption in kWh Added Child device Todays Production to show the daily energy production in kWh Changed Child device Consumption High and Low to com.fibaro.energyMeter (kWh in property "value"; "rateType" = consumption). These values will be shown in the new energy panel. Changed Child device Production High and Low to com.fibaro.energyMeter (kWh in property "value"; "rateType" = production). These values will be shown in the new energy panel. Added automaticaly change rateType interface of Child device Consumption High and Low to "consumption" and Production High and Low to "production Changed Child device Consumption and Production to type com.fibaro.powerSensor (Watt) to show power graphs Changed Child device Consumption L1, L2 and L3 and Production L1, L2 and L3 to type com.fibaro.powerSensor (Watt) to show power graphs Additional changes: Added todays Maximum consumption and todays Maximum production and timestamp to the label text and Child device log text Added todays Maximum consumption and todays Maximum production automatic format measurement to W, Kw, MW or GW Added todays Consumption low and high (kWh) and todays Production low and high (kWh) to the label text and Child devices log text Added todays Consumption of gas in the label text and Child device log text Added Timestamp in format dd-mm-yyyy hh:mm:ss to log of Main device and labels Placed production below consumption in the labels Solved bug when Production is higher than Consumption with calculation of Gross Consumption (Gross Consumption = Net Consumption minus or plus Device Consumption) Version 1.4 (11th April 2021) Added Child Devices Waterflow and Total Waterflow Version 1.3 (13th February 2021) Added Child Devices for Voltage L1 L2 L3 Version 1.2 (6th February 2021) Added a lot of Child Device Version 1.1 (18th January 2021) Solved a bug when powerID = 0 Version 1.0 (15th Januari 2021) Changed routine te get Energy Device ID's fast (no more maxNodeID needed) Added "Update Devicelist" button to update the Energy devicelist Added Tarifcode High and Low (and empty for flat fee) Rounded Consumption and Production to zero digits Watt Added Quickapp variable for debug level (1=some, 2=few, 3=all). Recommended default value is 1. Re-aranged the labels Cleaned up some code Version 0.3 (16th August 2020) Added Quickapp variables for easy configuration Added Power Production Changed method of adding QuickApp variables, so they can be edited Tested on P1 Monitor version: 20221105 V2.1.0 Raspberry Pi model: Raspberry Pi 4 Model B Rev 1.1 Linux-5.15.74-v7l+-armv7l-with-glibc2.31 Python version: 3.9.2 QuickApp variables (mandatory, they will be automatically added with the default values): IPaddress = IP address of your P1 monitor interval = Number in seconds, the P1 Monitor normally is updated every 10 seconds, sometimes even faster debugLevel = Number (1=some, 2=few, 3=all) (default = 1) waterMeter = Existance of watermeter true or false (default = false) language = Preferred language (default = en) (supported languages are Engish (en), French (fr), Polish (pl) and Dutch (nl)) Download the QuickApp here (download the file and un-zip): https://github.com/GitHub4Eddy/p1_monitor/archive/refs/tags/p1_monitor_20.zip or Fibaro Marketplace: https://marketplace.fibaro.com/items/p1-monitor How to install: Open the Configuration Interface Go to Settings > Devices Click + Choose Other Device Choose Upload File Choose file from your computer with .fqa

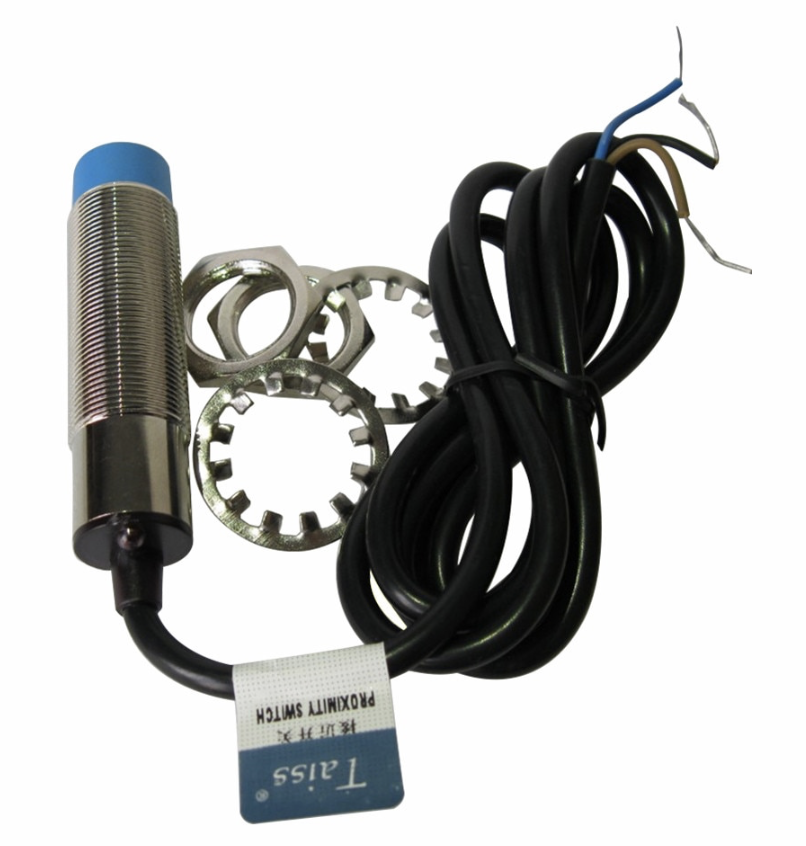

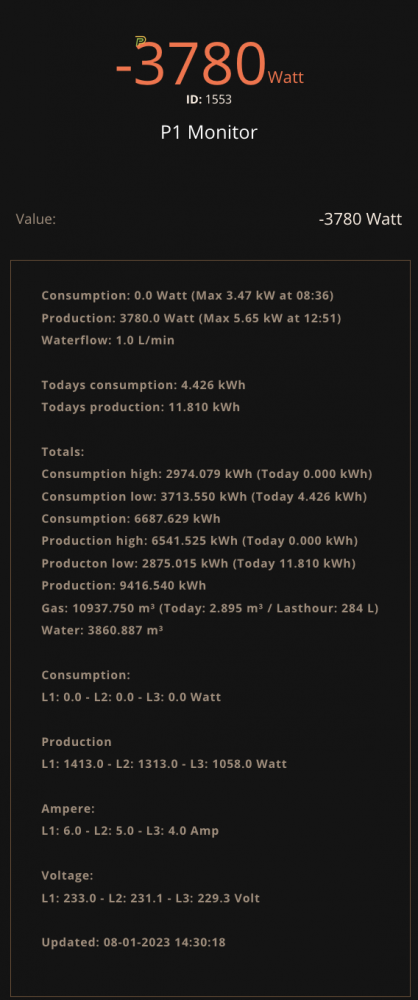

- 108 replies
-
- 3
-
-
- energy
- power meter
- (and 8 more)