About This File
What features does the LOQED Touch Smart Lock offer with Fibaro?
The LOQED Touch Smart Lock & Fibaro integration is done via the local bridge API.
Currently, the following functionalities are supported:
-
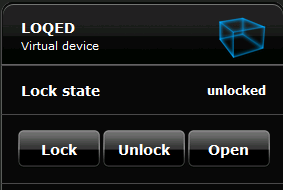
Send real-time status changes of the lock (open, unlock, lock) and battery, Wi-Fi, Bluetooth state to the Fibaro gateway. Battery level, if below 5%, will display om tje QuickApp as dead.
-
Receive commands from the Fibaro gateway to change the lock state (open, unlock, lock).
-
English, German and Dutch languagesupported (the QuickApp tkaes your local language setting). You can change the language by editting the QuickApp sourcecode yourself.
-
When using multiple LOQED locks, simply add extra QuickApp instance and setup with proper data.
-
Currently this QuickApp can’t decode json data POSTed by the bridge, as FIBARO/Yubii/elero/zooz API simply ignores any unknown data and accept only JSON key args:[{}]. Therefore, one can’t decode who opened/closed the LOQED via App (or if it was manually, with knob).
-
Security consideration: the LOQED bridge sends any status change (e.g. "the door was opened") to Fibaro over an unsecure HTTP connection in your Wi-Fi network, but with a digital signature. Fibaro uses the digital signature to ensure the status change is not sent by someone else than the LOQED Bridge (thus, to ensure that nobody can make the Fibaro device think the door opened, while in fact that was not the case). Only the HC3 (not the Yubii Home / HC3L) supports this. Note that this does not affect opening/locking the door, it is only concerns the status information.
Requirements
-
A supported gateway, such as:
-
Fibaro Home Center 3 (note that the Home Center 2 is not supported)
-
Installation
Step 1: create API key
Go to https://app.loqed.com/API-Config and log in with your LOQED app e-mail address and password (note that you will be logged out of the LOQED app). Click on the “API Configuration tool" button. Click the “Add new API key” button. Set any name and create the API key. It is normal the “Remove unlocking/locking checkbox is greyed out.
After the key is created, click on the "view / edit" button. Leave this screen open.
Step 2: install the Fibaro QuickApp
Login into your Fibaro gateway. If you have a Fibaro branded device, you should be able to go to http://find.fibaro.com/to find your gateway's IP address.
Download the QuickApp, go to "settings" -> "Devices" and click the plus-icon to add a new device. Next, find the device called "Upload file" and upload the Quick App file.

Step 3: Create a user on the Fibaro gateway
Create a local user on your gateway with permissions for the LOQED Quick App. Please do not use any special characters. This user is used to update the gateway of lock state changes as soon as they happen. While not recommended, you can also skip this step and user your administrator username and password (if they do not contain special characters).
Step 4: configure the Quick App
Click the variables tab.

Now, set the variables to the correct value. Each value can be find on https://app.loqed.com/API-Config.
|
Variable |
Where to find the value |
|
bridge_ip |
LOQED API Config -> "Outgoing Webhooks via LOQED Bridge" -> "IP address" |
|
bridge_auth_key |
LOQED API Config -> "Outgoing Webhooks via LOQED Bridge" -> "Authentication Key (base64)" |
|
key |
LOQED API Config -> "API Keys (incoming webhooks)" -> "Key" |
|
lock_id |
LOQED API Config -> "API Keys (incoming webhooks)" -> "Lock ID" |
|
local_key_id |
LOQED API Config -> "API Keys (incoming webhooks)" -> "Local Key ID" |
|
refresh_time (default 600) |
How often (in seconds) the Quick App will poll for a lock status change. We recommend to keep this value low. It is actually only required to poll after the gateway boots, as any lock state change is directly sent to the gateway. Battery and online status information is only received via polling, although the LOQED bridge does support sending it. |
|
extra_errors (default 0) |
Set to 1 to see HTTP information. |
|
webhook_user |
Use the username from step 3. |
|
webhook_pass |
Use the password from step 3. Note: you have to delete this "secret" field, and then create it again, giving it again the name "webhook_pass". |
|
home_center_ip |
Set the IP address of your gateway here. Do not use a loopback IP (127.0.0.1), but the local network IP address. |
|
use_webhooks (default 1) |
When set to 1, all Quick App functions (related to webhooks) are enabled using the user/password you created. Set it to 0 if you wish to use loop / poll instead (see refresh_time above). |
Step 5: create webhooks on LOQED bridge
The LOQED bridge can send any status change of the lock to your gateway as soon as they happen. For this, you need to set some URL's on the LOQED Bridge. There are two ways to do this:
-
If you have a Fibaro Home Center 3, you can do this by just clicking a button.
These buttons are not available on Home Center 3 Lite, Yubii Home nor Z-Box gateways, due to missing support for 53-bit floating point numbers in 32bit CPU LUA environment (as used by these gateways). -
Otherwise, you have to do this manually.
Step 5a: create webhooks if you have Fibaro Home Center 3
Go to the "Edit & Preview" tab. Click the "Create Webhooks" button.
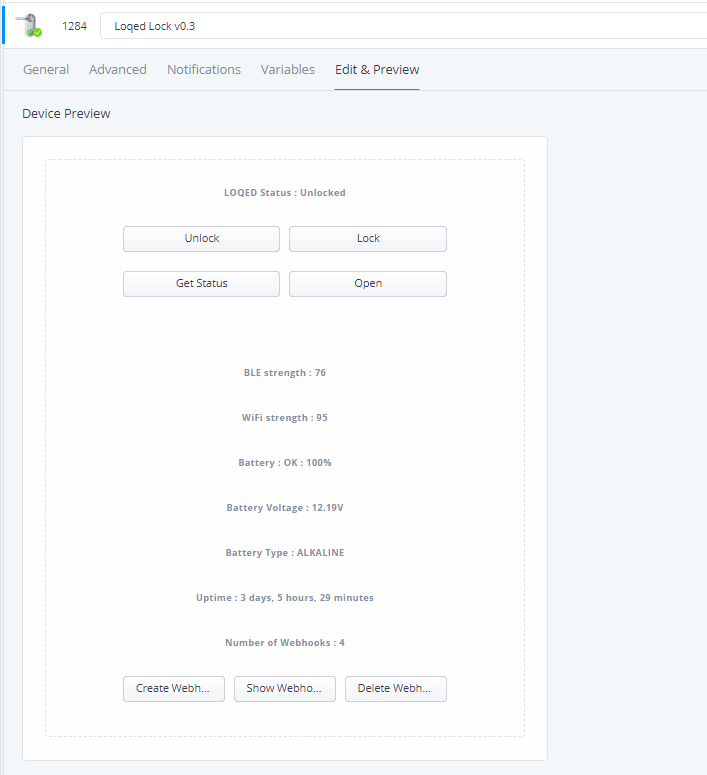
You can verify the action was successfull by going to https://app.loqed.com/API-Config --> "Outgoing Webhooks via LOQED Bridge" --> click the button "Add/delete webhooks". On that page, you should see multiple entries with an URL to your gateway.

Note: if you click by mistake multiple times on the button, don't worry, as the bridge will not create duplicate webhooks.
This QuickApp will generate only webhooks for "open", “latch”, “night lock” and “unknown” events, as these are normally sufficient for most users. Battery or online status events are polled every 10 minutes by default.
Step 5b: create webhooks manually (if you do not have a Fibaro Home Center 3)
Skip this step if you have done step 5a.
You need to create 4 webhooks on the LOQED Bridge to inform the gateway about the 4 different lock statuses.
Go to https://app.loqed.com/API-Config --> "Outgoing Webhooks via LOQED Bridge" --> click the button "Add/delete webhooks". On that page, add the following URLs:
-
http://gw_user:gw_password@gw_ip/api/devices/thisQAID/action/webhookNightLock (only for the night lock trigger)
-
http://gw_user:gw_password@gw_ip/api/devices/thisQAID/action/webhookDayLock (only for the latch trigger)
-
http://gw_user:gw_password@gw_ip/api/devices/thisQAID/action/webhookOpen (only for the open trigger)
-
http://gw_user:gw_password@gw_ip/api/devices/QAID/action/webhookUnknown (only for the unknown state trigger)
Above, "gw_user" and "gw_password" is your gateway's username and password created in step 3, "gw_ip" is the IP of the gateway, "QAID" is the device ID of the QuickApp, which can be found in the device list (see below image where it is 22)

Done
That's it! You can now control your LOQED Touch using Fibaro.
Questions?
If you have any questions regarding this QuickApp, comments or improvements requests,please send me PM
tinman
Edited by tinman