

About This File
Holiday Lights [Christmas Lights]
Hello dear Fibaro community!
Christmas time is near so I made this VD to make it possible to automate turning On/Off some lights by using some smart plugs and relay modules, by setting favorite program on RGBW modules and some Philips HUE bulbs that you want to. It is possible to do that manually by just pressing button on VD, or it can be automated completely if you are using Main scene for time based events control scene! But more about that at the end of this post.
ABOUT Holiday Lights VD
It looks like this:
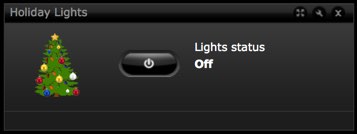
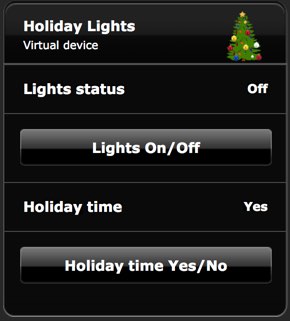
As you can see from above pictures this VD is very simple. Holiday Time button changes value of predefined global variable "HolidayTime" which enables to automate control of holiday lights. Button LightsOn/Off changes value of predefined global variable "HolidayLights" and turns On or Off lights that you define in code of this button. Let see first what global variables you need to add to variable panel:
GLOBAL VARIABLE SETUP
Following are predefined global variables (bottom part in panel) that you need to add before importing this VD:
Name of variable - possible values
-----------------------------------------------------------------------------------------------------------------------------
HolidayTime - possible values: No, Yes or values in your language mapped properly in code (this variable is also used in Very Smart Light™ scene)
HolidayLights - possible values: Off, On or values in your language mapped properly in code (this variable is also used in Very Smart Lights™ scene)
HomeTable - predefined global variable table with device and scene IDs. Recommended to use since z-wave devices can change their ID with re-inclusion and then is necessary to edit only scene which make this table and only device ID in scene headers. Much less time and effort is needed than without that option! But if you don't use this feature then you MUST delete following lines from button code:
-- get the table from global if not using then delete this line!!!
local jT  = json.decode(fibaro:getGlobalValue("HomeTable"))
IMPORTING Holiday Lights VD
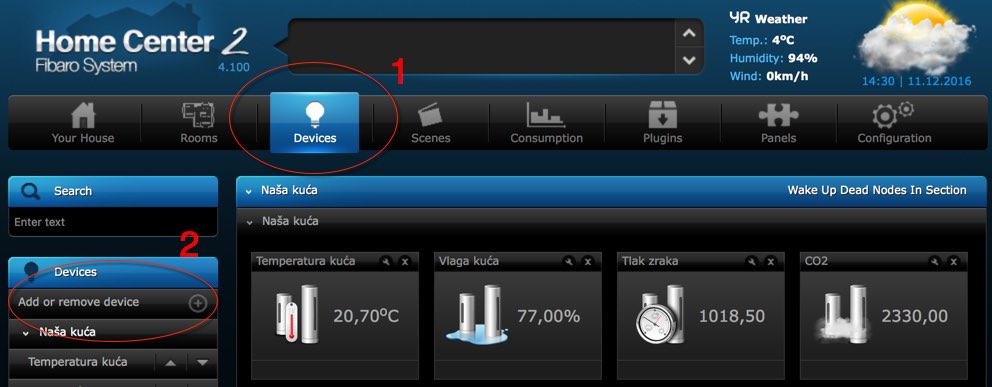
Select on HC web GUI Devices and then click on Add or remove device on top of the left column (see picture):
Next window will open and you will click on "Choose Files":
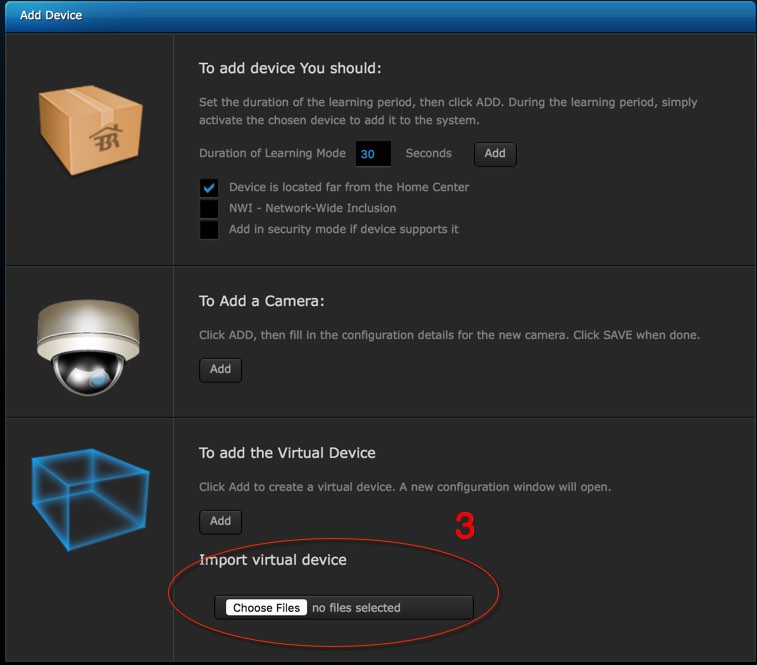
Open file dialog will open where you will select downloaded file Holiday_Lights.vfib.json and press Select or Open or Choose button.
SETTING UP Holiday Lights VD
Virtual device will import and open on General tab where you need to import icons:
![]()
To import icons click on button Change Icon and new window will open:

Now click on button Choose File and file dialog will open where you will select first icon from the Download folder where they are after downloading and click on button Select.
Name of the selected icon will show on the right side of the Choose File button. Now press button Add. Repeat same procedure for another icon. When you finished importing icons select Off icon by clicking twice on it to select it for VD main icon. If you don't want to see virtual device default blue box icon then do same for buttons!
You will need icons ID numbers and the easiest way to find out is to drag icon from General tab to the desktop! On desktop it will have name like User1058.png. That number in the name of the icon is it's ID number. If you drag to the desktop first imported icon, then second icon ID will have ID number plus one, eg. User1059.png.
ADDING DEVICES AND LIGHTS
We are almost done. Just need to click on Advanced tab and edit code of each button and Main loop. In code for button Lights On/Off you need to put names of global variables that you use and do proper mapping of your values to the values used in code, then you need to put your icons IDs and you can change message text which you will get if you try to turn On holiday lights when HolidayTime is set to No. See code bellow:
-- GLOBAL VARIABLES -- enter names and value mapping of your
-- global variables or leave as it is and add to variables panel
-- get the table from global if not using then delete this line!!!
local jT = json.decode(fibaro:getGlobalValue("HomeTable"));

-- enter name of your global variable for holiday time and map
-- your values this global value is set with this VD
local holidayTime         = "HolidayTime";
local holidayTimeMapping  = {Yes="Yes", No="No"};
-- enter message when holiday time is not active and trying to turn
-- holiday lights On.
local messageHolidayTimeOff = "Holiday time is set to No!";
-- enter name of your global variable that indicates holiday lights are
-- turned on and map your values. This global variable value is set with
-- this VD
local holidayLights        = "HolidayLights";
local holidayLightsMapping = {On="On", Off="Off"};

-- VD ICONS ----------------------------------------------------
-- enter ID numbers of corresponding icons on your system
local iconHolidayOn  = 1056;
local iconHolidayOff = 1055;
Then you need to setup some smart plugs and relay modules that you will use to control Christmas lights. Just add ID numbers between {} brackets separated with comma like in code bellow:
-- SETUP RELAY, SMART PLUG TO BE CONTROLLED --------------------
-- put in bracket separated by comma ID of smart plugs, switches,
-- and dimmers that you want to turn On/Off with this button
local deviceID = {238, 140, 1002};
If you have some Philips HUE lamps that you like to use to change colors by other scene or mobile application then you can add their ID numbers between {} brackets separated by comma, if not then just skip this part. At this moment VD will only turn on HUE lamps at predefined brightness, or turn them off. To make them to change color you can use one of many mobile applications from Apple AppStore or Google play. It is possible to make scene that will be started and then run in loop and change HUE lamps color by some program and I may make one but can't promise that it will be available on time since it requires a lot of testing. But if you are interested to have one please leave comment.
If you use Phillips HUE virtual device then set variable VDlightIDtype to "VD" or to "PlugIn" if you use plugins. Set VDdim to the brightness value at which you want bulbs to be turned On (for VD 0-100, for PlugIn 0-254). VDRefreshType you need to set to "Button" if you use Philips HUE VD version 2.0b with button refresh or to "Main" if you use version with Main loop refresh. VDrefreshButton and VDbrightnessSlider are set to numbers that are ok for Philips HUE VD v2.0. If you use other versions or made by you then please put correct button and slider number see code bellow:
-- SETUP HUE VD OR PLUGIN TO BE CONTROLLED ----------------------
-- enter lights ID controlled by VD or plugin (like HUE) separated
-- by comma between brackets or if none leave brackets empty
local VDlightID          = {jT.dnevni.stojeca, jT.dnevni.lampa1,
                            jT.dnevni.lampa2, jT.fontana.svjetlo1,
                            jT.fontana.svjetlo2, jT.blagovaona.lampa1,
                            jT.blagovaona.lampa2};
-- enter if it is VD (virtual device) "VD" or plugin type "PlugIn"
-- REMEMBER!! If you use VD then brightness, color and saturation can be
-- set from 0 to 100 and if you use PlugIn then brightnes, color and
-- saturation can be set from 0 to 255!!!
local VDlightIDtype      = "VD";
-- enter brightness value for HUE lamps to which to turn on
local VDdim              = "30";
-- if it is VD type then enter type of refreshing of VD lights:
-- "Main" for main loop or "Button" for button. If it is button then also
-- enter nuber of the button bellow:
local VDrefreshType      = "Button";
-- enter number of refresh button on VD for light
local VDrefreshButton    = "5";
-- enter number of brightness slider on VD for light
local VDbrightnessSlider = "2";
-- NOTE! If you are using Very Smart Lights™ scene then open to edit
-- and set VDholidayFlag to 1 for above HUE lamps so when you turn on
-- holiday lights then Very Smart Lights scene will not control above
-- lamps util Holiday Lights are turned off. Also you can set
-- useholidayLights to "Yes" and adjust dimming of the other lighting
-- to prefered levels while holiday lights are turned On. Same applies
-- for RGBW modules!
And now if you have RGBW modules and you want to use your new made programs then you can add to RGBWlightID their ID numbers between {} brackets separated by comma. You can setup different programs for each RGBW module for all seven days of the week! See bellow code as example for two RGBW modules:
-- RGBW MODULE PROGRAM SETTINGS -----------------------------------------
-- enter lights ID controlled by RGBW MODULE separated by comma between
-- brackets or if none leave brackets empty
local RGBWlightID        = {120, 122};
-- RGBW module has some default programs and more can be added by users,
-- here you can define your favorite program for each day of the week
-- that will be used for holiday time
local RGBWfavorite    = {{493, 492, 493, 492, 493, 492, 493}, {1, 3, 4, 2, 1, 4, 3}};
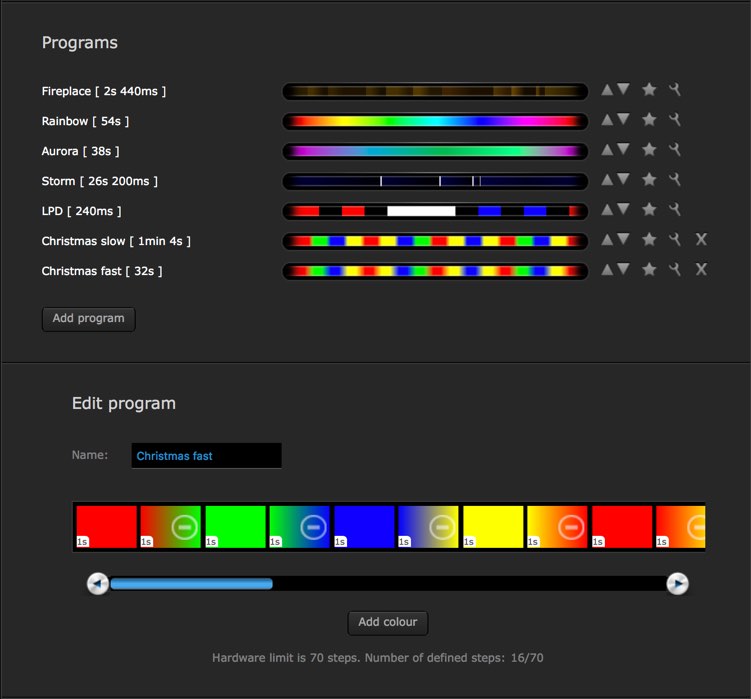
From above example you can see that first RGBW module with ID 120 is playing custom made programs with ID 492 and 493. This are simple programs that are changing four default colors red, yellow, green and blue in different sequence and different speeds and look like this:
The other RGBW module with ID 122 is playing default programs, Fireplace on Sunday, Aurora on Monday, Storm on Tuesday and so on. If you want to find out what is ID of your new program then you can make new scene with just this line of code:
fibaro:debug("RGBW running program ID number is: "..fibaro:getValue(100, "currentProgramID"))
Change 100 for ID number of your RGBW module. First start new program on RGBW module and then run this scene to see program ID number.


ADDITIONAL INFORMATION
if you setup and using Main scene for time based events control that can be downloaded from here:
Then you can setup this VD so that lights are turned On and Off at specific time of the day. Here is example:
-- SCHEDULED VD SETUP ---------------------------------------------------
-- here you can setup VDs that will be executed at predefined time of
-- day in format "00:00". You can set up more than one time during day.
-- Also you can enter flag for each day of the week when VD will be
-- executed or not. See more details bellow.
-- enter VD IDs that will run at scheduled time separated by comma.
local runVDSchedID       = {100};
-- enter here which button to press to execute command
local runVDSchedButton   = {"2"};
-- enter at what time of day will VD button be pressed separated by comma.
-- You can define more than one time in format "00:00" for one VD
-- or even use local or global variables like sunsettime or sunrisetime
-- Example: {{"13:30", "19:20"}, {sunrisetime, "13:00", sunsettime}}
-- in above example first VD button will be pressed at 13:30 and 19:20
-- while second VDs button will be pressed at sunrisetime, 13:00 and
-- at sunsettime
local runVDSchedHour     = {{"07:00", "09:00", "19:00", "23:59"}};
-- enter here flag for each day of the week for VD to press button
-- at above scheduled time. if flag 1 the VD button will be pressed and
-- if flag 0 then will not be pressed for that day. Remeber, Sunday is
-- first day of the week on HC2! Example for two VDs:
-- {{1, 0, 0, 0, 0, 0, 0}, {0, 1, 1, 1, 1, 1, 0}} - in this example
-- first VDs button will be pressed only on Sunday, and second VDs
-- button will be pressed on weekdays but not on weekends (Saturday
-- and Sunday).
local runVDSchedWeek     = {{1, 1, 1, 1, 1, 1, 1}};
-- enter here flag for sending push message when VD buttons is pressed
-- 1 for sending message, 0 no messages
local runVDSchedPushFlag = {0};
-- enter here message content that will be sent to you when VD is
-- executed. If above flag is 0 for any of the VDs then just put
-- empty "" for it.
local runVDSchedPushMessage = {""};
From above example, button on Holiday Lights VD with ID 100 will be pressed at four different times each day of the week and no push message will be sent. Since it is only one button that flips On/Off, at 7h in the morning lights will be turned On (if where Off), then at 9h will be turned Off. Again at 19h turned On and minute before midnight turned off again.
This is just one way it can be done, but here are many other ways that I will add after posting some other scenes like Very Smart Lights™, Good Morning, Good Night, etc.
Enjoy coding and Holiday lights!! There is more to come soon!
Sankotronic ![]()


Recommended Comments
Join the conversation
You can post now and register later. If you have an account, sign in now to post with your account.