
Welcome to Smart Home Forum by FIBARO
Dear Guest,
as you can notice parts of Smart Home Forum by FIBARO is not available for you. You have to register in order to view all content and post in our community. Don't worry! Registration is a simple free process that requires minimal information for you to sign up. Become a part of of Smart Home Forum by FIBARO by creating an account.
As a member you can:
- Start new topics and reply to others
- Follow topics and users to get email updates
- Get your own profile page and make new friends
- Send personal messages
- ... and learn a lot about our system!
Regards,
Smart Home Forum by FIBARO Team
Search the Community
Showing results for tags 'smart meter'.
Found 6 results
-
 QuickApp to read the EASTRON SDM630 V3 and SDM230 V2 Modbus Smart Meter for HC3 This QuickApp is for querying pretty much most of the parameters of the Eastron SDM630 / SDM 230 Modbus devices. It reads directly from the Modbus server, for example a Modbus Device Waveshare RS485 to RJ45 Ethernet Industrial Serial Server Modbus Gateway. Some important information: After installation, only the parent device will be created. You can now use your own icons for parent and child devices; these must be entered as a variable with the icon ID's. If multiple device-ID's are used, you have to provide an icon for each device; comma separated. As soon as the device is activated, these are then used when the ChildDevices are created. Hint: you can use http://<hc3-ip-address>/api/icons to get a list of your icons and icon-id's. The query and creation of ChilDevices remains inactive until the variable SDM_ACTIVE is set to true. This allows you to adjust the other parameters, which are also set on the "Variables" tab, as required. After SDM_ACTIVE has been set to true, the ChildDevices are created automatically. Further ChildDevices can be added or removed by setting the "enabled" parameter to true or false in the LUA code under "ChildDevicesDetails". If you have a V2 device, simply delete the last two lines in "ChildDevices Details", these are for V3 only. Tip: If you make changes and save the QA file, make sure that you delete all variables on the "Variables" tab beforehand. Otherwise, the variable settings of your saved QA file will be used and the entry "SDM_ACTIVE = false" will probably not be present and the QA will immediately try to create ChildDevices and read in values. Variables: MODBUS_IP contains the IP address of the Modbus adapter, e.g. from Waveshare MODBUS_PORT is the standard port of the adapter, 502 UNIT_ID is the ID of the Eastron smart meter INTERVALL defines the polling intervals in seconds ICON_PARENT sets the ID of the icon to be used for the parent device ICON_CHILDS sets the ID's of the icons to be used for the childs. You can use different icons for different devices (IDs); comma separated entries DEVICE_TYPE sets the Device, SDM230 or SDM630 are supported only UNIT_IDS = comma-separated IDs of the smart meters. These must correspond to the IDs set on the smartmeter SDM_ACTIVE stops all processes if false and continues them if true Important: If ChildDevices are deleted using "enabled=false", the data stored for this ChildDevice up to that point is also deleted! If this is not desired, the device should be managed via the interface. I would not recommend reading all the parameters as the QuickApp has otherwise put too much load on the HC3 memory in my case. Use at your own risk, I have written the device myself for my own purposes and the code can be used without any guarantee of completeness and correctness. If you don't want to take any risks, just leave it. Code is still subject to change. Have fun! Eastron_SDM_230___SDM_630.fqa
 -
Version 1.0.0
28 downloads
QuickApp to read the EASTRON SDM630 V3 Modbus Smart Meter for HC3 This QuickApp is for querying pretty much most of the parameters of an Eastron SDM630 Modbus device. It reads directly from the Modbus server, for example a Modbus Device Waveshare RS485 to RJ45 Ethernet Industrial Serial Server Modbus Gateway. Some important information: After installation, only the parent device will be created. You can now use your own icons for parent and child devices; these must be entered as a variable with the icon ID. As soon as the device is activated, these are then used when the ChildDevices are created. Hint: you can use http://<hc3-ip-address>/api/icons to get a list of your icons and icon-id's. The query and creation of ChilDevices remains inactive until the variable SDM_ACTIVE is set to true. This allows you to adjust the other parameters, which are also set on the "Variables" tab, as required. After SDM_ACTIVE has been set to true, the ChildDevices are created automatically. Further ChildDevices can be added or removed by setting the "enabled" parameter to true or false in the LUA code under "ChildDevicesDetails". If you have a V2 device, simply delete the last two lines in "ChildDevices Details", these are for V3 only. Tip: If you make changes and save the QA file, make sure that you delete all variables on the "Variables" tab beforehand. Otherwise, the variable settings of your saved QA file will be used and the entry "SDM_ACTIVE = false" will probably not be present and the QA will immediately try to create ChildDevices and read in values. Variables: MODBUS_IP contains the IP address of the Modbus adapter, e.g. from Waveshare MODBUS_PORT is the standard port of the adapter, 502 UNIT_ID is the ID of the Eastron SDM 630 meter INTERVALL defines the polling intervals in seconds ICON_PARENT sets the ID of the icon to be used for the parent device ICON_CHILDS sets the ID of the icon to be used for the child device SDM_ACTIVE stops all processes if false and continues them if true. Important: If ChildDevices are deleted using "enabled=false", the data stored for this ChildDevice up to that point is also deleted! If this is not desired, the device should be managed via the interface. I would not recommend reading all the parameters as the QuickApp has otherwise put too much load on the HC3 memory in my case. Use at your own risk, I have written the device myself and the code can be used at will, without any guarantee of completeness and accuracy. Code is still subject to change. Have fun!-
- 1
-

-
- smart meter
- modbus
- (and 4 more)
-
To implement Powerfox to Fibaro HC3 just follow the steps below: 1. Create 4 virtual devices (QuickApps): 2x Power meter (W), Production and Consumption and 2x Smart meter (kWh), Production and Consumption. Leave the LUA code as generated by Fibaro. 2. Create 9 Labels, naming Label1, Label2 ... Label9 for each of those devices. 3. Create a Generic Virtual Device named "Powerfox Exporter". 4. Delete the generated LUA code of this device and replace it with the code attached to this post. 5. Insert Username, Password, Device ID of your Powerfox device. 6. Insert the Virtual Device IDs of the 4 devices from step 1 and the Virtual Device ID of the exporter. 7. Change the refreshInterval according to your needs. If it's done correctly, save it and the values should appear. Powerfox-Exporter.LUA
-
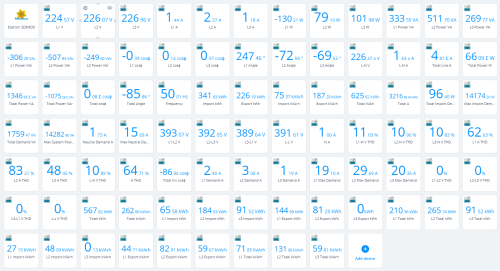
Hi all, The wife and I have done some work on getting json data from a Raspberry PI, running PI1Monitor. The Pi is reading the data from a smart meter P1 port and we built a virtual device that shows the meter readings in a VD screen. I included the VD and LUA-code. It's not pretty, but it works. We would like to take this to the next level, but here is where we need help. - Would it be possible to change the VD so it delivers the current usage to the power metering of the HC2. Right now, we have only some switches and dimmers that are counted in the power panel and we would like to have all power usage visible and we're not so interested in the usage of individual lights. We could use "some" help with that. - How can we add icons to the labels. We've seen some examples with beautiful screenshots, but we are stuck with plain text. Feel free to use the code. We're happy to share it with you. Regards, Erwin & Linda Slimme meter.lua Slimme_meter.vfib
- 57 replies
-
- 1
-
-
- p1
- smart meter
- (and 2 more)
-

Qubino 3-Phase Smart Meter - not working with HC2
PAL_HC2 posted a question in Other Devices / Third-party devices
The Qubino 3-Phase Smart Meter can operate an external contactor if certains parameters are set - this is a very smart solution for controlling that you can cut power in case of to high current (power) consumption. BUT, The setup method described is based on settng certain parameters in the Smart Meter while included (no 7=3 and no 100=11), then exclude the unit and when included again it will be noticed that there is an output activiated. The problem is that HC2 over writes alla parameters to default while including the unit making the idea off Smart Meter useless Advicew please -
Hello all, Have anyone tried to implement some sort of power management for your homes? Then thinking of logic to turn on/off loads pending on current power consumption or time of day. Reason for this thread is that we in Norway have implemented the smart power meters and in the future we might expect to get different power cost based on instant consumption / time of day. Some might also have solar power or other which generates power and would like to limit consumption from elsewhere. Then thinking of powering off or reducing power on electric heating, lowering setpoints of heating, switching etween loads for a period or other means to keep the peak loads or consumtion during certain hours down. Brgds Tor Harald

