
Welcome to Smart Home Forum by FIBARO
Dear Guest,
as you can notice parts of Smart Home Forum by FIBARO is not available for you. You have to register in order to view all content and post in our community. Don't worry! Registration is a simple free process that requires minimal information for you to sign up. Become a part of of Smart Home Forum by FIBARO by creating an account.
As a member you can:
- Start new topics and reply to others
- Follow topics and users to get email updates
- Get your own profile page and make new friends
- Send personal messages
- ... and learn a lot about our system!
Regards,
Smart Home Forum by FIBARO Team
Search the Community
Showing results for tags 'modbus'.
Found 10 results
-
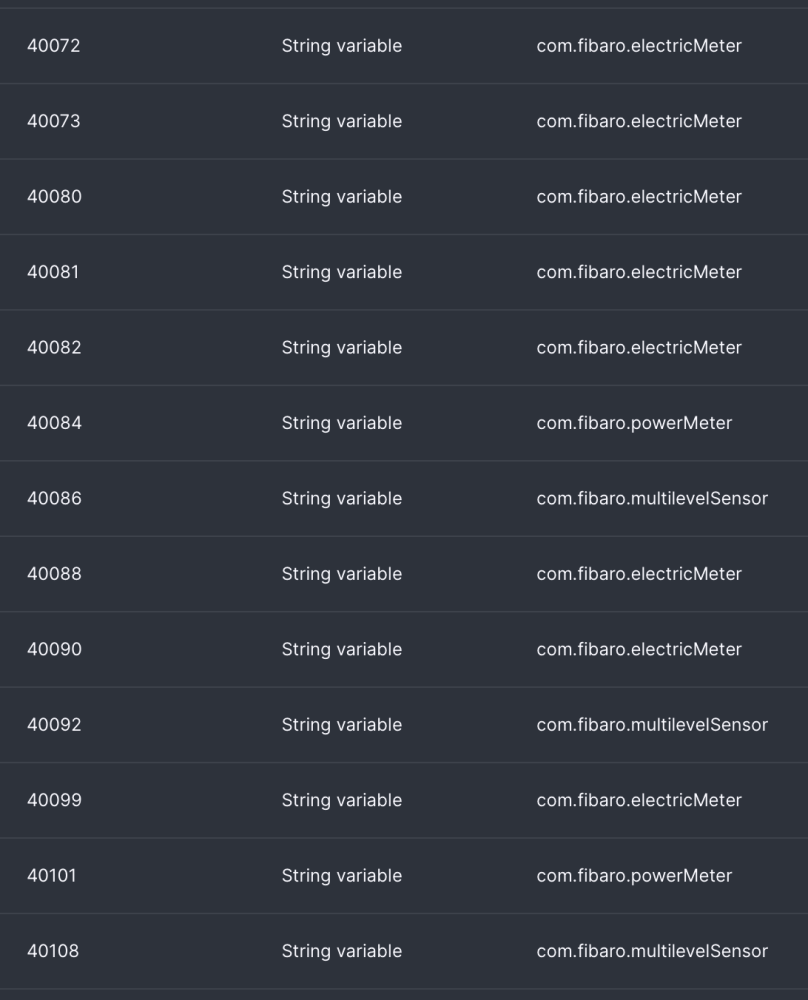
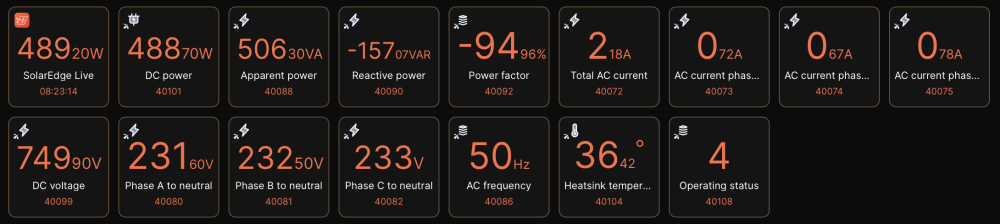
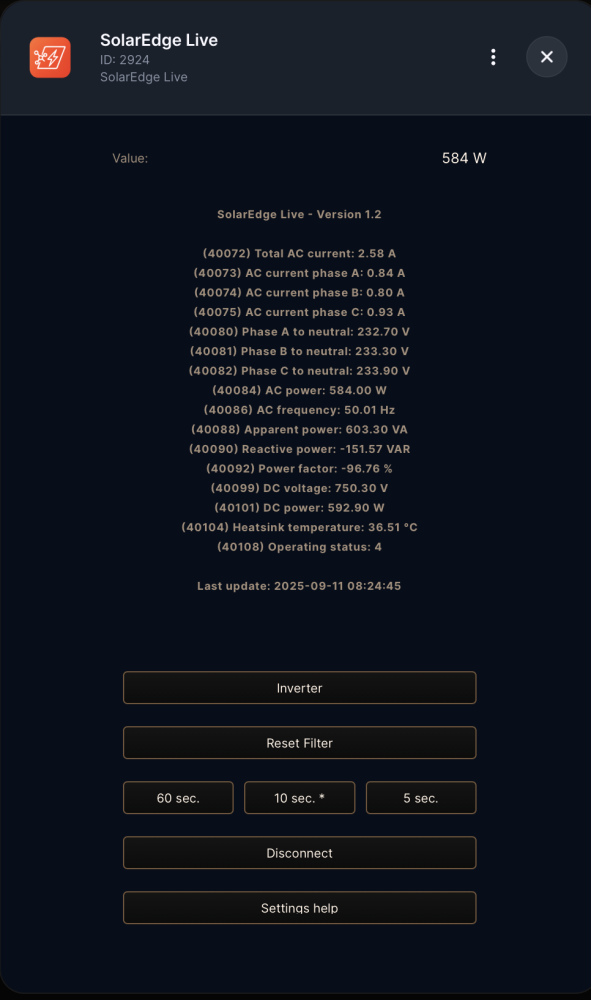
This is the next version 1.2 of the SolarEdge Live (Modbus) QuickApp. The SolarEdge Live (Modbus) QuickApp represents an advanced integration that provides instant, real-time access to local inverter data without the limitations of cloud-based API’s. This QuickApp uses the Modbus of your SolarEdge Inverter to get the real-time information about your SolarEdge setup. The QuickApp reads the SolarEdge SunSpec Modbus registers and shows the with QuickApp variables requested register values in child devices and labels. The QuickApp runs at an interval setup in the QuickApp variables. A special button is available to adjust the speed up the interval. Example QuickApp Variables with register addresses and devicetypes: Enabling Modbus on SolarEdge Inverters: To enable Modbus communication on a SolarEdge inverter, follow these general steps: Access the inverter’s configuration menu, either via its control panel or through the manufacturer’s configuration app. Navigate to the communication settings. Enable Modbus support, selecting TCP/IP for network connections. Adjust Modbus parameters as needed, such as device ID and communication port. Save your changes and restart the inverter if required. After activation, the inverter is ready to communicate with external systems or monitoring solutions using the Modbus protocol. Always consult your inverter’s user manual for detailed instructions specific to your model. Important documentation for the right register addresses (use the base 1 address): https://knowledge-center.solaredge.com/sites/kc/files/sunspec-implementation-technical-note.pdf Disclaimer: Use this QuickApp at your own risk. You are responsible for ensuring that the information provided via this QuickApp do not contain errors. SolarEdge is a registered trademark being the property of SolarEdge. SolarEdge reserves all rights to the registered trademarks. Information which is published on SolarEdge’s websites belongs to SolarEdge or is used with the permission of the rights holder. Making of copies, presentations, distribution, display or any other transfer of the information on the website to the public is, except for strictly private use, prohibited unless done with the consent of SolarEdge. Published material on dedicated SolarEdge press websites, intended for public use, is exempt from the consent requirement. Changes version 1.2 (2nd September 2025) Changed the main device type to com.fibaro.powerMeter, so it can contain the AC Power value. Added QuickApp variable for the main device register, mainRegister (default = 40084 AC Power). Added default don't 'Save events to History' (saveLogs = false) to the setup of every child device. Disabled the warnings for READ, WRITE and Invalid response. Users can't prevent those errors and to display them as warnings only clutters the logging. Changed the text of the interval speed buttons to the content of the quickapp variables intervalChildsS, intervalChildsM and intervalChildsF. Found a few old SolarEdge Modbus QuickApp names in the code and changed them also to SolarEdge Live. Optimised the register mapping. Changed the default interval timing to 60, 10 and 5 seconds. Of course, you can use your own settings. Removed the expiration date. Changes version 1.1 (9th August 2025) Renamed the QuickApp from SolarEdge Modbus to SolarEdge Live. SolarEdge Live represents the QuickApp in a better way. Of course the Modbus is still used as protocol. Added button for 'Inverter' with support for SunSpec model type 101 (single phase), 102 (split phase) or 103 (three phase). Added QuickApp variable inverterType for the model type of your Inverter (101 (single phase), 102 (split phase) or 103 (three phase), default type 101 (single phase). Also see the value of register 40070.) Added optimisation with re-use of the already connected Modbus socket. Improved memory usage with more variables as local variable. Changed the maximum retries to a maximum consecutive time no response. Changed the interval to three speeds, Slow, Medium and Fast. With QuickApp variables the speeds setting can be made for the interval and child updates. Added an indicator (*) to most of the buttons to show what selection is active. Added 'Disconnect' (or 're-connect') button to manually disconnect the QuickApp and Modbus. Added extra check for the amount of addresses (including the extra scale factor addresses) not to exceed 125 (Modbus spec: max 125 registers per request). Added extra check for the addresses being in the 40001-49999 range. Changed the register table to indexed, so the addresses (and scale factors) can be selected directly and fast from the table. Removed a double warning for CONNECT issue. Added in case of a device type 'com.fibaro.energyMeter' the property 'storeEnergyData = false' is added to the setup of that child device. By default the energyMeter won't save energy to the energy database. Added in case of a device type 'com.fibaro.powerMeter' the property 'includeInEnergyPanel = false' is added to the setup of that child device. By default the powerMeter won't be used for instantaneous power in Energy Panel calculations. Added the current time to the log text of the main device. Added the register address to the log text of all the child devices. The log text was empty. This will help to get more acquainted with the register addresses. Placed the register address in front of the label text to make it more readable. Improved the message of the retry warnings, show seconds to maxResponseTime. Improved some register description text. Rounded all the values to two decimal places. Changes version 1.0 (27th July 2025) Initial version with child devices to configure in QuickApp variables. Variables (mandatory and created automatically): host = Modbus TCP IP address of your target device (default 192.168.1.145) port = Modbus TCP port (default 1502) unitId = Modbus slave/unit address (default 1) inverterType = Type of your Inverter (101, 102 or 103, default type 101. Also see the value of register 40070.) intervalS = How fast the Modbus will refresh the data (Slow default 60 seconds) intervalM = How fast the Modbus will refresh the data (Medium default 10 seconds) intervalF = How fast the Modbus will refresh the data (default 5 seconds) intervalChildsS = How fast the Childs will update (Slow default 60 seconds) intervalChildsM = How fast the Childs will update (Medium default 10 seconds) intervalChildsF = How fast the Childs will update (default 5 seconds) maxResponseTime = Maximum time in seconds for response of the Modbus to disconnect (default = 60) debugLevel = Number (1=some, 2=few, 3=all) (default 1) Also with the QuickApp variables child devices can be created. Insert a QuickApp variabel with the address as 'variable' and the deviceType as 'value'. By default the values from the childs will show in the labels (except Scalefactor values). You can use all kinds of devicesTypes, for example: com.fibaro.energyMeter (Wh) (by default no storage to energy database) com.fibaro.powerMeter (Watt) (by default not used for instantaneous power in Energy Panel calculations) com.fibaro.electricMeter (Volt and Ampere) com.fibaro.multilevelSensor (Number values) com.fibaro.temperatureSensor (Temperature) Download the QuickApp here: SolarEdge_Live-12.fqax or from the Fibaro Marketplace: https://marketplace.fibaro.com/items/solaredge-modbus How to install: Open the Configuration Interface Go to Settings > Devices Click + Choose Other Device Choose Upload File Choose file from your computer with .fqax (This download contains several example register addresses, but you can choose you own register addresses to create your child devices)

-
Version 1.0.0
28 downloads
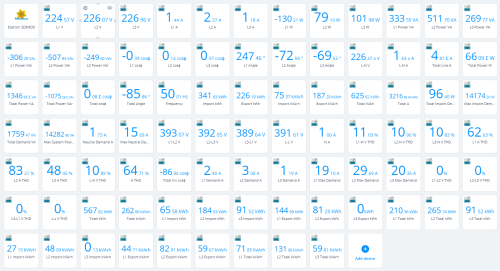
QuickApp to read the EASTRON SDM630 V3 Modbus Smart Meter for HC3 This QuickApp is for querying pretty much most of the parameters of an Eastron SDM630 Modbus device. It reads directly from the Modbus server, for example a Modbus Device Waveshare RS485 to RJ45 Ethernet Industrial Serial Server Modbus Gateway. Some important information: After installation, only the parent device will be created. You can now use your own icons for parent and child devices; these must be entered as a variable with the icon ID. As soon as the device is activated, these are then used when the ChildDevices are created. Hint: you can use http://<hc3-ip-address>/api/icons to get a list of your icons and icon-id's. The query and creation of ChilDevices remains inactive until the variable SDM_ACTIVE is set to true. This allows you to adjust the other parameters, which are also set on the "Variables" tab, as required. After SDM_ACTIVE has been set to true, the ChildDevices are created automatically. Further ChildDevices can be added or removed by setting the "enabled" parameter to true or false in the LUA code under "ChildDevicesDetails". If you have a V2 device, simply delete the last two lines in "ChildDevices Details", these are for V3 only. Tip: If you make changes and save the QA file, make sure that you delete all variables on the "Variables" tab beforehand. Otherwise, the variable settings of your saved QA file will be used and the entry "SDM_ACTIVE = false" will probably not be present and the QA will immediately try to create ChildDevices and read in values. Variables: MODBUS_IP contains the IP address of the Modbus adapter, e.g. from Waveshare MODBUS_PORT is the standard port of the adapter, 502 UNIT_ID is the ID of the Eastron SDM 630 meter INTERVALL defines the polling intervals in seconds ICON_PARENT sets the ID of the icon to be used for the parent device ICON_CHILDS sets the ID of the icon to be used for the child device SDM_ACTIVE stops all processes if false and continues them if true. Important: If ChildDevices are deleted using "enabled=false", the data stored for this ChildDevice up to that point is also deleted! If this is not desired, the device should be managed via the interface. I would not recommend reading all the parameters as the QuickApp has otherwise put too much load on the HC3 memory in my case. Use at your own risk, I have written the device myself and the code can be used at will, without any guarantee of completeness and accuracy. Code is still subject to change. Have fun!-
- 1
-

-
- smart meter
- modbus
- (and 4 more)
-
 Hello! Can anybody help, please? I am looking for a way how to send a Modbus command - Preset Single Register to a Komfovent recuperation unit to change the function/Register number 5 (Current mode of ventilation) to 4 (Boost). Please see the attached Modbus communication codes from Komfovent. I would like to use this command when the movement is registered in the toilet or other places. Thanks a lot! C6_MODBUS_EN.pdf
 -
I need to send commands to a Modbus router to turn on a thermostat. I've heard that the commands need to be sent in hexadecimal format, as shown in this example I found online: function QuickApp:turnOn() comand = string.char(0x00,0x01,0x00,0x00,0x00,0x06,0x01,0x06,0x00,0x64,0x00,0x01); self:send(comand) -- sending data to the device. In a normal implementation it will be a code with an appropriate command. self:updateProperty("value", true) end But how can I know how to encript the commands I want in this format, I mean, how many characters it needs to be, in what order, etc. I can't find any info online so any help is appreciated. Thx.
-
-
-
-
-
Version 1.0.0
61 downloads
VD - Switch CCGX Relais .lua A VD that can switch the AC-Out2 relais of the Victron inverter One can not directly switch the Quattro relais, therefore I used the “Venus GX Relais 2” (currently NOT used) and connected it to the contacts of the “AUX inputs of the Quattro inverter and you have to install an assistant on the Quattro to do the final switching o the Relays. -
Hi Do the somebody try to connect fibaro with PLC. Example with modbus. If yes how to do this.


