Welcome to Smart Home Forum by FIBARO
Dear Guest,
as you can notice parts of Smart Home Forum by FIBARO is not available for you. You have to register in order to view all content and post in our community. Don't worry! Registration is a simple free process that requires minimal information for you to sign up. Become a part of of Smart Home Forum by FIBARO by creating an account.
As a member you can:
- Start new topics and reply to others
- Follow topics and users to get email updates
- Get your own profile page and make new friends
- Send personal messages
- ... and learn a lot about our system!
Regards,
Smart Home Forum by FIBARO Team
Search the Community
Showing results for tags 'quickapp'.
-
My new attempt at a tool for developing QuickApps on your PC/Mac before pushing them to the real HC3. Plua stands for Python Lua, and is a lua compatible app written in Python, wrapping a real lua engine within. The advantage is that we can easily add functionality that is difficult to achieve with Lua. So instead of using lua to compile and run your program, you use plua. Plua is mostly backwards compatible with how the standard lua interpreter takes command line arguments so it is fairly easy to integrate in existing IDEs. I have made it work for VSCode and ZerobraneStudio. If you code using Agents/AI help - Claude, Codex, Copilot etc. there are a collection of skills <here> that can be added to your project that makes the AI better at coding QuickApps and using plua. The skills also informs the AI how to use plua as the tool to upload, download, update QAs to the HC3 and do some other tasks. This is the tool I use to develop my own QAs these days, so Plua is constantly being improved as I run into limitations and bugs (Changelog). 📺 Short video on youtube, installing and running a QA on Windows 11 📖 Documentation here How plua works, the simple version It requires that Python is installed (including pip, that is a part of most Python installations) To install run >pip install plua To upgrade to latest >pip install --upgrade plua Setup a .env file in your home directory with the content HC3_URL=http://192.168.1.100/ HC3_USER=admin HC3_PASSWORD=your_password_here To run a QA file use plua as a lua interpreter with the flag --fibaro >plua --fibaro MyQA.lua We can then use plua as the executable lua interpreter in vscode to run our QA code. add a launch config in .vscode/launch.json { "version": "0.2.0", "configurations": [ { "name": "plua: Run Current Fibaro File with Debugger", "type": "luaMobDebug", "request": "launch", "workingDirectory": "${workspaceFolder}", "sourceBasePath": "${workspaceFolder}", "listenPort": 8172, "listenPublicly": false, "stopOnEntry": false, "sourceEncoding": "UTF-8", "interpreter": "plua", "arguments": [ "--fibaro", "--run-for", "0", "${relativeFile}" ] } ] } You must make sure that plua is available as a command globally on you machine for the vscode launch command to work, because we are just referring to executable "plua" If you install plua in a python virtual environment, make the executable point to the plua app in your <venv>/bin/... A simple QA lua file looks like: --%%name:MyQA --%%type:com.fibaro.binarySwitch function QuickApp:onInit() self:debug(self.name,self.id) end Link to Plua on PyPi The plua interpreter has a lot of options and capabilities >plua -h usage: plua [-h] [-v] [--init-qa] [-e EVAL] [-i] [--telnet] [--loglevel {debug,info,warning,error}] [-o] [--desktop [DESKTOP]] [-t] [--nodebugger] [--nogreet] [--fibaro] [--diagnostic] [-l L] [--header HEADER] [--api-port API_PORT] [--api-host API_HOST] [--telnet-port TELNET_PORT] [--no-api] [--run-for RUN_FOR] [scripts ...] PLua - Python Lua Engine with Web UI positional arguments: scripts Lua script files to run (optional, multiple files allowed) options: -h, --help show this help message and exit -v, --version Show version information --init-qa Initialize a new QuickApp project -e EVAL, --eval EVAL Execute Lua code fragments -i, --interactive Start interactive REPL mode (stdin/stdout with prompt_toolkit) --telnet Start telnet server for remote REPL access --loglevel {debug,info,warning,error} Set logging level -o, --offline Run in offline mode (disable HC3 connections) --desktop [DESKTOP] Override desktop UI mode for QuickApp windows (true/false). If not specified, QA decides based on --%desktop header -t, --tool Run tool, [help, downloadQA, uploadQA, updateFile, updateQA] --nodebugger Disable Lua debugger support --nogreet Suppress startup greeting message --fibaro Enable Fibaro HC3 emulation mode --diagnostic Run diagnostic tests -l L Ignored, for Lua CLI compatibility --header HEADER Add header string (can be used multiple times) --api-port API_PORT Port for FastAPI server (default: 8080) --api-host API_HOST Host for FastAPI server (default: localhost) --telnet-port TELNET_PORT Port for telnet server (default: 8023) --no-api Disable FastAPI server --run-for RUN_FOR Run script for specified seconds then terminate It is a reuse of the code from my last effort, hc3emu, but with some major improvements. It's constantly under development, so beware of some rough edges appearing now and then. However, I promise to try and smooth them out as soon as possible. More extensive documentation in the GitHub repo here. QuickStart to develop a QuickApp with plua here

- 141 replies
-
- 9
-

-

-
- quickapp
- development
- (and 1 more)
-
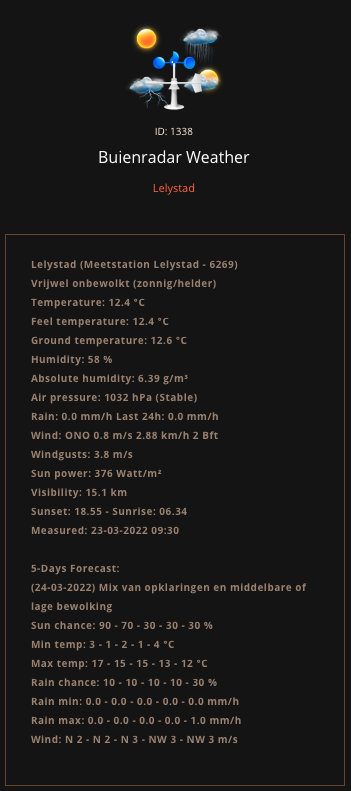
This QuickApp can be used as your Fibaro Homecenter 3 Weather Provider (Settings - 6. General - Main - Main Devices - Weather Provider) The Buienradar Weather QuickApp contains the current Dutch weather measurements, the weather forecast and the 5-day forecast The 5-days forecast is shown in the labels and the tomorrow forecast is shown in the child devices The current observations are measured by KNMI weather stations spread across The Netherlands and are updated every 10 minutes The weather report is updated several times a day by the Buienradar meteorologists The QuickApp has child devices for: Temperature °C Feel temperature °C Ground temperature °C Humidity % Absolute humidity g/m³ Airpressure hPa Windspeed m/s Windspeed km/h Winddirectiondegrees ° (plus wind direction and arrow) Windspeed Bft Windgusts km/h Rain mm/h Rain Last 24h mm Sunpower Watt/m² Visibility km Sunset (time) Sunrise (time) Sun Chance tomorrow % Min Temp tomorrow °C Max Temp tomorrow °C Rain Chance tomorrow % Min Rain tomorrow mm/h Max Rain tomorrow mm/h Wind tomorrow m/s (plus wind direction and arrow) Wind tomorrow km/h (plus wind direction and arrow) This QuickApp is plug-and-play. The only thing you can do, is change the Station ID to a weather-station nearby from the list or add some nice icons to the devices. Wind Chill (based on the JAG/TI-method) and is only valid for temperatures between -46 C and +10 C and is only valid for wind speed between 1.3 m/s and 49 m/s Windspeed is shown in m/s (km/3.6) Absolute humidity is the measure of water vapor (moisture) in the air, regardless of temperature. It is expressed as grams of moisture per cubic meter of air (g/m3) conditionCodes = {unavailable = 3200, clear = 32, rain = 40, snow = 43, storm = 38, cloudy = 30, fog = 20,} The time shown in the QuickApp, is the last time of the measurement from Buienradar (not the system time) Changes version 5.0 (18th June 2026) Changed all the json names back because someone at Buienradar changed them AGAIN. Changes version 4.0 (15th June 2026) Changed all code to the changes Buienradar made to the json data. Changes version 3.0 (23rd March 2022) Added 5-days forecast to the labels Addded child devices for: Feel temperature °C Ground temperature °C Windspeed km/h Windspeed Bft Windgusts km/h Rain Last 24h mm Sun Chance tomorrow % Min Temp tomorrow °C Max Temp tomorrow °C Rain Chance tomorrow % Min Rain tomorrow mm/h Max Rain tomorrow mm/h Wind tomorrow m/s (plus wind direction and arrow) Wind tomorrow km/h (plus wind direction and arrow) Changed SunPower device type to powerSensor Changed all Wind devices types to windSensor Converted date-times to more nice format Quickapp variable setGlobalVar changed to boolean Added Quickapp variable stationWarning to show a warning (once) if your station hasn't got some weather value (default is true) Optimised some code Changes version 2.1 (15th January 2021) Added weatherdescription: "Mix van opklaringen en hoge bewolking" to conditioncode "cloudy" "Half bewolkt" to conditioncode "cloudy" "Opklaring en lokaal nevel of mist" to conditioncode "fog" "Zwaar bewolkt met lichte sneeuwval" to conditionCode "snow" "Zwaar bewolkt met regen en winterse neerslag" to conditioncode "snow" "Afwisselend bewolkt met lichte sneeuwval" to conditioncode "snow" "Zware sneeuwval" to conditioncode "snow" "Opklaringen en kans op enkele pittige (onweers)buien" to conditioncode "rain" "Bewolkt en kans op enkele pittige (onweers)buien" to conditioncode "rain" Added Airpressure Text in log of Airpressure Child Device Changes version 2.0 (3rd January 2021) Added Child Devices for: Temperature °C (including feeltemperature and groundtemperature) Humidity % Absolute humidity g/m³ Airpressure hPa Windspeed m/s (including windspeedBft and Windgust km/h) Winddirectiondegrees ° (including winddirection and arrow) Rain mm/h (including rainFallLast24Hour mm) Sunpower watt/m² Visibility km Sunset (time) Sunrise (time) Re-arranged the labels Added backup station functionality for weather stations that don't have all the data, the data from 6260 Meetstation De Bilt is used. Improved check for missing data Added Quickapp variable for debug level (1=some, 2=few, 3=all). Recommended default value is 1. Changes version 1.0 (25th October 2020) Added weatherdescription "Zwaar bewolkt met wat lichte regen" to conditionCode "rain" Changes version 0.6 (9th September 2020) Changed conditionCodes storm = 38 snow = 43 and unknown = unavailable Added weatherdescription "Afwisselend bewolkt met (mogelijk) wat lichte regen" to conditionCode "rain" and and "Afwisselend bewolkt met lokaal mist(banken)" to conditionCode "fog" Changes version 0.5 (4th September 2020) Added wind direction, air pressure and feel temperature to QuickApp labels Changed stationname to regio in labels and log Changed the names of the Global Variables to meet the Fibaro standards and shortened them (please manually delete your old ones and change the names in your scenes) Added an extra check for response of Buienradar (jsonTable) Changes version 0.4 (22nd August 2020) Completely renewed code Several Global Variables are available for personal use Added QuickApp variable SetGlobalVar true or false, whether you want to use the Global Variables Added QuickApp variable Timeout for finetuning waiting for response Changes version 0.3 (11th August 2020) error message instead of debug message in case of an error Changed method of adding QuickApp variables, so they can be edited Weather conditions: The Buienradar weather description is converted to the right Fibaro condition codes, with the icons: Fibaro Dashboard: The Fibaro properties Temperature, Humidity and Wind values are updated to show in your dashboard: Mobile App: For the Mobile app these values are available: For the most accurate measurements you can select a Station in your neighborhood: 6391 Meetstation Arcen / 6275 Meetstation Arnhem / 6249 Meetstation Berkhout / 6308 Meetstation Cadzand / 6260 Meetstation De Bilt / 6235 Meetstation Den Helder / 6370 Meetstation Eindhoven / 6377 Meetstation Ell / 6321 Meetstation Euro platform / 6350 Meetstation Gilze Rijen / 6323 Meetstation Goes / 6283 Meetstation Groenlo-Hupsel / 6280 Meetstation Groningen / 6315 Meetstation Hansweert / 6278 Meetstation Heino / 6356 Meetstation Herwijnen / 6330 Meetstation Hoek van Holland / 6279 Meetstation Hoogeveen / 6251 Meetstation Hoorn Terschelling / 6258 Meetstation Houtribdijk / 6285 Meetstation Huibertgat / 6209 Meetstation IJmond / 6225 Meetstation IJmuiden / 6277 Meetstation Lauwersoog / 6320 Meetstation LE Goeree / 6270 Meetstation Leeuwarden / 6269 Meetstation Lelystad / 6348 Meetstation Lopik-Cabauw / 6380 Meetstation Maastricht / 6273 Meetstation Marknesse / 6286 Meetstation Nieuw Beerta / 6312 Meetstation Oosterschelde / 6344 Meetstation Rotterdam / 6343 Meetstation Rotterdam Geulhaven / 6316 Meetstation Schaar / 6240 Meetstation Schiphol / 6324 Meetstation Stavenisse / 6267 Meetstation Stavoren / 6229 Meetstation Texelhors / 6331 Meetstation Tholen / 6290 Meetstation Twente / 6313 Meetstation Vlakte aan de Raan / 6242 Meetstation Vlieland / 6310 Meetstation Vlissingen / 6375 Meetstation Volkel / 6215 Meetstation Voorschoten / 6319 Meetstation Westdorpe / 6248 Meetstation Wijdenes / 6257 Meetstation Wijk aan Zee / 6340 Meetstation Woensdrecht / 6239 Meetstation Zeeplatform F-3 / 6252 Meetstation Zeeplatform K13 QuickApp variables (mandatory, they will be automatically added with the default values): interval = Number in seconds to update the data (defaul = 601) timeout = Number in seconds to wait for a response (default = 5) stationID = Number of the station you want to use for weather measurements (default = 6260 Meetstation De Bilt) backupstationID = Number of the backup station for missing weather data from stations that don't have all the data (default = 6260 Meetstation De Bilt). Don't change this ID unless you know what you are doing. setGlobalVar = true or false, whether you want tu use the Global Variables (default = false) stationWarning = true or false, whether you want to receive warnings if your station hasn't got some weather value (default is true) debugLevel = Number (1=some, 2=few, 3=all) (default = 1) Download the QuickApp here (download the file and un-zip): https://github.com/GitHub4Eddy/buienradar_weather/archive/refs/tags/buienradar_weather_50.zip or Fibaro Marketplace: https://marketplace.fibaro.com/items/buienradar-weather How to install: Open the Configuration Interface Go to Settings > Devices Click + Choose Other Device Choose Upload File Choose file from your computer with .fqa JSON data copyright: (C)opyright Buienradar / RTL. All rights reserved JSON data terms: This feed may be used freely under condition of source reference buienradar.nl including a hyperlink to https://www.buienradar.nl. The feed cannot be derived from users or other persons.


-
A thread to share some coding techniques for QuickApps? Because QAs are "long running scenes" (they don't have to be loaded and restarted for every event) - it is actually worthwhile to build up a library of "nice to have" code and include them in QAs. Here is Fibaro's manual for QuickApps. Here is Fibaro's manual for creating QuickAppChild devices Here is Fibaro's manual for using MQTT client Here is Fibaro's manual for WebSocket client List of posts: Introduction to the QuickApp anatomy - tutorial Part 1. Lua functions and object-oriented programming. (QuickApp is a OO class, so we need that base) Part 2. The basic QuickApp functions and what they do... and how. Part 3. More on QuickApp event handling - interaction with the UI and fibaro.call(<quickApp>,"name",...) Part 4. QuickAppChildren and how to raise them... what makes them tick? Also a tutorial on using classes in QuickApps here... All functions and variables available in the QuickApp Lua environment Logging functions (replacement for color/html tags + tostring for customised data structure) Shared functions calls between QuickApps (Here is an improved version) Off-line HC3api to use fibaro.* calls on PCs/Linux/Mac (fibaroapiHC3.lua) Polling for triggers in a QuickApps (like fibaro.getSourceTrigger()) Here is another method using a helper QA Patching 'setTimeout' so you get an error message if the function crashes A generic template for a QuickApp A simple code-lock QuickApp (demonstrating the UI with buttons) A QuickApp for scheduling user profiles (demonstrates UI buttons that change labels/text to present options) It doesn't' actually schedules the profile yet. (here is a working version) Structuring a QuickApp using event handlers to cope with asynchronous calls - like when using net.HTTPClient() instead of FHTTP(). looping with setInterval (without drifting) A QD reporting if other QDs are crashing (leveraging the "polling for triggers" code) Coding and debugging HC3 QuickApps offline using PC/Mac/Linux and a Lua IDE (and auto-creating a proxy on the HC3) An example of a QuickApp that download and installs scenes and QuickApps from a repository (files in a flat format) Coding and debugging of HC3 scenes using fibaroapiHC3.lua (not strictly about QuickApps but related) - can speed-up time A more complex QD that reads Google calendars or iPhone calendars and schedule custom events (uses the QuickApp structure for asynchronous calls in a previous tip) A substitute for Lua's loadstring() Here is another method of loading code dynamically into a QA Creating proxy devices on the HC3 to share devices between HC2 and HC3 A "webhook" QD - pushing events to external apps Adding interfaces to QA's - ex. power and battery and updating the properties (updates the little battery and power icon UI) @tinman Using '/plugin/publishEvent' to emit 'centralSceneEvent' (and a few other) .... Ex. keyfob QA by @tinman QA Toolbox. A modular toolbox of add-on functions to QAs that makes it easier to develop QAs 'basic' - Generic QA functions for loggin, loading modules, and management - used by all other modules. (some documentation) 'childs' - QA functions to easily manage quickAppChild devices. Loading, saving state, getting UI events etc. 'events' - QA functions for defining event handlers and structuring your code accordingly. Makes it easy to setup timers in various ways... 'triggers' QA functions for recieving triggers like Scenes do. The events module will receive triggers if loaded, but own handler can be defined. 'rpc' - QA functions for declaring (synchronous) remote functions from other QAs files - QA functionality for copying files between QAs pubsub - QA functions for event publish/subscribe... ui - QA functions for manipulation the UI elements of a QA lua parser/compiler - QA function for emulating loadstring and evaluating Lua expression from strings profiler - Functions for timing code used in QA Reading label/button/slider values. Sha2.lib crypto libs for HC3 (MD5, HMAC, SHA-1, SHA-224, SHA-256, SHA-512/224, SHA-512/256, SHA-384, SHA-512, SHA3-224, SHA3-256, SHA3-384, SHA3-512, SHAKE128, SHAKE256) @tinman aes crypto lib @tinman List of HC3 device types and interfaces @tinman Readers note. I started to call QuickApp devices for QDs (as in QuickApp Device, thought QAs sounded like Question and Answers). So, I use the word QD here and there but I'm not religious about it...
-
QA Dist Manager A Fibaro HC3 QuickApp that lets you install, upgrade, and downgrade other QuickApps directly from GitHub — without leaving the HC3 UI. Features Load one or more manifest files from GitHub (or any URL) Browse all QuickApps listed in the manifests See which versions are already installed on your HC3 Install a new instance or update an existing one to any release Syncs files, UI layout, and interfaces during an update Supports per-QA "ignore" lists to preserve user-specific files (e.g. userconfig) Multiple manifest sources — just add more manifestXxx QA variables Installation Download the latest .fqa file from the qaDist repository and import it into your HC3. Import it into your HC3 via Settings → QuickApps → Add QuickApp → Import. Open the QuickApp and set the manifestUrl variable to point to your manifest (see below). Optionally set githubToken if you need more than 60 GitHub API requests per hour. QuickApp Variables Variable Required Description manifestUrl Yes URL to a dist.json manifest file. Any variable whose name starts with manifest is loaded — add more for additional sources (e.g. manifestFriend). githubToken No Personal access token for GitHub API. Leave empty for anonymous access (60 req/hour). Multiple manifest sources You can load QAs from several publishers at once. Add extra QA variables named with any prefix starting with manifest: manifestUrl = https://raw.githubusercontent.com/jangabrielsson/qaDist/main/dist.json manifestAlice = https://raw.githubusercontent.com/alice/hc3-apps/main/dist.json manifestBob = https://raw.githubusercontent.com/bob/myapps/main/dist.json All entries are merged. If the same uid appears in multiple manifests, the first one wins. For QA Authors — Publishing Your Own Manifest To distribute your QuickApps via QA Dist Manager, host a dist.json file in your GitHub repository and share the raw URL. Manifest schema { "author": "Your Name", "quickApps": [ { "name": "My QuickApp", "uid": "UNIQUE_ID_STRING", "description": "Short description shown in the UI.", "url": "https://api.github.com/repos/yourname/your-repo/", "fqa": "dist/MyQuickApp.fqa", "versionFile": "main", "versionPattern": "local VERSION = \"([^\"]+)\"", "ignore": ["userconfig"] } ] } Field reference Field Required Description author Yes Your name or organisation. Shown in the QA Dist Manager UI. minVersion No Minimum QA Dist Manager version required to use this manifest (e.g. "0.1.2"). If the installed QADist is older, the manifest is skipped with a warning. Omit or leave blank for no restriction. quickApps Yes Array of QuickApp entries. name Yes Display name shown in the selector. uid Yes A stable unique identifier for this QuickApp. Must never change between releases. Used to match already-installed instances on the HC3. Any unique string works — e.g. "UPD896846032517896". description No Short description shown below the selector. url Yes GitHub API base URL for the repository: https://api.github.com/repos/<owner>/<repo>/ fqa Yes Relative path to the .fqa file inside the repo, e.g. dist/MyApp.fqa. The file is fetched from the raw GitHub URL at the selected release tag. versionFile No Name of the Lua file inside an installed QA that contains the version string. Used to show the current version in the Installed dropdown. versionPattern No Lua string.match pattern used to extract the version from versionFile. Must capture the version string in a capture group. Example: local VERSION = "([^"]+)" ignore No Array of file names to exclude during updates. Files listed here are never overwritten from the FQA and never deleted if they already exist on the device. Use this to preserve user-edited files like userconfig. Releases and tags QA Dist Manager fetches the list of available versions by calling the GitHub releases API (/releases). If no releases are found, it falls back to tags (/tags). Publish a GitHub release (or push a tag) for each version you want to make available. The .fqa file must exist at the tagged commit under the path given in fqa. How to create a release on GitHub (recommended) A release is the most visible way to publish a version. It appears on your repo's front page and lets you attach files and release notes. Go to your repository on GitHub. In the right-hand sidebar, click Releases (or go to https://github.com/<owner>/<repo>/releases). Click Draft a new release. In the Choose a tag field, type a new version string such as v1.0.0 and select Create new tag: v1.0.0 on publish. Fill in a Release title (e.g. Version 1.0.0) and optionally add release notes. Make sure your .fqa file is already committed and pushed to the branch you're releasing from (usually main). Click Publish release. How to create a tag only (lightweight alternative) If you prefer not to write release notes, you can push a plain git tag. QA Dist Manager will find it via the tags fallback. Using the GitHub web UI: Go to your repository → Code tab. Click the branch/tag dropdown (top-left, shows main by default). Type a new tag name such as v1.0.0 in the search box. Click Create tag: v1.0.0 on main (or whatever branch is current). Using the command line: git tag v1.0.0 git push origin v1.0.0 Versioning convention It is recommended to use Semantic Versioning: vMAJOR.MINOR.PATCH Part When to increment MAJOR Breaking changes (e.g. removed user-config keys) MINOR New features, backwards compatible PATCH Bug fixes only Examples: v1.0.0, v1.2.3, v2.0.0 Generating a UID A UID is just a string that uniquely identifies your QuickApp. You can use any method: # macOS / Linux echo "UPD$(date +%s%N | head -c 18)" # Or just use a descriptive string "uid": "com.example.MyQuickApp" The only requirement is that it stays constant across all releases of the same QuickApp. Minimal example { "author": "Alice", "quickApps": [ { "name": "My Sensor", "uid": "com.alice.MySensor", "description": "Reads temperature from my custom sensor.", "url": "https://api.github.com/repos/alice/my-sensor/", "fqa": "releases/MySensor.fqa" } ] } Host this at https://raw.githubusercontent.com/alice/my-sensor/main/dist.json and share that URL with users. How updates work When you press Apply with an existing installed instance selected: Downloads the .fqa for the chosen release from GitHub. Compares the file list with what's currently installed. Creates files that are new in the release. Updates content of all non-ignored files. Deletes files that are no longer in the release (unless listed in ignore). Syncs interfaces (adds/removes) based on initialInterfaces in the FQA. Updates the UI layout (uiView, uiCallbacks, viewLayout) on the device. HC3 automatically restarts the QuickApp after file changes. Programmatic API Other QuickApps can call QA Dist Manager via fibaro.call to install or update QuickApps automatically — for example to self-update on a daily timer. Because fibaro.call is fire-and-forget, results are delivered asynchronously. Pass callbackId and callbackMethod in the args table; QA Dist Manager will call fibaro.call(callbackId, callbackMethod, result) when finished. Methods apiListReleases(args) Fetch the available releases for a QuickApp. Arg Type Description uid string Required. UID of the QuickApp as listed in the manifest. refresh bool true to force a manifest re-fetch even if the cache is fresh. Default false. callbackId number Device ID of the QuickApp to call back. callbackMethod string Method name to call on the callback device. Result: { ok=true, uid="...", releases={{tag="v1.2.0", name="..."}, ...} } { ok=false, uid="...", msg="error description" } apiInstall(args) Download and install a new instance of a QuickApp. Arg Type Description uid string Required. UID of the QuickApp. tag string Release tag to install. "latest" or omit for the newest release. refresh bool Force manifest re-fetch. Default false. callbackId number Callback device ID. callbackMethod string Callback method name. Result: { ok=true, uid="...", tag="v1.2.0", deviceId=42, msg="..." } { ok=false, uid="...", msg="error description" } apiUpdate(args) Update an existing installed instance. When force=false (the default) and the manifest entry has versionFile/versionPattern set, QA Dist Manager reads the running version and skips the update if it already matches the target tag. Arg Type Description deviceId number Required. Device ID of the installed instance. uid string Required. UID of the QuickApp in the manifest. tag string Target release tag. "latest" or omit for the newest release. force bool true to update even if already on the target version. Default false. refresh bool Force manifest re-fetch. Default false. callbackId number Callback device ID. callbackMethod string Callback method name. Result: { ok=true, uid="...", deviceId=42, tag="v1.2.0", upToDate=false, msg="..." } { ok=true, uid="...", deviceId=42, tag="v1.2.0", upToDate=true, msg="already at v1.2.0" } { ok=false, uid="...", msg="error description" } Self-updating QuickApp example local QADIST_ID = 10 -- device ID of your QA Dist Manager instance local MY_UID = "com.example.MyQuickApp" function QuickApp:onInit() -- Check for updates every 24 hours setInterval(function() self:checkForUpdate() end, 24 * 60 * 60 * 1000) self:checkForUpdate() end function QuickApp:checkForUpdate() fibaro.call(QADIST_ID, "apiUpdate", { deviceId = self.id, uid = MY_UID, tag = "latest", force = false, callbackId = self.id, callbackMethod = "onUpdateResult", }) end function QuickApp:onUpdateResult(result) if result.upToDate then self:debug("Already at " .. result.tag .. " — no update needed.") elseif result.ok then self:debug("Updated to " .. result.tag .. ". HC3 will restart the QA.") else self:error("Update failed: " .. tostring(result.msg)) end end License MIT
-
scheduler.lua Repo & Code: https://github.com/jangabrielsson/scheduler A Lua port of the Python schedule library by Daniel Bader — job scheduling for humans. Designed for plua and Fibaro HC3 QuickApps, but works in plain Lua too. schedule.every(10).minutes:do_(job) schedule.every().hour:do_(job) schedule.every().day:at("10:30"):do_(job) schedule.every(5):to(10).minutes:do_(job) schedule.every().monday:do_(job) schedule.every().wednesday:at("13:15"):do_(job) schedule.every().minute:at(":17"):do_(job) schedule.every().day:at_sunrise():do_(job) schedule.every().day:at_sunset(-15 * 60):do_(job) -- 15 min before sunset Why a port? The Python schedule API is a fluent builder pattern that reads almost like English. Lua's metatables (specifically __index as a function) let us reproduce both the bare-property chaining (.minutes, .day, .monday) and the method chaining (:at(...), :to(...), :tag(...)) without the user having to type extra parentheses. Two execution models are provided: Mode Use when Polling — schedule.run_pending() Plain Lua, your own event loop Reactive — schedule.start() plua / HC3 / anything with setTimeout Plain interval jobs are drift-free (anchored to their first scheduled fire). Wall-clock anchored jobs (:at("HH:MM"), weekday jobs) are tied to local time and self-correct. Installation plua / Fibaro HC3 QuickApp There's no require in QA context, so scheduler.lua installs itself onto fibaro.schedule when loaded via the multi-file directive: --%%name:My QA --%%type:com.fibaro.binarySwitch --%%file:scheduler.lua,scheduler function QuickApp:onInit() local schedule = fibaro.schedule schedule.every(30).seconds:do_(function() self:debug("tick") end) schedule.every().day:at("06:30"):do_(function() self:turnOn() end) schedule.start() end Plain Lua local schedule = require("scheduler") schedule.every(10).minutes:do_(function() print("tick") end) while true do schedule.run_pending() os.execute("sleep 1") end Differences vs. the Python original No timezone support. All times use os.time() / os.date() in local time. The Python version's at(time, tz=...) is not implemented. do is a Lua keyword, so the method is :do_(fn, ...) (with a trailing underscore) instead of Python's .do(fn, ...). Property access uses ., not :. In Lua you cannot write obj:property without a call. So: every().monday ✅ (property) every():monday ❌ (Lua syntax error) every().day:at("10:30") ✅ (.day is a property, :at is a method) Two execution models. The Python version only has polling. This port adds :start() / :stop() for native setTimeout-based scheduling. until_() instead of until (Lua keyword). Grammar / chaining cheat sheet schedule.every([N]) -- start a new job, N defaults to 1 [:to(M)] -- random interval N..M (method) .UNIT -- (property, no parens) one of: -- .second .seconds -- .minute .minutes -- .hour .hours -- .day .days -- .week .weeks | .WEEKDAY -- (property) one of: -- .monday .tuesday .wednesday .thursday -- .friday .saturday .sunday -- (implies .weeks) [:at("HH:MM[:SS]")] -- (method) wall-clock anchor; -- ":MM" or ":SS" for hour/minute units | :at_sunrise([off]) -- (method) anchor to sunrise (+ offset seconds) | :at_sunset([off]) -- (method) anchor to sunset (+ offset seconds) | :at_sunrise_twilight([off]) | :at_sunset_twilight([off]) [:tag(...)] -- (method) attach one or more tag values [:until_(when)] -- (method) deadline; see below :do_(fn, ...) -- (method) register fn(args...) and start Singular forms (.second, .minute, .hour, .day, .week) require an interval of 1; using every(2).minute raises IntervalError. Weekdays require interval of 1 (every().monday, never every(2).monday). at() format depends on the unit: Unit Format .day / weekday HH:MM or HH:MM:SS .hour :MM, MM:SS, or :MM:SS .minute :SS until_(when) accepts: a number — epoch seconds (large), or seconds-from-now (small) "YYYY-MM-DD HH:MM:SS" (or without seconds, or just date) "HH:MM" / "HH:MM:SS" — today Examples Time-based intervals schedule.every(10).seconds:do_(job) schedule.every(2).hours:do_(job) schedule.every().day:do_(job) schedule.every(3).days:do_(job) Wall-clock times schedule.every().day:at("10:30"):do_(job) -- daily at 10:30 schedule.every().hour:at(":15"):do_(job) -- every hour at xx:15 schedule.every().minute:at(":30"):do_(job) -- every minute at :30 schedule.every().monday:at("08:00"):do_(job) -- Mondays 08:00 Randomized intervals schedule.every(5):to(10).minutes:do_(job) -- N in [5,10] min schedule.every(1):to(5).hours:do_(job) Sunrise & sunset Sun events are computed per upcoming day (so future days use the correct sunrise/sunset for that date, not today's value). On HC3 the location is read automatically from api.get("/settings/location"). Elsewhere, set it once: schedule.set_location(59.33, 18.07) -- lat, lon Then: schedule.every().day:at_sunrise():do_(open_blinds) schedule.every().day:at_sunset():do_(turn_on_lights) -- offsets are in seconds, may be negative schedule.every().day:at_sunset(-15 * 60):do_(prep_lights) -- 15 min before sunset schedule.every().day:at_sunrise(30 * 60):do_(morning) -- 30 min after sunrise -- civil twilight variants schedule.every().day:at_sunset_twilight():do_(close_shutters) schedule.every().day:at_sunrise_twilight():do_(stop_outdoor_lights) -- combine with weekday schedule.every().sunday:at_sunset():do_(weekly_recap) -- raw values (seconds since midnight, for the local date of `time`) local sr, ss, srt, sst = schedule.sunCalc() -- today local sr2 = schedule.sunCalc(os.time() + 7*86400) -- a week from now Sun-based jobs require interval 1 and either .day or a weekday property. They return a useful next-run because _schedule_next_run scans the next 14 calendar days for the first matching event in the future. Passing arguments local function notify(channel, msg) print(channel, msg) end schedule.every(2).hours:do_(notify, "ALERT", "heartbeat") Tags & bulk cancellation schedule.every(30).minutes:tag("housekeeping"):do_(cleanup) schedule.every(45).minutes:tag("housekeeping","weekly"):do_(report) schedule.get_jobs("housekeeping") -- returns matching jobs schedule.clear("housekeeping") -- cancels all matching jobs schedule.clear() -- cancels everything Self-cancelling job Return schedule.CancelJob from the function to unschedule it: local n = 0 schedule.every(1).minutes:do_(function() n = n + 1 if n >= 5 then return schedule.CancelJob end end) Deadline schedule.every(10).minutes :until_("2026-12-31 23:59") -- absolute :do_(job) schedule.every(5).seconds :until_(60) -- 60 seconds from now :do_(job) schedule.every().hour :until_("23:00") -- today at 23:00 :do_(job) Inspection schedule.next_run() -- epoch of next run, or nil schedule.idle_seconds() -- seconds until next run, or nil schedule.get_jobs() -- list of all jobs print(tostring(job)) -- human-readable job description Running -- plua / HC3 (reactive, setTimeout-based, drift-free) schedule.start() -- plain Lua (polling) while true do schedule.run_pending() os.execute("sleep 1") end -- run all jobs once, ignoring schedule schedule.run_all() schedule.run_all(2) -- with 2s delay between Multiple schedulers The module-level schedule.every, schedule.run_pending, etc. all use a shared default scheduler. You can also create independent ones: local s1 = schedule.Scheduler.new() local s2 = schedule.Scheduler.new() s1:every(10).seconds:do_(job_a) s2:every(1).minutes:do_(job_b) s1:start(); s2:start() API reference Module-level (default scheduler) Function Description schedule.every([n]) Start a new job, returns a Job schedule.run_pending() Run any due jobs (polling mode) schedule.run_all([delay]) Run all jobs immediately, optionally with delay between schedule.get_jobs([tag]) List all jobs (optionally filtered by tag) schedule.clear([tag]) Cancel all jobs (or all with matching tag) schedule.cancel_job(job) Cancel a specific job schedule.next_run([tag]) Epoch of next run, or nil schedule.idle_seconds() Seconds until next run, or nil schedule.start() Begin reactive (setTimeout) execution schedule.stop() Stop reactive execution and clear timers schedule.jobs() Direct access to the list of jobs schedule.CancelJob Sentinel — return from a job to unschedule it Job methods (all chainable, return the job) Method Description :to(latest) Use a random interval in [interval, latest] :at("HH:MM[:SS]") Anchor to a wall-clock time :at_sunrise([offset]) Anchor to sunrise (offset in seconds, may be negative) :at_sunset([offset]) Anchor to sunset :at_sunrise_twilight([offset]) Anchor to civil-twilight sunrise :at_sunset_twilight([offset]) Anchor to civil-twilight sunset :tag(...) Attach one or more tags :until_(when) Set a deadline after which the job is cancelled :do_(fn, ...) Register the function and start the job Job properties (no parens) Units: .second(s), .minute(s), .hour(s), .day(s), .week(s) Weekdays: .monday, .tuesday, .wednesday, .thursday, .friday, .saturday, .sunday Scheduler class schedule.Scheduler.new() returns a fresh instance with the same methods as the module-level functions (using :), e.g. s:every(2):minutes, s:run_pending(), s:start(), etc. Sun helpers Function Description schedule.set_location(lat, lon) Set the lat/lon used for sun calculations (auto-read from api.get("/settings/location") on HC3) schedule.sunCalc([time]) Returns sunrise, sunset, sunrise_twilight, sunset_twilight as seconds-since-midnight on the local date of time (default os.time()). Returns -1 for an event if the sun never rises/sets that day. Testing lua test_scheduler.lua # plain-Lua smoke test plua --fibaro QA_scheduler.lua # full QA demo (uses speed.lua to fast-forward 24h) QA_scheduler.lua exercises ~10 features and uses speed.lua (also in this repo) to compress a 24-hour simulation into seconds by hijacking setTimeout and os.time. Credits Original library: schedule by Daniel Bader and contributors — MIT-licensed. Inspirations cited by the original: Adam Wiggins' "Rethinking Cron" The Ruby clockwork module Lua port by Jan Gabrielsson, 2026.
-
Here is an experimental extension for VSCode (search 'hc3' in extension tab). https://marketplace.visualstudio.com/items?itemName=GsonSoft-development.hc3-vfs It allow you to see all QAs on the HC3 and their associated files in the vscode file explorer. The files are editable and pushed back to the HC3 when saved. In practice allowing you to use the VSCode editor as your editor for QAs on the HC3. The extension uses the same REST API as the HC3 WeUI uses for its editor when fetching and saving the code files for a QA. I have tested it by editing files, created files, and deleted files and it seems to work. The only problem is that the HC3 WebUI don't always follow, so if you have a QA file open in the WebUI edit and update the same file via VSCode, you need to close the WebUI editor and reopen to see the changes. Notes: First release(s), use with caution. If it's found to be useful I may put some more effort into it... feedback appreciated. Note, you can't run the files with plua in vscode yet as they are "virtual files" and the debugger can't locate them.... so you need to rely on saving back to HC3 and watch the HC3 log output the traditional way... ------------------- HC3 Virtual Filesystem Browse and edit HC3 QuickApp Lua files directly in the VS Code Explorer — no manual downloading or uploading. Also supports opening local .fqa archive files as editable virtual filesystems. Features QuickApps appear as folders in the VS Code Explorer under an HC3 — <host> workspace folder Open any .lua file — content is fetched live from the HC3 Save to HC3 on ⌘S — the file is written back via the HC3 REST API instantly QuickApp properties editor — each QuickApp folder contains a (QuickApp).hc3qa file; opening it shows a graphical editor for name, enabled/visible state, interfaces, QuickApp variables, and description. Changes are saved to the HC3 on ⌘S Create new files — new Lua files appear on the HC3 immediately Delete files — removes the file from the HC3 (the main file of a QuickApp cannot be deleted) Rename files — rename a non-main Lua file by pressing F2 or right-clicking in the Explorer (implemented as create + delete) Rename QuickApp — rename a device directly from VS Code (right-click the QuickApp folder) Export .fqa — export a QuickApp as a .fqa archive (right-click the QuickApp folder) Open in HC3 Web UI — jump to the HC3 device page in the browser (right-click the QuickApp folder) File & text search — Ctrl+P quick-open and Ctrl+Shift+F Find in Files both search across all QuickApp files in the virtual filesystem HC3 Log output channel — the HC3 Log output panel polls the HC3 debug log every few seconds and streams new entries as they arrive, so you can see QuickApp output and errors without leaving VS Code API traffic statistics — run HC3: Statistics to see a breakdown of every API call made since connect, grouped by endpoint Credentials from .env — reuses the same HC3_URL/HC3_USER/HC3_PASSWORD variables as plua, with a fallback to VS Code settings + SecretStorage .fqa file browser Open any .fqa file as a virtual workspace folder — right-click a .fqa file in the Explorer and choose Open .fqa File, or run HC3: Open .fqa File from the Command Palette Edit Lua files inside the archive — each Lua file appears as a .lua file in the folder; saving writes directly back into the .fqa JSON on disk Create and delete Lua files — use the Explorer New File / Delete buttons as normal Rename Lua files — press F2 or right-click → Rename in the Explorer Properties editor — a (QuickApp).hc3qa file in each fqa workspace folder opens the same graphical properties editor as the live HC3 connection; edit name, QuickApp variables, interfaces, and description, then save to write changes back to the on-disk .fqa file Persisted across sessions — the fqa:// workspace folder is remembered and reconnected automatically when you reopen VS Code Explorer tree examples Live HC3 connection: HC3 — 192.168.1.100 ├── 42-living-room-lights/ │ ├── main.lua │ ├── utils.lua │ └── (QuickApp).hc3qa ← properties editor └── 55-weather-station/ ├── main.lua └── (QuickApp).hc3qa Local .fqa archive: 📦 living-room-lights (42) ├── main.lua ├── utils.lua └── (QuickApp).hc3qa ← properties editor Getting started 1. Configure credentials Option A — .env file (recommended, works with plua) Create a .env file in your workspace root (or ~/.env😞 HC3_URL=http://192.168.1.100 HC3_USER=admin HC3_PASSWORD=your-password Option B — VS Code settings + SecretStorage Run the command HC3: Configure Credentials (Ctrl+Shift+P → HC3: Configure Credentials) and enter your HC3 host, username, and password. The password is stored securely in VS Code's SecretStorage. 2. Connect Run HC3: Connect from the Command Palette. An HC3 — <host> workspace folder will appear in the Explorer containing all your QuickApps. 3. Edit & save Open any .lua file, make changes, and save — the file is written back to the HC3 immediately. 4. Watch the log The HC3 Log output channel opens automatically on connect and streams new debug, warning, trace, and error entries from /api/debugMessages as they arrive. Each line is formatted as: HH:MM:SS [DEBUG] [QUICKAPP1234] your message here Commands Command Description HC3: Connect Open the HC3 filesystem in the Explorer HC3: Configure Credentials Set HC3 host, username, and password HC3: Refresh Clear the cache and reload the file tree HC3: Disconnect Remove the HC3 workspace folder and stop polling HC3: Open in HC3 Web UI Open the selected QuickApp in the HC3 browser UI HC3: Export .fqa Export the selected QuickApp as a .fqa archive HC3: Rename QuickApp Rename the selected QuickApp on the HC3 HC3: Statistics Show a breakdown of API calls made since connect HC3: Open .fqa File Open a local .fqa file as a virtual workspace folder Open in HC3 Web UI, Export .fqa, and Rename QuickApp are also available via right-click on a QuickApp folder in the Explorer. Open .fqa File is also available via right-click on any .fqa file in the Explorer. Settings Setting Default Description hc3vfs.host `` HC3 hostname or IP. Overridden by HC3_URL in .env. hc3vfs.user admin HC3 username. Overridden by HC3_USER in .env. hc3vfs.logPollInterval 4 How often (in seconds) to poll the HC3 debug log output channel. Passwords are never stored in plain-text settings — they go to VS Code SecretStorage or are read from .env. Auto-save recommendation Each save triggers a real HTTP PUT to the HC3, which may restart the QuickApp. Auto-save is best turned off for hc3://files so you only push code to the HC3 when it is in a valid state. Add this to your workspace .vscode/settings.json: { "files.autoSave": "off" } onFocusChange is acceptable if you prefer convenience. Avoid afterDelay — it will push incomplete Lua while you type and cause constant QuickApp restarts. Limitations Renaming the main file is not supported — the HC3 API does not allow it Creating new QuickApp devices (new folders) is not supported — use the HC3 web interface No live refresh — the HC3 has no push notifications. Use HC3: Refresh if you made changes outside VS Code File names must be at least 3 characters and contain only a-z, A-Z, 0-9 "Preloaded files limit" warning — VS Code indexes the virtual filesystem for search and IntelliSense. If you have many QuickApps you may see a warning that the 500-file preload limit has been reached. This is a VS Code limit; all files are still fully accessible, editable, and searchable. The warning can be safely ignored. Working with GitHub / version control The virtual filesystem (hc3://) is great for quick edits directly on the HC3, but it doesn't compose naturally with git — there are no real files on disk to commit. The recommended workflow for GitHub users is to use plua: Keep your QuickApp source files (.lua) in a normal local git repo — edit them directly in VS Code, commit and push to GitHub as usual When ready to deploy to the HC3, use plua from the terminal: Upload (or create) the full QuickApp from a .fqa file: plua -t uploadQA MyQA.fqa Or update individual Lua files on the HC3 without touching the rest: plua -t updateQA MyQA.fqa This keeps git clean and simple. The HC3 extension is then useful as a companion — browse live device state, tweak a variable, check the log — while plua handles the deployment pipeline. Approach A — quick edits without plua If you just want to track your work without a full deployment pipeline, export the QuickApp as a .fqa archive and commit that single file: Right-click the QuickApp folder → Export .fqa → save to your repo folder Open the .fqa with HC3: Open .fqa File to edit Lua files and properties git add MyQA.fqa && git commit && git push Note: git diff on a .fqa shows JSON noise. Code review on GitHub is unreadable. For anything beyond personal backups, the plua workflow above is cleaner. Related plua — Local QuickApp development and testing tool for Fibaro HC3
- 36 replies
-
- 6
-
-
- qa
- development
- (and 2 more)
-
I have put together agent skills for developing QuickApps (offline). These are files added to your coding workspace that contains best practices for coding QuickApps. Agent skills are a "standard" for most coding environments using agents - copilot, Claude code, Codex etc. In the past I have coded an MCP for QA support but this is a much better approach. Please delete the MCP if you use it... The caveat is that these skills assumes that you are using plua to code and test QuickApps. Many skills will use the plua command to to run troubleshooting scripts etc... The instructions below are specifically for vscode/copilot but should be easy to reuse for other AI coding tools. Just put the skills directory in the proper place for your tool and ask it to add the skills to CLAUDE.md, AGENT.MD etc. The install-qa-skills prompt is specific for VSCode but your agent can most likely convert it to your agents preferences. Below is for VSCode. To install the skills you run an agent prompt 'install-qa-skills'. It's also used to update the skills to the latest version. Before you can run /install-qa-skills, you need this prompt file in your workspace. Run one of these commands from your workspace root, then type /install-qa-skills in Copilot chat. Universal (Python — macOS, Linux, Windows): python3 -c "import urllib.request,pathlib; pathlib.Path('.github/prompts').mkdir(parents=True,exist_ok=True); urllib.request.urlretrieve('https://raw.githubusercontent.com/jangabrielsson/plua/main/.github/prompts/install-qa-skills.prompt.md','.github/prompts/install-qa-skills.prompt.md'); print('Done')" macOS / Linux (curl): mkdir -p .github/prompts && curl -sL https://raw.githubusercontent.com/jangabrielsson/plua/main/.github/prompts/install-qa-skills.prompt.md -o .github/prompts/install-qa-skills.prompt.md Windows (PowerShell): New-Item -ItemType Directory -Force .github/prompts | Out-Null; Invoke-WebRequest https://raw.githubusercontent.com/jangabrielsson/plua/main/.github/prompts/install-qa-skills.prompt.md -OutFile .github/prompts/install-qa-skills.prompt.md Then in VS Code Copilot Chat: type /install-qa-skills and the agent will download all skills automatically. And the same command to update the skills. The skills makes the agent aware about the REST API, the Fibaro Lua SDK, best practices, using plua etc. This will allow the agent to help you create QuickApps from scratch, debug existing QAs, review the code for potential issues etc An example prompt Create a QUickApp in test/QATemp.lua that is a multilevel sensor and shows the temperature fetched from some public webservice Creates the code below --%%name:Temperature Sensor --%%type:com.fibaro.temperatureSensor --%%var:pollInterval=300 --%%var:city="London" --%%u:{label="tempLbl",text="Temperature: --"} --%%u:{label="infoLbl",text="Last update: --"} --%%desktop:true --%%offline:true -- Fetches current temperature from Open-Meteo (no API key required). -- Uses the WMO geocoding API to resolve city → lat/lon, then Open-Meteo for weather. -- Change --%%var:city= to any city name. local BASE_GEO = "https://geocoding-api.open-meteo.com/v1/search?name=%s&count=1&language=en&format=json" local BASE_WEATHER = "https://api.open-meteo.com/v1/forecast?latitude=%s&longitude=%s¤t_weather=true" local function httpGet(url, cb) local http = net.HTTPClient() http:request(url, { options = { method = "GET", timeout = 10000 }, success = function(r) if r.status == 200 then local ok, data = pcall(json.decode, r.data) if ok then cb(data) else cb(nil, "JSON parse error") end else cb(nil, "HTTP " .. tostring(r.status)) end end, error = function(err) cb(nil, tostring(err)) end }) end function QuickApp:onInit() self:debug(self.name, self.id) self.city = self:getVariable("city") if self.city == "" then self.city = "London" end local interval = tonumber(self:getVariable("pollInterval")) or 300 self:fetchTemperature() setInterval(function() self:fetchTemperature() end, interval * 1000) end function QuickApp:fetchTemperature() local geoUrl = string.format(BASE_GEO, self.city:gsub(" ", "+")) httpGet(geoUrl, function(geo, err) if not geo or not geo.results or not geo.results[1] then self:warning("Geocoding failed for '" .. self.city .. "': " .. tostring(err or "no results")) self:updateView("infoLbl", "text", "Error: city not found") return end local lat = tostring(geo.results[1].latitude) local lon = tostring(geo.results[1].longitude) local weatherUrl = string.format(BASE_WEATHER, lat, lon) httpGet(weatherUrl, function(wx, werr) if not wx or not wx.current_weather then self:warning("Weather fetch failed: " .. tostring(werr)) self:updateView("infoLbl", "text", "Error: weather unavailable") return end local temp = wx.current_weather.temperature self:updateProperty("value", temp) self:updateProperty("unit", "C") self:updateView("tempLbl", "text", string.format("Temperature: %.1f °C", temp)) self:updateView("infoLbl", "text", "Updated: " .. os.date("%H:%M:%S") .. " (" .. self.city .. ")") self:debug("Temperature in", self.city, ":", temp, "°C") end) end) end Pretty reasonable. It even found an available web api to get the temp. We could improve it by asking Instead of a hard coded quickVar, could we use the location of the HC3? ...and it will change the code accordingly. The exact result may vary depending on what LLM model is used. In these examples (and my coding overall) I use Claude Sonnet 4.6. This is an excellent way to over time add new skills and best practices so the agent becomes smarter - and I will update the skills continuously as I identify these "best practices" and possible issues when coding QAs. If you find something the agent could handle smarter, let me know in this thread and we can add it to the skill collection. This is the first release so there is a ton of stuff that could be added... Also, if someone uses this with Claude code or Codex, please share the instructions in this thread. I'm not using Claude myself but maybe in the future. The skill files are available directly from the repo at https://github.com/jangabrielsson/plua/tree/main/.github
- 4 replies
-
- 1
-
-
- agent
- development
- (and 4 more)
-
The EventRunner QuickApp makes it easy to write home automation rules, but also allows for development of very advanced rules Schedule actions at specific times with additional conditions Trigger actions when complex conditions are met Interact with other QuickApps and systems A complete event based programming language "eventscript" that is concise and powerful to describe concurrent automation rules. Example -- Setup some variables to use in rules (We could also use a "home-table") rule("xmas={ tree = 122, light = 166 }") -- xmas tree and light deviceIds rule("kitchen = {}") rule("kitchen.lamps = { 77, 98, 101 }"). -- deviceIds of lights in kitchen rule("kitchen.sensors = { 56, 33}") -- deviceIds of motion sensors in kitchen -- Define rules rule("kitchen.sensors:breached => kitchen.lamps:on") -- If any sensor is breached, turn on lights rule("trueFor(00:10,kitchen.sensors:safe) => kitchen.lamps:off") -- If all sensors are safe for 10 minutes, turn off lights rule("@sunset-01:00 & wday('sat-sun') => xmas.tree:on") -- 1 hour before sunsets on Saturday and Sunday turn on xmas tree rule("remote:key == '2:Pressed' => xmas.light:toggle") -- Key 2 on remote toggles xmas light on/off rule("kitchen.sensors:breached & once(06:00..08:00) => fibaro.call(RadioQA,'play')") -- Start radio when someone enters kitchen between 6 and 8, but only once Many more possibilities, with rules triggering on temperatures, alarm states, global variables etc etc... The rule language "event script" is designed to be reasonable easy to read. If condition before '=>' is true, then do the actions after the '=>'. If we don't have a '=>' it's just an expression that is computed, ex. for setting up variables like in the example. An beta of EventRunner5 is available now at https://github.com/jangabrielsson/EventRunner5 I will also publish versions available via the UpdaterQA which is probably the easiest way to install/update. Here is v1.03EventRunner5-1_03.fqa for download Many thanks to the bug hunters that helped me find problems @Sjakie @Neo Andersson @ChristianSogaard @Pica2017 @chelson @minsad79 Goals with EventRunner5 Backwards compatibility for rules from ER4 (as much as possible...) Better error messages Better debug possibilities Easier to extend with custom functions Some new cool scripting functions Much cleaner code - which will allow me to sleep better at nights... Current version is almost on feature parity with ER4. There are some bloat in ER4 I would like to skip unless people really need it... There are most likely bugs lurking in ER5 as it is not tested as much yet (However, I'm eating my own dogfood and have started to use it...) Introduction EventScript basics Variables EventScript in depth... Functions and properties Time scheduling rules - scheduling rules for time of day and dates Interval rules - rules running at given intervals during the day Trigger rules Event rules Alarm rules - arming/disarming and triggering on alarms Http and Nodered - integration with http requests and nodeRed flows Working with rules Settings and options Debugging and finding faults with rules... Terminal 5 - interactive web based terminal to play with rules on the HC3/ER5 Custom property functions - define your own :<property> functions Custom objects Advanced topics Recipes - common rules... Known changes from ER4: ER5 is not based on fibaroExtra so a lot of extra functions are not available. Especially functions defined for QuickApp. Ex. self:debugf etc. '=' has less priority than '&'. In ER4 we could write rule("@sunset => lamp:isOn & flag = true") which, if lamp was on set flag to true. In ER5 the priority makes this being interpreted as rule("@sunset => (lamp:isOn & flag) = true") which is not what we want and generates a runtime error. Instead, in cases like this, wrap the assignment in parenthesis rule("@sunset => lamp:isOn & (flag = true)") Alarms for partitions works differently Function to define rule is eval(...). They way eval is defined is differently. Most of this functions comes from the table 'er' that is passed to main(...). See declarations in the beginning of the main() function. A variable 'rule' is defined in the beginning of main(er) that points to the eval function so we can use rule("rule string") for backward compatibility... Nodered integration is slightly different. to be continued...
- 1,244 replies
-
- 6
-
-
- rule engine
- eventrunner4
- (and 1 more)
-
Here is a link to a set of QAs to control Shelly devices. https://www.smarthome.com.au/free-shelly-quick-apps-for-fibaro-home-center-3/ It's both gen 1 and gen 2 devices. Gen 2 devices are easier to integrate with the web socket API than the gen 1 where we need to poll the device with regular interval. Battery operated devices are in general a pain to support as they sleep and wake up now and then - which makes polling difficult. So, battery devices are not in focus The QAs support the basic features expected from a device of that QA type so they fit into the fibaro model of handling devices. Extra features like setting timers etc that Shelly support is better handled with the pretty good mobile/cloud Shelly app. There are a lot of devices that are potentially supported but not all have been tested. Please give us feedback here or in https://www.smarthome.com.au/free-shelly-quick-apps-for-fibaro-home-center-3/ so we can come out with an 1.1 update... (gen 1 Shelly 1 and Shelly 1PM have issues but will be fixed in next release) The suite contains 5+1 different QAs that each support different Shelly devices. The devices tested, and devices not tested but we expect they could work are: ShellyMultiDevice v1.0 com.fibaro.deviceController + child devices Supported Shelly devices: - Shelly 3EM (Gen1). Note: untested Children: - com.fibaro.binarySwitch - com.fibaro.energyMeter - com.fibaro.energyMeter - com.fibaro.energyMeter - Shelly EM (Gen1). Note: tested Children: - com.fibaro.binarySwitch - com.fibaro.energyMeter - com.fibaro.energyMeter - Shelly Plus 2PM (Switch) (Gen2). Note: tested Children: - com.fibaro.binarySwitch - com.fibaro.binarySwitch - Shelly Pro 2 (Gen2). Note: untested Children: - com.fibaro.binarySwitch - com.fibaro.binarySwitch - Shelly Pro 2M (Switch) (Gen2). Note: tested Children: - com.fibaro.binarySwitch - com.fibaro.binarySwitch - Shelly Pro 3 (Gen2). Note: tested Children: - com.fibaro.binarySwitch - com.fibaro.binarySwitch - com.fibaro.binarySwitch - Shelly Pro 4PM (Gen2). Note: tested Children: - com.fibaro.binarySwitch - com.fibaro.binarySwitch - com.fibaro.binarySwitch - com.fibaro.binarySwitch Supported HC3 QuickAppMethods: - <com.fibaro.binarySwitch>:turnOn() - <com.fibaro.binarySwitch>:turnOff() - <com.fibaro.binarySwitch>:toggle() ShellySingleColor v1.0 com.fibaro.colorController Supported Shelly devices: - Shelly Color Bulb (Gen1). Note: tested, only color mode for now - Shelly RGBW2 Color (Gen1). Note: tested Supported HC3 QuickAppMethods: - QuickApp:turnOn() - QuickApp:turnOff() - QuickApp:setValue(val) - QuickApp:setColor(r,g,b,w) - QuickApp:startLevelIncrease() - QuickApp:startLevelDecrease() - QuickApp:stopLevelChange() ShellySingleCover v1.0 com.fibaro.rollerShutter Supported Shelly devices: - Shelly Plus 2PM (Cover) (Gen2). Note: tested - Shelly Pro 2M (Cover) (Gen2). Note: tested Supported HC3 QuickAppMethods: - QuickApp:open() - QuickApp:close() - QuickApp:stop() - QuickApp:setValue(value) ShellySingleDimmer v1.0 com.fibaro.multilevelSwitch Supported Shelly devices: - Shelly Dimmer 1 (Gen1). Note: tested - Shelly Dimmer 2 (Gen1). Note: tested - Shelly Vintage (Gen1). Note: tested Supported HC3 QuickAppMethods: - QuickApp:turnOn() - QuickApp:turnOff() - QuickApp:setValue(val) - QuickApp:startLevelIncrease() - QuickApp:startLevelDecrease() - QuickApp:stopLevelChange() ShellySingleSwitch v1.0 com.fibaro.binarySwitch Supported Shelly devices: - Shelly 1 (Gen1). Note: untested - Shelly 1L (Gen1). Note: untested - Shelly 1PM (Gen1). Note: tested, not working yet...TBD - Shelly Plus 1 (Gen2). Note: tested - Shelly Plus 1 PM (Gen2). Note: tested - Shelly Plus Plug IT (Gen2). Note: untested - Shelly Plus Plug S (Gen2). Note: tested - Shelly Plus Plug UK (Gen2). Note: untested - Shelly Plus Plug US (Gen2). Note: untested - Shelly Pro 1 (Gen2). Note: tested - Shelly Pro 1 PM (Gen2). Note: tested Supported HC3 QuickAppMethods: - QuickApp:turnOn() - QuickApp:turnOff() - QuickApp:toggle() ShellyPlusHT v1.0 com.fibaro.temperatureSensor + com.fibaro.humiditySensor child Supported Shelly devices: - Shelly Plus H&T (Gen2). Note: tested, experimental, only wakes up when new data is available Children: - com.fibaro.temperatureSensor - com.fibaro.humiditySensor Supported HC3 QuickAppMethods:
- 44 replies
-
- 10
-
-
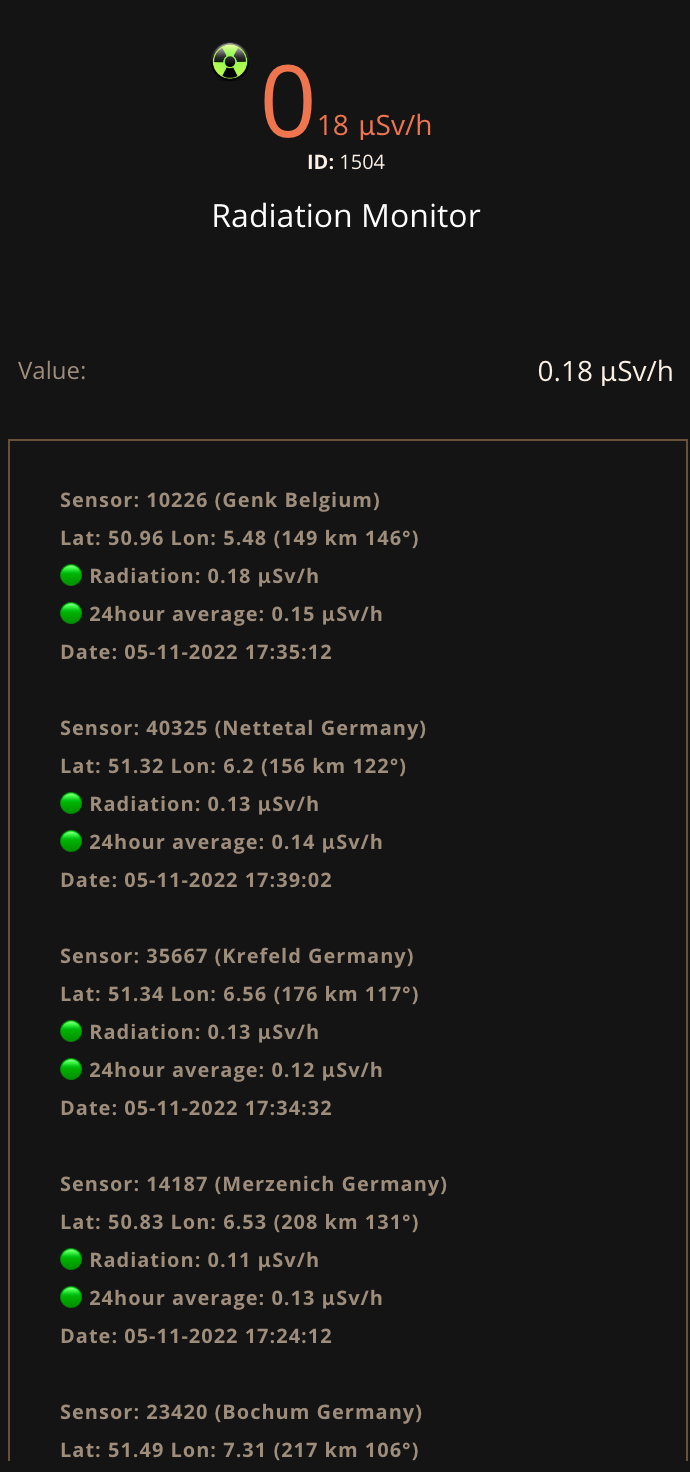
The Radiation Monitor collects radiation levels from all available stations around the world and shows 5 nearest stations to your location and one station with highest current readings and one station with the highest 24 hour average readings. The QuickApp uses the location (latitude and ongitude) of your Homecenter to measure the distance to the stations and to get the nearest stations. The bearings in degrees from your location to the stations is shown. Next to the measurements, the five nearest reactors are shown. The languages English, French, Polish and Duth are supported. Thanks to @Sankotronic for his work for his HC2 Virtual Device version and ideas. The main device shows the nearest measurement μSv/h. There are Child Devices for: Nearest sensor 24h average μSv/h 2nd, 3rd, 4th, 5th nearest sensor measurement with the 24 average in the log text Nearest maximum measurement Nearest maximum 24h average measurement The nearest five reactors are retrieved once at startup of the QuickApp or at the next interval if you click on the button. Radioactive@Home is a Polish science project using the distributed computing capabilities of the BOINC platform. The main goal of the project is to create a free and continuously updated map of radiation levels available for everyone, by gathering information about gamma radiation using sensors connected to the computers of volunteers willing to participate in the project. Project is completely non-commercial, participating will be free of charge (excluding cost of detector) and the software will be licensed under the GNU General Public License (GPL). μSv/h: The sievert (symbol: Sv) is a unit in the International System of Units (SI) intended to represent the stochastic health risk of ionizing radiation. In land navigation, a 'bearing' is ordinarily calculated in a clockwise direction starting from a reference direction of 0° and increasing to 359.9 degrees. Measured in this way, a bearing is referred to as an azimuth by the US Army but not by armies in other English speaking nations, which use the term bearing. The human population is continuously exposed to ionizing radiation from several natural sources (cosmic and terrestrial contributions). For most individuals, exposure to natural sources exceeds that from all man-made (artificial) sources combined. The man-made sources arise from peaceful (e.g. medical use, energy generation, and associated fuel cycle facilities, radioisotope production, waste management) and military purposes (nuclear tests and their fallout or radioactive release, nuclear explosions). Radiation levels: Green: Radiation up to 0.3 μSv/h Yellow: Radiation between 0.3 and 0.8 μSv/h Red: Radiation above 0.8 μSv/h 1.14 µSv/h - Shelter population 5.7 µSv/h - Evacuation of population 11.4 µSv/h - Issue Iodine tablets 0.114 µSv/h - Max daily dose == 1 mSv/year Reverse Geocoding by Nominatim Reverse geocoding generates an address from a latitude and longitude. The reverse geocoding API does not exactly compute the address for the coordinate it receives. It works by finding the closest suitable OSM object and returning its address information. This may occasionally lead to unexpected results. QuickApp code logics: onInit() Initialise the QuickApp getQuickAppVariables() Get all Quickapp Variables or create them createVariables() Setup the global variables setupChildDevices() -- Setup all child devices loadMap() Get the webpage from http://radioactiveathome.org/map/ (This is the main loop of the QuickApp) extractData() Extract the data from the webpage source-code geoDistance() Calculate the distance from the HC3 (QuickApp variables) lat/lon to the sensors lat/lon geoBearing() Calculate the bearing from the HC3 (QuickApp variables) lat/lon to the sensors lat/lon Check for the values to give the right dot colours for the sample and average measurements Store the values of all sensors in a table and sort the table on distance Run through the table to get the maximum sample and maximum average measurements. If there are more than one, get the one that is the nearest-by updateIcon() Set the icon (colour) based on the sensor measurement getCity() Get the cities and countries for the seven selected sensors from https://nominatim.openstreetmap.org/ and store them in a table updateLabels() Update the labels updateProperties() Update the properties updateChildDevices() Update the Child Devices Return to the main loop loadMap() Links: Radioactive@Home Map: http://radioactiveathome.org/map/ Status servers: http://radioactiveathome.org/boinc/server_status.php Reverse geocoding: https://nominatim.org/release-docs/latest/api/Reverse/ licence:Data © OpenStreetMap contributors, ODbL 1.0. https://osm.org/copyright Nominatim Usage Policy (aka Geocoding Policy): https://operations.osmfoundation.org/policies/nominatim/ Variables (mandatory and created automatically): latitude = Latitude of your location (Default is the latitude of your HC3) longitude = Longitude of your location (Default is the longitude of your HC3) language = Preferred language (default = en) (supported languages are English (en), French (fr), Polish (pl), Croatian (hr) and Dutch (nl)) interval = Interval in seconds to get the data from the Radioactive@Home website debugLevel = Number (1=some, 2=few, 3=most, 4=all) (default = 1, debugLevel 4 is only recommended for solving difficult issues) icon_refresh = User defined icon number for refresh status icon_green = User defined icon number for values less than 0.3 μSv/h icon_yellow = User defined icon number for values between 0.3 and 0.8 μSv/h icon_red = User defined icon number for values greater than 0.8 μSv/h icon_error = User defined icon number in case of an error gettng the data Version 1.4 (6th February 2024) Added extra check for an empty response in the address from Geocity (thanks to @Sankotronic from the Fibaro forum) Version 1.3 (17th July 2023) Added extra check for the right response from Geocity (in case of response {"error":"Unable to geocode"}) Version 1.2 (11th January 2023) Added support for Croatian language thanks to @Sankotronic Version 1.1 (9th January 2023) Changed handling of negative values for dots and icons: if tonumber(num) >= 0 and tonumber(num) <= 0.3 then Added a better translation for French (thanks to @fredokl) Version 1.0 (5th November 2022) Added the nearest five reactors to the labels with distance and bearing Added a button to refresh the list of (five nearest) reactors Added a warning at startup if the latitude or longitude differs from the setup of your HC3 Replaced the creation of the dots 🟢🟡🔴 to the labels, so no longer for all sensors Added some extra notifications to the labels in case the website is down Extended the http timeout a bit, to give the reverse geocoding some more time to respond Added translations for new functions Version 0.5 (29th October 2022) Added translation to the Reverse API geocoding response (city and country) Changed calculation of the bearings only for the 7 selected sensors, not all sensors Optimized the code and added more structure by using multi file code (main, childs and i18n) Version 0.4 (22nd October 2022) Added six Child devices for the nearest sensor 24h average, 2nd, 3rd, 4th, 5th nearest sensor sample, the nearest sensor maximum sample and the nearest sensor maximum 24h average Added icons based on sensor measurements to all Child Devices Added translations for the labels and properties from English to French, Polish and Dutch. (Thanks to @ppeterr and @fredokl for help with the translation) Limited the details of the response of the Reverse Geocoding with zoom=10 (address detail = city) Version 0.3 (16th October 2022) Added the City and Country also for worst sample and worst average sensors Added all debug information and set the debug levels Optimised the code Version 0.2 (15th October 2022) Added the City and Country for all 5 sensors, not only the first one Version 0.1 (15th October 2022) Initial version Download the QuickApp here (download the file and un-zip): https://github.com/GitHub4Eddy/radiation_monitor/archive/refs/tags/radiation-monitor-14.zip or from the Fibaro Marketplace: https://marketplace.fibaro.com/items/radiation-monitor How to install: Open the Configuration Interface Go to Settings > Devices Click + Choose Other Device Choose Upload File Choose file from your computer with .fqa Icons thanks to @Sankotronic


- 98 replies
-
- 5
-
-
- quickapp
- radioactive@home
- (and 3 more)
-
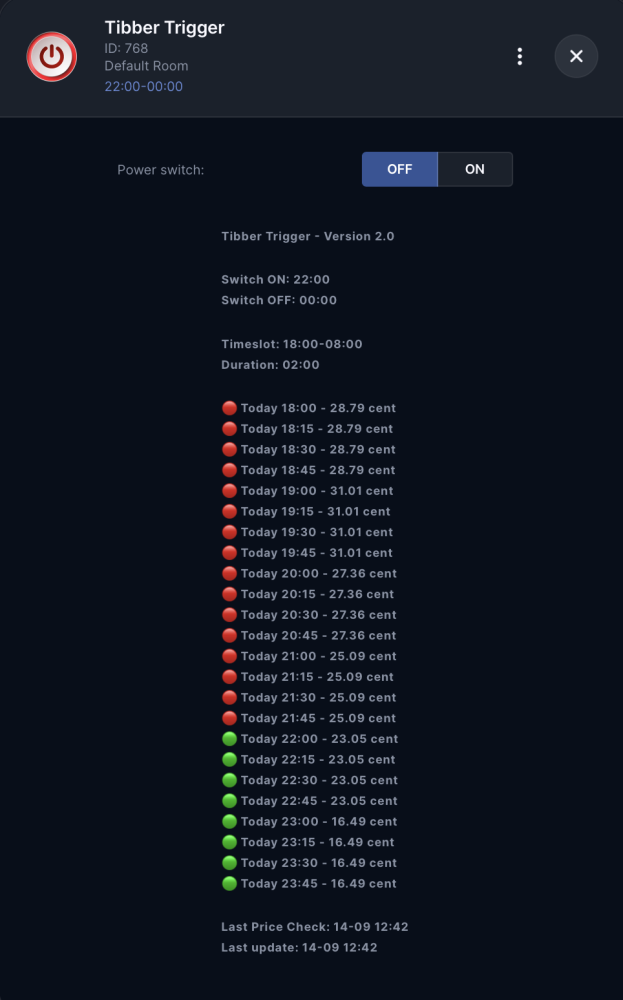
THIS IS THE NEW QUARTER-HOURLY VERSION This QuickApp calculates the cheapest prices for using appliances based on the hourly Tibber energy prices. This QuickApp is especially useful for appliances (like charging your car and washing the dishes) that need to run once a day, within a timeframe and during some hours. You can use more than one instance of this QuickApp if you need more than one appliance to start in the cheapest hour but not within the same timeslot. IMPORTANT This QuickApp needs the Tibber Monitor QuickApp (THE NEW QUARTER-HOURLY VERSION) to run on your HC3. Tibber today and tomorrow prices The tomorrow prices are available from 13:00 hour. If the tomorrow prices aren't available yet and the timeslot is (partially) tomorrow, a temporary calculation and start-stop plan is made with the today prices, until the tomorrow prices are available. If the start time plus duration is (partially) tomorrow, for example start time 22:00 and duration 2 hours, the calculation can be made from 13:00 hour when the tomorrow prices are available. At 22:00 the binary switch will turn ON and at 00:00 the binary switch will turn OFF. You would still have to create a script, triggers by this binary switch, to actually turn on the charging of your car, or turn on the dishwasher. QuickApp logics onInit() getQuickAppVariables() --> Get all Quickapp Variables or create them createVariables() --> Create all Variables checkPrice() --> Determine the cheapest cycle of hours missionControl() --> The central loop If Tibber main device doesn't exists --> disable QuickApp If current hour is hour to start --> turn the switch ON If current hour is hour to stop --> turn the switch OFF If current hour is 12:00 --> Check for QuickApp update If current hour is 13:00 (and timeSlotStart isn't due) --> checkPrice() with extra wait time intervalOffset to check the prices again to calculate with the tomorrow prices and to plan a new start and stop hour If current hour is the end of the timeslot --> checkPrice() to check the prices again to plan a new start and stop hour If current hour is 00 and the timeslot doesn't goes through midnight (timeSlotStart < timeSlotEnd) --> checkPrice() to transfer the tomorrow prices to todays prices If current hour is 00 and the timeslot goes through midnight (timeSlotStart > timeSlotEnd) --> Only change tomorrow prices to today prices and today prices to yesterday prices updateLabels() --> Update the labels calculateNextInterval() --> Calculate the next interval for missionControl() missionControl() --> etc. DISCLAIMERS Use this QuickApp at your own risk. You are responsible for ensuring that the information provided via this QuickApp do not contain errors. Tibber is a registered trademark being the property of TIBBER. TIBBER reserves all rights to the registered trademarks. Information which is published on TIBBER’s websites belongs to TIBBER or is used with the permission of the rights holder. Making of copies, presentations, distribution, display or any other transfer of the information on the website to the public is, except for strictly private use, prohibited unless done with the consent of TIBBER. Published material on dedicated TIBBER press websites, intended for public use, is exempt from the consent requirement. Also see: https://tibber.com/en/legal-notice Tibber API documentation: https://developer.tibber.com/docs/guides/calling-api Tibber API explorer: https://developer.tibber.com/explorer Tibber status: https://status.tibber.com Variables (mandatory and created automatically) tibberMain = The Tibber Monitor main device number language = Preferred language (default = English (en)) (supported languages are English (en), Dutch (nl), German (de), Swedish (se) and Norwegian (no)) durationTime = How many time [ormat 00:00] should the switch be ON (not more than 24 hours) timeSlotStart = At which time [ormat 00:00] should the timeslot start timeSlotEnd = At what time [format 00:00] should the timeslot end showTax = If true then the shown prices will include all taxes (default = true) setGlobalVar = true or false, whether you want tu use the Global Variables to store the start and end time (default = false) intervalOffset = The offset time in seconds to the interval for tomorrowPrices (default 60 seconds) debugLevel = Number (1=some, 2=few, 3=all (default = 1) Changes version 2.1 (23rd November 2025) Solved a tiny bug with the check for a new version. Changes version 2.0 (14th September 2025) QUARTER-HOURLY PRICES: Adjusted the Tibber Trigger QuickApp to the quarter-hourly prices. Tibber Trigger doesn't use the Tibber Monitor childs anymore, but now uses two Tibber Monitor global variables, one for all the today prices and one for all the tomorrow prices. Added lots of small improvements, like: Extra: at midnight when the timeslot is running, tomorrow prices change to today prices and today prices change to yesterday prices. Added extra handling of existance of the global variables for today en tomorrow prices. Added the date of the last price check to the labels. Added a new QuickApp variable showTax. If true then the prices will include all taxes (default = true), otherwise without taxes. Changes version 1.1 (15th January 2025) Changed the maximum durationHours to 24 hours (it was 23 hours) Added start and end time to the log text Changes version 1.0 (20th June 2024) Added two global variables for the time ON and time OFF. To use them, set the QuickApp variable setGlobalVar to true. Added an extra check at midnight if the timeslot doesn't goes through midnight (timeSlotStart < timeSlotEnd) to transfer the tomorrow prices to todays prices (after midnight) Solved a bug with a timeslot starting at the next day 23:00. Changed the label layout in case the prices aren't available yet. Changed the time tomorrow prices calculations will take place to hh:mm:ss in stead of "13:00 (+310 seconds)" Changes version 0.3 (19th March 2024) Solved a small bug when timeslot end was greater than 23 hours Changes version 0.2 (15th February 2024) Optimized calculations and turnOn/TurnOff Added translations for Dutch (nl), German (de), Swedish (se) and Norwegian (no) Initial (beta) version 0.1 (11th February 2024) Initial beta version Download the QuickApp here: Tibber_Trigger-21.fqax or from the Fibaro Marketplace: https://marketplace.fibaro.com/items/tibber-trigger How to install Open the Configuration Interface Go to Settings > Devices Click + Choose Other Device Choose Upload File Choose file from your computer with .fqax And enter the Tibber Monitor devicenumber in the tibberMain quickApp variable.
- 40 replies
-
- 3
-
-
- quickapp
- quick apps
- (and 4 more)
-
HC3 Event Logger - Installation Guide HC3 Event Logger is a desktop application for monitoring Fibaro Home Center 3 (HC3) events in real-time. It provides a clean interface to view device events, scene triggers, and system activities as they happen. It's mainly useful if you need to monitor the HC3 (system) events. Ex. if you are developing a QA using the RefreshStateSubscriber or other mechanisms. Features: Real-time event monitoring with live updates HC3 system information viewer Automatic update checking and installation No CORS issues - native desktop app Fast and lightweight Secure local connection to your HC3 Download Download the latest version: https://github.com/jangabrielsson/EventLogger/releases/latest Available files: macOS (Apple Silicon M1/M2/M3): HC3-Event-Logger_aarch64.app.tar.gz macOS (Intel): HC3-Event-Logger_x64.app.tar.gz Windows: HC3-Event-Logger_x64-setup.exe IMPORTANT: Configure HC3 Credentials First You must configure your HC3 credentials before using the app. Option 1: Using a .env File (Recommended) Create a file named .env with the following content: HC3_HOST=192.168.1.57 HC3_USER=admin HC3_PASSWORD=yourpassword HC3_PROTOCOL=http Replace with your actual values: HC3_HOST - Your HC3 IP address (no http://) HC3_USER - Your HC3 username (usually "admin") HC3_PASSWORD - Your HC3 password HC3_PROTOCOL - Optional, defaults to 'http'. Use 'https' if your HC3 requires it Where to place the .env file: macOS: Place in your home directory: ~/.env (easiest - just create it in your home folder) Windows: Place in your user folder: C:\Users\YourUsername\.env Quick create commands: macOS: nano ~/.env (then paste content, Ctrl+X to save) Windows: notepad %USERPROFILE%\.env (then paste content and save) Option 2: Using Environment Variables macOS/Linux: export HC3_HOST=192.168.1.57 export HC3_USER=admin export HC3_PASSWORD=yourpassword export HC3_PROTOCOL=http open /Applications/hc3-event-logger.app Windows (PowerShell): $env:HC3_HOST="192.168.1.57" $env:HC3_USER="admin" $env:HC3_PASSWORD="yourpassword" $env:HC3_PROTOCOL="http" Start-Process "C:\Program Files\hc3-event-logger\hc3-event-logger.exe" Installation Instructions macOS Download the appropriate file for your Mac (Apple Silicon or Intel) Extract the downloaded .tar.gz file (double-click in Finder) Drag hc3-event-logger.app to your Applications folder Create a .env file in your home directory: ~/.env with your HC3 credentials (see above) Right-click the app and select "Open" (first time only for macOS security) macOS Security Note: If you see "cannot be opened because it is from an unidentified developer": Right-click the app and select "Open", or Go to System Preferences → Security & Privacy → Click "Open Anyway" Windows Download HC3-Event-Logger_x64-setup.exe Run the installer and follow the wizard Create a .env file in your user folder: C:\Users\YourUsername\.env with your credentials Launch from Start Menu or desktop shortcut Windows Security Note: If you see "Windows protected your PC": Click "More info" Click "Run anyway" Using the App Main Window - Event Logger Displays real-time events from your HC3: Timestamp - When the event occurred Event Type - Type of event (device change, scene trigger, etc.) Source ID - Device or scene that triggered the event Details - Event-specific information HC3 System Info Window Access from Window → HC3 System Info menu to view: System information (version, serial number, platform) Z-Wave and Zigbee configuration Settings (timezone, temperature unit, language) Sun times (sunrise/sunset) Available updates Automatic Updates The app includes automatic update functionality: Click Window → Check for Updates... to manually check for new versions When an update is available, you'll see a dialog with release notes Click "Update" to automatically download and install the latest version The app will restart automatically after the update is installed All updates are cryptographically signed for security Troubleshooting App shows "Credentials Not Configured" Make sure you created the .env file with correct credentials Check the file is in the correct location (home directory for macOS: ~/.env, user folder for Windows: %USERPROFILE%\.env) Verify the file is named exactly .env (not .env.txt) Restart the application after creating/modifying .env Enable DevTools to see credential loading logs: Press Cmd+Shift+I (macOS) or Ctrl+Shift+I (Windows), or use Window → Toggle Developer Tools menu Cannot connect to HC3 Verify your HC3 IP address is correct Check your computer is on the same network as HC3 Test by opening http://YOUR_HC3_IP in a browser Verify username and password are correct Click the connection status indicator to retry the connection Check DevTools console (Cmd/Ctrl+Shift+I) for detailed error messages Using Developer Tools For debugging issues, you can open the Developer Tools: Press Cmd+Shift+I (macOS) or Ctrl+Shift+I (Windows) Or select Window → Toggle Developer Tools from the menu The Console tab shows credential loading status and connection errors Look for messages about .env file location and what credentials were loaded Press the same shortcut again to close DevTools Updates If automatic update check fails, you can always download the latest version manually from GitHub Updates require an internet connection to check and download The app will notify you when a new version is available Security & Privacy Your credentials are stored locally on your computer only No data is sent to external servers The app connects directly to your HC3 on your local network Keep your .env file secure (same as any password file) System Requirements macOS: macOS 10.15 (Catalina) or later, Apple Silicon or Intel processor Windows: Windows 10 or later, 64-bit processor Support: Report issues at github.com/jangabrielsson/EventLogger/issues GitHub: github.com/jangabrielsson/EventLogger

- 23 replies
-
- 3
-
-
- quickapp
- development
- (and 1 more)
-
This QuickApp gets your energy consumption and production data from Tibber Live. This QuickApp can be used in combination with the Tibber Monitor to get the Tibber Prices. Based on the Fibaro WebSockets/GraphQL demo by Peter Gebruers If you use Tibber for your Energy Panel, you can use this Tibber Live QuickApp for your energy consumption and production combined with the Tibber Monitor QuickApp to provide the Energy Panel with the hourly prices. Main device with positive or negative actual power consumption Child devices are available for: power (Actual consumption with maxPower in log text) powerProduction (Actual production with maxPowerProduction in log text) accumulatedConsumption (Todays consumption, also the child device for the Energy Panel) accumulatedProduction (Todays production) accumulatedCost (Todays cost) Accumulated Reward (Todays reward for energy production) Net Profit (Todays reward for energy production minus todays cost for energy consumption) accumulatedConsumptionLastHour (Consumed since since last hour shift) accumulatedProductionLastHour (Produced since last hour shift) lastMeterConsumption (Total consumption) lastMeterProduction (Total production) voltagePhase1 voltagePhase2 voltagePhase3 currentL1 currentL2 currentL3 Available information: power (Consumption at the moment (Watt)) maxPower (Peak consumption since midnight (Watt)) powerProduction (Net production (A-) at the moment (Watt)) maxPowerProduction (Max net production since midnight (Watt)) accumulatedConsumption (kWh consumed since midnight) accumulatedProduction (net kWh produced since midnight) accumulatedCost (Accumulated cost since midnight; requires active Tibber power deal) currency (Currency of displayed cost; requires active Tibber power deal) lastMeterConsumption (Last meter active import register state (kWh)) lastMeterProduction (Last meter active export register state (kWh)) voltagePhase1 (Voltage on phase 1) * voltagePhase2 (Voltage on phase 2) * voltagePhase3 (Voltage on phase 3) * currentL1 (Current on L1) * currentL2 (Current on L2) * currentL3 (Current on L3) * accumulatedConsumptionLastHour (kWh consumed since since last hour shift) accumulatedProductionLastHour (net kWh produced since last hour shift) accumulatedReward (Accumulated reward since midnight; requires active Tibber power deal) minPower (Min consumption since midnight (Watt)) averagePower (Average consumption since midnight (Watt)) powerReactive (Reactive consumption (Q+) at the moment (kVAr)) * powerProductionReactive (Net reactive production (Q-) at the moment (kVAr)) * minPowerProduction (Min net production since midnight (Watt)) maxPowerProduction (Max net production since midnight (Watt)) powerFactor (Power factor (active power / apparent power)) * signalStrength (Device signal strength (Pulse - dB; Watty - percent)) * timestamp (Timestamp when usage occurred) * on Kaifa and Aidon meters the value is not part of every HAN data frame therefore the value is null at timestamps with second value other than 0, 10, 20, 30, 40, 50. There can be other deviations based on concrete meter firmware. In this QuickApp "null" values are replaced by their previous values. To communicate with the API you need to acquire a OAuth access token and pass this along with every request passed to the server. A Personal Access Token give you access to your data and your data only. This is ideal for DIY people that want to leverage the Tibber platform to extend the smartness of their home. Such a token can be acquired here: https://developer.tibber.com When creating your access token or OAuth client you’ll be asked which scopes you want the access token to be associated with. These scopes tells the API which data and operations the client is allowed to perform on the user’s behalf. The scopes your app requires depend on the type of data it is trying to request. If you for example need access to user information you add the USER scope. If information about the user's homes is needed you add the appropriate HOME scopes. If you have more than one home in your subscription, you need to fill in your home number the change between your homes. If the Tibber server disconnects the webSocket, the QuickApp wil do a re-connect for the amount in the QuickApp variable reconnect. If the re-connect fails for that amount, there will be a timeout for the seconds in the QuickApp variable timeout. Use this QuickApp at your own risk. You are responsible for ensuring that the information provided via this QuickApp do not contain errors. Tibber is a registered trademark being the property of TIBBER. TIBBER reserves all rights to the registered trademarks. Information which is published on TIBBER’s websites belongs to TIBBER or is used with the permission of the rights holder. Making of copies, presentations, distribution, display or any other transfer of the information on the website to the public is, except for strictly private use, prohibited unless done with the consent of TIBBER. Published material on dedicated TIBBER press websites, intended for public use, is exempt from the consent requirement. Also see: https://tibber.com/en/legal-notice Guide Communicating with the Tibber API: https://developer.tibber.com/docs/guides/calling-api Tibber API Explorer: https://developer.tibber.com/explorer Tibber gitHub: https://github.com/tibber Tibber SDK NET: https://github.com/tibber/Tibber.SDK.NET/tree/master/src/Tibber.Sdk Fibaro webSocket manual: https://manuals.fibaro.com/knowledge-base-browse/hc3-quick-apps-websocket-client/ Fibaro Forum - Headers in webSocket: https://forum.fibaro.com/topic/60307-added-support-for-headers-in-websocket-connections-any-documentation WebSocket++ Documentation: https://docs.websocketpp.org GraphQL over WebSocket Protocol: https://github.com/enisdenjo/graphql-ws/blob/master/PROTOCOL.md GraphQL query language: https://spec.graphql.org/June2018/#sec-Language Version 4.0 (3rd January 2025) Added child for Accumulated Reward (todays reward for energy production). Added child for Net Profit (todays reward for energy production minus todays cost for energy consumption). Added more functions to fully disable the quickapp. If the QuickApp is disabled by the user, now also the buttons and fibaro calls are disabled. Added buttons to disconnect and connect webSocket session. Changed the behaviour of connecting to the Tibber WebSocket. After the maximum reconnects (10), the QuickApp disconnects and sends a notification to the Tibber iOS or Android app. The Tibber user gets better informed and can take action. Removed the reconnect QuickApp variable, not necessary to get changed by the Tibber user, it is now hardcoded (and the value is still 10 reconnects). Added check if realtime consumption (Tibber Pulse is working) is enabled at startup of the QuickApp and when reconnecting the QuickApp. If the Tibber Pulse is not available, not working, then the QuickApp will go in disconnected status and in the labels the Tibber user can see the reason. Added Net Profit (todays reward for energy production minus todays cost for energy consumption) to the labels. Placed the average power consumption (Watt) more prominent in the labels. Added Tibber Server responses to the labels (they were already in de debuglogging) so the Tibber users gets better informed about the connection status. Added the check for a new QuickApp version. The user gets notified in the Fibaro Notifications of the new QuickApp with the changelog. Changed the debuglevels a bit, so you can see the connection statusses already in debuglevel 2. Changed QuickApp variabels 'token' and 'homeId' to secret (stored encrypted) so they cannot get shown or published unintentionally. Added dynamic Tibber Live webSocket URL (at startup the QuickApp gets the current webSocket URL), so the QuickApp is future proof in case the WebSocket URL gets changed. Removed both simulation modes (debugLevel 4 and 5). Version 3.0 (8th March 2023) Removed Tibber old Websocket code Prepared, not enabled: Check home.features.realTimeConsumptionEnabled has a true value always before reconnecting Prepared, not enabled: Added button to disconnect or re-connect the Tibber webSocket Prepared: Added quickapp variable homeNr (most of the time 1) to be able to check the response realTimeConsumptionEnabled Version 2.3 (beta 8th December 2022) Improved the 60 seconds interval child devices update, it now never skips a beat Added translation for English (en), Dutch (nl), Swedish (se), Norwegian (no) Changed the json response for the debugLevel=4 Offline Simulation mode, the date/time format was wrong Added random (jitter) reconnection handleDisconnected and handleError between 10 and 15 seconds Added random (jitter) reconnection interval handleDisconnected and handleError plus between 1 and 10 seconds Added exponential backoff (increasing delay) between each timeout. The increase is limited to 10 times the value in the quickapp reconnect variable. Version 2.2 (20th November 2022) Changed to new Tibber webSocket requirements, required from December 2022 Version 2.1 (15th October 2022) Child devices are now updated every (whole) minute to reduce CPU load Replaced zero values for Voltage L1 L2 L3 with the previous value Version 2.0 (5th August 2022) Added two child devices, Hourly Consumption and Hourly Production Added re-connect routine to handleError. If an Tibber error occurs, the QuickApp will try to re-connect. Thanks @JcBorgs for testing. Improved routine to handle Tibber null values. Thanks @Darquan for testing. Changed labels a bit to save some space Changed "volt" and "amp" text in the labels. Thanks @Morten22 for mentioning. Changed kWh device types from com.fibaro.electricMeter to com.fibaro.energyMeter Version 1.0 (19th June 2022) Initial webSocket version Tibber Live Thanks @JcBorgs for testing all beta versions and great suggestion to improve the quickapp Based on the Fibaro WebSockets/GraphQL demo by @petergebruers Variables (mandatory and created automatically): token = Authorization token (see the Tibber website: https://developer.tibber.com) homeId = Tibber Home ID (see the Tibber website: https://developer.tibber.com) homeNr = Tibber home (nodes) number if you have more than one home (default = 1) language = Preferred language (default = en) (supported languages are English (en), Swedisch (se), Norwegian (no) and Dutch (nl)) reconnect = Amount of re-connects after disconnect from Tibber server (default = 10) timeout = Pause after maximum amount of re-connects (default = 300 seconds) debugLevel = Number 1=some, 2=few, 3=all (default = 1) Fibaro Firmware: Minimal version 5.111.48 (beta) Download the QuickApp here: Tibber_Live-40.fqax Or from the Fibaro Marketplace: https://marketplace.fibaro.com/items/tibber-live How to install: Open the Configuration Interface Go to Settings > Devices Click + Choose Other Device Choose Upload File Choose file from your computer with .fqax (And enter your Token and Home ID in the quickapp variables)
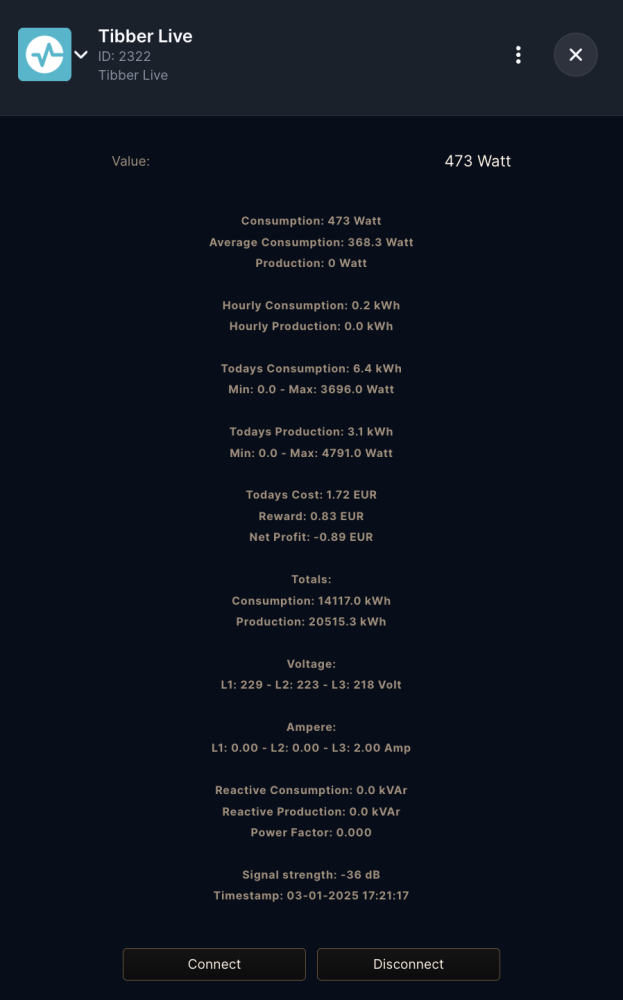
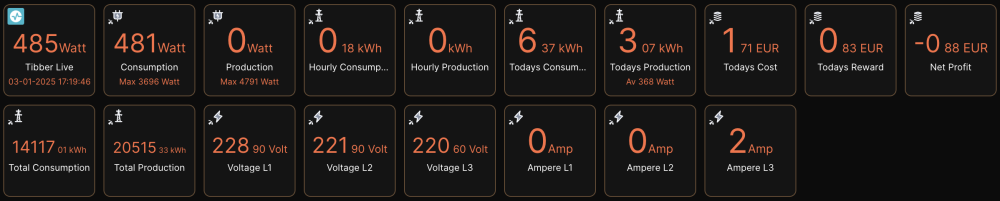
-
This QuickApp monitors your Solax managed Solar Panels The QuickApp has (child) devices for Solarpower/m², Today production, Total production, Total Power to Grid, Total Energy to Grid, Energy from Grid, Total Power/m², Battery Energy, AC Power R, AC Power S, AC Power T, Battery Power, Power DC1, Power DC2, Power DC3 and Power DC4 The rateType interface of child device Today Energy is automatically set to "production" The readings from the child device Today Energy will be shown in the new energy panel The readings from the child device Total Energy is automatically set to the right Wh unit (Wh, kWh, MWh or GWh) See API documentation on https://www.eu.solaxcloud.com/phoebus/resource/files/userGuide/Solax_API_for_End-user_V1.0.pdf User can get a specific range of information through the granted tokenID. Please obtain your tokenID on the API page of Solaxcloud for free. The tokenID can be used to obtain real-time data of your inverter system. The obtain frequency need to be lower than 10 times/min and 10,000 times/day. Version 3.0 (19th February 2023) Changed the descriptions of the Solax Cloud values Converted the feedinpower value from positive to negative or from negative to positive Added translation for English, Dutch and Portugese Added child device for consumeenergy Version 2.1 (4th December 2022) Prevented almost empty responses like these: {"success":false,"exception":"Query success!","result":"this sn did not access!"} Added log text to main device if no data from Solax Cloud Version 2.0 (16th April 2022) Added Child Devices for feedinpower, feedinenergy, consumeenergy, feedinpowerM2, soc, peps1, peps2, peps3, batPower, powerdc1, powerdc2, powerdc3, powerdc4 Added all values returned from the Solax Cloud to the labels Changed all the device types to the most current ones Changed the handling of bad responses from the Solax Cloud Replaced null values in responses with 0.0 Optimized some code Version 1.0 (17th November 2021) Tested, ready for release Version 0.2 (15th November 2021) Changed json response Version 0.1 (13th November 2021) First (test) version Variables (mandatory): tokenId = token ID of your Solax Inverter, obtain your tokenID on the API page of Solaxcloud for free inverterSN = Unique identifier (Serial No.) of your Solax inverter solarM2 = The amount of m2 Solar Panels (use . for decimals) for calculating Solar Power m² (default = 0) interval = The default is 300 seconds (5 minutes), the daily API limitation is maximum 10 times/min and 10,000 times/day debugLevel = Number (1=some, 2=few, 3=all, 4=simulation mode) (default = 1) API items: Description (Accuracy) (Unit) inverterSN: Unique identifier of inverter (Serial No.) sn: Unique identifier of communication module (Registration No.) acpower: Inverter.AC.power.total (1) (W) yieldtoday: Inverter.AC.energy.out.daily (0.1) (KWh) yieldtotal: Inverter.AC.energy.out.total (0.1) (KWh) feedinpower: Grid.power.total (1) (W) feedinenergy: Grid.energy.toGrid.total (0.01) (KWh) consumeenergy: Grid.energy.fromGrid.total (0.01) (KWh) feedinpowerM2: Inverter.Meter2.AC.power.total (1) (W) soc: inverter.DC.battery.energy.SOC (1) (%) peps1: Inverter.AC.EPS.power.R (1) (W) peps2: Inverter.AC.EPS.power.S (1) (W) peps3: Inverter.AC.EPS.power.T (1) (W) inverterType: Inverter type, details refer to Table 4 in appendix inverterStatus: Inverter status, details refer to Table 5 in appendix uploadTime: Update time (format 2016-10-26 17:33:01) batPower: Inverter.DC.Battery.power.total (1) (W) powerdc1: Inverter.DC.PV.power.MPPT1 (1) (W) powerdc2: Inverter.DC.PV.power.MPPT2 (1) (W) powerdc3: Inverter.DC.PV.power.MPPT3 (1) (W) powerdc4: Inverter.DC.PV.power.MPPT4 (1) (W) Download the QuickApp here (download the file and un-zip): https://github.com/GitHub4Eddy/solax_monitor/archive/refs/tags/solax-monitor-30.zip or from the Fibaro Marketplace: https://marketplace.fibaro.com/items/solax-monitor How to install: Open the Configuration Interface Go to Settings > Devices Click + Choose Other Device Choose Upload File Choose file from your computer with .fqa


-
Generic Fibaro HC3 Alarm system Hi Luabuilder Sharing is Caring I have see a lot of talk using Fibaro HC3 for Alarm system. I love the idea - i want that, so i tried to describe what a Generic Alarm system should be build of. Several people already tipped in with things they made og thoughts they have, issues they identified. Why invent the wheel when great tuff already has been made. @jgab has created the EventRunner4 and ChildrenOfHUE - All-in-one QA framework for HC3 - this can be used for arming and disarming the alarm - An example is provided here @10derand @JcBorgs described issue about HC3 is missing the "disable alarmExclude" - a “pre-check” for sensors before arming ALARM is needed What a good way to solve this - I way thinking of enhancing the doorstatus QA (below) ? And @FBerges already shared his version of an alarm system @Mateo created a Siren Quick APP And probably many more worked on their own solution to create a ALARM SYSTEM. Please tip IN if there is elementary features ? - that is missing for a generic HC3 Alarm! How would you structure this? ? - ONE Quick APP with everything, Variable for customising? or a QA with Scenes and Eventrunner4? Another useful idea that could be used, is the status for open windows and doors. This QA changes the Color in the matrix Bulb when a door or windows is opened. Doorstatus.fqa @10der learned me about getting the sensor possibilities with print(json.encode((api.get("/devices/hierarchy")))) com.fibaro.windowSensor com.fibaro.doorWindowSensor com.fibaro.doorSensor Perhaps some of the forum experts could create some overall structure and point the learners in right direction? ? ? Desired Functionality In case of alarm not armed Geofence • Ongoing control - have all users left the house? Message on Telephone (s) that the house is empty and the alarm is not active For ARMING the Alarm • Message on Telephone (s) about which windows are not closed. Message format Section, room, Sensor Message on Telephone (s) about which doors are not closed Message format Section, room, Sensor Message on Phone (s) When alarm is active and which Zone. Message could be Fibaro APP push, or Telegram Delay to get out the door Use a Keypad like Matrix for ARM - ala triple cut on one button and subsequently double click on another. This feature is already made by @Jgab in Eventrunner4 Use Fibaro APP for ARM LED/Bulb for show Status ARMED – I will probably use MATRIX ZDB LED in the perimeter to changes to RED By Disarm the Alarm Message on Phone (s) alarm is deactivated and if other Zones are active LED/Bulb for show Status DisARMED – I will probably use MATRIX ZDB LED in the perimeter to changes to GREEN, but could be a HUE Bulb Use Matrix for DisARM - like triple cut on one button and subsequently double click on another. This feature is already made by @jgab in Eventrunner4 Use Fibaro APP for DisARM For Alarm ACTIVE Internal sirens are triggered External sirens are triggered Light with alarm status, flashes 1 Hz SONOS speech - sound. Could be by using the Quick App - Sonos Zone Controller Message on Telephone about which device has triggered alarm - Section, room, Sensor
-
Note my newest effort is now Plua, <here>. HC3Emu is a Lua-based emulator designed to simulate the Fibaro Home Center 3 QuickApp runtime environment. It allows developers to code and test QuickApps offline before deploying them to a physical HC3 controller. I prefer to develop my QuickApps "offline" using popular IDEs like Visual Studio Code or ZeroBrane Studio. I have thus created "emulators" that emulates the Lua environment that is available on the HC3, with all the fibaro.* functions etc. This is my last attempt to put together all my past experiences and create a portable “emulator” with just the basics. The idea is that you can add any IDE-specific tools outside the emulator base. (This video is for the older "hc3emu" and has some changes when it comes header directives in the QA file) The new "workflow" (This video is for the older "hc3emu" and has some changes when it comes header directives in the QA file) It is provided as a "rock" and installed with >luarocks install hc3emu2 It's only the luarocks package that is named hc3emu2, as it it's the second rewrite of the emulator. It's still referred to as hc3emu in code and examples- To use this you need a properly installed lua, together with a working installed luarocks. 1. Properly installed lua means that lua must be installed to be generally available in your system. Sometimes lua is provided together with other programs like ZeroBrane, but then it's only available for ZeroBrane and not other programs. 2. Working luarocks menas that luarocks should be able to compile C libraries. For MacOS and Linux that is generally not a problem and work by default. On Windows it's a bit trickier and usually requires installation of gcc (mingw) See Windows installation tips below. If luarocks is working it will take care of installing additional lua libraries that hc3emu depends on. It’s also a great way to install new versions as I release them (just install again). If you install Lua libraries by hand, the trickiest parts are to install the ones that hc3emu needs. luasec, usually depends on a system native openssl library to be installed. luasocket If successful it is used like this: --%%name=MyQuickApp # Name of the QuickApp --%%type=com.fibaro.binarySwitch # Device type --%%proxy=true # Create HC3 proxy (named MyQuickAppProxy) --%%var=foo:config.secret # Set QuickApp variable (from config file) --%%debug=api:true # Configure a debug flag --%%file=lib.lua:lib # Include external file --%%save=MyQA.fqa # Save as FQA file when running function QuickApp:onInit() self:debug(self.name,self.id) end I’ve tested it in ZeroBrane and VSCode. For VSCode, it uses the “Lua MobDebug adapter” currently since it currently since it seems to works best. There are a number of different lua debugers for vscode and all of them work with some tweaking and all of them have some trade-offs - MobDebug is still my favorite. The source code and some examples are available in my GitHub repo: https://github.com/jangabrielsson/hc3emu2. However you should not need to clone the repo. For VSCode you need a .vscode/launch.json and .vscode/tasks.json in your workspace to correctly start running and debugging your QA. They are also available in the repo, but is preferable installed by installing the VSCode extension "Hc3Emu Helper". With that extension active you will get a "hc3emu2: Current file" launch option to run your QA. When running the emulator it reads configuration if available from home directory ~/.hc3emu.lua and project/workspace directory ./hc3emu.lua if available. The minimum is to provide hc3 credentials. Ex. ~/.hc3emu.lua return { user="admin", password="admin42", url="http://192.168.1.57/" } Key Features Most of the lua functions available in the HC3 QuickApp lua environment fibaro.* hub.* (same as fibaro.*) QuickApp, QuickAppChild, class api.get, api.put, api.post. api.delete json.encode, json.decode plugin.* setTimeout, clearTimeout setInterval, clearInterval net.HTTPClient net.TCPSocket net.UDPSocket net.WebSocketClient net.WebSocketClientTls mqtt.* RefreshStatesSubscriber Can automatically deploy proxy QA on HC3 for developing and testing UI. Also useful if other QAs on the HC3 sends commands to your QA you develop... Supports QAs with multiple files Supports saving the QA to a .fqa file Missing WebSocket has minor some issues - it will not automatically ping to keep an idle socket open. What will happen is that after ~20s of no traffic a server will close the socket. Can sometimes be solved with explicit pinging if protocol allows. On the other hand, your QA should be able to deal with server closing socket and open the socket again... Credentials Install a file named .hc3emu.lua, in your home directory, or workspace folder. If it's in your home directory it is shared between all workspaces. It should have the content return { user = "admin", url = "http://192.168.1.57/", password = "admin!", Hue_user = "AqlHjZVlyhskdhfsdkfhksdhfg0zitdckmn9", Hue_ip = "192.168.1.153" } The user/password/url will be used to access the HC3. In this example we add two more credentials for accessing a Hue hub. We can then in our QA code create QuickAppVariables with those values --%%var=HueUser:config.Hue_user --%%var=HueIP:config.Hue_ip This way we don't have to have our credentials in out QA course code and accidentally share it with others... Header directives --%%type=<type> - Type of the QA, ex. --%%type=com.fibaro.binarySwitch --%%name=<name> - Name of the QA, ex. --%%name=My QuickApp --%%proxy=<true|false> - Make this device a proxy device --%%proxy_new=<true|false> - Recreate proxy if exists? Default false --%%proxy_set_ui=<true|false> - Set UI for the proxy device at every startup? Default false --%%state=<tag> - Tag for the state file, ex. --%%state=MyQAState --%%time=<time> - Start time for the emulator, ex. --%%time=2027/10/10/12:00:00 --%%speed=<time> - Hours to speed the emulator, ex. --%%speed=24*7 -- speed for 1 week --%%offline=<true|false> - Run in offline mode, ex. --%%offline=true --%%logui=<true|false> - Log proxy's current UI at startup, ex. --%%logui=true --%%webui=<true|false> - Enable emulated web UI for the QA, ex. --%%webui=true --%%uid=<string> - uid property of the QA, ex. --%%uid=12345678-1234-5678-1234-567812345678 --%%manufacturer=<string> - Manufacturer property of the QA, ex. --%%manufacturer=MyCompany --%%model=<string> - Model property of the QA, ex. --%%model=MyModel --%%role=<string> - Device role of the QA, ex. --%%role=Light --%%description=<string> - Description property of the QA, ex. --%%description=My QuickApp --%%latitude=<number> - Latitude of the system, ex. --%%latitude=59.3293 --%%longitude=<number> - Longitude of the system, ex. --%%longitude=18.0686 --%%temp=<path> - Path to the temporary directory, ex. --%%temp=/tmp/hc3emu --%%nodebug=<true|false> - Disable debugging, ex. --%%nodebug=true --%%norun=<true|false> - Load but do not run the QuickApp, ex. --%%norun=true --%%silent=<true|false> - Do not print debug messages, ex. --%%silent=true --%%breakOnLoad=<true|false> - Break on first line when loading the QuickApp, ex. --%%breakOnLoad=true --%%breakOnInit=<true|false> - Break on first line of QuickApp:onInit(), ex. --%%breakOnInit=true --%%save=<path> - Save the QA as a .fqa when running, ex. --%%save=myQA.fqa --%%nodir=<true|false> - Do not create emu directory, ex. --%%nodir=true --%%conceal=<true|false> - Conceal quickApp variables when saving QA, ex. --%%conceal=password:"Set this to the password" --%%condensedLog=<true|false> - Use condensed log format, ex. --%%condensedLog=true --%%pport=<number> - Port for the proxy, ex. --%%pport=8265 --%%wport=<number> - Port for the web server, ex. --%%wport=8266 --%%hport=<number> - Port for the help server, ex. --%%hport=8267 --%%dport=<number> - Port for the debugger, ex. --%%dport=8172 --%%hip=<ip> - IP for the help server, ex. --%%hip=127.0.0.1 --%%url=<url> - URL for the HC3, ex. --%%url=http://192.168.1.57/ --%%user=<user> - User for the HC3, ex. --%%user=admin --%%pwd=<password> - Password for the HC3, ex. --%%pwd=admin --%%pin=<pin> - PIN for the HC3, ex. --%%pin=1234 --%%u=<table> - Add UI element to the QuickApp, ex. --%%u={button="btn1",text="Click me",onReleased="myFunction"} --%%debug=<flags> - Set debug flags, ex. --%%debug=system:true,api:true,onAction:true --%%file=<path,method> - Add file to the QuickApp, ex. --%%file=./myfile.lua,init --%%var=<name:value> - Add variable to the QuickApp, ex. --%%var=MyVar:"MyValue" --%%install=<user,pass,url> - Install the QuickApp on the HC3, ex. --%%install=admin,admin,http://192.168.1.57/ List of debug flags system=<boolean> --System debug (combined) api=<boolean> --Log API errors device=<boolean> --Device lifecycle debug http=<boolean> --log HTTP requests timer=<boolean> --Timer operations time=<boolean> --Time operations onAction=<boolean> --Log onAction calls onUIEvent=<boolean> --Log onUIEvent calls notrace=<boolean> --No trace log rawrefresh=<boolean> --Raw refresh log refresh=<boolean> --Refresh log warn=<boolean> --Warning log server=<boolean> --Server log web=<boolean> --Web server log Installation tips When using luarocks from within Zerobrane you must run a separate (system) installed lua interpreter. When interpreter is selected from within Zerobrane (Project -> Lua interpreter -> ...) it will use per default lua interpreters that come bundled with Zerobrane and sometimes they are compiled in a way that they don't like binary libraries compiled by other systems like luarocks. On MacOS that can be ex. x86 vs arm binaries. The builtin Lua interpreter also uses old bundled Lua libraries not compatible with hc3emu. To make zerobrane use your own installed lua 5.4 do, Preferences -> Settings: System, and set path.lua54 = "/opt/homebrew/bin/lua" In my case I have installed lua 5.4 in /opt/homebrew/bin/lua, but you may have installed it somewhere else.. This way, luarocks will install libraries that will be used by the right lua. For vscode, the normal behavior is that the plugin use the system installed lua. When managed to install the hc3emu luarock without errors, it's time to setup the environment. The easiest way to generate the necessary configuration setup is to run a small QA that looks like --%%install=<user>,<password>,<HC3 url> Ex. --%%install=admin,myPassword!,http://192.168.1.57 It will generate a config file ~/-hc3emu.json in your home directory with the user, password and url parameters set. (Don't forget to remove the --%%install line or QA afterward so you don't have your credentials visible in your code...) Specific installation tips For Visual Studio Code Hc3Emu Helper extension for VSCode For ZeroBrane Studio Windows 11 and WSL Windows 11 native Visual Studio Code Dev Container (Only need to install VSCode and Docker) Other information Tips & tricks Using proxy device Working with QuickAppChild devices Debugging tips Implementation details

- 285 replies
-
- 5
-
-
- development
- zerobrane
- (and 2 more)
-
This QuickApp gives access to real-time and 5-day forecast pollen count and risk category for grass pollen, mold spores, ragweed pollen and tree pollen of any location from AccuWeather.com Pollen is a fine powder produced by trees and plants Pollen can severely affect people, especially those with different ailments such as asthma and respiratory issues. It can aggravate these existing conditions or cause these issues in high risk groups Grass Pollen: Pollen grains from grasses Mold Spores: The fungus produces spores that can become airborne Radweed Pollen: Ragweeds are annual and perennial herbs and shrubs. A single plant may produce about a billion grains of pollen per season. Tree Pollen: Pollen from trees such as Birch and Oak The QuickApp provides a risk evaluation with levels in particles/m³ Grass Pollen Risk Begin Range End Range Low 0 4.99 Moderate 5 19.99 High 20 199.99 Very High 200 299.99 Extreme 300 1000000 Mold Spores Risk Begin Range End Range Low 0 6499.99 Moderate 6500 12999.99 High 13000 49999.99 Very High 50000 64999.99 Extreme 65000 1000000 Ragweed Pollen Risk Begin Range End Range Low 0 9.99 Moderate 10 49.99 High 50 499.99 Very High 500 649.99 Extreme 650 1000000 Tree Pollen Risk Begin Range End Range Low 0 14.99 Moderate 15 89.99 High 90 1499.99 Very High 1500 2999.99 Extreme 3000 1000000 IMPORTANT You need an API key from https://developer.accuweather.com The API is free up to 50 API calls/day, one key Variables (mandatory): apiKey = Get your free API key from AccuWeather locationKey = AccuWeather number from your HC3 Lon/Lat interval = [number] in seconds time to get the data from the API timeout = [number] in seconds for http timeout debugLevel = Number (1=some, 2=few, 3=all, 4=simulation mode) (default = 1) icon = [numbber] User defined icon number (add the icon via an other device and lookup the number)


- 15 replies
-
- 6
-
-
- accuweather
- download
- (and 5 more)
-
Note, my newest emulator that works in vscode is here This setup is designed for QA development using Visual Studio Code (VSCode). It includes an emulator, allowing you to run and debug QAs directly in VSCode. This setup is compatible with HC3, offering features such as code completion, syntax highlighting, and workflow tasks for downloading, editing, packaging, and uploading QAs to/from HC3. Tested on Windows 11 and MacOS, this setup should also work on Linux. You can download the repository from here. Documentation, still in progress, is available here. Additionally, there's a video tutorial on installing this setup on Windows 11. The setup in VSCode looks as shown in the image. This configuration allows you to develop and run a QuickApp (QA) offline on your PC, Mac, or Linux system, and interact with the HC3 in a controlled manner. There's also a simple Web user interface for interacting with the QAs and monitoring events (available at http://127.0.0.1:5004/frontend) To get started: Install Python 3 on your machine. NOTE! Only Python v3.11 and 3.12 is supported. in settings.json set "fibpython":".venv/bin/python", fibpython should point to your executable python. In the example it points to a python venv in the workspace, but it could point anywhere you have installed python. There is a settings.templ provided as a base for your own settings.json (should be in the .vscode directory) To test if the installation is ok , in the vscode terminal window, type what you set the fibpython path to. ex: .venv/bin/python and see if it works. Install the required Python libraries from requirements.txt using >pip install -r requirements.txt. Make sure they install for the python interpreter that is pointed out by fibpython. Create a config.json file with credentials to access the HC3, based on the config.json.example. Install the VSCode extension "Local Lua Debugger" by Tom Blind. Create a QA file in the directory, choose the launcher "Fibenv QA file (remote)," and start debugging with F5. For more examples, refer to the files in the examples/ directory. The included .gitignore file excludes the ./dev and ./test subdirectories, allowing you to test your own code without affecting the rest of the repository. For installing Python libraries, it's recommended to create a virtual environment in the folder first. This setup includes a Python wrapper for the Lua runtime (Lupa), addressing dependencies on luasocket and others, eliminating the need for Lua installation on your machine. To instruct the emulator about the type of QA, directives similar to TQAE can be used in the QA file, but with slight differences, as shown in the example. Ex. --%%name=MyQA --%%type=com.fibaro.binarySwitch --%%file=qa3_1.lua,extra; --%%remote=devices:788,790 --%%remote=globalVariables:myVar,anotherVar --%%debug=libraryfiles:false,userfilefiles:false function QuickApp:onInit() self:debug(self.name,self.type,self.id) fibaro.call(788,"turnOn") end Note the --%%remote directive It instructs the emulator that it's ok to call device 788,789 o the HC3. As a default, the emulator treats all resources as local (we can read from HC3 but then treat them as local copies) and we enable resources we want to interact with on the HC3 as 'remote'. This goes for other resources also like 'globalVariables'. The setup integrates with the Lua debugger, allowing for breakpoint setting and more. Note that this project is still in progress, and updates will be provided as improvements are made. The emulator UI can be accessed at http://127.0.0.1:5004/, with a Swagger page for implemented APIs at http://127.0.0.1:5004/docs. The port (5004) can be changed as needed. Supported APIs include various fibaro and net functions, along with api calls and plugin functions. The setup also includes classes for QuickApp development and management. Supported APIs fibaro.debug(tag,str) fibaro.warning(tag,str) fibaro.trace(tag,str) fibaro.error(tag,str) fibaro.call(deviceID, actionName, ...) fibaro.getType(deviceID) fibaro.getValue(deviceID, propertyName) fibaro.getName(deviceID) fibaro.get(deviceID,propertyName) fibaro.getGlobalVariable(varName) fibaro.setGlobalVariable(varName ,value) fibaro.getRoomName(roomID) fibaro.getRoomID(deviceID) fibaro.getRoomNameByDeviceID(deviceID) fibaro.getSectionID(deviceID) fibaro.getIds(devices) fibaro.getAllDeviceIds() fibaro.getDevicesID(filter) fibaro.scene(action, sceneIDs) fibaro.profile(profile_id, action) fibaro.callGroupAction(action,args) fibaro.alert(alert_type, user_ids, notification_content) fibaro.alarm(partition_id, action) fibaro.setTimeout(ms, func) fibaro.clearTimeout(ref) fibaro.setInterval(ms, func) fibaro.clearInterval(ref) fibaro.emitCustomEvent(name) fibaro.wakeUpDeadDevice(deviceID) fibaro.sleep(ms) ...and corresponding hub.* functions net.HTTPClient() net.TCPSocket() net.UDPSocket() net.WebSocketClient() net.WebSocketClientTLS() --mqtt.Client.connect(uri, options) --no yet --<mqttclient>:addEventListener(message,handler) --no yet --<mqttclient>:subscribe(topic, options) --no yet --<mqttclient>:unsubscribe(topics, options) --no yet --<mqttclient>:publish(topic, payload, options) --no yet --<mqttclient>::disconnect(options) --no yet api.get(call) api.put(call <, data>) api.post(call <, data>) api.delete(call <, data>) setTimeout(func, ms) clearTimeout(ref) setInterval(func, ms) clearInterval(ref) json.encode(expr) json.decode(string) plugin.mainDeviceId ---plugin.deleteDevice(deviceId) --not yet plugin.restart(deviceId) plugin.getProperty(id,prop) plugin.getChildDevices(id) plugin.createChildDevice(prop) class QuickAppBase class QuickApp class QuickAppChild class RefreshStateSubscriber class <name> property(get,set) QuickApp:onInit() -- called at startup if defined QuickApp - self:setVariable(name,value) QuickApp - self:getVariable(name) QuickApp - self:debug(...) QuickApp - self:trace(...) QuickApp - self:warning(...) QuickApp - self:error(...) QuickApp - self:updateView(elm,type,value) QuickApp - self:updateProperty(name,value) QuickApp - self:createChildDevice(props,device) QuickApp - self:removeChildDevice(id) QuickApp - self:initChildDevices(table) QuickApp - self:isTypeOf(typ) QuickApp - self:callAction(name, ...) QuickApp - self:setName(name) QuickApp - self:setEnabled(bool) QuickApp - self:setVisible(bool) getHierarchy() For your own QA development have the repo 'fibemu' downloaded in a separate directory. Then create your own vscode development directory, and initialise that as a git repo if you want. With that open, do File->Add Folder to Workspace, and add the fibemu folder. This is what Vscode calls a "multi-root" workspace and it. Create a lua (QuickApp file) in your directory. First line in your QuickApp file should be the offset to your directory --%%root=../<name of your dir>/ So if you have a multi-root workspace now that looks like o fibemu o myDirectory You set the root to ../myDirectory/ Then press F5 to start to debug. The launch commands and other will be taken from the fibemu folder. This way you can pull down new version of fibemu without messing up your own directory and development. Also, don't forget to setup your config.json with credentials (copy from fibemu/config.json.example) Here is a link to the multi-project setup instructions (may include a video in the future) Implementation Some implementation notes. Supported REST APIs. Workflow There are some defined vscode Tasks that help in remotely uploading and updating the QA on the HC3 from within the vscode environment "QA, download fqa" downloads an QA from the HC3 and saves it as a .fqa file. The task will prompt for deviceID and path where to store. The path/dir needs to exist "QA, download and unpack" downloads an QA from the HC3 and saves all QA files as .lua files. It also adds fibemu headers in the main file so it can be opened and run with the emulator . The task will prompt for deviceId and path where to store. The path/dir needs to exist "QA, upload" will upload the QA to the HC3. It will prompt for QA file. If '.' is given as argument it will upload the current opened file. This will create a new QA, with a new deviceId on the HC3. "QA, update" will try to update QA files, viewLayout, uiCallbacks, and quickAppVariables of an existing QA on the HC3. If '.' is given as argument the file must have set the fibemu header --%%id=<ID> so it knows what QA to update. One can also give the deviceId of the QA on the HC3 that should be updated. This is convenient when developing and avoiding new IDs being "consumed". Sometimes when you update a QA you would not like to update the quickAppVariables. In that case give '-' instead '.' for the current opened file, or -deviceId for an exiting QA on the HC3. Scripts An advantage with the emulator is that we have access to more lua functions than on the HC3 which allow us to write some maintenance scripts QA backup. Backs up QAs from the HC3 to a local directory, keeping the 3 last versions QA distribution. Packs a development file to a .fqa, initialises some quickAppVariables, adds readme.txt file and zips it to an archive. Known issues While the QA is running, break-points can't be added. This is a limitation of the debugger used. Just add the break-point and restart the QA. When the emulator crashes, it may leave a process open that keeps the port 5004 in use. The emulator will complain at restart that the port is already bound. You may need to manually kill the process. On Mac: >kill -9 $(lsof -ti:5004)
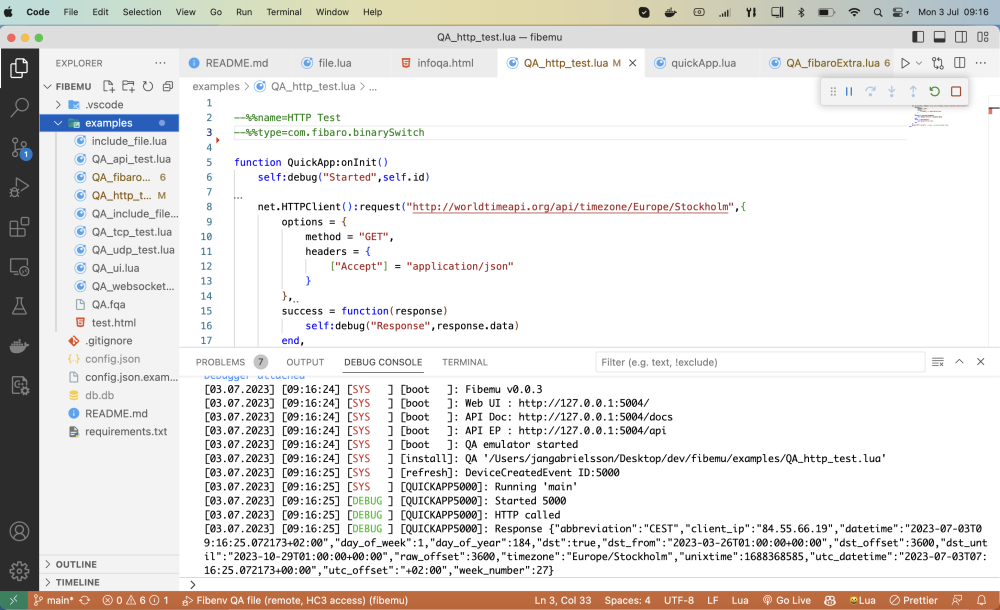
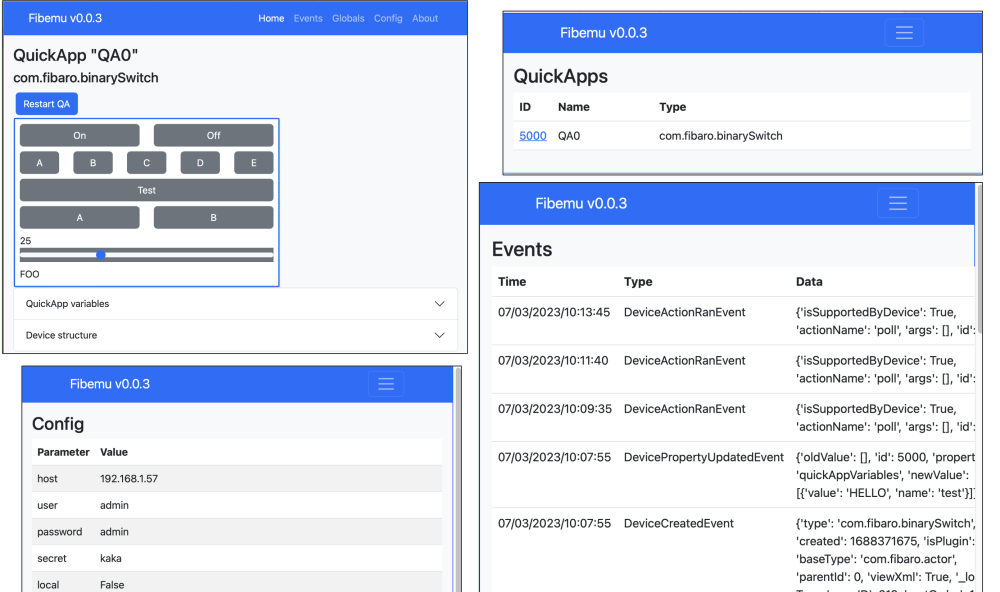
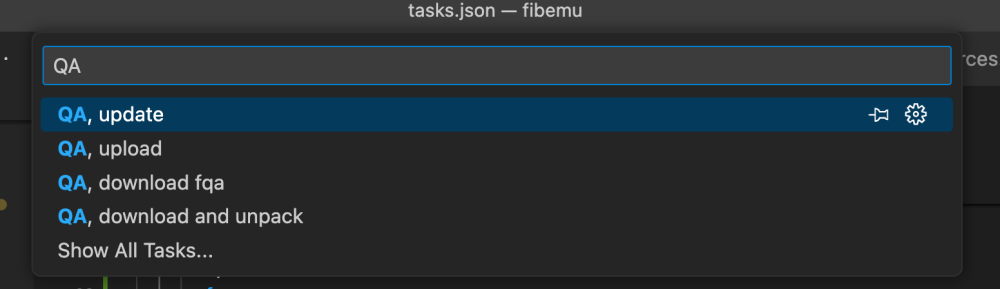
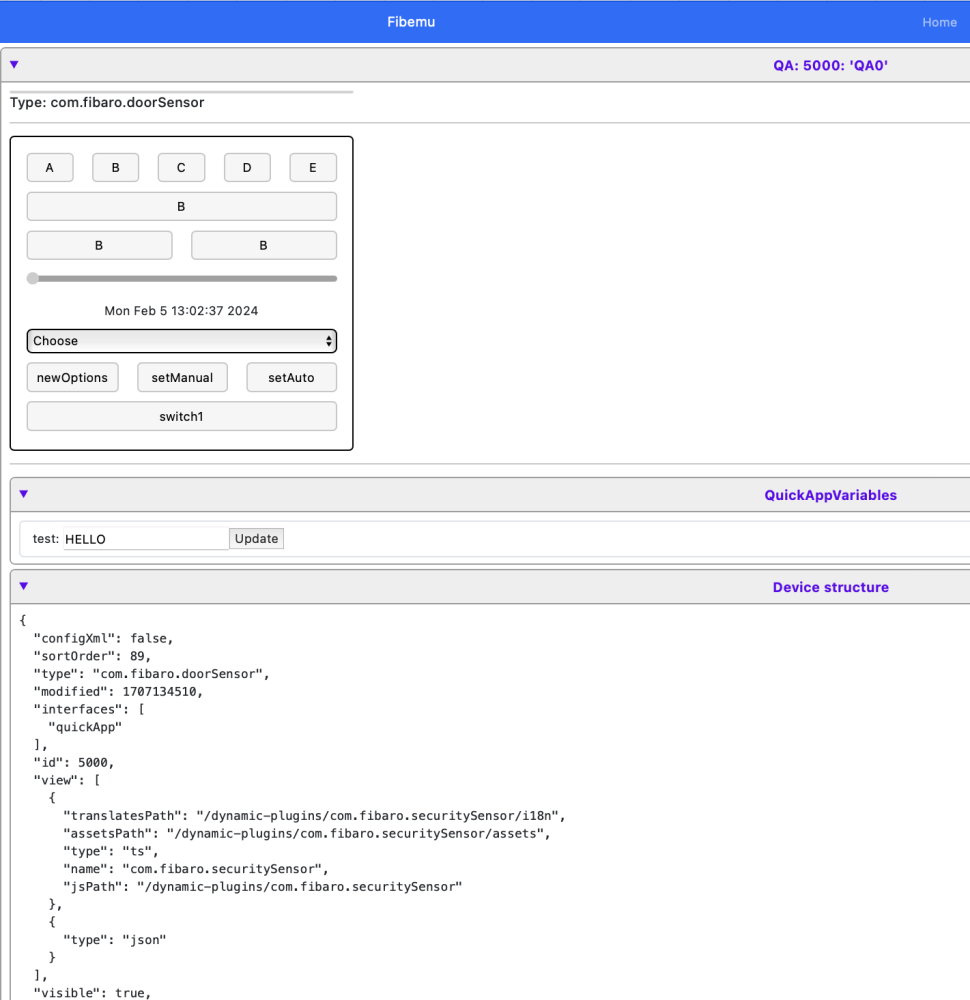
- 394 replies
-
- 7
-
-
-
- visual studio code
- quickapp
- (and 3 more)
-
Hi guys! I would like to say that I am a beginner on Fibaro. I would like to integrate my LED strip on HC3. I have the API Key, I downloaded the fqa file (from here https://marketplace.fibaro.com/items/govee-colorled-controller-qa) but I don't know how to proceed. I have created the Quick App, but I don't know what I have to do to configure it. Can anyone help me?
-
Hi all. So I have a QA I am playing around with which provides a graph of my home temperatures from various sensors. It automatically adjusts depending the number of items in the array. This is done with HTML tags (below). I would like the 10,20,30 & 40 to be aligned at the top of the "cells" but everything I have tried doesn't work. Any suggestions? Thanks. GUI: function QuickApp:updatechart() local scaleMin = 0 local scaleMax = 40 local quantity = 0 local wdth = 0 local hgt=0 local trhgt =0 local tblVar="" local legVar="" -- 273.value for outside temp local arr = {{name="Outside",val=hub.getValue(273, "value")},{name="Master",val=getVar(308,"Temperature")},{name="Ensuite",val=hub.getValue(113, "value")},{name="Study",val=getVar(288,"Temperature")},{name="Guest",val=getVar(309,"Temperature")},{name="Living",val=getVar(310,"Temperature")},{name="Lounge",val=getVar(311,"Temperature")},{name="Entry Front",val=hub.getValue(119, "value")},{name="Entry Rear",val=hub.getValue(125, "value")}} self:debug(scaleMin .. " - " .. scaleMax.." - ") for _,i in ipairs(arr) do quantity = quantity+1 end for _,i in ipairs(arr) do self:debug("element ".. i.name) self:debug("value ".. i.val) wdth = (10*quantity)+120 trhgt = quantity*100//6 hgt = ((quantity*100//6)*i.val)/(scaleMax-scaleMin) tblVar = tblVar.."<td><table><table width=10px><tr height="..trhgt-hgt.." bgcolor=black><td></td></tr><tr height="..hgt.." bgcolor=blue><td></td></tr></table></td>" legVar = legVar.."<tr bgcolor=black><td>"..i.name.."</td></tr>" end local tblhtml = "<table><table width="..wdth.."px><tr height="..tostring(trhgt).."px><td><table><table width=20px border=white><tr height="..tostring(trhgt//4).." bgcolor=black ><td>"..tostring(scaleMax).."</td></tr><tr height="..tostring(trhgt//4).." bgcolor=black><td>"..tostring(3*(scaleMax-scaleMin)//4).."</td></tr><tr height="..tostring(trhgt//4).." bgcolor=black><td>"..tostring(2*(scaleMax-scaleMin)//4).."</td></tr><tr height="..tostring(trhgt//4).." bgcolor=black><td>"..tostring(1*(scaleMax-scaleMin)//4).."</td></tr></table></td>"..tblVar.."<td><table><table width=100px>"..legVar.."</td></tr></table>" self:updateView("lblTable", "text", tblhtml) end

-
Hi all. I am currently creating a QA for my iZone AC system and came across the "log" property. I currently have a temperature and vent mode displayed along with an icon of the temperature sensor: I was wondering three things: 1. is it possible to put superscript in somehow so I can display oC for the units? 2. is it possible to change the color etc of the log text? I tried with HTML tags but didn't seem to work 3. Finally - is there a way that I can send the temperature to be logged so it appears on the temperature chart under the General tab? Thanks in advance, Anthony

-
So I have been working on integrating my ceiling fan & light into my HC3 hub. I want to treat the fan control as a device and the light control as a device. But the problem is that I need buttons and sliders for user interaction. I get that the focus is primarily on z-wave integration but it is very shortsighted to imagine that everything the user installs in his/her Smart Home will be z-wave enabled. Furthermore, it seems that Fibaro does not have much market share in the United States. Consequently we are left in the dust having to integrate our devices ourselves. The Fibaro tech support seems very non-responsive to its community of owners and simply patches bugs without sharing new and updated features. For example, I noticed there is a new thermostat UI that appeared recently. Or at least I did not see it before a certain recent FW update. I presume it was made available because Fibaro needed it to sell their own thermostat device. Truly, I love my hub. The use of a web interface is far superior to using a smart phone app, IMHO. And, if I cannot easily find a z-wave enabled device, I can create or help someone else create a device handler for this device. I use and enjoy my Alexa but home automation is far more than telling Alexa to turn on my lights. And why should I rely on an internet device for more sophisticated control strategies? Right now my z-wave continues to operate even when my ISP goes offline. My ceiling fan will rely on my WiFi operating but it does not have to go to the cloud to be controlled. Only my Nest Thermostat will lose connection to my hub when my internet goes offline. When the time (and money) comes, I will replace it with something z-wave or maybe WiFi but not cloud controlled. I think the biggest takeaway from this rant is that there needs to be a means to create custom UIs for child devices. An added bonus would be a few different control objects. Things like a select box, a multi-select box, a check box (or something that looks like a pushbutton?), ways to group things (a container) or a means to draw a line between sections. Granted that images may be memory hogs so adding a bunch of icons or other small pictures would be memory intensive but small icons that could be added to a global list in the device might mitigate some of that. It seems that many of these structures are integral to the HTML world and a part of the web client. We just need a way to safely use them in the UI. Also, a comprehensive list of Lua methods that we can use along with simple descriptions of their use. Fibaro relies too heavily on its community so leverage that community to learn and share their knowledge on use. Fibaro need not shy away from providing this list because they don't want to write extensive descriptions of each and every method. Reward your faithful users with better tools to take advantage of your systems and you may be rewarded with an increase in sales. You could think of it as hiring a huge team of unpaid integrators who develop creative ways to solve problems. I was impressed with one user who described his sophisticated solution to control his home energy use based on the hourly electric rates that his utility company makes available each day. We don't have that need in North America (yet) but I am aware of a niche market that could be tapped for remote locations who exist off-grid and use solar energy exclusively. Thank you for your time in reading this. I feel better having expressed myself even though I figure this will be ignored or looked at as impractical. Have a great day (or night). Peter
- 11 replies
-
- 1
-
-
- quickapp
- quickappchild
- (and 3 more)
-
HI I have a doorbird intercom with which I can open the gate, in fibaro HC2 I could open the gate via a virtual device by clicking twice on a light button. I understand that I need to use quick app instead of virtual device in HC3. I was told to make a quick app with which I can open the relay, I found an LUA code on line which I used, but I can I see if this quick app will work and how can I make a scene with it. Is there anyone that uses doorbird and can open a gate (relay) with fibaro who can share this with me, so I can try to make it. I have no knowledge of lua and currently only work with blockscenes this is what I found online (copilot), in which I changed the local url in my own url for the gate. I do not know of this is correct and how to check if this is working. I do not see this quick app when I want to make a scene. Sorry for these "stupid" questions but this is a bridge too far for me, but I would still like to learn and get it fixed. Thanks for your help local http = require("http") -- Function to turn on the relay local function turnOnRelay() local url = "https://your-relay-ip/api/relay/on" local response = http.request(url, nil, {["Content-Type"] = "application/json"}) if response.status == 200 then print("Relay turned on successfully") else print("Failed to turn on relay: " .. response.status) end end -- Function to turn off the relay local function turnOffRelay() local url = "https://your-relay-ip/api/relay/off" local response = http.request(url, nil, {["Content-Type"] = "application/json"}) if response.status == 200 then print("Relay turned off successfully") else print("Failed to turn off relay: " .. response.status) end end return { turnOnRelay = turnOnRelay, turnOffRelay = turnOffRelay }
-
* QuickApp no longer working without a paid subscription * Tomorrow.io focuses on commercial accounts and unfortunately do not offer a paid plan that fits the needs of private use. This QuickApp gives access to real-time pollen count and risk category for grass pollen, weed pollen and tree pollen of any location from Tomorrow.io Pollen is a fine powder produced by trees and plants Pollen can severely affect people, especially those with different ailments such as asthma and respiratory issues. Version 0.1 (15th August 2021) Initial working version Pollen: Grass Pollen: Pollen grains from grasses Weed Pollen: Weeds are annual and perennial herbs and shrubs. A single plant may produce about a billion grains of pollen per season. Tree Pollen: Pollen from trees such as Birch and Oak Risk: 0: None 1: Very low 2: Low 3: Medium 4: High 5: Very High IMPORTANT You need an API key from https://app.tomorrow.io The API is free up to 500 calls / per day, 25 calls / per hour, 3 calls / per second (Pollen is 5% of rate limit) You need to create your location in https://app.tomorrow.io/locations to get a location ID and copy it to the QuickApp variable Variables (mandatory): Variables (mandatory): apiKey = Get your free API key from Tomorrow.io location = Tomorrow.io location ID (created in https://app.tomorrow.io/locations) interval = [number] in seconds time to get the data from the API timeout = [number] in seconds for http timeout debugLevel = Number (1=some, 2=few, 3=all, 4=simulation mode) (default = 1) icon = [numbber] User defined icon number (add the icon via an other device and lookup the number)

- 24 replies
-
- 2
-
-
- air quality data
- quickapp
- (and 5 more)
-
Here is an example of adding "decorators" to functions in QuickApps. 'Test_decorators'.fqa It's similar to the model, ex, Python uses - but of course adopted to the limitations we have in QA/Lua... The implementation consists of a QA file "Decorator" and a couple of QA files for decorator plugins for different decorations. When the QA starts up, the decorator parses all QA files and detects function decorations and calls relevant plugin. Ex. --@Log:level=INFO function foo(a,b) return a+b end --@Log:level=INFO function QuickApp:test(tab) return #tab end function QuickApp:onInit() foo(8,9) self:test({1,2,3}) end results in [24.10.2024] [09:59:15] [TRACE] [QUICKAPP1885]: Call[1]:foo(8,9) [24.10.2024] [09:59:15] [TRACE] [QUICKAPP1885]: Call[1]:QuickApp:test([1,2,3]) Another decorator is to declare functions to receieve sourceTriggers --@Event:type='device',id=44,property='value' function QuickApp:stateChange(value) if value the print("Device 44 turned on") else print("Device 44 turned off") end end The names of the function parameters are important as the function will get the event key corresponding to its parameter name. In this case the 'value' key of the event. If we declared function QuickApp:stateChange(id,value) it would have received the id and the value key of the event. The special parameter '_event' will receive the full event structure. It's a little bit more limited compared to my previous EventLib but easier to use. A third decorator, Private, is to declare QuickApp functions "private", meaning they can't be invoked remotely with a fibaro.call(....) --@Event:type='device',id=44,property='value' --@Private function QuickApp:stateChange(value) if value the print("Device 44 turned on") else print("Device 44 turned off") end end Here we see also that we can combine decorators... The concept is still under development, the plugins above works, and I've started to use it and it seems useful/easy to use. Could probably be useful with a type-check decorator...