Welcome to Smart Home Forum by FIBARO
Dear Guest,
as you can notice parts of Smart Home Forum by FIBARO is not available for you. You have to register in order to view all content and post in our community. Don't worry! Registration is a simple free process that requires minimal information for you to sign up. Become a part of of Smart Home Forum by FIBARO by creating an account.
As a member you can:
- Start new topics and reply to others
- Follow topics and users to get email updates
- Get your own profile page and make new friends
- Send personal messages
- ... and learn a lot about our system!
Regards,
Smart Home Forum by FIBARO Team
Search the Community
Showing results for tags 'qa'.
-
EventRunner is a powerful rule-based automation framework for Fibaro Home Center 3 (HC3) home automation systems. It provides an intuitive domain-specific language for creating complex automation rules with advanced event handling, scheduling, and device control capabilities. Disclaimer: It's still under development so there may be bugs 🪲 Documentation README EventScript reference EventScript tutorial Home automation recipes EventScript grammar Preferred way to install is using QA Dist Manager. Manually installation using links below also works. Links Release ER7 (EventRunner7.fqa) Releases ER6 (EventRunner6.fqa) Changelog Debugging rules Updating from EventRunner 5 Adding modules - with rules or custom functions (Extra QA files) Adding new properties to devices ( Ex. deviceID:myProperty = 42) Adding new objects that can be used with properties ( MyObject:value = 42) Installation tips Architecture/Implementation notes
- 393 replies
-
- 6
-

-
- rule engine
- automation
- (and 4 more)
-
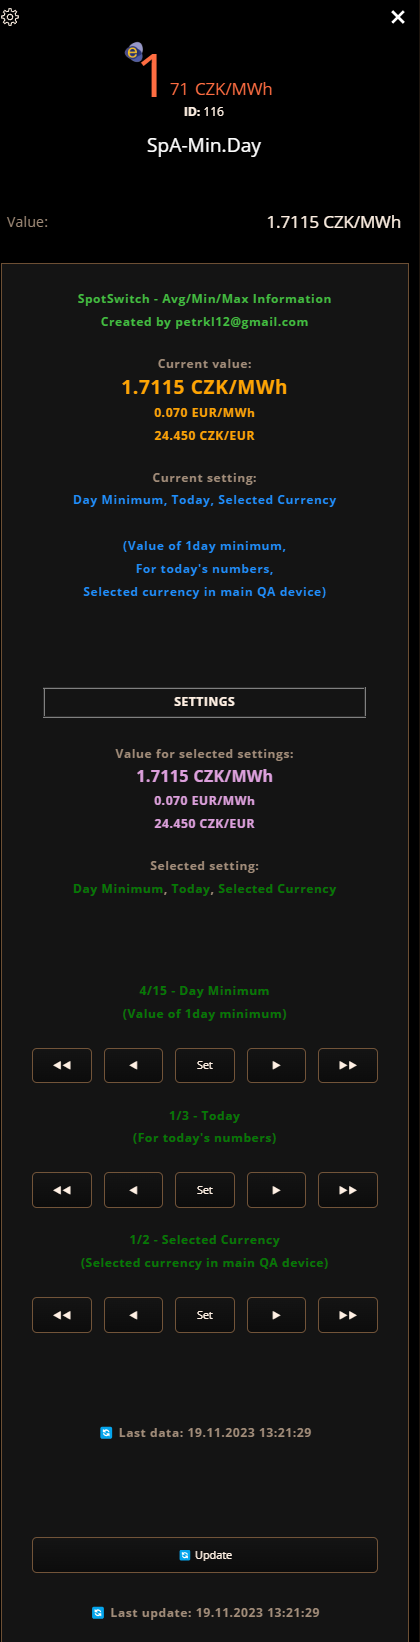
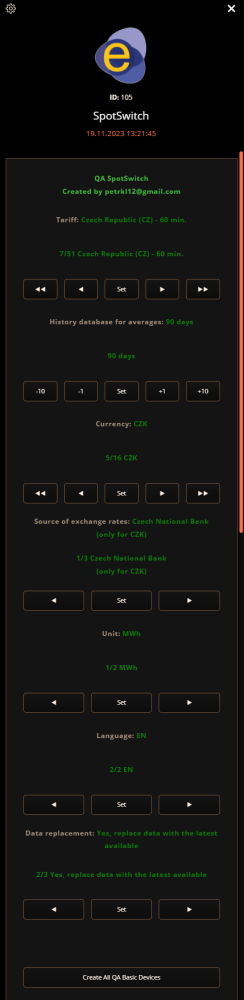
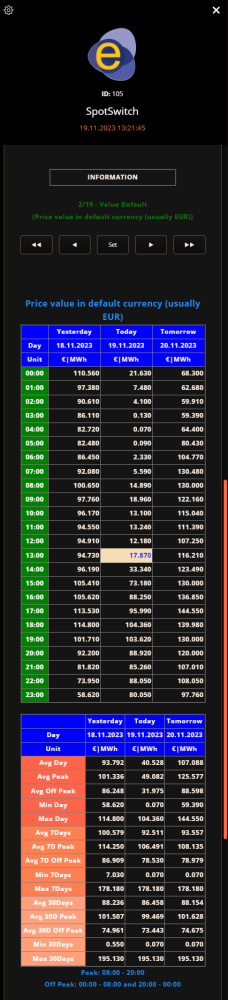
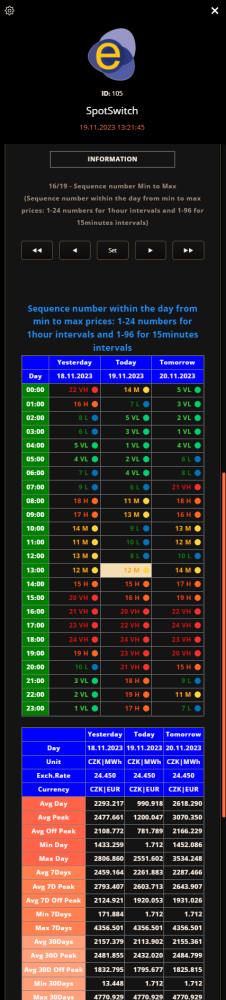
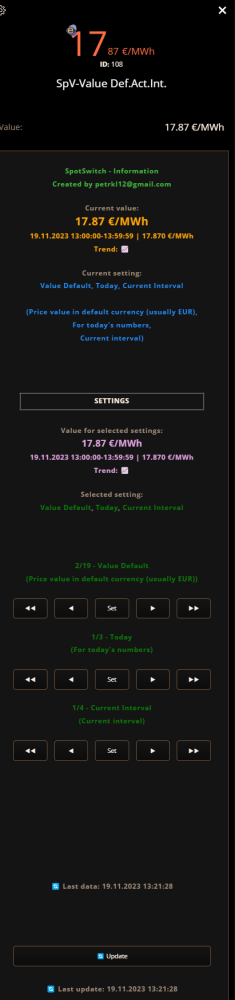
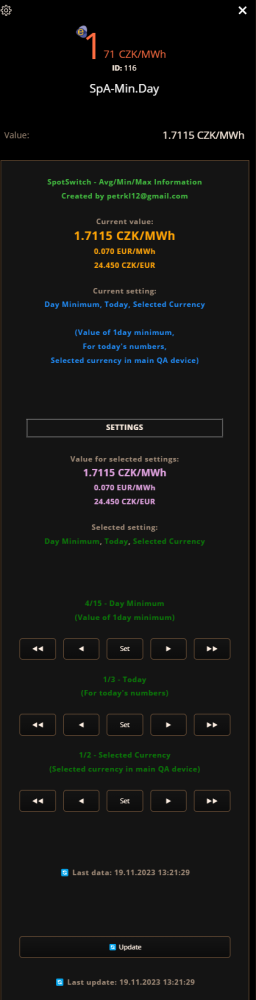
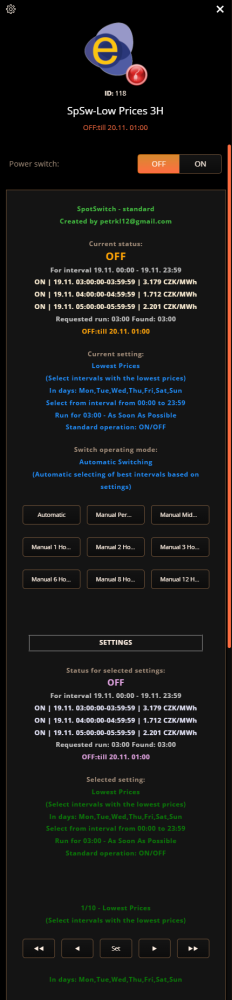
QA SpotSwitch - save your money with this QA QA loads data about spot electricity prices for a selected country (EU), can display them according to selected parameters, and can create switches for the lowest or highest prices in various intervals. It's possible to create any number of switches and informative child devices. Settings in child devices can be changed by the user and the impact of any changes can be immediately seen before saving of new settings. Source for electricity spot prices is Entsoe database. With SpotSwitch, you can control the most suitable times, for example, for charging an electric car, electric heating, heating hot water or selling electricity from solar panels. All my QAs have auto update mechanism so you don't need to any copy+paste exercise with source codes or button/label layouts including update of child devices! 30 days trial period - than you need license key: 50EUR via Paypal account https://paypal.me/petrkl12 For license key I need your HC3 (or HC3L or Yubii) serial number: HC3-xxxxxxxx Ideally include your device serial number and QA name in the payment note. QA: SpotSwitch.fqa Icons: In Main QA you can select: - Country Tariff for spot prices (60min or 15min intervals) from Entsoe - Currency - Language (currently: EN, CZ - for translators to other languages license will be free of charge) - Number of days in history for spot prices - Source of exchange rates (ExchangeRate.host - European Central Bank, Czech National Bank for CZK, Polish National Bank for PLN) - Unit (MWh or kWh) - Data replacement – how to replace data in case of unavailability (3 options: do not replace data, replace data with the latest available, replace date from the last same day in week) Instalation: 1. upload QA to Fibaro 2. select your country/language/currency/unit in main QA 3. press button Create All QA Basic Devices 4. you can create any number of child devices (Switches, Price Information, Averages/Min/Max) 5. detail settings can be done via user interface in child devices (6. select icon for main QA and all other information child devices will have same icon (after some time or restart QA), select icon for one switch and icons in other switches will be replaced after QA restart) There can be 3 types of child devices: 1. Informative devices about prices (SpV) 2. Informative devices about averages, minimums, and maximums for a given period (SpA) 3. Spot switch devices (SpSw) 1. Informative child devices about prices (SpV) - the following options can be combined: - Data for Today or Tomorrow or Yesterday - Current Interval - Next Interval - Exact time during day [HH:MM] - Selected hour during day in [HH] - Price value in selected currency in main QA device - Price value in default currency in downloaded data (usually EUR) - Rating against day average (VH - VeryHigh, H - High, M - Medium, L - Low, VL - VeryLow) - as in Fibaro main value can be only in numbers: 100=VeryHigh, 10=High, 1=Medium, -10=Low, -100=VeryLow - Rating against 7 days average (VH,H,M,L,VL) - Rating against 30 days average (VH,H,M,L,VL) - Rating against day min/max numbers (VL=Min,L,M,H,VH=Max) - Rating against 7 days min/max numbers (VL=Min,L,M,H,VH=Max) - Rating against 30 days min/max numbers (VL=Min,L,M,H,VH=Max) - Value against day average in percent (100%=Average) - Value against 7 days average in percent (100%=Average) - Value against 30 days average in percent (100%=Average) - Value against day min/max numbers in percent (0%=Min,100%=Max) - Value against 7 days min/max numbers in percent (0%=Min,100%=Max) - Value against 30 days min/max numbers in percent (0%=Min,100%=Max) - Fix day rating - 5hours very high (VH), 5hours high (H), 4hours medium (M), 5hours low (L), 5hours very low (VL) - Sequence number within the day from min to max prices: 1-24 numbers for 1hour intervals and 1-96 for 15minutes intervals - Sequence number within the day from max to min prices: 1-24 numbers for 1hour intervals and 1-96 for 15minutes intervals - Data availability for selected interval (Yes=1, No=0) - Value based on formula in QA child variable 2. Informative child devices about averages, minimums, and maximums for a given period (SpA) - the following options can be combined: - Data for Today or Tomorrow or Yesterday - Selected currency in main QA device - Default currency in downloaded data (usually EUR) - 1day average - 1day peak average (8:00-20:00) - 1day off peak average (0:00-8:00,20:00-24:00) - 1day minimum - 1day maximum - 7days average - 7days peak average (8:00-20:00) - 7days off peak average (0:00-8:00,20:00-24:00) - 7days minimum - 7days maximum - 30 days average - 30days peak average (8:00-20:00) - 30days off peak average (0:00-8:00,20:00-24:00) - 30days minimum - 30days maximum 3. Spot switch child devices (SpSw) - the following options can be combined: - Intervals with the lowest prices - Intervals with the highest prices - Continuous interval with the lowest prices - Continuous interval with the highest prices - Select intervals with prices less than zero - Select intervals with prices less than or equal to zero - Results based on formula in QA variables with lowest prices - Results based on formula in QA variables with highest prices - Results based on formula in QA variables with continuous interval with lowest prices - Results based on formula in QA variables with continuous interval with highest prices - Interval when switch should run – ie. from 00:00 to 23:59 - Days in week when switch should run – ie. Monday-Sunday - How long (maximum) switch should run in case of fulfilled all conditions ie. 4 hours and 35 minutes - If you prefer run As Soon As Possible or As Late As Possible (in case of same prices) - Standard operation ON/OFF or Reversed operation OFF/ON - Device can be temporarily or permanently switch off from automatic operation For advaced users: In formulas you can use following variables: price avgDay avgDayPeak avgDayOffPeak minDay maxDay avg7Days avg7DaysPeak avg7DaysOffPeak min7Days max7Days avg30Days avg30DaysPeak avg30DaysOffPeak min30Days max30Days exchRate units $DEVID:1025 (reads value from device number 1025) $DEVID:1025:value (reads value from device number 1025) $DEVID:545:state (reads state from device number 1025 - state False is 0, state True is 1) By default, all values are in MWh and in the original currency according to Entsoe (usually in EUR) Can be converted via the _EXCH and _UNIT expressions behind the given variable E.g. avgDay_EXCH_UNIT (converts the average daily price according to the current exchange rate and according to the selected unit (MWh or kWh) price_EXCH (converts the Price value to the selected currency according to the current exchange rate) price_UNIT (converts the Price value according to the selected unit) Example of expressions – in QA child variables - item Formula (Price-100)*$DEVID:545:state (when the switch id 545 is turned on (it has a value of 1) then 100 is subtracted from the current value in MWh and this value is displayed. If the switch is turned off, the value will always be 0, because we multiply 0) Example of expressions - for switches, there are items FormulaLeft, FormulaCompare and FormulaRight in QA child variables FormulaLeft, FormulaRight are expressions similar to the previous one, and FormulaCompare expresses how the expressions in FormulaLeft and FormulaRight should be compared, i.e. =,==, <, >, <=,=<, >=,=>, A separate number, e.g. 200, can also be used as a Formula, then it will be FormulaLeft: price FormulaCompare: <= FromulaRight: 200 I.e. evaluates to Price <= 200 - The condition will be met if the Price is less than or equal to 200 Other example of formula in QA child switch: Brackets, numbers, basic mathematical expressions + - * / and mathematical functions from the math library can be used In this way, you can practically create any combination for turning switches on and off, even outside the given scope 😊 for example, you can define that if the temperature in the room via $DEVID will be less than 23, then the switch will turn on 😊


-
scheduler.lua Repo & Code: https://github.com/jangabrielsson/scheduler A Lua port of the Python schedule library by Daniel Bader — job scheduling for humans. Designed for plua and Fibaro HC3 QuickApps, but works in plain Lua too. schedule.every(10).minutes:do_(job) schedule.every().hour:do_(job) schedule.every().day:at("10:30"):do_(job) schedule.every(5):to(10).minutes:do_(job) schedule.every().monday:do_(job) schedule.every().wednesday:at("13:15"):do_(job) schedule.every().minute:at(":17"):do_(job) schedule.every().day:at_sunrise():do_(job) schedule.every().day:at_sunset(-15 * 60):do_(job) -- 15 min before sunset Why a port? The Python schedule API is a fluent builder pattern that reads almost like English. Lua's metatables (specifically __index as a function) let us reproduce both the bare-property chaining (.minutes, .day, .monday) and the method chaining (:at(...), :to(...), :tag(...)) without the user having to type extra parentheses. Two execution models are provided: Mode Use when Polling — schedule.run_pending() Plain Lua, your own event loop Reactive — schedule.start() plua / HC3 / anything with setTimeout Plain interval jobs are drift-free (anchored to their first scheduled fire). Wall-clock anchored jobs (:at("HH:MM"), weekday jobs) are tied to local time and self-correct. Installation plua / Fibaro HC3 QuickApp There's no require in QA context, so scheduler.lua installs itself onto fibaro.schedule when loaded via the multi-file directive: --%%name:My QA --%%type:com.fibaro.binarySwitch --%%file:scheduler.lua,scheduler function QuickApp:onInit() local schedule = fibaro.schedule schedule.every(30).seconds:do_(function() self:debug("tick") end) schedule.every().day:at("06:30"):do_(function() self:turnOn() end) schedule.start() end Plain Lua local schedule = require("scheduler") schedule.every(10).minutes:do_(function() print("tick") end) while true do schedule.run_pending() os.execute("sleep 1") end Differences vs. the Python original No timezone support. All times use os.time() / os.date() in local time. The Python version's at(time, tz=...) is not implemented. do is a Lua keyword, so the method is :do_(fn, ...) (with a trailing underscore) instead of Python's .do(fn, ...). Property access uses ., not :. In Lua you cannot write obj:property without a call. So: every().monday ✅ (property) every():monday ❌ (Lua syntax error) every().day:at("10:30") ✅ (.day is a property, :at is a method) Two execution models. The Python version only has polling. This port adds :start() / :stop() for native setTimeout-based scheduling. until_() instead of until (Lua keyword). Grammar / chaining cheat sheet schedule.every([N]) -- start a new job, N defaults to 1 [:to(M)] -- random interval N..M (method) .UNIT -- (property, no parens) one of: -- .second .seconds -- .minute .minutes -- .hour .hours -- .day .days -- .week .weeks | .WEEKDAY -- (property) one of: -- .monday .tuesday .wednesday .thursday -- .friday .saturday .sunday -- (implies .weeks) [:at("HH:MM[:SS]")] -- (method) wall-clock anchor; -- ":MM" or ":SS" for hour/minute units | :at_sunrise([off]) -- (method) anchor to sunrise (+ offset seconds) | :at_sunset([off]) -- (method) anchor to sunset (+ offset seconds) | :at_sunrise_twilight([off]) | :at_sunset_twilight([off]) [:tag(...)] -- (method) attach one or more tag values [:until_(when)] -- (method) deadline; see below :do_(fn, ...) -- (method) register fn(args...) and start Singular forms (.second, .minute, .hour, .day, .week) require an interval of 1; using every(2).minute raises IntervalError. Weekdays require interval of 1 (every().monday, never every(2).monday). at() format depends on the unit: Unit Format .day / weekday HH:MM or HH:MM:SS .hour :MM, MM:SS, or :MM:SS .minute :SS until_(when) accepts: a number — epoch seconds (large), or seconds-from-now (small) "YYYY-MM-DD HH:MM:SS" (or without seconds, or just date) "HH:MM" / "HH:MM:SS" — today Examples Time-based intervals schedule.every(10).seconds:do_(job) schedule.every(2).hours:do_(job) schedule.every().day:do_(job) schedule.every(3).days:do_(job) Wall-clock times schedule.every().day:at("10:30"):do_(job) -- daily at 10:30 schedule.every().hour:at(":15"):do_(job) -- every hour at xx:15 schedule.every().minute:at(":30"):do_(job) -- every minute at :30 schedule.every().monday:at("08:00"):do_(job) -- Mondays 08:00 Randomized intervals schedule.every(5):to(10).minutes:do_(job) -- N in [5,10] min schedule.every(1):to(5).hours:do_(job) Sunrise & sunset Sun events are computed per upcoming day (so future days use the correct sunrise/sunset for that date, not today's value). On HC3 the location is read automatically from api.get("/settings/location"). Elsewhere, set it once: schedule.set_location(59.33, 18.07) -- lat, lon Then: schedule.every().day:at_sunrise():do_(open_blinds) schedule.every().day:at_sunset():do_(turn_on_lights) -- offsets are in seconds, may be negative schedule.every().day:at_sunset(-15 * 60):do_(prep_lights) -- 15 min before sunset schedule.every().day:at_sunrise(30 * 60):do_(morning) -- 30 min after sunrise -- civil twilight variants schedule.every().day:at_sunset_twilight():do_(close_shutters) schedule.every().day:at_sunrise_twilight():do_(stop_outdoor_lights) -- combine with weekday schedule.every().sunday:at_sunset():do_(weekly_recap) -- raw values (seconds since midnight, for the local date of `time`) local sr, ss, srt, sst = schedule.sunCalc() -- today local sr2 = schedule.sunCalc(os.time() + 7*86400) -- a week from now Sun-based jobs require interval 1 and either .day or a weekday property. They return a useful next-run because _schedule_next_run scans the next 14 calendar days for the first matching event in the future. Passing arguments local function notify(channel, msg) print(channel, msg) end schedule.every(2).hours:do_(notify, "ALERT", "heartbeat") Tags & bulk cancellation schedule.every(30).minutes:tag("housekeeping"):do_(cleanup) schedule.every(45).minutes:tag("housekeeping","weekly"):do_(report) schedule.get_jobs("housekeeping") -- returns matching jobs schedule.clear("housekeeping") -- cancels all matching jobs schedule.clear() -- cancels everything Self-cancelling job Return schedule.CancelJob from the function to unschedule it: local n = 0 schedule.every(1).minutes:do_(function() n = n + 1 if n >= 5 then return schedule.CancelJob end end) Deadline schedule.every(10).minutes :until_("2026-12-31 23:59") -- absolute :do_(job) schedule.every(5).seconds :until_(60) -- 60 seconds from now :do_(job) schedule.every().hour :until_("23:00") -- today at 23:00 :do_(job) Inspection schedule.next_run() -- epoch of next run, or nil schedule.idle_seconds() -- seconds until next run, or nil schedule.get_jobs() -- list of all jobs print(tostring(job)) -- human-readable job description Running -- plua / HC3 (reactive, setTimeout-based, drift-free) schedule.start() -- plain Lua (polling) while true do schedule.run_pending() os.execute("sleep 1") end -- run all jobs once, ignoring schedule schedule.run_all() schedule.run_all(2) -- with 2s delay between Multiple schedulers The module-level schedule.every, schedule.run_pending, etc. all use a shared default scheduler. You can also create independent ones: local s1 = schedule.Scheduler.new() local s2 = schedule.Scheduler.new() s1:every(10).seconds:do_(job_a) s2:every(1).minutes:do_(job_b) s1:start(); s2:start() API reference Module-level (default scheduler) Function Description schedule.every([n]) Start a new job, returns a Job schedule.run_pending() Run any due jobs (polling mode) schedule.run_all([delay]) Run all jobs immediately, optionally with delay between schedule.get_jobs([tag]) List all jobs (optionally filtered by tag) schedule.clear([tag]) Cancel all jobs (or all with matching tag) schedule.cancel_job(job) Cancel a specific job schedule.next_run([tag]) Epoch of next run, or nil schedule.idle_seconds() Seconds until next run, or nil schedule.start() Begin reactive (setTimeout) execution schedule.stop() Stop reactive execution and clear timers schedule.jobs() Direct access to the list of jobs schedule.CancelJob Sentinel — return from a job to unschedule it Job methods (all chainable, return the job) Method Description :to(latest) Use a random interval in [interval, latest] :at("HH:MM[:SS]") Anchor to a wall-clock time :at_sunrise([offset]) Anchor to sunrise (offset in seconds, may be negative) :at_sunset([offset]) Anchor to sunset :at_sunrise_twilight([offset]) Anchor to civil-twilight sunrise :at_sunset_twilight([offset]) Anchor to civil-twilight sunset :tag(...) Attach one or more tags :until_(when) Set a deadline after which the job is cancelled :do_(fn, ...) Register the function and start the job Job properties (no parens) Units: .second(s), .minute(s), .hour(s), .day(s), .week(s) Weekdays: .monday, .tuesday, .wednesday, .thursday, .friday, .saturday, .sunday Scheduler class schedule.Scheduler.new() returns a fresh instance with the same methods as the module-level functions (using :), e.g. s:every(2):minutes, s:run_pending(), s:start(), etc. Sun helpers Function Description schedule.set_location(lat, lon) Set the lat/lon used for sun calculations (auto-read from api.get("/settings/location") on HC3) schedule.sunCalc([time]) Returns sunrise, sunset, sunrise_twilight, sunset_twilight as seconds-since-midnight on the local date of time (default os.time()). Returns -1 for an event if the sun never rises/sets that day. Testing lua test_scheduler.lua # plain-Lua smoke test plua --fibaro QA_scheduler.lua # full QA demo (uses speed.lua to fast-forward 24h) QA_scheduler.lua exercises ~10 features and uses speed.lua (also in this repo) to compress a 24-hour simulation into seconds by hijacking setTimeout and os.time. Credits Original library: schedule by Daniel Bader and contributors — MIT-licensed. Inspirations cited by the original: Adam Wiggins' "Rethinking Cron" The Ruby clockwork module Lua port by Jan Gabrielsson, 2026.
-
Version 22.0
4,310 downloads
🧠 What AOQ (All-in-One QuickApp) Offers Multi-System Control: Seamlessly manages HC3, HC2, and HCL controllers using master/slave architecture. Unified Automation: Replaces scattered Lua and Block scenes with one centralized QA. Device Intelligence: Auto-detects Z-Wave, ZigBee, Nice, QA devices, and scenes. Alarm Zone Management: Identifies breached zones/sensors and triggers actions. Custom Events & Profiles: Supports dynamic profiles and custom rule-based automation. 🛠️ Core Configuration: Job Management - jM{} Hash Table Each line in jM{} includes: Field Description Time Span Duration in minutes for monitoring or action. 0 = activity only, negative = suspended IDs List Devices/scenes/variables/keywords (e.g., `"137,630"or"_45"` for scenes) Criteria & Rules Optional conditions like state="value=true" or property="power" Action Tables Optional commands: trueAct{}, falseAct{}, trigAct{}, etc. 🔄 Device Aliasing with jS2n{} Avoid hardcoding device IDs: jS2n = {mSensor=200, boiler=137, dryer=630, light=230, timeScene="_17"} Use aliases in jM{}: jM={ {15,"`mSensor`",{state="value=true", trueAct={"`light`", "turnOn"},falseAct={"`light`", "turnOff"}}} } 🔍 Monitor Option Detects inactivity or failure to report: {8, "`timeScene` and _545", {timeSlot="10:00~22:00"}} -- scenes must be active every 8 min between 10am to 22pm {10, "`boiler`and 145", {property="power"}} -- must report power every 10 min {30, "`boiler`", {state="power>100"}} -- alert if power >100 for 30 min ⚙️ Control Option Example: Turn on light when motion sensor is breached, turn off after 3 min when motion sensor back to safe: jM={"`mSensor`",{state="value=true",trueAct={"`lightSw`","turnOn"},falseAct={"`lightSw`","turnOff", "180"}}} To restrict to nighttime: jM={"`mSensor`",{state="value=true",timeslot="18:00~07:00", trueAct={"`lightSw`","turnOn"},falseAct={"`lightSw`","turnOff", "180"}}} Example: Turn on light when motion sensor is breached, turn off after 3 min (regardless of when motion sensor back to safe) jM={"`mSensor`",{state="value=true", trueAct={{"`lightSw`","turnOn"},{"`lightSw`","turnOff", "180"}}}} 🧪 Debug & Table View Debugger Output: Shows executed commands with color-coded status. Table Header: Displays system info, sunrise/sunset, home/vacation mode, system traffic. Columns: Device type, ID, name, battery status Criteria evaluation Alerts and elapsed time Action tables and active rules 📊 Top Active Monitor (New) AOQ now includes an enhanced Top Active Devices monitor designed to identify devices that may destabilize HC3 performance. It analyzes lifetime activity, current load per hour, and burst behavior to detect devices generating excessive or abnormal traffic. The table highlights devices that may cause delays, radio congestion, disconnects, or even controller restarts. A Peak/h column appears only when abnormal bursts are detected, helping users quickly locate problematic devices without cluttering the interface. 📘 Want to Go Deeper? You can find the full documentation and guides on the Smart Home Forum by FIBARO, including: AOQ Advanced User’s Guide AOQ Quick Guide AOQ HC-WebEye Viewer -
Here is an experimental extension for VSCode (search 'hc3' in extension tab). https://marketplace.visualstudio.com/items?itemName=GsonSoft-development.hc3-vfs It allow you to see all QAs on the HC3 and their associated files in the vscode file explorer. The files are editable and pushed back to the HC3 when saved. In practice allowing you to use the VSCode editor as your editor for QAs on the HC3. The extension uses the same REST API as the HC3 WeUI uses for its editor when fetching and saving the code files for a QA. I have tested it by editing files, created files, and deleted files and it seems to work. The only problem is that the HC3 WebUI don't always follow, so if you have a QA file open in the WebUI edit and update the same file via VSCode, you need to close the WebUI editor and reopen to see the changes. Notes: First release(s), use with caution. If it's found to be useful I may put some more effort into it... feedback appreciated. Note, you can't run the files with plua in vscode yet as they are "virtual files" and the debugger can't locate them.... so you need to rely on saving back to HC3 and watch the HC3 log output the traditional way... ------------------- HC3 Virtual Filesystem Browse and edit HC3 QuickApp Lua files directly in the VS Code Explorer — no manual downloading or uploading. Also supports opening local .fqa archive files as editable virtual filesystems. Features QuickApps appear as folders in the VS Code Explorer under an HC3 — <host> workspace folder Open any .lua file — content is fetched live from the HC3 Save to HC3 on ⌘S — the file is written back via the HC3 REST API instantly QuickApp properties editor — each QuickApp folder contains a (QuickApp).hc3qa file; opening it shows a graphical editor for name, enabled/visible state, interfaces, QuickApp variables, and description. Changes are saved to the HC3 on ⌘S Create new files — new Lua files appear on the HC3 immediately Delete files — removes the file from the HC3 (the main file of a QuickApp cannot be deleted) Rename files — rename a non-main Lua file by pressing F2 or right-clicking in the Explorer (implemented as create + delete) Rename QuickApp — rename a device directly from VS Code (right-click the QuickApp folder) Export .fqa — export a QuickApp as a .fqa archive (right-click the QuickApp folder) Open in HC3 Web UI — jump to the HC3 device page in the browser (right-click the QuickApp folder) File & text search — Ctrl+P quick-open and Ctrl+Shift+F Find in Files both search across all QuickApp files in the virtual filesystem HC3 Log output channel — the HC3 Log output panel polls the HC3 debug log every few seconds and streams new entries as they arrive, so you can see QuickApp output and errors without leaving VS Code API traffic statistics — run HC3: Statistics to see a breakdown of every API call made since connect, grouped by endpoint Credentials from .env — reuses the same HC3_URL/HC3_USER/HC3_PASSWORD variables as plua, with a fallback to VS Code settings + SecretStorage .fqa file browser Open any .fqa file as a virtual workspace folder — right-click a .fqa file in the Explorer and choose Open .fqa File, or run HC3: Open .fqa File from the Command Palette Edit Lua files inside the archive — each Lua file appears as a .lua file in the folder; saving writes directly back into the .fqa JSON on disk Create and delete Lua files — use the Explorer New File / Delete buttons as normal Rename Lua files — press F2 or right-click → Rename in the Explorer Properties editor — a (QuickApp).hc3qa file in each fqa workspace folder opens the same graphical properties editor as the live HC3 connection; edit name, QuickApp variables, interfaces, and description, then save to write changes back to the on-disk .fqa file Persisted across sessions — the fqa:// workspace folder is remembered and reconnected automatically when you reopen VS Code Explorer tree examples Live HC3 connection: HC3 — 192.168.1.100 ├── 42-living-room-lights/ │ ├── main.lua │ ├── utils.lua │ └── (QuickApp).hc3qa ← properties editor └── 55-weather-station/ ├── main.lua └── (QuickApp).hc3qa Local .fqa archive: 📦 living-room-lights (42) ├── main.lua ├── utils.lua └── (QuickApp).hc3qa ← properties editor Getting started 1. Configure credentials Option A — .env file (recommended, works with plua) Create a .env file in your workspace root (or ~/.env😞 HC3_URL=http://192.168.1.100 HC3_USER=admin HC3_PASSWORD=your-password Option B — VS Code settings + SecretStorage Run the command HC3: Configure Credentials (Ctrl+Shift+P → HC3: Configure Credentials) and enter your HC3 host, username, and password. The password is stored securely in VS Code's SecretStorage. 2. Connect Run HC3: Connect from the Command Palette. An HC3 — <host> workspace folder will appear in the Explorer containing all your QuickApps. 3. Edit & save Open any .lua file, make changes, and save — the file is written back to the HC3 immediately. 4. Watch the log The HC3 Log output channel opens automatically on connect and streams new debug, warning, trace, and error entries from /api/debugMessages as they arrive. Each line is formatted as: HH:MM:SS [DEBUG] [QUICKAPP1234] your message here Commands Command Description HC3: Connect Open the HC3 filesystem in the Explorer HC3: Configure Credentials Set HC3 host, username, and password HC3: Refresh Clear the cache and reload the file tree HC3: Disconnect Remove the HC3 workspace folder and stop polling HC3: Open in HC3 Web UI Open the selected QuickApp in the HC3 browser UI HC3: Export .fqa Export the selected QuickApp as a .fqa archive HC3: Rename QuickApp Rename the selected QuickApp on the HC3 HC3: Statistics Show a breakdown of API calls made since connect HC3: Open .fqa File Open a local .fqa file as a virtual workspace folder Open in HC3 Web UI, Export .fqa, and Rename QuickApp are also available via right-click on a QuickApp folder in the Explorer. Open .fqa File is also available via right-click on any .fqa file in the Explorer. Settings Setting Default Description hc3vfs.host `` HC3 hostname or IP. Overridden by HC3_URL in .env. hc3vfs.user admin HC3 username. Overridden by HC3_USER in .env. hc3vfs.logPollInterval 4 How often (in seconds) to poll the HC3 debug log output channel. Passwords are never stored in plain-text settings — they go to VS Code SecretStorage or are read from .env. Auto-save recommendation Each save triggers a real HTTP PUT to the HC3, which may restart the QuickApp. Auto-save is best turned off for hc3://files so you only push code to the HC3 when it is in a valid state. Add this to your workspace .vscode/settings.json: { "files.autoSave": "off" } onFocusChange is acceptable if you prefer convenience. Avoid afterDelay — it will push incomplete Lua while you type and cause constant QuickApp restarts. Limitations Renaming the main file is not supported — the HC3 API does not allow it Creating new QuickApp devices (new folders) is not supported — use the HC3 web interface No live refresh — the HC3 has no push notifications. Use HC3: Refresh if you made changes outside VS Code File names must be at least 3 characters and contain only a-z, A-Z, 0-9 "Preloaded files limit" warning — VS Code indexes the virtual filesystem for search and IntelliSense. If you have many QuickApps you may see a warning that the 500-file preload limit has been reached. This is a VS Code limit; all files are still fully accessible, editable, and searchable. The warning can be safely ignored. Working with GitHub / version control The virtual filesystem (hc3://) is great for quick edits directly on the HC3, but it doesn't compose naturally with git — there are no real files on disk to commit. The recommended workflow for GitHub users is to use plua: Keep your QuickApp source files (.lua) in a normal local git repo — edit them directly in VS Code, commit and push to GitHub as usual When ready to deploy to the HC3, use plua from the terminal: Upload (or create) the full QuickApp from a .fqa file: plua -t uploadQA MyQA.fqa Or update individual Lua files on the HC3 without touching the rest: plua -t updateQA MyQA.fqa This keeps git clean and simple. The HC3 extension is then useful as a companion — browse live device state, tweak a variable, check the log — while plua handles the deployment pipeline. Approach A — quick edits without plua If you just want to track your work without a full deployment pipeline, export the QuickApp as a .fqa archive and commit that single file: Right-click the QuickApp folder → Export .fqa → save to your repo folder Open the .fqa with HC3: Open .fqa File to edit Lua files and properties git add MyQA.fqa && git commit && git push Note: git diff on a .fqa shows JSON noise. Code review on GitHub is unreadable. For anything beyond personal backups, the plua workflow above is cleaner. Related plua — Local QuickApp development and testing tool for Fibaro HC3
- 36 replies
-
- 6
-
-
- qa
- development
- (and 2 more)
-
I have put together agent skills for developing QuickApps (offline). These are files added to your coding workspace that contains best practices for coding QuickApps. Agent skills are a "standard" for most coding environments using agents - copilot, Claude code, Codex etc. In the past I have coded an MCP for QA support but this is a much better approach. Please delete the MCP if you use it... The caveat is that these skills assumes that you are using plua to code and test QuickApps. Many skills will use the plua command to to run troubleshooting scripts etc... The instructions below are specifically for vscode/copilot but should be easy to reuse for other AI coding tools. Just put the skills directory in the proper place for your tool and ask it to add the skills to CLAUDE.md, AGENT.MD etc. The install-qa-skills prompt is specific for VSCode but your agent can most likely convert it to your agents preferences. Below is for VSCode. To install the skills you run an agent prompt 'install-qa-skills'. It's also used to update the skills to the latest version. Before you can run /install-qa-skills, you need this prompt file in your workspace. Run one of these commands from your workspace root, then type /install-qa-skills in Copilot chat. Universal (Python — macOS, Linux, Windows): python3 -c "import urllib.request,pathlib; pathlib.Path('.github/prompts').mkdir(parents=True,exist_ok=True); urllib.request.urlretrieve('https://raw.githubusercontent.com/jangabrielsson/plua/main/.github/prompts/install-qa-skills.prompt.md','.github/prompts/install-qa-skills.prompt.md'); print('Done')" macOS / Linux (curl): mkdir -p .github/prompts && curl -sL https://raw.githubusercontent.com/jangabrielsson/plua/main/.github/prompts/install-qa-skills.prompt.md -o .github/prompts/install-qa-skills.prompt.md Windows (PowerShell): New-Item -ItemType Directory -Force .github/prompts | Out-Null; Invoke-WebRequest https://raw.githubusercontent.com/jangabrielsson/plua/main/.github/prompts/install-qa-skills.prompt.md -OutFile .github/prompts/install-qa-skills.prompt.md Then in VS Code Copilot Chat: type /install-qa-skills and the agent will download all skills automatically. And the same command to update the skills. The skills makes the agent aware about the REST API, the Fibaro Lua SDK, best practices, using plua etc. This will allow the agent to help you create QuickApps from scratch, debug existing QAs, review the code for potential issues etc An example prompt Create a QUickApp in test/QATemp.lua that is a multilevel sensor and shows the temperature fetched from some public webservice Creates the code below --%%name:Temperature Sensor --%%type:com.fibaro.temperatureSensor --%%var:pollInterval=300 --%%var:city="London" --%%u:{label="tempLbl",text="Temperature: --"} --%%u:{label="infoLbl",text="Last update: --"} --%%desktop:true --%%offline:true -- Fetches current temperature from Open-Meteo (no API key required). -- Uses the WMO geocoding API to resolve city → lat/lon, then Open-Meteo for weather. -- Change --%%var:city= to any city name. local BASE_GEO = "https://geocoding-api.open-meteo.com/v1/search?name=%s&count=1&language=en&format=json" local BASE_WEATHER = "https://api.open-meteo.com/v1/forecast?latitude=%s&longitude=%s¤t_weather=true" local function httpGet(url, cb) local http = net.HTTPClient() http:request(url, { options = { method = "GET", timeout = 10000 }, success = function(r) if r.status == 200 then local ok, data = pcall(json.decode, r.data) if ok then cb(data) else cb(nil, "JSON parse error") end else cb(nil, "HTTP " .. tostring(r.status)) end end, error = function(err) cb(nil, tostring(err)) end }) end function QuickApp:onInit() self:debug(self.name, self.id) self.city = self:getVariable("city") if self.city == "" then self.city = "London" end local interval = tonumber(self:getVariable("pollInterval")) or 300 self:fetchTemperature() setInterval(function() self:fetchTemperature() end, interval * 1000) end function QuickApp:fetchTemperature() local geoUrl = string.format(BASE_GEO, self.city:gsub(" ", "+")) httpGet(geoUrl, function(geo, err) if not geo or not geo.results or not geo.results[1] then self:warning("Geocoding failed for '" .. self.city .. "': " .. tostring(err or "no results")) self:updateView("infoLbl", "text", "Error: city not found") return end local lat = tostring(geo.results[1].latitude) local lon = tostring(geo.results[1].longitude) local weatherUrl = string.format(BASE_WEATHER, lat, lon) httpGet(weatherUrl, function(wx, werr) if not wx or not wx.current_weather then self:warning("Weather fetch failed: " .. tostring(werr)) self:updateView("infoLbl", "text", "Error: weather unavailable") return end local temp = wx.current_weather.temperature self:updateProperty("value", temp) self:updateProperty("unit", "C") self:updateView("tempLbl", "text", string.format("Temperature: %.1f °C", temp)) self:updateView("infoLbl", "text", "Updated: " .. os.date("%H:%M:%S") .. " (" .. self.city .. ")") self:debug("Temperature in", self.city, ":", temp, "°C") end) end) end Pretty reasonable. It even found an available web api to get the temp. We could improve it by asking Instead of a hard coded quickVar, could we use the location of the HC3? ...and it will change the code accordingly. The exact result may vary depending on what LLM model is used. In these examples (and my coding overall) I use Claude Sonnet 4.6. This is an excellent way to over time add new skills and best practices so the agent becomes smarter - and I will update the skills continuously as I identify these "best practices" and possible issues when coding QAs. If you find something the agent could handle smarter, let me know in this thread and we can add it to the skill collection. This is the first release so there is a ton of stuff that could be added... Also, if someone uses this with Claude code or Codex, please share the instructions in this thread. I'm not using Claude myself but maybe in the future. The skill files are available directly from the repo at https://github.com/jangabrielsson/plua/tree/main/.github
- 4 replies
-
- 1
-
-
- agent
- development
- (and 4 more)
-
 I am encountering an issue with encrypted QuickApps on my Home Center 3 (Firmware 5.200 & 5.201.18). When I create a new QuickApp and add a button to the UI, the following happens: I save the QuickApp. I download it using the "encrypted" option. After uploading the same file again, the UI button is gone. Interestingly, any underlying code (if I put there any) still works perfectly, but the user interface is completely missing.
 -
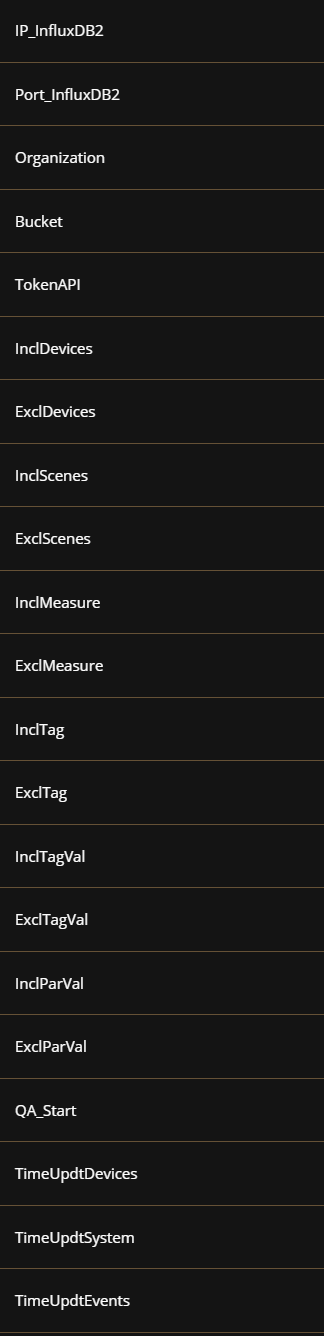
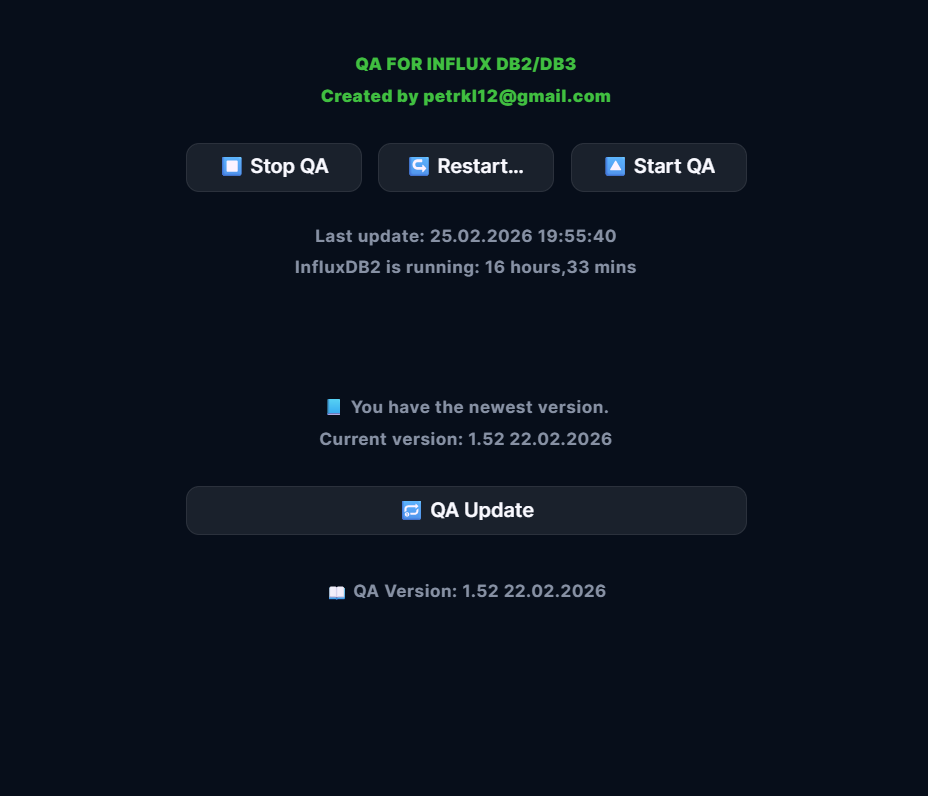
QA for regular exporting data from HC3 to InfluxDB 2.x or InfluxDB 3.x 30 days trial period - than you need license key: 30EUR via Paypal account https://paypal.me/petrkl12 For license key I need your HC3 (or HC3L or Yubii) serial number: HC3-xxxxxxxx Ideally include your device serial number and QA name in the payment note. QA is sending data based on events and also in regular intervals from HC3/HCL/Yubii to InluxDB 2.x or InluxDB 3.x. It generates data to Influx with minimum delay. There is data about HC3 system (cpu,ram), info about scenes (start, stop), geofence events and a lot of details about devices. In QA variables there is possibility to define include/exclude measurements/IDs/… (default: all data are sent to Influx) QA: (same QA for InfluxDB2 or InfluxDB3) InfluxDB2.fqa Icon: QA variables - you have to setup - IP_InfluxDB2 ie. 192.168.1.111 (or server/database address without https:// or http:// ) Port_InfluxDB2 ie. 8086 (for cloud database usually 443) HttpType ie. http (default value http, for cloud usually https) VersionInflux ie. V2 (default V2 for InfluxDB2 or V3 for InfluxDB3)e. Organization ie. Your Organization From InfluxDB2 or Your Database for InfluxDB3 Bucket ie. Your Bucket From InfluxDB2 or empty for InfluxDB3 TokenAPI ie. Your TokenAPI From InfluxDB2 or InfluxDB3


-
Here is a link to a set of QAs to control Shelly devices. https://www.smarthome.com.au/free-shelly-quick-apps-for-fibaro-home-center-3/ It's both gen 1 and gen 2 devices. Gen 2 devices are easier to integrate with the web socket API than the gen 1 where we need to poll the device with regular interval. Battery operated devices are in general a pain to support as they sleep and wake up now and then - which makes polling difficult. So, battery devices are not in focus The QAs support the basic features expected from a device of that QA type so they fit into the fibaro model of handling devices. Extra features like setting timers etc that Shelly support is better handled with the pretty good mobile/cloud Shelly app. There are a lot of devices that are potentially supported but not all have been tested. Please give us feedback here or in https://www.smarthome.com.au/free-shelly-quick-apps-for-fibaro-home-center-3/ so we can come out with an 1.1 update... (gen 1 Shelly 1 and Shelly 1PM have issues but will be fixed in next release) The suite contains 5+1 different QAs that each support different Shelly devices. The devices tested, and devices not tested but we expect they could work are: ShellyMultiDevice v1.0 com.fibaro.deviceController + child devices Supported Shelly devices: - Shelly 3EM (Gen1). Note: untested Children: - com.fibaro.binarySwitch - com.fibaro.energyMeter - com.fibaro.energyMeter - com.fibaro.energyMeter - Shelly EM (Gen1). Note: tested Children: - com.fibaro.binarySwitch - com.fibaro.energyMeter - com.fibaro.energyMeter - Shelly Plus 2PM (Switch) (Gen2). Note: tested Children: - com.fibaro.binarySwitch - com.fibaro.binarySwitch - Shelly Pro 2 (Gen2). Note: untested Children: - com.fibaro.binarySwitch - com.fibaro.binarySwitch - Shelly Pro 2M (Switch) (Gen2). Note: tested Children: - com.fibaro.binarySwitch - com.fibaro.binarySwitch - Shelly Pro 3 (Gen2). Note: tested Children: - com.fibaro.binarySwitch - com.fibaro.binarySwitch - com.fibaro.binarySwitch - Shelly Pro 4PM (Gen2). Note: tested Children: - com.fibaro.binarySwitch - com.fibaro.binarySwitch - com.fibaro.binarySwitch - com.fibaro.binarySwitch Supported HC3 QuickAppMethods: - <com.fibaro.binarySwitch>:turnOn() - <com.fibaro.binarySwitch>:turnOff() - <com.fibaro.binarySwitch>:toggle() ShellySingleColor v1.0 com.fibaro.colorController Supported Shelly devices: - Shelly Color Bulb (Gen1). Note: tested, only color mode for now - Shelly RGBW2 Color (Gen1). Note: tested Supported HC3 QuickAppMethods: - QuickApp:turnOn() - QuickApp:turnOff() - QuickApp:setValue(val) - QuickApp:setColor(r,g,b,w) - QuickApp:startLevelIncrease() - QuickApp:startLevelDecrease() - QuickApp:stopLevelChange() ShellySingleCover v1.0 com.fibaro.rollerShutter Supported Shelly devices: - Shelly Plus 2PM (Cover) (Gen2). Note: tested - Shelly Pro 2M (Cover) (Gen2). Note: tested Supported HC3 QuickAppMethods: - QuickApp:open() - QuickApp:close() - QuickApp:stop() - QuickApp:setValue(value) ShellySingleDimmer v1.0 com.fibaro.multilevelSwitch Supported Shelly devices: - Shelly Dimmer 1 (Gen1). Note: tested - Shelly Dimmer 2 (Gen1). Note: tested - Shelly Vintage (Gen1). Note: tested Supported HC3 QuickAppMethods: - QuickApp:turnOn() - QuickApp:turnOff() - QuickApp:setValue(val) - QuickApp:startLevelIncrease() - QuickApp:startLevelDecrease() - QuickApp:stopLevelChange() ShellySingleSwitch v1.0 com.fibaro.binarySwitch Supported Shelly devices: - Shelly 1 (Gen1). Note: untested - Shelly 1L (Gen1). Note: untested - Shelly 1PM (Gen1). Note: tested, not working yet...TBD - Shelly Plus 1 (Gen2). Note: tested - Shelly Plus 1 PM (Gen2). Note: tested - Shelly Plus Plug IT (Gen2). Note: untested - Shelly Plus Plug S (Gen2). Note: tested - Shelly Plus Plug UK (Gen2). Note: untested - Shelly Plus Plug US (Gen2). Note: untested - Shelly Pro 1 (Gen2). Note: tested - Shelly Pro 1 PM (Gen2). Note: tested Supported HC3 QuickAppMethods: - QuickApp:turnOn() - QuickApp:turnOff() - QuickApp:toggle() ShellyPlusHT v1.0 com.fibaro.temperatureSensor + com.fibaro.humiditySensor child Supported Shelly devices: - Shelly Plus H&T (Gen2). Note: tested, experimental, only wakes up when new data is available Children: - com.fibaro.temperatureSensor - com.fibaro.humiditySensor Supported HC3 QuickAppMethods:
- 44 replies
-
- 10
-
-
I have started to code a Hue QA that uses the new V2 api. It's still early beta... (v0.11) It's available via the QAUpdater QA. The QA is a standalone QA that keeps an updated state of the Hue resources and accept commands to change them - like turning on/off lights. It only provides an API (fibaro.call, fibaro.getValue) and no QuickAppChild devices (the latter can be built relatively easy built using HueConnector...) To use the QA you create a your own client QA that calls the HueConnector QA. Example client: local devices = { "9222ea53-37a6-4ac0-b57d-74bca1cfa23f", -- Sensor "3ab27084-d02f-44b9-bd56-70ea41163cb6", -- Tim "a007e50b-0bdd-4e48-bee0-97636d57285a", -- Switch } function QuickApp:hueInited() local function printf(...) print(string.format(...)) end -- local map = self.hue.getRsrc("deviceMap") -- Setup custom mapping from room+name to Hue ID. -- for id,info in pairs(map) do -- local name = ((info.room and (info.room.."_") or "")..info.name):gsub("[%-%s]","_") -- self.hue.idMap[name]=id -- print(name,"=>",id) -- end print(("-"):rep(40)) print("Mapping table:") -- Print out default mapping for name,id in pairs(self.hue.idMap) do printf("'%s' => '%s'",name,id) end print(("-"):rep(40)) self.hue.subscribeTo(devices) self.hue.listSubscribedDevices() self.hue.listAllDevices() -- setTimeout(function() fibaro.call("3ab27084-d02f-44b9-bd56-70ea41163cb6","setColor","white") end, 0) -- setTimeout(function() fibaro.call("3ab27084-d02f-44b9-bd56-70ea41163cb6","turnOff") end, 0) -- setTimeout(function() fibaro.call("3ab27084-d02f-44b9-bd56-70ea41163cb6","turnOn") end, 3000) -- setTimeout(function() fibaro.call("3ab27084-d02f-44b9-bd56-70ea41163cb6","turnOff") end, 5000) -- setTimeout(function() fibaro.call("3ab27084-d02f-44b9-bd56-70ea41163cb6","turnOn") end, 7000) -- setTimeout(function() fibaro.call("3ab27084-d02f-44b9-bd56-70ea41163cb6","setDim",0,4000) end, 10000) -- setTimeout(function() fibaro.call("3ab27084-d02f-44b9-bd56-70ea41163cb6","setDim",100,4000) end, 15000) -- setTimeout(function() fibaro.call("Guest_room_Tim","setColor","green") end, 17000) -- setTimeout(function() print(fibaro.get("3ab27084-d02f-44b9-bd56-70ea41163cb6","on")) end, 19000) end function QuickApp:hueEvent(id,event) self:debug("Event:",uid," ",json.encode(event)) end function QuickApp:onInit() self:debug(self.name, self.id) self:setupUpHue() end This example uses 3 Hue devices, a motion/lux/temp sensor, a light (Tim), and a switch. The QA supports devices, rooms, zones and scenes. We can send command to the Hue light with fibaro.call. Note that the id is the Hue uid and not a device number. When a device changes state there is a callback to QuickApp:hueEvent with the uid and the event. There is a deviceMap (more about that later) accessible with self.hue.getRsrc("deviceMap") that maps Hue ids to the various properties of the device/resource. In particular, name and room. This allows us to build a map from our own IDs to hue ids as they may be easier to deal with. In the example above we map the light "3ab27084-d02f-44b9-bd56-70ea41163cb6" that has the name "Tim" and room "Guest room" to "Guest_room_Tim"="3ab27084-d02f-44b9-bd56-70ea41163cb6" in the self.hue.deviceMap[] table. That table is used by fibaro.call so if the id is in the self.hue.deviceMap table it will use that mapping. This allows us to call fibaro.call("Guest_room_Tim","setColor","green") in our example. but it also works with fibaro.call("3ab27084-d02f-44b9-bd56-70ea41163cb6","setColor","green") Only lights, rooms, zones and scenes can take commands: fibaro.call(uid,"turnOn"[,transition]) -- transition in ms. fibaro.call(uid,"turnOff"[,transition]) -- transition in ms. fibaro.call(uid,"toggle"[,transition]) -- transition in ms. fibaro.call(uid,"setDim",value[,transition])). -- value 0-100, transition in ms. fibaro.call(uid,"setTemperature",value[,transition]) -- value in mirek fibaro.call(uid,"setColor",<string> | {x=x, y=y} | {r=r,g=g,b=b}[,transition]) -- color string, ex "green" or x,y float values. (RGB support tbd) fibaro.call(uid,"recall"[,transition]) -- Recall scene for scene with uid. fibaro.call(uid,"sendRaw",<table>) -- POST raw command to Hue device with uid Sensor properties motion -- true/false temperature -- temperature light -- lux status -- connected/reachable power_state -- battery Buttons/switches properties button -- button pressed status -- connected/reachable power_state -- battery Lights properties on -- true/false dimming -- 0-100 color_temperature -- mirek color -- x,y status -- connected/reachable To use this there is a small Hue client library that needs to be included in the QA On top of this it would be relatively easy to create ex. childDevices for each device etc. So, there is some setup that needs be done for the HueConnector QA too. There are quickApp variables with "Hue_IP" and "Hue_User". The latter is the api key you get from the hub. You can dump the current devices, rooms, zones and scenes (the resources we can work with) When I log my resources looks like [12.08.2022] [10:02:42] [DEBUG] [QUICKAPP1001]: ['1c10e485-e52b-4144-9991-46dbb2eedafa'] = { type='device', name='Middle window', model='LCT012', room='Living room', }, [12.08.2022] [10:02:42] [DEBUG] [QUICKAPP1001]: ['21fc2e2f-05e6-4fbd-ad3b-a12762c88e72'] = { type='device', name='Hue white lamp 1', model='LWA001', room='Guest room', }, [12.08.2022] [10:02:42] [DEBUG] [QUICKAPP1001]: ['2219eadd-9464-4149-b52d-073ed1d9754a'] = { type='device', name='Köksö2', model='LCG002', room='Köksö', }, [12.08.2022] [10:02:42] [DEBUG] [QUICKAPP1001]: ['2d7bfac8-688b-4889-b813-b927e875b533'] = { type='device', name='Star right', model='LCT012', room='Guest room', }, [12.08.2022] [10:02:42] [DEBUG] [QUICKAPP1001]: ['3ab27084-d02f-44b9-bd56-70ea41163cb6'] = { type='device', name='Tim', model='LCT015', room='Guest room', }, [12.08.2022] [10:02:42] [DEBUG] [QUICKAPP1001]: ['429ee799-9b86-43e5-bf31-ce3d06b45cc7'] = { type='device', name='Roof3', model='LCT012', room='Hall', }, [12.08.2022] [10:02:42] [DEBUG] [QUICKAPP1001]: ['598e4796-be01-482f-99c1-92f95fa8a18c'] = { type='device', name='Roof2', model='LCT012', room='Hall', }, [12.08.2022] [10:02:42] [DEBUG] [QUICKAPP1001]: ['59cbfb37-eba9-4746-9e64-ded409857abc'] = { type='device', name='Left window', model='LCT012', room='Living room', }, [12.08.2022] [10:02:42] [DEBUG] [QUICKAPP1001]: ['5ddcb36b-f985-4876-88b6-a238c58b9dbf'] = { type='device', name='Star left', model='LCT012', room='Guest room', }, [12.08.2022] [10:02:42] [DEBUG] [QUICKAPP1001]: ['721e69c5-bc75-4e99-b3ea-c05038ffa1af'] = { type='device', name='Star middle', model='LCT012', room='Guest room', }, [12.08.2022] [10:02:42] [DEBUG] [QUICKAPP1001]: ['8a453c82-0072-4223-9c42-f395b5cb0c40'] = { type='device', name='Hue smart plug 1', model='LOM007', room='Guest room', }, [12.08.2022] [10:02:42] [DEBUG] [QUICKAPP1001]: ['8dddf049-0a73-44e2-8fdd-e3c2310c1bb1'] = { type='device', name='Roof1', model='LCT012', room='Hall', }, [12.08.2022] [10:02:42] [DEBUG] [QUICKAPP1001]: ['9222ea53-37a6-4ac0-b57d-74bca1cfa23f'] = { type='device', name='Living room sensor', model='SML001', }, [12.08.2022] [10:02:42] [DEBUG] [QUICKAPP1001]: ['932bd43b-d8cd-44bc-b8bd-daaf72ae6f82'] = { type='device', name='Living room wall switch', model='RDM001', }, [12.08.2022] [10:02:42] [DEBUG] [QUICKAPP1001]: ['93d49902-6ce5-4383-9037-bfaeec8cd538'] = { type='device', name='Right window', model='LWO003', room='Living room', }, [12.08.2022] [10:02:42] [DEBUG] [QUICKAPP1001]: ['9be444b2-1587-4fbe-89ac-efb809d7e629'] = { type='device', name='Roof lamp', model='LCT015', room='Bedroom', }, [12.08.2022] [10:02:42] [DEBUG] [QUICKAPP1001]: ['a001f510-48dd-47fc-b9ff-f779c40dd693'] = { type='device', name='Table1', model='LCA001', room='Living room', }, [12.08.2022] [10:02:42] [DEBUG] [QUICKAPP1001]: ['a007e50b-0bdd-4e48-bee0-97636d57285a'] = { type='device', name='Dimmer switch', model='RWL021', }, [12.08.2022] [10:02:42] [DEBUG] [QUICKAPP1001]: ['a2b30b76-f044-46b6-9e1c-c8156baf00ab'] = { type='device', name='Table2', model='LCA001', room='Living room', }, [12.08.2022] [10:02:42] [DEBUG] [QUICKAPP1001]: ['c4bef7c5-0173-4d57-ae6a-d7f8a14b4dde'] = { type='device', name='Roof5', model='LCT012', room='Hall', }, [12.08.2022] [10:02:42] [DEBUG] [QUICKAPP1001]: ['d3b04b72-c2f0-401f-85d7-a65f2db5c48e'] = { type='device', name='Roof4', model='LCT012', room='Hall', }, [12.08.2022] [10:02:42] [DEBUG] [QUICKAPP1001]: ['e82c2285-20f3-401f-9621-9dc356feb694'] = { type='device', name='Köksö1', model='LCG002', room='Köksö', }, [12.08.2022] [10:02:42] [DEBUG] [QUICKAPP1001]: ['f2a231b4-9c27-466f-8344-05c4012c742b'] = { type='device', name='Philips hue', model='BSB002', }, [12.08.2022] [10:02:42] [DEBUG] [QUICKAPP1001]: ['795959f5-9313-4aae-b930-b178b48249e0'] = { type='room', name='Guest room', model='bedroom', }, [12.08.2022] [10:02:42] [DEBUG] [QUICKAPP1001]: ['9ab242fb-fae1-47e5-a54f-51bb8e80ac31'] = { type='room', name='Köksö', model='kitchen', }, [12.08.2022] [10:02:42] [DEBUG] [QUICKAPP1001]: ['bbe472e6-8ea8-477b-a116-ca345452e056'] = { type='room', name='Hall', model='living_room', }, [12.08.2022] [10:02:42] [DEBUG] [QUICKAPP1001]: ['bcd3daec-82a9-4de7-813a-3464beee0090'] = { type='room', name='Living room', model='living_room', }, [12.08.2022] [10:02:42] [DEBUG] [QUICKAPP1001]: ['cc309f30-d0f4-4ab5-a31f-39cd2206be57'] = { type='room', name='Bedroom', model='bedroom', }, [12.08.2022] [10:02:42] [DEBUG] [QUICKAPP1001]: ['03541e04-3481-47e7-ad22-c167437ca905'] = { type='scene', name='Bright', model='unknown', room='Kitchen table', }, [12.08.2022] [10:02:42] [DEBUG] [QUICKAPP1001]: ['29d8ba67-980a-4ab9-9fa6-50a0f994b273'] = { type='scene', name='Bright', model='unknown', room='Window lights', }, [12.08.2022] [10:02:42] [DEBUG] [QUICKAPP1001]: ['dd2cef77-e4fb-455b-867f-bad85f8f846c'] = { type='scene', name='Miami', model='unknown', room='Guest room', }, [12.08.2022] [10:02:42] [DEBUG] [QUICKAPP1001]: ['f1677f3f-db72-45b2-a922-97046cdbff9d'] = { type='scene', name='Bright', model='unknown', room='Guest room', }, [12.08.2022] [10:02:42] [DEBUG] [QUICKAPP1001]: ['39e1fc25-e926-42e5-a840-b2d21aaa08f3'] = { type='zone', name='Stars', model='recreation', }, [12.08.2022] [10:02:42] [DEBUG] [QUICKAPP1001]: ['79e44c37-15e0-4d93-8d89-230b14822270'] = { type='zone', name='Gymet', model='gym', }, [12.08.2022] [10:02:42] [DEBUG] [QUICKAPP1001]: ['9bfda4bf-b17e-4ec9-9123-a97afbcca814'] = { type='zone', name='Window lights', model='recreation', }, [12.08.2022] [10:02:42] [DEBUG] [QUICKAPP1001]: ['b5f12b5f-20c7-47a5-8535-c7a20fb9e66d'] = { type='zone', name='Kitchen island', model='kitchen', }, [12.08.2022] [10:02:42] [DEBUG] [QUICKAPP1001]: ['fe101c36-3dcc-4831-90f1-5052fc54e08b'] = { type='zone', name='Kitchen table', model='kitchen', }, That table is the one used when creating a custom mapping between names and Hue uids There will be improvements in the coming week and also hoping the V2 API will mature a bit more. There are some speed improvements that I know about that will improve the QA significantly...
- 45 replies
-
- 8
-
-

-
- qa
- development
- (and 1 more)
-
Hi all ! I would like to update another QA's label. In this case, it's QA with ID 95 and the label is called Doors. Does anyone know if this is possible and what that code might look like. function QuickApp:onInit() self:debug("QuickApp:OnInit") self:updateView("Doors open", "text", Doors) -- would like to update QA ID 95 end
-
Version 2.1
317 downloads
Netatmo Weather Station QA standalone v2.1 INTRODUCTION Netatmo Weather station QA brings complete integration of Netatmo weather station to HC3, HC3Lite and Yubii Home users including rain and wind gauges and support for more than one station. PREREQUISITES Fibaro HC3, HC3Lite or Yubii Home with firmware 5.150 or greater One or more Netatmo Weather station FEATURES QA type is now weather provider and can be selected to update Fibaro Home Center weather Complete integration of Netatmo weather station with HC3, HC3Lite and Yubii Home including rain gauge and anemometer Only one QA is needed for any number of Netatmo Weather stations and their included modules. Support for Netatmo weather station main module without outdoor module included Support for maximum 3 additional indoor modules per station Smart update system that follows Netatmo weather station cloud updates Netatmo weather station measurements are shown on child devices added for each measurement of all stations and their modules found QA has built in multi-language support with 32 languages included. QA can use HC selected language or user can select any other available language. AVAILABLE DOWNLOAD Netatmo Weather station QA v2.1 Netatmo Weather station QA User manual v2.0 Icons set INSTALLATION & UPGRADE IMPORTANT NOTE - Due to upload file type restrictions imposed by Fibaro for Quick Apps, after downloading file with FQA extension, change this extension to ZIP and then unzip package. In this ZIP package you will find PDF User manual, Netatmo Weather Station QA v2.1 Standalone.fqax and folder with icons. Please follow User manual for installation & upgrade. I hope that Fibaro will remove this limitation in near future since there is no such limitation on Fibaro Marketplace and even here for Virtual Devices. NOTE - I know that some users will not like that this QA is encrypted. Since license is now changed to donationware, I can send original code or even unencrypted QA, but only to users that will donate. Thank you for understanding! TERMS AND CONDITIONS Permission to use, copy, modify and distribute this software and its documentation for educational, research, personal use and non-profit purposes, without fee and without a signed licensing agreement is hereby granted, provided that the copyright notice, with "Terms and conditions" and "Disclaimer" appear in all copies, modifications and distributions. It is strictly forbidden to sell, rent, lease and/or lend this software for profit without prior consent from the Author. DISCLAIMER This software is provided by copyright owner "as is" and any express or implied warranties, including, but not limited to, the implied warranties of merchantability and fitness for a particular purpose are disclaimed. In no event shall the author and distributor be liable for any direct, indirect, incidental, special, exemplary, or consequential damages (including, but not limited to, procurement of substitute goods or services; loss of use, data, or profits; or business interruption) however caused and on any theory of liability, whether in contract, strict liability, or tort (including negligence or otherwise) arising in any way out of the use of this software, even if advised of the possibility of such damage. Fibaro a Nice company and their employees are not responsible for support of this QA. Please contact the author Sankotronic, on the Fibaro Forum, for any questions or support required. VERSION HISTORY 1.1 - first public release as open source. 2.0 - second release as donationware. For more details please check below. 2.1 - updated Netatmo server domain to api.netatmo.com since old one will be removed LOOK & FEEL Enjoy coding and your new Netatmo weather station QA! Sankotronic- 5 comments
-
- 7
-
-
- yubii home
- hc3l
- (and 5 more)
-
Version 2.1
82 downloads
Netatmo Indoor Air Quality Monitor QA standalone v2.1 INTRODUCTION Netatmo Indoor Air Quality Monitor QA brings complete integration of Netatmo Indoor Air Quality Monitor (coach) to HC3, HC3Lite and Yubii Home users with support for more than one monitor. PREREQUISITES Fibaro HC3, HC3Lite or Yubii Home with firmware 5.150 or greater One or more Netatmo Indoor Air Care Monitor (coach) FEATURES Complete integration of Netatmo Indoor Air Quality Monitor(s) Only one QA is needed for multiple Netatmo Indoor Air Quality Monitors Smart update system that follows Netatmo Indoor Air Quality Monitors cloud updates Netatmo Indoor Air Quality Monitor measurements are shown on child devices added for each measurement of all monitors QA has built in multi-language support with 32 languages included. QA can use HC selected language or user can select any other available language. DOWNLOAD PACKAGE CONTENT Netatmo Indoor Air Quality Monitor QA v2.1 Netatmo Indoor Air Quality Monitor QA User manual v2.0 Icons set INSTALLATION & UPGRADE IMPORTANT NOTE - Due to upload file type restrictions imposed by Fibaro for Quick Apps, after downloading file with FQA extension, change this extension to ZIP and then unzip package. In this ZIP package you will find PDF User manual, Netatmo Indoor Air Quality Monitor QA v2.0 Standalone.fqax and folder with icons. Please follow User manual for installation & upgrade. I hope that Fibaro will remove this limitation in near future since there is no such limitation on Fibaro Marketplace and even here for Virtual Devices. NOTE - I know that some users will not like that this QA is encrypted. Since license is now changed to donationware, I can send original code or even unencrypted QA, but only to users that will donate. Thank you for understanding! TERMS AND CONDITIONS Permission to use, copy and distribute this software and its documentation for educational, research, personal use and non-profit purposes, without fee and without a signed licensing agreement is hereby granted, provided that the copyright notice, with "Terms and conditions" and "Disclaimer" appear in all copies, modifications and distributions. It is strictly forbidden to sell, rent, lease and/or lend this software for profit without prior consent from the Author. DISCLAIMER This software is provided by copyright owner "as is" and any express or implied warranties, including, but not limited to, the implied warranties of merchantability and fitness for a particular purpose are disclaimed. In no event shall the author and distributor be liable for any direct, indirect, incidental, special, exemplary, or consequential damages (including, but not limited to, procurement of substitute goods or services; loss of use, data, or profits; or business interruption) however caused and on any theory of liability, whether in contract, strict liability, or tort (including negligence or otherwise) arising in any way out of the use of this software, even if advised of the possibility of such damage. Fibaro a Nice company and their employees are not responsible for support of this QA. Please contact the author Sankotronic, on the Fibaro Forum, for any questions or support required. VERSION HISTORY 1.1 - first public release as open source. 2.0 - second release with changed licese to donationware. For more details please check below. 2.1 - updated Netatmo server domain to api.netatmo.com since old one will be removed LOOK & FEEL Enjoy coding and your new Netatmo Indoor Air Quality Monitor QA! Sankotronic -
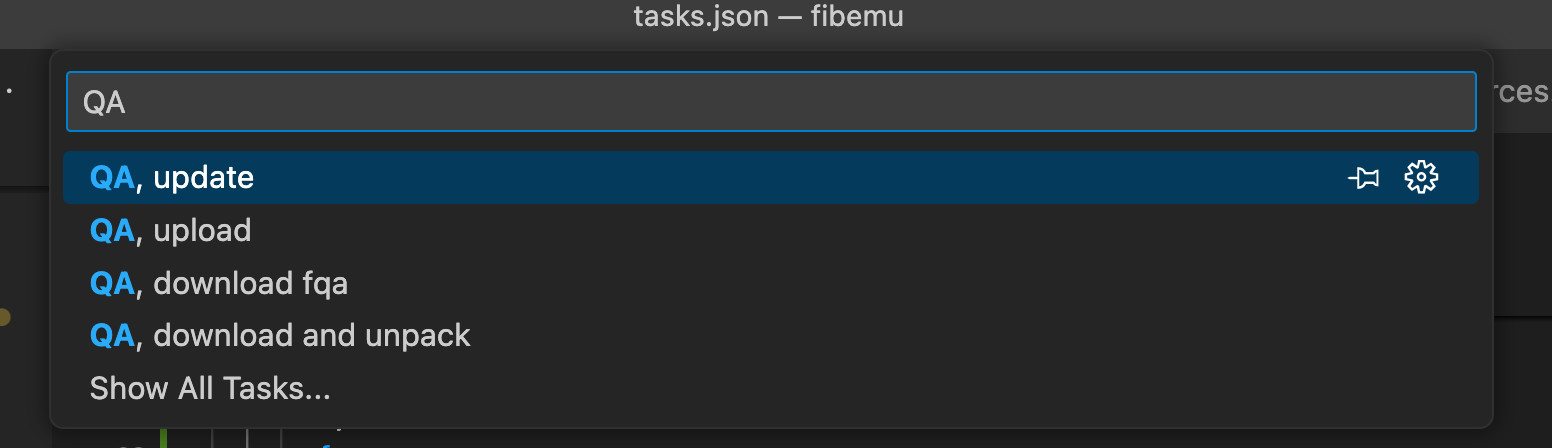
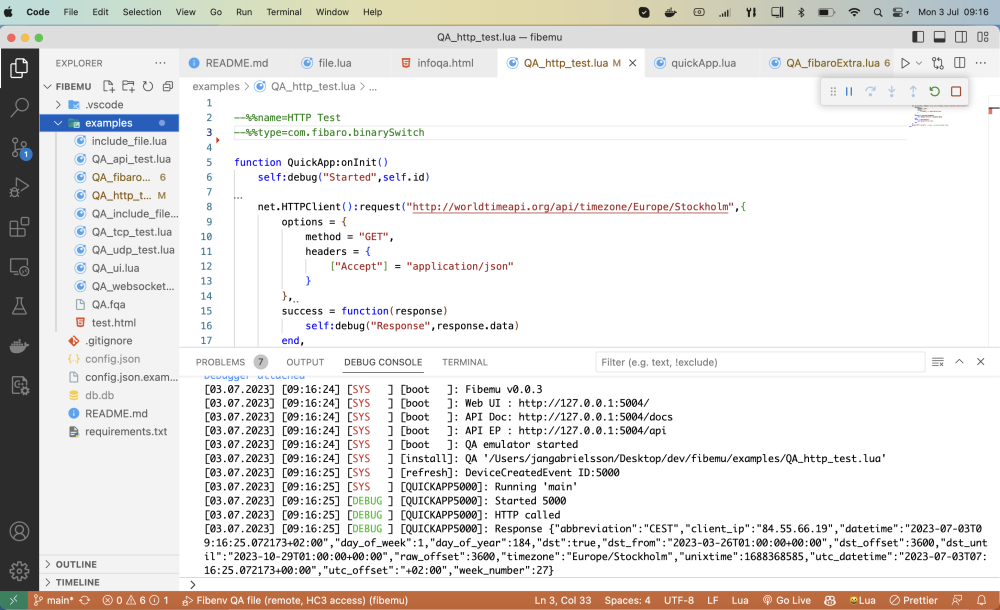
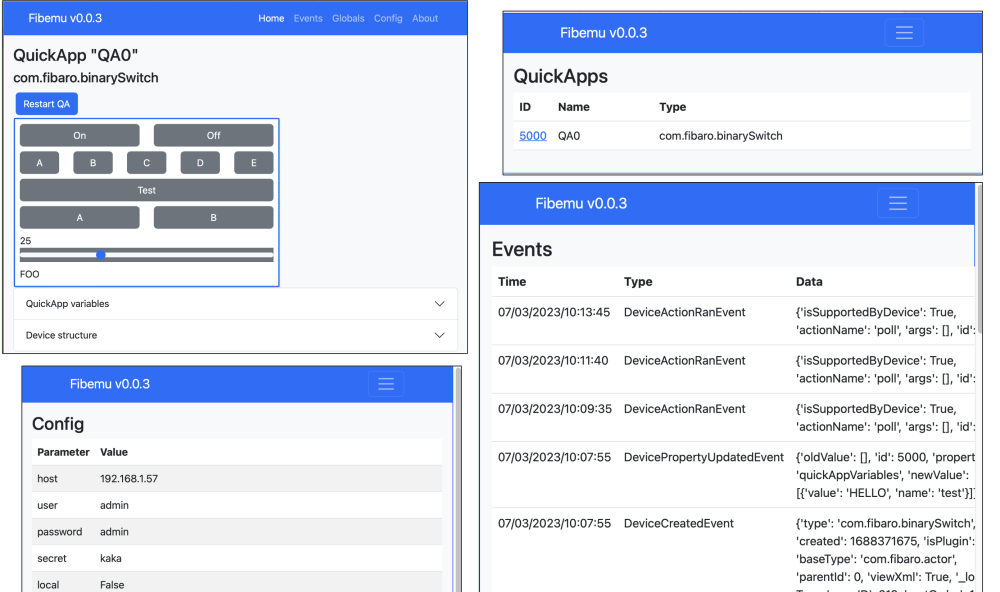
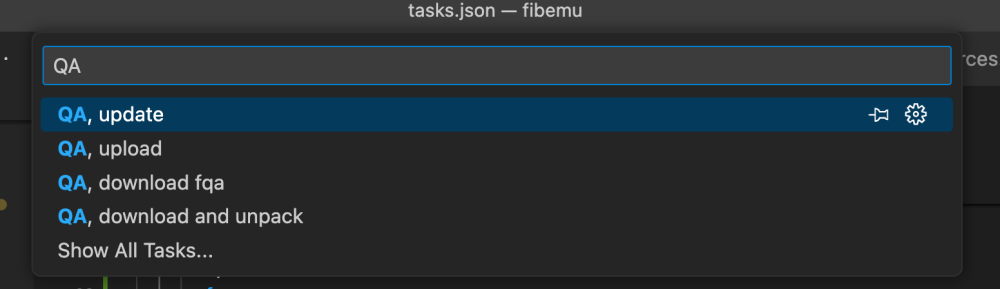
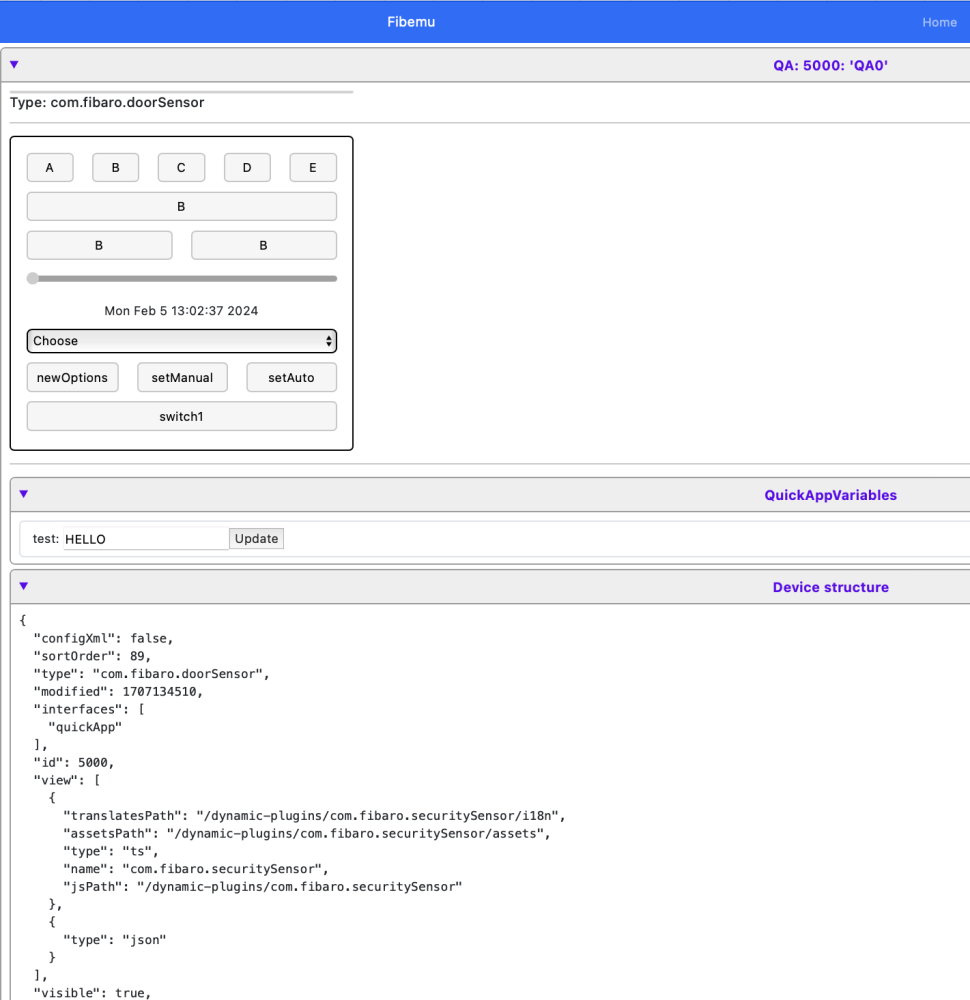
Note, my newest emulator that works in vscode is here This setup is designed for QA development using Visual Studio Code (VSCode). It includes an emulator, allowing you to run and debug QAs directly in VSCode. This setup is compatible with HC3, offering features such as code completion, syntax highlighting, and workflow tasks for downloading, editing, packaging, and uploading QAs to/from HC3. Tested on Windows 11 and MacOS, this setup should also work on Linux. You can download the repository from here. Documentation, still in progress, is available here. Additionally, there's a video tutorial on installing this setup on Windows 11. The setup in VSCode looks as shown in the image. This configuration allows you to develop and run a QuickApp (QA) offline on your PC, Mac, or Linux system, and interact with the HC3 in a controlled manner. There's also a simple Web user interface for interacting with the QAs and monitoring events (available at http://127.0.0.1:5004/frontend) To get started: Install Python 3 on your machine. NOTE! Only Python v3.11 and 3.12 is supported. in settings.json set "fibpython":".venv/bin/python", fibpython should point to your executable python. In the example it points to a python venv in the workspace, but it could point anywhere you have installed python. There is a settings.templ provided as a base for your own settings.json (should be in the .vscode directory) To test if the installation is ok , in the vscode terminal window, type what you set the fibpython path to. ex: .venv/bin/python and see if it works. Install the required Python libraries from requirements.txt using >pip install -r requirements.txt. Make sure they install for the python interpreter that is pointed out by fibpython. Create a config.json file with credentials to access the HC3, based on the config.json.example. Install the VSCode extension "Local Lua Debugger" by Tom Blind. Create a QA file in the directory, choose the launcher "Fibenv QA file (remote)," and start debugging with F5. For more examples, refer to the files in the examples/ directory. The included .gitignore file excludes the ./dev and ./test subdirectories, allowing you to test your own code without affecting the rest of the repository. For installing Python libraries, it's recommended to create a virtual environment in the folder first. This setup includes a Python wrapper for the Lua runtime (Lupa), addressing dependencies on luasocket and others, eliminating the need for Lua installation on your machine. To instruct the emulator about the type of QA, directives similar to TQAE can be used in the QA file, but with slight differences, as shown in the example. Ex. --%%name=MyQA --%%type=com.fibaro.binarySwitch --%%file=qa3_1.lua,extra; --%%remote=devices:788,790 --%%remote=globalVariables:myVar,anotherVar --%%debug=libraryfiles:false,userfilefiles:false function QuickApp:onInit() self:debug(self.name,self.type,self.id) fibaro.call(788,"turnOn") end Note the --%%remote directive It instructs the emulator that it's ok to call device 788,789 o the HC3. As a default, the emulator treats all resources as local (we can read from HC3 but then treat them as local copies) and we enable resources we want to interact with on the HC3 as 'remote'. This goes for other resources also like 'globalVariables'. The setup integrates with the Lua debugger, allowing for breakpoint setting and more. Note that this project is still in progress, and updates will be provided as improvements are made. The emulator UI can be accessed at http://127.0.0.1:5004/, with a Swagger page for implemented APIs at http://127.0.0.1:5004/docs. The port (5004) can be changed as needed. Supported APIs include various fibaro and net functions, along with api calls and plugin functions. The setup also includes classes for QuickApp development and management. Supported APIs fibaro.debug(tag,str) fibaro.warning(tag,str) fibaro.trace(tag,str) fibaro.error(tag,str) fibaro.call(deviceID, actionName, ...) fibaro.getType(deviceID) fibaro.getValue(deviceID, propertyName) fibaro.getName(deviceID) fibaro.get(deviceID,propertyName) fibaro.getGlobalVariable(varName) fibaro.setGlobalVariable(varName ,value) fibaro.getRoomName(roomID) fibaro.getRoomID(deviceID) fibaro.getRoomNameByDeviceID(deviceID) fibaro.getSectionID(deviceID) fibaro.getIds(devices) fibaro.getAllDeviceIds() fibaro.getDevicesID(filter) fibaro.scene(action, sceneIDs) fibaro.profile(profile_id, action) fibaro.callGroupAction(action,args) fibaro.alert(alert_type, user_ids, notification_content) fibaro.alarm(partition_id, action) fibaro.setTimeout(ms, func) fibaro.clearTimeout(ref) fibaro.setInterval(ms, func) fibaro.clearInterval(ref) fibaro.emitCustomEvent(name) fibaro.wakeUpDeadDevice(deviceID) fibaro.sleep(ms) ...and corresponding hub.* functions net.HTTPClient() net.TCPSocket() net.UDPSocket() net.WebSocketClient() net.WebSocketClientTLS() --mqtt.Client.connect(uri, options) --no yet --<mqttclient>:addEventListener(message,handler) --no yet --<mqttclient>:subscribe(topic, options) --no yet --<mqttclient>:unsubscribe(topics, options) --no yet --<mqttclient>:publish(topic, payload, options) --no yet --<mqttclient>::disconnect(options) --no yet api.get(call) api.put(call <, data>) api.post(call <, data>) api.delete(call <, data>) setTimeout(func, ms) clearTimeout(ref) setInterval(func, ms) clearInterval(ref) json.encode(expr) json.decode(string) plugin.mainDeviceId ---plugin.deleteDevice(deviceId) --not yet plugin.restart(deviceId) plugin.getProperty(id,prop) plugin.getChildDevices(id) plugin.createChildDevice(prop) class QuickAppBase class QuickApp class QuickAppChild class RefreshStateSubscriber class <name> property(get,set) QuickApp:onInit() -- called at startup if defined QuickApp - self:setVariable(name,value) QuickApp - self:getVariable(name) QuickApp - self:debug(...) QuickApp - self:trace(...) QuickApp - self:warning(...) QuickApp - self:error(...) QuickApp - self:updateView(elm,type,value) QuickApp - self:updateProperty(name,value) QuickApp - self:createChildDevice(props,device) QuickApp - self:removeChildDevice(id) QuickApp - self:initChildDevices(table) QuickApp - self:isTypeOf(typ) QuickApp - self:callAction(name, ...) QuickApp - self:setName(name) QuickApp - self:setEnabled(bool) QuickApp - self:setVisible(bool) getHierarchy() For your own QA development have the repo 'fibemu' downloaded in a separate directory. Then create your own vscode development directory, and initialise that as a git repo if you want. With that open, do File->Add Folder to Workspace, and add the fibemu folder. This is what Vscode calls a "multi-root" workspace and it. Create a lua (QuickApp file) in your directory. First line in your QuickApp file should be the offset to your directory --%%root=../<name of your dir>/ So if you have a multi-root workspace now that looks like o fibemu o myDirectory You set the root to ../myDirectory/ Then press F5 to start to debug. The launch commands and other will be taken from the fibemu folder. This way you can pull down new version of fibemu without messing up your own directory and development. Also, don't forget to setup your config.json with credentials (copy from fibemu/config.json.example) Here is a link to the multi-project setup instructions (may include a video in the future) Implementation Some implementation notes. Supported REST APIs. Workflow There are some defined vscode Tasks that help in remotely uploading and updating the QA on the HC3 from within the vscode environment "QA, download fqa" downloads an QA from the HC3 and saves it as a .fqa file. The task will prompt for deviceID and path where to store. The path/dir needs to exist "QA, download and unpack" downloads an QA from the HC3 and saves all QA files as .lua files. It also adds fibemu headers in the main file so it can be opened and run with the emulator . The task will prompt for deviceId and path where to store. The path/dir needs to exist "QA, upload" will upload the QA to the HC3. It will prompt for QA file. If '.' is given as argument it will upload the current opened file. This will create a new QA, with a new deviceId on the HC3. "QA, update" will try to update QA files, viewLayout, uiCallbacks, and quickAppVariables of an existing QA on the HC3. If '.' is given as argument the file must have set the fibemu header --%%id=<ID> so it knows what QA to update. One can also give the deviceId of the QA on the HC3 that should be updated. This is convenient when developing and avoiding new IDs being "consumed". Sometimes when you update a QA you would not like to update the quickAppVariables. In that case give '-' instead '.' for the current opened file, or -deviceId for an exiting QA on the HC3. Scripts An advantage with the emulator is that we have access to more lua functions than on the HC3 which allow us to write some maintenance scripts QA backup. Backs up QAs from the HC3 to a local directory, keeping the 3 last versions QA distribution. Packs a development file to a .fqa, initialises some quickAppVariables, adds readme.txt file and zips it to an archive. Known issues While the QA is running, break-points can't be added. This is a limitation of the debugger used. Just add the break-point and restart the QA. When the emulator crashes, it may leave a process open that keeps the port 5004 in use. The emulator will complain at restart that the port is already bound. You may need to manually kill the process. On Mac: >kill -9 $(lsof -ti:5004)
- 394 replies
-
- 7
-
-
-
- visual studio code
- quickapp
- (and 3 more)
-
Hi everyone, I've been developing a QA and while doing so I have added more buttons than I needed. Labels are easy enough to remove as there is a trash can to delete them but for some reason I cannot remove a row of buttons that has no code linked to them. Does anyone know how to get rid of these excess buttons? Thanks, Anthony
-
Hi all. I am currently creating a QA for my iZone AC system and came across the "log" property. I currently have a temperature and vent mode displayed along with an icon of the temperature sensor: I was wondering three things: 1. is it possible to put superscript in somehow so I can display oC for the units? 2. is it possible to change the color etc of the log text? I tried with HTML tags but didn't seem to work 3. Finally - is there a way that I can send the temperature to be logged so it appears on the temperature chart under the General tab? Thanks in advance, Anthony

-
Alarm Control HC3 new alarm concept could be used very efficiently by AOQ: For example: Assuming we have defined "nightSleep" which includes 1 doors and 2 window sensors. The zone is activated during the night (23:00~06:30). When the zone has breached we can send notification and/or send notification for breached device. When sensor has breached it will stay in breach mode and not monitored by alarm anymore, so additional breach is not identified. In order to monitor all sensors again, entire zone must be re-armed. Here is an example how to do it: jS2n={door=300, wSense1=410,wSense2=420, rgb=500} jM={ {0,"$blank",{timeSlot="06:30~23:00,23:00~,~06:30",initAct={"nightSleep","disarmAlarm",""}, trueAct={"nightSleep","armAlarm",""},falseAct={"nightSleep","disarmAlarm",""}}}, {0,"`door`|`wSense1`|`wSense2`",{state="alarm=breached",trueAct={{"Night Sleep Zone breached","sendEmail","$name at $room has breached"}}}}, {0,"$nightSleep",{state="value=breached",trueAct={{"nightSleep","disarmAlarm",""},{"nightSleep","armAlarm","5"}}}}, If you need visual indication of alarm status, we can add trigAct{} to set RGB Bulb according to alarm state by change last line as following: jS2n={door=300, wSense1=410,wSense2=420, rgb=500} jM={ {0,"$blank",{timeSlot="06:30~23:00,23:00~,~06:30",initAct={"nightSleep","disarmAlarm",""}, trueAct={"nightSleep","armAlarm",""},falseAct={"nightSleep","disarmAlarm",""}}}, {0,"`door`|`wSense1`|`wSense2`",{state="alarm=breached",trueAct={{"Night Sleep Zone breached","sendEmail","$name at $room has breached"}}}}, {0,"$nightSleep",{state="value=breached",trueAct={{"nightSleep","disarmAlarm",""},{"nightSleep","armAlarm","5"}}, trigAct={{"`rgb`","setColor,255,0,0,0","","{$nightSleep:value=breached}"},{"`rgb`","setColor,0,255,0,0","","{$nightSleep:value=armed}"},{"`rgb`","setValue,0","","{$nightSleep:value=disarmed}"}}}, You can use sendEmail, sendPush or sendiPush notification. Note: Using sendiPush you can define to execute scene or an action on any device (and any command) in the system. By pressing "RUN" button on iPush notification you can do follow: {"Night Sleep Zone breached","sendiPush,run_30","$name at $room has breached"} run scene 30 {"Night Sleep Zone breached","sendiPush,run85{turnOn}","$name at $room has breached"} turn ON device 85 {"Night Sleep Zone breached","sendiPush,run90{setColor,255,0,0,0}","$name at $room has breached"} set red color on device 90
-
Version 1.0
32 downloads
WeatherAPI weather provider QA standalone v1.0 INTRODUCTION WeatherAPI weather provider QA brings current weather state and forecast provided by Weather API to your home automation. Can be selected as default weather provider on HC3, HC3L and Yubii Home. PREREQUISITES Fibaro HC3, HC3Lite or Yubii Home with firmware 5.160 or greater User account on WeatherAPI with free subscription FEATURES QA can be set as default weather provider to update HC weather condition, temperature, humidity and wind. Current weather and weather forecast measurements and are shown on child devices added, while current weather and forecast condition is shown by icon and description on main QA. The QA checks measurement units setup on user's Fibaro controller and adjusts values accordingly. QA has built in multi-language support with 32 languages included (see APPENDIX 1 for the list). QA can use HC selected language or user can select any other available language. DOWNLOAD PACKAGE CONTENT WeatherAPI weather provider QA v1.0 WeatherAPI weather provider QA User manual v1.0 Icon set INSTALL & UPGRADE MPORTANT NOTE - Due to upload file type restrictions imposed by Fibaro for Quick Apps, after downloading file with FQA extension, change this extension to ZIP and then unzip package. In this ZIP package you will find PDF User manual, WeatherAPI weather provider QA v1.0 Standalone.fqax and folder with icons. Please follow User manual for installation & upgrade. I hope that Fibaro will remove this limitation in near future since there is no such limitation on Fibaro Marketplace and even here for Virtual Devices. NOTE - I know that some users will not like that this QA is encrypted. Since license is now changed to donationware, I can send original code or even unencrypted QA, but only to users that will donate or at least write a review and vote. Thank you for understanding! TERMS AND CONDITIONS Permission to use, copy and distribute this software and its documentation for educational, research, personal use and non-profit purposes, without fee and without a signed licensing agreement is hereby granted, provided that the copyright notice, with "Terms and conditions" and "Disclaimer" appear in all copies, modifications and distributions. It is strictly forbidden to sell, rent, lease and/or lend this software for profit without prior consent from the Author. DISCLAIMER This software is provided by copyright owner "as is" and any express or implied warranties, including, but not limited to, the implied warranties of merchantability and fitness for a particular purpose are disclaimed. In no event shall the author and distributor be liable for any direct, indirect, incidental, special, exemplary, or consequential damages (including, but not limited to, procurement of substitute goods or services; loss of use, data, or profits; or business interruption) however caused and on any theory of liability, whether in contract, strict liability, or tort (including negligence or otherwise) arising in any way out of the use of this software, even if advised of the possibility of such damage. Fibaro a Nice company and their employees are not responsible for support of this QA. Please contact the author Sankotronic, on the Fibaro Forum, for any questions or support required. VERSION HISTORY 1.0 - first public release as donationware. LOOK & FEEL Enjoy coding and your new WeatherAPI weather provider QA! Sankotronic -
Version 1.2
85 downloads
Weather Underground weather provider QA standalone v1.2 INTRODUCTION Weather Underground weather provider QA brings current weather state and forecast provided by Wunderground to your home automation. Can be selected as default weather provider on HC3, HC3L and Yubii Home. PREREQUISITES Fibaro HC3, HC3Lite or Yubii Home with firmware 5.160 or greater At least one personal weather station connected to Weather Underground User account on Weather underground with free subscription FEATURES QA can be set as default weather provider to update HC weather condition, temperature, humidity and wind. Current weather and weather forecast measurements and are shown on child devices added, while current weather and forecast condition is shown by icon and description on main QA. The QA checks measurement units setup on user's Fibaro controller and adjusts values accordingly. QA has built in multi-language support with 32 languages included (see APPENDIX 1 for the list). QA can use HC selected language or user can select any other available language. DOWNLOAD PACKAGE CONTENT Weather Underground weather provider QA v1.2 Weather Underground weather provider QA User manual v1.2 Icon set INSTALL & UPGRADE MPORTANT NOTE - Due to upload file type restrictions imposed by Fibaro for Quick Apps, after downloading file with FQA extension, change this extension to ZIP and then unzip package. In this ZIP package you will find PDF User manual, Weather Underground weather provider QA v1.0 Standalone.fqax and folder with icons. Please follow User manual for installation & upgrade. I hope that Fibaro will remove this limitation in near future since there is no such limitation on Fibaro Marketplace and even here for Virtual Devices. NOTE - I know that some users will not like that this QA is encrypted. Since license is now changed to donationware, I can send original code or even unencrypted QA, but only to users that will donate or at least write a review and vote. Thank you for understanding! TERMS AND CONDITIONS Permission to use, copy and distribute this software and its documentation for educational, research, personal use and non-profit purposes, without fee and without a signed licensing agreement is hereby granted, provided that the copyright notice, with "Terms and conditions" and "Disclaimer" appear in all copies, modifications and distributions. It is strictly forbidden to sell, rent, lease and/or lend this software for profit without prior consent from the Author. DISCLAIMER This software is provided by copyright owner "as is" and any express or implied warranties, including, but not limited to, the implied warranties of merchantability and fitness for a particular purpose are disclaimed. In no event shall the author and distributor be liable for any direct, indirect, incidental, special, exemplary, or consequential damages (including, but not limited to, procurement of substitute goods or services; loss of use, data, or profits; or business interruption) however caused and on any theory of liability, whether in contract, strict liability, or tort (including negligence or otherwise) arising in any way out of the use of this software, even if advised of the possibility of such damage. Fibaro a Nice company and their employees are not responsible for support of this QA. Please contact the author Sankotronic, on the Fibaro Forum, for any questions or support required. VERSION HISTORY 1.0 - first public release as donationware. 1.1 - corrected handling of units of measurement 1.2 - added child devices for weather current and forecast conditions that can be used in other user code. Bug corrections for translations and debugging. LOOK & FEEL Enjoy coding and your new Weather Underground weather provider QA! Sankotronic- 2 comments
- 1 review
-
- 1
-
-
- yubii
- sankotronic
- (and 5 more)
-
Version 1.1
29 downloads
Weerlive weather provider QA standalone v1.1 INTRODUCTION Weerlive weather provider QA brings current weather state provided by Weerlive Nederland to your home automation. Can be selected as default weather provider on HC3, HC3L and Yubii Home. NOTE - This weather provider is working only for Nederland! PREREQUISITES Fibaro HC3, HC3Lite or Yubii Home with firmware 5.160 or greater User account on Weerlive with free subscription FEATURES QA can be set as default weather provider to update HC weather condition, temperature, humidity and wind. Weerlive measurements are shown on child devices added while weather condition is shown by icon and description on main QA. The QA checks measurement units setup on user's Fibaro controller and adjusts values accordingly. QA has built in multi-language support with 32 languages included (see APPENDIX 1 for the list). QA can use HC selected language or user can select any other available language. DOWNLOAD PACKAGE CONTENT Weerlive weather provider QA v1.1 Weerlive weather provider QA User manual v1.1 Icon set INSTALLATION & UPGRADE IMPORTANT NOTE - Due to upload file type restrictions imposed by Fibaro for Quick Apps, after downloading file with FQA extension, change this extension to ZIP and then unzip package. In this ZIP package you will find PDF User manual, Weerlive weather provider QA v1.0 Standalone.fqax and folder with icons. Please follow User manual for installation & upgrade. I hope that Fibaro will remove this limitation in near future since there is no such limitation on Fibaro Marketplace and even here for Virtual Devices. NOTE - I know that some users will not like that this QA is encrypted. Since license is now changed to donationware, I can send original code or even unencrypted QA, but only to users that will donate or at least write a review and vote. Thank you for understanding! TERMS AND CONDITIONS Permission to use, copy and distribute this software and its documentation for educational, research, personal use and non-profit purposes, without fee and without a signed licensing agreement is hereby granted, provided that the copyright notice, with "Terms and conditions" and "Disclaimer" appear in all copies, modifications and distributions. It is strictly forbidden to sell, rent, lease and/or lend this software for profit without prior consent from the Author. DISCLAIMER This software is provided by copyright owner "as is" and any express or implied warranties, including, but not limited to, the implied warranties of merchantability and fitness for a particular purpose are disclaimed. In no event shall the author and distributor be liable for any direct, indirect, incidental, special, exemplary, or consequential damages (including, but not limited to, procurement of substitute goods or services; loss of use, data, or profits; or business interruption) however caused and on any theory of liability, whether in contract, strict liability, or tort (including negligence or otherwise) arising in any way out of the use of this software, even if advised of the possibility of such damage. Fibaro a Nice company and their employees are not responsible for support of this QA. Please contact the author Sankotronic, on the Fibaro Forum, for any questions or support required. VERSION HISTORY 1.0 - first public release as donationware. 1.1 - Added local variable condition to save weather condition description. Bug correction for translations and debugging LOOK & FEEL Enjoy coding and your new Weerlive Weather Map weather provider QA! Sankotronic -
Version 1.3
56 downloads
Open Weather Map weather provider QA standalone v1.3 INTRODUCTION Open Weather Map weather provider QA brings current weather state provided by Open Weather Map to your home automation. Can be selected as default weather provider on HC3, HC3L and Yubii Home. PREREQUISITES Fibaro HC3, HC3Lite or Yubii Home with firmware 5.160 or greater User account on Open Weather Map with free subscription FEATURES QA can be set as default weather provider to update HC weather condition, temperature, humidity and wind. Open Weather Map measurements are shown on child devices added while weather condition is shown by icon and description on main QA. The QA checks measurement units setup on user's Fibaro controller and adjusts values accordingly. QA has built in multi-language support with 32 languages included (see APPENDIX 1 for the list). QA can use HC selected language or user can select any other available language. DOWNLOAD PACKAGE CONTENT Open Weather Map weather provider QA v1.3 Open Weather Map weather provider QA User manual v1.3 Icon set INSTALLATION & UPGRADE IMPORTANT NOTE - Due to upload file type restrictions imposed by Fibaro for Quick Apps, after downloading file with FQA extension, change this extension to ZIP and then unzip package. In this ZIP package you will find PDF User manual, weather provider QA v1.1 Standalone.fqax and folder with icons. Please follow User manual for installation & upgrade. I hope that Fibaro will remove this limitation in near future since there is no such limitation on Fibaro Marketplace and even here for Virtual Devices. NOTE - I know that some users will not like that this QA is encrypted. Since license is now changed to donationware, I can send original code or even unencrypted QA, but only to users that will donate or at least write a review and vote. Thank you for understanding! TERMS AND CONDITIONS Permission to use, copy and distribute this software and its documentation for educational, research, personal use and non-profit purposes, without fee and without a signed licensing agreement is hereby granted, provided that the copyright notice, with "Terms and conditions" and "Disclaimer" appear in all copies, modifications and distributions. It is strictly forbidden to sell, rent, lease and/or lend this software for profit without prior consent from the Author. DISCLAIMER This software is provided by copyright owner "as is" and any express or implied warranties, including, but not limited to, the implied warranties of merchantability and fitness for a particular purpose are disclaimed. In no event shall the author and distributor be liable for any direct, indirect, incidental, special, exemplary, or consequential damages (including, but not limited to, procurement of substitute goods or services; loss of use, data, or profits; or business interruption) however caused and on any theory of liability, whether in contract, strict liability, or tort (including negligence or otherwise) arising in any way out of the use of this software, even if advised of the possibility of such damage. Fibaro a Nice company and their employees are not responsible for support of this QA. Please contact the author Sankotronic, on the Fibaro Forum, for any questions or support required. VERSION HISTORY 1.0 - first public release as donationware. 1.1 - corrected handling of units of measurement 1.2 - added child devices for minimum and maximum temperature for the current day 1.3 - Added child device for weather condition code, added local variables to store weather condition code and description and corrected bugs for translation and debugging LOOK & FEEL Enjoy coding and your new Open Weather Map weather provider QA! Sankotronic-
- 3
-
-
- yubii
- sankotronic
- (and 5 more)
-
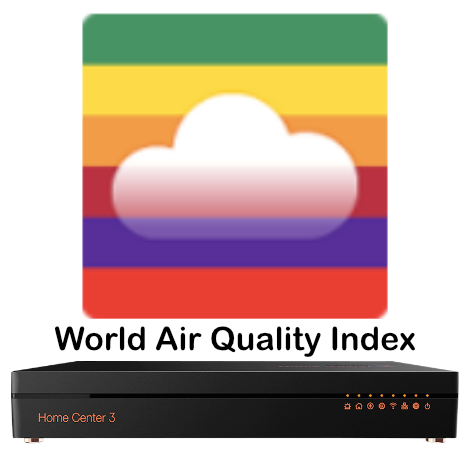
Version 1.1
17 downloads
Air Quality Worldwide QA standalone v1.1 INTRODUCTION Air Quality Worldwide QA brings current air quality provided by nearest station to your home automation. PREREQUISITES Fibaro HC3, HC3Lite or Yubii Home with firmware 5.160 or greater Request API token at: https://aqicn.org/data-platform/token/ FEATURES The QA retrieves air quality data from the nearest station found depending on user location settings. Air Quality Worldwide QA measurements are shown on child devices added while air quality index is shown by icon and description on main QA. QA has built in multi-language support with 32 languages included (see APPENDIX 1 for the list). QA can use HC selected language or user can select any other available language. DOWNLOAD PACKAGE CONTENT Air Quality Worldwide QA v1.1 Air Quality Worldwide QA User manual v1.1 Icon set INSTALL & UPGRADE MPORTANT NOTE - Due to upload file type restrictions imposed by Fibaro for Quick Apps, after downloading file with FQA extension, change this extension to ZIP and then unzip package. In this ZIP package you will find PDF User manual, Air Quality Worldwide QA v1.1 Standalone.fqax and folder with icons. Please follow User manual for installation & upgrade. I hope that Fibaro will remove this limitation in near future since there is no such limitation on Fibaro Marketplace and even here for Virtual Devices. NOTE - I know that some users will not like that this QA is encrypted. Since license is now changed to donationware, I can send original code or even unencrypted QA, but only to users that will donate or at least write a review and vote. Thank you for understanding! TERMS AND CONDITIONS Permission to use, copy and distribute this software and its documentation for educational, research, personal use and non-profit purposes, without fee and without a signed licensing agreement is hereby granted, provided that the copyright notice, with "Terms and conditions" and "Disclaimer" appear in all copies, modifications and distributions. It is strictly forbidden to sell, rent, lease and/or lend this software for profit without prior consent from the Author. DISCLAIMER This software is provided by copyright owner "as is" and any express or implied warranties, including, but not limited to, the implied warranties of merchantability and fitness for a particular purpose are disclaimed. In no event shall the author and distributor be liable for any direct, indirect, incidental, special, exemplary, or consequential damages (including, but not limited to, procurement of substitute goods or services; loss of use, data, or profits; or business interruption) however caused and on any theory of liability, whether in contract, strict liability, or tort (including negligence or otherwise) arising in any way out of the use of this software, even if advised of the possibility of such damage. Fibaro a Nice company and their employees are not responsible for support of this QA. Please contact the author Sankotronic, on the Fibaro Forum, for any questions or support required. VERSION HISTORY 1.0 - first public release as donationware. 1.1 - corrected bugs with translations and debugging. LOOK & FEEL Enjoy coding and your new Weather Underground weather provider QA! Sankotronic -

Version 1.1
31 downloads
Nanoleaf Shapes QA standalone v1.1 INTRODUCTION Nanoleaf Shapes QA brings complete integration of Nanoleaf Canvas, Shapes, Lines and Elements lights to HC3, HC3Lite and Yubii Home. PREREQUISITES Fibaro HC3, HC3Lite or Yubii Home with firmware 5.160 or greater Nanoleaf Canvas, Shapes, Lines or Elements light FEATURES Enables HC3, HC3Lite and Yubii Home to control Nanoleaf lights and show their status Can control brightness, hue, saturation, color temperature and activate color effects QA automatically updates list of the available effects when added or deleted with Nanoleaf mobile application Has buttons for light effects selection and activation Selected and running effect type can be recognized by emoji icon in front of the of the effect name. Nanoleaf Canvas, Shapes, Lines and Elements light control panel has built in Rhythm module and there is no AUX input available. Rhythm module is automatically activated when rhythm effect is activated Has button for generating authorization token for easy connection to the Nanoleaf light QA has built in multi-language support with 32 languages included. QA can use HC selected language or user can select any other available language. AVAILABLE DOWNLOAD Nanoleaf Shapes QA v1.1 Nanoleaf Shapes QA User manual v1.1 INSTALLATION & UPGRADE IMPORTANT NOTE - Due to upload file type restrictions imposed by Fibaro for Quick Apps, after downloading file with FQA extension, change this extension to ZIP and then unzip package. In this ZIP package you will find PDF User manual, Nanoleaf Shapes QA v1.1 Standalone.fqax. Please follow User manual for installation & upgrade. I hope that Fibaro will remove this limitation in near future since there is no such limitation on Fibaro Marketplace and even here for Virtual Devices. NOTE - I know that some users will not like that this QA is encrypted. Since license is now changed to donationware, I can send original code or even unencrypted QA, but only to users that will donate. Thank you for understanding! TERMS AND CONDITIONS Permission to use, copy and distribute this software and its documentation for educational, research, personal use and non-profit purposes, without fee and without a signed licensing agreement is hereby granted, provided that the copyright notice, with "Terms and conditions" and "Disclaimer" appear in all copies, modifications and distributions. It is strictly forbidden to sell, rent, lease and/or lend this software for profit without prior consent from the Author. DISCLAIMER This software is provided by copyright owner "as is" and any express or implied warranties, including, but not limited to, the implied warranties of merchantability and fitness for a particular purpose are disclaimed. In no event shall the author and distributor be liable for any direct, indirect, incidental, special, exemplary, or consequential damages (including, but not limited to, procurement of substitute goods or services; loss of use, data, or profits; or business interruption) however caused and on any theory of liability, whether in contract, strict liability, or tort (including negligence or otherwise) arising in any way out of the use of this software, even if advised of the possibility of such damage. Fibaro a Nice company and their employees are not responsible for support of this QA. Please contact the author Sankotronic, on the Fibaro Forum, for any questions or support required. VERSION HISTORY 1.0 - first public release as open source. 1.1 - second release as donationware. For details please check below. LOOK & FEEL Enjoy coding and your new Nanoleaf Shapes QA! Sankotronic-
- 3
-
-
- sankotronic
- nanoleaf
- (and 4 more)
-
Version 1.1
35 downloads
Nanoleaf Aurora QA standalone v1.1 INTRODUCTION Nanoleaf Aurora QA brings complete integration of Nanoleaf Aurora light panels to HC3, HC3Lite and Yubii Home. PREREQUISITES Fibaro HC3, HC3Lite or Yubii Home with firmware 5.160 or greater Nanoleaf Aurora light panels FEATURES Enables HC3, HC3Lite and Yubii Home to control Nanoleaf Aurora lights and show their status Can control brightness, hue, saturation, color temperature and activate color effects QA automatically updates list of the available effects when added or deleted with Nanoleaf mobile application Has buttons for light effects selection and activation Selected and running effect type can be recognized by emoji icon in front of the of the effect name. If Nanoleaf Aurora light has attached Rhythm module this QA will recognize it and enable selection between built in microphone or AUX input. Rhythm module is automatically activated when rhythm effect is activated Has button for generating authorization token for easy connection to the Nanoleaf Aurora light QA has built in multi-language support with 32 languages included. QA can use HC selected language or user can select any other available language. AVAILABLE DOWNLOAD Nanoleaf Aurora QA v1.1 Nanoleaf Aurora QA User manual v1.1 INSTALLATION & UPGRADE IMPORTANT NOTE - Due to upload file type restrictions imposed by Fibaro for Quick Apps, after downloading file with FQA extension, change this extension to ZIP and then unzip package. In this ZIP package you will find PDF User manual, Nanoleaf Aurora QA v1.1 Standalone.fqax. Please follow User manual for installation & upgrade. I hope that Fibaro will remove this limitation in near future since there is no such limitation on Fibaro Marketplace and even here for Virtual Devices. NOTE - I know that some users will not like that this QA is encrypted. Since license is now changed to donationware, I can send original code or even unencrypted QA, but only to users that will donate. Thank you for understanding! TERMS AND CONDITIONS Permission to use, copy and distribute this software and its documentation for educational, research, personal use and non-profit purposes, without fee and without a signed licensing agreement is hereby granted, provided that the copyright notice, with "Terms and conditions" and "Disclaimer" appear in all copies, modifications and distributions. It is strictly forbidden to sell, rent, lease and/or lend this software for profit without prior consent from the Author. DISCLAIMER This software is provided by copyright owner "as is" and any express or implied warranties, including, but not limited to, the implied warranties of merchantability and fitness for a particular purpose are disclaimed. In no event shall the author and distributor be liable for any direct, indirect, incidental, special, exemplary, or consequential damages (including, but not limited to, procurement of substitute goods or services; loss of use, data, or profits; or business interruption) however caused and on any theory of liability, whether in contract, strict liability, or tort (including negligence or otherwise) arising in any way out of the use of this software, even if advised of the possibility of such damage. Fibaro a Nice company and their employees are not responsible for support of this QA. Please contact the author Sankotronic, on the Fibaro Forum, for any questions or support required. VERSION HISTORY 1.0 - first public release as open source. 1.1 - second release as donationware. For details please check below. LOOK & FEEL Enjoy coding and your new Nanoleaf Aurora QA! Sankotronic -
Czy ktoś może pomóc w wykonaniu QA? Potrzebne aby QA : - po naciśnięciu przycisku wykonało - "open" danego urządzenia - sprawdziło stan czujnika binarnego i zwróciło jego wartość w formie "otwarte" gdy true lub "zamknięte" gdy false - wpisało stan czujnika w etykiecie QA Przykład: function QuickApp:wjazd_open() -- nazwa przycisku QA hub.call(1955, "open") -- otwarcie bramy (smart implant zwiera styki) self:updateView("wjazd_label", "text", "Brama wjazdowa: " .. tostring(hub.getValue(152, "value")) ) -- 152 to czujnik otwarcia bramy end