Welcome to Smart Home Forum by FIBARO
Dear Guest,
as you can notice parts of Smart Home Forum by FIBARO is not available for you. You have to register in order to view all content and post in our community. Don't worry! Registration is a simple free process that requires minimal information for you to sign up. Become a part of of Smart Home Forum by FIBARO by creating an account.
As a member you can:
- Start new topics and reply to others
- Follow topics and users to get email updates
- Get your own profile page and make new friends
- Send personal messages
- ... and learn a lot about our system!
Regards,
Smart Home Forum by FIBARO Team
Search the Community
Showing results for tags 'scene'.
-
Many users have downloaded All-in-One Scene and I believe there are some questions about usage. The purpose of this topic is to help to get most of All-in-One Scene , to share best ideas/actions and solutions. Please feel free to ask any scene's related question and I'll share my best solution with you.
-
Version 22.0
4,307 downloads
🧠 What AOQ (All-in-One QuickApp) Offers Multi-System Control: Seamlessly manages HC3, HC2, and HCL controllers using master/slave architecture. Unified Automation: Replaces scattered Lua and Block scenes with one centralized QA. Device Intelligence: Auto-detects Z-Wave, ZigBee, Nice, QA devices, and scenes. Alarm Zone Management: Identifies breached zones/sensors and triggers actions. Custom Events & Profiles: Supports dynamic profiles and custom rule-based automation. 🛠️ Core Configuration: Job Management - jM{} Hash Table Each line in jM{} includes: Field Description Time Span Duration in minutes for monitoring or action. 0 = activity only, negative = suspended IDs List Devices/scenes/variables/keywords (e.g., `"137,630"or"_45"` for scenes) Criteria & Rules Optional conditions like state="value=true" or property="power" Action Tables Optional commands: trueAct{}, falseAct{}, trigAct{}, etc. 🔄 Device Aliasing with jS2n{} Avoid hardcoding device IDs: jS2n = {mSensor=200, boiler=137, dryer=630, light=230, timeScene="_17"} Use aliases in jM{}: jM={ {15,"`mSensor`",{state="value=true", trueAct={"`light`", "turnOn"},falseAct={"`light`", "turnOff"}}} } 🔍 Monitor Option Detects inactivity or failure to report: {8, "`timeScene` and _545", {timeSlot="10:00~22:00"}} -- scenes must be active every 8 min between 10am to 22pm {10, "`boiler`and 145", {property="power"}} -- must report power every 10 min {30, "`boiler`", {state="power>100"}} -- alert if power >100 for 30 min ⚙️ Control Option Example: Turn on light when motion sensor is breached, turn off after 3 min when motion sensor back to safe: jM={"`mSensor`",{state="value=true",trueAct={"`lightSw`","turnOn"},falseAct={"`lightSw`","turnOff", "180"}}} To restrict to nighttime: jM={"`mSensor`",{state="value=true",timeslot="18:00~07:00", trueAct={"`lightSw`","turnOn"},falseAct={"`lightSw`","turnOff", "180"}}} Example: Turn on light when motion sensor is breached, turn off after 3 min (regardless of when motion sensor back to safe) jM={"`mSensor`",{state="value=true", trueAct={{"`lightSw`","turnOn"},{"`lightSw`","turnOff", "180"}}}} 🧪 Debug & Table View Debugger Output: Shows executed commands with color-coded status. Table Header: Displays system info, sunrise/sunset, home/vacation mode, system traffic. Columns: Device type, ID, name, battery status Criteria evaluation Alerts and elapsed time Action tables and active rules 📊 Top Active Monitor (New) AOQ now includes an enhanced Top Active Devices monitor designed to identify devices that may destabilize HC3 performance. It analyzes lifetime activity, current load per hour, and burst behavior to detect devices generating excessive or abnormal traffic. The table highlights devices that may cause delays, radio congestion, disconnects, or even controller restarts. A Peak/h column appears only when abnormal bursts are detected, helping users quickly locate problematic devices without cluttering the interface. 📘 Want to Go Deeper? You can find the full documentation and guides on the Smart Home Forum by FIBARO, including: AOQ Advanced User’s Guide AOQ Quick Guide AOQ HC-WebEye Viewer -

Switch does not trigger scene, only interval makes it work
kunoch posted a question in Home Center Lite
Hi all, why does this scene only work when I have the interval? when removing the interval and declaring the 'Lichtschalter' as the trigger, the scene is not started.
-
Version 3.5.2
4,352 downloads
Netatmo Weather Station suite standalone v3.5.2 INTRODUCTION Netatmo Weather station suite brings complete integration of Netatmo weather station to HC2 users including rain and wind gauges and support for more than one station. PREREQUISITES Fibaro Home Center 2 with firmware 4.160 or greater Sankotronic Lab. Emoji VD standalone (not required since v3.4) Netatmo Weather station FEATURES Complete integration of Netatmo weather station with HC2 including rain gauge and anemometer Support for multiple Netatmo weather stations Support for maximum 3 additional indoor modules Since version 3.5 support for Indoor main module that is missing outdoor module Smart update system that follows Netatmo weather station cloud updates Completely independent installation does not require any more Weather State VD or Main scene FTBE Netatmo weather station measurements can be shown on Weather State VD and HC2 web GUI and mobile applications by means of Weather State VD and Weather provider plugin VD has built in multi-language support with 27 languages included (see APPENDIX 1 for the list). VD can use HC selected language or user can select any other available language. Easy setup for VD icons (on UHASTM compatible version is this even easier) Global variables are automatically added, monitored and repaired and does not require user intervention INSTALLATION Please check provided User Manual and video from @MarcoTorino71: PACKAGE CONTENT Netatmo Main module VD Netatmo Outdoor module VD Netatmo Additional indoor module VD Netatmo Wind sensor VD Netatmo Rain sensor VD Netatmo Weather station scene Set of icons for all VD's and scene UPRADE PACKAGE CONTENT v3.5.2 Netatmo Weather station scene Updated user manual TERMS AND CONDITIONS Permission to use, copy, modify and distribute this software and its documentation for educational, research, personal use and non-profit purposes, without fee and without a signed licensing agreement is hereby granted, provided that the copyright notice, with "Terms and conditions" and "Disclaimer" appear in all copies, modifications and distributions. It is strictly forbidden to sell, rent, lease and/or lend this software for profit without prior consent from the Author. DISCLAIMER This software is provided by copyright owner "as is" and any express or implied warranties, including, but not limited to, the implied warranties of merchantability and fitness for a particular purpose are disclaimed. In no event shall the author and distributor be liable for any direct, indirect, incidental, special, exemplary, or consequential damages (including, but not limited to, procurement of substitute goods or services; loss of use, data, or profits; or business interruption) however caused and on any theory of liability, whether in contract, strict liability, or tort (including negligence or otherwise) arising in any way out of the use of this software, even if advised of the possibility of such damage. Fibar Group S.A. and their employees are not responsible for support of the ABC VD. Please contact the author Sankotronic, on the Fibaro Forum, for any questions or support required. VERSION HISTORY 3.5.2 - Scene code changed to support Netatmo servers domain api.netatmo.com, since the other one will be removed 3.5 - Suite now support Netatmo weather station indoor main module that is missing outside module 3.4 - Scene code changed to use new Netatmo API grant access by replacing username and password with tokens. All VD's since v3.4 do not need Emoji VD to be installed to work properly. 3.3.1 - Scene code changed to get rain amount for past 3 adn 6 hours to better support Irrigation Control VD. All VD's corrected some translations. Rain gauge VD changed labels content to display last 3 hours rain amount 3.3 - Check below version description or consult User manual for more details 3.2 - Corrected rain sensor code and cleaned some bugs in scene. Indoor modules corrected handling of CO2 measurement, improved updating code. 3.0 – This new version is completely redesigned and made independent. Does not require Main scene FTBE and Weather State VD anymore. Updating is now synced with Netatmo cloud so readings are always up to date. 2.0.2 – Code optimized and resolved some bugs Here is look of the Netatmo Weather set: Enjoy coding and your new Netatmo weather station suite! Sankotronic- 73 comments
- 4 reviews
-
- 32
-

-

-
- vd
- sankotronic
- (and 3 more)
-
I am still testing around the usage of variables and tried the following simple thing. I do have a predefined variable having two values being ON and OFF. I do have a scene (automatic) which switches on a wall plug, when the variable is in its OFF status and sets the variable to ON. If variable=ON the "switch on" and set variable to ON nothing happens. Only when I restart HCL, the scene is triggered. When I then switch the variable to OFF in the variable panel, nothing happens. What I also noticed. when the variable is switched ON and I manually trigger the scene, the wall plug is switched ON, even the trigger condition of the variable being OFF is not fulfilled, how comes? this somehow makes the usage of variables as trigger conditions useless. anyone having a clue?
-
HI I have a doorbird intercom with which I can open the gate, in fibaro HC2 I could open the gate via a virtual device by clicking twice on a light button. I understand that I need to use quick app instead of virtual device in HC3. I was told to make a quick app with which I can open the relay, I found an LUA code on line which I used, but I can I see if this quick app will work and how can I make a scene with it. Is there anyone that uses doorbird and can open a gate (relay) with fibaro who can share this with me, so I can try to make it. I have no knowledge of lua and currently only work with blockscenes this is what I found online (copilot), in which I changed the local url in my own url for the gate. I do not know of this is correct and how to check if this is working. I do not see this quick app when I want to make a scene. Sorry for these "stupid" questions but this is a bridge too far for me, but I would still like to learn and get it fixed. Thanks for your help local http = require("http") -- Function to turn on the relay local function turnOnRelay() local url = "https://your-relay-ip/api/relay/on" local response = http.request(url, nil, {["Content-Type"] = "application/json"}) if response.status == 200 then print("Relay turned on successfully") else print("Failed to turn on relay: " .. response.status) end end -- Function to turn off the relay local function turnOffRelay() local url = "https://your-relay-ip/api/relay/off" local response = http.request(url, nil, {["Content-Type"] = "application/json"}) if response.status == 200 then print("Relay turned off successfully") else print("Failed to turn off relay: " .. response.status) end end return { turnOnRelay = turnOnRelay, turnOffRelay = turnOffRelay }
-
Hi I just migrated to HC3 and try to make a block scene with a doorsensor. See below my block scene (i do not know LUA), but it does not work. Any idea why? I saw a topic from 2020 that there were issues with doorsensors and scenes. can you help me?
-
Bank Holiday Calc Scene (V 1.2.3a) I started creating a scene where the bank Holidays can be calculated, at the moment Switzerland (alle Kantone), Germany (alle Bundesländer), Austria (alle Bundesländer), United Kingdome (all Countries), France (some Départements), Sweden (whole Country), Ireland (whole Country), Iceland (whole Country), Poland (whole Country), Italy (whole Country), Norway (whole Country), Croatia (whole Country), Netherlands (whole Country), Czech Republic (whole Country, thanks @petr23) are covered. Work in progress for more Countries to come. With this scene you can calculate all the Bank Holidays of the current year. There are some preset Countries with already defined Holidays, some also have Provinces as there may be different holidays in parts of the country. The yearly bank Holidays will be stored in the global Variable "BankHol_ThisYear" (in System Seconds). You can either use this list as you wish or implement it into Sankotronic's Main Scene for Time Based Events Control (setup described below). The Names/Titles of the Bank Holidays are provided in multiple Languages and it is set up that more language or your own language can be supported. Setup You need to create a global variable with the Name "BankHol_ThisYear" in the upper part of the variable Panel. If you wish to check constantly if today or tomorrow is a Bank Holiday, then you need to implement a function in @Sankotronic's Main Scene for Time Based Events Control. ************************ SETUP ************************** Create global Variable "BankHol_ThisYear" in the upper part of the variable Panel. If you want to implement the funcsion in Sankotronic's MAIN SCENE FOR TIME BASED EVENTS CONTROL you can check with a function called doBankHolidays() if the current day or the next day are Bank holidays. For this you also need two more variables: - BankHoliday - BankHolidayTomorrow both should be initialized with a 0. The function will set the variables to 1 if there is a Bank Holiday today or tomorrow. If the Function is not yet implemented in the base Version by Sankotronic, then add the following code above the MAIN LOOP PART. ************************** New FUNCTION For MSFTBEVC by Sankotronic ************************** function doBankHoliday() if fibaro:getGlobalValue("BankHol_ThisYear") ~= nil then --only perform if there is a global Variable BankHol_ThisYear local local_bankHolidays = json.decode(fibaro:getGlobalValue("BankHol_ThisYear")) --get the global Value from Variable fibaro:setGlobal("BankHoliday", 0) -- set Variable to 0 before checking today = os.time({year = os.date('*t',os.time()).year, month = currentmonth, day = currentday}) for k,v in pairs(local_bankHolidays) do if(today == v) then fibaro:setGlobal("BankHoliday", 1) --set Variable to 1 if exDebug then logbug("lightblue", "Today is a Bankholiday ("..k..")") end; break end end fibaro:setGlobal("BankHolidayTomorro", 0) -- set Variable to 0 before checking tomorrow = os.time({year = os.date('*t',os.time()).year, month = currentmonth, day = currentday}) + (24*3600) for k,v in pairs(local_bankHolidays) do if(tomorrow == v) then fibaro:setGlobal("BankHolidayTomorro", 1) --set Variable to 1 if exDebug then logbug("lightblue", "Tomorrow is a Bankholiday ("..k..")") end; break end end end end ************************** New FUNCTION For MSFTBEVC by Sankotronic **END ************************ In the MAIN LOOP PART you also need to call the function doBankHoliday(). Do this by adding doBankHoliday() above the following Lines: -- change value of global variable doGlobalSched(); ************************** Scheduling of the Scene ************************** I run this Scene daily at 00:15 (to move Load away from 00:00), you can also only call it once at the beginning of the new year. Here is the Setup in MSFTBEVC in the part of SCHEDULED SCENES SETUP: local runSceneSchedName = {"Calculate BankHoliday List"} local runSceneSchedID = {jT.scene.BankHolidayCalc}; (or the ID of your Scene if you are not using HomeTable local runSceneSchedHour = {{"00:15"}}; local runSceneSchedWeek = {{1,1,1,1,1,1,1}}; local runSceneSchedPushFlag = {{0}}; local runSceneSchedPushMessage = {{0}}; ************************ Scheduling of the Scene END ************************** ************************ SETUP END ************************** User Variables Country choose your country by changing the Code between the brackets (capital Letters) local country = "CH" Available Countries: CH = Switzerland DE = Germany AT = Austria GB = United Kingdom FR = France SE = Sweden IE = Ireland IS = Iceland PL = Poland IT = Italy NO = Norway HR = Croatia CZ = Czech Republic NL = Netherlands Province choose your province by changing the Code between the brackets (small Letters). If you do not wish to use a province you can keep the quotes empty "". local province = "zh" Available Provinces Switzerland: ag = Argau, ar = Appenzell Ausserrhoden, ai = Appenzell Innerrhoden, bl = Basel-Landschaft, bs = Basel-Stadt, be = Bern, fr = Freiburg, ge = Genf, gl = Glarus, gr = Graubünden, ju = Jura, lu = Luzern, ne = Neuenburg, nw = Nidwalden, ow = Obwalden, sh = Schaffhausen, sz = Schwyz, so = Solothurn, sg = St. Gallen, ti = Tessin, tg = Thurgau, ur = Uri, vd = Waadt, vs = Wallis, zg = Zug, zh = Zürich Germany: bw = Baden-Württemberg, by = Bayern, be = Berlin, bb = Brandenburg, hb = Bremen, hh = Hamburg, he = Hessen, mv = Mecklenburg-Vorpommern, ni = Niedersachsen, nw = Nordrhein-Westfalen, rp = Rheinland-Pfalz, sl = Saarland, sn = Sachsen, st = Sachsen-Anhalt, sh = Schleswig-Holstein, th = Thüringen Austria: b = Burgenland, k = Kärnten, n = Niederösterreich, o = Oberösterreich, s = Salzburg, st = Steiermark, t = Tirol, v = Vorarlberg, w = Wien United Kingdom: eng = England, sct = Scotland, wls = Wales, nir = Nord Ireland France: moselle = Moselle, basrhin = Bas-Rhin, hautrhin = Haut-Rhin Sweden: No Provinces (all public holidays apply for whole Country) Ireland: No Provinces (all public holidays apply for whole Country) Iceland: No Provinces (all public holidays apply for whole Country) Poland: No Provinces (all public holidays apply for whole Country) Italy: No Provinces (all public holidays apply for whole Country) Norway: No Provinces (all public holidays apply for whole Country) Croatia: No Provinces (all public holidays apply for whole Country) Czech Republic: No Provinces (all public holidays apply for whole Country) Netherlands: No Provinces (all public holidays apply for whole Country) Language choose your language by changing the Code between the brackets (small Letters) local titleLanguage = "de" en = English de = German fr = French sv = Swedish ga = Gaelic / Irish is = Islandic pl = Polish no = Norwegian it = Italian hr = Croatian cz = Czech nl = Dutch ol = own language The Texts are always given in the available languages. If there is no Title for your chosen language, default language English will be taken. There is also a key for your Own Language (ol) Add the text in your language in the lines with the ["ol"] keys, just change the whole text in "OL xxx" after the equal-sign. If you want to change the Title in an existing language for example German "de", then change it at the specific line where the key ["de"] is set. Example: in xmasDayTitle you want to rename the German translation then change the Text in the line xmasDayTitle["de"] = change it from "Weihnachten" to "1. Weihnachtsfeiertag" In this section I also tried to explain the Holiday as good as possible. This might need some improvement in future Versions. --Easter Sunday / Oster Sonntag easterSundayTitle = {} easterSundayTitle["en"] = "Easter Sunday" easterSundayTitle["de"] = "Oster Sonntag" easterSundayTitle["fr"] = "Pâques" easterSundayTitle["ol"] = "OL Easter Sunday" --January First / Neujahrstag januaryFirstTitle = {} januaryFirstTitle["en"] = "January First" januaryFirstTitle["de"] = "Neujahrstag" januaryFirstTitle["fr"] ="Nouvel An" januaryFirstTitle["sv"] ="nyårsdagen" januaryFirstTitle["ol"] = "OL January First" --2. January / Berchtoldstag (Switzerland) / 2. January januarySecondTitle ={} januarySecondTitle["en"] = "2nd New Years Day" januarySecondTitle["de"] = "Berchtoldstag" januarySecondTitle["fr"] = "Saint Berchtold" januarySecondTitle["ol"] = "OL 2nd New Years Day" --Christmas Day / Weihnachten / 25. Dec xmasDayTitle = {} xmasDayTitle["en"] = "Christmas Day" xmasDayTitle["de"] = "Weihnachten" xmasDayTitle["fr"] = "Nöel" xmasDayTitle["sv"] = "juldagen" xmasDayTitle["ol"] = "OL Christmas Day" ... ... ... Show Sundays There are some holidays that always fall on a Sunday (like Easter Sunday or Pentecost) these are not shown by default. If you want to add them, then you will have to set the variable "addSundays" to true. If set to false, these days are not shown/detected. This setting does not exclude a holiday if it is a fixed day and hits a Sunday (like Swiss National day at 1. August), these days will always show. local addSundays = false Debuggig There are some switches to enable Debugging: local debug = true local debugSpecificYear = false local debugYear = 2015 If debug is set to true, then it will print the Results in an ordered List (Name = Date) in the Scene. If you wish to check for a specific year to see if the calculations are correct, then set debugSpecificYear to true and choose the year in debugYear. Above it would check for the holidays in 2015 if debugSpecificYear were set to true. Result A JSON in the below format will be stored in the global Variable BankHol_ThisYear: {"Pfingstmontag":1654509600,"Neujahrstag":1641034800,"Reformationstag":1667214000, "Auffahrt":1653559200,"Stephanstag":1672052400,"1. Mai":1651399200, "Buss- und Bettag":1668596400,"Tag der Deutschen Einheit":1664791200, "Weihnachten":1671966000,"Oster Montag":1650276000,"Karfreitag":1650016800} Corrections Even though I have tested the dates thoroughly there might be mistakes in the calculations. Before using the Scene in a vital Environment (Alarms, etc.) please check the list first in Debug Mode. Please also let me know if I made a mistake, then I can correct it for future users. Improvements I will be adding more countries over the time. For certain Countries I am sure I'd need help from locals as these days are sometimes not easy to define. Version History 1.2.3a Fixed some Netherlands Holiday Names 1.2.3 Added Czech Republic, Netherlands 1.2.2 Added Norway, Italy, Croatia 1.2.1 Added Iceland, Poland 1.2.0 Introduced new Variable to add Sundays to the days too. Updated the countries and corrected a mistake in Sweden. Added Ireland and Irish/Gaelic language 1.1.0 Changed the Language Selection (see details above), added Sweden 1.0.2 Added France and Départements and French Language/Titles 1.0.1 Added Austria and its Bundesländer, Added United Kingdom (England, Northern Ireland, Wales and Scotland) 1.0.0 Initial Version for Switzerland & Germany With all Provinces (Kantone / Bundesländer) Hope you enjoy the scene and some of you can use it Here is the complete .lua file: BankHolidayCalc_V1.2.3a.lua Cheers Don BankHolidayCalc.lua BankHolidayCalc_V1.0.1.lua BankHolidayCalc_V1.0.2.lua BankHolidayCalc_V1.1.0.lua BankHolidayCalc_V1.2.0.lua BankHolidayCalc_V1.2.1.lua BankHolidayCalc_V1.2.2.lua BankHolidayCalc_V1.2.3.lua
-
Hi all of you. So the thing happening to me is: I reconfigured my entire network. 70 devices. im using engine 3.0 now (i know i shouldn't do that :D) But now when i am making a scene (block) the dimmer2 only shows up the light. not the remote control. when i reconfigure the device it does show up. after a few days ik want to make another scene and the switch dissapeard again from the dropdown list in de scene editor. What is happening here. anyone have an idea. What i also like to mention. it was a mistake going to engine 3.0. everthing is reacting 10 times slower then when i was at 2.0. still thinking of going back. but stays a lot of work:D.. Thanks already for some kind of reaction. Gr Wesley
-
Hi all, So I am using a basic scene to send the images from my IP cameras to my email: However this sends three separate emails. Is there a way to have the images consolidated onto one email? Thanks, Anthony
-
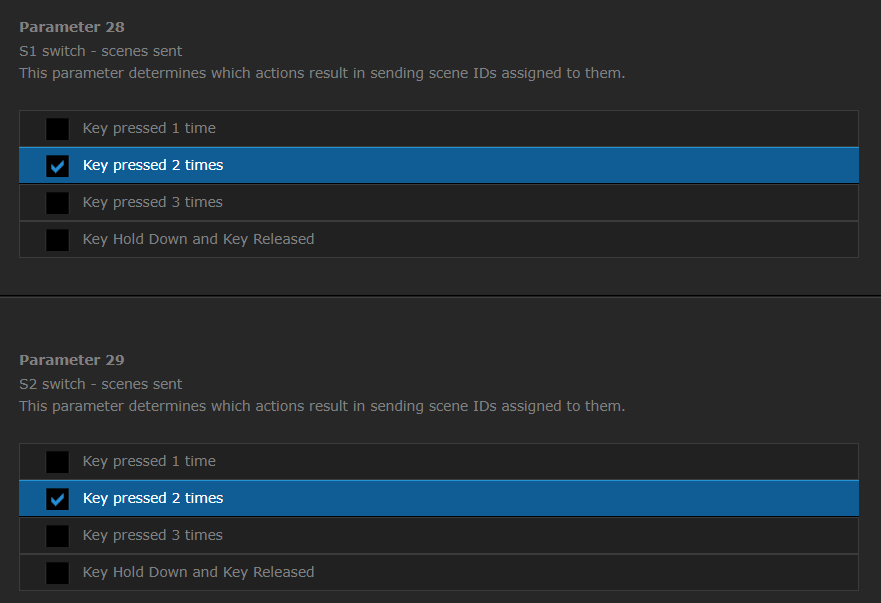
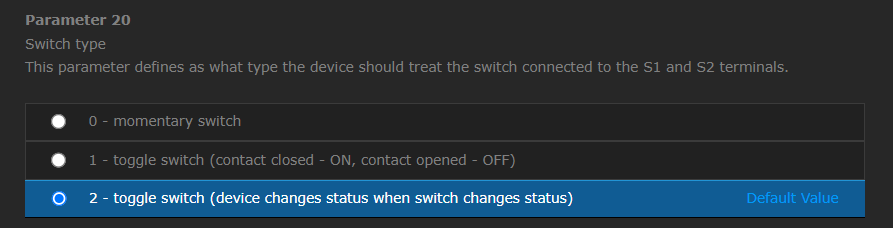
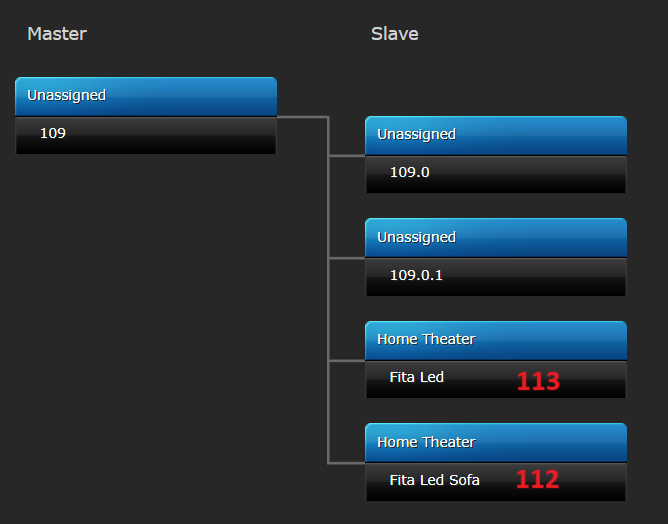
I have been trying to create the following scene in LUA: When i double click the light switch (Fibaro Switch 2), i want to turn all the room lights on. I have set the switch's parameters 28 and 29 to enable 2x click. I have also set the parameter 20 to the correct switch type. This is my object IDs: This is my LUA scene code (I have used this code as a template, since i don't know much about lua https://forum.fibaro.com/topic/23423-switch-2-trigger-scene/😞 --[[ %% properties %% events 109.0 CentralSceneEvent %% globals --]] local pressSource = fibaro:getSourceTrigger()["event"]["data"] --fibaro:debug(json.encode(pressSource)) if (tostring(pressSource["keyAttribute"]) == "Pressed2") then fibaro:debug('Pressed 2 times') if fibaro:getGlobalValue("Home") ~= "1" then fibaro:setGlobal("Home", "1") fibaro:debug(" Global Home set to "..fibaro:getGlobalValue("Home")) fibaro:startScene(68) else fibaro:setGlobal("Home", "0") fibaro:debug(" Global Home set to "..fibaro:getGlobalValue("Home")) fibaro:startScene(69) end end So the idea would be: if key is pressed 2x, the variable "Home" gets 1 (and trigger sceneID 68 - turn all on) or 0 (and trigger sceneID 69 - turn all off) The issue is that i don't know which "CentralSceneEvent" ID to use, i tried 109.0.1 (remote controller) but it didn't work. How does these IDs work exactly for this type of event call? What should i point the id to? Another thing i would like to know: Here i use a single ID that would call to both S1 and S2 of one switch. Can i insert more CentralSceneEvent IDs into this code, so that more switches can trigger the same scene, or i should copy this scene and create a new one for each switch? EDIT: So i figured i was not using the correct ID's to trigger the scene. The 109.0 is actually 110, which made the scene work. Now i just have to figure if i can use more than one ID in the same scene, or if I have to duplicate the scene and switch the ID to the other switch that needs to trigger too. Does anyone know that?
-
Hi, we use 6 MCO MH7 devices in our house and all have the same behavior. I have scenes with the Device MCO MH7 Heating Control. They worked propely. I am switching the temperature based on a heating plan for our water florr heating. Since the inclusion of the "Engery safing heating" state I got the problem, that the temperature isn´t set well to the new values. fibaro:call(420, "setSetpointMode", 11) fibaro:call(420, "setThermostatSetpoint", 11, "21"); fibaro:call(420, "setSetpointMode", 1) fibaro:call(420, "setThermostatSetpoint", 1, "21"); to be safe I also send it to both "setpointMode", but sometimes the device doesn´t catch the new value. Is some one here who has the same issue or know how to solve it?
-
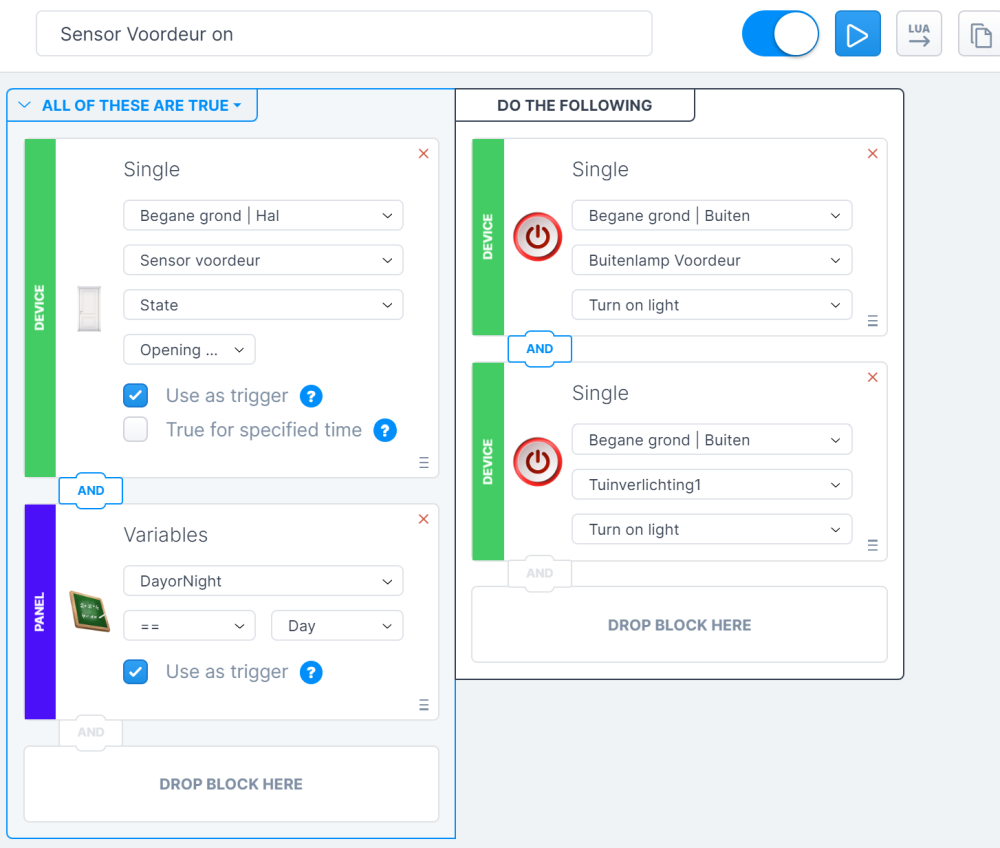
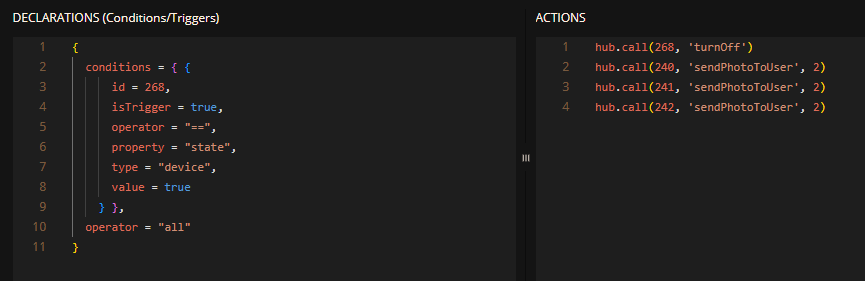
 Hi everyone, I have a lua scene that turns a light on when motion is detected and turns it off after 1 minute. How can I make it not turn the light off if it has been previously turned on manually using the switch? Here is the code for the scene { conditions = { { id = 220, isTrigger = true, operator = "==", property = "value", type = "device", value = true } }, operator = "all" } fibaro.call(185, 'turnOn') fibaro.setTimeout(60000, function() fibaro.call(185, 'turnOff') end) Thanks a lot
 -
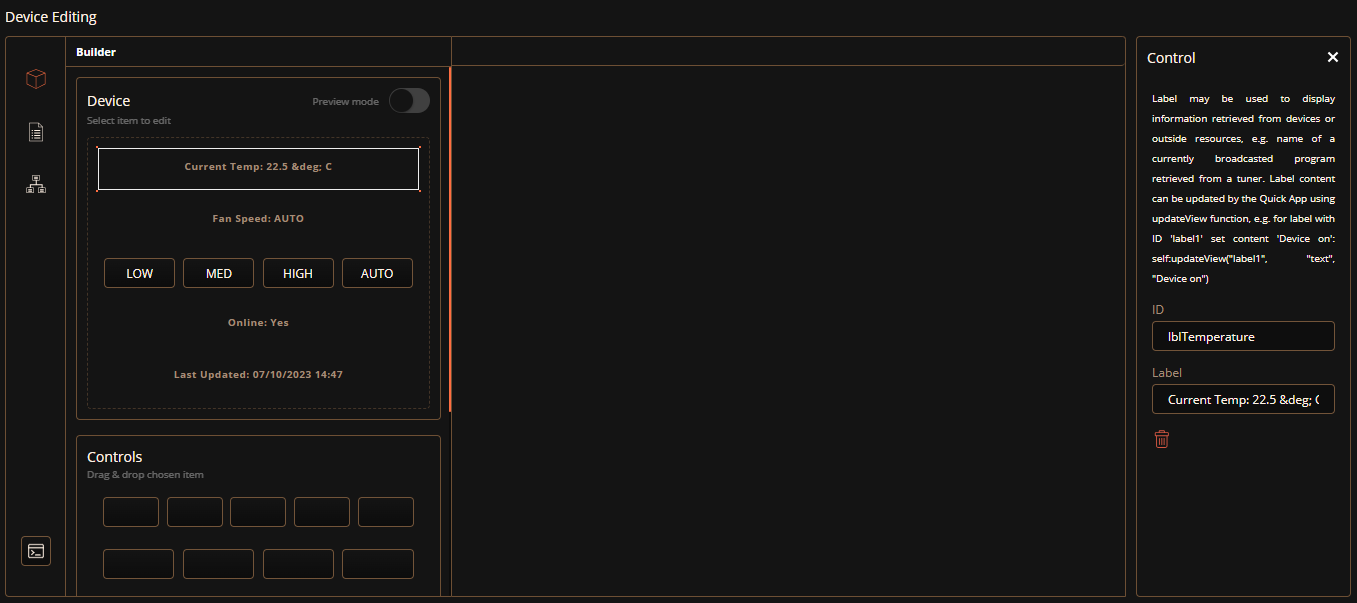
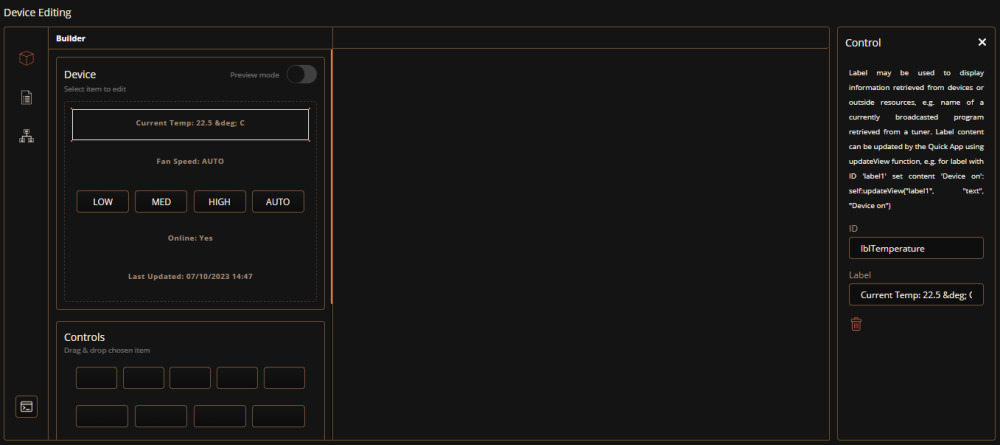
Hi everyone, So I have a Skaro automation bridge which connects my iZone HVAC system to my HC3. On the quickapp is a label representing the current temperature in the zone: I cannot seem to reference the lblTemperature value in LUA. I am actually trying to get the actual temperature into a global variable within a scene but cannot work out the syntax. I downloaded the device file under advanced to see if I can see any other references to lblTemperature but cannot see how it gets the value from the device. I assume it is part of the API. So for the scene action I just have local MST = hub.getValue(99, "lblTemperature") print(MST) where the QA device is 99 and the debug screen displays: [07.10.2023] [15:08:11] [DEBUG] [SCENE74]: nil I'd really appreciate any ideas you may have. Thanks. Anth
-
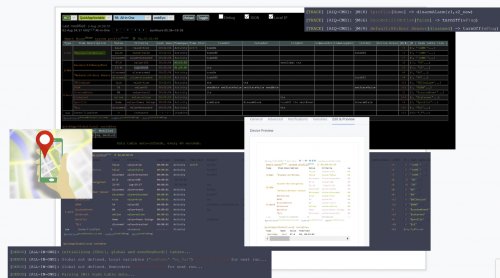
fibaroapiHC3.lua Note, I currently only support my new emulator, TQAE, and have moved all my development to that - please check it out... It's a rewrite with the learnings I have made coding fibaroapiHC3.lua... (Note: The new version of the emulator has gone through extensive rewrite and is stabilising (0.300). The old version of the emulator is here fibaroapiHC3_classic.lua.) This is a thread for the fibaroapiHC3.lua sdk that is under development (keeping it separate from the HC3 QuickApps coding - tips and tricks thread) I've started to run and test HC3 QuickApps offline and have made a fibaroapi.lua file that can be included to emulate the fibaro calls and call out to the HC3. This means that a whole QA can be developed offline, debugged and verified before deploying to the HC3. Something that significantly reduces the development process. It's an emulation so it's not 100% but it will cater for 99.99% of the needs to catch bugs, get decent error messages when things doesn't work (like timers). Be able to set breakpoints and inspect states etc. It's complete enough to run the most demanding QuickApps that I have found on the forum so far... If it runs in the emulator and it doesn't run on the HC3 or vice versa I will prioritise to fix it. Latest version here fibaroapiHC3.lua (v0.311) The code is updated weekly so please make sure you have the latest... It was inspired by the old fibaroapi for the HC2 in a thread started by @riemers but has evolved with more extensive support to create a better debugging and "offline experience"... in fact, it's really an HC3 emulator now. The video is an earlier version of the emulator but the principles are more or less the same. Note the nice tooltip and autocompletion of fibaro commands we get with the fibaroapiHC3plugin for ZBS. Enable English subtitles to see instructions... Some benefits: Use a modern development environment such as ZeroBrane Studio (free for Mac/PC/Linux, HC3 plugin here) on your laptop/PC to develop and debug QuickApps and Scenes. Here is a good introduction to Lua (using ZeroBrane) Step through code, inspect Lua variables, set break-points etc - all that is possible in a good IDE. Faster to pin-point errors as the error messages are better than on the HC3 - stack-traces etc. Advanced timer info (setTimeout) warning of late timers and from where the offending function was called if a timer function crashes. Info from where an eronous json.encode was called from in your code so you can easily find the error (instead of seeing a line from deep inside the json encoder) Use the whole Fibaro API fibaro.call etc and net.HTTPClient(), setTimeout(), json.ecode/decode, QuickApp self:functions like self:getVariable, self:updateView Support for MQTT client and QuickApp child devices Both QuickApps and Scenes are supported. Scenes support most conditions and are triggered by real triggers from the HC3 or simulated triggers. Speed up clock to run faster than real time, to watch a Scene or QuickApp over days/weeks/months in seconds. Start at any given time and date - test if your scene behaves on week-ends ? Automatically create a proxy QuickApp on the HC3 that sends UI clicks back to the code your are running and displays self:updateView updates. This way you can test the QuickApp UI (buttons etc) and still debug the main code on your PC. Develop and run multi-file QuickApps, allowing you to build up a library of common code to share between your QAs. Run completely disconnected from the HC3 simulating devices and other resources (now you can take your coding with you on your vacation ) There is a possibility to download resource definitions from the HC3 and use them (devices, globals etc) while running disconnected. Load multiple QAs/Scenes into the emulator at the same time to debug interaction patterns between QAs (or just run all your QAs offline and use the HC3 as a wave GW ) Telnet into the running emulator to capture logs or issue Lua commands like turning on/off devices at runtime to test you QA/Scene. Move the code as-is over to the HC3 when it runs in the emulator - and it will most likely run on the HC3. Scenes needs to be moved to conditions/actions part on the HC3 - may automat that in the future. Oh, and an emulated Web GUI for the quickApp so you can try out button/slider clicks without connecting to the HC3. And lastly, it makes it fun to develop code for the HC3 To get going download the fibaroapiHC3.lua and put in in the working directory where you code your QA(s) If you run ZerobraneStudio (recommended) paste this and run if dofile and not hc3_emulator then dofile("fibaroapiHC3.lua") end--hc3 hc3_emulator.downloadPlugin() hc3_emulator.downloadAssets() Please note the 'end--hc3' that ends the 'if dofile and not hc3_emulator then' statement. It requires the '--end' comment so I can recognise it. Also, you need to set the Lua interpreter to version 5.3 (In ZBS, Menu ; Project -> Lua Interpreter -> Lua 5.3) It will install the. ZBS plugin in ~/.zbstudio/packages and some code templates in ~/.zbstudio/hc3emu/ (Restart ZBS for the plugin to. be installed) Create a Lua file and create a header + QA/scene code. An example of a minimal QA can look like if dofile and not hc3_emulator then hc3_emulator = { name = "My QA", poll=1000, -- Poll for triggers from the HC3 every 1s credentials = {ip="192.168.1.X", user="<user>", pwd="<password>"} } dofile("fibaroapiHC3.lua") end--hc3 function QuickApp:onInit() fibaro.call(88,"turnOn") -- turns on device 88 on your HC3 end We wrap the emulator specific stuff inside "if dofile and not hc3_emulator then .... end" as the symbol 'dofile' is not defined on the HC3 and will thus be false and not include the code - This means that we can take the code as-is and paste it into the HC3 and it works. Note the credentials that contains the IP, username and password so that the emulator can access the HC3 box. If you use ZBS and the plugin there is an Edit-HC3 SDK templates-> menu that will insert a standard QA and Scene header + code in the current buffer. Most of the functions are there and will be improved over time. There are support for net.HTTPClient() and setTimeout/clearTimeout and api.* There are support for getting triggers and events from the HC3 Support for auto-creating a QuickApp proxy with UI elements that sends events back to the code being debugged. There are support for both QuickApps and Scenes (with conditions) Currently supported (v 0.300) fibaro.debug(type,str) fibaro.warning(type,str) fibaro.trace(type,str) fibaro.error(type,str) fibaro.call(deviceID, actionName, ...) fibaro.getType(deviceID) fibaro.getValue(deviceID, propertyName) fibaro.getName(deviceID) fibaro.get(deviceID,propertyName) fibaro.getGlobalVariable(varName) fibaro.setGlobalVariable(varName ,value) fibaro.getRoomName(roomID) fibaro.getRoomID(deviceID) fibaro.getRoomNameByDeviceID(deviceID) fibaro.getSectionID(deviceID) fibaro.getIds(devices) fibaro.getAllDeviceIds() fibaro.getDevicesID(filter) fibaro.scene(action, sceneIDs) fibaro.profile(profile_id, action) fibaro.callGroupAction(action,args) fibaro.alert(alert_type, user_ids, notification_content) fibaro.alarm(partition_id, action) fibaro.setTimeout(ms, func) fibaro.clearTimeout(ref) fibaro.setInterval(ms, func) fibaro.clearInterval(ref) fibaro.emitCustomEvent(name) fibaro.wakeUpDeadDevice(deviceID) fibaro.sleep(ms) net.HTTPClient() net.TCPSocket() net.UDPSocket() net.WebSocketClient() -- needs extra download net.WebSocketClientTLS() -- needs extra download api.get(call) api.put(call <, data>) api.post(call <, data>) api.delete(call <, data>) setTimeout(func, ms) clearTimeout(ref) setInterval(func, ms) clearInterval(ref) mqtt.Client.connect(uri, options) -- needs extra download <mqttclient>:addEventListener(message,handler) <mqttclient>:subscribe(topic, options) <mqttclient>:unsubscribe(topics, options) <mqttclient>:publish(topic, payload, options) <mqttclient>::disconnect(options) plugin.mainDeviceId plugin.deleteDevice(deviceId) plugin.restart(deviceId) plugin.getProperty(id,prop) plugin.getChildDevices(id) plugin.createChildDevice(prop) class QuickAppBase class QuickApp class QuickAppChild json.encode(expr) json.decode(string) QuickApp:onInit() -- called at startup if defined QuickApp - self:setVariable(name,value) QuickApp - self:getVariable(name) QuickApp - self:debug(...) QuickApp - self:updateView(elm,type,value) QuickApp - self:updateProperty() QuickApp - self:createChildDevice(props,device) QuickApp - self:initChildDevices(table) sourceTrigger - scene trigger Supported scene events: {type='alarm', id=<id>, property='armed', value=<value>} {type='alarm', id=<id>, property='breached', value=<value>} {type='alarm', property='homeArmed', value=<value>} {type='alarm', property='homeBreached', value=<value>} {type='weather', property=<prop>, value=<value>, old=<value>} {type='global-variable', property=<name>, value=<value>, old=<value>} {type='device', id=<id>, property=<property>, value=<value>, old=<value>} {type='device', id=<id>, property='centralSceneEvent', value={keyId=<value>, keyAttribute=<value>}} {type='device', id=<id>, property='accessControlEvent', value=<value>} {type='device', id=<id>, property='sceneActivationEvent', value=<value>} {type='profile', property='activeProfile', value=<value>, old=<value>} {type='location', id=<uid>,property=<locationId>, value=<geofenceAction>, timestamp=<timestamp>} {type='custom-event', name=<name>} {type='UpdateReadyEvent', value=_} {type='onlineEvent', value=<bool>} Some of the parameters that affect the behaviour of the emulator and can be set in the header are: hc3_emulator.name=<string> -- Name of QuickApp, default "QuickApp" hc3_emulator.id=<QuickApp ID> -- ID of QuickApp. Normally let emulator asign ID. (usually 999 for non-proxy QA) hc3_emulator.poll=<poll interval> -- Time in ms to poll the HC3 for triggers. default false hc3_emulator.type=<type> -- default "com.fibaro.binarySwitch" hc3_emulator.speed=<speedtime> -- If not false, time in hours the emulator should speed. default false hc3_emulator.proxy=<boolean> -- If true create HC3 procy. default false hc3_emulator.UI=<UI table> -- Table defining buttons/sliders/labels. default {} hc3_emulator.quickVars=<table> -- Table with values to assign quickAppVariables. default {}, hc3_emulator.offline=<boolean> -- If true run offline with simulated devices. default false hc3_emulator.autocreate=<boolean> -- Autocreate local resources hc3_emulator.apiHTTPS=<boolean> -- If true use https to call HC3 REST apis. default false hc3_emulator.deploy=<boolean>, -- If true deploy code to HC3 instead of running it. default false hc3_emulator.assetDirectory=<string> -- Directory where assets shoud be downloaded (ZBS). Default ~/.zbstudio/hc3emu hc3_emulator.resourceFile=<string> -- When doing a resource download, use this file as default. hc3_emulator.db=<boolean/string>, -- If true load a "resource download" from hc3_emulator.resourceFile or string hc3_emulator.htmlDebug=<boolean> -- Try to convert html tags to ZBS console cmds (i.e. colors) hc3_emulator.terminalPort=<boolean> -- Port used for socket/telnet interface hc3_emulator.webPort=<number> -- Port used for web UI and events from HC3 hc3_emulator.HC3_logmessages=<boolean> -- Defult false. If true will push log messages to the HC3 also. hc3_emulator.supressTrigger -- Make the emulator ignore certain events from the HC3, like = PluginChangedViewEvent hc3_emulator.negativeTimeout=<boolean> -- Allow specification of negative timeout for setTimeout (will fire immediatly) hc3_emulator.strictClass=<boolean> -- Strict class semantics, requiring initializers hc3_emulator.consoleColors=<table> -- Maps fibaro.debug/self:debug etc to color (debug.color enables color debugging) hc3_emulator.sysConsoleColors=<table> -- Maps colors used for system logs hc3_emulator.userdataType=<boolean> -- If true intercepts type(...) to return 'userdata' for our Lua classes. Some apps checks this... Some useful emulator functions: hc3_emulator.setOffline(<boolean>,<boolean>) -- hc3_emulator.getIPaddress() -- Return HC3 IP address hc3_emulator.prettyJsonFormat(<table>) -- Return json formatted string of Lua table hc3_emulator.postTrigger(<event>,[<time ms>]) -- Posts a trigger to the emulator... hc3_emulator.loadScene(...) -- Load scene from file or HC3... hc3_emulator.loadQA(...) -- Load QA from file or HC3... hc3_emulator.downloadPlugin() -- (ZBS). Default ~/.zbstudio/packages hc3_emulator.downloadAssets() -- (ZBS). Default ~/.zbstudio/hc3emu hc3_emulator.downloadResources([<filename>]) -- Downloads a "backup" of HC3 resources hc3_emulator.loadResources([<filename>]) -- ...that can be loaded as "local" resources for the emulator. Some debug flags that can be set with hc3_emulator.debug.<flag>=<value> fibaro=false, -- Logs calls to fibaro api trigger=true, -- Logs incoming triggers from HC3 or internal emulator timers=nil, -- Logs low level info on timers being called, very noisy. refreshloop=false, -- Logs evertime refreshloop receives events mqtt=true, -- Logs mqtt message and callbacks http=false, -- Logs all net.HTTPClient():request. ALso includes the time the request took api=false, -- Logs all api request to the HC3 onAction=true, -- Logs call to onAction (incoming fibaro.calls etc UIEvent=true, -- Logs incoming UIEvents, from GUI elements zbsplug=true, -- Logs call from ZBS plugin calls webServer=false, -- Logs requests to /web/ including headers webServerReq=false, -- Logs requests to /web/ excluding headers files=false, -- Logs files loaded and run color=true, -- Logs in console using ANSI colors (see hc3_emulator.consoleColors for mapping) locl=true, -- Log creation of local devices breakOnInit=<boolean> -- Tries to set breakpoint on QuickApp:onInit (mobdebug) breakOnLoad=<boolean> -- Tries to set breakpoint on first line in loaded file (mobdebug) breakOnError=<boolean> -- Tries to break after error (makes it easier to look at call stack etc) ctx=false, -- Logs Lua context switches timersSched=false, -- Logs when timers are scheduled timersWarn=0.500, -- Logs when timers are called late or setTimeout with time < 0 timersExtra=true, -- Adds extra info to timers, like from where it's called and definition of function (small time penalty) In the example in the beginning, the HC3 credentials are listed in the header. If you don't want that (it's easy to forget it and share the code with your passwords in plain sights<9 you can create a credentials.lua file with your secret stuff and it will be automatically included by the SDK. The format should be return { ip="2912.168.77", user="admin", pwd="admin", mySecret="hgskjfhgjhgkdfh" } It returns a Lua table with the relevant keys. ip, user,and pwd is used to log into the HC3. We have added another key here to 'mySecret'. Assume that you want you QA to have a defined quickAppVariable with the value of mySecret. It could be the password to log into an external services. Then you can do like this if dofile and not hc3_emulator then hc3_emulator = { name="My QA", quickVars = {["password"]="$CREDS.mySecret"}, This define a quickAppVariable with the name 'password' and it fetches the key 'mySecret' from the credentials table and uses that as the value. When you QA starts up you can do self:getVarible('password') and it will return the credential. This is useful as not to litter your code with visible credentials. NOTE. Be aware that if you deploy the real QA with hc3_emulator.deploy=true or using the menu commands with the plugin, the deployed QA will have the quickAppVariable defined and if you upload that for sharing people will see your credential. If someone wants to try this in another IDE than Zerobrane that I use (like Visual Studio) the only thing that could be an issue is to have access to the Lua libraries require("socket") -- LuaSocket require("socket.url") -- LuaSocket require("socket.headers") -- LuaSocket require("ltn12") -- LuaSocket require("mime") -- LuaSocket require("lfs") -- LuaFileSystem They are pretty standard lua libraries - based on LuaSocket. @10der has managed to run it under Visual Studio on Windows. Here is an updated library/project map to work with the latest version of the emulator vscode_fibaro_bin.zip. Note that you should update the fibaroapiHC3.lua file provided i the archive when new are released as I will not update this archive for every new release. @petergebruers also have some tips. Any improvements are happily received (in code) and credits will be due granted. Links to notable post Here is a description of the various way to use the emulator when developing code (high-level) Some in-depth posts Running "Offline" (TBD) Running in "Mix mode". Mixing real devices and locally emulated devices (TBD) Running with a "Proxy QA" (TBD) Using real QA as "Proxy" (TBD) Downloading HC3 resources to file and emulate them locally (TBD) Running standard Lua with access to HC3 functions (developing management scripts etc) (TBD) Loading multiple QAs/Scenes and run them in parallel in the emulator (also getting QAs/Scenes from the HC3 and install them in emulator on the fly...) (TBD) Running faster than real-time and manipulating start dates (TBD) A ZeroBrane plugin to make life easier while debugging A post introducing the SDK with QuickApps. A post introducing the SDK with Scenes. Scene support is not complete. Creating and debugging multi-file QuickApps The debug flags that can be set are described The new dynamic load functions to run multiple QAs/Scenes in the emulator are described Telneting into the emulator to capture logs and issuing Lua calls <here> (nice way to test your code) Using the Web GUI Debugging setTimeout code and tracking timers. MQTT support. Another post with running a scene completly without being connected to the HC3. Some notes on the implementation of the SDK - if you would like to hack on it A collection of QA's I developed with the SDK - which means that they can be run offline ChildrenOfHue. A QA that creates QA children devices for your Hue devices (It's the Hue QA I use myself these day) iOSLocator. An iOS geopresence QA. iCal (iOS,Google) QA Telegram QA. Event watcher QA. Helper QA to get/subscribe on event triggers Vonage/Nexmo SMS service. Send SMS. Changelog: v 0.67 - numerous bug fixes caused by the restructuring. hc3_emulator.start{startTime="07:00 4/5/2000"} - will start the simulation at the given time. v 0.68 - fibaro.debug behaves more like original. v 0.70 - better offline support and speeding. v 0.72 - More offline and support for downloading HC3 resources to be used while running disconnected from the HC3 v 0.73 - Various speed-time related bugs v 0.75 - Better http sync behaviour. Set hc3_emulator.asyncHTTP=true to get some pseudo asynchronous behaviour v 0.77 - Support for 5.030.45. Initial support for childDevices and fixes for the changed handling of UI events v 0.78 - UI fix. Name of callbacks defaults to button.."Clicked", unless you have a onReleased=name or onChanged=name in the UI table struct. v 0.80 - Fixed bug in self:getVariable and self:setVariable v 0.81 - Better quickVariables handling for proxies, and self.childDevices list updated when children are deleted. v 0.83 - self:getVariable returns the empty string "" if the variable does not exists according to the latest behaviour on the HC3... 'class' is not redefined if available from Luabind... However, I've not had a chance to test if it's 100% compatible yet... v 0.84 - Initial support for mqtt. You need to have installed https://github.com/xHasKx/luamqtt so that require("mqtt") works from fibaroapiHC3.lua. I have tried to mimic the HC3 mqtt api but I have not really used mqtt that much so if someone uses it with fibaroapiHC3.lua and discovers if stuff is not compatible with the HC3 implementation please let me know and we fix it. v 0.85 - Compatibility fix for function 'class' to adhere more closely to the HC3/luabind version v 0.90 - Cleanup of code, Better handling of children and QuickApps, ZBS color output with ansi escapes; hc3_emulator.colorDebug=true v 0.93 - New model for QuickApp proxies. Better child device compatibility. v 0.95 - Various bug fixes - log prints more in line with HC3 log console. fibaro.emitCustomEvent bug fix. v 0.98 - First support for backup/download/upload with the ZeroBrane plugin (another post here) v 0.99 - Better trigger handling and new way to include SDK in your QA/scene code. No hc3_emulator.start at the end. v 0.100 - Web GUI emulator for QuickApps. New format for using credentials.lua. Bug fixes... v 0.102 - Better handling of children and their quickAppVariables v 0.104 - Rewrite of offline mode. Better web UI support. v 0.105 - Support for new QA file format (proxies work again) v 0.106 - Added support for net.UDPSocket() v 0.109 - UDPSocket bug fix. ( @10der), property() support for class() - much harder than it looks... v 0.110 - Oops, serious bug in 'class' affecting ...everything. Hopefully fixed. v 0.111 - Removed unnecessary os.exit(). urlencode api calls ( @10der) v 0.112 - UDP fixes. ( @10der) v 0.114 - Bug fix (global 'self' escaped) v 0.115 - Bug in url encode for api calls. UDPSocket :bind(ip,port) function added. v 0.116 - :bind(ip,port) really fixed.... v 0.117 - startup fix v 0.119 - "Softer os.exit()" - better compatibility with Visual Studio (thanks @10der) v 0.120 - Debugger friendly QuickApp class (no __index). First version of file/backup v 0.121 - api.get bug fix. Faster proxy/deploy. v 0.123 - QuickApp:setVariable bug (thanks @10der) v 0.124 - fibaro.clearTimeout added, MQTT fixes. v 0.125 - fibaro.alarm() was buggy - fixed. Set self.USERPIN to pincode to allow fibaro.alarm("disarm") to be allowed from emulator. v 0.126 - fix __fibaro_get_device() ( @10der) v 0.128 - fix sort order of triggers. Default room in offline mode ( @10der) v 0.130 - fix UI handling ( @rangee. More UI options. v 0.131 - fix uiCallbacks not always updating when updating proxy v 0.135 - fixes... v 0.137 - TCPSocket fixes v 0.138 - setTimeout for negative times are inserted in the queue.... i.e. will execute as soon as possible. v 0.140 - fixed bug with setInterval (clearInterval within a setInterval function didn't work...) v 0.141 - fix bug in net.TCPClient() v 0.145 - bug in printout of sockets... stricter class constructor requirements v 0.148 - MQTT event format bug ( @jayrock) v 0.150 - Initial websocket support. Need to download wsLua_ER.lua from my github and put in project directory. v 0.152 - support fibaroapiHC3plug.lua v0.4 v 0.155 - bugfixes. v 0.156 - html color bugfix v 0.198 - New version of emulator with better support for everything. Thanks to @petrkl12 that has been a guinea pig and helped in debugging the code. v 0.200 - Fixed bug in speedTime. plugin.restart() now restarts the QA in a correct way. v 0.299 - Major rewrite of the HC3 API - cleaner architecture and prepared for being split into sub-files (I'm approaching 10k lines now). Note 'end--hc3' required to end header. v 0.300 - Bugfixes from v0.299 v 0.301 - Better/simpler class definition - easier to debug/step into classes (avoiding __index unless class uses property() )

-
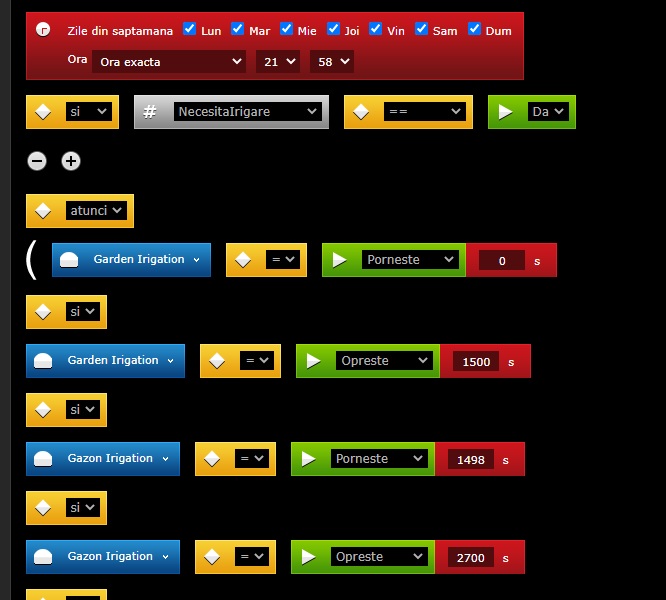
I have a scene for controling my sprinklers. The sprinkles are controled with an RGBW module and this can not be added in Irrigation Panel .so i created a scene and a variable in Variables Panel with options "Yes" and "No" This scene has to start irrigations on scheluled time and if a variable (NecesitaIrigare) has value "Yes". The scene start irrigations even if the variable has another value.
-
This is a Quickapp script for HC3. I am trying to get this to work in a VD on HC2. Is it possible, or do I have to do it together with a scene to make it work? Can anyone help? function QuickApp:onInit() self:updateProperty("unit", "kr/kWh") self.refresh = 60 -- in seconds local function loop() self:webrequest(); setTimeout(loop,self.refresh * 1000) end if self.username ~= "changeme" then loop() end end function QuickApp:webrequest() local tid = os.date("%R") local minutt = os.date("%M") --OPPDATERER STRØMPRIS OG SNITT HVER TIME if (minutt == "00") then self:OppdaterPris(); self:OppdaterSnitt(); end end function QuickApp:OppdaterPris() --Opprette lokale variable local GammelStrompris = fibaro.get(126,"value") local NyStrompris --Definerer http local http = net.HTTPClient(); --Definerer strengen Payload til å være kommando til tibber local payload = '{"query": "{viewer {homes {currentSubscription{priceInfo{current{total}}}}}}", "variables": null, "operationName": null}'; --API.POST til Tibber-- http : request('https://api.tibber.com/v1-beta/gql', { options = { method = "POST", headers = { ['Authorization'] = '.........', --Min Tibber ID her. ['Content-Type'] = 'application/json' }, data = payload -- Query. }, success = function(response) --fibaro.debug (response.data) --Verifiser at en har fått response.data. Dette er data som en har fått fra Tibber local data = json.decode(response.data); --fjernet local under??? NyStrompris = json.encode(data.data.viewer.homes[1].currentSubscription.priceInfo.current.total); self:updateProperty("value", tonumber(NyStrompris)) --print("OK") end, error = function(err) fibaro.debug ("Error:" .. err) end }); end function QuickApp:OppdaterSnitt() --Definerer http local http = net.HTTPClient(); --Definerer strengen average til å være kommando til tibber local average = '{"query": "{viewer {homes {currentSubscription{priceRating{daily{entries{total}}}}}}}", "variables": null, "operationName": null}'; --API.POST Til Tibber http : request ('https://api.tibber.com/v1-beta/gql', { options = { method = "POST", headers = { ['Authorization'] = '...............', --Min Tibber ID her. ['Content-Type'] = 'application/json' }, data = average -- Query }, success = function(response) --fibaro.debug(response.data) --Verifiser at en har fått response.data. Dette er data som en har fått fra Tibber local data = json.decode(response.data); local Nypris = tostring(json.encode(data.data.viewer.homes[1].currentSubscription.priceRating.daily.entries[31].total)); self:updateProperty("log", tostring(Nypris)) end, } ) end
-

How can I get a visual indicator of result of a scene execution
RohitNz posted a question in Scenes and Interface
Using HC3, I have a manual scene to initialise variables and hardware etc. What's a good way to get feedback on its result - whether it succeeded or failed? Checking the Debug Log would be a hassle. In HC2 it wasn't a problem as the debug info was right there without having to select tag and type. -

HC3L - Fibaro Heat send notification by temperature change
tobiassschulz posted a question in Scenes and Interface
Hi, I would like to receive a notification, when the temperature on the fibaro heat controller is manually changed. I tried to write a lua scene, but I don´t know how to use change of "Setpoint" as trigger. Thanks for your help -
How to run an existing block scene from the android device using the "Welcome Home" mobile app?
-
 Czy ktoś może podpowiedzieć jak stworzyć scenę w której z określonym interwałem czasowym centrala wyśle powiadomienie push z informacją o aktualnej wartości czujnika? Chciałbym aby klient raz na dzień dostawał info jaka jest wilgotność powietrza, ponieważ jest to ważne dla odpowiedniego utrzymania jego drewnianej podłogi. ____________ Can anyone suggest how to create a scene in which, with a specific time interval, HC3 will send a push notification with information about the current sensor value? I would like to receive information about the air humidity once a day, because it is important for the proper maintenance of client wooden floor.
 -
Hello, iam implementing automated heating which would consider weather temperature forecast for heating. Unfortunatelly although everything works fine iam not able to get forecast from ope weather. Everything works when i send same request using browser but as soon as i send it through Lua. API returns 401 Invalid API key. See yourself: local openWeatherAPIKey = "xyxyxy" -- You need to fill this out function process_heating() -- inside here i have implementation of heating itself, not interesting... end local location = api.get("/settings/location") local lat = location.latitude or 0 local lon = location.longitude or 0 local locStr = "lat="..lat.."&lon="..lon local opts = "&units=metric&cnt=1&appid="..openWeatherAPIKey local fullRequestUrl = "http://api.openweathermap.org/data/2.5/forecast?"..locStr..opts fibaro.debug("topeni", fullRequestUrl) local http = net.HTTPClient() http:request(fullRequestUrl, { options = { checkCertificate = false, method = "GET", timeout = 5000 }, success = function(res) local openWeatherData = res.status == 200 and json.decode(res.data) local max_temp = 0 if openWeatherData then max_temp = openWeatherData.list[0].main.temp_max fibaro.debug("topeni", "Today max temp: "..temp_max.."C") elseif res.status == 401 then local resp = json.decode(res.data) fibaro.debug("topeni", "Unable to load weather data 401: "..resp.message) fibaro.debug("topeni", fullRequestUrl) else fibaro.debug("topeni", "Unable to load weather data "..res.status) end process_heating(max_temp) end, error = function(res) fibaro.debug("topeni", "Unable to load weather data: "..res) process_heating(0) end }) Script outputs final request URL in case of failure to console. When i run this it fails, when i copy that final URL to web browser i get data as expected. Any idea what could be wrong?
-
Version 9.6
4,185 downloads
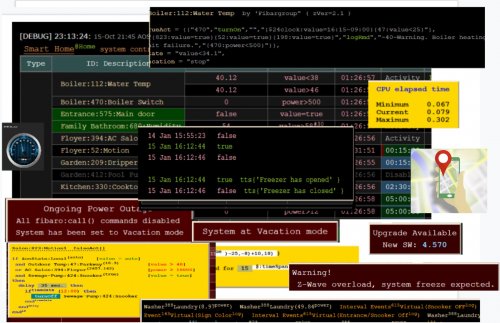
This script is designated to control and monitor your home system. Script automatically identifies the type of elements in the system. (Z-wave device, virtual device, scene, automatic scene (Block, Magic or Lua). Any valid Z-wave device property and his value could be monitored, controlled and execute commands accordingly. If you don’t want or need to use this script, but have issues with your system (like delays, z-wave devices don’t respond always, scene receives no triggers), it helpful to run this scene as is (without any changes) just to monitor and to identify z-wave “dead” and/or NACK occurrences in your system. You’ll receive on-line notifications about it. The first time you use All-in-One Scene, you will need to define jM {} hash table. Each line in table has two mandatory and two optional fields. jM={ { 15, "137|630",{timeSlot={“12:00~18:00”},state="value=true", trueAct={“|230|”, “turnOn”,””}}} } time span IDs list Criteria & Rules Action tables a) time span a period of time (in minutes) within which some activity must be performed by device or scene. Additional two option could be defined: I. time span = 0 defines the line as activity only. II. time span = ‘negative number’ line is suspended (remarked) b) IDs list given list of devices/scenes/VD/global/keywords. Use under score for scene IDs. (“_45”). a) global variable – add an ampersand sign & to global variable name: &varName b) keyword – add a dollar sign $ to keyword variable: $name Note: To use & and $ characters for other purpose , add % after the character. c) Criteria & Rules (optional) property, state, time slot, vacation mode… d) Action tables (optional) tables of commands to be executed. By defining String-to-number table which converts device name to ID jS2n= {boiler=137, dryer=630} jM{} above table will look like, device name must be included within back apostrophe sign. jM={ { 15, "`boiler`|`dryer`",{timeSlot={“12:00~18:00”},state="value=true", trueAct={“|230|”, “turnOn”,””}}} } 1. Monitor option There are so many times that scenes or Virtual devices are stuck w/o any understandable reason. Some devices suddenly stop to send reports or don’t change state. In most of the cases we don’t aware about the problem till something goes very wrong. The monitor option will send an alert in case of defined states are timed out. Note: In order to monitor virtual devices, fibaro:log() command must be included in main loop or in button’s code. For example, just add fibaro:log(“done”) at end of your main loop and VD could be monitored. Example to set watchdog timer for devices, scenes, virtual devices, global variables and keywords jM={ {8, "_17|_545",{timeSlot=”10:00~22:00”}}, -- within every 8 min. between 10am to 10pm, scenes 17, 545 must be active. If not alert sent. {3,"134|618|_556|_588"}, -- within every 3 min. devices 134,618 and scenes 556,588 must be active. If not auto-alert sent. {10,”132|145”,{property=”power”}}, -- within every 10 min. devices in list must report new power value. If not auto-alert sent. {5,”112”,{state=”value=true”}}, -- if device’s value is true over 5 minutes, auto-alert sent. (e.g. device stuck in breached state) {30,”470”,{state=”power>10”}}, -- if device’s power greater than 10 over 30 minutes, auto-alert sent. {20,”&HomeStatus|$iDoor”}} -- if global variable HomeStatus or keyword iDoor didn’t change within 20 min., auto-alert sent. 2. Control option This part of the script enables execution of actions based on device state or value changes. Script supports many options, calculations, time modifications, if statement and other features to do almost everything that you need to control your home just with one scene (which even doesn’t trigger by the system). Six action tables could be defined: (See AOS Advanced User’s Guide for more information.) trueAct{} - executed when state status is true. Please do not confused between state and value. If state defined as “value=false”, state status is true when value of device is false. falseAct{} - executed when state status is false. Please do not confused between state and value. If state defined as “value=false”, state status is false when value of device is true. trigAct{} - executed on every value change at any mode, true or false timeoutAct{} - Disables auto-alert notification and executed when elapsed time exceeds time span. Time span counting restarted after state status back to true. timeLoopAct{} - Disables auto-alert notification and executed when elapsed time exceeds time span. Time counting restarted immediately even if status remains true (no back to true change required). InitAct{} - Set of specific actions to be executed on startup only. Here is an example of most common wanted scenario, to turn on light when motion sensor breached and turn off light when sensor back to safe after few minutes (3 min. in this example) jM={0,”`mSensor`”,{state=”value=true”,trueAct={“`lightSw`”,”turnOn”,””},falseAct={“`lightSw`”,”turnOff”,”180”}}} Since no need to turn on light during the day, timeslot could be defined jM={0,”`mSensor`”,{state=”value=true”,timeslot=”18:00~07:00”,trueAct={“`lightSw`”,”turnOn”,””},falseAct={“`lightSw`”,”turnOff”,”180”}}} But now could be an issue to turn off the light, if sensor breached few seconds before end of timeslot and back to safe out of time slot, falseAct{} table won’t be executed. In this case, turning light off should be part of trueAct{} table jM={0,"`mSensor`”,{state=”value=true”,timeslot=”18:00~07:00”,trueAct={{“`lightSw`”,”turnOn”,””},{“`lightSw`”,”turnOff”,”180”}}} Same Z-wave device, global variable and keyword could be defined at several lines (no limit). Scene and Virtual devices could be defined one time only. Please download 1. AOS Advanced User’s Guide - complete instructions and information 2. AOS Quick Guide – syntax format reference and examples 3. AOS HC-WebEye Viewer Guide - AOS browser viewer guide 4. timeDrift – If you considering to use time drift correction, please download this scene and follow instructions at header. Script Advantages: No Lua or any software knowledge required. Supports time drift correction. (download timeDrift scene) Supports vacation and power outage modes. Provides excellent view of all devices, global and keyword variables at a glance, including: status, current value, up to 20 last values & executed commands. (Defined by dataRecord variable) Each command to be executed with current variable values is shown All items displayed by their names, including VD buttons in human readable format (not just IDs) At the bottom of the table up to 50 last commands in execution order are displayed (defined by cnnLine variable) Commands executed much faster than using system’s standard triggering mechanism (Lua, Block or Magic) No limits of scene’s “Max. running instances” Complex operation could be executed by newbie users (like experts). Anti-ripple delay could be applied. (change status after specific delay according to latest value) Actions could be executed by/from Scenes and VDs. Add/Change/Suspend any action in few seconds of work. Z-Wave traffic always monitored and summary of the traffic displayed. Dead and NACK occurrences of entire system immediately reported, recorded and notification sent to user. Repeated commands and device’s reports (RPT) of entire system are recorded and displayed. Global variables names, elapsed time from last change and their current values are shown. (Variables used in table) Details of all actions and commands are displayed in popup menus. Keeps Z-wave traffic low as possible by verifying device state before sending command. If device ID changed (excluded/included), user needs to update device ID in one place only! No extra jSON tables. Keeps your RAM load low All data displayed as a table where all configured devices and their related data displayed in human readable format. Extra button 'Refresh' will appear and covers 'Clear' button. Press ‘Refresh’ or ‘Start’ buttons to refresh table data. Table's header includes: startup time stamp, script current version, scene Name, LED as displayed at HC2 front panel, sunrise/set hours. System name – by hovering mouse over, system inventory shown Current home mode (@home or @vacation) system status - by hovering mouse over, last system's activities is shown Elapsed time Total Z-wave events - by hovering mouse over summary of all activities shown Min, average and max Z-traffic, by hovering mouse over CPU elapsed time shown By hovering mouse over column headers, quick guide is shown. Quick guide displayed during 5 minutes from startup. On every manual refresh, the guide displayed for next 5 minutes. Table columns are: Type – device type (Z.Device, G. Variable, V.Device, luaScene, blockScene, magicScene, Auto-luaScene, Auto-blockScene, Auto-magicScene). By hovering mouse over Z.dev type column, top active devices are shown. User configurable by setting topActive global variable. (0-30) default 15 ID: Description – room name: device ID: device name. Z-wave devices sorted by rooms, then by device ID. Battery capable device have green background according to current battery level. If device armed, alarm icon appears.By hovering mouse over, inventory of devices in jM{} table are shown. Value – items current value. By hovering mouse over, latest values, trigger value and command executed are shown. Criteria – state of evaluation to determine true or false status. If formula included, the state displayed in Italic fonts and by hovering mouse over, popup menu shows the formula and calculations Last seen – elapsed time since last status change. Alert – by default this column isn’t shown. If any devices have been alerted the column will be shown. Please notice that in some cases the device could be alerted, but after while it could back to normal activity. For example, if motion sensor is breached over specified time-span, alert notification will be sent. But after a while the sensor back to safe and alert is canceled, “back to normal” notification will be sent. At header of alert column shown current number of alerts Time Span – time span to monitor state of items. By hovering mouse over, maximum reached span time shown. If time span set to 0, then this line acts as activity, no timeout alerts reported. If time span set to negative number, this line is suspended and no actions executed. Time Slot – Active time slot range to execute related actions. Timestamp to execute specific action at specific time. trueAct – list of actions to execute when state is true. falseAct – list of actions to execute when state is true. trigAct – list of actions when value changes timeoutAct – list of actions to execute when time-span reached. Timer will be restarted when device state changed again to true. timeLoopAct – list of actions to execute when time-span reached. Timer restarted if state still true (no state changes required) initAct – list of actions to execute when scene started. By hovering mouse on actions cells, action’s details are shown In shown example for trueAct{} actions: a) time span of irrigation system calculated on line according to ambient temperature. min(max(floor(@47>value)-25,0)+10,18) b) TTS message announced (Garden Dripper has started) c) Irrigation is turned ON. The entire execution process is shown including all calculations, so user could see what exactly will happened. VacMode – vacation mode. In vacation mode by default timeSpan ignored and all Z-wave devices are converted to Activities, Scenes and VDs are not monitored. Non default vacation state could be defined in each line (vacation=”normal” or “stop”). Device index in jM{} hash table – shows device location in jM{} hash table. By hovering mouse over cells, device description, manufacturer, zwave version and JM{} line shown. At the bottom of the table list of up to 60 last executed actions (in order of execution) is displayed. (like CNN news line). If the device has same state as required by command, command isn’t executed and colored pink. Table color code: 1. Value, Criteria and Last seen columns green – state is true pink – state is false yellow – out of defined time slot, no actions or monitoring done. gray – line suspended. To suspend the line, set time-span to negative value. red - in alert-state, means this line exceeds time-span and auto-alert sent. 2. Time Slot black background and Suspended/Disabled label in gray means this line is inactive. Gray background and Activity label in green means the device assigned to control only. (Time span is zero). green background and red progress bar, device is monitored. On timeout auto-alert sent. blue background and purple progress bar, device is monitored and on timeout actions executed. (No alerts) If global variable in use, following table will be displayed Type – two types are available, Local and Global variable. Local means ‘global’ variable in use within the script (if global4local defined, those values are saved). Global is actual global variable of the system. Name – variable name Value – current variable value Modified – elapsed time since last change In case dead or nAck communication occurred following table will be displayed ID - device ID and his description is shown. nAck – number of “transfer failed” events occurred. Dead – number of “dead” reports received Is dead – current device dead status (true or false) Events history – last nACk and/or Dead events received and time-stamp of each event. Table of top active devices in your system is shown and could be used to analyze and reduce your Z-traffic. Up to 30 devices could be displayed by user configurable variable topZwave . Default is 15 ID - Since most of the devices has number of slaves, master device ID and his description is shown. By hovering on the line, slave devices and his number of events will be displayed. # – number of events occurred. % – Percentage of total events. In case reminders are active following table displayed: Rate – time interval to execute reminder RunTerms – triggers list to active reminder Note – send message as notification Reminder – reminder message By hovering mouse over “Run Terms” header, condition details displayed. Following actions are built-in : addRmd, logRmd, setRmd, delRmd, delAllRmd - reminders control disableScene, enableScene, startScene, killScene – scene control forceArm, setArmed – alarm control pressButton , setSlider, setProperty– virtual device control reboot, shutdown – system actions sendEmail, sendPush, sendiPush, sendPopup, sendNote, sendSms*, tts* – notification control setColor, setValue, turnOn, turnOff – Z-wave devices control setTimeSpan, setTimeSlot, setTimeDrift, timeSpanOn - time control setState, setStateValue, setStateDelay, setStateFormula -- parameters control vacOn, vacOff, powerOutage– special modes *not supported by the script. User defined functions. All valid actions or properties of any Zwave, Plugin or VD devices are fully supported also. By insert a new action in the tables, the action will be verified by the code and if it's valid will be in use. Special features If an error occurs during run time, it will be displayed on fixed type men. Scene will continue to run. By manual refreshing the table three times error is no longer displayed. When power outage mode activated, fixed menu displayed When vacation mode activated, fixed menu displayed As mentioned at the beginning, scene stuck without any reason and it’s true for this scene as well. To make sure that user will be notify if the scene is failed, weather triggers at the header of the script have been defined (these triggers exists by default at all systems and always work). When trigger received and the scene is failed, notification including last debug/error message sent to user. If autoRestart set to true, scene restarted automatically. Usually it takes awhile to receive weather trigger, so to speed up failure detection, recommended to add additional trigger (like motion sensor or any other device which is active often at your home) Please do not remove weather triggers… during normal operation all triggers are ignored. --[[ %% autostart %% properties %% weather Temperature Humidity Wind WeatherCondition --]] Using this script, I’m able to control over 95% percent of my needs, including irrigation system, heating system, bathrooms fans, all motion and door sensors, air conditioners and more. In my system then number of scenes reduced from 48 to 4 and virtual devices from 11 to 2. In addition my RAM consumption reduced from ~80% to 30%. The script has many options and features, so any action could be executed in several ways therefore please feel free to ask about implementation. The code is over 1,000 lines, but only ~15% of the code is actually running. Rest of the code is to display, initialize and to validate hash table data on startup. Code covers ~80 hash table syntax errors. Please read carefully displayed errors and follow instructions.- 58 comments
- 2 reviews
-
- 1
-
-
- scene
- all-in-one
- (and 1 more)
-
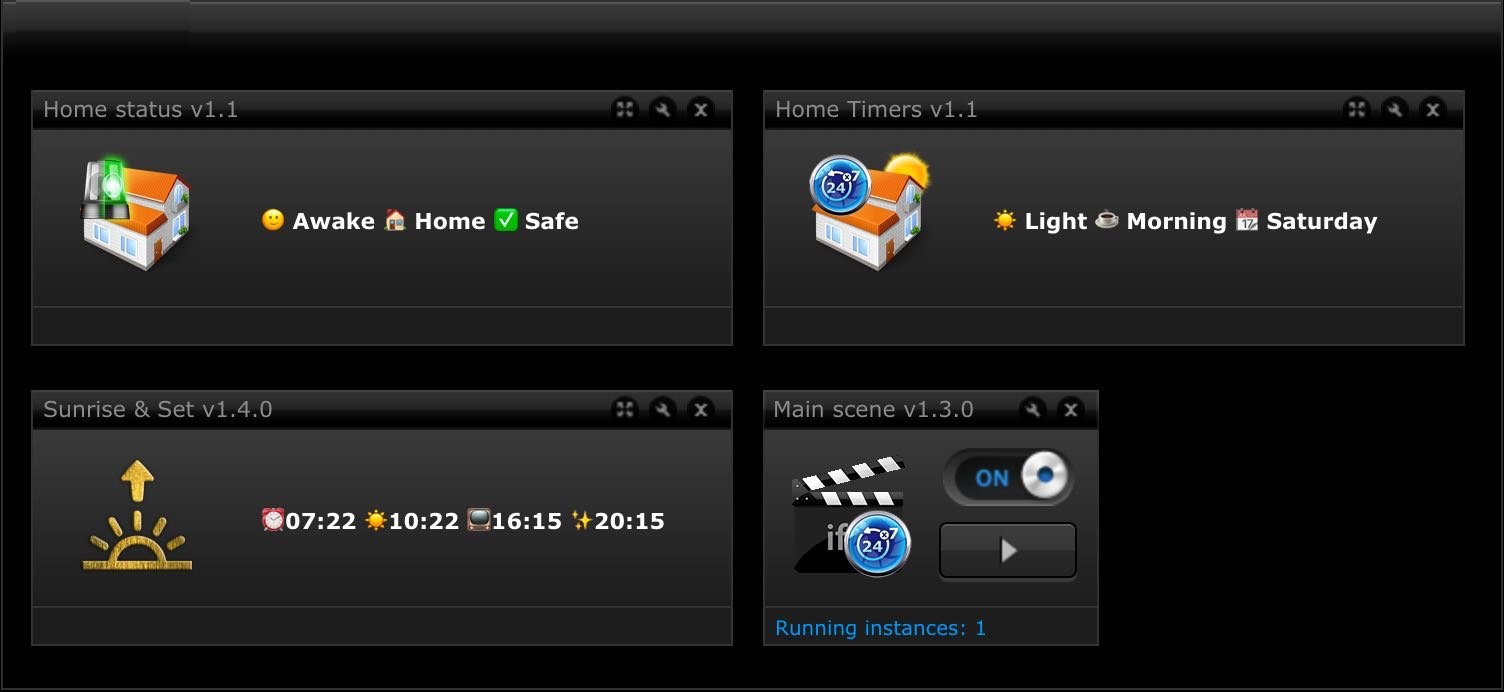
Main scene FTBE v 1.3.4 Hello everyone! NEW version is OUT! More about scene and download you can find here: WHAT'S NEW: Main scene FTBE 1.3.4 - changed function for time of day calculation and added use of SleepState global to set time of day to morning when Awake regardless of current time Main scene FTBE 1.3.0 - cleaned some bugs, added some more checks to prevent scene from stop running due to errors. Optimized and compacted code, removed unnecessary comments. DemoMode only stops changing timers while user code and scheduled events will continue to execute. Darkness can now be changed by measured lux level or global variable that is set to lux value measured by light measuring devices placed outside. Scene is now running on setTimeout function instead on sleep for better timing and also aligns to 0 seconds or exact minute. Sunrise & Sunset VD v1.4.0 - Modified main loop code to better handle global variables. Variables are now automatically repaired and are not reset to default settings after HC2 reboot. Added variable SunriseIcon to store VD icon ID and now when main icon for VD is set also all button icons are set automatically. Home Status VD v1.1 - Added variable HomeStatIcon to store VD icon ID and now when main icon for VD is set also all button icons are set automatically. Added label that shows most important values on VD when closed. Home Timers VD v1.1 - Added variable HomeTimersIcon to store VD icon ID and now when main icon for VD is set also all button icons are set automatically. Added label that shows most important values on VD when closed. NOTE - This version is compatible with previous versions so need to do any changes in your current code of other scenes and VD's. REQUEST - If you like my work and found it useful please give me support by rating and writing short review. Thank you! PS Dear friends from Slovakia you can find this scene and VD translated to your language here: HomeSystem.sk

- 637 replies
-
- 22
-
-
-
- time based events
- main
- (and 3 more)