Welcome to Smart Home Forum by FIBARO
Dear Guest,
as you can notice parts of Smart Home Forum by FIBARO is not available for you. You have to register in order to view all content and post in our community. Don't worry! Registration is a simple free process that requires minimal information for you to sign up. Become a part of of Smart Home Forum by FIBARO by creating an account.
As a member you can:
- Start new topics and reply to others
- Follow topics and users to get email updates
- Get your own profile page and make new friends
- Send personal messages
- ... and learn a lot about our system!
Regards,
Smart Home Forum by FIBARO Team
Search the Community
Showing results for tags 'development'.
Found 14 results
-
My new attempt at a tool for developing QuickApps on your PC/Mac before pushing them to the real HC3. Plua stands for Python Lua, and is a lua compatible app written in Python, wrapping a real lua engine within. The advantage is that we can easily add functionality that is difficult to achieve with Lua. So instead of using lua to compile and run your program, you use plua. Plua is mostly backwards compatible with how the standard lua interpreter takes command line arguments so it is fairly easy to integrate in existing IDEs. I have made it work for VSCode and ZerobraneStudio. If you code using Agents/AI help - Claude, Codex, Copilot etc. there are a collection of skills <here> that can be added to your project that makes the AI better at coding QuickApps and using plua. The skills also informs the AI how to use plua as the tool to upload, download, update QAs to the HC3 and do some other tasks. This is the tool I use to develop my own QAs these days, so Plua is constantly being improved as I run into limitations and bugs (Changelog). 📺 Short video on youtube, installing and running a QA on Windows 11 📖 Documentation here How plua works, the simple version It requires that Python is installed (including pip, that is a part of most Python installations) To install run >pip install plua To upgrade to latest >pip install --upgrade plua Setup a .env file in your home directory with the content HC3_URL=http://192.168.1.100/ HC3_USER=admin HC3_PASSWORD=your_password_here To run a QA file use plua as a lua interpreter with the flag --fibaro >plua --fibaro MyQA.lua We can then use plua as the executable lua interpreter in vscode to run our QA code. add a launch config in .vscode/launch.json { "version": "0.2.0", "configurations": [ { "name": "plua: Run Current Fibaro File with Debugger", "type": "luaMobDebug", "request": "launch", "workingDirectory": "${workspaceFolder}", "sourceBasePath": "${workspaceFolder}", "listenPort": 8172, "listenPublicly": false, "stopOnEntry": false, "sourceEncoding": "UTF-8", "interpreter": "plua", "arguments": [ "--fibaro", "--run-for", "0", "${relativeFile}" ] } ] } You must make sure that plua is available as a command globally on you machine for the vscode launch command to work, because we are just referring to executable "plua" If you install plua in a python virtual environment, make the executable point to the plua app in your <venv>/bin/... A simple QA lua file looks like: --%%name:MyQA --%%type:com.fibaro.binarySwitch function QuickApp:onInit() self:debug(self.name,self.id) end Link to Plua on PyPi The plua interpreter has a lot of options and capabilities >plua -h usage: plua [-h] [-v] [--init-qa] [-e EVAL] [-i] [--telnet] [--loglevel {debug,info,warning,error}] [-o] [--desktop [DESKTOP]] [-t] [--nodebugger] [--nogreet] [--fibaro] [--diagnostic] [-l L] [--header HEADER] [--api-port API_PORT] [--api-host API_HOST] [--telnet-port TELNET_PORT] [--no-api] [--run-for RUN_FOR] [scripts ...] PLua - Python Lua Engine with Web UI positional arguments: scripts Lua script files to run (optional, multiple files allowed) options: -h, --help show this help message and exit -v, --version Show version information --init-qa Initialize a new QuickApp project -e EVAL, --eval EVAL Execute Lua code fragments -i, --interactive Start interactive REPL mode (stdin/stdout with prompt_toolkit) --telnet Start telnet server for remote REPL access --loglevel {debug,info,warning,error} Set logging level -o, --offline Run in offline mode (disable HC3 connections) --desktop [DESKTOP] Override desktop UI mode for QuickApp windows (true/false). If not specified, QA decides based on --%desktop header -t, --tool Run tool, [help, downloadQA, uploadQA, updateFile, updateQA] --nodebugger Disable Lua debugger support --nogreet Suppress startup greeting message --fibaro Enable Fibaro HC3 emulation mode --diagnostic Run diagnostic tests -l L Ignored, for Lua CLI compatibility --header HEADER Add header string (can be used multiple times) --api-port API_PORT Port for FastAPI server (default: 8080) --api-host API_HOST Host for FastAPI server (default: localhost) --telnet-port TELNET_PORT Port for telnet server (default: 8023) --no-api Disable FastAPI server --run-for RUN_FOR Run script for specified seconds then terminate It is a reuse of the code from my last effort, hc3emu, but with some major improvements. It's constantly under development, so beware of some rough edges appearing now and then. However, I promise to try and smooth them out as soon as possible. More extensive documentation in the GitHub repo here. QuickStart to develop a QuickApp with plua here

- 127 replies
-
- 9
-

-

-
- quickapp
- development
- (and 1 more)
-
QA Dist Manager A Fibaro HC3 QuickApp that lets you install, upgrade, and downgrade other QuickApps directly from GitHub — without leaving the HC3 UI. Features Load one or more manifest files from GitHub (or any URL) Browse all QuickApps listed in the manifests See which versions are already installed on your HC3 Install a new instance or update an existing one to any release Syncs files, UI layout, and interfaces during an update Supports per-QA "ignore" lists to preserve user-specific files (e.g. userconfig) Multiple manifest sources — just add more manifestXxx QA variables Installation Download the latest .fqa file from the qaDist repository and import it into your HC3. Import it into your HC3 via Settings → QuickApps → Add QuickApp → Import. Open the QuickApp and set the manifestUrl variable to point to your manifest (see below). Optionally set githubToken if you need more than 60 GitHub API requests per hour. QuickApp Variables Variable Required Description manifestUrl Yes URL to a dist.json manifest file. Any variable whose name starts with manifest is loaded — add more for additional sources (e.g. manifestFriend). githubToken No Personal access token for GitHub API. Leave empty for anonymous access (60 req/hour). Multiple manifest sources You can load QAs from several publishers at once. Add extra QA variables named with any prefix starting with manifest: manifestUrl = https://raw.githubusercontent.com/jangabrielsson/qaDist/main/dist.json manifestAlice = https://raw.githubusercontent.com/alice/hc3-apps/main/dist.json manifestBob = https://raw.githubusercontent.com/bob/myapps/main/dist.json All entries are merged. If the same uid appears in multiple manifests, the first one wins. For QA Authors — Publishing Your Own Manifest To distribute your QuickApps via QA Dist Manager, host a dist.json file in your GitHub repository and share the raw URL. Manifest schema { "author": "Your Name", "quickApps": [ { "name": "My QuickApp", "uid": "UNIQUE_ID_STRING", "description": "Short description shown in the UI.", "url": "https://api.github.com/repos/yourname/your-repo/", "fqa": "dist/MyQuickApp.fqa", "versionFile": "main", "versionPattern": "local VERSION = \"([^\"]+)\"", "ignore": ["userconfig"] } ] } Field reference Field Required Description author Yes Your name or organisation. Shown in the QA Dist Manager UI. minVersion No Minimum QA Dist Manager version required to use this manifest (e.g. "0.1.2"). If the installed QADist is older, the manifest is skipped with a warning. Omit or leave blank for no restriction. quickApps Yes Array of QuickApp entries. name Yes Display name shown in the selector. uid Yes A stable unique identifier for this QuickApp. Must never change between releases. Used to match already-installed instances on the HC3. Any unique string works — e.g. "UPD896846032517896". description No Short description shown below the selector. url Yes GitHub API base URL for the repository: https://api.github.com/repos/<owner>/<repo>/ fqa Yes Relative path to the .fqa file inside the repo, e.g. dist/MyApp.fqa. The file is fetched from the raw GitHub URL at the selected release tag. versionFile No Name of the Lua file inside an installed QA that contains the version string. Used to show the current version in the Installed dropdown. versionPattern No Lua string.match pattern used to extract the version from versionFile. Must capture the version string in a capture group. Example: local VERSION = "([^"]+)" ignore No Array of file names to exclude during updates. Files listed here are never overwritten from the FQA and never deleted if they already exist on the device. Use this to preserve user-edited files like userconfig. Releases and tags QA Dist Manager fetches the list of available versions by calling the GitHub releases API (/releases). If no releases are found, it falls back to tags (/tags). Publish a GitHub release (or push a tag) for each version you want to make available. The .fqa file must exist at the tagged commit under the path given in fqa. How to create a release on GitHub (recommended) A release is the most visible way to publish a version. It appears on your repo's front page and lets you attach files and release notes. Go to your repository on GitHub. In the right-hand sidebar, click Releases (or go to https://github.com/<owner>/<repo>/releases). Click Draft a new release. In the Choose a tag field, type a new version string such as v1.0.0 and select Create new tag: v1.0.0 on publish. Fill in a Release title (e.g. Version 1.0.0) and optionally add release notes. Make sure your .fqa file is already committed and pushed to the branch you're releasing from (usually main). Click Publish release. How to create a tag only (lightweight alternative) If you prefer not to write release notes, you can push a plain git tag. QA Dist Manager will find it via the tags fallback. Using the GitHub web UI: Go to your repository → Code tab. Click the branch/tag dropdown (top-left, shows main by default). Type a new tag name such as v1.0.0 in the search box. Click Create tag: v1.0.0 on main (or whatever branch is current). Using the command line: git tag v1.0.0 git push origin v1.0.0 Versioning convention It is recommended to use Semantic Versioning: vMAJOR.MINOR.PATCH Part When to increment MAJOR Breaking changes (e.g. removed user-config keys) MINOR New features, backwards compatible PATCH Bug fixes only Examples: v1.0.0, v1.2.3, v2.0.0 Generating a UID A UID is just a string that uniquely identifies your QuickApp. You can use any method: # macOS / Linux echo "UPD$(date +%s%N | head -c 18)" # Or just use a descriptive string "uid": "com.example.MyQuickApp" The only requirement is that it stays constant across all releases of the same QuickApp. Minimal example { "author": "Alice", "quickApps": [ { "name": "My Sensor", "uid": "com.alice.MySensor", "description": "Reads temperature from my custom sensor.", "url": "https://api.github.com/repos/alice/my-sensor/", "fqa": "releases/MySensor.fqa" } ] } Host this at https://raw.githubusercontent.com/alice/my-sensor/main/dist.json and share that URL with users. How updates work When you press Apply with an existing installed instance selected: Downloads the .fqa for the chosen release from GitHub. Compares the file list with what's currently installed. Creates files that are new in the release. Updates content of all non-ignored files. Deletes files that are no longer in the release (unless listed in ignore). Syncs interfaces (adds/removes) based on initialInterfaces in the FQA. Updates the UI layout (uiView, uiCallbacks, viewLayout) on the device. HC3 automatically restarts the QuickApp after file changes. Programmatic API Other QuickApps can call QA Dist Manager via fibaro.call to install or update QuickApps automatically — for example to self-update on a daily timer. Because fibaro.call is fire-and-forget, results are delivered asynchronously. Pass callbackId and callbackMethod in the args table; QA Dist Manager will call fibaro.call(callbackId, callbackMethod, result) when finished. Methods apiListReleases(args) Fetch the available releases for a QuickApp. Arg Type Description uid string Required. UID of the QuickApp as listed in the manifest. refresh bool true to force a manifest re-fetch even if the cache is fresh. Default false. callbackId number Device ID of the QuickApp to call back. callbackMethod string Method name to call on the callback device. Result: { ok=true, uid="...", releases={{tag="v1.2.0", name="..."}, ...} } { ok=false, uid="...", msg="error description" } apiInstall(args) Download and install a new instance of a QuickApp. Arg Type Description uid string Required. UID of the QuickApp. tag string Release tag to install. "latest" or omit for the newest release. refresh bool Force manifest re-fetch. Default false. callbackId number Callback device ID. callbackMethod string Callback method name. Result: { ok=true, uid="...", tag="v1.2.0", deviceId=42, msg="..." } { ok=false, uid="...", msg="error description" } apiUpdate(args) Update an existing installed instance. When force=false (the default) and the manifest entry has versionFile/versionPattern set, QA Dist Manager reads the running version and skips the update if it already matches the target tag. Arg Type Description deviceId number Required. Device ID of the installed instance. uid string Required. UID of the QuickApp in the manifest. tag string Target release tag. "latest" or omit for the newest release. force bool true to update even if already on the target version. Default false. refresh bool Force manifest re-fetch. Default false. callbackId number Callback device ID. callbackMethod string Callback method name. Result: { ok=true, uid="...", deviceId=42, tag="v1.2.0", upToDate=false, msg="..." } { ok=true, uid="...", deviceId=42, tag="v1.2.0", upToDate=true, msg="already at v1.2.0" } { ok=false, uid="...", msg="error description" } Self-updating QuickApp example local QADIST_ID = 10 -- device ID of your QA Dist Manager instance local MY_UID = "com.example.MyQuickApp" function QuickApp:onInit() -- Check for updates every 24 hours setInterval(function() self:checkForUpdate() end, 24 * 60 * 60 * 1000) self:checkForUpdate() end function QuickApp:checkForUpdate() fibaro.call(QADIST_ID, "apiUpdate", { deviceId = self.id, uid = MY_UID, tag = "latest", force = false, callbackId = self.id, callbackMethod = "onUpdateResult", }) end function QuickApp:onUpdateResult(result) if result.upToDate then self:debug("Already at " .. result.tag .. " — no update needed.") elseif result.ok then self:debug("Updated to " .. result.tag .. ". HC3 will restart the QA.") else self:error("Update failed: " .. tostring(result.msg)) end end License MIT
-
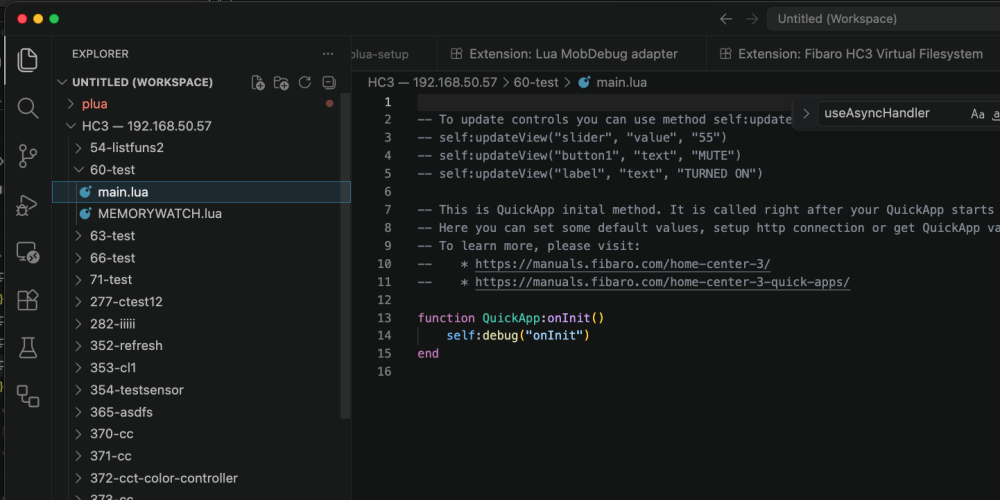
Here is an experimental extension for VSCode (search 'hc3' in extension tab). https://marketplace.visualstudio.com/items?itemName=GsonSoft-development.hc3-vfs It allow you to see all QAs on the HC3 and their associated files in the vscode file explorer. The files are editable and pushed back to the HC3 when saved. In practice allowing you to use the VSCode editor as your editor for QAs on the HC3. The extension uses the same REST API as the HC3 WeUI uses for its editor when fetching and saving the code files for a QA. I have tested it by editing files, created files, and deleted files and it seems to work. The only problem is that the HC3 WebUI don't always follow, so if you have a QA file open in the WebUI edit and update the same file via VSCode, you need to close the WebUI editor and reopen to see the changes. Notes: First release(s), use with caution. If it's found to be useful I may put some more effort into it... feedback appreciated. Note, you can't run the files with plua in vscode yet as they are "virtual files" and the debugger can't locate them.... so you need to rely on saving back to HC3 and watch the HC3 log output the traditional way... ------------------- HC3 Virtual Filesystem Browse and edit HC3 QuickApp Lua files directly in the VS Code Explorer — no manual downloading or uploading. Also supports opening local .fqa archive files as editable virtual filesystems. Features QuickApps appear as folders in the VS Code Explorer under an HC3 — <host> workspace folder Open any .lua file — content is fetched live from the HC3 Save to HC3 on ⌘S — the file is written back via the HC3 REST API instantly QuickApp properties editor — each QuickApp folder contains a (QuickApp).hc3qa file; opening it shows a graphical editor for name, enabled/visible state, interfaces, QuickApp variables, and description. Changes are saved to the HC3 on ⌘S Create new files — new Lua files appear on the HC3 immediately Delete files — removes the file from the HC3 (the main file of a QuickApp cannot be deleted) Rename files — rename a non-main Lua file by pressing F2 or right-clicking in the Explorer (implemented as create + delete) Rename QuickApp — rename a device directly from VS Code (right-click the QuickApp folder) Export .fqa — export a QuickApp as a .fqa archive (right-click the QuickApp folder) Open in HC3 Web UI — jump to the HC3 device page in the browser (right-click the QuickApp folder) File & text search — Ctrl+P quick-open and Ctrl+Shift+F Find in Files both search across all QuickApp files in the virtual filesystem HC3 Log output channel — the HC3 Log output panel polls the HC3 debug log every few seconds and streams new entries as they arrive, so you can see QuickApp output and errors without leaving VS Code API traffic statistics — run HC3: Statistics to see a breakdown of every API call made since connect, grouped by endpoint Credentials from .env — reuses the same HC3_URL/HC3_USER/HC3_PASSWORD variables as plua, with a fallback to VS Code settings + SecretStorage .fqa file browser Open any .fqa file as a virtual workspace folder — right-click a .fqa file in the Explorer and choose Open .fqa File, or run HC3: Open .fqa File from the Command Palette Edit Lua files inside the archive — each Lua file appears as a .lua file in the folder; saving writes directly back into the .fqa JSON on disk Create and delete Lua files — use the Explorer New File / Delete buttons as normal Rename Lua files — press F2 or right-click → Rename in the Explorer Properties editor — a (QuickApp).hc3qa file in each fqa workspace folder opens the same graphical properties editor as the live HC3 connection; edit name, QuickApp variables, interfaces, and description, then save to write changes back to the on-disk .fqa file Persisted across sessions — the fqa:// workspace folder is remembered and reconnected automatically when you reopen VS Code Explorer tree examples Live HC3 connection: HC3 — 192.168.1.100 ├── 42-living-room-lights/ │ ├── main.lua │ ├── utils.lua │ └── (QuickApp).hc3qa ← properties editor └── 55-weather-station/ ├── main.lua └── (QuickApp).hc3qa Local .fqa archive: 📦 living-room-lights (42) ├── main.lua ├── utils.lua └── (QuickApp).hc3qa ← properties editor Getting started 1. Configure credentials Option A — .env file (recommended, works with plua) Create a .env file in your workspace root (or ~/.env😞 HC3_URL=http://192.168.1.100 HC3_USER=admin HC3_PASSWORD=your-password Option B — VS Code settings + SecretStorage Run the command HC3: Configure Credentials (Ctrl+Shift+P → HC3: Configure Credentials) and enter your HC3 host, username, and password. The password is stored securely in VS Code's SecretStorage. 2. Connect Run HC3: Connect from the Command Palette. An HC3 — <host> workspace folder will appear in the Explorer containing all your QuickApps. 3. Edit & save Open any .lua file, make changes, and save — the file is written back to the HC3 immediately. 4. Watch the log The HC3 Log output channel opens automatically on connect and streams new debug, warning, trace, and error entries from /api/debugMessages as they arrive. Each line is formatted as: HH:MM:SS [DEBUG] [QUICKAPP1234] your message here Commands Command Description HC3: Connect Open the HC3 filesystem in the Explorer HC3: Configure Credentials Set HC3 host, username, and password HC3: Refresh Clear the cache and reload the file tree HC3: Disconnect Remove the HC3 workspace folder and stop polling HC3: Open in HC3 Web UI Open the selected QuickApp in the HC3 browser UI HC3: Export .fqa Export the selected QuickApp as a .fqa archive HC3: Rename QuickApp Rename the selected QuickApp on the HC3 HC3: Statistics Show a breakdown of API calls made since connect HC3: Open .fqa File Open a local .fqa file as a virtual workspace folder Open in HC3 Web UI, Export .fqa, and Rename QuickApp are also available via right-click on a QuickApp folder in the Explorer. Open .fqa File is also available via right-click on any .fqa file in the Explorer. Settings Setting Default Description hc3vfs.host `` HC3 hostname or IP. Overridden by HC3_URL in .env. hc3vfs.user admin HC3 username. Overridden by HC3_USER in .env. hc3vfs.logPollInterval 4 How often (in seconds) to poll the HC3 debug log output channel. Passwords are never stored in plain-text settings — they go to VS Code SecretStorage or are read from .env. Auto-save recommendation Each save triggers a real HTTP PUT to the HC3, which may restart the QuickApp. Auto-save is best turned off for hc3://files so you only push code to the HC3 when it is in a valid state. Add this to your workspace .vscode/settings.json: { "files.autoSave": "off" } onFocusChange is acceptable if you prefer convenience. Avoid afterDelay — it will push incomplete Lua while you type and cause constant QuickApp restarts. Limitations Renaming the main file is not supported — the HC3 API does not allow it Creating new QuickApp devices (new folders) is not supported — use the HC3 web interface No live refresh — the HC3 has no push notifications. Use HC3: Refresh if you made changes outside VS Code File names must be at least 3 characters and contain only a-z, A-Z, 0-9 "Preloaded files limit" warning — VS Code indexes the virtual filesystem for search and IntelliSense. If you have many QuickApps you may see a warning that the 500-file preload limit has been reached. This is a VS Code limit; all files are still fully accessible, editable, and searchable. The warning can be safely ignored. Working with GitHub / version control The virtual filesystem (hc3://) is great for quick edits directly on the HC3, but it doesn't compose naturally with git — there are no real files on disk to commit. The recommended workflow for GitHub users is to use plua: Keep your QuickApp source files (.lua) in a normal local git repo — edit them directly in VS Code, commit and push to GitHub as usual When ready to deploy to the HC3, use plua from the terminal: Upload (or create) the full QuickApp from a .fqa file: plua -t uploadQA MyQA.fqa Or update individual Lua files on the HC3 without touching the rest: plua -t updateQA MyQA.fqa This keeps git clean and simple. The HC3 extension is then useful as a companion — browse live device state, tweak a variable, check the log — while plua handles the deployment pipeline. Approach A — quick edits without plua If you just want to track your work without a full deployment pipeline, export the QuickApp as a .fqa archive and commit that single file: Right-click the QuickApp folder → Export .fqa → save to your repo folder Open the .fqa with HC3: Open .fqa File to edit Lua files and properties git add MyQA.fqa && git commit && git push Note: git diff on a .fqa shows JSON noise. Code review on GitHub is unreadable. For anything beyond personal backups, the plua workflow above is cleaner. Related plua — Local QuickApp development and testing tool for Fibaro HC3
- 36 replies
-
- 6
-
-
- qa
- development
- (and 2 more)
-
I have put together agent skills for developing QuickApps (offline). These are files added to your coding workspace that contains best practices for coding QuickApps. Agent skills are a "standard" for most coding environments using agents - copilot, Claude code, Codex etc. In the past I have coded an MCP for QA support but this is a much better approach. Please delete the MCP if you use it... The caveat is that these skills assumes that you are using plua to code and test QuickApps. Many skills will use the plua command to to run troubleshooting scripts etc... The instructions below are specifically for vscode/copilot but should be easy to reuse for other AI coding tools. Just put the skills directory in the proper place for your tool and ask it to add the skills to CLAUDE.md, AGENT.MD etc. The install-qa-skills prompt is specific for VSCode but your agent can most likely convert it to your agents preferences. Below is for VSCode. To install the skills you run an agent prompt 'install-qa-skills'. It's also used to update the skills to the latest version. Before you can run /install-qa-skills, you need this prompt file in your workspace. Run one of these commands from your workspace root, then type /install-qa-skills in Copilot chat. Universal (Python — macOS, Linux, Windows): python3 -c "import urllib.request,pathlib; pathlib.Path('.github/prompts').mkdir(parents=True,exist_ok=True); urllib.request.urlretrieve('https://raw.githubusercontent.com/jangabrielsson/plua/main/.github/prompts/install-qa-skills.prompt.md','.github/prompts/install-qa-skills.prompt.md'); print('Done')" macOS / Linux (curl): mkdir -p .github/prompts && curl -sL https://raw.githubusercontent.com/jangabrielsson/plua/main/.github/prompts/install-qa-skills.prompt.md -o .github/prompts/install-qa-skills.prompt.md Windows (PowerShell): New-Item -ItemType Directory -Force .github/prompts | Out-Null; Invoke-WebRequest https://raw.githubusercontent.com/jangabrielsson/plua/main/.github/prompts/install-qa-skills.prompt.md -OutFile .github/prompts/install-qa-skills.prompt.md Then in VS Code Copilot Chat: type /install-qa-skills and the agent will download all skills automatically. And the same command to update the skills. The skills makes the agent aware about the REST API, the Fibaro Lua SDK, best practices, using plua etc. This will allow the agent to help you create QuickApps from scratch, debug existing QAs, review the code for potential issues etc An example prompt Create a QUickApp in test/QATemp.lua that is a multilevel sensor and shows the temperature fetched from some public webservice Creates the code below --%%name:Temperature Sensor --%%type:com.fibaro.temperatureSensor --%%var:pollInterval=300 --%%var:city="London" --%%u:{label="tempLbl",text="Temperature: --"} --%%u:{label="infoLbl",text="Last update: --"} --%%desktop:true --%%offline:true -- Fetches current temperature from Open-Meteo (no API key required). -- Uses the WMO geocoding API to resolve city → lat/lon, then Open-Meteo for weather. -- Change --%%var:city= to any city name. local BASE_GEO = "https://geocoding-api.open-meteo.com/v1/search?name=%s&count=1&language=en&format=json" local BASE_WEATHER = "https://api.open-meteo.com/v1/forecast?latitude=%s&longitude=%s¤t_weather=true" local function httpGet(url, cb) local http = net.HTTPClient() http:request(url, { options = { method = "GET", timeout = 10000 }, success = function(r) if r.status == 200 then local ok, data = pcall(json.decode, r.data) if ok then cb(data) else cb(nil, "JSON parse error") end else cb(nil, "HTTP " .. tostring(r.status)) end end, error = function(err) cb(nil, tostring(err)) end }) end function QuickApp:onInit() self:debug(self.name, self.id) self.city = self:getVariable("city") if self.city == "" then self.city = "London" end local interval = tonumber(self:getVariable("pollInterval")) or 300 self:fetchTemperature() setInterval(function() self:fetchTemperature() end, interval * 1000) end function QuickApp:fetchTemperature() local geoUrl = string.format(BASE_GEO, self.city:gsub(" ", "+")) httpGet(geoUrl, function(geo, err) if not geo or not geo.results or not geo.results[1] then self:warning("Geocoding failed for '" .. self.city .. "': " .. tostring(err or "no results")) self:updateView("infoLbl", "text", "Error: city not found") return end local lat = tostring(geo.results[1].latitude) local lon = tostring(geo.results[1].longitude) local weatherUrl = string.format(BASE_WEATHER, lat, lon) httpGet(weatherUrl, function(wx, werr) if not wx or not wx.current_weather then self:warning("Weather fetch failed: " .. tostring(werr)) self:updateView("infoLbl", "text", "Error: weather unavailable") return end local temp = wx.current_weather.temperature self:updateProperty("value", temp) self:updateProperty("unit", "C") self:updateView("tempLbl", "text", string.format("Temperature: %.1f °C", temp)) self:updateView("infoLbl", "text", "Updated: " .. os.date("%H:%M:%S") .. " (" .. self.city .. ")") self:debug("Temperature in", self.city, ":", temp, "°C") end) end) end Pretty reasonable. It even found an available web api to get the temp. We could improve it by asking Instead of a hard coded quickVar, could we use the location of the HC3? ...and it will change the code accordingly. The exact result may vary depending on what LLM model is used. In these examples (and my coding overall) I use Claude Sonnet 4.6. This is an excellent way to over time add new skills and best practices so the agent becomes smarter - and I will update the skills continuously as I identify these "best practices" and possible issues when coding QAs. If you find something the agent could handle smarter, let me know in this thread and we can add it to the skill collection. This is the first release so there is a ton of stuff that could be added... Also, if someone uses this with Claude code or Codex, please share the instructions in this thread. I'm not using Claude myself but maybe in the future. The skill files are available directly from the repo at https://github.com/jangabrielsson/plua/tree/main/.github
- 4 replies
-
- 1
-
-
- agent
- development
- (and 4 more)
-
HC3 Event Logger - Installation Guide HC3 Event Logger is a desktop application for monitoring Fibaro Home Center 3 (HC3) events in real-time. It provides a clean interface to view device events, scene triggers, and system activities as they happen. It's mainly useful if you need to monitor the HC3 (system) events. Ex. if you are developing a QA using the RefreshStateSubscriber or other mechanisms. Features: Real-time event monitoring with live updates HC3 system information viewer Automatic update checking and installation No CORS issues - native desktop app Fast and lightweight Secure local connection to your HC3 Download Download the latest version: https://github.com/jangabrielsson/EventLogger/releases/latest Available files: macOS (Apple Silicon M1/M2/M3): HC3-Event-Logger_aarch64.app.tar.gz macOS (Intel): HC3-Event-Logger_x64.app.tar.gz Windows: HC3-Event-Logger_x64-setup.exe IMPORTANT: Configure HC3 Credentials First You must configure your HC3 credentials before using the app. Option 1: Using a .env File (Recommended) Create a file named .env with the following content: HC3_HOST=192.168.1.57 HC3_USER=admin HC3_PASSWORD=yourpassword HC3_PROTOCOL=http Replace with your actual values: HC3_HOST - Your HC3 IP address (no http://) HC3_USER - Your HC3 username (usually "admin") HC3_PASSWORD - Your HC3 password HC3_PROTOCOL - Optional, defaults to 'http'. Use 'https' if your HC3 requires it Where to place the .env file: macOS: Place in your home directory: ~/.env (easiest - just create it in your home folder) Windows: Place in your user folder: C:\Users\YourUsername\.env Quick create commands: macOS: nano ~/.env (then paste content, Ctrl+X to save) Windows: notepad %USERPROFILE%\.env (then paste content and save) Option 2: Using Environment Variables macOS/Linux: export HC3_HOST=192.168.1.57 export HC3_USER=admin export HC3_PASSWORD=yourpassword export HC3_PROTOCOL=http open /Applications/hc3-event-logger.app Windows (PowerShell): $env:HC3_HOST="192.168.1.57" $env:HC3_USER="admin" $env:HC3_PASSWORD="yourpassword" $env:HC3_PROTOCOL="http" Start-Process "C:\Program Files\hc3-event-logger\hc3-event-logger.exe" Installation Instructions macOS Download the appropriate file for your Mac (Apple Silicon or Intel) Extract the downloaded .tar.gz file (double-click in Finder) Drag hc3-event-logger.app to your Applications folder Create a .env file in your home directory: ~/.env with your HC3 credentials (see above) Right-click the app and select "Open" (first time only for macOS security) macOS Security Note: If you see "cannot be opened because it is from an unidentified developer": Right-click the app and select "Open", or Go to System Preferences → Security & Privacy → Click "Open Anyway" Windows Download HC3-Event-Logger_x64-setup.exe Run the installer and follow the wizard Create a .env file in your user folder: C:\Users\YourUsername\.env with your credentials Launch from Start Menu or desktop shortcut Windows Security Note: If you see "Windows protected your PC": Click "More info" Click "Run anyway" Using the App Main Window - Event Logger Displays real-time events from your HC3: Timestamp - When the event occurred Event Type - Type of event (device change, scene trigger, etc.) Source ID - Device or scene that triggered the event Details - Event-specific information HC3 System Info Window Access from Window → HC3 System Info menu to view: System information (version, serial number, platform) Z-Wave and Zigbee configuration Settings (timezone, temperature unit, language) Sun times (sunrise/sunset) Available updates Automatic Updates The app includes automatic update functionality: Click Window → Check for Updates... to manually check for new versions When an update is available, you'll see a dialog with release notes Click "Update" to automatically download and install the latest version The app will restart automatically after the update is installed All updates are cryptographically signed for security Troubleshooting App shows "Credentials Not Configured" Make sure you created the .env file with correct credentials Check the file is in the correct location (home directory for macOS: ~/.env, user folder for Windows: %USERPROFILE%\.env) Verify the file is named exactly .env (not .env.txt) Restart the application after creating/modifying .env Enable DevTools to see credential loading logs: Press Cmd+Shift+I (macOS) or Ctrl+Shift+I (Windows), or use Window → Toggle Developer Tools menu Cannot connect to HC3 Verify your HC3 IP address is correct Check your computer is on the same network as HC3 Test by opening http://YOUR_HC3_IP in a browser Verify username and password are correct Click the connection status indicator to retry the connection Check DevTools console (Cmd/Ctrl+Shift+I) for detailed error messages Using Developer Tools For debugging issues, you can open the Developer Tools: Press Cmd+Shift+I (macOS) or Ctrl+Shift+I (Windows) Or select Window → Toggle Developer Tools from the menu The Console tab shows credential loading status and connection errors Look for messages about .env file location and what credentials were loaded Press the same shortcut again to close DevTools Updates If automatic update check fails, you can always download the latest version manually from GitHub Updates require an internet connection to check and download The app will notify you when a new version is available Security & Privacy Your credentials are stored locally on your computer only No data is sent to external servers The app connects directly to your HC3 on your local network Keep your .env file secure (same as any password file) System Requirements macOS: macOS 10.15 (Catalina) or later, Apple Silicon or Intel processor Windows: Windows 10 or later, 64-bit processor Support: Report issues at github.com/jangabrielsson/EventLogger/issues GitHub: github.com/jangabrielsson/EventLogger

- 23 replies
-
- 3
-
-
- quickapp
- development
- (and 1 more)
-
Note my newest effort is now Plua, <here>. HC3Emu is a Lua-based emulator designed to simulate the Fibaro Home Center 3 QuickApp runtime environment. It allows developers to code and test QuickApps offline before deploying them to a physical HC3 controller. I prefer to develop my QuickApps "offline" using popular IDEs like Visual Studio Code or ZeroBrane Studio. I have thus created "emulators" that emulates the Lua environment that is available on the HC3, with all the fibaro.* functions etc. This is my last attempt to put together all my past experiences and create a portable “emulator” with just the basics. The idea is that you can add any IDE-specific tools outside the emulator base. (This video is for the older "hc3emu" and has some changes when it comes header directives in the QA file) The new "workflow" (This video is for the older "hc3emu" and has some changes when it comes header directives in the QA file) It is provided as a "rock" and installed with >luarocks install hc3emu2 It's only the luarocks package that is named hc3emu2, as it it's the second rewrite of the emulator. It's still referred to as hc3emu in code and examples- To use this you need a properly installed lua, together with a working installed luarocks. 1. Properly installed lua means that lua must be installed to be generally available in your system. Sometimes lua is provided together with other programs like ZeroBrane, but then it's only available for ZeroBrane and not other programs. 2. Working luarocks menas that luarocks should be able to compile C libraries. For MacOS and Linux that is generally not a problem and work by default. On Windows it's a bit trickier and usually requires installation of gcc (mingw) See Windows installation tips below. If luarocks is working it will take care of installing additional lua libraries that hc3emu depends on. It’s also a great way to install new versions as I release them (just install again). If you install Lua libraries by hand, the trickiest parts are to install the ones that hc3emu needs. luasec, usually depends on a system native openssl library to be installed. luasocket If successful it is used like this: --%%name=MyQuickApp # Name of the QuickApp --%%type=com.fibaro.binarySwitch # Device type --%%proxy=true # Create HC3 proxy (named MyQuickAppProxy) --%%var=foo:config.secret # Set QuickApp variable (from config file) --%%debug=api:true # Configure a debug flag --%%file=lib.lua:lib # Include external file --%%save=MyQA.fqa # Save as FQA file when running function QuickApp:onInit() self:debug(self.name,self.id) end I’ve tested it in ZeroBrane and VSCode. For VSCode, it uses the “Lua MobDebug adapter” currently since it currently since it seems to works best. There are a number of different lua debugers for vscode and all of them work with some tweaking and all of them have some trade-offs - MobDebug is still my favorite. The source code and some examples are available in my GitHub repo: https://github.com/jangabrielsson/hc3emu2. However you should not need to clone the repo. For VSCode you need a .vscode/launch.json and .vscode/tasks.json in your workspace to correctly start running and debugging your QA. They are also available in the repo, but is preferable installed by installing the VSCode extension "Hc3Emu Helper". With that extension active you will get a "hc3emu2: Current file" launch option to run your QA. When running the emulator it reads configuration if available from home directory ~/.hc3emu.lua and project/workspace directory ./hc3emu.lua if available. The minimum is to provide hc3 credentials. Ex. ~/.hc3emu.lua return { user="admin", password="admin42", url="http://192.168.1.57/" } Key Features Most of the lua functions available in the HC3 QuickApp lua environment fibaro.* hub.* (same as fibaro.*) QuickApp, QuickAppChild, class api.get, api.put, api.post. api.delete json.encode, json.decode plugin.* setTimeout, clearTimeout setInterval, clearInterval net.HTTPClient net.TCPSocket net.UDPSocket net.WebSocketClient net.WebSocketClientTls mqtt.* RefreshStatesSubscriber Can automatically deploy proxy QA on HC3 for developing and testing UI. Also useful if other QAs on the HC3 sends commands to your QA you develop... Supports QAs with multiple files Supports saving the QA to a .fqa file Missing WebSocket has minor some issues - it will not automatically ping to keep an idle socket open. What will happen is that after ~20s of no traffic a server will close the socket. Can sometimes be solved with explicit pinging if protocol allows. On the other hand, your QA should be able to deal with server closing socket and open the socket again... Credentials Install a file named .hc3emu.lua, in your home directory, or workspace folder. If it's in your home directory it is shared between all workspaces. It should have the content return { user = "admin", url = "http://192.168.1.57/", password = "admin!", Hue_user = "AqlHjZVlyhskdhfsdkfhksdhfg0zitdckmn9", Hue_ip = "192.168.1.153" } The user/password/url will be used to access the HC3. In this example we add two more credentials for accessing a Hue hub. We can then in our QA code create QuickAppVariables with those values --%%var=HueUser:config.Hue_user --%%var=HueIP:config.Hue_ip This way we don't have to have our credentials in out QA course code and accidentally share it with others... Header directives --%%type=<type> - Type of the QA, ex. --%%type=com.fibaro.binarySwitch --%%name=<name> - Name of the QA, ex. --%%name=My QuickApp --%%proxy=<true|false> - Make this device a proxy device --%%proxy_new=<true|false> - Recreate proxy if exists? Default false --%%proxy_set_ui=<true|false> - Set UI for the proxy device at every startup? Default false --%%state=<tag> - Tag for the state file, ex. --%%state=MyQAState --%%time=<time> - Start time for the emulator, ex. --%%time=2027/10/10/12:00:00 --%%speed=<time> - Hours to speed the emulator, ex. --%%speed=24*7 -- speed for 1 week --%%offline=<true|false> - Run in offline mode, ex. --%%offline=true --%%logui=<true|false> - Log proxy's current UI at startup, ex. --%%logui=true --%%webui=<true|false> - Enable emulated web UI for the QA, ex. --%%webui=true --%%uid=<string> - uid property of the QA, ex. --%%uid=12345678-1234-5678-1234-567812345678 --%%manufacturer=<string> - Manufacturer property of the QA, ex. --%%manufacturer=MyCompany --%%model=<string> - Model property of the QA, ex. --%%model=MyModel --%%role=<string> - Device role of the QA, ex. --%%role=Light --%%description=<string> - Description property of the QA, ex. --%%description=My QuickApp --%%latitude=<number> - Latitude of the system, ex. --%%latitude=59.3293 --%%longitude=<number> - Longitude of the system, ex. --%%longitude=18.0686 --%%temp=<path> - Path to the temporary directory, ex. --%%temp=/tmp/hc3emu --%%nodebug=<true|false> - Disable debugging, ex. --%%nodebug=true --%%norun=<true|false> - Load but do not run the QuickApp, ex. --%%norun=true --%%silent=<true|false> - Do not print debug messages, ex. --%%silent=true --%%breakOnLoad=<true|false> - Break on first line when loading the QuickApp, ex. --%%breakOnLoad=true --%%breakOnInit=<true|false> - Break on first line of QuickApp:onInit(), ex. --%%breakOnInit=true --%%save=<path> - Save the QA as a .fqa when running, ex. --%%save=myQA.fqa --%%nodir=<true|false> - Do not create emu directory, ex. --%%nodir=true --%%conceal=<true|false> - Conceal quickApp variables when saving QA, ex. --%%conceal=password:"Set this to the password" --%%condensedLog=<true|false> - Use condensed log format, ex. --%%condensedLog=true --%%pport=<number> - Port for the proxy, ex. --%%pport=8265 --%%wport=<number> - Port for the web server, ex. --%%wport=8266 --%%hport=<number> - Port for the help server, ex. --%%hport=8267 --%%dport=<number> - Port for the debugger, ex. --%%dport=8172 --%%hip=<ip> - IP for the help server, ex. --%%hip=127.0.0.1 --%%url=<url> - URL for the HC3, ex. --%%url=http://192.168.1.57/ --%%user=<user> - User for the HC3, ex. --%%user=admin --%%pwd=<password> - Password for the HC3, ex. --%%pwd=admin --%%pin=<pin> - PIN for the HC3, ex. --%%pin=1234 --%%u=<table> - Add UI element to the QuickApp, ex. --%%u={button="btn1",text="Click me",onReleased="myFunction"} --%%debug=<flags> - Set debug flags, ex. --%%debug=system:true,api:true,onAction:true --%%file=<path,method> - Add file to the QuickApp, ex. --%%file=./myfile.lua,init --%%var=<name:value> - Add variable to the QuickApp, ex. --%%var=MyVar:"MyValue" --%%install=<user,pass,url> - Install the QuickApp on the HC3, ex. --%%install=admin,admin,http://192.168.1.57/ List of debug flags system=<boolean> --System debug (combined) api=<boolean> --Log API errors device=<boolean> --Device lifecycle debug http=<boolean> --log HTTP requests timer=<boolean> --Timer operations time=<boolean> --Time operations onAction=<boolean> --Log onAction calls onUIEvent=<boolean> --Log onUIEvent calls notrace=<boolean> --No trace log rawrefresh=<boolean> --Raw refresh log refresh=<boolean> --Refresh log warn=<boolean> --Warning log server=<boolean> --Server log web=<boolean> --Web server log Installation tips When using luarocks from within Zerobrane you must run a separate (system) installed lua interpreter. When interpreter is selected from within Zerobrane (Project -> Lua interpreter -> ...) it will use per default lua interpreters that come bundled with Zerobrane and sometimes they are compiled in a way that they don't like binary libraries compiled by other systems like luarocks. On MacOS that can be ex. x86 vs arm binaries. The builtin Lua interpreter also uses old bundled Lua libraries not compatible with hc3emu. To make zerobrane use your own installed lua 5.4 do, Preferences -> Settings: System, and set path.lua54 = "/opt/homebrew/bin/lua" In my case I have installed lua 5.4 in /opt/homebrew/bin/lua, but you may have installed it somewhere else.. This way, luarocks will install libraries that will be used by the right lua. For vscode, the normal behavior is that the plugin use the system installed lua. When managed to install the hc3emu luarock without errors, it's time to setup the environment. The easiest way to generate the necessary configuration setup is to run a small QA that looks like --%%install=<user>,<password>,<HC3 url> Ex. --%%install=admin,myPassword!,http://192.168.1.57 It will generate a config file ~/-hc3emu.json in your home directory with the user, password and url parameters set. (Don't forget to remove the --%%install line or QA afterward so you don't have your credentials visible in your code...) Specific installation tips For Visual Studio Code Hc3Emu Helper extension for VSCode For ZeroBrane Studio Windows 11 and WSL Windows 11 native Visual Studio Code Dev Container (Only need to install VSCode and Docker) Other information Tips & tricks Using proxy device Working with QuickAppChild devices Debugging tips Implementation details

- 285 replies
-
- 5
-
-
- development
- zerobrane
- (and 2 more)
-
I have started to code a Hue QA that uses the new V2 api. It's still early beta... (v0.11) It's available via the QAUpdater QA. The QA is a standalone QA that keeps an updated state of the Hue resources and accept commands to change them - like turning on/off lights. It only provides an API (fibaro.call, fibaro.getValue) and no QuickAppChild devices (the latter can be built relatively easy built using HueConnector...) To use the QA you create a your own client QA that calls the HueConnector QA. Example client: local devices = { "9222ea53-37a6-4ac0-b57d-74bca1cfa23f", -- Sensor "3ab27084-d02f-44b9-bd56-70ea41163cb6", -- Tim "a007e50b-0bdd-4e48-bee0-97636d57285a", -- Switch } function QuickApp:hueInited() local function printf(...) print(string.format(...)) end -- local map = self.hue.getRsrc("deviceMap") -- Setup custom mapping from room+name to Hue ID. -- for id,info in pairs(map) do -- local name = ((info.room and (info.room.."_") or "")..info.name):gsub("[%-%s]","_") -- self.hue.idMap[name]=id -- print(name,"=>",id) -- end print(("-"):rep(40)) print("Mapping table:") -- Print out default mapping for name,id in pairs(self.hue.idMap) do printf("'%s' => '%s'",name,id) end print(("-"):rep(40)) self.hue.subscribeTo(devices) self.hue.listSubscribedDevices() self.hue.listAllDevices() -- setTimeout(function() fibaro.call("3ab27084-d02f-44b9-bd56-70ea41163cb6","setColor","white") end, 0) -- setTimeout(function() fibaro.call("3ab27084-d02f-44b9-bd56-70ea41163cb6","turnOff") end, 0) -- setTimeout(function() fibaro.call("3ab27084-d02f-44b9-bd56-70ea41163cb6","turnOn") end, 3000) -- setTimeout(function() fibaro.call("3ab27084-d02f-44b9-bd56-70ea41163cb6","turnOff") end, 5000) -- setTimeout(function() fibaro.call("3ab27084-d02f-44b9-bd56-70ea41163cb6","turnOn") end, 7000) -- setTimeout(function() fibaro.call("3ab27084-d02f-44b9-bd56-70ea41163cb6","setDim",0,4000) end, 10000) -- setTimeout(function() fibaro.call("3ab27084-d02f-44b9-bd56-70ea41163cb6","setDim",100,4000) end, 15000) -- setTimeout(function() fibaro.call("Guest_room_Tim","setColor","green") end, 17000) -- setTimeout(function() print(fibaro.get("3ab27084-d02f-44b9-bd56-70ea41163cb6","on")) end, 19000) end function QuickApp:hueEvent(id,event) self:debug("Event:",uid," ",json.encode(event)) end function QuickApp:onInit() self:debug(self.name, self.id) self:setupUpHue() end This example uses 3 Hue devices, a motion/lux/temp sensor, a light (Tim), and a switch. The QA supports devices, rooms, zones and scenes. We can send command to the Hue light with fibaro.call. Note that the id is the Hue uid and not a device number. When a device changes state there is a callback to QuickApp:hueEvent with the uid and the event. There is a deviceMap (more about that later) accessible with self.hue.getRsrc("deviceMap") that maps Hue ids to the various properties of the device/resource. In particular, name and room. This allows us to build a map from our own IDs to hue ids as they may be easier to deal with. In the example above we map the light "3ab27084-d02f-44b9-bd56-70ea41163cb6" that has the name "Tim" and room "Guest room" to "Guest_room_Tim"="3ab27084-d02f-44b9-bd56-70ea41163cb6" in the self.hue.deviceMap[] table. That table is used by fibaro.call so if the id is in the self.hue.deviceMap table it will use that mapping. This allows us to call fibaro.call("Guest_room_Tim","setColor","green") in our example. but it also works with fibaro.call("3ab27084-d02f-44b9-bd56-70ea41163cb6","setColor","green") Only lights, rooms, zones and scenes can take commands: fibaro.call(uid,"turnOn"[,transition]) -- transition in ms. fibaro.call(uid,"turnOff"[,transition]) -- transition in ms. fibaro.call(uid,"toggle"[,transition]) -- transition in ms. fibaro.call(uid,"setDim",value[,transition])). -- value 0-100, transition in ms. fibaro.call(uid,"setTemperature",value[,transition]) -- value in mirek fibaro.call(uid,"setColor",<string> | {x=x, y=y} | {r=r,g=g,b=b}[,transition]) -- color string, ex "green" or x,y float values. (RGB support tbd) fibaro.call(uid,"recall"[,transition]) -- Recall scene for scene with uid. fibaro.call(uid,"sendRaw",<table>) -- POST raw command to Hue device with uid Sensor properties motion -- true/false temperature -- temperature light -- lux status -- connected/reachable power_state -- battery Buttons/switches properties button -- button pressed status -- connected/reachable power_state -- battery Lights properties on -- true/false dimming -- 0-100 color_temperature -- mirek color -- x,y status -- connected/reachable To use this there is a small Hue client library that needs to be included in the QA On top of this it would be relatively easy to create ex. childDevices for each device etc. So, there is some setup that needs be done for the HueConnector QA too. There are quickApp variables with "Hue_IP" and "Hue_User". The latter is the api key you get from the hub. You can dump the current devices, rooms, zones and scenes (the resources we can work with) When I log my resources looks like [12.08.2022] [10:02:42] [DEBUG] [QUICKAPP1001]: ['1c10e485-e52b-4144-9991-46dbb2eedafa'] = { type='device', name='Middle window', model='LCT012', room='Living room', }, [12.08.2022] [10:02:42] [DEBUG] [QUICKAPP1001]: ['21fc2e2f-05e6-4fbd-ad3b-a12762c88e72'] = { type='device', name='Hue white lamp 1', model='LWA001', room='Guest room', }, [12.08.2022] [10:02:42] [DEBUG] [QUICKAPP1001]: ['2219eadd-9464-4149-b52d-073ed1d9754a'] = { type='device', name='Köksö2', model='LCG002', room='Köksö', }, [12.08.2022] [10:02:42] [DEBUG] [QUICKAPP1001]: ['2d7bfac8-688b-4889-b813-b927e875b533'] = { type='device', name='Star right', model='LCT012', room='Guest room', }, [12.08.2022] [10:02:42] [DEBUG] [QUICKAPP1001]: ['3ab27084-d02f-44b9-bd56-70ea41163cb6'] = { type='device', name='Tim', model='LCT015', room='Guest room', }, [12.08.2022] [10:02:42] [DEBUG] [QUICKAPP1001]: ['429ee799-9b86-43e5-bf31-ce3d06b45cc7'] = { type='device', name='Roof3', model='LCT012', room='Hall', }, [12.08.2022] [10:02:42] [DEBUG] [QUICKAPP1001]: ['598e4796-be01-482f-99c1-92f95fa8a18c'] = { type='device', name='Roof2', model='LCT012', room='Hall', }, [12.08.2022] [10:02:42] [DEBUG] [QUICKAPP1001]: ['59cbfb37-eba9-4746-9e64-ded409857abc'] = { type='device', name='Left window', model='LCT012', room='Living room', }, [12.08.2022] [10:02:42] [DEBUG] [QUICKAPP1001]: ['5ddcb36b-f985-4876-88b6-a238c58b9dbf'] = { type='device', name='Star left', model='LCT012', room='Guest room', }, [12.08.2022] [10:02:42] [DEBUG] [QUICKAPP1001]: ['721e69c5-bc75-4e99-b3ea-c05038ffa1af'] = { type='device', name='Star middle', model='LCT012', room='Guest room', }, [12.08.2022] [10:02:42] [DEBUG] [QUICKAPP1001]: ['8a453c82-0072-4223-9c42-f395b5cb0c40'] = { type='device', name='Hue smart plug 1', model='LOM007', room='Guest room', }, [12.08.2022] [10:02:42] [DEBUG] [QUICKAPP1001]: ['8dddf049-0a73-44e2-8fdd-e3c2310c1bb1'] = { type='device', name='Roof1', model='LCT012', room='Hall', }, [12.08.2022] [10:02:42] [DEBUG] [QUICKAPP1001]: ['9222ea53-37a6-4ac0-b57d-74bca1cfa23f'] = { type='device', name='Living room sensor', model='SML001', }, [12.08.2022] [10:02:42] [DEBUG] [QUICKAPP1001]: ['932bd43b-d8cd-44bc-b8bd-daaf72ae6f82'] = { type='device', name='Living room wall switch', model='RDM001', }, [12.08.2022] [10:02:42] [DEBUG] [QUICKAPP1001]: ['93d49902-6ce5-4383-9037-bfaeec8cd538'] = { type='device', name='Right window', model='LWO003', room='Living room', }, [12.08.2022] [10:02:42] [DEBUG] [QUICKAPP1001]: ['9be444b2-1587-4fbe-89ac-efb809d7e629'] = { type='device', name='Roof lamp', model='LCT015', room='Bedroom', }, [12.08.2022] [10:02:42] [DEBUG] [QUICKAPP1001]: ['a001f510-48dd-47fc-b9ff-f779c40dd693'] = { type='device', name='Table1', model='LCA001', room='Living room', }, [12.08.2022] [10:02:42] [DEBUG] [QUICKAPP1001]: ['a007e50b-0bdd-4e48-bee0-97636d57285a'] = { type='device', name='Dimmer switch', model='RWL021', }, [12.08.2022] [10:02:42] [DEBUG] [QUICKAPP1001]: ['a2b30b76-f044-46b6-9e1c-c8156baf00ab'] = { type='device', name='Table2', model='LCA001', room='Living room', }, [12.08.2022] [10:02:42] [DEBUG] [QUICKAPP1001]: ['c4bef7c5-0173-4d57-ae6a-d7f8a14b4dde'] = { type='device', name='Roof5', model='LCT012', room='Hall', }, [12.08.2022] [10:02:42] [DEBUG] [QUICKAPP1001]: ['d3b04b72-c2f0-401f-85d7-a65f2db5c48e'] = { type='device', name='Roof4', model='LCT012', room='Hall', }, [12.08.2022] [10:02:42] [DEBUG] [QUICKAPP1001]: ['e82c2285-20f3-401f-9621-9dc356feb694'] = { type='device', name='Köksö1', model='LCG002', room='Köksö', }, [12.08.2022] [10:02:42] [DEBUG] [QUICKAPP1001]: ['f2a231b4-9c27-466f-8344-05c4012c742b'] = { type='device', name='Philips hue', model='BSB002', }, [12.08.2022] [10:02:42] [DEBUG] [QUICKAPP1001]: ['795959f5-9313-4aae-b930-b178b48249e0'] = { type='room', name='Guest room', model='bedroom', }, [12.08.2022] [10:02:42] [DEBUG] [QUICKAPP1001]: ['9ab242fb-fae1-47e5-a54f-51bb8e80ac31'] = { type='room', name='Köksö', model='kitchen', }, [12.08.2022] [10:02:42] [DEBUG] [QUICKAPP1001]: ['bbe472e6-8ea8-477b-a116-ca345452e056'] = { type='room', name='Hall', model='living_room', }, [12.08.2022] [10:02:42] [DEBUG] [QUICKAPP1001]: ['bcd3daec-82a9-4de7-813a-3464beee0090'] = { type='room', name='Living room', model='living_room', }, [12.08.2022] [10:02:42] [DEBUG] [QUICKAPP1001]: ['cc309f30-d0f4-4ab5-a31f-39cd2206be57'] = { type='room', name='Bedroom', model='bedroom', }, [12.08.2022] [10:02:42] [DEBUG] [QUICKAPP1001]: ['03541e04-3481-47e7-ad22-c167437ca905'] = { type='scene', name='Bright', model='unknown', room='Kitchen table', }, [12.08.2022] [10:02:42] [DEBUG] [QUICKAPP1001]: ['29d8ba67-980a-4ab9-9fa6-50a0f994b273'] = { type='scene', name='Bright', model='unknown', room='Window lights', }, [12.08.2022] [10:02:42] [DEBUG] [QUICKAPP1001]: ['dd2cef77-e4fb-455b-867f-bad85f8f846c'] = { type='scene', name='Miami', model='unknown', room='Guest room', }, [12.08.2022] [10:02:42] [DEBUG] [QUICKAPP1001]: ['f1677f3f-db72-45b2-a922-97046cdbff9d'] = { type='scene', name='Bright', model='unknown', room='Guest room', }, [12.08.2022] [10:02:42] [DEBUG] [QUICKAPP1001]: ['39e1fc25-e926-42e5-a840-b2d21aaa08f3'] = { type='zone', name='Stars', model='recreation', }, [12.08.2022] [10:02:42] [DEBUG] [QUICKAPP1001]: ['79e44c37-15e0-4d93-8d89-230b14822270'] = { type='zone', name='Gymet', model='gym', }, [12.08.2022] [10:02:42] [DEBUG] [QUICKAPP1001]: ['9bfda4bf-b17e-4ec9-9123-a97afbcca814'] = { type='zone', name='Window lights', model='recreation', }, [12.08.2022] [10:02:42] [DEBUG] [QUICKAPP1001]: ['b5f12b5f-20c7-47a5-8535-c7a20fb9e66d'] = { type='zone', name='Kitchen island', model='kitchen', }, [12.08.2022] [10:02:42] [DEBUG] [QUICKAPP1001]: ['fe101c36-3dcc-4831-90f1-5052fc54e08b'] = { type='zone', name='Kitchen table', model='kitchen', }, That table is the one used when creating a custom mapping between names and Hue uids There will be improvements in the coming week and also hoping the V2 API will mature a bit more. There are some speed improvements that I know about that will improve the QA significantly...
- 45 replies
-
- 8
-
-
-
- qa
- development
- (and 1 more)
-
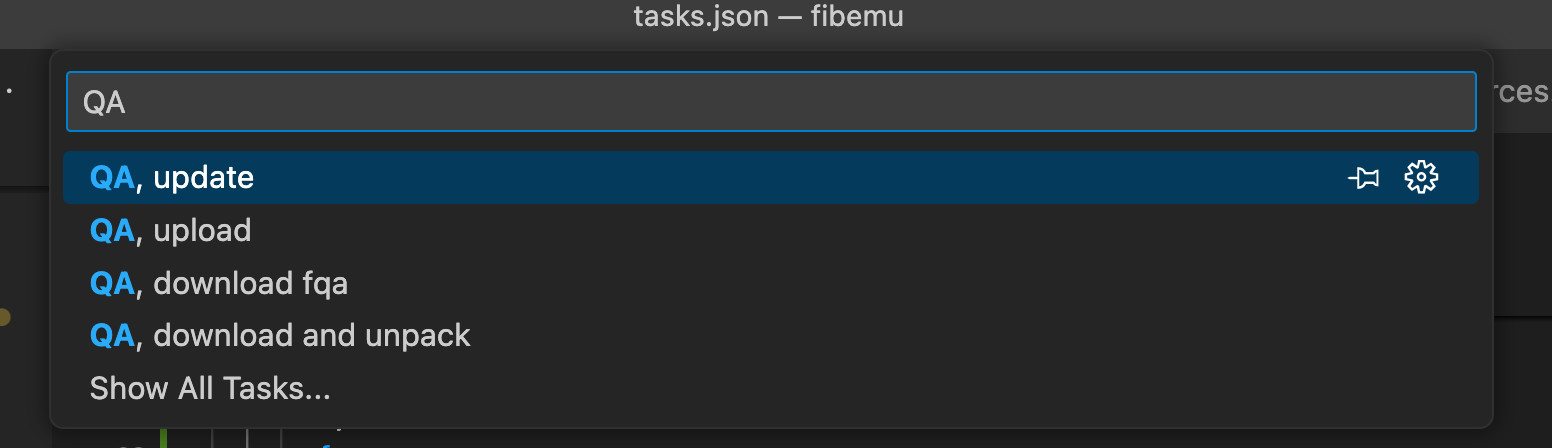
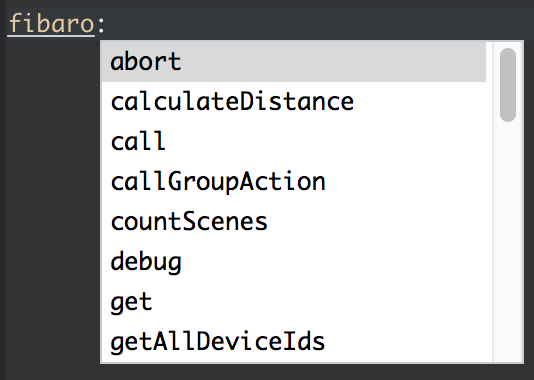
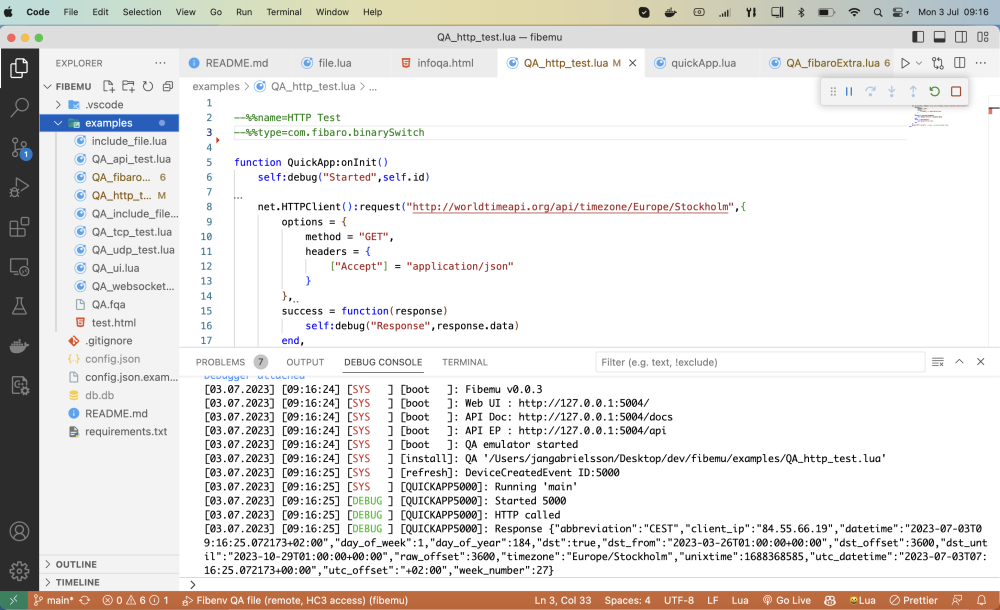
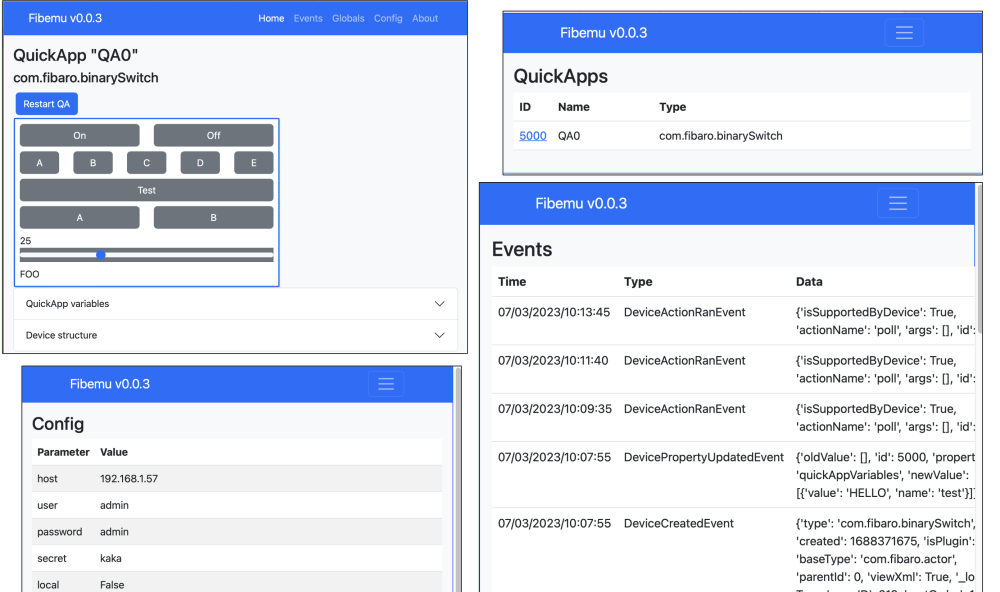
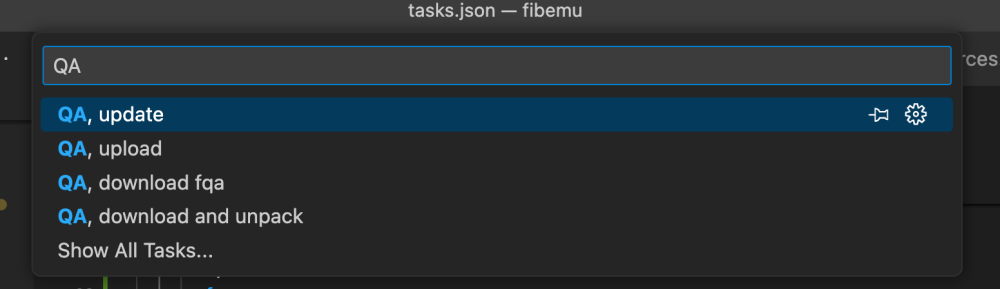
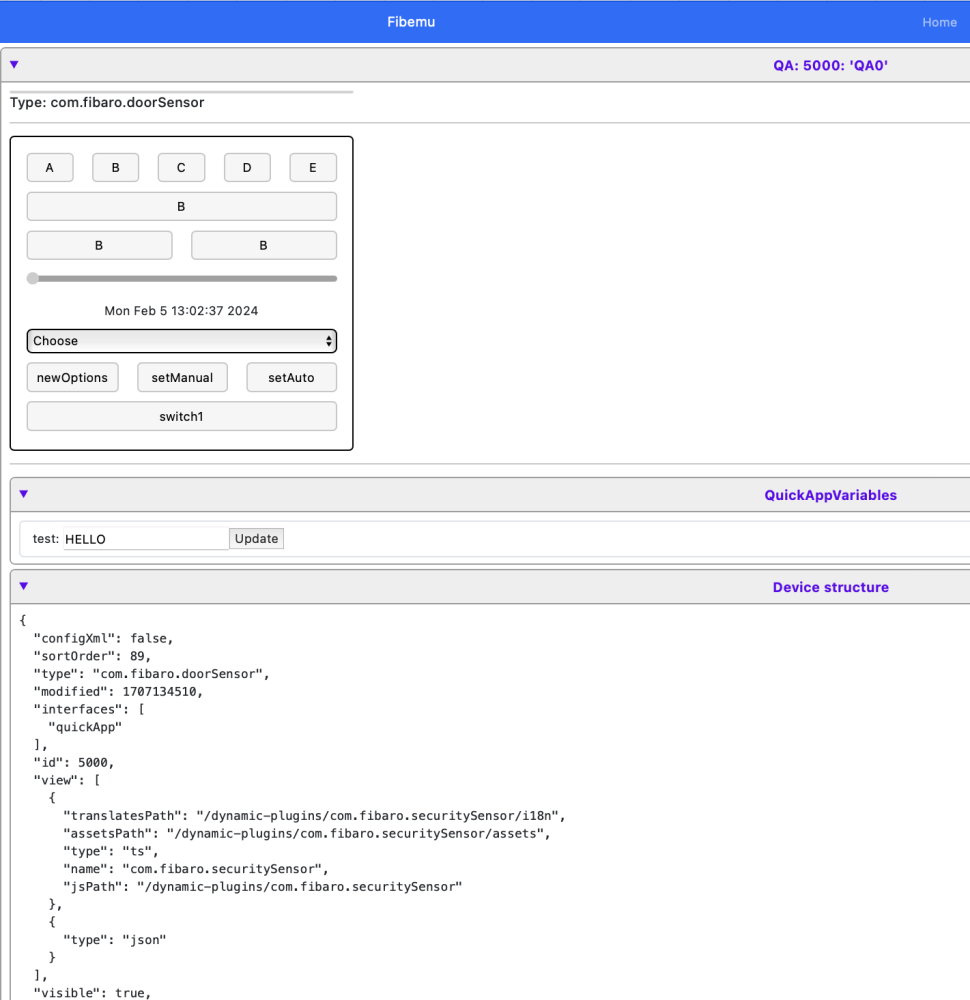
Note, my newest emulator that works in vscode is here This setup is designed for QA development using Visual Studio Code (VSCode). It includes an emulator, allowing you to run and debug QAs directly in VSCode. This setup is compatible with HC3, offering features such as code completion, syntax highlighting, and workflow tasks for downloading, editing, packaging, and uploading QAs to/from HC3. Tested on Windows 11 and MacOS, this setup should also work on Linux. You can download the repository from here. Documentation, still in progress, is available here. Additionally, there's a video tutorial on installing this setup on Windows 11. The setup in VSCode looks as shown in the image. This configuration allows you to develop and run a QuickApp (QA) offline on your PC, Mac, or Linux system, and interact with the HC3 in a controlled manner. There's also a simple Web user interface for interacting with the QAs and monitoring events (available at http://127.0.0.1:5004/frontend) To get started: Install Python 3 on your machine. NOTE! Only Python v3.11 and 3.12 is supported. in settings.json set "fibpython":".venv/bin/python", fibpython should point to your executable python. In the example it points to a python venv in the workspace, but it could point anywhere you have installed python. There is a settings.templ provided as a base for your own settings.json (should be in the .vscode directory) To test if the installation is ok , in the vscode terminal window, type what you set the fibpython path to. ex: .venv/bin/python and see if it works. Install the required Python libraries from requirements.txt using >pip install -r requirements.txt. Make sure they install for the python interpreter that is pointed out by fibpython. Create a config.json file with credentials to access the HC3, based on the config.json.example. Install the VSCode extension "Local Lua Debugger" by Tom Blind. Create a QA file in the directory, choose the launcher "Fibenv QA file (remote)," and start debugging with F5. For more examples, refer to the files in the examples/ directory. The included .gitignore file excludes the ./dev and ./test subdirectories, allowing you to test your own code without affecting the rest of the repository. For installing Python libraries, it's recommended to create a virtual environment in the folder first. This setup includes a Python wrapper for the Lua runtime (Lupa), addressing dependencies on luasocket and others, eliminating the need for Lua installation on your machine. To instruct the emulator about the type of QA, directives similar to TQAE can be used in the QA file, but with slight differences, as shown in the example. Ex. --%%name=MyQA --%%type=com.fibaro.binarySwitch --%%file=qa3_1.lua,extra; --%%remote=devices:788,790 --%%remote=globalVariables:myVar,anotherVar --%%debug=libraryfiles:false,userfilefiles:false function QuickApp:onInit() self:debug(self.name,self.type,self.id) fibaro.call(788,"turnOn") end Note the --%%remote directive It instructs the emulator that it's ok to call device 788,789 o the HC3. As a default, the emulator treats all resources as local (we can read from HC3 but then treat them as local copies) and we enable resources we want to interact with on the HC3 as 'remote'. This goes for other resources also like 'globalVariables'. The setup integrates with the Lua debugger, allowing for breakpoint setting and more. Note that this project is still in progress, and updates will be provided as improvements are made. The emulator UI can be accessed at http://127.0.0.1:5004/, with a Swagger page for implemented APIs at http://127.0.0.1:5004/docs. The port (5004) can be changed as needed. Supported APIs include various fibaro and net functions, along with api calls and plugin functions. The setup also includes classes for QuickApp development and management. Supported APIs fibaro.debug(tag,str) fibaro.warning(tag,str) fibaro.trace(tag,str) fibaro.error(tag,str) fibaro.call(deviceID, actionName, ...) fibaro.getType(deviceID) fibaro.getValue(deviceID, propertyName) fibaro.getName(deviceID) fibaro.get(deviceID,propertyName) fibaro.getGlobalVariable(varName) fibaro.setGlobalVariable(varName ,value) fibaro.getRoomName(roomID) fibaro.getRoomID(deviceID) fibaro.getRoomNameByDeviceID(deviceID) fibaro.getSectionID(deviceID) fibaro.getIds(devices) fibaro.getAllDeviceIds() fibaro.getDevicesID(filter) fibaro.scene(action, sceneIDs) fibaro.profile(profile_id, action) fibaro.callGroupAction(action,args) fibaro.alert(alert_type, user_ids, notification_content) fibaro.alarm(partition_id, action) fibaro.setTimeout(ms, func) fibaro.clearTimeout(ref) fibaro.setInterval(ms, func) fibaro.clearInterval(ref) fibaro.emitCustomEvent(name) fibaro.wakeUpDeadDevice(deviceID) fibaro.sleep(ms) ...and corresponding hub.* functions net.HTTPClient() net.TCPSocket() net.UDPSocket() net.WebSocketClient() net.WebSocketClientTLS() --mqtt.Client.connect(uri, options) --no yet --<mqttclient>:addEventListener(message,handler) --no yet --<mqttclient>:subscribe(topic, options) --no yet --<mqttclient>:unsubscribe(topics, options) --no yet --<mqttclient>:publish(topic, payload, options) --no yet --<mqttclient>::disconnect(options) --no yet api.get(call) api.put(call <, data>) api.post(call <, data>) api.delete(call <, data>) setTimeout(func, ms) clearTimeout(ref) setInterval(func, ms) clearInterval(ref) json.encode(expr) json.decode(string) plugin.mainDeviceId ---plugin.deleteDevice(deviceId) --not yet plugin.restart(deviceId) plugin.getProperty(id,prop) plugin.getChildDevices(id) plugin.createChildDevice(prop) class QuickAppBase class QuickApp class QuickAppChild class RefreshStateSubscriber class <name> property(get,set) QuickApp:onInit() -- called at startup if defined QuickApp - self:setVariable(name,value) QuickApp - self:getVariable(name) QuickApp - self:debug(...) QuickApp - self:trace(...) QuickApp - self:warning(...) QuickApp - self:error(...) QuickApp - self:updateView(elm,type,value) QuickApp - self:updateProperty(name,value) QuickApp - self:createChildDevice(props,device) QuickApp - self:removeChildDevice(id) QuickApp - self:initChildDevices(table) QuickApp - self:isTypeOf(typ) QuickApp - self:callAction(name, ...) QuickApp - self:setName(name) QuickApp - self:setEnabled(bool) QuickApp - self:setVisible(bool) getHierarchy() For your own QA development have the repo 'fibemu' downloaded in a separate directory. Then create your own vscode development directory, and initialise that as a git repo if you want. With that open, do File->Add Folder to Workspace, and add the fibemu folder. This is what Vscode calls a "multi-root" workspace and it. Create a lua (QuickApp file) in your directory. First line in your QuickApp file should be the offset to your directory --%%root=../<name of your dir>/ So if you have a multi-root workspace now that looks like o fibemu o myDirectory You set the root to ../myDirectory/ Then press F5 to start to debug. The launch commands and other will be taken from the fibemu folder. This way you can pull down new version of fibemu without messing up your own directory and development. Also, don't forget to setup your config.json with credentials (copy from fibemu/config.json.example) Here is a link to the multi-project setup instructions (may include a video in the future) Implementation Some implementation notes. Supported REST APIs. Workflow There are some defined vscode Tasks that help in remotely uploading and updating the QA on the HC3 from within the vscode environment "QA, download fqa" downloads an QA from the HC3 and saves it as a .fqa file. The task will prompt for deviceID and path where to store. The path/dir needs to exist "QA, download and unpack" downloads an QA from the HC3 and saves all QA files as .lua files. It also adds fibemu headers in the main file so it can be opened and run with the emulator . The task will prompt for deviceId and path where to store. The path/dir needs to exist "QA, upload" will upload the QA to the HC3. It will prompt for QA file. If '.' is given as argument it will upload the current opened file. This will create a new QA, with a new deviceId on the HC3. "QA, update" will try to update QA files, viewLayout, uiCallbacks, and quickAppVariables of an existing QA on the HC3. If '.' is given as argument the file must have set the fibemu header --%%id=<ID> so it knows what QA to update. One can also give the deviceId of the QA on the HC3 that should be updated. This is convenient when developing and avoiding new IDs being "consumed". Sometimes when you update a QA you would not like to update the quickAppVariables. In that case give '-' instead '.' for the current opened file, or -deviceId for an exiting QA on the HC3. Scripts An advantage with the emulator is that we have access to more lua functions than on the HC3 which allow us to write some maintenance scripts QA backup. Backs up QAs from the HC3 to a local directory, keeping the 3 last versions QA distribution. Packs a development file to a .fqa, initialises some quickAppVariables, adds readme.txt file and zips it to an archive. Known issues While the QA is running, break-points can't be added. This is a limitation of the debugger used. Just add the break-point and restart the QA. When the emulator crashes, it may leave a process open that keeps the port 5004 in use. The emulator will complain at restart that the port is already bound. You may need to manually kill the process. On Mac: >kill -9 $(lsof -ti:5004)
- 394 replies
-
- 7
-
-
-
- visual studio code
- quickapp
- (and 3 more)
-
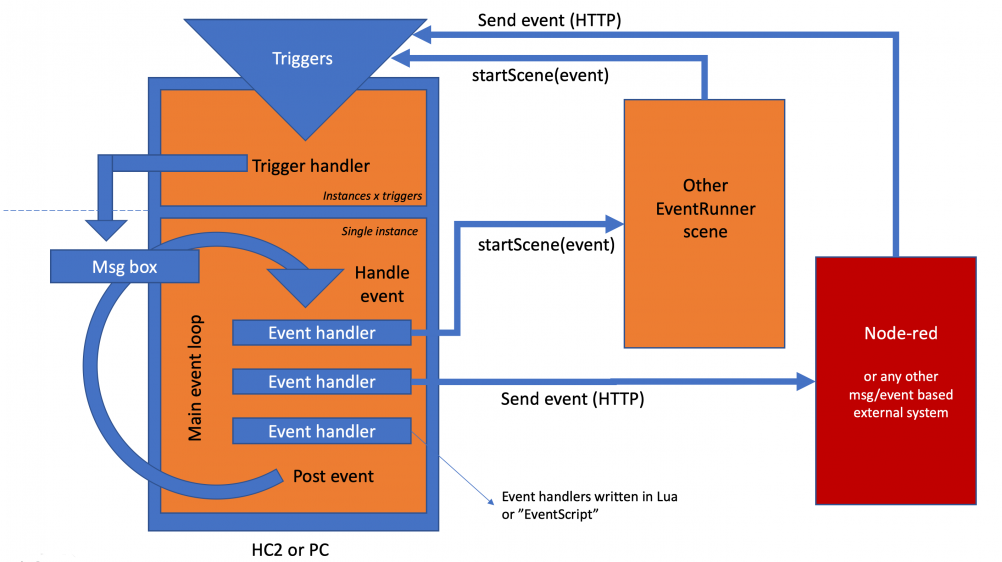
Note. The first ~2000 posts of this thread is mainly about EventRunner3 that is for the HC2. EventRunner3 is not developed further, but bugs are fixed as they are reported. For HC3, the version is EventRunner4, and is a QuickApp,. Here is a post introducing EventRunner4. Its EventRunner5, link <here> Most of the 'Event Script" syntax and commands are still valid and old posts can be of use for new HC3 owners. Link to EventRunner3.lua for the HC2 There is a QA that is used to download and install the EventRunner4 QA to your HC3 (and update to new versions) Here is an example of how to code in a "single instance / event" style. A style I'm using today for all of my scenes. The idea is that instead of having to deal with a new instance being spawned with every scene trigger, all triggers are dealt with from within a single scene instance that is continuously running. It becomes something close to a traditional event loop model found in most modern GUI frameworks. The advantages with coding scenes in this style are: Scene can keep state in local lua variables between scene invocations/triggers Easy to keep different rules/logic in the same scene without causing conflicts, e.g. combining continuous running loops/schedules with immediate reaction on incoming triggers Easy to distribute different rules/logic between different scenes and allow them to communicate Easy to schedule actions to do in the future - that can be easily cancelled if new information is gained. Because the scene is continuously running it doesn't matter if there is a heavy initialisation when the scene starts up (parsing HomeTables etc.) as it is only done once... The framework has extensive support to run and debug the scene offline on a PC/Mac to get things right before deploying the scene on the HC2 (uses HC2 emulator). Offline it is easy to simulate trigger/events to understand if the logic is correct, something that is not always easy to detect in a asynchronous environment. It has publish/subscribe mechanism allowing scenes to exchange events without having to know each other's names or IDs or rely on global variables. It has proven to be easy to integrate with external event/msg based systems like Node-red, where scenes can both send and receive events to node-red and thus extend functionality with Alexa, Google home, Hue etc etc. The framework is available in two version, a 'light' version and a full blow version with a lot of bells and whistles. The latter also supports writing rules in EventScript, a "simple", but very flexible and efficient approach to writing rules that need to trigger things at various times of the day, or trigger on sensors or switches changing states. The implementation of EventScript is built on-top of the single instance framework and the event model and would have been impossible to do in a traditional scene model. Ex of EventScript rules. --[[ %% properties 54 value 55 value 56 value 57 value 66 value 77 value 78 sceneActivation 88 ui.Slider1.value 88 ui.Label1.value %% events 100 CentralSceneEvent 120 AccessControlEvent %% globals Home %% autostart --]] myLightSensor1 = 54 -- do not declare local, script will not find them(!) myLightSensor2 = 55 myMotionSensor1 = 56 myMotionSensor2 = 57 myLight1 = 66 myLight2 = 67 myDoorSensor = 77 mySwitch = 78 myVD=88 myKeyFob = 100 myLock = 120 function main() -- Trigger rules Rule.eval("myLightSensor1:lux > 200 => myLight1:on") -- Turn on light1 if lux value goes above 200 Rule.eval("myLight1:isOn => myLight2:on") -- Turn on light2 if light1 is turned on Rule.eval("myDoorSensor:breached => myLight1:on") -- Turn on light1 if door sensor is breached Rule.eval("mySwitch:scene == S2.click => myLight1:on") -- Turn on light1 if S2 is clicked once Rule.eval("slider(myVD,'Slider1') == 50 => myLight1:on") -- Turn on light1 if slider is set to 50 Rule.eval("label(myVD,'Label1') == 'ON' => myLight1:on") -- Turn on light1 if label is set to 'ON' Rule.eval("myKeyFob:central.keyId==4 => myLight1:on") -- Turn on light1 if key 4 is pressed on keyFob Rule.eval("myLock:access.status=='Unlock' => log('Door unlocked by %s',myLock:access.name)") -- Door unlocked Rule.eval("$Home == 'AWAY' => myLight1:on") -- Turn on light1 if fibaro global variable 'Home' is set to 'AWAY' Rule.eval("#AccessControlEvent{data={name='$name',slotId='$slot',status='Unlock',id=myLock}} => log('Door unlocked by %s',name)") -- more rules -- Turn on lamp at 15min before sunset Rule.eval("@sunset-00:15 => myLight1:on") -- Turn on 2 lamps 15min past sunrise on weekdays Rule.eval("@sunrise+00:15 & wday('mon-fri') => {myLight1,myLight2}:on") -- Turn on lamp if sensor breached Rule.eval("myMotionSensor1:breached => myLight1:on") -- Turn off lamp if sensor safe for 5min Rule.eval("trueFor(00:05,myMotionSensor1:safe) => myLight1:off") -- Turn on lamp if doubleclick on switch S2 Rule.eval("mySwitch:scene==S2.double => myLight1:on") -- Toggle lamp if key '1' pressed on keyfob Rule.eval("myKeyfob:central.keyId=='1' => myLight1:toggle") -- Turn on lamp if average lux is less than 200 Rule.eval("sum({myLightSensor1,myLightSensor2}:lux)/2<200 => myLight1:on") -- Turn on lamp if any of motion sensor myMotionSensor1,myMotionSensor2 are breached Rule.eval("{myMotionSensor1,myMotionSensor2}:breached => lamp:on") -- ..and turn off lamp all motion sensors are safe for 10min Rule.eval("trueFor(00:10,{myMotionSensor1,myMotionSensor2}:safe) => lamp:off") -- Turn on lamp if any of motion sensor myMotionSensor1,myMotionSensor2 is breached -- but not if it's daytime, and only at dimmed level during night Rule.eval([[{myMotionSensor1,myMotionSensor2}:breached => || 24:00..sunrise >> myLight1:value=30 || sunset-00:30..24:00 >> myLight1:on ]]) end More on EventScript and the full blown version is available in the posts listed below: Here is a post on setting up the framework (works for EventRunnerLite too) Here is a post on the EventRunnerLite version - a bare bone version of the framework Here is a post on writing schedulers using EventScript. Here is a post on writing trigger rules using EventScript. Here is a post on EventScript syntax and rules (here is a new version under development) Here is a post on writing Lua event handlers Here is a post on debugging the framework Here is a post on the publish/subscribe mechanism Here is a post on enabling Hue support - mapping of Hue devices to standards z-wave/fibaro:* calls Here is a post on integrating the event model with Node-red - sending/receiving events from node-red, with extendable, example flow. Gives support for Sonos TTS and Alexa input...Updated flow <here>. (and here is another thread, 1,2,.) Here is a thread on the HC2 emulator used to debug EventRunner offline Here is a post on creating VDs from an ER scene and handle the VD logic with EventScript rules (and a calculator example) There will also be some services based on the EventFramework posted iOSLocator - a service that checks with iClod for people at places and sends events to other EventFramework services iCalendar - a service that fetches evens from Apple's iCloud calendar or Google calendar and post them to scenes. (latest iCalendar) Logger service - part of Supervisor Alarm service - TBD CronRunner - a UNIX like crontab service other scenes can register call-backs with Supervisor - A scene that pings EventRunner scenes and makes sure they stay alive. Best practices rules - TBD Implementation notes Notes on the basic EventRunner framework Notes on the EventScript implementation - TBD ChangeLog for the EventRunner framework. The lastest version of the code is kept in my GitHub. The background of this framework and a thread discussing it can be found here, however the code has evolved a bit from when originally posted there. If you are new to EventRunner I don't encourage you to read the posts in the thread chronological, as it contains a lot of outdated information. Instead, the best way to get an understanding of the capabilities of EventRunner is to browse the links in the list above.
- 4,679 replies
-
- 11
-
-
-
- events
- rule engine
- (and 8 more)
-
fibaroapiHC3.lua Note, I currently only support my new emulator, TQAE, and have moved all my development to that - please check it out... It's a rewrite with the learnings I have made coding fibaroapiHC3.lua... (Note: The new version of the emulator has gone through extensive rewrite and is stabilising (0.300). The old version of the emulator is here fibaroapiHC3_classic.lua.) This is a thread for the fibaroapiHC3.lua sdk that is under development (keeping it separate from the HC3 QuickApps coding - tips and tricks thread) I've started to run and test HC3 QuickApps offline and have made a fibaroapi.lua file that can be included to emulate the fibaro calls and call out to the HC3. This means that a whole QA can be developed offline, debugged and verified before deploying to the HC3. Something that significantly reduces the development process. It's an emulation so it's not 100% but it will cater for 99.99% of the needs to catch bugs, get decent error messages when things doesn't work (like timers). Be able to set breakpoints and inspect states etc. It's complete enough to run the most demanding QuickApps that I have found on the forum so far... If it runs in the emulator and it doesn't run on the HC3 or vice versa I will prioritise to fix it. Latest version here fibaroapiHC3.lua (v0.311) The code is updated weekly so please make sure you have the latest... It was inspired by the old fibaroapi for the HC2 in a thread started by @riemers but has evolved with more extensive support to create a better debugging and "offline experience"... in fact, it's really an HC3 emulator now. The video is an earlier version of the emulator but the principles are more or less the same. Note the nice tooltip and autocompletion of fibaro commands we get with the fibaroapiHC3plugin for ZBS. Enable English subtitles to see instructions... Some benefits: Use a modern development environment such as ZeroBrane Studio (free for Mac/PC/Linux, HC3 plugin here) on your laptop/PC to develop and debug QuickApps and Scenes. Here is a good introduction to Lua (using ZeroBrane) Step through code, inspect Lua variables, set break-points etc - all that is possible in a good IDE. Faster to pin-point errors as the error messages are better than on the HC3 - stack-traces etc. Advanced timer info (setTimeout) warning of late timers and from where the offending function was called if a timer function crashes. Info from where an eronous json.encode was called from in your code so you can easily find the error (instead of seeing a line from deep inside the json encoder) Use the whole Fibaro API fibaro.call etc and net.HTTPClient(), setTimeout(), json.ecode/decode, QuickApp self:functions like self:getVariable, self:updateView Support for MQTT client and QuickApp child devices Both QuickApps and Scenes are supported. Scenes support most conditions and are triggered by real triggers from the HC3 or simulated triggers. Speed up clock to run faster than real time, to watch a Scene or QuickApp over days/weeks/months in seconds. Start at any given time and date - test if your scene behaves on week-ends ? Automatically create a proxy QuickApp on the HC3 that sends UI clicks back to the code your are running and displays self:updateView updates. This way you can test the QuickApp UI (buttons etc) and still debug the main code on your PC. Develop and run multi-file QuickApps, allowing you to build up a library of common code to share between your QAs. Run completely disconnected from the HC3 simulating devices and other resources (now you can take your coding with you on your vacation ) There is a possibility to download resource definitions from the HC3 and use them (devices, globals etc) while running disconnected. Load multiple QAs/Scenes into the emulator at the same time to debug interaction patterns between QAs (or just run all your QAs offline and use the HC3 as a wave GW ) Telnet into the running emulator to capture logs or issue Lua commands like turning on/off devices at runtime to test you QA/Scene. Move the code as-is over to the HC3 when it runs in the emulator - and it will most likely run on the HC3. Scenes needs to be moved to conditions/actions part on the HC3 - may automat that in the future. Oh, and an emulated Web GUI for the quickApp so you can try out button/slider clicks without connecting to the HC3. And lastly, it makes it fun to develop code for the HC3 To get going download the fibaroapiHC3.lua and put in in the working directory where you code your QA(s) If you run ZerobraneStudio (recommended) paste this and run if dofile and not hc3_emulator then dofile("fibaroapiHC3.lua") end--hc3 hc3_emulator.downloadPlugin() hc3_emulator.downloadAssets() Please note the 'end--hc3' that ends the 'if dofile and not hc3_emulator then' statement. It requires the '--end' comment so I can recognise it. Also, you need to set the Lua interpreter to version 5.3 (In ZBS, Menu ; Project -> Lua Interpreter -> Lua 5.3) It will install the. ZBS plugin in ~/.zbstudio/packages and some code templates in ~/.zbstudio/hc3emu/ (Restart ZBS for the plugin to. be installed) Create a Lua file and create a header + QA/scene code. An example of a minimal QA can look like if dofile and not hc3_emulator then hc3_emulator = { name = "My QA", poll=1000, -- Poll for triggers from the HC3 every 1s credentials = {ip="192.168.1.X", user="<user>", pwd="<password>"} } dofile("fibaroapiHC3.lua") end--hc3 function QuickApp:onInit() fibaro.call(88,"turnOn") -- turns on device 88 on your HC3 end We wrap the emulator specific stuff inside "if dofile and not hc3_emulator then .... end" as the symbol 'dofile' is not defined on the HC3 and will thus be false and not include the code - This means that we can take the code as-is and paste it into the HC3 and it works. Note the credentials that contains the IP, username and password so that the emulator can access the HC3 box. If you use ZBS and the plugin there is an Edit-HC3 SDK templates-> menu that will insert a standard QA and Scene header + code in the current buffer. Most of the functions are there and will be improved over time. There are support for net.HTTPClient() and setTimeout/clearTimeout and api.* There are support for getting triggers and events from the HC3 Support for auto-creating a QuickApp proxy with UI elements that sends events back to the code being debugged. There are support for both QuickApps and Scenes (with conditions) Currently supported (v 0.300) fibaro.debug(type,str) fibaro.warning(type,str) fibaro.trace(type,str) fibaro.error(type,str) fibaro.call(deviceID, actionName, ...) fibaro.getType(deviceID) fibaro.getValue(deviceID, propertyName) fibaro.getName(deviceID) fibaro.get(deviceID,propertyName) fibaro.getGlobalVariable(varName) fibaro.setGlobalVariable(varName ,value) fibaro.getRoomName(roomID) fibaro.getRoomID(deviceID) fibaro.getRoomNameByDeviceID(deviceID) fibaro.getSectionID(deviceID) fibaro.getIds(devices) fibaro.getAllDeviceIds() fibaro.getDevicesID(filter) fibaro.scene(action, sceneIDs) fibaro.profile(profile_id, action) fibaro.callGroupAction(action,args) fibaro.alert(alert_type, user_ids, notification_content) fibaro.alarm(partition_id, action) fibaro.setTimeout(ms, func) fibaro.clearTimeout(ref) fibaro.setInterval(ms, func) fibaro.clearInterval(ref) fibaro.emitCustomEvent(name) fibaro.wakeUpDeadDevice(deviceID) fibaro.sleep(ms) net.HTTPClient() net.TCPSocket() net.UDPSocket() net.WebSocketClient() -- needs extra download net.WebSocketClientTLS() -- needs extra download api.get(call) api.put(call <, data>) api.post(call <, data>) api.delete(call <, data>) setTimeout(func, ms) clearTimeout(ref) setInterval(func, ms) clearInterval(ref) mqtt.Client.connect(uri, options) -- needs extra download <mqttclient>:addEventListener(message,handler) <mqttclient>:subscribe(topic, options) <mqttclient>:unsubscribe(topics, options) <mqttclient>:publish(topic, payload, options) <mqttclient>::disconnect(options) plugin.mainDeviceId plugin.deleteDevice(deviceId) plugin.restart(deviceId) plugin.getProperty(id,prop) plugin.getChildDevices(id) plugin.createChildDevice(prop) class QuickAppBase class QuickApp class QuickAppChild json.encode(expr) json.decode(string) QuickApp:onInit() -- called at startup if defined QuickApp - self:setVariable(name,value) QuickApp - self:getVariable(name) QuickApp - self:debug(...) QuickApp - self:updateView(elm,type,value) QuickApp - self:updateProperty() QuickApp - self:createChildDevice(props,device) QuickApp - self:initChildDevices(table) sourceTrigger - scene trigger Supported scene events: {type='alarm', id=<id>, property='armed', value=<value>} {type='alarm', id=<id>, property='breached', value=<value>} {type='alarm', property='homeArmed', value=<value>} {type='alarm', property='homeBreached', value=<value>} {type='weather', property=<prop>, value=<value>, old=<value>} {type='global-variable', property=<name>, value=<value>, old=<value>} {type='device', id=<id>, property=<property>, value=<value>, old=<value>} {type='device', id=<id>, property='centralSceneEvent', value={keyId=<value>, keyAttribute=<value>}} {type='device', id=<id>, property='accessControlEvent', value=<value>} {type='device', id=<id>, property='sceneActivationEvent', value=<value>} {type='profile', property='activeProfile', value=<value>, old=<value>} {type='location', id=<uid>,property=<locationId>, value=<geofenceAction>, timestamp=<timestamp>} {type='custom-event', name=<name>} {type='UpdateReadyEvent', value=_} {type='onlineEvent', value=<bool>} Some of the parameters that affect the behaviour of the emulator and can be set in the header are: hc3_emulator.name=<string> -- Name of QuickApp, default "QuickApp" hc3_emulator.id=<QuickApp ID> -- ID of QuickApp. Normally let emulator asign ID. (usually 999 for non-proxy QA) hc3_emulator.poll=<poll interval> -- Time in ms to poll the HC3 for triggers. default false hc3_emulator.type=<type> -- default "com.fibaro.binarySwitch" hc3_emulator.speed=<speedtime> -- If not false, time in hours the emulator should speed. default false hc3_emulator.proxy=<boolean> -- If true create HC3 procy. default false hc3_emulator.UI=<UI table> -- Table defining buttons/sliders/labels. default {} hc3_emulator.quickVars=<table> -- Table with values to assign quickAppVariables. default {}, hc3_emulator.offline=<boolean> -- If true run offline with simulated devices. default false hc3_emulator.autocreate=<boolean> -- Autocreate local resources hc3_emulator.apiHTTPS=<boolean> -- If true use https to call HC3 REST apis. default false hc3_emulator.deploy=<boolean>, -- If true deploy code to HC3 instead of running it. default false hc3_emulator.assetDirectory=<string> -- Directory where assets shoud be downloaded (ZBS). Default ~/.zbstudio/hc3emu hc3_emulator.resourceFile=<string> -- When doing a resource download, use this file as default. hc3_emulator.db=<boolean/string>, -- If true load a "resource download" from hc3_emulator.resourceFile or string hc3_emulator.htmlDebug=<boolean> -- Try to convert html tags to ZBS console cmds (i.e. colors) hc3_emulator.terminalPort=<boolean> -- Port used for socket/telnet interface hc3_emulator.webPort=<number> -- Port used for web UI and events from HC3 hc3_emulator.HC3_logmessages=<boolean> -- Defult false. If true will push log messages to the HC3 also. hc3_emulator.supressTrigger -- Make the emulator ignore certain events from the HC3, like = PluginChangedViewEvent hc3_emulator.negativeTimeout=<boolean> -- Allow specification of negative timeout for setTimeout (will fire immediatly) hc3_emulator.strictClass=<boolean> -- Strict class semantics, requiring initializers hc3_emulator.consoleColors=<table> -- Maps fibaro.debug/self:debug etc to color (debug.color enables color debugging) hc3_emulator.sysConsoleColors=<table> -- Maps colors used for system logs hc3_emulator.userdataType=<boolean> -- If true intercepts type(...) to return 'userdata' for our Lua classes. Some apps checks this... Some useful emulator functions: hc3_emulator.setOffline(<boolean>,<boolean>) -- hc3_emulator.getIPaddress() -- Return HC3 IP address hc3_emulator.prettyJsonFormat(<table>) -- Return json formatted string of Lua table hc3_emulator.postTrigger(<event>,[<time ms>]) -- Posts a trigger to the emulator... hc3_emulator.loadScene(...) -- Load scene from file or HC3... hc3_emulator.loadQA(...) -- Load QA from file or HC3... hc3_emulator.downloadPlugin() -- (ZBS). Default ~/.zbstudio/packages hc3_emulator.downloadAssets() -- (ZBS). Default ~/.zbstudio/hc3emu hc3_emulator.downloadResources([<filename>]) -- Downloads a "backup" of HC3 resources hc3_emulator.loadResources([<filename>]) -- ...that can be loaded as "local" resources for the emulator. Some debug flags that can be set with hc3_emulator.debug.<flag>=<value> fibaro=false, -- Logs calls to fibaro api trigger=true, -- Logs incoming triggers from HC3 or internal emulator timers=nil, -- Logs low level info on timers being called, very noisy. refreshloop=false, -- Logs evertime refreshloop receives events mqtt=true, -- Logs mqtt message and callbacks http=false, -- Logs all net.HTTPClient():request. ALso includes the time the request took api=false, -- Logs all api request to the HC3 onAction=true, -- Logs call to onAction (incoming fibaro.calls etc UIEvent=true, -- Logs incoming UIEvents, from GUI elements zbsplug=true, -- Logs call from ZBS plugin calls webServer=false, -- Logs requests to /web/ including headers webServerReq=false, -- Logs requests to /web/ excluding headers files=false, -- Logs files loaded and run color=true, -- Logs in console using ANSI colors (see hc3_emulator.consoleColors for mapping) locl=true, -- Log creation of local devices breakOnInit=<boolean> -- Tries to set breakpoint on QuickApp:onInit (mobdebug) breakOnLoad=<boolean> -- Tries to set breakpoint on first line in loaded file (mobdebug) breakOnError=<boolean> -- Tries to break after error (makes it easier to look at call stack etc) ctx=false, -- Logs Lua context switches timersSched=false, -- Logs when timers are scheduled timersWarn=0.500, -- Logs when timers are called late or setTimeout with time < 0 timersExtra=true, -- Adds extra info to timers, like from where it's called and definition of function (small time penalty) In the example in the beginning, the HC3 credentials are listed in the header. If you don't want that (it's easy to forget it and share the code with your passwords in plain sights<9 you can create a credentials.lua file with your secret stuff and it will be automatically included by the SDK. The format should be return { ip="2912.168.77", user="admin", pwd="admin", mySecret="hgskjfhgjhgkdfh" } It returns a Lua table with the relevant keys. ip, user,and pwd is used to log into the HC3. We have added another key here to 'mySecret'. Assume that you want you QA to have a defined quickAppVariable with the value of mySecret. It could be the password to log into an external services. Then you can do like this if dofile and not hc3_emulator then hc3_emulator = { name="My QA", quickVars = {["password"]="$CREDS.mySecret"}, This define a quickAppVariable with the name 'password' and it fetches the key 'mySecret' from the credentials table and uses that as the value. When you QA starts up you can do self:getVarible('password') and it will return the credential. This is useful as not to litter your code with visible credentials. NOTE. Be aware that if you deploy the real QA with hc3_emulator.deploy=true or using the menu commands with the plugin, the deployed QA will have the quickAppVariable defined and if you upload that for sharing people will see your credential. If someone wants to try this in another IDE than Zerobrane that I use (like Visual Studio) the only thing that could be an issue is to have access to the Lua libraries require("socket") -- LuaSocket require("socket.url") -- LuaSocket require("socket.headers") -- LuaSocket require("ltn12") -- LuaSocket require("mime") -- LuaSocket require("lfs") -- LuaFileSystem They are pretty standard lua libraries - based on LuaSocket. @10der has managed to run it under Visual Studio on Windows. Here is an updated library/project map to work with the latest version of the emulator vscode_fibaro_bin.zip. Note that you should update the fibaroapiHC3.lua file provided i the archive when new are released as I will not update this archive for every new release. @petergebruers also have some tips. Any improvements are happily received (in code) and credits will be due granted. Links to notable post Here is a description of the various way to use the emulator when developing code (high-level) Some in-depth posts Running "Offline" (TBD) Running in "Mix mode". Mixing real devices and locally emulated devices (TBD) Running with a "Proxy QA" (TBD) Using real QA as "Proxy" (TBD) Downloading HC3 resources to file and emulate them locally (TBD) Running standard Lua with access to HC3 functions (developing management scripts etc) (TBD) Loading multiple QAs/Scenes and run them in parallel in the emulator (also getting QAs/Scenes from the HC3 and install them in emulator on the fly...) (TBD) Running faster than real-time and manipulating start dates (TBD) A ZeroBrane plugin to make life easier while debugging A post introducing the SDK with QuickApps. A post introducing the SDK with Scenes. Scene support is not complete. Creating and debugging multi-file QuickApps The debug flags that can be set are described The new dynamic load functions to run multiple QAs/Scenes in the emulator are described Telneting into the emulator to capture logs and issuing Lua calls <here> (nice way to test your code) Using the Web GUI Debugging setTimeout code and tracking timers. MQTT support. Another post with running a scene completly without being connected to the HC3. Some notes on the implementation of the SDK - if you would like to hack on it A collection of QA's I developed with the SDK - which means that they can be run offline ChildrenOfHue. A QA that creates QA children devices for your Hue devices (It's the Hue QA I use myself these day) iOSLocator. An iOS geopresence QA. iCal (iOS,Google) QA Telegram QA. Event watcher QA. Helper QA to get/subscribe on event triggers Vonage/Nexmo SMS service. Send SMS. Changelog: v 0.67 - numerous bug fixes caused by the restructuring. hc3_emulator.start{startTime="07:00 4/5/2000"} - will start the simulation at the given time. v 0.68 - fibaro.debug behaves more like original. v 0.70 - better offline support and speeding. v 0.72 - More offline and support for downloading HC3 resources to be used while running disconnected from the HC3 v 0.73 - Various speed-time related bugs v 0.75 - Better http sync behaviour. Set hc3_emulator.asyncHTTP=true to get some pseudo asynchronous behaviour v 0.77 - Support for 5.030.45. Initial support for childDevices and fixes for the changed handling of UI events v 0.78 - UI fix. Name of callbacks defaults to button.."Clicked", unless you have a onReleased=name or onChanged=name in the UI table struct. v 0.80 - Fixed bug in self:getVariable and self:setVariable v 0.81 - Better quickVariables handling for proxies, and self.childDevices list updated when children are deleted. v 0.83 - self:getVariable returns the empty string "" if the variable does not exists according to the latest behaviour on the HC3... 'class' is not redefined if available from Luabind... However, I've not had a chance to test if it's 100% compatible yet... v 0.84 - Initial support for mqtt. You need to have installed https://github.com/xHasKx/luamqtt so that require("mqtt") works from fibaroapiHC3.lua. I have tried to mimic the HC3 mqtt api but I have not really used mqtt that much so if someone uses it with fibaroapiHC3.lua and discovers if stuff is not compatible with the HC3 implementation please let me know and we fix it. v 0.85 - Compatibility fix for function 'class' to adhere more closely to the HC3/luabind version v 0.90 - Cleanup of code, Better handling of children and QuickApps, ZBS color output with ansi escapes; hc3_emulator.colorDebug=true v 0.93 - New model for QuickApp proxies. Better child device compatibility. v 0.95 - Various bug fixes - log prints more in line with HC3 log console. fibaro.emitCustomEvent bug fix. v 0.98 - First support for backup/download/upload with the ZeroBrane plugin (another post here) v 0.99 - Better trigger handling and new way to include SDK in your QA/scene code. No hc3_emulator.start at the end. v 0.100 - Web GUI emulator for QuickApps. New format for using credentials.lua. Bug fixes... v 0.102 - Better handling of children and their quickAppVariables v 0.104 - Rewrite of offline mode. Better web UI support. v 0.105 - Support for new QA file format (proxies work again) v 0.106 - Added support for net.UDPSocket() v 0.109 - UDPSocket bug fix. ( @10der), property() support for class() - much harder than it looks... v 0.110 - Oops, serious bug in 'class' affecting ...everything. Hopefully fixed. v 0.111 - Removed unnecessary os.exit(). urlencode api calls ( @10der) v 0.112 - UDP fixes. ( @10der) v 0.114 - Bug fix (global 'self' escaped) v 0.115 - Bug in url encode for api calls. UDPSocket :bind(ip,port) function added. v 0.116 - :bind(ip,port) really fixed.... v 0.117 - startup fix v 0.119 - "Softer os.exit()" - better compatibility with Visual Studio (thanks @10der) v 0.120 - Debugger friendly QuickApp class (no __index). First version of file/backup v 0.121 - api.get bug fix. Faster proxy/deploy. v 0.123 - QuickApp:setVariable bug (thanks @10der) v 0.124 - fibaro.clearTimeout added, MQTT fixes. v 0.125 - fibaro.alarm() was buggy - fixed. Set self.USERPIN to pincode to allow fibaro.alarm("disarm") to be allowed from emulator. v 0.126 - fix __fibaro_get_device() ( @10der) v 0.128 - fix sort order of triggers. Default room in offline mode ( @10der) v 0.130 - fix UI handling ( @rangee. More UI options. v 0.131 - fix uiCallbacks not always updating when updating proxy v 0.135 - fixes... v 0.137 - TCPSocket fixes v 0.138 - setTimeout for negative times are inserted in the queue.... i.e. will execute as soon as possible. v 0.140 - fixed bug with setInterval (clearInterval within a setInterval function didn't work...) v 0.141 - fix bug in net.TCPClient() v 0.145 - bug in printout of sockets... stricter class constructor requirements v 0.148 - MQTT event format bug ( @jayrock) v 0.150 - Initial websocket support. Need to download wsLua_ER.lua from my github and put in project directory. v 0.152 - support fibaroapiHC3plug.lua v0.4 v 0.155 - bugfixes. v 0.156 - html color bugfix v 0.198 - New version of emulator with better support for everything. Thanks to @petrkl12 that has been a guinea pig and helped in debugging the code. v 0.200 - Fixed bug in speedTime. plugin.restart() now restarts the QA in a correct way. v 0.299 - Major rewrite of the HC3 API - cleaner architecture and prepared for being split into sub-files (I'm approaching 10k lines now). Note 'end--hc3' required to end header. v 0.300 - Bugfixes from v0.299 v 0.301 - Better/simpler class definition - easier to debug/step into classes (avoiding __index unless class uses property() )

-
Latest version of Lualibs = lualibs v1.0.1.zip Changelog for v1.0.1 (thank to @petergebruers) - fix HC user authentication (was: user:password in URL, is now: basic authentication).- fix chunked responses (was: use only chunk 1, is now: concatenate chunks). Fixes "getDevicesId".- add error checking and display in the HTTP part, to get sensible error messages. Most of the information came from the french forum which can be found here all credits go to Steven! ZeroBrane is an IDE for development in Lua code. It offers you auto completion and partial support to use the actual fibaro: option in your code too. To get started grab the latest version from https://studio.zerobrane.com/download (1.5.0 as of writing) grab your favorite flavor. It supports Mac, Windows and Linux. To use the Lua Library you have to install it, grab the lua libs (top of page) for fibaro. You need to install these files in your c:\<yourlocation>\ZeroBraneStudio\lualibs (for Mac this would be /Applications/ZeroBraneStudio.app/Contents/ZeroBraneStudio/lualibs) after that a restart of the app is a good thing to do. Use this always in your code when you start testing your setup. For example: require("FibaroSceneAPI") hc2_user = "youraccount" hc2_pwd = "yourpassword" hc2_ip = "192.168.x.x" local data = fibaro:getGlobal("somevariable") print(data) Do keep in mind this is your userid/password on the box itself, do NOT use a fibaro ID since that is only the login to your remote. To change the Colors to be the same as on Fibaro (if you feel really cozy with those colors) edit your user settings at: Edit -> Preferences -> Settings: User styles = loadfile('cfg/tomorrow.lua')('TomorrowNight') stylesoutshell = styles -- apply the same scheme to Output/Console windows styles.auxwindow = styles.text -- apply text colors to auxiliary windows styles.calltip = styles.text -- apply text colors to tooltips local colors = { orange = {255,158,89}, braun = {217,191,140}, darkgray = {38,38,38}, blue = {89,158,255}, green = {188,210,121}, red = {179,94,77}, white = {255,255,255}, gray = {102,102,102} } styles.comment = {fg = colors.gray} styles.operator = {fg = colors.white} styles.number = {fg = colors.red} styles.stringtxt = {fg = colors.green} styles.keywords0 = {fg = colors.blue} styles.text = {fg = colors.braun, bg = colors.darkgray} styles.keywords3 = {fg = colors.orange} styles.keywords4 = {fg = colors.orange} styles.keywords5 = {fg = colors.orange} styles.keywords6 = {fg = colors.orange} styles.keywords7 = {fg = colors.orange} And if you want to have auto completion you have to add fibaro.lua to your ZeroBraneStudio/api/lua folder. Please note that this file is the english file and has some few additions which i didn't see or where incorrect. Looks like: To activate it, please make sure you add it. Go to Edit -> Preferences -> Settings: System Add the following string to it: api = {luadeb = {'fibaro'}} The fibaro:calculateDistance doesn't work and the sourcetrigger needs to be set manually. See below snippet for testing: __fibaroSceneSourceTrigger = {type="global", name="Pushbullet"} -- __fibaroSceneSourceTrigger = {type="global", name="Pushbullet"} -- __fibaroSceneSourceTrigger = {type="property", deviceID=6, propertyName="value"} -- __fibaroSceneSourceTrigger = {type="autostart"} -- __fibaroSceneSourceTrigger = {type="other"} print(fibaro.getSourceTrigger().type) -- global print(fibaro.getSourceTrigger().name) -- Pushbullet __fibaroSceneSourceTrigger = {type="autostart"} print(fibaro.getSourceTrigger().type) -- autostart FAQ: Q: I get the following error message: lualibs/json/decode.lua:74: bad argument #1 to 'match' (string expected, got nil) A: It cannot reach Fibaro system correctly. Please make sure you have the right userid/pwd and correct ip number. Q: I don't see any completion on my fibaro: A: Make sure you added the completion Edit -> Preferences -> Settings: System (lualib) Q: Where do i get all my values from? A: You can make use of the excellent tool from @Krikroff found in this thread to grab all the values. Q: Where is this data coming from? A: Fibaro has an api interface, you can go there via http://192.16.x.x/docs where you can try it out. Q: I click on play but it does not keep running? A: Make sure you click the double green arrow. The other one stops untill you press forward. (F6 = Go, F5 = Waits on next itteration) Q: I want to change the width of the tabs A: Go to Edit -> Preferences -> Settings: User and add "editor.tabwidth = 3" Q: Disable wordwrap for long lines A: Go to Edit -> Preferences -> Settings: User and add "editor.usewrap = false" Q: How to i debug line by line? A: See below (credits go to Fred the Phew for below screenshots & explanation) Open Zerobranstudio and display the following windows if you have not already done so insert the following code in a new blank window Zerobranstudio (we will revise multiplication ) local loop = true local i = 1 local j = 1 while loop == true do i = i + 1 j = j + 2 print ( i .. "x" .. j .. "=" .. i * j ) end To activate dynamic tag tracking, simply select the name of the variable you want to track, then right click on it to bring up a context menu. You must then select the option Add watch expression as in the image below. In our case, it must be done for the 2 variables i & j. To switch to debug mode, press the F5 key once, the window should look like this. The green cursor is positioned on the first instruction, and the Watch window displays the values of i and j (to nil at the moment which is logical) Now press the F10 key to execute the program step by step, until the first result of the multiplication is displayed, as shown below. The result of the multiplication is consistent with the values of i and j. To test now the modification on the fly of a variable, we will re-run the loop a second time by pressing the F10 key several times but without executing the print instruction, as in the image below. The value of the 2 variables has been modified by programming. To modify dynamically the value of j, click on the Remote console tab, type the line i = 20 then press the Enter key to validate the command, as in the image below. We can then see that the value of ja has been modified in the Watch window. It is now enough to click on the tab Output (suspended), and to press the key F10 to resume the execution of the program. It is now that the value of j set by hand has been dynamically taken into account by the program. Happy Coding! \o/ (feel free to make remarks so i can make it better) lualibs.zip
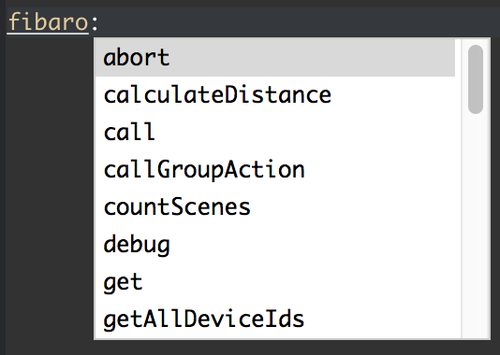
- 25 replies
-
- 3
-
-
- development
- zerobrane
- (and 2 more)
-
What what be REST API endpoint and protocol / documentation for opening the gate on Fibaro Intercom? Like, there is mjpeg on http://ip_address:8080/live/mjpeg Thank you
-
Hi, I am using and maintaining some 50s scene on my HC2. I am developing mostly in ZeroBrane. Well so far so good. But the most anoying thing is that there is no way to "upload" scene to the HC2. Ideally this could be done from the development environment. So my question is: Is anybody using such a feature? And if yes, how? If not, I am currently looking into integrating such a feature in a GIT workflow, as git hook. So if there is any interst I would look further into it. While I have already a plan (REST/put with a decent JSON content, retrieving information from the lua script) I have still some questions, or could need some help. Even if it is just "testing". So if you there are any comments on this, just contact me. Best regards, Theo
-
Since we are quiet some months further... I was wondering when the dev.Departement of Fibaro is coming with some news on the promissed NEST plugins and when it will be available? Or am I just the only one who would like to see this being implemented in our Hc2? (I am aware that there seems to be a IFTTT solution... But I prefer to use a direct plug for this...)