Welcome to Smart Home Forum by FIBARO
Dear Guest,
as you can notice parts of Smart Home Forum by FIBARO is not available for you. You have to register in order to view all content and post in our community. Don't worry! Registration is a simple free process that requires minimal information for you to sign up. Become a part of of Smart Home Forum by FIBARO by creating an account.
As a member you can:
- Start new topics and reply to others
- Follow topics and users to get email updates
- Get your own profile page and make new friends
- Send personal messages
- ... and learn a lot about our system!
Regards,
Smart Home Forum by FIBARO Team
Search the Community
Showing results for tags 'api'.
-
Hi guys! I would like to say that I am a beginner on Fibaro. I would like to integrate my LED strip on HC3. I have the API Key, I downloaded the fqa file (from here https://marketplace.fibaro.com/items/govee-colorled-controller-qa) but I don't know how to proceed. I have created the Quick App, but I don't know what I have to do to configure it. Can anyone help me?
-
Version 1.0.0
105 downloads
This is an API for Honeywell Lyric T6. The idea is based on Remco B's version for the Honeywell Evo. Using a virtual device with API scene, you can change setpoint and set away, holiday and schedule modes. Because it is a virtual device, you can call these buttons from any other scene. For example I use it while tracking my phones location, this creates options for GeofenceMode in combination with ScheduleMode You will need a webserver (or access to a webserver) for the initial setup. This is to retrieve some keys from Honeywell. As soon as you have the keys, you do not need the webserver anymore. For further details please follow instruction in the pdf and use at own risk. release 1.1 added checkCertificate option to bypass https check. Installation instructions Honeywell Lyric API.pdf Fibaro_Lyric_API.lua -
Hello I noticed that API calls using updateProperty are no more working. But if I use setProperty,it is back ok. Questions : is this permanent change ? should I change all my QA where I'm using self:updateProperty("...", ...) by self:setProperty("...",...) is this change only for physical z-wave devices or for all devices, including QA Are there other API changes ? Thank you for your feedback
-
- api
- updateproperty
-
(and 1 more)
Tagged with:
-
Version: 4.510 HC2 REST API Hi guys, since update to version 4.510 i get sometimes this email: "Suspicious Login Attempts Prevented: We noticted 5 failed login attempts to your HC2 that seemed suspicious. For your security, the following IP address xxx has been locked for 30 min" Why? The REST Auth are right. At start status code 200 with successful result and a little bit later 401 bad user and pass. All request, in the previous version, ran flawlessly...
-
Error 403 on QuickApp http request
edouardc posted a question in Other Devices / Third-party devices
Hi Team, I try to develop some QuickApp on my HC3, but I have an problem with the http request : When I call an API (here switchbot api), the external API respond me an 403 error... The probleme isn't the API because the same request with an little php script works... I have tried much methods but I get only the response code 403. Recently, I have downloaded an quickapp on the marketplace. All review on it are good but for me, it's doesn't work. When I see the console logs, I can see the 403 error code from this downloaded QuickApp too. Do you have an idea for my problem ? You can find my function code here : function QuickApp:GetDeviceList() self.http = net.HTTPClient({timeout=10*1000}) local apikey = self:getVariable("apikey"); self:debug(apikey); --For debug an my token is successfuly loaded local address = "https://api.switch-bot.com/v1.0/devices" --local address = "http://10.0.10.10:1880/debug" self.http:request(address, { options = { headers = { ["Authorization"] = apikey, ["Content-Type"] = "application/json; charset=utf8", ["Accept"] = "application/json", ["User-agent"] = "Mozilla/5.0" --For try but no change }, checkCertificate = false, method = 'POST' }, success = function(response) self:debug(response.status); --return : 403 self:debug(response.data); --return: nothing self:debug(response.headers);--return: array self:debug(message); --return: nil end, }); end -
Im trying to turn on my AC using a http request. I am able to turn lights on and off as well as other things no worries, but turning the AC on isn't working. I have a remotec ZXT-600, I am assuming it has to do with not having the right arguments in there. The back end of the url is /api/devices/58/action/setThermostatMode with the arguments as blank { "args": [ "{}", "{}" ], "delay": 0, "integrationPin": "1234" } My question is how and where do I pass in an argument with an action for it to turn to cool or heat. Below is the device data. Any help is appreciated. { "id": 58, "name": "AC Lounge", "roomID": 219, "view": [ { "assetsPath": "/dynamic-plugins/com.fibaro.hvacSystem/assets", "jsPath": "/dynamic-plugins/com.fibaro.hvacSystem", "name": "com.fibaro.hvacSystem", "translatesPath": "/dynamic-plugins/com.fibaro.hvacSystem/i18n", "type": "ts" } ], "type": "com.fibaro.hvacSystem", "baseType": "com.fibaro.device", "enabled": true, "visible": true, "isPlugin": false, "parentId": 57, "viewXml": false, "configXml": false, "interfaces": [ "battery", "coolingThermostatSetpoint", "fibaroFirmwareUpdate", "heatingThermostatSetpoint", "thermostatFanMode", "thermostatMode", "zwave" ], "properties": { "parameters": [ { "id": 27, "lastReportedValue": 17, "lastSetValue": 17, "size": 2, "value": 17 } ], "pollingTimeSec": 0, "zwaveCompany": "Remotec", "zwaveInfo": "3,4,33", "zwaveVersion": "1.7", "batteryLevel": 92, "batteryLowNotification": true, "categories": [ "climate" ], "configured": true, "coolingThermostatSetpoint": 19, "coolingThermostatSetpointCapabilitiesMax": 31, "coolingThermostatSetpointCapabilitiesMin": 16, "coolingThermostatSetpointFuture": 19, "coolingThermostatSetpointStep": { "C": 0.5, "F": 1 }, "dead": false, "deadReason": "", "defInterval": 0, "deviceControlType": 1, "deviceIcon": 70, "deviceRole": "Other", "endPointId": 0, "firmwareUpdate": { "info": "", "progress": 0, "status": "UpToDate", "updateVersion": "1.7" }, "heatingThermostatSetpoint": 28, "heatingThermostatSetpointCapabilitiesMax": 31, "heatingThermostatSetpointCapabilitiesMin": 16, "heatingThermostatSetpointFuture": 28, "heatingThermostatSetpointStep": { "C": 0.5, "F": 1 }, "log": "", "logTemp": "", "manufacturer": "", "markAsDead": true, "maxInterval": 0, "minInterval": 0, "model": "", "nodeId": 9, "parametersTemplate": "0", "productInfo": "82,84,1,2,132,144,1,7", "saveLogs": true, "serialNumber": "", "setpointExpiryDate": 0, "stepInterval": 0, "supportedDeviceRoles": [ "Other" ], "supportedThermostatFanModes": [ "AutoLow", "Low", "High", "Medium" ], "supportedThermostatModes": [ "Off", "Heat", "Cool", "Auto", "Resume", "Fan", "Dry" ], "supportsThermostatFanOff": true, "thermostatFanMode": "High", "thermostatFanOff": false, "thermostatMode": "Cool", "thermostatModeFuture": "", "thermostatModeManufacturerData": [], "unit": "C", "updateVersion": "", "useTemplate": false, "userDescription": "" }, "actions": { "abortUpdate": 1, "reconfigure": 0, "retryUpdate": 1, "setCoolingThermostatSetpoint": 1, "setHeatingThermostatSetpoint": 1, "setInterval": 1, "setThermostatFanMode": 1, "setThermostatMode": 1, "startUpdate": 1, "updateFirmware": 1 }, "created": 1646027026, "modified": 1646027026, "sortOrder": 24 }
- 13 replies
-
- api-commands
- api call
-
(and 2 more)
Tagged with:
-
Hello. I have written a code in LUA 5.4 which gives me a list of prices and timestamps through a URL, and on FIBARO HC2 it wont work. I understand that FIBARO HC2 uses Lua 5.1 or something like that. I am trying to start a boiler and a heater using HC2, but I have no idea how to start with that. How can I start the boiler and a heater at the time when prices are low on HC2 using a website URL? If required, I will provide more information in the comments. Thanks in advance.
- 1 reply
-
- automation
- api get
- (and 4 more)
-
At the moment I'm working on trying to integrate the Somfy Tahoma/Switch IO system. At my local system (with TQAE) I can connect to the API to get a access token. When I run exactly the same code on the HC3 I get a HTTP 404 error (Page Not Found). The code isn't that complicated: function QuickApp:GetAuth() local url = "https://accounts.somfy.com/oauth/oauth/v2/auth?response_type=code&client_id=o59WTNp303e1ABRg1j4bJ8COYGGmEZdc6N8X1_CRDyyWE6&grant_type=authorization_code" self.http:request(url, { options = { headers = {["Content-Type"] = "application/x-www-form-urlencoded"}, method = 'GET', }, success = function(response) self:debug(response.status) --self:debug(response.headers) local csrf_token = string.match(response.data, "value=\"(.-)\"") self:debug(csrf_token) print(response.data:gsub("<","<")) --self:getToken(csrf_token) end , error = function(message) self:debug("error:", message) end }) end The HC3 doesn't show me the body or headers when an error occurs. In the message variable only the error code is shown (404). Has someone experience with this? I tried everything, it looks like they are blocking traffic from the HC3. I tried to add another User-Agent string, but no luck.
-
I am trying to start a boiler and a heater from an URL that has a lot of prices and timestamps. I am using Home Center 2. I have no idea where to start from, I understand I need VD (Virtual Devices) and Scenes, but anything I have tried hasn't worked sadly. How can I start a boiler and a heater during the lowest prices with JSON timestamp values from an URL? If required, I can post the URL here. Can anyone help me?
-
Introduction to API and http requests Like the other 'Introduction to' posts I'm h0ping this may help some of the people begining their HC2 and lua journey Corrections and suggestions to improve always welcome. What is an API An API can be used to execute commands but the majority are used to request a response or status. Most API’s are interrogated through a http or https request. Some API’s require authentication in the form of a username or a password or an API key. There are public API’s and private API’s. There are a number of API types and the one of the most widely used is a called RESTAPI. This type of API is supported by the HC2 but there are others such MQTT, SOAP, etc The following are API’s that you may have come across in this forum and there are many others Home Center 2 : http://<hc2-ip>/docs (where hc2-ip is the ipaddress of your hc2 192.168.x.x OWN : open weather map ( https://openweathermap.org/api ) Sonos-http-api : ( https://github.com/jishi/node-sonos-http-api ) AWS Polly: used for TTS (http://docs.aws.amazon.com/polly/latest/dg/API_Reference.html ) VoiceRSS : used for TTS (http://www.voicerss.org/api/documentation.aspx ) Some organisations like AWS or Google have multiple API’s that are used for different purposes Structure All API’s has a set of web methods with a set structure. An API call or request can be either a GET, DELETE, POST, PUT and for this introduction we will focus on the GET This means that the data format is predictable and as such is easy to traverse and extract responses. Most RESTAPI responses have a format that conforms to json standard. Json is a way to store information in an organized, easy-to-access manner. It gives us a human-readable collection of data that we can access in a really logical manner. All public API’s are documented like the ones outlined above so a under will know what to expect when they issue a http request. A simple json example would be something like local jStr = {"age" : "24", “hometown" : "Missoula, MT", "gender" : "male" }; A slightly more complicated json string could be be {"coord":{"lon":15.98,"lat":45.81},"weather":[{"id":802,"main":"Clouds","description":"scattered clouds","icon":"03d"}],"base":"stations","main" :{"temp":10.86,"pressure":1018.82, "humidity":66,"temp_min":10.86,"temp_max":10.86,"sea_level":1035.43,"grnd_level":1018.82},"wind":{"speed":1.06,"deg":281.501},"clouds":{"all":32},"dt":1487346966,"sys":{"message":0.0038,"country":"HR","sunrise":1487310847,"sunset":1487348795},"id":6618983,"name":"Zagreb - Centar","cod":200} This could also be referreed to as a tbale because of it's structured format. Fortunately there are websites like http://jsonprettyprint.com/ that make these json strings easier to read { "coord": { "lon": 15.98, "lat": 45.81 }, "weather": [ { "id": 802, "main": "Clouds", "description": "scattered clouds", "icon": "03d" } ], "base": "stations", "main": { "temp": 10.86, "pressure": 1018.82, "humidity": 66, "temp_min": 10.86, "temp_max": 10.86, "sea_level": 1035.43, "grnd_level": 1018.82 }, "wind": { "speed": 1.06, "deg": 281.501 }, "clouds": { "all": 32 }, "dt": 1487346966, "sys": { "message": 0.0038, "country": "HR", "sunrise": 1487310847, "sunset": 1487348795 }, "id": 6618983, "name": "Zagreb - Centar", "cod": 200 } To access an api you need 2 things ip address, port, etc to make the http/https request Structure/format of the response so you know how to traverse it and extract what you want The easiest way to explain and learn is by example. As it is highly likely that everybody reading this will have a HC2 we can use to demonstrate the principles. The HC2 RESTAPI is documented on the Fibaro developer site at https://developer.fibaro.com/docs/fghc-restapi The one we will look at is devices. This the first one under the General category at the developers website above. The developer website shows the various parameters that are returned with this call. The API can be used to request information or complete an action. We will look at the request for information If you go to http://,hc2-ip./docs you will see the interactive or inline documentation for web API Go to the section on devices and select deviceid enter a device number ( I selected device 176 which is a dimmer module ) and click Try It. You will see the json formatted or encoded response for that API call. You will also see the full url for the call. If you copy the url and paste it into a browser you will get the same thing (except as one long string) {"id":176,"name":"kitchenPendant","roomID":7,"type":"com.fibaro.multilevelSwitch","baseType":"com.fibaro.binarySwitch","enabled":true,"visible":true,"isPlugin":false,"parentId":175,"remoteGatewayId":0,"interfaces":["deviceGrouping","fibaroFirmwareUpdate","levelChange","light","power","zwave","zwaveConfiguration","zwaveSceneActivation"],"properties":{"parameters":[{"id":1,"lastReportedValue":255,"lastSetValue":255,"size":1,"value":255},{"id":6,"lastReportedValue":0,"lastSetValue":0,"size":1,"value":0},{"id":7,"lastReportedValue":1,"lastSetValue":1,"size":1,"value":1},{"id":8,"lastReportedValue":1,"lastSetValue":1,"size":1,"value":1},{"id":9,"lastReportedValue":5,"lastSetValue":5,"size":1,"value":5},{"id":10,"lastReportedValue":1,"lastSetValue":1,"size":1,"value":1},{"id":11,"lastReportedValue":1,"lastSetValue":1,"size":1,"value":1},{"id":12,"lastReportedValue":99,"lastSetValue":99,"size":1,"value":99},{"id":13,"lastReportedValue":2,"lastSetValue":2,"size":1,"value":2},{"id":14,"lastReportedValue":2,"lastSetValue":2,"size":1,"value":2},{"id":15,"lastReportedValue":1,"lastSetValue":1,"size":1,"value":1},{"id":16,"lastReportedValue":1,"lastSetValue":1,"size":1,"value":1},{"id":17,"lastReportedValue":0,"lastSetValue":0,"size":1,"value":0},{"id":18,"lastReportedValue":0,"lastSetValue":0,"size":1,"value":0},{"id":19,"lastReportedValue":0,"lastSetValue":0,"size":1,"value":0},{"id":20,"lastReportedValue":110,"lastSetValue":110,"size":1,"value":110},{"id":30,"lastReportedValue":3,"lastSetValue":3,"size":1,"value":3},{"id":39,"lastReportedValue":600,"lastSetValue":600,"size":2,"value":600},{"id":41,"lastReportedValue":0,"lastSetValue":0,"size":1,"value":0}],"pollingTimeSec":0,"zwaveCompany":"Fibargroup","zwaveInfo":"3,3,52","zwaveVersion":"2.2","configured":"true","dead":"false","deviceControlType":"23","deviceGroup":"[]","deviceGroupMaster":"0","deviceIcon":"15","emailNotificationID":"0","emailNotificationType":"0","endPointId":"0","firmwareUpdate":"{\"info\":\"\",\"progress\":0,\"status\":\"UpToDate\",\"updateVersion\":\"2.2\"}","isLight":"true","liliOffCommand":"","liliOnCommand":"","log":"","logTemp":"","manufacturer":"","markAsDead":"false","model":"","nodeId":"49","parametersTemplate":"235","power":"0.00","powerConsumption":"42","productInfo":"1,15,1,0,16,10,2,2","pushNotificationID":"0","pushNotificationType":"0","remoteGatewayId":"0","saveLogs":"true","sceneActivation":"0","serialNumber":"","showEnergy":"true","smsNotificationID":"0","smsNotificationType":"0","updateVersion":"","useTemplate":"true","userDescription":"","value":"0"},"actions":{"associationGet":1,"associationSet":2,"getParameter":1,"reconfigure":0,"setParameter":2,"setValue":1,"startLevelDecrease":0,"startLevelIncrease":0,"stopLevelChange":0,"turnOff":0,"turnOn":0,"updateFirmware":1},"created":1486747960,"modified":1486747960,"sortOrder":13} EXAMPLE - API Call from a Virtual Device The following is a http request to the HC2 api. Copy the following in a button or main loop in a virtual device local device = fibaro:getSelfId() localhost = '127.0.0.1' local port = 11111 diag = Net.FHttp(localhost, port); response = diag:GET("/api/devices/176") result = json.decode(response); fibaro:debug("name: "..result.name) fibaro:debug("properties.value: "..result.properties.value) run the vd and open the debug window You’ll see the name and value of the device you selected. If you look through the json response from further up in the tutorial you’ll see the correlation between the results and the json There are some examples of how to iterate through an array in another one of the tutorials I posted. Please see my signature… One last one in case you have difficulty sleeping and the if the above was too simple This function iterates through all the virtual devices on your HC2 and looks for one called 'LAN Network 2.0' The 'LAN Network 2.0' virtual device has multiple labels The function iterates through the virtual device and counts all the labels ( in the json for the virtual device these are called rows) For each row above it looks for an element type ‘Label’ It then iterates through all the labels checking that they match the default format of Label1, Lable2, etc. string.match(jT[i].properties.rows[r].elements[e].name, "Label")) == "Label" The result is a loop inside a loop inside another loop, iterating and checking at each step full code for function to pick through when you have some time. function labelCheck() fibaro:log("vdCheck mode enabled") local device, localhost, port = fibaro:getSelfId(), '127.0.0.1', 11111; diag = Net.FHttp(localhost, port); response = diag:GET("/api/virtualDevices") jT = json.decode(response); for i = 1, #jT do if jT[i].name == "LAN Monitor 2.0" then if #jT[i].properties.rows == #jN then labelCount = "true" else labelCount = "false" end for r = 1, #jT[i].properties.rows do for e = 1, #jT[i].properties.rows[r].elements do if (string.match(jT[i].properties.rows[r].elements[e].name, "Label")) == "Label" then labelMatch = labelMatch else labelMatch = "false" end end end end end if labelCount == "true" and labelMatch ~= "false" then fibaro:debug("Quantity and format of labels is correct") else if labelCount == "false" then fibaro:debug("Quantity of labels incorrect") fibaro:log("Quantity of labels incorrect") end fibaro:sleep(3000) if labelMatch == "false" then fibaro:debug("Label format is incorrect") fibaro:log("Label format is incorrect") end end end Happy coding and suggestions to improve/correct always welcome -f
-
What what be REST API endpoint and protocol / documentation for opening the gate on Fibaro Intercom? Like, there is mjpeg on http://ip_address:8080/live/mjpeg Thank you
- 9 replies
-
- intercom
- development
-
(and 1 more)
Tagged with:
-
All, I was wondering if someone has any experience with the Honeywell Lyric T6 Thermostat and "integration" with the Fibaro HC2 ? Looks like a great (simple) device from a "respected" Corporation and has, as far as I see, great potential to be integrated with Fibaro (VD and Senes).
-
hi, i need to send this command "https://IP/api/callAction?deviceID=136&name=pressButton&arg1=1" to HC3 but the answer is "Class does not have pressButton function defined - action ignored". To do this I created a quick app of the type "remote controller" but i think is not the same as a "virtual device" https://forum.fibaro.com/topic/12399-beta-api-http-commands-3341/page/5/ so I would like to know how to create a virtual device who responds to the action call. thanks
-
Hello, I have just installed a AirSend box. With the AirSend you can send Operate all devices with a 433Mhz protocol like gates, blinds, garage doors etc. After installation you can operate your devices by the use of their APP , a cloud application or by just open a website (for every device/command a different) I have been trying to do this from my HC2 but even with the use of many examples i have found I didn't succeed to get it to work. Has anyone already interfaced with the AirSend. A typic webcall would look like "https://airsend.cloud/device/16199/command/4/?session=ddf1352a983e717fcee0c8c4fe78289c2a19c8e5a2786be77868fd15f41017653bfe55dfce2b47d90487d3f0d2eeb4b16fba053b139f91071444e1d8cb821de7" There is also an other way of interfacing through a API (https://airsend.cloud/api-docs) I don't know what the better option would be. Any one can give some help please
-
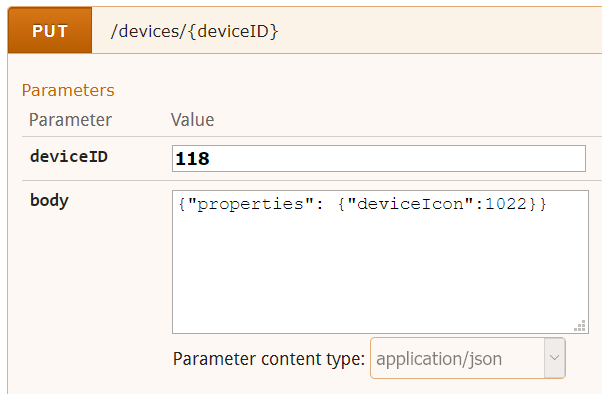
Cześć, Mam zagwózdkę z komendą api.put Chcę zmianić parametr urządzenia (nie VD, nie sceny) (np. ikony) Jeśli chodzi o zmianę nazwy urządzenia to rozwiązałem to w ten sposób: --[[ %% autostart %% properties %% weather %% events %% globals --]] function main() local jHome = json.decode(fibaro:getGlobalValue("jMyHomeIDs")) end api.put('/devices/118', {name='pompa'}) działa (może komuś przy okazji się przyda bo przykładów jak używać api.put jak na lekarsto (zwłaszcza odnośnie urządzeń a nie VD) natomiast już: api.put('/devices/118', {"properties": {"deviceIcon":1022}}) niestety nie działa, mimo iż po wpisaniu {"properties": {"deviceIcon":1022}} w http://192.168.1.2/docs/ daje pożądany rezultat i zmienia ikonę proszę o ewenetualne nakierowanie gdzie błąd!? Z góry dziękuję PS. Chcę wykorzystać zmianę ikony (jak i innych parametrów) w ten sposób że do jednego gniazdka streowanego przy pomocy relay switch podłączam rózne urządzenia w zależności od pory roku.
- 2 replies
-
- deviceicon
- api.put
-
(and 3 more)
Tagged with:
-
Modify global variable using REST API with HTTP.PUT
parper posted a question in Scenes and Interface
Hello, I'm trying to modify a already define global variable using the REST API for the HC2. This is done from a ESP2866 (nodeMCU-isch) board. I can do a http.get towards the HC" and I get the correct JSON information. When I do http.put I seem not to be able to set the variable. My message headers contains a basic auth, and I have payload that looks like this {"value":"On"} The address looks like this http://1.2.3.4/api/globalVariables/thevariable According to the httpclient i'm using i seem to get return code 200 but no result and the variable is not changed. Using the hc2ip/docs link I can test this out with the correct payload and it works fine. However I'm logged in as an Admin then. Trying to change the user from my ESP2866 I just got that the HC" banned me for 30 min. So is there a problem using normal users when trying to modify a global variable ? Do I need to be admin ? Or is there something else I need to check ? Regards P -
HC3, version: 5.050.13 API endpoint: /events/history Parameter: lastId (Description: requests with id<=lastId will be skipped (only more recent entries then lastId will be returned) Test call: https://HC3-IP/api/events/history?lastId=330776&numberOfRecords=2 Result: [ { "data": { "id": 78, "newValue": 23.5, "oldValue": 23.6, "property": "value" }, "id": 330775, "objects": [ { "id": 78, "type": "device" } ], "sourceId": 0, "sourceType": "system", "timestamp": 1606766914, "type": "DevicePropertyUpdatedEvent" }, { "data": { "id": 27, "newValue": false, "oldValue": true, "property": "value" }, "id": 330774, "objects": [ { "id": 27, "type": "device" } ], "sourceId": 0, "sourceType": "system", "timestamp": 1606766874, "type": "DevicePropertyUpdatedEvent" } ] It seems data are returned in wrong order, not recent but older entries are returned.
-
Need help on how to login to UNFI API on UDM-PRO
Brunanchon posted a question in Scenes and Interface
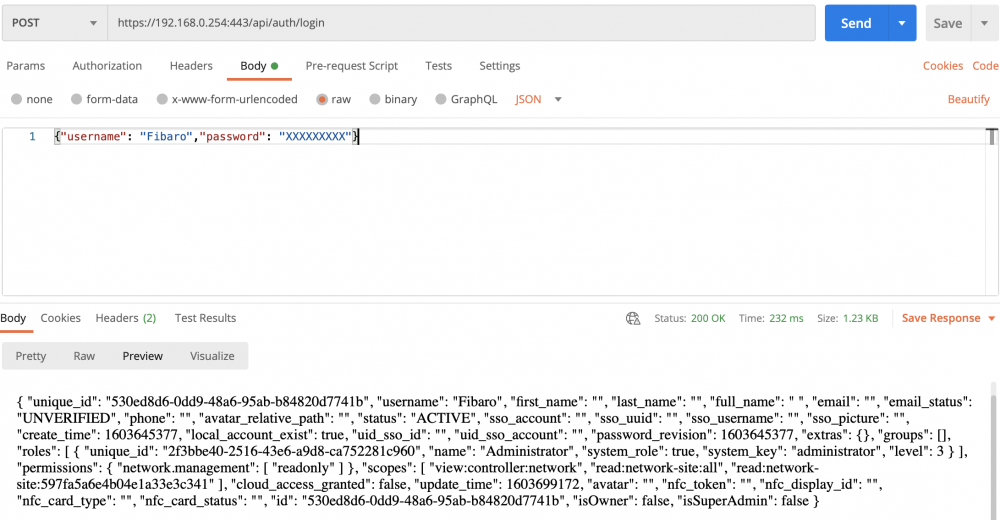
Hello, Just migrated from a ClouKey to the new UniFi Dream Machine Pro. I’m using the API for presence monitoring. I can’t manage to login to the new API from HC2. It's easy to login from POSTMAN: But the following code on HC2 doesn't work: local username = "XXXXXXXXX" local password = "YYYYYYYYY" local httpClient = net.HTTPClient() httpClient:request("https://192.168.0.254:443/api/auth/login", { success = function(response) print(json.encode(response.data)) end, error = function(err) print('httpClient:request() : Error : ' .. err) end, options = { method = 'POST', checkCertificate = false, data = json.encode({username=username, password=password}) } }) It returns a 401 error: { "data" : [ ] , "meta" : { "msg" : "api.err.LoginRequired" , "rc" : "error"}} More info here: https://ubntwiki.com/products/software/unifi-controller/api Has any of you an idea on how to manage this? Thx! -
Hi, Here is my working Volvo interface. Most things you can do with your Volvo On Call app, you can also read out and do with the following Scene + VD. To start off, it is using the jT.hometable so if you don't use that, start using that or strip it away in the Scene/VD. You need to add a entry in your jT.hometable called 'volvo' an example looks like this (yes all here is dummy data and also the 'time' one) volvo = { sceneid = 14, lua = 512, vin = 'YOURVINNUMBER', auth = 'Basic dsjkh42euwendeh279eynhsfd8o3yg7bo3redgefdhf' } And add this line because it uses it to run every xx minutes, add this to your homeTable too. time = { minute = 59000 , five = 299000 , ten = 599000 } Sceneid will be the number of the scene you will create, the 'YOURVINNUMBER' you can get by going into the technical information in your app (usually settings, then technical information, it will be at the bottom) Your basic auth is just a username:password which is base64 encoded. To keep it simple and also have a nice tool to test out api's, i suggest you install Postman. You can add your credentials here: Then click on update request and find your basic auth line here: Next up create your scene: --[[ %% autostart %% properties %% globals volvoTable --]] local jT = json.decode(fibaro:getGlobalValue("HomeTable")) local volvotrigger = tostring(fibaro:getGlobalValue("volvoTable")); local vapi = '/customerapi/rest/v3.0/vehicles/' local shortUrl = 'https://vocapi.wirelesscar.net/customerapi/rest/v3.0/vehicles/' .. jT.volvo.vin local trigger = fibaro:getSourceTrigger() if (trigger['type'] == 'global') then controlUrl = shortUrl .. "" .. volvotrigger httpmethod = 'POST' else controlUrl = shortUrl .. "/status" httpmethod = 'GET' end local httpClient = net.HTTPClient({timeout=5000}) httpClient:request(controlUrl, { options = { method = httpmethod, headers = { ['Content-Type'] = 'application/json; charset=UTF-8', ['Authorization'] = jT.volvo.auth, ['User-Agent'] = 'Dalvik/2.1.0 (Linux; U; Android 5.1.1; SM-G925F Build/LME47X)', ['X-Device-Id'] = 'b7d2fb2e39436fe', ['X-OS-Type'] = 'Android', ['X-Originator-Type'] = 'app' } }, success = function(status) if (trigger['type'] ~= 'global') then local result = json.decode(status.data) if result then -- print("successful") -- print(status.data) if result.carLocked then fibaro:call(jT.volvo.lua, "setProperty", "ui.Label1.value", "Yes"); else fibaro:call(jT.volvo.lua, "setProperty", "ui.Label1.value", "No"); end fibaro:call(jT.volvo.lua, "setProperty", "ui.Label2.value", result.distanceToEmpty); fibaro:call(jT.volvo.lua, "setProperty", "ui.Label3.value", result.heater.status); fibaro:call(jT.volvo.lua, "setProperty", "ui.Label4.value", result.serviceWarningStatus); print(result.serviceWarningStatus) end else print(status.data) -- failed end end, error = function(error) --errorlog("ERROR") print(error) end }) As you might have noticed it also uses a GlobalVar called "volvoTable" you need to make this one too. You can leave the value empty for now. Now install the VD (yes remember the ID to fill it in the jT table) Volvo_V40.vfib And then make it fancy with a nice picture for the scene: And one for the lua. And if all goes well, you can see this one: There is more you can do, but for now i think this is sufficient. I own a V40 hence why it says that. Some cars don't have preheating or have other features (but these are most common) If it doesn't work, let me know since this is my first 'bigger' scene & vd scripts in lua. It uses the global var to send over the url it needs to post to the api, while status commands are get commands for example. Have fun (this really should be just a proper plugin)
- 13 replies
-
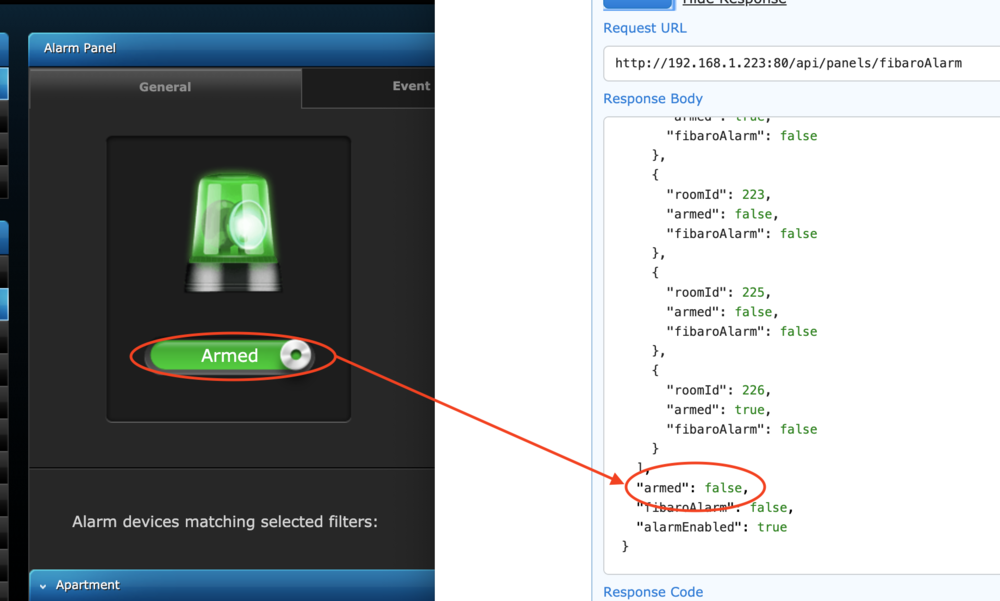
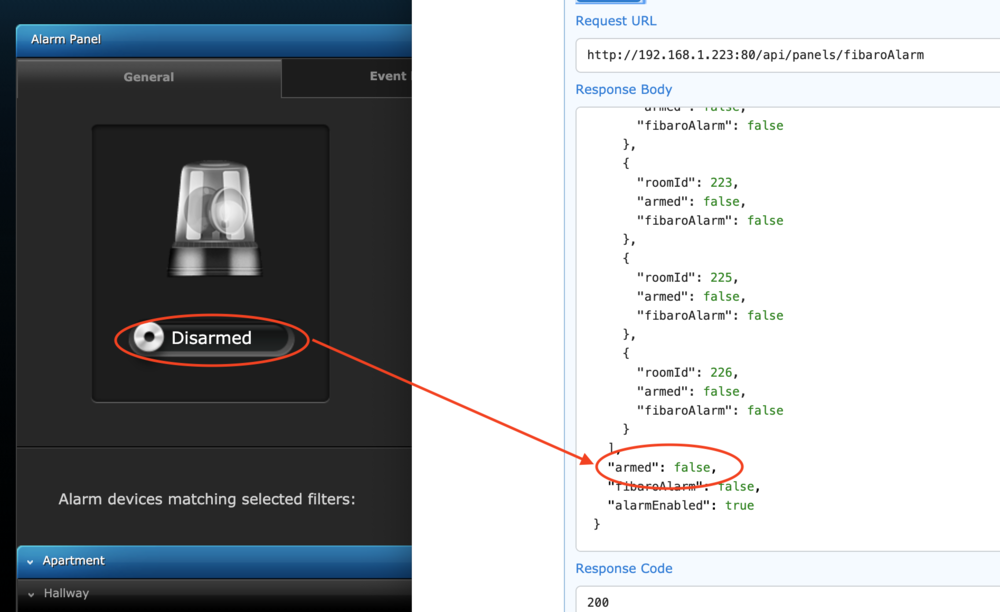
I'm hoping someone can assist me in working out why the API is incorrect when using the Fibaro Alarm. When Disarmed, the API call http://192.168.1.223:80/api/panels/fibaroAlarm returns the correct status (note this is just the last section of the result) ...."armed": false, "fibaroAlarm": false, "alarmEnabled": true When Armed, the API call also returns the same "armed":false value I also have a HCL, which is working as expected with the API. See the attached screen shots.
- 1 reply
-
- alarmpanel
- alarm
-
(and 1 more)
Tagged with:
-
HC2 i rekuperator Polski reQnet jest API
vikizgoda posted a question in Other Devices / Third-party devices
Witajcie forumowicze, Rozpoczynam wątek połączenia HC2 z rekuperatoremp polskiej firmy reQnet. Dostałem od działu progrmistuów REST API do tego rekuperatora. Na tą chwilę czekam na wszystkie zabawki jak dojadą. Jeśli ktoś z Was posiada rekuperator reqnet proszę o info. Razem raźniej. https://reqnet.pl *** Hello forum members, I am starting the topic of connecting HC2 with an air ventilation unit from the Polish company reQnet. I got a REST API for this unit from the programming department. At the moment I am waiting for all the toys when they arrive. If any of you have a reqnet air unit, please let me know. Better together. https://reqnet.pl- 5 replies
-
- rekuperacja
- hc2
-
(and 2 more)
Tagged with:
-
Hi all, I am trying to create a virtual light switch which will fire out an on and off command to a network interface from a third party. I already have a server on the network listening for the commands for example the on command is http://(server ip address:port)/commands for on off command is http://(server ip address:port) commands for off Can it be done? any help would be super appreciated
-
Hello everybody, I was wondering is it possible to develop a plugin for HC2, I'd like to connect my Sonoff devices to my HC. But i have to use ewelink-API but i can't import it into the Lua code. I've successfully that API into Homey app on Homey pro. I was hoping to do the same with Fibaro Home center. anyone has an idea how this could be done. Thanks in advance
-
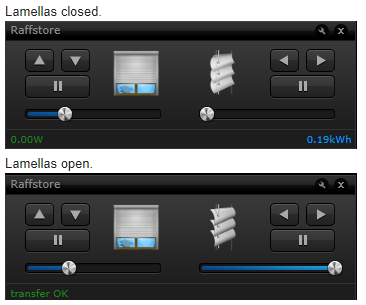
Hi, I have a FGRM222 and I'm using REST API to read the properties of the device. I think that property called "value" is the raise/lower percentage. I suppose that property "value2" contains the information about the positioning of lamellas... but in my system it's always 0. I'm able to open and close lamellas but this value doesn't change. Is there anyone who knows why?
-
I am building a small app (in Flutter) that needs to get data from the API of my HC3. I am not quite sure how to log in programmatically from within this app. Does the API provide a token to use with all requests, or do I need to provide username and password with each request? An how do the header have to look? Many thanks!


