Welcome to Smart Home Forum by FIBARO
Dear Guest,
as you can notice parts of Smart Home Forum by FIBARO is not available for you. You have to register in order to view all content and post in our community. Don't worry! Registration is a simple free process that requires minimal information for you to sign up. Become a part of of Smart Home Forum by FIBARO by creating an account.
As a member you can:
- Start new topics and reply to others
- Follow topics and users to get email updates
- Get your own profile page and make new friends
- Send personal messages
- ... and learn a lot about our system!
Regards,
Smart Home Forum by FIBARO Team
Search the Community
Showing results for tags 'alarm'.
-
Generic Fibaro HC3 Alarm system Hi Luabuilder Sharing is Caring I have see a lot of talk using Fibaro HC3 for Alarm system. I love the idea - i want that, so i tried to describe what a Generic Alarm system should be build of. Several people already tipped in with things they made og thoughts they have, issues they identified. Why invent the wheel when great tuff already has been made. @jgab has created the EventRunner4 and ChildrenOfHUE - All-in-one QA framework for HC3 - this can be used for arming and disarming the alarm - An example is provided here @10derand @JcBorgs described issue about HC3 is missing the "disable alarmExclude" - a “pre-check” for sensors before arming ALARM is needed What a good way to solve this - I way thinking of enhancing the doorstatus QA (below) ? And @FBerges already shared his version of an alarm system @Mateo created a Siren Quick APP And probably many more worked on their own solution to create a ALARM SYSTEM. Please tip IN if there is elementary features ? - that is missing for a generic HC3 Alarm! How would you structure this? ? - ONE Quick APP with everything, Variable for customising? or a QA with Scenes and Eventrunner4? Another useful idea that could be used, is the status for open windows and doors. This QA changes the Color in the matrix Bulb when a door or windows is opened. Doorstatus.fqa @10der learned me about getting the sensor possibilities with print(json.encode((api.get("/devices/hierarchy")))) com.fibaro.windowSensor com.fibaro.doorWindowSensor com.fibaro.doorSensor Perhaps some of the forum experts could create some overall structure and point the learners in right direction? ? ? Desired Functionality In case of alarm not armed Geofence • Ongoing control - have all users left the house? Message on Telephone (s) that the house is empty and the alarm is not active For ARMING the Alarm • Message on Telephone (s) about which windows are not closed. Message format Section, room, Sensor Message on Telephone (s) about which doors are not closed Message format Section, room, Sensor Message on Phone (s) When alarm is active and which Zone. Message could be Fibaro APP push, or Telegram Delay to get out the door Use a Keypad like Matrix for ARM - ala triple cut on one button and subsequently double click on another. This feature is already made by @Jgab in Eventrunner4 Use Fibaro APP for ARM LED/Bulb for show Status ARMED – I will probably use MATRIX ZDB LED in the perimeter to changes to RED By Disarm the Alarm Message on Phone (s) alarm is deactivated and if other Zones are active LED/Bulb for show Status DisARMED – I will probably use MATRIX ZDB LED in the perimeter to changes to GREEN, but could be a HUE Bulb Use Matrix for DisARM - like triple cut on one button and subsequently double click on another. This feature is already made by @jgab in Eventrunner4 Use Fibaro APP for DisARM For Alarm ACTIVE Internal sirens are triggered External sirens are triggered Light with alarm status, flashes 1 Hz SONOS speech - sound. Could be by using the Quick App - Sonos Zone Controller Message on Telephone about which device has triggered alarm - Section, room, Sensor
-
Is it possible to disable the default push notification to the app when an alarm is triggered? I currently get "An alarm was detected on partition xxx" message as soon as an alarm partition is activated. I want to disable this. Reason is my scene plays an entry beep allowing time for someone to enter and put in their code. Therefore if the alarm is cancelled before say 60 seconds, I don't want to get the notification. The problem with the entry delay is that there is no way to trigger a scene and play the sound so the entry delay in the panel is pointless. I want to just handle the push notification in the code rather than get the one automatically. Thanks!
-
Witam, zastanawiam sie czy ktoś z Was wykorzystał Fibaro jako system bezpieczeństwa zastępując Satela. Czy macie doświadczenia z tym? Co sądzicie o zrobieniu systemy alarmowego operatorów o fibaro
-
Hi, Can anyone help with setup siren 6? When is alarm activated and triggered, the sound play for only a few second, how to make the sound play all the time? Screen is not in English language.

-
 Cześć, Czy ktoś ma pomysł jak ustawić Aoetec Siren 6 tak, aby alarm nieprzerwanie się powtarzał do momentu rozbrojenia alarmu? Wczoraj miałem naruszenie czujki (na szczęście przez psa) i alarm włączył się tylko na 35s i cisza. Ja się obudziłem, ale reszta domowników już nie. A co jeśli jeden "dzwonek" nas nie obudzi podczas prawdziwego włamania? Jaka jest funkcja w LUA, aby powtarzać czynność do momentu spełnienia określonego warunku. (czy ten kod posiada cos jak elseif ?)
 -

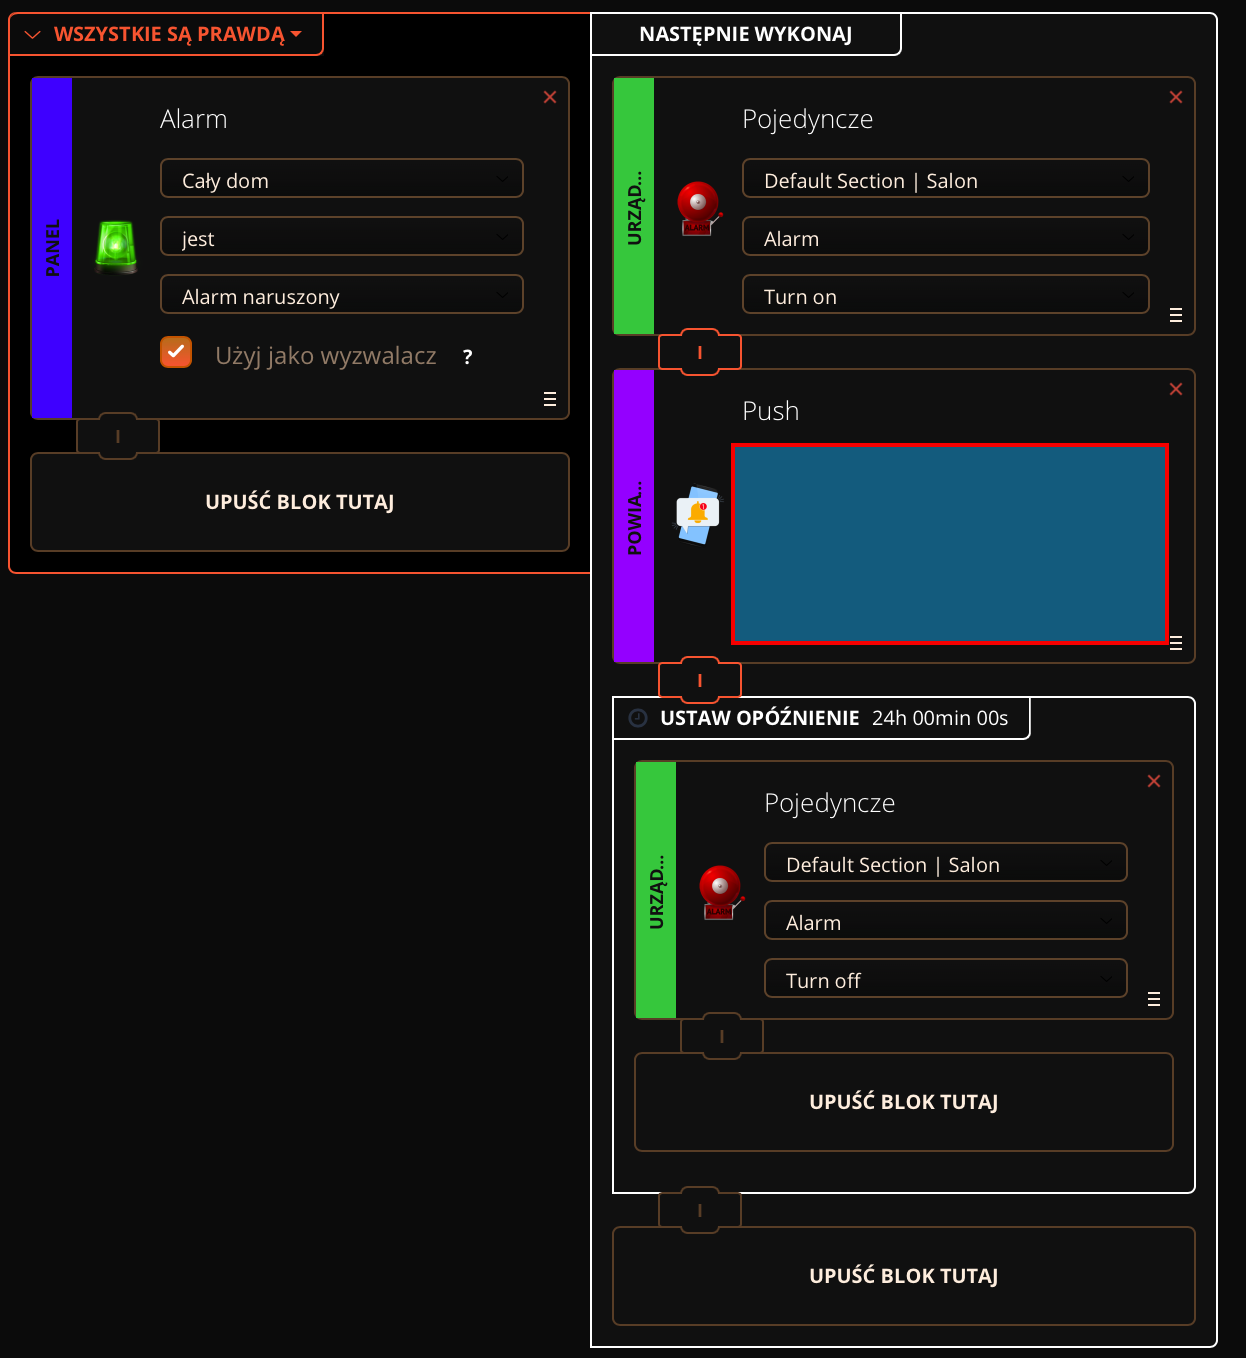
Uruchomienie jednego z 3 alarmów na podstawie warunków
coonrado posted a question in Sceny i Interfejs
Chciałbym w jednej scenie zawrzeć kilka warunków i uruchomienie jednego z 3 alarmów w zależności od tego: uzbrój alarm id = 6 gdy: osoba id = 2 opuszcza strefę 220 i osoba id = 315 opuszcza strefę 200 i urządzenie id = 304 ma stan = zamknięty i urządzenie id = 229 ma stan = nienaruszony i urządzenie id = 230 ma stan = nienaruszony uzbrój alarm id = 7 gdy: osoba id = 2 opuszcza strefę 220 i osoba id = 315 opuszcza strefę 200 i urządzenie id = 304 ma stan = zamknięty i urządzenie id = 229 ma stan = naruszony i urządzenie id = 230 ma stan = nienaruszony uzbrój alarm id = 8 gdy: osoba id = 2 opuszcza strefę 220 i osoba id = 315 opuszcza strefę 200 i urządzenie id = 304 ma stan = zamknięty i urządzenie id = 229 ma stan = nienaruszony i urządzenie id = 230 ma stan = naruszony Pierwsze 3 warunki w każdym wariancie uruchomienia alarmu pozostają takie same. -
Hi, My alarm system has finally died , for good this time, the panel was always a little dodgey, but now it's burnt beyond what I can be bothered trying to fix .. Anyway, I'd like to replace the complete alarm system with something I can integrate to a greater or lesser extent with the HC2. I remember someone posting something about a plug in board called .. envision .. i think ? and it might have been a plug in for DAS alarms ? But I can't find anything on that when I search so I've probably got the name wrong. I don't mind running wires, Actually prefer it for an alarm system, and I don't really mind what sort of cost there is if it ticks the right boxes. Although it's not essential, Ideally I'd like to have some secured integration also with gate and door control and also cameras all in one... but that wish list may have just put me into a fixed wired C-Bus or Control-4 system I expect. Does anyone have anything remotely like this that I can start researching ? It's difficult to know where to start as the suppliers of most of the alarm systems around here seem to have little idea about integration. Or to put it another way, what home alarm system do you have and how have you integrated it with your Fibaro system ? Cheers in advance, al.
-

Alarm for HomeCenter 2 - Multiple Modes Supported
morpheus75 posted a question in Scenes and Interface
I messed up some code tags so re-posting... Hi Here is my small tutorial on the alarm system code i use to complement the rfid keypad system. Firstly you need to create an 'ALARM' variable with at least 2 values. one variable will be OFF second variable will be FULL (or whatever name you want to give) you could if you wanted create many more variables for different zone eg i have a 3rd called DOWN you then programme the keypads (or any other scene) to change the variable to the alarm mode you want --[[ %% properties 145 value 146 value 159 value 160 value %% events %% globals --]] local alarm = fibaro:getGlobal("alarm") local kpof = fibaro:getValue(145, 'value') local kpon = fibaro:getValue(146, "value") local bkon = fibaro:getValue(159, "value") local bkof = fibaro:getValue(160, "value") if ( ((kpon == '1') or ( bkon == '1')) and (alarm == 'off') ) then fibaro:setGlobal("alarm", "down") end if ( ((kpon == '1') or (bkon == '1')) and (alarm == 'down') ) then fibaro:setGlobal("alarm", "full") end if ( (bkof == '1') or (kpof == '1') ) then fibaro:setGlobal("alarm", "off") end From above i have 2 keypads. I have put triggers under the properties for both ON and OFF when i press the 'ON' button once it changes the VARIABLE to PART, if i then press again it changes the VARIABLE to FULL. If you wanted you could continue this for more zones but it can get a bit complicated...... Finally if either of the OFF buttons are pressed the VARIABLE is set to OFF. Next part is the actual setting of the alarm.. --[[ %% properties %% events %% globals alarm --]] if (fibaro:countScenes() > 1) then fibaro:debug('NO!') fibaro:abort() end fibaro:sleep(12*1000) -- set delay time here mine is 12 seconds local alarm = fibaro:getGlobal("alarm") local downArmIds = {} -- set ID's for DOWN mode local fullArmIds = {} -- set ID's for FULL mode local deviceIds = {} -- leave blank as it will auto fill -- single 'alarm' variable with multiple arguments -- in one place (lists above) if (alarm == 'full') then deviceIds = fullArmIds elseif (alarm == 'down') then deviceIds = downArmIds elseif (alarm == 'off') then fibaro:abort() end local unsafeDevices = {} -- will add unsafe devices to this empty list local statusMessage = "" -- will get changed to push message depending on outcome below -- below loops through all devices to check device values are safe, i.e. '0' -- otherwise adds the devices to unsafe list in preparation for push message local armStatus = 'safe' for i, id in ipairs(deviceIds) do if (fibaro:getValue(id, "value") == '0') then deviceStatus = 'safe' else deviceStatus = 'unsafe' table.insert(unsafeDevices, id) armStatus = 'unsafe' end print("Id: " .. id .. " " .. fibaro:getName(id) .. " is " .. deviceStatus) end print("\nArm status is " .. armStatus) -- if unsafe, then formulates the push message, otherwise sets the device to arm if (armStatus == 'unsafe') then -- loops each device in unsafeDevices list to specify the all the names of device to be -- included in push message for i, id in ipairs(unsafeDevices) do statusMessage = statusMessage .. fibaro:getName(id) .. " ; " end statusMessage = statusMessage .. " unsafe to arm.\nAlarm not set" fibaro:setGlobal("alarm", "off") --[[ Example message... "Front Door; Living Room Motion; Studio Door Lock; unsafe to arm. Alarm not set" ]]-- else -- loops devices to set them to arm status for i, id in ipairs(deviceIds) do fibaro:call(id, "setArmed", "1") end statusMessage = "Alarm set to " .. fibaro:getGlobal("alarm") --[[ Example message... "Alarm set to full" or "Alarm set to part" ]]-- end fibaro:call(319, 'sendPush', statusMessage) -- push message to me change 319 accordingley -- add any other code here that you want to run eg turn lights off or heating off etc print(statusMessage) -- prints in debug window this looks big but you only need to add the device ID's of your FULL mode, DOWN mode and any other message once the alarm has been set. Remember to separate your ID numbers with a comma The code is triggered by a change in the global variable called 'alarm'. This then starts the scene. The time delay gives you time to press again for different modes and also to leave the house and make sure that all sensors become safe. (i have set my motion sensors to show as being safe after 5 secs, the default is around 15 secs). After the time delay it checks which variable is set, then it only checks those sensors to make sure they are all SAFE. If they are SAFE then it proceeds to ARM those sensors and then sends you a push message that the alarm has been set and will run any additional code you have added eg turn off the lights, heating etc If they are UNSAFE then it aborts the arming procedure and sends you a message that 'a named sensor is unsafe to arm', you can then investigate and make sure it is safe before starting again. examples include if a door was left ajar or window is left open etc Next part is the ACTIVATION code: --[[ %% properties 25 value 85 value 95 value 148 value 90 value 171 value 176 value 166 value 32 value 45 value %% events %% globals --]] function activation() local trigger = fibaro:getSourceTrigger() --fibaro:debug(trigger) local device = fibaro:getName(trigger['deviceID']) fibaro:debug(device) local subject = 'alarm activated' local message = 'alarm activated ' fibaro:call(2,'sendEmail',subject,message..device) -- ID of user '2' is always admin fibaro:call(319,'sendPush',message..device) -- ID of my phone end local alarm = fibaro:getGlobal("alarm") local downArmIds = {} local fullArmIds = {} local deviceIds = {} if (alarm == 'full') then deviceIds = fullArmIds elseif (alarm == 'down') then deviceIds = downArmIds elseif (alarm == 'off') then fibaro:abort() end for i, id in ipairs(deviceIds) do if ( (fibaro:getValue(id, "value") == '1') and (fibaro:getValue(id, "armed") == '1') and (alarm ~= 'off') ) then activation() -- this is function above fibaro:call(123, "turnOn") -- code for turning siren on fibaro:sleep(10*60*1000) -- 10 min delay change to what you want fibaro:call(123, "turnOff") -- code for turning siren off -- plus any other code you want to add end end firstly you need to enter the ID numbers of all your sensors in the properties section as triggers except the entry zonesalso the fullArmIds and downArmIds need to match the previous arming code except for the entry doors we have a separate entry code to give us a time delayed entry1st block is the function activation(), this basically tells me via push message and email which sensor triggered my alarm2nd block checks to see which mode the alarm is in and therefore will only monitor those specific ID's3rd block will cause the alarm to trigger if our 'armed' devices are breached and run the activation code Entry code is below this as name suggests gives us a defined time to enter property and switch off alarm before it activates: --[[ %% properties 82 value 83 value %% events %% globals --]] local fda = fibaro:getValue(82,'armed') -- front door armed local fdv = fibaro:getValue(82,'value') -- front door value local bda = fibaro:getValue(83,'armed') -- back door armed local bdv = fibaro:getValue(83,'value') -- back door value local alarm = fibaro:getGlobalValue("alarm") function activation() local trigger = fibaro:getSourceTrigger() --fibaro:debug(trigger) local device = fibaro:getName(trigger['deviceID']) fibaro:debug(device) local subject = 'alarm activated' local message = 'alarm activated ' fibaro:call(2,'sendEmail',subject,message.. device) fibaro:call(319,'sendPush',message.. device) end if ( ( (fda == '1') and (fdv == '1') and (alarm~='off') ) or ( (bdv == '1') and (bda == '1') and (alarm~='off') ) ) then fibaro:sleep(30*1000) -- 30 sec delay local alarm = fibaro:getGlobalValue("alarm") if (alarm == 'off') then fibaro:abort() else activation() fibaro:call(123, "turnOn") fibaro:sleep(10*60*1000) fibaro:call(123, "turnOff") end end to start with set the ID of your entry zones under properties, and update the ID 82 and 83 with your own. If you have just 1 then delete accordingley and more than 2 then just add the extra as needed the function is same as before the final block checks if the doors have been opened if they are armed and the alarm is NOT set to off it then starts a 30 sec timer. Just amend 30 to whatever time you need. once the timer has counted down it will check the variable again and if you have turned alarm off then code aborted. if alarm not switched off then activation procedure starts just as before and sends push message, email and siren activates for 10 mins. Final part is turning the alarm off --[[ %% properties %% events %% globals alarm --]] local alarm = fibaro:getGlobal("alarm") local deviceIds = {} if ( alarm == 'off' ) then fibaro:call(319, "sendPush", "Alarm Off") -- my phone fibaro:call(123, "turnOff") -- siren -- any other code for i, id in ipairs(deviceIds) do fibaro:call(id, "setArmed", "0") end end fill the deviceIds with the values of ALL YOUR SENSORS - incl entry sensors the trigger for this is the global variable alarm if its in the 'off' setting then it will send me a push message and send an 'off' command to siren (just in case it was activated) it will then go through the sensors 1 by 1 and disarm them all I hope this helps all of you and any questions and feedback and comments please feel free to leave them thanks -
Hello, Please help with topic how to set aeotc siren 6 to turn on the sound until I disarm alarm.
-
Hello I'm trying to learn simple LUA code, just bought my HC3, but I cannot get the value from my alarm? I've tried this; local alarm = fibaro.getValue(2, "value") but when I print 'alarm' in console is says the value I nil. Can anybody tell me what to do? Thanks
-
I have a smoke alarm (FireAngel ST-630 with Sprue Z-wave-module) which I would like to trigger switching off a relay when an alarm is given. Basically, there are two ways to make one device trigger another, associations or scenes. Using association has the advantage of being independent of the HC2 gateway, so that is what I was looking for at first. The supplier of the alarm tells me, however, that association will not work in this case, since the appropriate association group uses a "sensor notification reports and not a set command". I am a little out of my depth here, and would appreciate any comments. The complete documentation for the device is enclosed. There is no Fibaro template for this device, but I do not expect that to make a difference. Do you agree with the supplier that association to a switch or relay is not possible in this case? What is a good and simple way to set up a scene for this function: 'If smoke alarm on device xxx then set switch yyy to "off"?' Sprue-Z-Wave-Module-Developer-Pack-2017.pdf
-
Why doesn’t the Fibaro app warm me when the Alarm Goes off. No vibration or alarmtone?
-
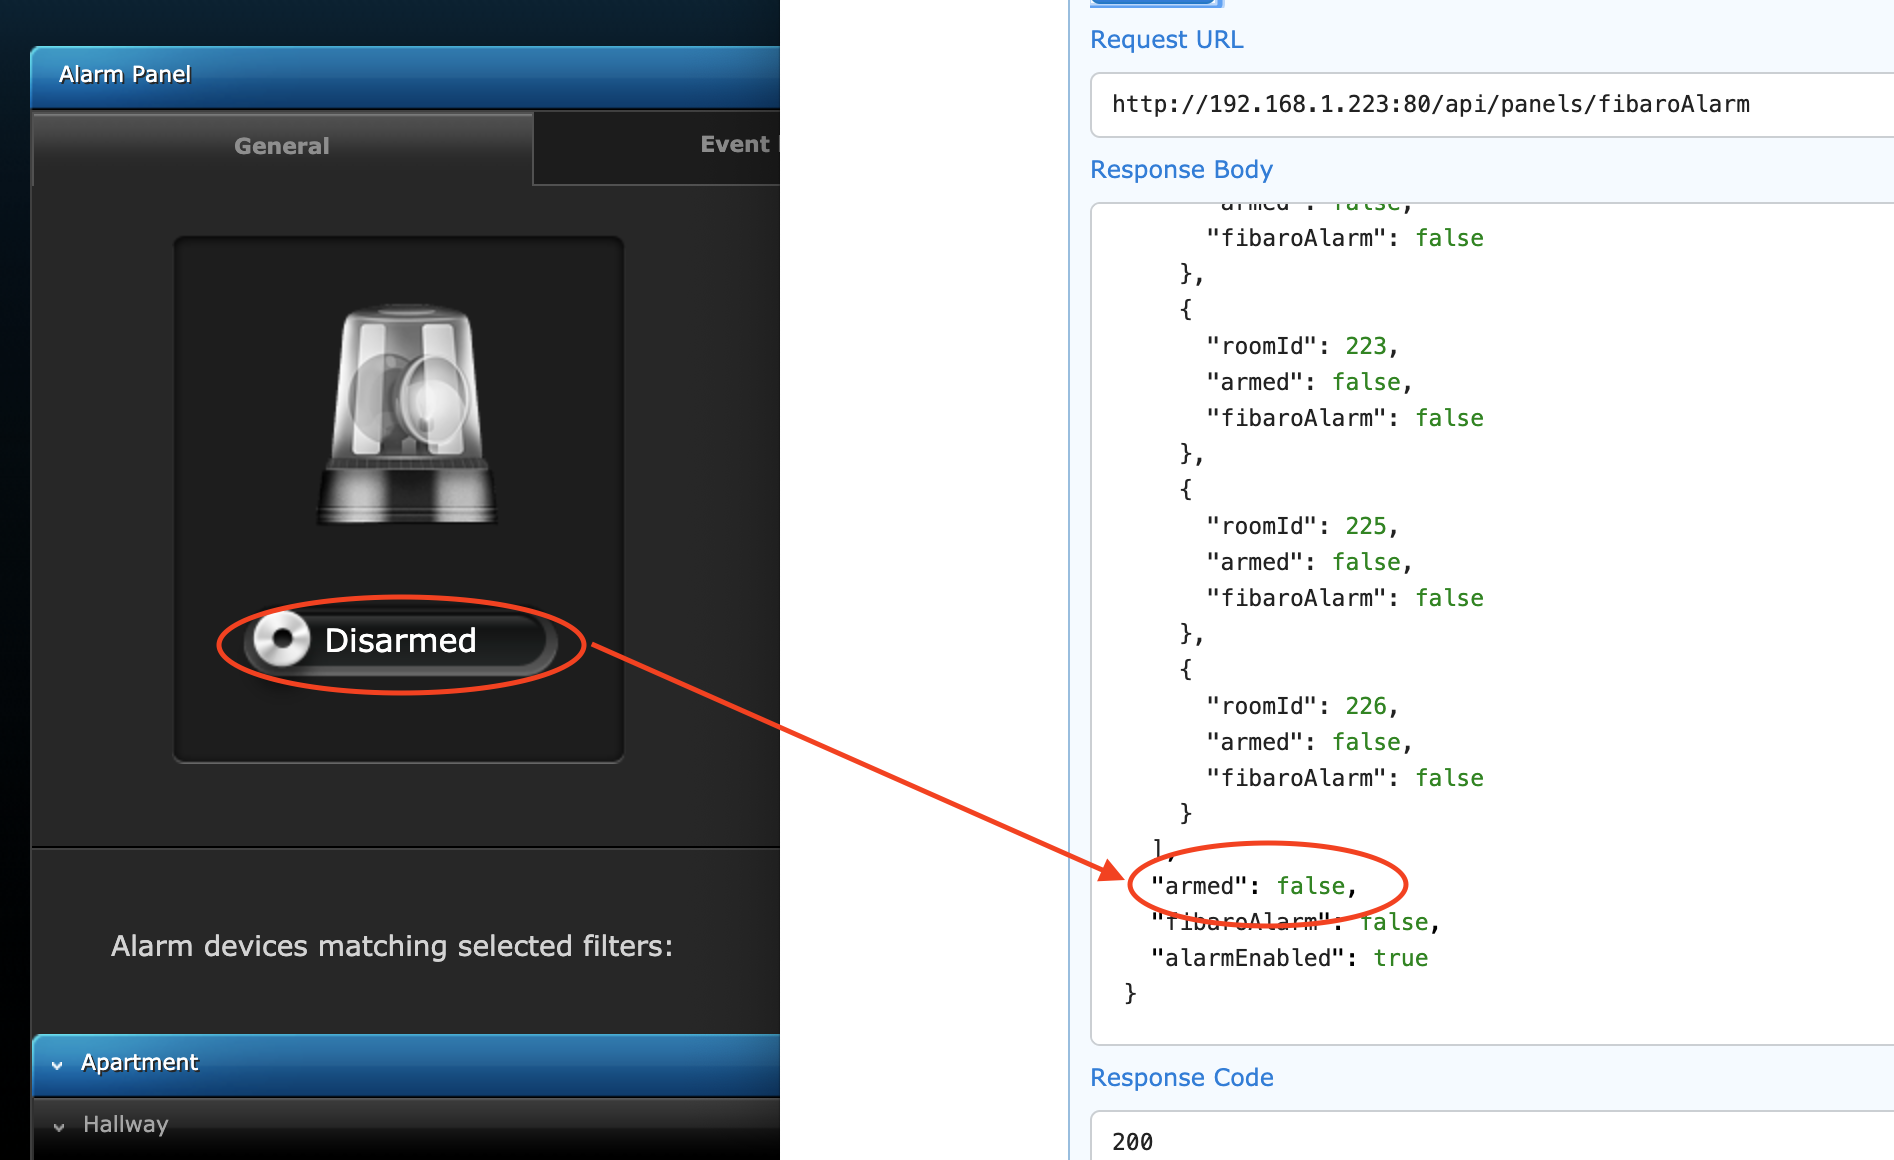
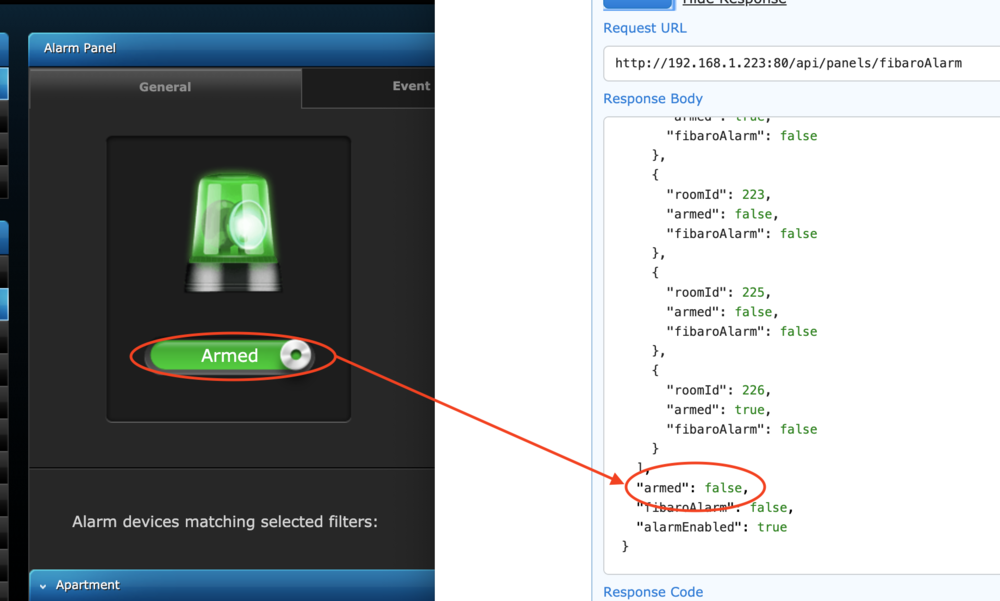
I'm hoping someone can assist me in working out why the API is incorrect when using the Fibaro Alarm. When Disarmed, the API call http://192.168.1.223:80/api/panels/fibaroAlarm returns the correct status (note this is just the last section of the result) ...."armed": false, "fibaroAlarm": false, "alarmEnabled": true When Armed, the API call also returns the same "armed":false value I also have a HCL, which is working as expected with the API. See the attached screen shots.

-
![More information about "[VD+Scene] Advanced Alarm Clock"](https://forum.fibaro.com/uploads/monthly_2020_04/AdvancedAlarmClockScene.thumb.png.07237ec21a59b8fafc43c56a0e0c947d.png)
Version 3.6.2
173 downloads
Advanced Alarm Clock First release on the French board in March 2019. INTRODUCTION This VD+Scene Bundle will help you to wake up in better shape by simulating a smooth dawn with any device in your HC2 : Roller Shutters, lights devices and VD. After the ignition at the value that you have set up in the VD, the scene can fade one or more speakers. The curves for light and audio fade in can be choosen separately. The scene manages itself if it's day or not. So, for each light you will set up in the scene, you can decide if it has to be active everytime, or only when it's day or only when it's night. For example, you can set up a Roller Shutter which is active only if it's day! This Bundle can be used as much as you want, just by adding it again and creating a new Global Variable for each new bundle set. THE SCENE IS ABLE TO MANAGE Roller Shutters (FGR22, FGR223...) Dimmers (FGD211, FGD212...) Switchs (FGS211, FGS212, FGS213...) RGBW Devices (FGRGBW, RGBW Controller 1, RGB Controller 2) RGBW Programs (Any Fibaro's programs) Home Center Scenes Any Light VD (Philips Hue, Ikea TRÅDFRI...) Any VD clickable Any Audio VD (Sonos, Yamaha Multicast or any else...) INSTALLATION Most of explainations are in the scripts. Create a Global Variable which starts with REVEIL_ (what means alarm clock in French ?) and import the Virtual Device you want (12h or 24h). VD CONFIG -- Manageable Alarm Clock Scene Id local SceneID = 193; -- Which room will this VD Manage ? Must be the same than the Scene local ROOM = "ROOM"; -- Days Off local DaysOff = {"Saturday","Sunday"}; -- By defaut, this scene will be launched to have full light at the time set up in the VD : Actual Hour - Dawn Time -- Change this var to anything else if you want to trigg the scene at the hour H. local StartScene = "DEFAULT"; -- Icon's ids local icon_ok = 1156 local icon_wait = 1158 local icon_off = 1160 SceneID : ID of the scene Advanced Alarm Clock ROOM : Value corresponding to the Global Variable you created DaysOff : List here all your days off within quotes marks, separated by commas. Take care of the uppercase at the beggining of the days names! StartScene : Start the scene to have the full ignition at the time set in VD (DEFAULT), or start to begin the dawn's simulation at the time set in the VD (anything else) icon_ok : ID of the icon which will be displayed when the scene is triggered and active icon_wait : ID of the icon ID which will be displayed when an alarm is set and waiting to trigg the scene icon_off : ID of the icon which will be displayed when the alarm is disabled Note: In this Virtual Device, you have to change 3 times the variable's value of ROOM, corresponding to the Global Variable you have created before : REVEIL_ROOM. VD USE Press on : will display 12:00 (or 07:30am in the 12h version). This can be changed by anything else with the variable ClickHour in the corresponding button Sound Volume is in percentage (Act on sliders) Audio fade-in is in seconds Light's Power is in percentage* Dawn's duration is in minutes Once button sets the alarm for the next avalaible scheduele, regardless of the day (DayOff or not). The alarm will automatically be disabled after the dawn's ignition Week of job sets the alarm for everyday, without the days set in the variable table DaysOff. Scene will automatically be launch until it's manually deactivated Recall will recall every parameters set before last VD deactivation Alarm OFF will save every actual parameters and disable the alarm * Rollers Shutters will open at the same time than others lights devices, but will not been affected by Light's Power parameter I thought it was better to be able to choose the power of lights, without having a half opened roller shutter. SCENE local ROOM = "ROOM"; -- Room code corresponding to the Global Var created local StartVolume = 15; -- Which Speakers volume value the fadein will start at (percentage) local CurveLight = "linear"; -- Which function will be used to fadein light keys local CurveAudio = "linear"; -- Which function will be used to fadein speakers keys BASIC SETTINGS ROOM The famous variable wich has to be the same in the Scene+VD StartVolume could be useful if you don't want to start audio fadein from 1. CurveLight & CurveAudio Curves that will be used to fade lights and audio. See the following image to have a better understanding Note1: If you comment a Curve Variable, the curve will be randomly choosen Note2: The curves are possible thanks to the great work that Robert Penners made in 2001. POSSIBLE CURVES : Linear + Robert Penner's Easing Equations -- Debug Vars local debug = 1; -- 1 Enable / 0 Disable local lang = "en"; -- Debug lang local DisplayNamesorID = "ID"; -- Display DeviceName + RoomName (Names) or Type + ID (ID) on each Debug line local DisplayNamesAtStartup = 1; -- Display Rooms & Names at scene startup (1) or not (0) local DisplayRGBWValues = 1; -- Display RGBW Values increasement when fading in (1) instead of only multiplier (0) local DayLightDelay = 60; -- After sunrise/sunset, it's still daylight for .. mn local VolDiffMin = 5; -- Minimum difference between Start Volume and Volume set in VD (in case of Start Volume > Volume set) local LimitDebugLines = 1; -- Limit number of Debug Lines to 4 max per device and to 20 max per roller shutter -- Changing next var values may seriously impact the scene local CheckAlarmMode = 1; -- Check if the alarm is set and not just memorized before starting sthis scene local DisplayScenesNames = 0; -- Display Scenes Names in debug (1) or not (0)! Active this function may delay the script local tempo = 1; -- Pause between two actions in LightsAction and SpeakersAction functions (s) - It' not recommended to change this value DEBUGS SETTINGS debug lang DisplayNamesorID DisplayNamesAtStartup DisplayRGBWValues DaylighDelay VolDiffMin LimitDebugLines CheckAlarmMode If this var value is set on 0, this scene will be able to be launched manually with stored values, even though the VD displays None DisplayScenesNames tempo Note: everything explained in the script! ADDING YOUR DEVICES Add a Roller Shutter (FGR) Parameter "steps" is needed to set how many steps this roller shutter will do to open (to protect motors of 100 steps) table.insert(LightsList, {typ="Shutter", id=279, steps=6}); Add a Dimmer (FGD) table.insert(LightsList, {typ="Dimmer", id=10}); Add a RGBW device (FG-RGB) : To fade a choosen color with RGBW parameters (Set this color at full range, scene will fade this value from 0 to the value set in VD) table.insert(LightsList, {typ="RGBW", id=20, r=150, g=100, b=0, w=255}); Add a RGBW Program : To set a RGBW program, just use "program" parameter Add "start" parameter to manage when this program will be started during the light fadein (in percentage) If no "start" parameter is set, program will be started at the beginning of the scene table.insert(LightsList, {typ="Program", id=20, program=3, start=50}); Add a switch (FGS) Add "start" parameter to manage when this turnon action will be done during the light fadein (in percentage) If no "start" parameter is set, action will be done at the beginning of the scene table.insert(LightsList, {typ="Switch", id=49,start=100}); To add a VD If it's a light VD : Parameter "slider" needed to manage brightness table.insert(LightsList, {typ="VD", id=298, slider=10}); "btn" paramater can be added to set a color preset before the fadein (Be sure that the VD brightness for this button is set et 1%) table.insert(LightsList, {typ="VD", id=298, slider=10, btn=6}); If it's not a light VD (with brightness slider) : Just indicate "btn" parameter table.insert(LightsList, {typ="VD", id=298, btn=6}); Add "start" parameter if you want to manage when this button will be pressed during the dawn fade in (in percentage) table.insert(LightsList, {typ="VD", id=298, btn=6, start=50}); Scene : To start a scene Add "start" parameter to manage when the action will be done during the light fadein (in percentage) If no "start" parameter is set, action will be done at the beginning of the scene table.insert(LightsList, {typ="Scene", id=254, start=50}); To add Speakers VD : One action per key Example for an action on the slider 15 of the VD 245 table.insert(SpeakerAction, {id=245, slider=15}); Example for an action on the button 6 of the VD 245 table.insert(SpeakerAction, {id=245, btn=6}); Note: This is an extract of the scene. So you will find it in the scene to help you if needed One line = One device LightsList typ = Shutter id Roller Shutter ID steps Number of steps which will be done by the roller shutter (to preserve shutter's motor). 2 mini / 20 maxi typ = Dimmer id Device ID typ = VD id VD ID slider Slider number to manage light power btn* Button to push start* When the button have to be pushed during dawn"s ignition (if not set, the button will be pressed just before acting on slider) typ = RGBW id Device ID r Red Value(0-255) g Green Value (0-255) b Blue Value (0-255) w White Value (0-255) Note: Please write the parameters for a full power. The scene will calculate the values needed from them typ = Scene id Device ID start* At which percentage of the dawn's ignition this scene will be started. 1 will be use by default if nothing is set. typ = Switch id Device ID start* At which percentage of the dawn's ignition this switch will be turned on. 1 will be use by default if nothing is set. typ = Program id Device ID program ID of the program to launch start* At which percentage of the dawn's ignition this program will be started. 1 will be use by default if nothing is set. SpeakerAction id VD ID 2nd parameter = Button Type (One or the other) with this button number slider Number of the volume's slider btn Number of the button to push Note: This actions will be done in the order you declare them in the script Note: items with * are not mandatory MODE PARAMETER This parameter is not mandatory. If not set, all your keys will be used to fade the dawn. You can mix modes and no modes keys! For each light key, if you want to see it lighting only when it's day, just add mode="day", or mode="night" if you want to see a key lighting only if it's night. To use a key everytime : no mode or mode="both". WHERE CHANGE GLOBAL VARIABLE "ROOM" VALUE At the beginning of the scene In the "Once" Button of the VD In the "Week of Work" Button of the VD In the "Alarm OFF" Button of the VD At the beginning of the Main Loop of the VD Note: Please take care of this changement of value. If the value is not the same everywhere, the scene could not be launched! DEBUG EXAMPLE SUPPORT In case on any issue, please try again with defaults debug's values and post all your DEBUG lines to help me to understand what happens in your configuration. CONTENT Advanced Alarm Clock Scene v3.6 Multilingual Advanced Alarm Clock Trigger 12h v2.2 for people that have 12-hour clocks (am-pm) Advanced Alarm Clock Trigger 24h v2.2 3 Icons for the VD 1 icon for the Scene info.txt file TRANSLATION All Debugs texts are available in english and french. They could be easily translated in any other language without any LUA knowledge, by creating a new language condition and translating every DebugMsg vars. Don't hesitate to contact me with the support thread if you want to translate them in another language. Only 37 sentences in the scene v.3.6! Your translations could be added in this official bundle.- 1 comment
-
- 1
-

-
- dawn simulator
- dawn simulation
- (and 5 more)
-

Arrowhead Alarm system with Smart Implant
Mykee posted a question in Other Devices / Third-party devices
Hi Team, can anyone please share the knowledge or experience using Smart Implant with Arrowhead Alarm system? Thank you regards Mykee -

Smart implant w sygnalizatorze np SPLZ-1011 R - alarm
piowla posted a question in Urządzenia Firm Trzecich
Witam. Mam pytanie. Czy jest możliwość podpięcia smart implantu do sygnalizatora alarmu SPLZ-1011 R w taki sposób aby zasilanie sygnalizatora posiadającego wewnętrzny akumulator było zasilaniem smart implantu, a dokładnie aby smart implant był w razie wyłączenia prądu zasilany awaryjnie również z akumulatora sygnalizatora. Niestety nie znalazłem schematu tego sygnalizatora i nie wiem czy to możliwe. Czy miejscem, gdzie należy się wpiąć z implantem w sensie jego zasilania to miejsce równoległe do zasilania akumulatora tego sygnalizatora? -

PIR włączony tylko w trakcie uzbrojonego alarmu - czy da się?
olus posted a question in Motion Sensor
Cześć! Szukałem, nie znalazłem - więc pytam. Czujnik ruchu ma możliwość załączenia PIR w dzień, w nocy lub może być załączony cały czas. Moim zdaniem ciekawa opcja, szczególnie gdy jestesmy w domu i niemalże co pare sekund wysyła on zgłoszenie o naruszeniu do centralki. Gdy wybierzemy że PIR działa jedynie w nocy to możemy ograniczyć wysyłanie impulsów co zaoszczędzi nam baterię (chyba). Niestety gdy uzbrajamy alarm to czujnik ruchu również w takim wypadku będzie działał jedynie w nocy - czy znacie jakieś rozwiązanie, może ustawienia które mogą rozwiąć ten problem? W skrócie aby czujnik PIR był załączany tylko w przypadku uzbrojenia alarmu. Niestety całość jest na HCL więc LUA nie wchodzi w grę. Chociaż jeżeli to jedyne rozwiazanie to też wezmę je pod uwagę. Z góry dzięki -
Hi all. Does anyone know if the new Texecom Connect API is being worked on to integrate with Fibaro? see here for more details: http://www.texe.com/uk/technology/connect/ Thanks
-
I am trying to connect the smart implant to an alarm with 12v outputs to signal "alarm armed" and "alarm active" (i.e. breach identified). I connected the SI using the inputs as analog. I can see the correct voltage on the analog inputs (i.e. +12v = armed / 0v = unarmed). But I can't make the smart implant to generate events (i.e. open/closed/switched) when the voltage changes. I can only poll the voltage periodically to check if it has changed. I have already fiddled wit parameters 63 (input threshold) and 64 (periodical report) with no success. What is the right way to generate events when the voltage changes from 0 to 12v? Thanks Roberto
-
Hello, I have a Fibaro Smart Implant and was wondering if you can explain some strange behavior I'm seeing. I have binary sensors connected to IN1 and IN2, with this configuration: parameters 20 and 21 set to 0 (normally closed) parameters 150 and 151 set to 10 (100ms) parameters 152 and 153 set to 0 (no delay) The problem is, if I leave the contacts open for a period of time, the implant will report they are closed after exactly 1 hour (3600 seconds). I have tested multiple times with multiple implants. Thanks for your help, Ovidiu
-
Being completely new to Fibaro (just bought a HC3) but not to domotica and programming I am not able to find the info I need to do the following: Receive a http request from my Synology Surveillance Station telling HC3 that camera movement has occurred and then set a zone to breached and trigger an alarm. I was thinking of creating a QuickApp device of type binary sensor and turn that on with an http GET request from the surveillance station. This part works fine: when I send the request I can catch it in Quickapp:turnOn() Can see that by checking a debug message. But now.... How do I get this device to set the zone to breached? I've tried to test it in a scene, using state "Detected" but that doesn't react to the turnOn. The updateProperty("state", true) or updateProperty("state", "Detected") methods also didn't work. Big problem here is imo the lack of documentation (at least I can't find it) E.g. where can I find a list of properties and built-in methods of the QuickApp class? The page at https://manuals.fibaro.com/home-center-3-quick-apps/ certainly does not contain all these properties and methods, doesn't it? Can anyone point me in the right direction?
-

How to get FIBARO Notification/Alarm from the 3rd Software
cuong.mhome posted a question in Scenes and Interface
Dear All, We are writing a software to communication with FIBARO HC2, all function is ok but I don't know how to get HC2 notification and alarm. Thank you. This is to HC2 Information we want to get from our software.
-
Witam Zakupiłem syrene alarmowa neo coolcam. Potrzebuję pomocy. Podobno ma ona kilka mocy głośności i różne dźwięki. Tylko nie mam pojęcia jak się je ustawia - aktywuje. Chciałbym ją użyć do alarmów (pożar. Zalanie. Włamanie) jak i do sceny - gdy motion sensor przy drzwiach wejściowych wykryje ruch (powiadomienie że ktoś wchodzi do domu - krótki nie za głośny sygnał)
-
Hello Im looking for at faster way to arm/disarm my system from a widget. I know it´s possible with a scene-widget but then there is no requirement of a PIN (or fingerprint) which seems bad if a phone is dropped outside the house for some reason. Because of that I also don´t want to use GPS, which by the way doesn´t seem to work that great and what happens if the phone goes to batterysave-mode and turns off GPS? Also a battery drainer... I have lockcode on my phone but my wife is not keen on that (you need to have instant access to Instagram and Pinterest! ?) Lockcode one app itself makes it a hassle to control the home. Anyone has a smart solution to that? Right now there is at least 4 clicks (open app, open alarmpanel, click on icon, slide arm/disarm) and that is if you are at the home screen of the app, otherwise there is 5 clicks, not WF (wife friendly). A possibility to make a scene ask for a PIN would be great. Also a widget that shows the icon of a device (or a VD widget) that could show the status of the device (on=locked padlock icon / unlocked = unlocked padlock-icon), push notes is one way but will require one to actually controll the alarm to check status. There is a few things to implement in the Fibaro Apps to make it user friendly, now it´s something between geek-friendly and user-friendly, not anywhere near wife-friendly Burglary alarm (Caddx AC948) integrated with one Universal sensor and one Smart Implant, if I can get this wife friendly I might switch the AC948 to a Moxa PLC integration to connect all my sensors to the HC2.