Welcome to Smart Home Forum by FIBARO
Dear Guest,
as you can notice parts of Smart Home Forum by FIBARO is not available for you. You have to register in order to view all content and post in our community. Don't worry! Registration is a simple free process that requires minimal information for you to sign up. Become a part of of Smart Home Forum by FIBARO by creating an account.
As a member you can:
- Start new topics and reply to others
- Follow topics and users to get email updates
- Get your own profile page and make new friends
- Send personal messages
- ... and learn a lot about our system!
Regards,
Smart Home Forum by FIBARO Team
Search the Community
Showing results for tags 'mqtt'.
Found 11 results
-
Hi, I have a HC3L and using MQTT to control Smart Implant and Single Switch. If the network is disconnected or there is no data transmission in MQTT for a long time, the connection seems to be interrupted, but the MQTT client does not have a property to check if it is still connected. I currently put the reconnection on the onError and onClosed events to perform the reconnection. Below is my code... function QuickApp:onInit() self.mqtt = nil self.nowid = tostring(os.time()) self.CHT_device_id = self:getVariable("CHT_device_id") self.CHT_key = self:getVariable("CHT_key") self.devicesMapping = self:getDevicesMapping() self:establishMqttConnection() end function QuickApp:getDevicesMapping() local _map = { door_sensor = 88, door_switch = 93, switch_0001 = 24, switch_0002 = 30 } return _map end function QuickApp:establishMqttConnection() local options = {} local mqtt_server = self:getVariable("MQTT_SERVER") options = self:mqttParams() local mq = mqtt.Client.connect(mqtt_server, options) mq:addEventListener('connected', function(event) self:onConnected(event) end) mq:addEventListener('closed', function(event) self:onClosed(event) end) mq:addEventListener('message', function(event) self:onMessage(event) end) mq:addEventListener('error', function(event) self:onError(event) end) mq:addEventListener('subscribed', function(event) self:onSubscribed(event) end) mq:addEventListener('published', function(event) self:onPublished(event) end) self.mqtt = mq end function QuickApp:mqttParams() local tlsOptions = { allowUnauthorized = true, sessionPresent = true } local param = { username = self.CHT_key, password = self.CHT_key, cleanSession = true, keepAlivePeriod = 60, clientId = "HC3L1" .. tostring(os.time()), tls = {} } return param end function QuickApp:onConnected(event) self:debug("--- onConnected:", json.encode(event)) self:subscribe() end function QuickApp:onClosed(event) self:debug("--- onClosed:", json.encode(event)) -- To connect MQTT self:establishMqttConnection() end function QuickApp:onError(event) self:debug("--- onError:", event.code) if event.code > 0 then self:debug("DO DISCONNECT") self.mqtt:disconnect() end end function getErrorCodeMsg(param) local _map = { "Connection refused – incorrect protocol version", "Connection refused – invalid client identifier", "Connection refused – server unavailable", "Connection refused – bad username or password", "Connection refused – not authorised" } return _map[param] end function QuickApp:subscribe() self:debug("--- DO subscribe") local topic = "" topic = "/v1/device/" .. self.CHT_device_id .. "/sensor/+/command" self.mqtt:subscribe(topic, { qos = 0 }) self:debug("--- DO subscribe DONE") end function QuickApp:onSubscribed(event) self:debug("--- onSubscribed:", json.encode(event)) end function QuickApp:onMessage(event) self:debug("--- onMessage:", json.encode(event)) local payload = json.decode(event.payload) local CHT_sensor_id = payload.id local CHT_device_id = payload.deviceId local cmd = payload.cmd local hc3_device_id = self.devicesMapping[CHT_sensor_id] if hc3_device_id then local device_cmd = self:getDeviceCmd(hc3_device_id, cmd) if device_cmd then fibaro.call(hc3_device_id, device_cmd) end else self:error("Received payload id `" .. CHT_sensor_id "` not found") end end function QuickApp:publishDeviceSensorData(sensor_id, value) local topic = "/v1/device/" .. self.CHT_device_id .. "/rawdata" local payload = { { id = sensor_id, value = {value} } } self.mqtt:publish(topic, json.encode(payload)) end function QuickApp:onPublished(event) -- print("onPublished:", json.encode(event)) self:debug("--- onPublished:", json.encode(event)) end function getVar(deviceID, varName) for _,v in ipairs(api.get("/devices/"..deviceID).properties.quickAppVariables) do if v.name==varName then return v.value end end return nil end function QuickApp:getDeviceCmd(deviceID, cmd) self:debug("---- getDevice: ", deviceID) local data = api.get("/devices/"..deviceID) if data then self:debug("---- getDevice: ", data.type) if data.type == "com.fibaro.doorLock" then if cmd == "open" then return "unsecure" elseif cmd == "close" then return "secure" else self:error("Method `" .. cmd .. "` on device id `" .. deviceID .. "` not implemented.") end elseif data.type == "com.fibaro.binarySwitch" then if cmd == "open" then return "turnOn" elseif cmd == "close" then return "turnOff" else self:error("Method `" .. cmd .. "` on device id `" .. deviceID .. "` not implemented.") end else self:error("Type `" .. data.type .. "` of device id `" .. deviceID .. "` not defined.") end end return nil -- return "" as self:getVariable... end Are there other options for reconnecting? Andy Chiang
-
 I had a few problems to get it right and maybe this post helps others to NOT make so many mistakes than I did I am running the currently latest Dietpi Version 7.3.x Installing MQTT Broker: "Mosquitto" log on to your dietpi via ssh. run: pyhon3 -V result : Python 3.7.x Should be somewhere @ 3.7.x or higher Install software via "dietpi-software" - search for: "pip" - should find package n#130 "influx" - should find package n#74 = InfluxDB "mosquitto" - should find package n#123 Important: I also installed "paho-mqtt" via: sudo pip3 install paho-mqtt # if you forget this step - like I did first - the listener will not publish to the MQTT Broker but still works!! WITHOUT any ERROR message # You will only notice that the when you run listen.py from the command prompt that the line: # "publishing to" will be missing # It took me a while to figure this out Next I changed the "mosquitto.conf" file located in /etc/mosquitto I installed Midnight Commander via dietpi-software and started "mc" from here Then opened "mosquitto.conf" for editing via "Edit F4" and added a line: allow_anonymous true # obviously to allow connection without user & password and changed the listener line to: listener 1833 0.0.0.0 #otherwise mosquitto starts in "local ONLY"mode I then restarted the mosquitto server: systemctrl restart mosquitt.service and checked systemctrl status mosquitto service I then changed directory to: cd /usr/local/bin/ Create a new text file via: touch listen.py - or by any other means Then go to: https://github.com/vinceskahan/weatherflow-udp-listener click on "listen.py" and then on "raw" "ctrl-a" > ctrl-c" - copy I then started "mc" and opened "listen.py" for editing and pasted the content from the above via "shift-ctrl-v" then quit via F10 and save the file. Then I started: python3 /usr/local/bin/listen.py -b 127.0.0.1 -m -d This should produce some output like: rapid_wind => ts = 1624942363 mps = 2.07 dir = 131 publishing to mqtt://127.0.0.1/wf/rapid_wind I then edited the dietpi "custom.sh" file @ /var/lib/dietpi-autostart/ and added the line nohup python3 /usr/local/bin/listen.py -b 127.0.0.1 -m I then run dietpi-config and changed Autostart options to n#14: Custom This should start the listener.py automatically after a reboot. NI then checked that the MQTT Broker "mosquitto" is running and reachable! I use "MQTT Explorer" which is free and available for all major plattforms: Can be found here: http://mqtt-explorer.com/ Install on any machine on your network. When you are connected to your MQTT server you should find the topi "wf" and now all should be good to go and run the QuickApp You might also want to publish to InfluxDB for later use with grafana or so by adding the options to the listen.py command line. for options look at: https://github.com/vinceskahan/weatherflow-udp-listener ....and last but not least again thanks to: vinceskahan for the brilliant "listener" -- THANKS afendikov for providing the QuickApp -- THANKS and Bodyart @ for providing an alternate way of reading out the WeatherFlow data ..and of course anybody else I might have forgotten to mention here. THANK you very much Cheers Jürgen PS: Please report if you spot anything wrong here!
-
- 1
-

-
- mqtt
- udp listener
- (and 4 more)
-

HC3 - Sonoff Tasmota temperature sensor via MQTT
Max Cerny posted a question in Other Devices / Third-party devices
Hello, I have Sonoff temperature/humidity sensor flashed with Tasmota. I'm able to pull temperature into HC3 quickapp variable using MQTT broker. The problem is, that I can not use that temperature in the HC3's Climate zone as reference temperature sensor for my zone (i can choose only from zwave devices). Is there any solution for that? Thank you Max -
Hi there! I am messing around with MQTT for integration with a third party device (Logic Machine 5) that has MQTT broker built in. I have successefully connected a QA with MQTT and it commands a KNX group address just fine. But, when I add a different QA to control another group address, subscibing a different topic of course, it behaves a bit strange. When I edit the QA (I endup triggering it's OnInit function) it is normal and keeps working on the home menu but, the other QA I created before stops working. Then, if I go to edit the other QA (OnInit debug message comes in the console), this one takes the place of the previous QA, starts to work, but then the previous QA that was working stops responding. I see a pattern here, that tells me the OnInit function of each device is not called at system startup (I rebooted to check). Wouldn't it be best to create a scene at startup that could subscribe all the topics at the broker? About that... is there anyone that can tell me how to use MQTT on scenes, instead of only on QA's? Thanks in advance!
-
I would like to have an MQTT Broker implemented on the HC2. This would enable the HC2 to easily access latest sensor data from other access clients like displays or apps.
-
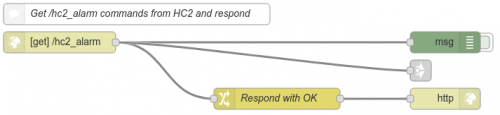
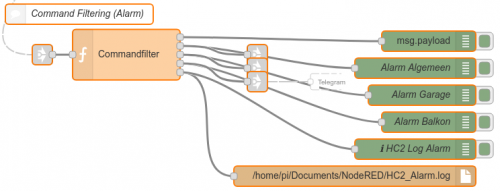
 Hi to you all! Maybe you know that I'm a critical HC2 user since 2013. In short, as I mention here I was feeling the Fibaro was holding me back in possibilities, privacy and security. So I started to investigate to get more control over what I think was important to me. I said I would abandon the HC2. The good news, I will not (for now). After extensive testing and trying to find a proper configuration, I found a way to implement the HC2, demanding my needs and wishes concerning: Security Privacy Possibilities Time to spend (re-configuring 200+ devices, 50 scenes and 30 Virtual Devices) The solution I'm implementing is a Raspberry Pi 3 with Node-Red for all communications from the HC2. In short, this means using the HC2 solely as a Z-wave controller and automation gateway. Setup: - The Node-Red will receive commands from the HC2 by an encrypted (https) and password protected connection. At this point it's still one way by sending from the HC2 to Node-Red. - The HC2 is (will be) blocked from internet access. Internet access to the HC2 will be done by VPN. - All other domotica devices are on a separate subnet (VLAN). - All messages (email/push/Telegram) is processed by Node-Red. (disabling all Fibaro 'services'). Example: An alarm is breached: - HC2 will send a message by https to Node-Red. - Node-Red sends IP-Camera snapshots to own email-server, push-account or private Telegram-bot. - Node-Red will check my Ubiquiti manage-switch to check if someone is at home (Mobile phone present in LAN) at will send result to push or Telegram. For sending data to Node-Red a scene is used with content of 5 Global Variable, triggered by one: SC_Nred_VarName (Name variable to send. used as trigger, must be written as last) SC_Nred_VarVal (Value to send) SC_Nred_VarType (not used yet, could be used for sending the type of value, like string, date, time etc.) SC_Nred_VarLog (data for storing data in Node-Red logfiles) SC_Nred_VarPath (path to the Node-Red http-receive-node, default /hc2) The scene code (Beta code 20170526): --[[ %% properties %% events %% globals SC_Nred_VarName --]] -- -- Initialisation of user settings (change if necessary) -- -- Global variables (has to be added manually in HC2 variables panel) local globVarName = 'SC_Nred_VarName'; -- Name of global variable to send (trigger!) local globVarValue = 'SC_Nred_VarVal'; -- Value of global variable to send local globVarType = 'SC_Nred_VarType'; -- Type of global variable to send local globVarLog = 'SC_Nred_VarLog'; -- Logmessage to send local globVarPath = 'SC_Nred_VarPath'; -- Node-Red http-node path to interact with -- Node-Red server connections credentials local nredIp = '192.168.x.x'; -- Node-RED server IP-address local nredPort = 1880; -- Node-Red server port number local nredUser = 'HC2'; -- Node-Red user used to change variables local nredPass = 'XXXXXXXXXXXXXXXX'; -- Node-Red password of used user -- Node-Red server credentials options: true = Enable, false = Disable local nredUseLogin = false; -- TODO!! Option to use user/password login (default = false) local nredUseSecure = true; -- Option to use secure https connections (default = true) -- Node-Red http-node settings local nredPathDefault = 'hc2'; -- Default Node-Red http-node path to interact with local nredVarName = 'name'; -- Node-Red http-node option for variable name local nredVarValue = 'value'; -- Node-Red http-node option for variable value local nredVarType = 'type'; -- Node-Red http-node option for variable type local nredVarLog = 'log'; -- Node-Red http-node option for variable log -- Debug options: true = Enable (default), false = Disable local debug = true; -- -- Funtions (do not change) -- -- Debug and Log local function log(str) if debug then fibaro:debug('<font color="yellow">'..str..'</font>'); end; end local function errorlog(str) fibaro:debug('<font color="red">'..str..'</font>'); end -- -- Code (do not change) -- -- Prevents the scene from running when command is 0 if (tonumber(fibaro:getGlobalValue(globVarName)) == 0) then fibaro:abort(); end -- Get variable content from global variable and convert to usable values -- Name value content local nredName = fibaro:getGlobalValue(globVarName); local nredName = string.gsub(nredName,'%s','%%20'); -- Replace <space> with %20 local nredName = string.gsub((nredName),'?','%%3F'); -- Replace ? with %3F --local nredName = string.gsub((nredName),'%','%%25'); -- TODO! Replace % with %25 -- Value content local nredValue = fibaro:getGlobalValue(globVarValue); local nredValue = string.gsub((nredValue), '%s', '%%20'); -- Replace <space> with %20 local nredValue = string.gsub((nredValue),'?','%%3F'); -- Replace ? with %3F --local nredValue = string.gsub((nredValue),'%','%%25'); -- TODO! Replace % with %25 -- Type value content local nredType = fibaro:getGlobalValue(globVarType); local nredType = string.gsub((nredType), '%s', '%%20'); -- Replace <space> with %20 local nredType = string.gsub((nredType),'?','%%3F'); -- Replace ? with %3F --local nredType = string.gsub((nredType),'%','%%25'); -- TODO! Replace % with %25 -- Log value content local nredLog = fibaro:getGlobalValue(globVarLog); local nredLogIsChanged = ''; if nredLog == '' or nredLog == nil then nredLogIsChanged = ' is changed to'; nredLog = os.date("%d/%m/%Y %X ")..': '..nredName..' --> '..nredValue; end if debug then fibaro:debug('Logcontent'..nredLogIsChanged..': '..nredLog) end; local nredLog = string.gsub((nredLog), '%s', '%%20'); -- Replace <space> with %20 local nredLog = string.gsub((nredLog),'?','%%3F'); -- Replace ? with %3F -- Node-Red http-node path value local nredPath = fibaro:getGlobalValue(globVarPath); if debug then fibaro:debug('Node-RED Path: '..nredPath) end; if nredPath == '' or nredPath == nil then nredPath = nredPathDefault; end local nredPath = string.gsub((nredPath), '%s', '%%20'); -- Replace <space> with %20 local nredPath = string.gsub((nredPath),'?','%%3F'); -- Replace ? with %3F -- Construct API URL if nredUseSecure then urlPre = 'https'; else urlPre = 'http'; end local apiURL = urlPre..'://'..nredIp..':'..nredPort..'/'..tostring(nredPath)..'?'..tostring(nredVarName)..'='..tostring(nredName)..'&'..tostring(nredVarValue)..'='..tostring(nredValue)..'&'..tostring(nredVarType)..'='..tostring(nredType)..'&'..tostring(nredVarLog)..'='..tostring(nredLog); if debug then log(apiURL) end; -- Initialisation of communication to Node-Red local selfHttp = net.HTTPClient(); -- Sending HTTP apiURL selfHttp:request(apiURL, { options={ headers = selfHttp.controlHeaders, data = requestBody, method = 'GET', timeout = 5000 }, success = function(status) local result = json.decode(status.data); if result.status == 'OK' then if debug then log('<font color="green">Respond is OK</font>') end; else errorlog('failed'); if debug then log(status.data) end; end end, error = function(error) errorlog("ERROR"); if debug then log(error) end; end }) -- Reset the global command variable to 0 and empty all other global variables fibaro:setGlobal(globVarValue, ''); fibaro:setGlobal(globVarType, ''); fibaro:setGlobal(globVarLog, ''); fibaro:setGlobal(globVarPath, ''); fibaro:setGlobal(globVarName, '0'); -- Trigger variable, write as last To actually send data, a Virtual Device can be used with buttons to write values to the proper global variables. For example (when balcony security is breached, VD report-label name = RedNodeAlarmLabel): -- -- Initialisation of user settings (change if necessary) -- -- Global variables (has to be present in HC2 variables panel) local globVarName = 'SC_Nred_VarName'; -- Global variable used for Node-RED variable name local globVarValue = 'SC_Nred_VarVal'; -- Global variable used for Node-Red variable value local globVarType = 'SC_Nred_VarType'; -- Global variable used for Node-Red variable type local globVarLog = 'SC_Nred_VarLog'; -- Global variable used for Node-Red variable Log (String) local globVarPath = 'SC_Nred_VarPath'; -- Node-Red http-node path to interact with -- Symbol and text table local symbolTable = { -- Symbols to show in this VD buttonIcon = 'Balcony', -- Symbol representing activating this button (for VD Label) buttonText = 'Alarm', -- Text representing activating this button (for external log) timeLastRun = 'Time: ' -- Symbol representing time of last run } -- Node-Red http-node values to send local sendName = 'HC2_Alarm_Balcony'; -- Node-Red variable name to use local sendValue = 'Balcony'; -- Node-Red variable value to use local sendType = '2'; -- Node-Red variable type to use -- Types: 0 = Integer, e.g. -1, 1, 0, 2, 10 -- 1 = Float, e.g. -1.1, 1.2, 3.1 -- 2 = String -- 3 = Date in format DD/MM/YYYY -- 4 = Time in 24 hr format HH:MM -- 5 = DateTime (but the format is not checked) local sendLog = tostring(symbolTable.buttonText.. os.date(" %d/%m/%Y %X ")..symbolTable.buttonText..' --> '..sendValue); local sendPath = 'hc2_alarm'; -- Debug options local debug = true; -- Enable (default, true) or disable (false) general debug output local debugCommands = true; -- Enable (true) or disable (false, default) debug output of command sending to Homey -- ------------------------------------------------------------------------------------------ -- Initialisation of code (do not change unless you know what you are doing!) -- ------------------------------------------------------------------------------------------ local selfId = fibaro:getSelfId(); local selfLabel = 'RedNodeAlarmLabel'; local function debugLog(_logString, _logStringColor, _logValue, _logValueColor) fibaro:debug('<span style="color:'.._logStringColor..'"> '..tostring(_logString)..' </span><span style="color:'.._logValueColor..'"> '..tostring(_logValue)..'</span>'); end -- ------------------------------------------------------------------------------------------ -- Code (do not change) -- ------------------------------------------------------------------------------------------ -- store values (store scene-trigger as the last) fibaro:setGlobal(globVarValue, sendValue); fibaro:setGlobal(globVarType, sendType); fibaro:setGlobal(globVarLog, sendLog); fibaro:setGlobal(globVarPath, sendPath); fibaro:setGlobal(globVarName, sendName); -- Scene-trigger fibaro:call(selfId, "setProperty", "ui."..selfLabel..".value", symbolTable.buttonIcon..' '..symbolTable.timeLastRun.. os.date(" %d/%m/%Y %X ")); fibaro:log(symbolTable.buttonIcon); if debugCommands then debugLog(symbolTable.buttonIcon..' '..symbolTable.timeLastRun.. os.date(" %d/%m/%Y %X. "), 'orange', 'Variable name: '..sendName..', type: '..sendType..', value: '..sendValue, 'yellow') end; Node-Red Nodes examples: Receiving data and respond with 'OK' Processing content of received values: Example Commandfilter code with 5 outputs: var input = { payload: msg.payload }; // Output 1 (msg.payload) var hc2AlarmAlgemeen; // Output 2 (HC2_Alarm_Generic) var hc2AlarmGarage; // Output 3 (HC2_Alarm_Garage) var hc2AlarmBalkon; // Output 4 (HC2_Alarm_Balcony) var add2Log; // Output 5 (add2Log) // --> Output 1 (msg.payload) // Content of payload: // Name: msg.payload.name // Value: msg.payload.value // Type: msg.payload.type // Log: msg.payload.log // --> Output 2 (HC2_Alarm Generic) if (msg.payload.name === "HC2_Alarm_Generic") { hc2AlarmAlgemeen = { payload: msg.payload.value }; add2Log = { payload: msg.payload.log }; } // --> Output 3 (HC2_Alarm Garage) if (msg.payload.name === "HC2_Alarm_Garage") { hc2AlarmGarage = { payload: msg.payload.value }; add2Log = { payload: msg.payload.log }; } // --> Output 4 (HC2_Alarm Balcony) if (msg.payload.name === "HC2_Alarm_Balcony") { hc2AlarmBalkon = { payload: msg.payload.value }; add2Log = { payload: msg.payload.log }; } // Set to proper outputs return [ input, hc2AlarmGeneric, hc2AlarmGarage, hc2AlarmBalcony, add2Log ]; How to get snapshots from IP-camera and send to Telegram: https://github.com/guidone/node-red-contrib-chatbot/wiki/Examples Updates, changes and additional info: 20170527 Setup Raspberry Pi with Node-Red Short Guide 20171017 Setup Raspberry Pi with MQTT (Mosquitto) Short Guide Beware, this is not out-of-a-box solution. Just want to share this example because the possibilities are huge! Greetings, Lambik
-
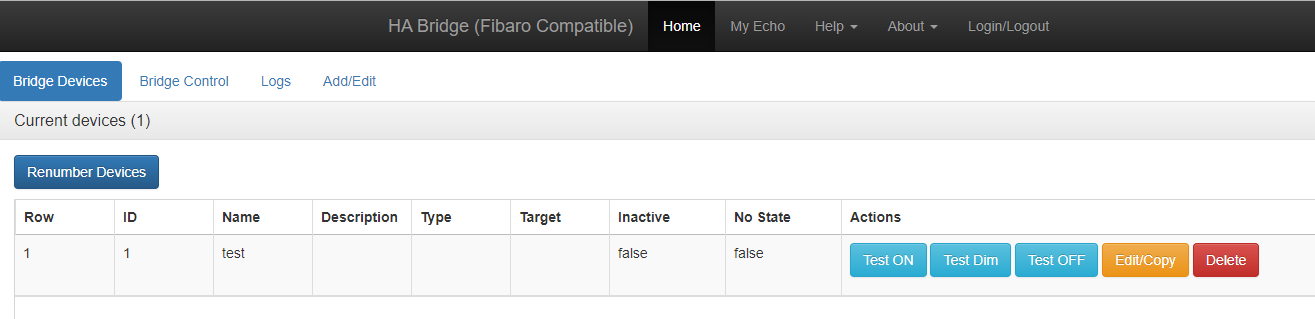
The genesis of this post was a desire to try and simplify the third party programs (mainly sonos http api, HA bridge & NUT UPS monitor) that I have running on a few Raspberry PI devices. The Goal - Get them all onto one Pi device, move from SD to USB booting and overall make it easier to manage, especially in the case of a crash (ie have a spare usb stick) I currently don't use NodeRed or MQTT but decided to include them as well to see if I could get them all working on a Pi3 I ended up with the following running on a Pi3 from a Sandisk 16gb Cruzer USB memory stick sonos-http-api - https://github.com/jishi/node-sonos-http-api HA bridge - https://github.com/bwssytems/ha-bridge NUT UPS Server - https://networkupstools.org/ NodeRed - https://nodered.org/ Mosquitto MQTT (broker and client) - https://mosquitto.org/ The results can be accessed at Sonos API - http://192.168.1.240:5005/Livingroom/state HA Bridge - http://192.168.1.240/#!/ NodeRed - http://192.168.1.240:1880/ MQTT pub and sub available at 192.168.1.240 NUT UPS service listener at 192.168.1.240:3493 Preface: The following steps worked for me and I referenced some of web pages I used but not all. I use Windows and I don't know the MAC equivalents. My purpose for posting is to document what I did and hopefully this may help some users get started. It is not meant to be a foolproof guide that will work for all. You may come across some issues I never encountered and your best friend is google for resolving those ...af ===== Installing Raspbian Buster Download the zip from https://www.raspberrypi.org/downloads/ Use an application such as Win32DiskImager and a card reader to burn image onto SD Card (or Flash drive) Before removing the SD card from the Card Reader use File explorer to view the content of the SD Card Place a file called SSH (no file extension) into the root folder of the SD Card. This will allow you SSH into the Pi and use it headless Place SD Card into Pi, connect Ethenet and apply power Use Advanced Port Scanner (PC) or Fing (mobile) to find the IP address of the PI Use Putty to SSH into the PI (enter IP address and port 22) Login into Pi Username - pi password - raspberry You can change the password if you like Booting from SD card and then from the USB Flash Drive If you have a Pi3 you can get your Pi to boot from a Flash Drive/Memory Stick. It is documented below but in summary thisisi what you do Initially burn a standard raspbian image on an SD card. You then boot up the Pi using the SD card and run some commands over SSH. This tells the Pi to boot from USB first the next time Burn a standard raspbian image onto a Flash Drive. Remove the SD card and insert the Flash Drive and power on. It can take 20-30 second to boot and get a SSH connection so be patient. Don't forget to add the SH file (no extension) in the root of both the SD Card and Flash Drive/Memory as described above to enable SSH access from each to the Pi Boot up the PI with the SD card and a standard Raspbian Buster Image SSH in the Pi Enter the following commands (one per line) sudo apt-get update && sudo apt-get upgrade echo program_usb_boot_mode=1 | sudo tee -a /boot/config.txt vcgencmd otp_dump | grep 17: The last command should give a result like 17:3020000a If not then repeat the above steps Power off pi Remove the SD Card and insert the Flash Drive/Memory Stick into one USB port Add power and ethernet and let it boot (It can take up to 30 seconds to boot up) SSH in as normal and confirm you can log in Use an application like WnSCP if you want to get file access to the card/flash drive while it is running on the Pi References: htps://www.raspberrypi.org/documentation/hardware/raspberrypi/bootmodes/msd.md ====== Install NODE.JS & NPM I use Node.js v8 here as there appears to be a conflict between v10 and npm where npm doesn't work correctly. Npm is included in the Node v8 release below Clone/Copy the zip the Pi wget https://nodejs.org/dist/latest-v8.x/node-v8.16.1-linux-armv7l.tar.gz Extract & Install tar -xzf node-v8.16.1-linux-armv7l.tar.gz reboot Pi using sudo reboot Use following commands to verify install node -v npm -v ====== Sonos http api Install Clone http api files to PI sudo git clone https://github.com/jishi/node-sonos-http-api.git List folder contents and change to http-api folder and install the api (enter each one seperately) ls cd node-sonos-http-api sudo npm install --production Start the API Service sudo npm start You should see references to sonos rooms, etc Now open a browser and assuming your sonos zone/room name is Kitchen you can confirm that the api is working by entering the following http://IP of Pi:5005/kitchen/state For me it is http://192.168.1.240:5005/kitchen/state You should see something like {"volume":13,"mute":false,"equalizer":{"bass":7,"treble":9,"loudness":true},"currentTrack":{"artist":"Cork's 96fm","title":"x-sonosapi-stream:s15078?sid=254","albumArtUri":"/getaa?s=1&u=x-sonosapi-stream%3as15078%3fsid%3d254","duration":0,"uri":"x-sonosapi-stream:s15078?sid=254","trackUri":"x-sonosapi-stream:s15078?sid=254","type":"radio","stationName":"Cork's 96fm","absoluteAlbumArtUri":"http://192.168.1.63:1400/getaa?s=1&u=x-sonosapi-stream%3as15078%3fsid%3d254"},"nextTrack":{"artist":"","title":"","album":"","albumArtUri":"","duration":0,"uri":""},"trackNo":1,"elapsedTime":25197,"elapsedTimeFormatted":"06:59:57","playbackState":"PLAYING","playMode":{"repeat":"none","shuffle":false,"crossfade":false}} Get API service to start automatically when Pi powers up INSTALL PM2 Reboot Pi (sudo reboot) and enter each command separately when it boots npm install -g pm2 pm2 startup raspberry or pm2 startup (if error encountered) sudo env PATH=$PATH:/usr/local/bin pm2 startup raspberry -u pi cd node-sonos-http-api sudo pm2 start server.js -x --name "http-api" pm2 dump Reboot Pi (sudo reboot ) and confirm service starts automatically by using browser commands above FOR TextToSpeech function of the Sonos API Change folder cd node-sonos-http-api Edit the settings.json file sudo nano settings.json Amend as you need - I use AWS Polly and these are my settings { "aws": { "credentials": { "region": "eu-west-1", "accessKeyId": "XXXXXXXXXXXXXXXXXXXXX", "secretAccessKey": "XXXXXXXXXXXXXXXXXXXXXXXXXXXXXXXXXXXXX" }, "name": "Emma" } } Reboot Pi (sudo reboot) and confirm with the SAY command to one of your zones Ref: https://github.com/jishi/node-sonos-http-api ====== HA Bridge Install Install Java8 sudo apt install openjdk-8-jdk openjdk-8-jre Let finish and verify using following command to display version java -version Install HA Bridge sw (enter each command separately) mkdir ha-bridge cd ha-bridge wget https://github.com/bwssytems/ha-bridge/releases/download/v5.3.0/ha-bridge-5.3.0.jar Create the service file Change directory and edit/create the ha-bridge.service file cd /etc/systemd/system sudo nano ha-bridge.service Copy the following into the ha-bridge.service file [Unit] Description=HA Bridge Wants=network.target After=network.target [Service] Type=simple WorkingDirectory=/home/pi/ha-bridge ExecStart=/usr/bin/java -jar -Dconfig.file=/home/pi/ha-bridge/data/habridge.config /home/pi/ha-bridge/ha-bridge-5.3.0.jar [Install] WantedBy=multi-user.target Save the file in the editor by hitting CTL-X and then saying Y to update and save. Reload the system control config: sudo systemctl daemon-reload To start the bridge: sudo systemctl start ha-bridge.service To start the service at boot, use the enable command: sudo systemctl enable ha-bridge.service Open browser and access HA Bridge GUI at http://Ip of Pi/ Configure as required Note: If you have an instance running and want to migrate you will need to copy the habridge.config and device.db files to the new Pi There are some guidelines here for that but I haven't tried them - https://github.com/bwssytems/ha-bridge/issues/353 Ref: https://github.com/bwssytems/ha-bridge & others ====== Network Utility Tools Install For UPS devices connected over USB Update some pi network references sudo nano /etc/dhcpcd.conf Scroll to bottom and add this text (Change the static address to be that of your Pi) interface eth0 static ip_address=192.168.1.240/24 static routers=192.168.1.1 static domain_name_servers=192.168.1.1 Save the file in the editor by hitting CTL-X and then saying Y to update and save. Now hook up the UPS to the RPi using the USB cable and reboot the RPi. (sudo reboot) Install NUT sudo apt install nut Confirm any questions with Y reboot (sudo reboot) Display USB interfaces to ensure that UPS is visible lsusb you should see something similar to this Bus 001 Device 005: ID 0781:5567 SanDisk Corp. Cruzer Blade Bus 001 Device 004: ID 0463:ffff MGE UPS Systems UPS Bus 001 Device 003: ID 0424:ec00 Standard Microsystems Corp. SMSC9512/9514 Fast Ethernet Adapter Bus 001 Device 002: ID 0424:9514 Standard Microsystems Corp. SMC9514 Hub Bus 001 Device 001: ID 1d6b:0002 Linux Foundation 2.0 root hub Note: You can see both the USB Drive (Cruzer) and the UPS System (MGE Systems) Configure NUT sudo nano /etc/nut/ups.conf Add this to the bottom of the file [ups] driver = usbhid-ups port = auto desc = "UPS model or description" remove the MaxRetry = 3 entry Review https://networkupstools.org/stable-hcl.html to change usbhid-ups above if required to match your UPS driver Save the file in the editor by hitting CTL-X and then saying Y to update and save. Test the UPS driver by running: sudo upsdrvctl start You may see something similar to the following Network UPS Tools - UPS driver controller 2.7.4 Network UPS Tools - Generic HID driver 0.41 (2.7.4) USB communication driver 0.33 No matching HID UPS found Driver failed to start (exit status=1) Network UPS Tools - Generic HID driver 0.41 (2.7.4) USB communication driver 0.33 No matching HID UPS found Driver failed to start (exit status=1) Network UPS Tools - Generic HID driver 0.41 (2.7.4) USB communication driver 0.33 Using subdriver: MGE HID 1.39 Configure Upsmon and upsd Edit the upsd.conf file sudo nano /etc/nut/upsd.conf Scroll down to the LISTEN part and uncomment the LISTEN directive for localhost (127.0.0.1) and add another LISTEN directive for the static IP we assigned to the RPi earlier. You should end up with LISTEN 127.0.0.1 3493 LISTEN 192.168.0.13 3493 Edit the upsd.users file sudo nano /etc/nut/upsd.users Add the following to the bottom [admin] password = passwd2 actions = SET instcmds = ALL [upsmon_local] password = passwd2 upsmon master [upsmon_remote] password = passwd2 upsmon slave Edit /etc/nut/upsmon.conf and add the UPS to be monitored and user credentials for upsd in the MONITOR section: sudo nano /etc/nut/upsmon.conf Add the following to the MONITOR section MONITOR ups@localhost 1 upsmon_local passwd2 master Edit /etc/nut/nut.conf and set the value for MODE equal to 'netserver' without any spaces before and after the = sign: sudo nano /etc/nut/nut.conf Add the following to the bottom of the file MODE=netserver save and close file. Reboot Pi (sudo reboot) I then created a service as the service doesn't always start by itself. The issue is referenced here - https://github.com/networkupstools/nut/issues/277 I used a py script and there are other ways. Edit/Create the py script file from the home directory) sudo nano ups.py Add the following to the file import os os.system('sleep 30 ; sudo /etc/init.d/nut-server stop ; sleep 5 ; sudo /etc/init.d/nut-server start') Use systemd to run at start up by creating a service Create/edit the service file sudo nano /etc/systemd/system/ups.service Add the following to the file [Unit] Description=My service After=network.target [Service] ExecStart=python /home/pi/ups.py StandardOutput=inherit StandardError=inherit User=pi [Install] WantedBy=multi-user.target CTRL-X and Y to exit Change to systemd Directory cd /etc/systemd/system Reload the services sudo systemctl daemon-reload Start service by .. sudo systemctl start ups.service Enable to run at boot sudo systemctl enable ups.service Ref : https://www.reddit.com/r/homelab/comments/5ssb5h/ups_server_on_raspberry_pi/ ====== Install Mosquitto MQTT Broker and Client Retrieve and add the key (enter each command separately) wget http://repo.mosquitto.org/debian/mosquitto-repo.gpg.key sudo apt-key add mosquitto-repo.gpg.key Then make the repository available to apt Change folder cd /etc/apt/sources.list.d/ Enter the following to get the list for raspbian buster sudo wget http://repo.mosquitto.org/debian/mosquitto-buster.list Update the source list sudo apt-get update This installs the mosquitto broker sudo apt-get install mosquitto This installs mqtt mosquitto client sudo apt-get install mosquitto-clients Testing MQTT Open tow SSH sessions to the Pi (call one putty1 and the second putty2). Log into both In putty1 session type the command with the topic name armtronix_mqtt (just used for testing) mosquitto_sub -d -t armtronix_mqtt This will subscribe Pi to MQTT broker(which is runs on Pi) handling MQTT armtronix_mqtt. In putty2 session type the following command with the same topic i.e armtronix_mqtt mosquitto_pub -d -t armtronix_mqtt -m “Hello” Now come to the window putty1, image 1 here you will be able to see the message "Hello" Ref: https://www.instructables.com/id/Installing-MQTT-BrokerMosquitto-on-Raspberry-Pi/ ====== Install Node RED I'm installing just NodeRed and not NodeJs/NPM as I don't want NodeJs version to be upgraded to the latest v10 Install Nodered sudo npm install -g --unsafe -perm node-red test by starting start with node-red-pi --max-old-space-size=256 Now we need to create a service to get it to start on reboot Create/Edit file sudo nano /etc/systemd/system/nodered.service Add the following to the service file [Unit] Description=My service After=network.target [Service] ExecStart=/usr/bin/env node-red-pi --max-old-space-size=128 -v StandardOutput=inherit StandardError=inherit User=pi [Install] WantedBy=multi-user.target CTRL-X and Y to exit Ensure that the service runs at boot up using systemd Change folder cd /etc/systemd/system reload the services sudo systemctl daemon-reload Start service by .. sudo systemctl start nodered.service Enable to run at boot sudo systemctl enable nodered.service Access NodeRed UI at http://ip of Pi:1880/ Ref http://pdacontrolen.com/installation-node-red-platfor/ & https://nodered.org/docs/getting-started/raspberrypi ====== Optional ... Save the Flash Drive image to your PC to reburn later or create copies for fast swap out if you need to Use something like Win23DiskImager to do this. ... Enjoy !!


-
Witam, Oto opis sytuacji: mam czujnik temperatury, wilgotności, ruchu oraz natężenia światła. Całość działa pod kodowaniem arduino. Informacje z czujki są wysyłane do serwera mqtt (CloudMQTT). Wygląda to tak na serwerze mqtt: sensornode_2{"state":"OFF","color":{"r":255,"g":255,"b":255},"brightness":255,"humidity":"45.90","motion":"standby","ldr":"903","temperature":"31.40","heatIndex":"26.40"} sensornode_1{"state":"OFF","color":{"r":255,"g":255,"b":255},"brightness":255,"humidity":"48.80","motion":"standby","ldr":"816","temperature":"31.10","heatIndex":"26.20"} Czy da się to przenieść na HC2 jako VD ?? Będę wdzięczny za pomoc.
-
Hi2Uall! I configured a (working) Raspberry Pi 3 Raspbian with Node-Red and MQTT (see this excellent YouTube video for explanation). Now on working, and learning (a lot) how to implement this. So far it is very useful to connect several IoT services. Did anyone have an idea how to connect the HC2 to an MQTT server?
-

MQTT to RESTAPI convertor - wanted
AutoFrank posted a question in Other Devices / Third-party devices
Hi, I have mastervolt PV panels that have a cloud monitor with a public api The only issue is that the api is MQTT Does anybody know if a MQTT to RESTAPI exists that may run on a pi or other similar platform Thanks -f -
Hi, My PV panel install from MasterVolt has a MQTT API Details here - IntelliWeb MQTT API spec does anybody know if it is possible access data from this api using vd or scene ? Thanks f