Welcome to Smart Home Forum by FIBARO
Dear Guest,
as you can notice parts of Smart Home Forum by FIBARO is not available for you. You have to register in order to view all content and post in our community. Don't worry! Registration is a simple free process that requires minimal information for you to sign up. Become a part of of Smart Home Forum by FIBARO by creating an account.
As a member you can:
- Start new topics and reply to others
- Follow topics and users to get email updates
- Get your own profile page and make new friends
- Send personal messages
- ... and learn a lot about our system!
Regards,
Smart Home Forum by FIBARO Team
Search the Community
Showing results for tags 'newbie'.
Found 9 results
-
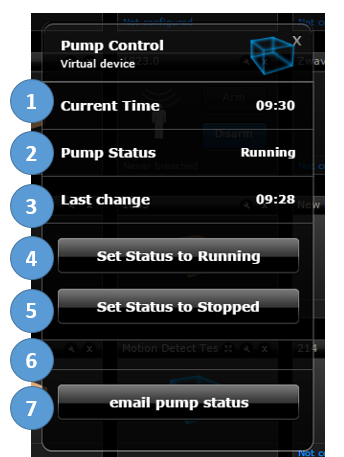
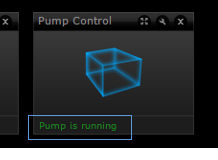
Hi, I know that when I started working with the HC2 I struggled with some of the simpler stuff. In some case it was down to a lack of understanding of the concepts rather than the code. I decided to put together this Virtual Devices 101 for new people starting out. I put some of this together to answer a few posts but decided to bring it into one post here to make it easier for newer users to find, I am starting from the basics and if anybody has ideas on how to make it better please let me know Some Virtual device basics LABELS - enable the user to display a title and a value. A label with no value entered can act as a divider BUTTONS - enable a user to execute an action, button can be manually pressed or through code. A VD can press one of its own buttons MAIN LOOP - Code here runs continuously in a loop - you can add fibaro:sleep code to slow down how fast the main loop code executes. Variables that are defined in the MAIN LOOP cannot be reused in the buttons. Seperate declarations are required DEBUG - option on Main loop or Button to what is being echo'd back as it executes The easiest way to understand virtual devices is to take apart a very simple one and understand the various parts I've attached a very simple VD. This will run on any HC2 after you have created the following two variables (Panels, Variables) Use the Add button but NOT the save button that is part of the right side vertical menu (as this may corrupt some of your other variable values) Go to "Add New Device" and import the VD (Pump Control) attached to this post. It's a very simple VD that interacts with the two variables you just created. (I don't expect the VD to be any use in real life but hopefully acts as a good learning tool. Press the appropriate set Status buttons to adjust the status displayed and also updates the Last change time to current time that indicates when somebody last changed the status. Send email send the current status and when this status was set I'll step through each part Current Time - label that display the current time from a local variable Pump Status - label that takes the value of a global variable and display appropriate text (1 = Runnnig, 0 = Stopped) Last Change - label that displays the value of a global variable. This global variable is whenever the status is adjusted by the following two buttons (#4, #5) Set Status to Running - Button that adjust a global variable to 1 value of 1. This also updates the global variable that holds the Last Change time to the current time. Set Status to Stopped - Button that adjust a global variable to 1 value of 1. This also updates the global variable that holds the Last Change time to the current time Divider - Label with now label value entered email Pump Status - This reads some global variables and using the Sendemail command sends the email to whatever emaila ccount is associated with HC2 admin role. MAIN LOOP - this keeps the global and local variable values up to date so they can be displayed in the labels Pick your way through the VD code, I think its straightforward enough. I did add some debug lines so you'll see more info in the debug screens Press Button action if you wanted to press one of the on the VD from another scene you need to know two things to use the following command fibaro:call(986, "pressButton",10) The id of the virtual device (986 above) and the button position (10 above) The id can be derived from the browser url when you have either the General or Advanced tab open n my screenshot above it 1870 but when you import it, the id will be different The second is the button position You need to count all elements in the VD so above buttons 4, 5 and 7 are valid PressButton actions These can be activated from within this VD, another VD or a scene using the following commands -- Set Status to Running fibaro:call(1870, "pressButton",4) -- Set Status to Stopped fibaro:call(1870, "pressButton",5) -- email pump status fibaro:call(1870, "pressButton",7) fibaro:log command The fibaro.log command in the VD presents the information on the VD when looked at in the full list of devices Virtual device - Advanced Config Tab In the advanced Tab of a VD you can define an IP address and Port If these are defined then the data can be used throughout the VD as follows. Place this code at the top of the main loop, button or label local device = fibaro:getSelfId(); local zonename = fibaro:getName(device); local ipaddress = fibaro:getValue(device, "IPAddress"); local port = fibaro:getValue(device, "TCPPort"); This takes what was entered as part of the advanced tab and assigns them as local variables (ipaddress and port) This are generally used where a VD is used to execute a http request Some other commands -- display a text value in a VD label fibaro:call(thisId, "setProperty", "ui.label1.value", "offline") -- display a variable value in a VD label fibaro:call(thisId, "setProperty", "ui.downavg.value",downavg.." °C") -- some slightly more complicated examples fibaro:call(thisId, "setProperty", "ui.hall.value",roundit(fibaro:getValue(1974, "value"),1).." °C") fibaro:call(thisId, "setProperty", "ui.hall.value",roundit(fibaro:getValue(hallTemp, "value"),1).." °C") fibaro:call(thisId, "setProperty", "ui.downavg.value",downavg.." °C") -- variable declaration local data = 1 local parameter = 5 local data, parameter = 1, 5 local msg = "1st "..alarmStatus.." alert with "..alertMsg.."." -- press button #1518 is the VD id and 1 is the button or through a local variable called SonosTTS fibaro:call(1518, "pressButton",1) fibaro:call(SonosTTS, "pressButton",5) -- Action to start a scene by either ID or variable that represents a numerical value fibaro:startScene(AlarmSet) fibaro:startScene(284) -- allow user to send email, 2 is the user id ("Alert" is email subject, "Garden sensor.." is the email body) fibaro:call(2, "sendEmail","Alert!", "Garden Sensor triggered") Suggestions to improve welcome -f EDIT : Feb 11 I added one more VD as an attachment from a suggestion from @Jamie mccrostie It's called Rack Temp Mngt It reads and displays the temperature from two probes I have, one is above each of my equipment racks . (The temp probes are 1-wire and use a Fibaro UBS to connect to HC2) I have two fans arrays to the side of the racks and these are switched from the two sides of a Fibaro dual relay This status is displayed as Fan status II then have two ON/OFF buttons to switch the Fans on or off if I see the temp running high. (I plan on automating this with temp threshold and notifications but it's on my long to-do list) It's a simple scene but I thought it was a good scene to help understand how things can setup It does use a HomeTable so the devices are all jT.equipment_rack.XXXX - just replace these with a relay id or equivalent local variable. Pump_Control.vfib Rack_temp_Management (1).vfib


- 18 replies
-
- 8
-

-

-
- newbie
- virtual devices
- (and 4 more)
-
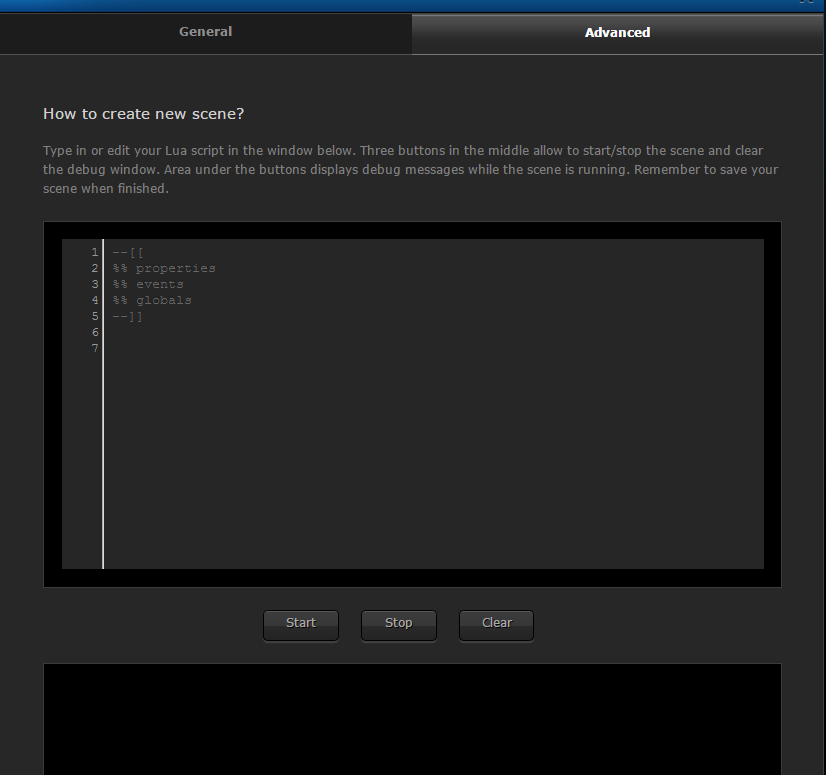
Hi, After I put together the Virtual devices Introduction Tutorial I was asked would I do something similar for Scenes. I’ll preface this post (like the Virtual devices) that I am no expert but I am willing to document what I understand and it can be added to over time. It would be great if some of the experst could read through, fill in the coupelof gaps and let me know if I havesomething wrong or coudl do with better explanation I also start at a very basic level as some of the newer users people liked that with the virtual device tutorial I am also only going to Lua scenes as I have never worked with Magic Scenes or Graphics Blocks Scene Basics A scene is a mechanism to execute a lua code script for an on-demand basis. General Tab Name, Room - self explanatory ID – set when the scene is saved, doesn’t change for life of scene. This is the unique identifier for this scene and can be used as part of the startScene command fibaro:startScene (ID) Max number of instances – A scene can be called from a number of different sources. This dictates how many instance of the scene can be running concurrently. This can also be set within the scene using lua. I’m not sure if these two settings are in conflict which one takes priority. if (fibaro:countScenes()>2) then fibaro:abort() end -- or if (fibaro:countScenes()>1) then fibaro:debug("stop scene") fibaro:abort() end Lili commands – voice control for running/stopping scene using Lili who is the native HC2 personal assistant. Run Scene Automatic – it can be called from other scenes or run manually Manual – it can be called from other scenes or run manually (unsure what the difference is between manual and automatic) Disabled – scene cannot be run Scene Hidden: Not visible in the Web UI (unless you select HC2 hidden devices) Protect by Pin: Prompted for PIN CODE if scene is set to running Do Not Alarm to Stop: ??? Change Icon – select a new icon to display alongside the scene (128x128 png transparent) Advanced Tab Lua Window The code in the lua window is the defaulst header for any scene and needs to be kept. Debug window (debug output from scene code when it is run) START – Start the script running STOP – Stop the script running CLEAR – Clear the debug window Web UI View 1. Title of scene 2. Edit 3. Delete (confirmation req) 4. Icon 5. Disable/enable 6. Run/Stop scene 7. Status – populated by fibaro:log command Lua Scene Header The header of a scene always contains some of all of the following. These are used to trigger the scene in a number of different way. --[[ %% autostart %% properties %% events %% globals --]] %%autostart – including this means that the scene will run when it is saved or when the HC2 restarts. $$ properties – the user can add a device ID and parameter. Any change to this parameter will trigger/run the scene. The format is ID following by parameter. --[[ %% autostart %% properties 1429 value %% events %% globals --]] In the example above if 1429 was a door sensor and value was the status parameter that changed (0 <-> 1) when the door opened than any status change would cause the scene to run. This has to be the device ID and cannot be a variable that represents the ID %%events – ?? %%globals – the user can add the name of global variable (exactly and case sensitive). Any change to the value of the global variable will trigger/run the scene An example would be --[[ %% autostart %% properties %% events %% globals G_AREA__1 --]] A scene can be setup to trigger from properties, events or global variables The following code allows a different action depending on the trigger if this is what’s required. -- Trigger Management local currentDate = os.date("*t") local startSource = fibaro:getSourceTrigger() --Start of Scene Execution if (startSource["type"] == 'property') then fibaro:debug("Started through property") tempFunc1() -- this is calling the the function if something happens. elseif (startSource["type"] == 'global') then fibaro:debug("Started through variable") tempFunc2() -- this is calling the the function if something happens. elseif (startSource["type"] == "autostart") then fibaro:debug("Started through autostart") tempFunc3() -- this is calling the the function if something happens. elseif (startSource["type"] == "other") then fibaro:debug("Started through other ") tempFunc4() -- this is calling the the function if something happens. else fibaro:debug("Scene not started, this can only be started through other, property, global or autostart!"); end In the example above the following happens Scene triggered from property (1425 value) - it will execute function1() Scene triggered from global variable(sleepState) - it will execute function2() Scene triggered from an autostart - it will execute function3() Scene triggered from any other valid method - it will execute function4() or else the scene will no start Local Variable declaration These are variables tha you intend to use within the scene. You can also use global variable but these do not need to be declared prior to usage Many people put the local variable declaration at the start of the scene followed by the functions -- example of local variable declaration local HC2email = "true" -- Notification Alerts using Fibaro email service local HC2popUp = "true" -- Notification Alerts using Fibaro popup service notifications local pushOver = "false" -- Notification Alerts using Pushover Notification Service (Tutorial by AutoFrank) local ALLINONE = "false" -- Notification Alerts using 'All in one Notification' scene (created by jompa68) local updateData = "false" -- Set to true to update the data in the table. ** SET BACK TO FALSE ONCE COMPLETE ** Code Comments Comments /explanations in the code are very useful as the allow you to explain what the code is doing to either yourself or others You need to preface or encapsulated all comments to prevent them being executed at runtime. Example of single line and multi-line comments are shown below -- Example of a single line comment --[[ example of a multiline comment where the sentence spans one or more lines in the scene --]] In general all scenes will have the following structure but over time most people develop your own style … --[[ %% autostart %% properties %% events %% globals --]] if (fibaro:countScenes()>2) then fibaro:abort() end -- explanation of the code purpose or usage or installation -- local variable declarations -- functions -- Main Code sequence (calling the functions above) Lua command syntax is generally the same whether it is used in a scene or used in a virtual device (exceptions to this are http requests) Some useful lua command if fibaro:getGlobalValue("Occupancy_HOUSE") == "no" -- compare global value if fibaro:setGlobal("Alarm_TrigCount", "0") then -- setting global value if tonumber(fibaro:getValue(GardenSensor, "value")) == 1 -- get device status value fibaro:startScene(AlarmSet) -- Start a scene fibaro:call(1387, "pressButton", 10) -- press a button on a vd fibaro:debug("Notify Alert! "..jN[i].device.." is offline") -- print a mix of variable and text string fibaro:call(2, "sendEmail","Alert!", "Garden Sensor triggered") -- send email using HCC2 native email service -- HC2 native popup notirfication service HomeCenter.PopupService.publish({ title = 'Home Alarm Activated ', subtitle = os.date("%I:%M:%S %p | %B %d, %Y"), contentTitle = 'Zones Status', contentBody = fibaro:getGlobalValue("G_SPC_AREA_STATUS_1"), type = 'Success', }) Some useful lua functions ENCODING - replace a space in a string with another character, a + symbol in the example below This function takes one parameter - s so The Cat and the Mat will be changed to The+Cat+and+the+Mat -- function to replace a space in a text string with a + function urlencode(s) if (s) then s = string.gsub (s, "\n", "\r\n") s = string.gsub (s, "([^%w ])", function (c) return string.format ("%%%02X", string.byte(c)) end) s = string.gsub (s, " ", "+") end return s end test = urlencode(message) ROUNDIT Rounds a number to a defined number of decimal places This function takes one parameter - num (the number you want rounded) and idp (the number of decimal places) so roundit(2.12348, 3) would result in 2.123 function roundit(num, idp) local mult = 10^(idp or 0) return math.floor(num * mult + 0.5) / mult end If there are any other useful functions that you feel would be of benefit to new users please let me know and I'll include them Overall the best way to gain a greater understanding is to download the many scenes that are published to the forum and start to take them apart. I hope this will be of benefit to some users and suggestions and corrections are always welcome happy coding -f


-
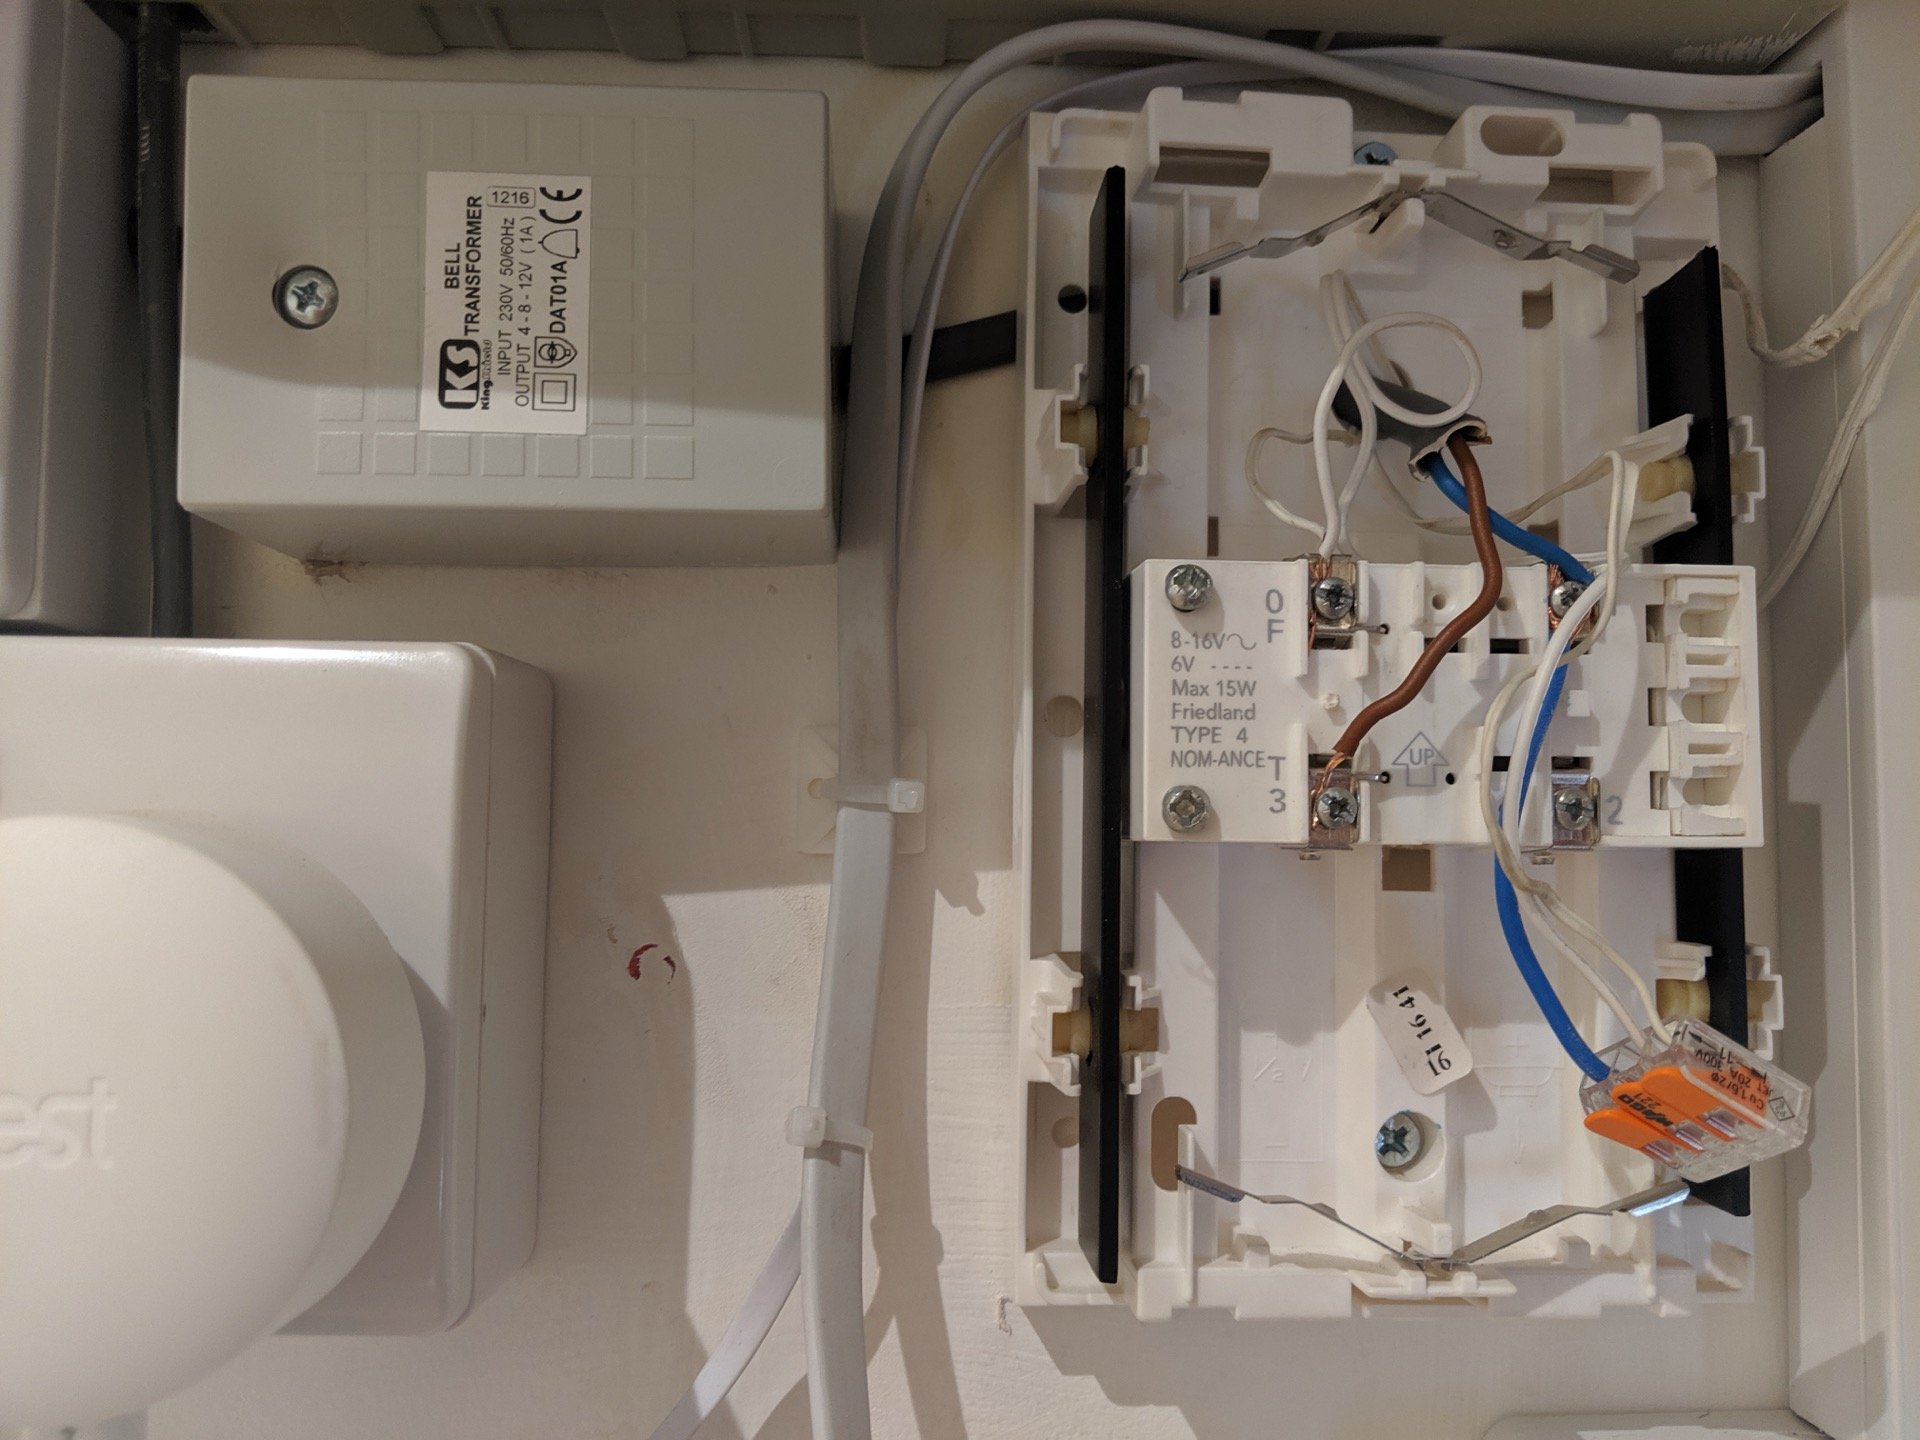
I have a doorbell (pictured) which I'm trying to integrate a USB into, but having problems. I've tried following the instructions in the included manual, and also from https://en.robbshop.nl/smarthome/z-wave-projects/z-wave-doorbel, but without any luck, I think because the doorbells (there are two, hence the two sets of white wires) have a light and so one side of them is connected to 12v power. Can anyone tell me how I can get this working? Thanks, M

-
Hello please could someone help me. I have just bought a home center lite and created a fibaro id. I have selected remote access in my LAN settings but when I try to add HC it says " HC already added by other user. Please contact tech support " I have email a couple of days ago but I have had no response ?
-
Hi All, Probably a really stupid question and i think i know how to resolve this, But with my scenes i get notifications telling me "Too many Instances" - I know on the scene you can type in the max number of instances - however what does this actually mean ?, I can run it more than "2" times or whatever the prescibed max number is. I'm assuming this is one of those things you want to set a parameter up that zeros it on a daily basis ? however have no idea how to do this, anyone able to walk me through an example please. Thanks in advance
-
Apologies for what is probably a stupid question, but can someone please explain the purpose of the master / slave settings behind each of the devices? I'm sure I will kick myself when someone explains it, but I can't find a simple explanation of the purpose of this and / or how one goes about using / modifying it and why. Many thanks in advance for all and any help!
-
Apologies for the newbie question but, is there a LUA IDE application / tool already available, or does everyone tend to use the one they feel comfortable with?
-

Need to learn LUA, any other languages necessary?
LeeSteventon posted a question in Scenes and Interface
Dear All, I want to get into learning LUA. It seems that this is the right way to move forward if anyone is to use the HC2 seriously. However, as a newbie (relatively) to programming, I want to first understand if I need to learn other languages besides LUA in order to get the most out of the HC2. Any advice on where I should start this adventure? -
Newbie to LUA, need to learn other languages also?
LeeSteventon posted a question in Scenes and Interface
Dear forum, As a newbie to LUA (although I have past experiences with C#, not extensive, again as a newbie) I'm interested in what other languages I also need to learn alongside LUA in order to be able to use / learn LUA. Are there any others I need to / should learn as well as LUA?