
Welcome to Smart Home Forum by FIBARO
Dear Guest,
as you can notice parts of Smart Home Forum by FIBARO is not available for you. You have to register in order to view all content and post in our community. Don't worry! Registration is a simple free process that requires minimal information for you to sign up. Become a part of of Smart Home Forum by FIBARO by creating an account.
As a member you can:
- Start new topics and reply to others
- Follow topics and users to get email updates
- Get your own profile page and make new friends
- Send personal messages
- ... and learn a lot about our system!
Regards,
Smart Home Forum by FIBARO Team


Virtual Devices
The category contains virtual devices submitted by users.
Downloading and submission terms have to be accepted.
Types of files accepted: LUA, VFIB, ZIP, TAR, RAR, JSON.
Virtual devices have to be described properly, screen shots are optional.
Support topics are created automatically here Virtual devices
Report topics and files that are no longer supported by authors.
All the files submitted have to be approved by administrators.
86 files
-

Holiday Lights
By Sankotronic
Holiday Lights [Christmas Lights]
Hello dear Fibaro community!
Christmas time is near so I made this VD to make it possible to automate turning On/Off some lights by using some smart plugs and relay modules, by setting favorite program on RGBW modules and some Philips HUE bulbs that you want to. It is possible to do that manually by just pressing button on VD, or it can be automated completely if you are using Main scene for time based events control scene! But more about that at the end of this post.
ABOUT Holiday Lights VD
It looks like this:
As you can see from above pictures this VD is very simple. Holiday Time button changes value of predefined global variable "HolidayTime" which enables to automate control of holiday lights. Button LightsOn/Off changes value of predefined global variable "HolidayLights" and turns On or Off lights that you define in code of this button. Let see first what global variables you need to add to variable panel:
GLOBAL VARIABLE SETUP
Following are predefined global variables (bottom part in panel) that you need to add before importing this VD:
Name of variable - possible values
-----------------------------------------------------------------------------------------------------------------------------
HolidayTime - possible values: No, Yes or values in your language mapped properly in code (this variable is also used in Very Smart Light™ scene)
HolidayLights - possible values: Off, On or values in your language mapped properly in code (this variable is also used in Very Smart Lights™ scene)
HomeTable - predefined global variable table with device and scene IDs. Recommended to use since z-wave devices can change their ID with re-inclusion and then is necessary to edit only scene which make this table and only device ID in scene headers. Much less time and effort is needed than without that option! But if you don't use this feature then you MUST delete following lines from button code:
-- get the table from global if not using then delete this line!!! local jT = json.decode(fibaro:getGlobalValue("HomeTable")) Now when you added above variables you can import VD.
IMPORTING Holiday Lights VD
Select on HC web GUI Devices and then click on Add or remove device on top of the left column (see picture):
Next window will open and you will click on "Choose Files":
Open file dialog will open where you will select downloaded file Holiday_Lights.vfib.json and press Select or Open or Choose button.
SETTING UP Holiday Lights VD
Virtual device will import and open on General tab where you need to import icons:
To import icons click on button Change Icon and new window will open:
Now click on button Choose File and file dialog will open where you will select first icon from the Download folder where they are after downloading and click on button Select.
Name of the selected icon will show on the right side of the Choose File button. Now press button Add. Repeat same procedure for another icon. When you finished importing icons select Off icon by clicking twice on it to select it for VD main icon. If you don't want to see virtual device default blue box icon then do same for buttons!
You will need icons ID numbers and the easiest way to find out is to drag icon from General tab to the desktop! On desktop it will have name like User1058.png. That number in the name of the icon is it's ID number. If you drag to the desktop first imported icon, then second icon ID will have ID number plus one, eg. User1059.png.
ADDING DEVICES AND LIGHTS
We are almost done. Just need to click on Advanced tab and edit code of each button and Main loop. In code for button Lights On/Off you need to put names of global variables that you use and do proper mapping of your values to the values used in code, then you need to put your icons IDs and you can change message text which you will get if you try to turn On holiday lights when HolidayTime is set to No. See code bellow:
-- GLOBAL VARIABLES -- enter names and value mapping of your -- global variables or leave as it is and add to variables panel -- get the table from global if not using then delete this line!!! local jT = json.decode(fibaro:getGlobalValue("HomeTable")); -- enter name of your global variable for holiday time and map -- your values this global value is set with this VD local holidayTime = "HolidayTime"; local holidayTimeMapping = {Yes="Yes", No="No"}; -- enter message when holiday time is not active and trying to turn -- holiday lights On. local messageHolidayTimeOff = "Holiday time is set to No!"; -- enter name of your global variable that indicates holiday lights are -- turned on and map your values. This global variable value is set with -- this VD local holidayLights = "HolidayLights"; local holidayLightsMapping = {On="On", Off="Off"}; -- VD ICONS ---------------------------------------------------- -- enter ID numbers of corresponding icons on your system local iconHolidayOn = 1056; local iconHolidayOff = 1055; Then you need to setup some smart plugs and relay modules that you will use to control Christmas lights. Just add ID numbers between {} brackets separated with comma like in code bellow:
-- SETUP RELAY, SMART PLUG TO BE CONTROLLED -------------------- -- put in bracket separated by comma ID of smart plugs, switches, -- and dimmers that you want to turn On/Off with this button local deviceID = {238, 140, 1002}; If you have some Philips HUE lamps that you like to use to change colors by other scene or mobile application then you can add their ID numbers between {} brackets separated by comma, if not then just skip this part. At this moment VD will only turn on HUE lamps at predefined brightness, or turn them off. To make them to change color you can use one of many mobile applications from Apple AppStore or Google play. It is possible to make scene that will be started and then run in loop and change HUE lamps color by some program and I may make one but can't promise that it will be available on time since it requires a lot of testing. But if you are interested to have one please leave comment.
If you use Phillips HUE virtual device then set variable VDlightIDtype to "VD" or to "PlugIn" if you use plugins. Set VDdim to the brightness value at which you want bulbs to be turned On (for VD 0-100, for PlugIn 0-254). VDRefreshType you need to set to "Button" if you use Philips HUE VD version 2.0b with button refresh or to "Main" if you use version with Main loop refresh. VDrefreshButton and VDbrightnessSlider are set to numbers that are ok for Philips HUE VD v2.0. If you use other versions or made by you then please put correct button and slider number see code bellow:
-- SETUP HUE VD OR PLUGIN TO BE CONTROLLED ---------------------- -- enter lights ID controlled by VD or plugin (like HUE) separated -- by comma between brackets or if none leave brackets empty local VDlightID = {jT.dnevni.stojeca, jT.dnevni.lampa1, jT.dnevni.lampa2, jT.fontana.svjetlo1, jT.fontana.svjetlo2, jT.blagovaona.lampa1, jT.blagovaona.lampa2}; -- enter if it is VD (virtual device) "VD" or plugin type "PlugIn" -- REMEMBER!! If you use VD then brightness, color and saturation can be -- set from 0 to 100 and if you use PlugIn then brightnes, color and -- saturation can be set from 0 to 255!!! local VDlightIDtype = "VD"; -- enter brightness value for HUE lamps to which to turn on local VDdim = "30"; -- if it is VD type then enter type of refreshing of VD lights: -- "Main" for main loop or "Button" for button. If it is button then also -- enter nuber of the button bellow: local VDrefreshType = "Button"; -- enter number of refresh button on VD for light local VDrefreshButton = "5"; -- enter number of brightness slider on VD for light local VDbrightnessSlider = "2"; -- NOTE! If you are using Very Smart Lights™ scene then open to edit -- and set VDholidayFlag to 1 for above HUE lamps so when you turn on -- holiday lights then Very Smart Lights scene will not control above -- lamps util Holiday Lights are turned off. Also you can set -- useholidayLights to "Yes" and adjust dimming of the other lighting -- to prefered levels while holiday lights are turned On. Same applies -- for RGBW modules! And now if you have RGBW modules and you want to use your new made programs then you can add to RGBWlightID their ID numbers between {} brackets separated by comma. You can setup different programs for each RGBW module for all seven days of the week! See bellow code as example for two RGBW modules:
-- RGBW MODULE PROGRAM SETTINGS ----------------------------------------- -- enter lights ID controlled by RGBW MODULE separated by comma between -- brackets or if none leave brackets empty local RGBWlightID = {120, 122}; -- RGBW module has some default programs and more can be added by users, -- here you can define your favorite program for each day of the week -- that will be used for holiday time local RGBWfavorite = {{493, 492, 493, 492, 493, 492, 493}, {1, 3, 4, 2, 1, 4, 3}}; From above example you can see that first RGBW module with ID 120 is playing custom made programs with ID 492 and 493. This are simple programs that are changing four default colors red, yellow, green and blue in different sequence and different speeds and look like this:
The other RGBW module with ID 122 is playing default programs, Fireplace on Sunday, Aurora on Monday, Storm on Tuesday and so on. If you want to find out what is ID of your new program then you can make new scene with just this line of code:
fibaro:debug("RGBW running program ID number is: "..fibaro:getValue(100, "currentProgramID")) Change 100 for ID number of your RGBW module. First start new program on RGBW module and then run this scene to see program ID number.
ADDITIONAL INFORMATION
if you setup and using Main scene for time based events control that can be downloaded from here:
Then you can setup this VD so that lights are turned On and Off at specific time of the day. Here is example:
-- SCHEDULED VD SETUP --------------------------------------------------- -- here you can setup VDs that will be executed at predefined time of -- day in format "00:00". You can set up more than one time during day. -- Also you can enter flag for each day of the week when VD will be -- executed or not. See more details bellow. -- enter VD IDs that will run at scheduled time separated by comma. local runVDSchedID = {100}; -- enter here which button to press to execute command local runVDSchedButton = {"2"}; -- enter at what time of day will VD button be pressed separated by comma. -- You can define more than one time in format "00:00" for one VD -- or even use local or global variables like sunsettime or sunrisetime -- Example: {{"13:30", "19:20"}, {sunrisetime, "13:00", sunsettime}} -- in above example first VD button will be pressed at 13:30 and 19:20 -- while second VDs button will be pressed at sunrisetime, 13:00 and -- at sunsettime local runVDSchedHour = {{"07:00", "09:00", "19:00", "23:59"}}; -- enter here flag for each day of the week for VD to press button -- at above scheduled time. if flag 1 the VD button will be pressed and -- if flag 0 then will not be pressed for that day. Remeber, Sunday is -- first day of the week on HC2! Example for two VDs: -- {{1, 0, 0, 0, 0, 0, 0}, {0, 1, 1, 1, 1, 1, 0}} - in this example -- first VDs button will be pressed only on Sunday, and second VDs -- button will be pressed on weekdays but not on weekends (Saturday -- and Sunday). local runVDSchedWeek = {{1, 1, 1, 1, 1, 1, 1}}; -- enter here flag for sending push message when VD buttons is pressed -- 1 for sending message, 0 no messages local runVDSchedPushFlag = {0}; -- enter here message content that will be sent to you when VD is -- executed. If above flag is 0 for any of the VDs then just put -- empty "" for it. local runVDSchedPushMessage = {""}; From above example, button on Holiday Lights VD with ID 100 will be pressed at four different times each day of the week and no push message will be sent. Since it is only one button that flips On/Off, at 7h in the morning lights will be turned On (if where Off), then at 9h will be turned Off. Again at 19h turned On and minute before midnight turned off again.
This is just one way it can be done, but here are many other ways that I will add after posting some other scenes like Very Smart Lights™, Good Morning, Good Night, etc.
Enjoy coding and Holiday lights!! There is more to come soon!
Sankotronic
572 downloads
-

Smarter Coffee VD
By Sankotronic
Smarter Coffee VD
Hello friends of Fibaro and a good cup of coffee!!!
When I became proud owner of Smarter coffee machine, I didn't know that Smarter is making smart appliances that are actually not connectible to home automation. I have ask them several times if they plan to publish coffee machine API or what ever is needed so that it can became connected part of our every day smarter home. What is the use of smart coffee machine if you have to grab mobile phone every morning in bed to tell it that you want coffee to be brewed!! The answer was always "maybe soon". So I get tired of waiting!
I was intensively searching the wast land of internet and just few days ago finally stumble on at least some kind of solution provided by Simone Margaritelli the evilsocket and Aden Forshaw. Of course their solution is written in python but for me is unacceptable to have additional server even on small PI just to start coffee machine. So done little experimenting because this coffee machine has really simple commands in bytes where first byte is command and last byte is marking end of command. Here is what evilsocket and Aden found and I provide translation to our LUA language with this little knowledge I have just in case if you want to experiment further or do similar VD for iKittle 2:
-- Smarter coffee commands: command - hexadecimal - decimal format used in LUA -------------------------------------------------------------------------------------- brew = "7" = "7" reset = "\x10" = "\16" get wifi aps = "\xD" = "\13" toggle grind = "\x3c\x7e" = "\60\126" set strength = "\x35%\x7e" = "\53\%\126" where % = 0-2 (weak, mid, strong) set cups = "\x36%\x7e" = "\54\%\126" where % = 1-12 cups set config = "\x38\%1\%2\%3\%4\x7e" = "\56\%1\%2\%3\%4\126" where %1 = strength %2 = cups %3 = mode (grind, filter) %4 = warm time warm % min = "\x3e%\x7e" = "\62\%\126" where % = 1-30 min warm stop = "\x4a\x7e" = "\74\126" -- Smarter coffee response response - hex - decimal counterpart ------------------------------------------------------- brewing or OK = "\x03\x00~" = "\3\0~" already brewing = "\x03\x01~" = "\3\1~" invalid argument = "\x03\x04~" = "\3\4~" no carafe = "\x03\x05~" = "\3\5~" no water = "\x03\x06~" = "\3\6~" low water = "\x03\x07~" = "\3\7~" reset ok = "\x03i~" = "\3i~" -- In LUA backslash \ is used to mark byte in the string so it cannot stand alone or be -- last character in string like this: "\" or this "\56\". ''So this is problem if you want -- to combine different values in string commands like for changing number of cups -- since it is impossible to join "\54\" ..cups.. "\126". 'Only possibility that -- came across my mind is to use table with predefined strings for coffee strenght, -- number of cups and Keep wamring time as listed bellow. local comm = "\56"; local cups = {"\1", "\2","\3", "\4","\5", "\6","\7", "\8","\9", "\10", "\11", "\12"}; local stre = {"\0", "\1","\2"}; local mode = {"\0", "\1"}; local time = {"\5", "\10", "\15", "\20", "\25", "\30", "\35", "\40"} local endb = "\126" -- example of building command for setting coffee machine default settings local command = comm..stre[2]..cups[2]..mode[1]..time[1]..endb I should actually put this part in developer section but here it is for those of you who like to play with it.
So here it is SMARTER COFFEE VD V0.1 first release
Smarter_coffee.vfib.json
To be able to use this VD you will need following devices:
1) HC2 - VD will work only on HC2 due to LUA code (Will try to do HCL version but will not be with all possibilities as LUA version)
2) Smarter Coffee machine with latest firmware V 22.0 (will work with older version but you will not be able to stop Keep warming or set it to 40 min)
3) FGWP smart plug or any other similar. It is needed to monitor coffee machine consumption from which is determined if it is brewing, keep coffee warm or stopped
Also after importing VD to your system you need to setup IP address and TCP port. Since it is not possible to get IP address of your precious coffee machine from original app you will need some other app to find it for you. I used Fing on my iPhone. TCP port is 2081. And it should be entered on advanced tab of the VD:
Before you start using VD first you will need to define some global variables in global variable panel. I was planning to add code to do that part for you, but since Fibaro is constantly changing API on HC I decided to leave this part to you. Besides you can put values of global variables in your language but then you will also have to change few things in code of each button and main loop. Will explain later what to change.
So this are global variables that are needed for Smarter coffee VD to work properly:
First are variables (top part in panel):
Name of variable - possible value that you must enter when adding (DO NOT leave 0 if is not possible value!!)
-----------------------------------------------------------------------------------------------------------------------------
SmarterCups - possible values: between 1 and 12. Do not leave 0. Keeps number of cups of coffee.
SmarterStrength - possible values: 0 - Weak, 1 - Medium or 2 - Strong. Keeps value of coffee strength
SmarterWarm - possible values: 5, 10, 15, 20, 25, 30, 35 and 40. Keeps time for how long coffee will be kept warm
Following are predefined global variables (bottom part in panel):
Name of variable - possible values that you must enter in order I put them here bellow.
-----------------------------------------------------------------------------------------------------------------------------
SmarterBrewed - possible values: No, Yes. Used to prevent starting brewing twice in a row. This is filter coffee and filter is better to cleaned after each use.
SmarterDefaults - possible values: table that contains coffee machine default values for strength, number of cups, mode (Filter or Grind) and time to Keep warm. You need to define only one value with name Table and then save. Open again to edit and then delete Value2. VD will take care of the rest.
SmarterMode - possible values: Filter, Grind. It is self explanatory
SmarterPush - possible values: No, Yes. It is used to send push notification only ones from VD main loop when coffee is ready
SmarterStatus - possible values: Ready, Not ready, Brewing, Keep warm, Faulty, No carafe, No water, Low water. Status of the machine.
SmarterUseDef - possible values: No, Yes. If using default values then VD needs to restore to those values after brewing is finished.
For global variables SmarterBrewed, SmarterMode and SmarterStatus you can use words in your language but if you do then you will have to change in code as follows:
-- GLOBAL VARIABLES -- enter names and value mapping of your -- global variables or leave as it is and add to variables panel -- "SmarterStatus" is predefined global variable. Enter your -- name and mapping of values local smarterStatus = "SmarterStatus"; -- change value mapping to corresponds to your values in your global variable local smarterStatusMapping = {ready="Ready", notready="Not ready", brewing="Brewing", warming="Keep Warm", faulty="Faulty", nocarafe="No carafe", nowater="No water", lowater="Low water"}; -- "SmarterMode" is predefined global variable local smarterMode = "SmarterMode"; -- change value mapping to corresponds to your values in your global variable local smarterModeMapping = {filter="Filter", grind="Grind"}; -- "SmarterWarm" is global variable possible value 5 to 40 in -- step of 5 local smarterWarm = "SmarterWarm"; -- "SmarterBrewed" is predefined global variable used to change -- machine status local smarterBrewed = "SmarterBrewed"; -- change value mapping to corresponds to your values in your global variable local smarterBrewedMapping = {Yes="Yes", No="No"}; and this has to be done in all code for each button and main loop!
Next step is to add icons and then do mapping of their IDs in the code. Here are the icons in order and with their names in code:
Main icon that you will set as default on the VD and all buttons except on button Brew and Keep warm:
In code is named iconBrewing so you will need ID and also set it up on Brew button:
In code is named iconWarming so you will need ID and also set it up on Keep warm button:
in code is named iconNoCarafe so you will need ID:
in code is named iconLoWater and ID is needed:
in code is named iconNoWater and ID is needed:
in code is named iconFilter0 you need ID and it is showing setting for Weak strength and Filter mode:
in code is named iconFilter1 you need ID and it is showing setting for Middle strength and Filter mode:
in code is named iconFilter2 ID is needed and it is showing setting for Strong coffee and Filter mode:
in code is named iconGrind0 ID is needed and it is showing setting for Weak coffee and Grind mode:
in code is named iconGrind1 Id is needed and it is showing setting for Medium coffee and Grind mode:
and the last one is named in code iconGrind2 Id needed and is showing setting for Strong coffee and Grind mode:
How to get icon ID is explained many times here on forum so I will skip that. After you get ID of all icons then you need to replace them in main loop and for buttons Brew, Keep warm, Weak, Medium, Strong, Change mode, Reset machine and main loop. Code is well commented and looks like this:
-- VD ICONS ---------------------------------------------------- -- enter ID numbers of corresponding icons on your system local iconBrewing = 1041; local iconWarming = 1042; local iconNoCarafe = 1044; local iconFilter0 = 1045; local iconFilter1 = 1046; local iconFilter2 = 1047; local iconGrind0 = 1048; local iconGrind1 = 1049; local iconGrind2 = 1050; local iconLoWater = 1051; local iconNoWater = 1052; And before you can start enjoying your coffee there is one more touch that needs to be done. You need to go to main loop code and first setup smart plug ID. Look for this code in main loop:
-- SMART PLUG -------------------------------------------------- -- enter ID nuber of smart plug to which Smarter cofee is -- connected. Smart plug is the only way to check machine status -- at the present moment so it is needed for proper functioning -- of this VD local plugID = 135; Then if you want to be notified by VD when coffee is ready then find this code and enter ID of your mobile devices to which will be send. You can put as many as you like between brackets {} just separate them by comma eg. {2, 45, 121}:
-- PUSH NOTIFICATIONS ------------------------------------------ -- define users that will receive push notifications when -- coffee is ready if leaved empty no notification will be send local userID = {} -- enter default flags: 1 - will send, 0 - will not send -- must be same number of flas as users local userFlag = {}; -- enter push message text that will be sent when coffee is -- ready local pushMessage = "Coffee is ready!" -- here you can put code that will change flags to whom push -- notification will be sent function setupUsers() -- here you can put code to dynamically change which users -- will get push notifications if you use flags end If you want to change who will receive push notifications you can use variable userFlag for that. For each userID you can enter 1 to send push notification or 0 not to send. Then you can add some code in function setupUsers() where you can change flags as you wish. For example I use that code to stop receiving push notifications when I'm away from home. If you don't need this feature then just leave brackets empty. And of course you can change message for pushMessage to your language.
And if you want to completely translate VD to your language you just need to check all code for this part:
-- MESSAGES ---------------------------------------------------- -- enter messages in your language -- response messages from coffee machine local _respBrewing = "Brewing"; local _respAlready = "Already brewing"; local _respInvalid = "Invalid argument"; local _respNocarafe = "No carafe" local _respNowater = "No water"; local _respLowater = "Low water"; local _respResetOK = "Reset OK"; local _respCheck = "Check machine"; local _respFailed = "Transfer failed"; -- command sent by this button local _command = "Brew"; -- coffee machine status messages local _statReady = "Ready"; local _statNotready = "Not ready - fill in coffee"; local _statBrewing = "Already brewing!"; local _statWarming = "Warming coffee!"; local _statFaulty = "Faulty - check machine"; local _statNocarafe = "No carafe - put it back"; local _statLowater = "Warning! - Low water"; local _statNowater = "No water - fill tank"; I try to make it easier for you as much as I could in this four days of development so all messages I collected on beginning of the code. Some buttons have more messages, some don't so you better check them all.
At the end just short explanation how it works. Before first run, you will need to check if settings in VD corresponds to machine settings by checking display on the machine or original app. When this is synced you can start using it.
Before first brewing status of VD must be Ready. If it is not you can press button Reset status to just reset VD or Reset machine to reset all to factory settings. Reseting machine will clear all default settings so you will need to send them again by pressing button Set above as default after you make your favorite choice of strength, cups and mode. This default settings will be always set back after brewing coffee no matter what settings was for the last brew. After brewing coffee status of the VD will be always set to Not ready except if there is No carafe in place, or No water or Low water. After rectifying cause: placing carafe in place, filling water and cleaning filter you will need to press button Reset status to put it back into Ready state. If this is too annoying you can always setup some short scene that you will trigger with some switch, button or swipe or whatever and reset VD to Ready status. If you want to keep coffee warm after brewing you can do that by setting time and then pressing button Set above as default so warming will start immediately after brewing, or you can setup time and then press button Keep warm. If during Keep warm you press button Keep warm again this will stop warming but only with new machine firmware. Keep warming time can be set up to 40 minutes. And that's it!
Enjoy coding and coffee!!!
EDIT
Still working on 4.180
68 downloads
(1 review)0 comments
Updated
-
20180525 Presence_Detector (posted).vfib
By Lambik
20180525 (Stable) release
Added/Changed: - Added some code to the mainloop to detect critical error occurring when a device is forced-removed
[ERROR] line 195: attempt to perform arithmetic on a nil value
312 downloads
- presence detector
- vitual device
- (and 1 more)
-
Jakość powietrza Głównego Inspektoratu Ochrony Środowiska
By drboss
VD wyświetlające jakość powietrza w Polsce wg. stacji GIOS. Poprzez GIOS dane są pobierane raz na godzinę z WIOS więc nie ma potrzeby częściej odpalać głównej pętli niż jest ( a przy większej niż kilka zapytań z jednego IP na godzinę blokują dostęp)
Konfiguracja - utworzyć zmienną globalną "powietrze". W polu IP VD wpisujemy adres serwera (obecnie api.gios.gov.pl), w polu PORT wstawić kod stacji pomiarowej z której interesują nas pomiary. Kody stacji pomiarowych są wysyłane na adres email administratora (id2) po wciśnięciu przycisku "Lista stacji". Ręczne pobieranie danych przycisk "Pomiar"
W VD pod przyciskiem "Pomiar" trzeba sobie ustawić ID do powiadomień przez PUSH i EMAIL po każdej zmianie warunków powietrza, oraz ID ikon do wyświetlania.
W pliku zip ikony do VD
/Wątek przeniesiony z FIBARO Aktualizacja/Rozwiązania Społeczności/Urządzenia Wirtualne/Jakość powietrza v0.2 wg Głównego Inspektoratu Ochrony Środowiska/
jakosc powietrza - ikony.zip
57 downloads
(0 reviews)0 comments
Submitted
-
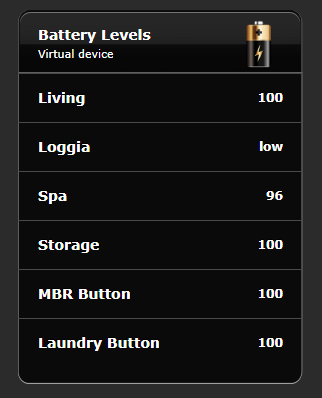
Battery Level Display
By RohitNz
The Virtual Device shows the battery status of battery powered devices. In addition, it will send an email to a user when the battery is low or dead. It is suitable for a small number of devices and gives you a snapshot view.
Note that the Lithium battery drops suddenly and if its below 80 then its marked as low and should be replaced. The battery is checked once a day roughly.
The lua code is attached. I have written it for efficiency instead of accuracy, as lua execution is so so slow. Hence the use of delays. You need as many labels in the VD as the number of devices and it uses label1..labeln for simplicity.
CODE.TXT
272 downloads
-

Automatic Icon Downloader
Automatic Icon Downloader
What does this device:
Device can automatically download from dedicated web-page all icons that you use to your HC2. The device can be used by installers to easily download their favorite sets of icons to new HC2, by end users to get back icons after recovery or any other purpose. Device before uploading any icon to your HC2 check if any of selected in IconSet already exists so it should be safe to click on "Download to HC2" button many times.
This solution has to separate parts: vd and portal.
Version history:
0.6 - first published version of AID
To Do VD:
- future version of virtual device will be updated automatically from internet if user agreed to do it, after HC2 restart
To Do portal:
- next version will support adding user device icon to library (on, off, state 1-10)
Manual
1. Download and install virtual device.
2. Go to: www.grace-land.pl/fibaro/aid portal to get your IconSet. Current version looks like below.
Please note some important things:
- HC2 keeps your icons in 4 separate groups: devices, virtual devices, scenes, rooms. It means that if you want to use one image as room image and virtual device image it needs to be added twice - that is why portal items are divided into four groups (for user convenience - each group has different color)
How the portal works?
You just check all icons in each group you want to add to your IconSet and then click "Get your IconSet".
Please remember that you can edit this IconSet later.
What if I have icon/s that is not in portal library?
There is option to upload your icons and make library bigger. In this case you click on "Add new icons" button. You will be redirected to new page.
Please note some important things:
- You can upload many files and many groups in the same time,
- All icons will be checked before upload. Icon needs to be: PNG file, 128x128 size, unique [portal checks if this icon exists in this group*], no bigger then 1MB (one icon),
- You will see preview of icons that you want to add but without category,
- For now there is no option to add "device" icons. I am working on it to make it simple,
- You will get status whats was added and what not.
How to edit my IconSet?
You need to know your IconSetID and then click on "Edit your IconSet" button. Page will refresh and all icons from your set will be automatically checked.
What you need to do is to check more icons or uncheck unwanted icons and then click "Update your IconSet".
Please note that VD doesn't delete icons from your HC2.
3. After you have your IconSetID there is time to configure virtual device. In this case you need to provide some information.
a) In VD information please provide IP and TCP port.
IP: grace-land.pl
TCP port: 80
b) In Advanced tab scroll to button and replace needed credentials.
c) click "Save".
Please note that virtual device only downloads data so there is no risk in providing credentials.
------------------------------------------------- -- PUT YOUR ADMIN CREDENTIALS ------------------------------------------------- sv_user = '[email protected]'; sv_password = 'Y0urP@ssword'; sv_automaticDownloaderId = 'iconSetID_from_website';
4. Your device is ready to use. You just click on "Download to HC2" and wait. All needed information is in debug for vd button.
Device before uploading any icon to your HC2 check if any of selected in IconSet already exists so it should be safe to click on "Download to HC2" button many times, but it will take a while.
Have fun!
Disclaimer:
Every of icons on portal [grace-land.pl/fibaro/] aid library are not my property.
The code wasn't inspired by the somebody mentioned in comment below - the first version of uploading I found in 2013 [https://github.com/rafikel/Fibaro/tree/master/ncplus] - and I went this way to make something usefull.
580 downloads
- icons
- automatic_download
- (and 1 more)
-
Remotec Multimedia VD
By marshal
ZXT-120 is an IR extender for air conditioners, but it can be learned up to 20 defferent ir code for multimedia. The process of learning of zxt-120 is written in its manual, but i want to show a way to use that codes in fibaro HC.
For this purpose we have to change the virtual device IP Address with your HC ip, and write 80 in TCP port box:
You can change the buttons according to your custom multimedia device (here we made a TV control):
Now you have to change commands for corresponding buttons.
For example for first button:
Authorization code is your username:password in 64Base format.
admin:admin => YWRtaW46YWRtaW4=
We can learn up to 20 code according to this list:
Use this command for changing mode :
/api/callAction?deviceID=107&name=setMode&arg1=0
For setting temperature (in cooling mode):
/api/callAction?deviceID=107&name=setThermostatSetpoint&arg1=2&arg2=23
For setting temperature (in heating mode):
/api/callAction?deviceID=107&name=setThermostatSetpoint&arg1=1&arg2=21
119 downloads
- remotec
- multimedia
- (and 3 more)
-
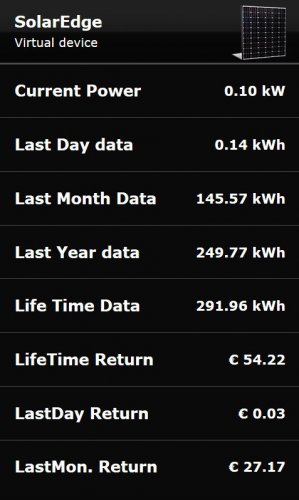
SolarEdge Monitor
By D-Vine
----------========== SolarEdge Monitor Virtual Device ==========----------
I want to share my virtual device to monitor SolarEdge solar panels.
SolarEdge have the possibility to read your system data with API.
What you need is the VD to download and ad into the Fibaro
Make a LUA scene where you copy the code
The code is based on @jompa68 Consumption Monitor Scene and I have permission to share my version of it with the change/ integrate of SolarEdge
With this it also supports
@AutoFrank SmartMessageHub and
@Sankotronic Time Based Events Control
First you need the API key that only a admin of the portal can give to you.
When the SolarEdge was installed at my home I register the system by myself.
You only need the serial number that is on the invertor
Go to:
https://monitoring.solaredge.com
And select new installer Fill in the information needed see example of serial number to fill in
Or ask the site admin to enable the API key
To generate a Site API key:
For most time people will have standard access to the portal and will not be able to set the API Key them self
Ask your Installer/ manufacturer to enable the API key by these steps or do it yourself.
In the Site Admin >> Site Access tab >> Access Control tab >> API Access > section:
Acknowledge reading and agreeing to the SolarEdge API Terms & Conditions. Click Generate API key. Copy the key. Click Save Use the key in all API requests
SolarEdge Scene setup
Line 23 local vDevId > enter the VD id SE_API > Your API Key SE_CLIENT_ID > Your Client ID Line 41 (true or false) and 42 possibility to calculate rates with the the power you get from the solar panels Line 51 refresh rate > set 60 or higher due API data restrictions of SolarEdge setup you push message when and in what way you want, see description in the scene.1,116 downloads
-
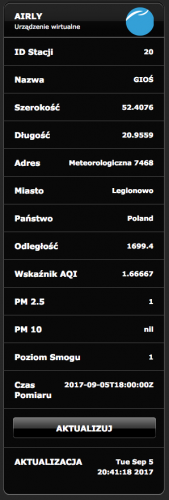
Odczyt czujników jakości powietrza z AIRLY.EU
By gucio1234
Urządzenie wirtualne odczytująca parametry jakości powietrza z najbliższego czujnika sieci AIRLY.EU
Wirtualne urządzenie odczytuje z ustawień centralki jej współrzędne geograficzne i znajduje najbliższy czujnik w promieniu 5 km.
Jedynym ustawieniem użytkownika jest wpisanie klucza API dla AIRLY.EU w kodzie LUA (jest to odpowiednio opisane).
89 downloads
(0 reviews)0 comments
Submitted
-

Google Calendar Synchronization
By jcichon01
Hi All,
I came across the problem of making my private Google Calendar's entries available in HC2 with the intention of using it in some of my home's automation scenarios. Since I was unable to find any simple solution on the internet I did create my own and here it is
The scene runs on my HC2 since few weeks without any issues. I did schedule the scene using Sankotronic's Main Scene for Time Based Events and it is synchronizing my Google Cal every hour.
There are three basic steps to make the scene working for you:
· Provide the link to your google calendar by modifying the address hold in the local variable
local gCalUrl = https://calendar.google.com/calendar/ical/xxxxxxx.ics
Create global variable GCalendar which will hold the synchronized Google Calendar entries
Maintain the translation table monthMapping to map the names of the months to your local language. This is needed due to the fact that global variable “Month” could the name of current month in your local language – which is the case for me.
Once GCalendar global variable is synchronized with Google Calendar I can use it in "good morning" scene which is reading the agenda for the day once I'm brushing my teeth in the morning
Any comments highly appreciated.
Global variable GCalendar is holding the information on upcoming events. The information is structured in the following way:
GCalendar = { Name, StartDate, EndDate, WholeDay }; Name holds the name of Calendar event, StartDate and EndDate are the event's start and end-date accordingly, WholeDay is a flag with values "Yes" in case the event was defined as "whole day" and "No" if this isn't the case.
@jompa68
jompa68 did create VD which shows today's events from your calendar for current date. VD is attached below (hope you don't mind jompa68 but having it in the first post makes it easier to find ).
Update 8.3.2017
Thanks to @jompa68 I realized there is no handling of recurring events. Honestly I did not think this small topic can be so much complicated... anyway. Some basic recurrence rules should now be supported by the script.
Update 12.3.2017
@emielstroeve figured out that calendar events marked as "whole day" were not recognized by the script. Version 1.2 solves this problem by adding the missing functionality. I did extend the structure of GCalendar variable with additional field "WholeDay". The field contains "Yes" in case the event is defined as "whole day" otherwise the field is set to "No".
311 downloads
-

Bluesound interface, first setup
By doezel
Hi,
here's a quick version to gain basic control of a bluesound device in your network.
Make sure to set up the correct IP address.
TCP port should be 11000
For now the following functions are supported:
- polling of the status, every second
- volume
- pause
- play
151 downloads
-
New reviews
-
 By Bornheim · PostedI integrated two HUE bridges in my HC3. It works perfect (and much better and more powerful then the app integrated in HC3). In particular, also sensors, temperature measures etc. are available and can be used in Scenes. However, in both cases after installing and entering the IP adress of my HUEs I had to restart the HC3 to get the authentification running. So I assume to install one has to (i) upload / install the QuickApp, (ii) enter the IP address of the HUE in the local LAN, (iii) rest
 -

-

-

-
 By Sankotronic · PostedVery useful solution to help with gradually moving from HC2 to HC3. I have tested few of the QA and used them to test some of my new solutions on HC3 keeping HC2 still having main controll of our house. Thank you @cag014 for yet another excellent solution!
 -

-

-

-
 By SmartHomeEddy · PostedGreat QuickApp and excellent configuration manual. QuickApp works smooth. Thanks!
 -

-
-
Highest Rated Submitters
No ratings this week.
No ratings this month.
No ratings this year.
-
1

-
2

-
3

-
4
-
5

-