
Welcome to Smart Home Forum by FIBARO
Dear Guest,
as you can notice parts of Smart Home Forum by FIBARO is not available for you. You have to register in order to view all content and post in our community. Don't worry! Registration is a simple free process that requires minimal information for you to sign up. Become a part of of Smart Home Forum by FIBARO by creating an account.
As a member you can:
- Start new topics and reply to others
- Follow topics and users to get email updates
- Get your own profile page and make new friends
- Send personal messages
- ... and learn a lot about our system!
Regards,
Smart Home Forum by FIBARO Team
Virtual Devices
The category contains virtual devices submitted by users.
Downloading and submission terms have to be accepted.
Types of files accepted: LUA, VFIB, ZIP, TAR, RAR, JSON.
Virtual devices have to be described properly, screen shots are optional.
Support topics are created automatically here Virtual devices
Report topics and files that are no longer supported by authors.
All the files submitted have to be approved by administrators.
86 files
-
![More information about "[VD] Daily Triggers"](https://forum.fibaro.com/uploads/monthly_2020_04/trigger_none_today.thumb.png.ea533531744f63b48280506f7c5fc6d6.png)
[VD] Daily Triggers
By J3R3M
Daily Triggers
First release on french board in April 2018
INTRODUCTION
This VD was my first contribution on the french forum. I was so glad! I learnt to use LUA tables just before and I wanted to use them in a VD which can be useful.
This VD allows you to easily manage some one-time actions for each day in a week. With it, you quickly can change the time to trigg one or many actions, or see when an action will be done. It's possible to set one our per day, using a time shift if needed.
It's my first VD, I was learning how to program in LUA and I was beginning to work with time in LUA, so it's not perfect in the programming way, but it works! I used it for a long time and I have never met any issue!
INSTALLATION
Create a Global Variable called VD_TRIGGERS Import the VD Change the Icons ID in the Main Loop, using the icons below -- Icons IDs local icone_ok = 1156 local icone_wait = 1158 local icone_no_trigg = 1155 local icone_triggers_off = 1157 local icone_vd_off = 1160 Add your to-do actions for each day with the totrigg() function, into the Main Loop -- To do each day local function totrigg(day) -- Here actions for everyday if day == 1 then -- Actions for Monday elseif day == 2 then -- Actions for Tuesday elseif day == 3 then -- Actions for Wednesday elseif day == 4 then -- Actions for Thursday elseif day == 5 then -- Actions for Friday elseif day == 6 then -- Actions for Saturday elseif day == 7 then -- Actions for Sunday end end
VD CONFIGURATION AND USE
This VD is divided into 4 parts :
Information about the next trigger The Programmer View on all triggers set Enable/Disable VD
3 Sliders and the OFF button can be used to prepare trigger informations : Hours Sliders will convert 0-100 value to 1 - 23 in the programmer Minutes Sliders will convert 0-100 value to 1 - 59 in the programmer Time Shift Sliders will convert 0-100 value to -30 - +30 in the programmer Please take care to set 0 (Slider at 50) if you want to trigg your actions at the time set! OFF Button will replace all the programmer's informations by OFF If you want to set a new time information, you only need to click on any slider above After each slider move, check the Prog Label content to avoid any error Once the Prog content is correct and checked, you can affect its value for each day you want by simply clicking on its name! You will be able to see the affected times just 3 seconds after in the Triggers Views At this time, the actions set in the totrigg() function will be done Of course, if the VD is disabled, no actions will be triggered
ICONS
Waiting to trigg today's action Today's action triggered No action planned today (OFF) All triggers set at OFF VD OFF83 downloads
-
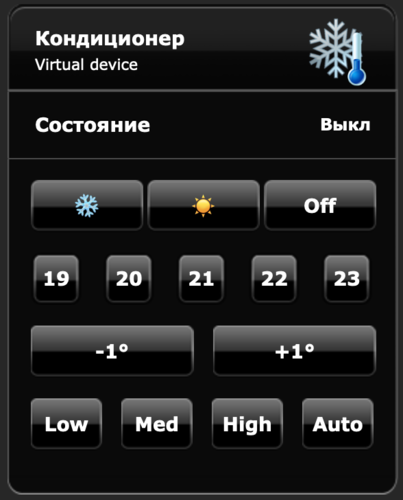
ZXT-120 AC control VD
By baskalex
This is a simple VD+Scene to control ZXT-120 AC controllers. I use it because of 2 factors:
1) You can control everything on one screen instead of 3 devices in HC2 interface
2) it is visible in Home Center app (ZXT-120 is not visible natively yet)
It supports heating and cooling modes and fan speed. You can see current status as well.
Setup is very simple:
VD - just put ID of the child device of ZXT-120 which controls temperature into the "Port" field of VD
Scene - You have to put IDs of three child deviced of ZXT in the triggers field annd the same ID into "Options" part of the scene. Also put VD ID inn the "Options" part.
Maybe it can be useful for some of you.
ZXT-120.zip
116 downloads
-
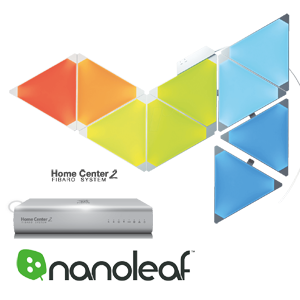
Nanoleaf Aurora VD standalone
By Sankotronic
Nanoleaf Aurora VD v2.0.1
(standalone version)
INTRODUCTION
Nanoleaf Aurora light panels https://nanoleaf.me/en/ brings new way of lighting experience. Nanoleaf Aurora VD enables Fibaro Home Center 2 to control this lights and show their status. This is new updated version.
PREREQUISITES
Fibaro Home Center 2 with firmware 4.120 or higher (tested up to 4.530) Nanoleaf Aurora starter kit with firmware 1.5.1 up to 3.0.6
FEATURES
Control brightness, hue, saturation, color temperature and activate Aurora effects VD automatically updates list of the available effects when added or deleted with Nanoleaf mobile application Scroll with buttons through available effects on VD and activate Selected and running effect type can now be recognized by small icon in front of the effect name.
Support for Rhythm module. VD automatically recognizes if Rhythm module is attached to Aurora light and enables selection of input between built in microphone or aux input. Use Process button to control Aurora light by other scenes and VD Built in button for generating authorization token for easy connection to Aurora light Multilanguage support with 27 languages. VD will be automatically translated to HC selected language or user can select any other available language. Easy setup for VD icons with automatic setup of icons for buttons and sliders too. (UHAS™ compatible version has even more easier icon setup) User can setup VD to have separated on and off buttons or to have toggle on/off button Light can be turned on/off with buttons and brightness slider. Even if brightness slider is used to turn off Aurora light, VD remembers last brightness settings so if light is turned back on with button it will be turned on at last brightness level. Self adding and checking of global variable data integrity. Automatic repair of global variables without user intervention New approach to programming other code to control this VD enables future upgrades without needing to change that code. (See more about that in User Manual provided)
INSTALLATION
Please check provided User Manual where all steps are explained in detail and this video made by @MarcoTorino71:
UPGRADE
To upgrade from v2.0 to v2.0.1 just paste provided code in package over old Main loop code and redo settings
To upgrade from v1.0s and v1.1 to version 2.0.1 just delete old version and import new version of VD.
PACKAGE CONTENT
Nanoleaf Aurora VD v2.0.1 (standalone) Icons for VD User manual v1.3 EN
CREDITS
Many thanks to
gucio1234 and BodyArt from forum.fibaro.com for help with testing, translations and manual.
TERMS AND CONDITIONS
Permission to use, copy, modify, and distribute this software and its documentation for educational, research, personal use and non-profit purposes, without fee and without a signed licensing agreement, is hereby granted, provided that the copyright notice, with "Terms and Conditions" and "Disclaimer" appear in all copies, modifications, and distributions.
It is strictly forbidden to sell, rent, lease and/or lend this software for profit without prior consent from the Author.
DISCLAIMER
This software is provided by copyright owner "as is" and any express or implied warranties, including, but not limited to, the implied warranties of merchantability and fitness for a particular purpose are disclaimed. In no event shall the author and distributor be liable for any direct, indirect, incidental, special, exemplary, or consequential damages (including, but not limited to, procurement of substitute goods or services; loss of use, data, or profits; or business interruption) however caused and on any theory of liability, whether in contract, strict liability, or tort (including negligence or otherwise) arising in any way out of the use of this software, even if advised of the possibility of such damage.
Fibar Group S.A. and their employees are not responsible for support of the Nanoleaf Aurora VD. Please contact the author Sankotronic, on the Fibaro Forum, for any questions or support required.
LEGAL NOTICE
Nanoleaf and Aurora are registered trademarks or trademarks of Nanoleaf Energy Technology ShenZhen Limited registered in PR China and other countries.
LATEST NEWS
1 April 2019
Nanoleaf Aurora light panels latest firmware update 3.0.8 is out. If you upgrade to this latest firmware Nanoleaf Aurora VD v2.0 will not be able to show VD main icon for effects anymore due to color mode type name "effects" changed to "effect". Even if effect is selected VD will have icon set for solid color. Other functionality of the VD remained intact and will function properly with this latest firmware.
12 September 2019
Nanoleaf Aurora VD is working with the latest Aurora firmware 3.2.0. Problem from 1 April this year with icon functionality is solved!
VERSION HISTORY
2.0.1 - Corrected bug in VD main loop that prevented saving updated effect
2.0 - Code rewritten to enable recognizing type of the running and selected effect. Further optimized part of the code and cleaned some bugs.
1.1 - Corrected some bugs in code and replaced light unreachable icon
1.0 - First release of standalone version build on code of VD for UHAS™
Here is look of the Nanoleaf Aurora VD:
Enjoy coding and your new Nanoleaf Aurora virtual device!
Sankotronic
318 downloads
-
![More information about "[VD+Scene] Advanced Alarm Clock"](https://forum.fibaro.com/uploads/monthly_2020_04/AdvancedAlarmClockScene.thumb.png.07237ec21a59b8fafc43c56a0e0c947d.png)
[VD+Scene] Advanced Alarm Clock
By J3R3M
Advanced Alarm Clock
First release on the French board in March 2019.
INTRODUCTION
This VD+Scene Bundle will help you to wake up in better shape by simulating a smooth dawn with any device in your HC2 : Roller Shutters, lights devices and VD.
After the ignition at the value that you have set up in the VD, the scene can fade one or more speakers. The curves for light and audio fade in can be choosen separately.
The scene manages itself if it's day or not. So, for each light you will set up in the scene, you can decide if it has to be active everytime, or only when it's day or only when it's night. For example, you can set up a Roller Shutter which is active only if it's day!
This Bundle can be used as much as you want, just by adding it again and creating a new Global Variable for each new bundle set.
THE SCENE IS ABLE TO MANAGE
Roller Shutters (FGR22, FGR223...) Dimmers (FGD211, FGD212...) Switchs (FGS211, FGS212, FGS213...) RGBW Devices (FGRGBW, RGBW Controller 1, RGB Controller 2) RGBW Programs (Any Fibaro's programs) Home Center Scenes Any Light VD (Philips Hue, Ikea TRÅDFRI...) Any VD clickable Any Audio VD (Sonos, Yamaha Multicast or any else...)
INSTALLATION
Most of explainations are in the scripts.
Create a Global Variable which starts with REVEIL_ (what means alarm clock in French ?) and import the Virtual Device you want (12h or 24h).
VD CONFIG
-- Manageable Alarm Clock Scene Id local SceneID = 193; -- Which room will this VD Manage ? Must be the same than the Scene local ROOM = "ROOM"; -- Days Off local DaysOff = {"Saturday","Sunday"}; -- By defaut, this scene will be launched to have full light at the time set up in the VD : Actual Hour - Dawn Time -- Change this var to anything else if you want to trigg the scene at the hour H. local StartScene = "DEFAULT"; -- Icon's ids local icon_ok = 1156 local icon_wait = 1158 local icon_off = 1160 SceneID : ID of the scene Advanced Alarm Clock ROOM : Value corresponding to the Global Variable you created DaysOff : List here all your days off within quotes marks, separated by commas. Take care of the uppercase at the beggining of the days names! StartScene : Start the scene to have the full ignition at the time set in VD (DEFAULT), or start to begin the dawn's simulation at the time set in the VD (anything else) icon_ok : ID of the icon which will be displayed when the scene is triggered and active icon_wait : ID of the icon ID which will be displayed when an alarm is set and waiting to trigg the scene icon_off : ID of the icon which will be displayed when the alarm is disabled Note: In this Virtual Device, you have to change 3 times the variable's value of ROOM, corresponding to the Global Variable you have created before : REVEIL_ROOM.
VD USE
Press on : will display 12:00 (or 07:30am in the 12h version). This can be changed by anything else with the variable ClickHour in the corresponding button Sound Volume is in percentage (Act on sliders) Audio fade-in is in seconds Light's Power is in percentage* Dawn's duration is in minutes Once button sets the alarm for the next avalaible scheduele, regardless of the day (DayOff or not). The alarm will automatically be disabled after the dawn's ignition Week of job sets the alarm for everyday, without the days set in the variable table DaysOff. Scene will automatically be launch until it's manually deactivated Recall will recall every parameters set before last VD deactivation Alarm OFF will save every actual parameters and disable the alarm * Rollers Shutters will open at the same time than others lights devices, but will not been affected by Light's Power parameter
I thought it was better to be able to choose the power of lights, without having a half opened roller shutter.
SCENE
local ROOM = "ROOM"; -- Room code corresponding to the Global Var created local StartVolume = 15; -- Which Speakers volume value the fadein will start at (percentage) local CurveLight = "linear"; -- Which function will be used to fadein light keys local CurveAudio = "linear"; -- Which function will be used to fadein speakers keys BASIC SETTINGS
ROOM The famous variable wich has to be the same in the Scene+VD StartVolume could be useful if you don't want to start audio fadein from 1. CurveLight & CurveAudio Curves that will be used to fade lights and audio. See the following image to have a better understanding Note1: If you comment a Curve Variable, the curve will be randomly choosen
Note2: The curves are possible thanks to the great work that Robert Penners made in 2001.
POSSIBLE CURVES : Linear + Robert Penner's Easing Equations
-- Debug Vars local debug = 1; -- 1 Enable / 0 Disable local lang = "en"; -- Debug lang local DisplayNamesorID = "ID"; -- Display DeviceName + RoomName (Names) or Type + ID (ID) on each Debug line local DisplayNamesAtStartup = 1; -- Display Rooms & Names at scene startup (1) or not (0) local DisplayRGBWValues = 1; -- Display RGBW Values increasement when fading in (1) instead of only multiplier (0) local DayLightDelay = 60; -- After sunrise/sunset, it's still daylight for .. mn local VolDiffMin = 5; -- Minimum difference between Start Volume and Volume set in VD (in case of Start Volume > Volume set) local LimitDebugLines = 1; -- Limit number of Debug Lines to 4 max per device and to 20 max per roller shutter -- Changing next var values may seriously impact the scene local CheckAlarmMode = 1; -- Check if the alarm is set and not just memorized before starting sthis scene local DisplayScenesNames = 0; -- Display Scenes Names in debug (1) or not (0)! Active this function may delay the script local tempo = 1; -- Pause between two actions in LightsAction and SpeakersAction functions (s) - It' not recommended to change this value DEBUGS SETTINGS
debug lang DisplayNamesorID DisplayNamesAtStartup DisplayRGBWValues DaylighDelay VolDiffMin LimitDebugLines CheckAlarmMode If this var value is set on 0, this scene will be able to be launched manually with stored values, even though the VD displays None DisplayScenesNames tempo Note: everything explained in the script!
ADDING YOUR DEVICES
Add a Roller Shutter (FGR) Parameter "steps" is needed to set how many steps this roller shutter will do to open (to protect motors of 100 steps) table.insert(LightsList, {typ="Shutter", id=279, steps=6}); Add a Dimmer (FGD) table.insert(LightsList, {typ="Dimmer", id=10}); Add a RGBW device (FG-RGB) : To fade a choosen color with RGBW parameters (Set this color at full range, scene will fade this value from 0 to the value set in VD) table.insert(LightsList, {typ="RGBW", id=20, r=150, g=100, b=0, w=255}); Add a RGBW Program : To set a RGBW program, just use "program" parameter Add "start" parameter to manage when this program will be started during the light fadein (in percentage) If no "start" parameter is set, program will be started at the beginning of the scene table.insert(LightsList, {typ="Program", id=20, program=3, start=50}); Add a switch (FGS) Add "start" parameter to manage when this turnon action will be done during the light fadein (in percentage) If no "start" parameter is set, action will be done at the beginning of the scene table.insert(LightsList, {typ="Switch", id=49,start=100}); To add a VD If it's a light VD : Parameter "slider" needed to manage brightness table.insert(LightsList, {typ="VD", id=298, slider=10}); "btn" paramater can be added to set a color preset before the fadein (Be sure that the VD brightness for this button is set et 1%) table.insert(LightsList, {typ="VD", id=298, slider=10, btn=6}); If it's not a light VD (with brightness slider) : Just indicate "btn" parameter table.insert(LightsList, {typ="VD", id=298, btn=6}); Add "start" parameter if you want to manage when this button will be pressed during the dawn fade in (in percentage) table.insert(LightsList, {typ="VD", id=298, btn=6, start=50}); Scene : To start a scene Add "start" parameter to manage when the action will be done during the light fadein (in percentage) If no "start" parameter is set, action will be done at the beginning of the scene table.insert(LightsList, {typ="Scene", id=254, start=50}); To add Speakers VD : One action per key Example for an action on the slider 15 of the VD 245 table.insert(SpeakerAction, {id=245, slider=15}); Example for an action on the button 6 of the VD 245 table.insert(SpeakerAction, {id=245, btn=6});
Note: This is an extract of the scene. So you will find it in the scene to help you if needed
One line = One device
LightsList typ = Shutter id Roller Shutter ID steps Number of steps which will be done by the roller shutter (to preserve shutter's motor). 2 mini / 20 maxi typ = Dimmer id Device ID typ = VD id VD ID slider Slider number to manage light power btn* Button to push start* When the button have to be pushed during dawn"s ignition (if not set, the button will be pressed just before acting on slider) typ = RGBW id Device ID r Red Value(0-255) g Green Value (0-255) b Blue Value (0-255) w White Value (0-255) Note: Please write the parameters for a full power. The scene will calculate the values needed from them
typ = Scene id Device ID start* At which percentage of the dawn's ignition this scene will be started. 1 will be use by default if nothing is set. typ = Switch id Device ID start* At which percentage of the dawn's ignition this switch will be turned on. 1 will be use by default if nothing is set. typ = Program id Device ID program ID of the program to launch start* At which percentage of the dawn's ignition this program will be started. 1 will be use by default if nothing is set. SpeakerAction id VD ID 2nd parameter = Button Type (One or the other) with this button number slider Number of the volume's slider btn Number of the button to push Note: This actions will be done in the order you declare them in the script
Note: items with * are not mandatory
MODE PARAMETER
This parameter is not mandatory. If not set, all your keys will be used to fade the dawn. You can mix modes and no modes keys!
For each light key, if you want to see it lighting only when it's day, just add mode="day", or mode="night" if you want to see a key lighting only if it's night.
To use a key everytime : no mode or mode="both".
WHERE CHANGE GLOBAL VARIABLE "ROOM" VALUE
At the beginning of the scene In the "Once" Button of the VD In the "Week of Work" Button of the VD In the "Alarm OFF" Button of the VD At the beginning of the Main Loop of the VD Note: Please take care of this changement of value. If the value is not the same everywhere, the scene could not be launched!
DEBUG EXAMPLE
SUPPORT
In case on any issue, please try again with defaults debug's values and post all your DEBUG lines to help me to understand what happens in your configuration.
CONTENT
Advanced Alarm Clock Scene v3.6 Multilingual Advanced Alarm Clock Trigger 12h v2.2 for people that have 12-hour clocks (am-pm) Advanced Alarm Clock Trigger 24h v2.2 3 Icons for the VD 1 icon for the Scene info.txt file
TRANSLATION
All Debugs texts are available in english and french. They could be easily translated in any other language without any LUA knowledge, by creating a new language condition and translating every DebugMsg vars.
Don't hesitate to contact me with the support thread if you want to translate them in another language. Only 37 sentences in the scene v.3.6! Your translations could be added in this official bundle.
173 downloads
- dawn simulator
- dawn simulation
- (and 5 more)
-

Philips HUE AIO VD standalone
By Sankotronic
Philips HUE AIO VD v3.1
(standalone version)
With Philips HUE preview VD v1.1 - brings easier setup and support for multiple Philips HUE bridges
INTRODUCTION
Philips HUE lighting brings colorful way of lighting experience. More about this lights you can find here https://www2.meethue.com/en-us Philips HUE AIO VD is All In One solution for HC2 owners to control Philips HUE lighting with support for all types of HUE lamps made by Philips and some other manufacturers.
PREREQUISITES
Fibaro Home Center 2 with firmware 4.120 or greater (tested up to 4.540) Philips HUE bridge V1 (round) with firmware up to 01041302 (released 05 February 2018) or Philips HUE bridge V2 (square) with firmware up to 1901181309 (released 07 February 2019)
FEATURES
Consists of two VD's: Philips HUE Preview VD which connects to Philips HUE bridge and downloads information of all lights and groups of lights and greatly simplifies installation of Philips HUE AIO VD that controls individual HUE bulbs or group of bulbs. Also added unreachable icon for Philips HUE bridge v1. Philips HUE Preview VD has button for generating authorization username and for easy connection to Philips HUE bridge Support for multiple HUE bridges and most of the Philips HUE bulbs including bulbs from other manufacturers that can be connected to HUE bridge. HUE AIO VD recognizes different types of bulbs like multicolor, white ambience and dimmable and enables proper controls Can control brightness, hue, saturation, color temperature and transition speed that can be set from instant to 10 seconds duration Buttons to activate colorloop efect and Alerts Multilanguage support with 27 languages included. VD's can use HC2 selected language or user can select any other available language. VD will be automatically translated to the selected language (visible after refreshing page on browser or refreshing network data on Fibaro mobile application) Easy setup for VD icons that will also setup icons for all buttons and sliders of the VD. (on UHASTM compatible version is even more easier to setup VD icons with Icon Preview VD) On HUE AIO VD user can setup separated on and off button or have on/off toggle button Self adding of global variables needed and global variable data integrity checking Automatic repair of global variables without user intervention New approach to programming other code to control this VD enables future upgrades without needing to change that code. (See more about that in User Manual provided)
INSTALLATION
Please check provided User Manual where all steps are explained in detail and this video made by @MarcoTorino71:
PACKAGE CONTENT
Philips HUE Preview VD v1.1 standalone Philips HUE AIO VD v3.1 standalone Icon pack Philips HUE E27 bulb indoor Icon pack Philips HUE E27 bulb outdoor Icon pack Philips HUE GU10 bulb indoor Icon pack Philips HUE GU10 bulb outdoor Icon pack Philips HUE LED strip indoor User Manual v1.1 EN
CREDITS
Many thanks to BodyArt, gucio1234 and many other Fibaro forum users for help with testing, translations and user manual.
TERMS AND CONDITIONS
Permission to use, copy, modify and distribute this software and its documentation for educational, research, personal use and non-profit purposes, without fee and without a signed licensing agreement is hereby granted, provided that the copyright notice, with "Terms and conditions" and "Disclaimer" appear in all copies, modifications and distributions.
It is strictly forbidden to sell, rent, lease and/or lend this software for profit without prior consent from the Author.
DISCLAIMER
This software is provided by copyright owner "as is" and any express or implied warranties, including, but not limited to, the implied warranties of merchantability and fitness for a particular purpose are disclaimed. In no event shall the author and distributor be liable for any direct, indirect, incidental, special, exemplary, or consequential damages (including, but not limited to, procurement of substitute goods or services; loss of use, data, or profits; or business interruption) however caused and on any theory of liability, whether in contract, strict liability, or tort (including negligence or otherwise) arising in any way out of the use of this software, even if advised of the possibility of such damage.
Fibar Group S.A. and their employees are not responsible for support of the Philips HUE AIO VD. Please contact the author Sankotronic, on the Fibaro Forum, for any questions or support required.
LEGAL NOTICE
HUE is registered trademark of Philips Lighting Holding B.V. registered internationally.
LATEST NEWS
1 April 2019
Philips HUE bridge firmware new version 1901181309 is out. If you upgrade to this latest firmware Philips HUE AIO VD will continue function properly.
VERSION HISTORY
3.1 - Corrected bug that was causing HUE AIO VD main loop to stop with error if user set light or group ID that does not exists on HUE bridge. Also corrected bug that was not updating list correctly after first scan if user removed or added light or group on HUE bridge.
3.0 - All In One solution, one VD for all types of bulbs and for control of individual light or group of lights with supporting Philips HUE Preview VD.
2.1 - added Philips HUE White dimmable VD of same version as color version.
2.1 - Corrected error handling when HUE bridge is not reachable.
2.0 - Added On/Off button; two version available: 2.0m with Main loop refresh or 2.0b with button refresh for systems with more than 15 HUE lamps to improve response and reduce network traffic; changing brightness, color or Saturation sliders now immediately refreshes VD status; code improved so users can easier setup necessary data
1.5 - Added sliders for color (hue) and Saturation, VD is now getting ID & TCP port setting from VD general tab
1.0 - Changing icons based on the brightness level, Changing icons based on HUE lights state (unreachable/error); Error handling for HUE response data, status information in the bottom bar of the VD; detailed comments in LUA code, main loop refresh code added
Here is a new look of Philips HUE AIO VD and companion Philips HUE Preview VD:
Enjoy coding and your new Philips HUE virtual device!
Sankotronic
PS
This solution is only for HC2. If you have HCL then please check @AkilliYuva.com solution here:
2,822 downloads
-

HC2 Icon Preview VD standalone
By Sankotronic
INTRODUCTION
HC2 Icon Preview VD provides easy way to search custom icons installed on Fibaro Home Center 2 to find their ID number. User can also use it to list through all virtual devices and set their main icon and also icon of all VD buttons and sliders. This capability greatly speeds up building of new virtual devices with many buttons and sliders since their icons can be set at once.
PREREQUISITES
Fibaro Home Center 2 with firmware 4.120 or greater
Any internet browser on computer locally connected to HC2
FEATURES
Provides simple preview of all room, scene and VD custom icons imported to HC2 what makes it great tool for developers and users to find icon ID numbers Provides easy way to setup main icon and icon of all buttons and sliders of all virtual devices installed with just one click on Setup VD icon button VD automatically updates list of the installed virtual devices and icons Multi-language support with 27 languages included (see APPENDIX 1 for the list in user manual). VD can use HC selected language or user can select any other available language. VD will be automatically translated to selected language (visible after refreshing page on browser or refreshing network data on Fibaro mobile application) Global variables are automatically added, monitored and repaired and does not require user intervention
INSTALLATION
Please check provided User Manual and this video by Mr Apple @MarcoTorino71:
PACKAGE CONTENT
HC2 Icon Preview VD v2.1 Standalone Beautiful main icon User manual EN
TERMS AND CONDITIONS
Permission to use, copy, modify and distribute this software and its documentation for educational, research, personal use and non-profit purposes, without fee and without a signed licensing agreement is hereby granted, provided that the copyright notice, with "Terms and conditions" and "Disclaimer" appear in all copies, modifications and distributions. It is strictly forbidden to sell, rent, lease and/or lend this software for profit without prior consent from the Author.
DISCLAIMER
This software is provided by copyright owner "as is" and any express or implied warranties, including, but not limited to, the implied warranties of merchantability and fitness for a particular purpose are disclaimed. In no event shall the author and distributor be liable for any direct, indirect, incidental, special, exemplary, or consequential damages (including, but not limited to, procurement of substitute goods or services; loss of use, data, or profits; or business interruption) however caused and on any theory of liability, whether in contract, strict liability, or tort (including negligence or otherwise) arising in any way out of the use of this software, even if advised of the possibility of such damage.
Fibar Group S.A. and their employees are not responsible for support of the ABC VD. Please contact the author Sankotronic, on the Fibaro Forum, for any questions or support required.
VERSION HISTORY
2.1 – VD completely redesigned and added possibility to set virtual devices main and all buttons and sliders icon. Added checking of global variables integrity and automatic repair. It also automatically updates list of available virtual devices on HC2 and list of custom icons after each change. 1.0 – Code optimized and resolved some bugs 0.1 – First release
Here is look of the HC2 Icon preview VD:
Enjoy coding and your new HC2 Icon Preview virtual device!
Sankotronic
1,557 downloads
-

Ambient Weather Station VD
By Sankotronic
Ambient Weather Station VD standalone
INTRODUCTION
Ambient Weather station (AWS) VD reads measurements provided by Ambient weather stations which are connected to ambientweather.net service on internet. VD is tested with Ambient Weather station WS-1401-IP OBSERVER, but should also work with other similar types of Ambient weather stations.
PREREQUISITES
Fibaro Home Center 2 with firmware 4.560 or greater
Emoji VD standalone must be downloaded and installed for AWS VD to function properly.
At least one Ambient weather station connected to internet and user application key and API key
FEATURES
User can install multiple instances of VD for as many Ambient Weather stations he/she might have. Uses ambient weather cloud API to retrieve latest measurements. Provides measurements in imperial or metric units and also wind speed in m/s. Provides global variables for indoor and outdoor temperature, indoor and outdoor humidity, wind and gust speed, rain event, solar radiation, UV, outdoor and indoor PM25 and CO2 that can be used to trigger block or LUA scenes for specific user actions. Multi-language support with 27 languages included (see APPENDIX 1 for the list). VD can use HC selected language or user can select any other available language. VD will be automatically translated to selected language Easy setup for VD icons (on UHAS™ compatible version is this even easier) Global variables are automatically added, monitored, repaired and cleaned and does not require user intervention
INSTALLATION
Please check provided User Manual
PACKAGE CONTENT
Ambient Weather Station VD v1.1 Icon pack User manual EN
TERMS AND CONDITIONS
Permission to use, copy, modify and distribute this software and its documentation for educational, research, personal use and non-profit purposes, without fee and without a signed licensing agreement is hereby granted, provided that the copyright notice, with "Terms and conditions" and "Disclaimer" appear in all copies, modifications and distributions. It is strictly forbidden to sell, rent, lease and/or lend this software for profit without prior consent from the Author.
DISCLAIMER
This software is provided by copyright owner "as is" and any express or implied warranties, including, but not limited to, the implied warranties of merchantability and fitness for a particular purpose are disclaimed. In no event shall the author and distributor be liable for any direct, indirect, incidental, special, exemplary, or consequential damages (including, but not limited to, procurement of substitute goods or services; loss of use, data, or profits; or business interruption) however caused and on any theory of liability, whether in contract, strict liability, or tort (including negligence or otherwise) arising in any way out of the use of this software, even if advised of the possibility of such damage.
Fibar Group S.A. and their employees are not responsible for support of the ABC VD. Please contact the author Sankotronic, on the Fibaro Forum, for any questions or support required.
116 downloads
(0 reviews)0 comments
Submitted
-

Yeelight Manager
By ojc
VD YEELIGHT MANAGER
Originally released on domotique-fibaro.fr
v. 1.3.0 - 14/01/2018
I present the VD Yeelight Manager which, as its name suggests, allows you to integrate Yeelight products with the HC2. To be very precise, I only have a Bedside Lamp and I have not tested this VD with other products. However, since the API is generic, there are no reasons that it does not work too. The only limit, I did not integrate in the DV management of the background light since the Bedside Lamp does not have such a light.
To use it, simply enter the IP of the Yeelight in the IP field of the DV, and the port in the Port field of the DV (the port used by the Yeelights is 55443). You can add or change elements of the virtual device according to your needs (the white light bulb does not need, for example, anything related to color management), as long as the TCP Connection and Transmission buttons keep their respective names (btnTCPConnection and btnTransmission). Yeelight Manager will find them himself by these names.
In order to be able to manage a Yeelight 'almost' like a module, simply insert in the scene or the code of the button or Main Loop the following code:
_y={credits='Yeelight Controller v. 1.3.0 - Copyright 2018 Olivier Meyer - GNU GPLv3',global='y_yeelight_global',item='y_yeelight_',props={power=true,bright=true,ct=true,rgb=true,hue=true,sat=true,color_mode=true,flowing=true,delayoff=true,flow_params=true,music_on=true,name=true,bg_power=true,bg_flowing=true,bg_flow_params=true,bg_ct=true,bg_lmode=true,bg_bright=true,bg_rgb=true,bg_hue=true,bg_sat=true,nl_br=true},f=fibaro,debug=function(s,m,c)s.f:debug(string.format('<span style="color:%s;">%s</span>', c, m))end,here=function(s)local h=type(s.f.getSelfId)=='nil' if h then return h,__fibaroSceneId else return h,s.f:getSelfId(),_elementID_ end end,log=function(s)local h=s:here()if h then local a=s.f:args()if a then if a[1].yeelight then s:debug(a[1].debug,a[1].color);s:debug(a[1].command,a[1].color);os.exit()end end end end,getBtn=function(s,i,n)local c,r=0,api.get('/devices/'..tostring(i))['properties']['rows'] local x=#r for a=1,x do local y=#r[a].elements for b=1,y do c=c+1 if n==r[a].elements[b].name then return c end end end s:debug('[Yeelight] Unable to locate button '..n..', check virtual device '..i,'Tomato');return nil end,build=function(s,m,p)local c='{"id":1, "method":"'..m..'", "params":['for i=1,#p do if type(p[i])=="number"then c=c..p[i]else c=c..'"'..p[i]..'"'end;if i~=#p then c=c..', 'end end;c=c..']}\r\n'return c end,load=function(s,v)local g=s.f:getGlobalValue(v)if string.len(g or '')>0 then local d=json.decode(g)if d and type(d)=='table'then return d else s:debug('[Yeelight] Unable to process data, check variable','Tomato')end else s:debug('[Yeelight] No data found!','Tomato')end return nil end,set=function(s,i,d)local g=s:load(s.global)if g[tostring(i)]then local a,b,c=s:here();g[tostring(i)].scene=a;g[tostring(i)].id=b;g[tostring(i)].button=c;g[tostring(i)].command=d;s.f:setGlobal(s.global,json.encode(g))end end,call=function(s,i,m,p)local b=s:getBtn(i,'btnTransmission')if b==nil then return nil end;local c=s:build(m,p)s:set(i,c)s.f:call(i,'pressButton',b)end,getValue=function(s,i,p,g)if s:checkP(p) then if type(g)~='table' then g=s:load(s.item..i)end if g.properties then if g.properties[p] then if g.properties[p].value then return g.properties[p].value end end end s:debug('[Yeelight] Unable to get value of '..tostring(p)..', please check variable.','Tomato');end return nil end,getModificationTime=function(s,i,p,g)if s:checkP(p) then if type(g)~='table' then g=s:load(s.item..i)end if g.properties then if g.properties[p] then if g.properties[p].modificationTime then return g.properties[p].modificationTime end end end s:debug('[Yeelight] Unable to get modification time of '..tostring(p)..', please check variable.','Tomato');end return nil end,get=function(s,i,p)local g=s:load(s.item..i);return s:getValue(i,p,g),s:getModificationTime(i,p,g)end,getStatus=function(s,i)local g=s:load(s.item..i)if g then if g.status then return g.status end end return nil end,getLastChange=function(s,i)local g=s:load(s.item..i)if g then if g.last then return g.last end end return nil end,checkP=function(s,p)if not s.props[p] then s:debug('[Yeelight] '..p..' is not an existing property!','Tomato') return false end return true end} _y:log() This code above offers the following functions:
_y:call(id, method, params) which allows to send a command to the lamp. The various buttons of the VD give examples. To go further, please have a look at the Yeelight API documentation : Yeelight_Inter-Operation_Spec.pdf _y:get(id, property) which does exactly the same thing as fibaro:get() _y:getValue(id, property) which does exactly the same thing as fibaro:getValue() _y:getModificationTime(id, property) which does exactly the same thing as fibaro:getModificationTime() _y:getStatus(id) which returns "online" if the lamp is connected to the wifi network, and "offline" otherwise _y:getLastChange(id) which returns a table containing the properties that have just been modified and their new value
The logs generated by the call () function are displayed in the debug zone of the scene (do not forget the _y: log () line and allow enough instances) or in the button or main loop of the virtual module from which the function was used.
To use these lamps as scene triggers, the VD automatically creates a global variable y_yeelight_XXX, where XXX is the ID of the VD. This global variable contains all the properties of the lamp and is updated in real time.
For example, to start a scene when a Yeelight is turned on:
--[[ %% globals y_yeelight_XXX --]] _y={credits='Yeelight Controller v. 1.3.0 - Copyright 2018 Olivier Meyer - GNU GPLv3',global='y_yeelight_global',item='y_yeelight_',props={power=true,bright=true,ct=true,rgb=true,hue=true,sat=true,color_mode=true,flowing=true,delayoff=true,flow_params=true,music_on=true,name=true,bg_power=true,bg_flowing=true,bg_flow_params=true,bg_ct=true,bg_lmode=true,bg_bright=true,bg_rgb=true,bg_hue=true,bg_sat=true,nl_br=true},f=fibaro,debug=function(s,m,c)s.f:debug(string.format('<span style="color:%s;">%s</span>', c, m))end,here=function(s)local h=type(s.f.getSelfId)=='nil' if h then return h,__fibaroSceneId else return h,s.f:getSelfId(),_elementID_ end end,log=function(s)local h=s:here()if h then local a=s.f:args()if a then if a[1].yeelight then s:debug(a[1].debug,a[1].color);s:debug(a[1].command,a[1].color);os.exit()end end end end,getBtn=function(s,i,n)local c,r=0,api.get('/devices/'..tostring(i))['properties']['rows'] local x=#r for a=1,x do local y=#r[a].elements for b=1,y do c=c+1 if n==r[a].elements[b].name then return c end end end s:debug('[Yeelight] Unable to locate button '..n..', check virtual device '..i,'Tomato');return nil end,build=function(s,m,p)local c='{"id":1, "method":"'..m..'", "params":['for i=1,#p do if type(p[i])=="number"then c=c..p[i]else c=c..'"'..p[i]..'"'end;if i~=#p then c=c..', 'end end;c=c..']}\r\n'return c end,load=function(s,v)local g=s.f:getGlobalValue(v)if string.len(g or '')>0 then local d=json.decode(g)if d and type(d)=='table'then return d else s:debug('[Yeelight] Unable to process data, check variable','Tomato')end else s:debug('[Yeelight] No data found!','Tomato')end return nil end,set=function(s,i,d)local g=s:load(s.global)if g[tostring(i)]then local a,b,c=s:here();g[tostring(i)].scene=a;g[tostring(i)].id=b;g[tostring(i)].button=c;g[tostring(i)].command=d;s.f:setGlobal(s.global,json.encode(g))end end,call=function(s,i,m,p)local b=s:getBtn(i,'btnTransmission')if b==nil then return nil end;local c=s:build(m,p)s:set(i,c)s.f:call(i,'pressButton',b)end,getValue=function(s,i,p,g)if s:checkP(p) then if type(g)~='table' then g=s:load(s.item..i)end if g.properties then if g.properties[p] then if g.properties[p].value then return g.properties[p].value end end end s:debug('[Yeelight] Unable to get value of '..tostring(p)..', please check variable.','Tomato');end return nil end,getModificationTime=function(s,i,p,g)if s:checkP(p) then if type(g)~='table' then g=s:load(s.item..i)end if g.properties then if g.properties[p] then if g.properties[p].modificationTime then return g.properties[p].modificationTime end end end s:debug('[Yeelight] Unable to get modification time of '..tostring(p)..', please check variable.','Tomato');end return nil end,get=function(s,i,p)local g=s:load(s.item..i);return s:getValue(i,p,g),s:getModificationTime(i,p,g)end,getStatus=function(s,i)local g=s:load(s.item..i)if g then if g.status then return g.status end end return nil end,getLastChange=function(s,i)local g=s:load(s.item..i)if g then if g.last then return g.last end end return nil end,checkP=function(s,p)if not s.props[p] then s:debug('[Yeelight] '..p..' is not an existing property!','Tomato') return false end return true end} _y:log() local function run() --executed on light on end local trigger = fibaro:getSourceTrigger() if trigger.type == "global" then if trigger.name == "y_yeelight_XXX" then if _y:getLastChange(XXX)["power"] == "on" then run() end end end429 downloads
(1 review)0 comments
Updated
-

Heating
By szmyk
Heating VD, which I use especially when I go on winter holidays.
On the day of departure we have no time to adjust heating, so a few days before using this VD I set the date/time when the heating should be turned off and date/time when it should be turned on again. Of course you can use this VD everyday just to turn on/off heating or to set the heating timer on/off.
When it turn off the heating it just turn on vacation mode for every zone.
Features:
instant turn on/off the heating in all zones set the date and time when the heating will be turned off and/or turned on _ - change on/off setting time ❌ - clear timer ♻️ - refresh button - you don't need to touch it. It's called programmatically displaying the current state (on/off) sending push messages about changing heating state (by scheduler)
Customization:
change the VD labels to your own language set mobile device id to get push messages about changing heating state -- USER MODIFICATION local pushDeviceId = 0 -- mobile device id to send push messages local scheduleFreq = 1 -- [min] -- END OF USER MODIFICATION Screenshot:
Icon:
Enjoy...
143 downloads
(0 reviews)0 comments
Updated
-

Sleep Timer & Scheduler
By szmyk
Initially it was supposed to be a simple Sleep Timer, similar to what we have in TV but later I added some new functions and now it is a simple Scheduler and Sleep Timer in one VD.
Features:
Sleep Timer - just set the time after which the device will be turned off or turned on Scheduler - set the time when the the device should be turned on and the time when the the device should be turned off (or in the reverse order - first turn off and then turn on) Filtering devices - you can choose only devices with turnOff action attribute Filtering rooms - you can choose only rooms which have devices with turnOff action attribute _ - change on/off setting time ✔ - add device to schedule ❌ - remove device from schedule; triple click to clear the schedule Refresh button - you don't need to touch it. It's called programmatically Displaying the current schedule Logging the events to debug window: add, remove, turn on, turn off automatic support for plugins with turnOff action attribute support for custom virtual devices and plugins instant turn on/off (VD and plugins also) presenting the current device state ( ⚡ when the device is on, and - when is off)
Customization:
change the VD labels to your own language change the texts in the Refresh button code and in the main code: local lT = { newLine = "<br/>", -- change to "\n" if you use this VD on iOS mobile mainly or " " for Android scheduledDevices = "Scheduled devices" } Actually there is a problem with breaking lines in labels, so you can choose new line char. More details here.
add your own virtual devices or plugins in main loop code:
local extraDevices = { -- deviceId, commandOn, parameterOn, commandOff, parameterOff ["335"] = { "pressButton", "2", "pressButton", "3" }, ["339"] = { "setVolume", "20", "setMute", "" }, } icons:
Enjoy...
165 downloads
-
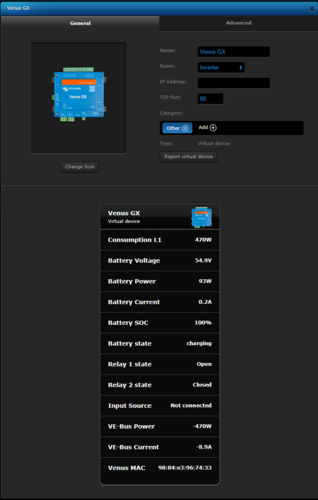
Venus_GX.vfib
By Pflug
Venus_GX.vfib
Please enter the local IP address of your Venus in the LUA "Main loop"
( under advanced settings of the virtual device)
vvvvvvvvvvv
local Venus_IP = "192.168.1.11"
Just replace the numbers with yours(keep the " characters)
99 downloads
(0 reviews)0 comments
Updated
-
VD - Switch CCGX Relais .lua
By Pflug
VD - Switch CCGX Relais .lua
A VD that can switch the AC-Out2 relais of the Victron inverter
One can not directly switch the Quattro relais,
therefore I used the “Venus GX Relais 2” (currently NOT used) and connected it to the contacts of the “AUX inputs of the Quattro inverter
and you have to install an assistant on the Quattro to do the final switching o the Relays.
61 downloads
- victron
- modbus tcp
- (and 6 more)
(0 reviews)0 comments
Submitted
-
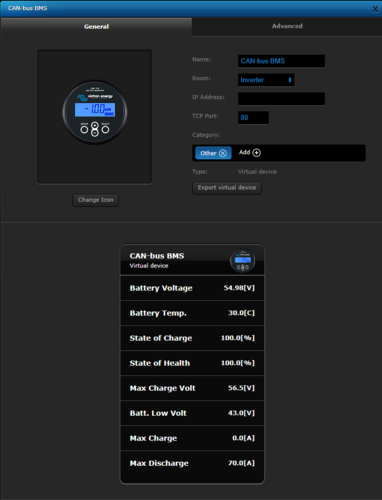
VD-BMS.lua
By Pflug
VD-BMS.lua
This is for Canbus BMS
I have a BYD Battery monitor.
Most of the Registers are have only "0" valiues and I extracted only what I found having some values.
-- Unit ID /DeviceInstance Remark
-- 225 512 CAN-bus BMS
24 downloads
- bms
- canbus bms
- (and 4 more)
(0 reviews)0 comments
Submitted
-
(0 reviews)
0 comments
Submitted
-
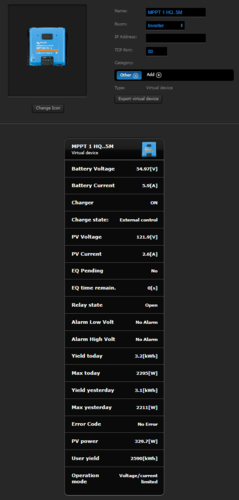
VD-Solar-Charger.lua
By Pflug
VD-Solar-Charger.lua
This extracts all available information from the MPPT charger.
-- Unit ID Instance in VRM
-- 245 258 Venus GX VE.Direct 1 port (ttyO2)
-- 243 260 Venus GX VE.Direct 2 port (ttyO4)
45 downloads
(0 reviews)0 comments
Submitted
-
VD-Venus.lua
By Pflug
VD-Venus.lua
Extracts all info from Unit ID 100
-- READ Venus Register 840-846 UNIT ID 100
41 downloads
(0 reviews)0 comments
Submitted
-
 (0 reviews)
0 comments
Submitted
-
 (0 reviews)
0 comments
Submitted
-

Inverter_AC2_On_Off.vfib
By Pflug
Inverter_AC2_On_Off.vfib
Switches Relais 2 on Venus GX.
70 downloads
(0 reviews)0 comments
Submitted
-
 (0 reviews)
0 comments
Submitted
-
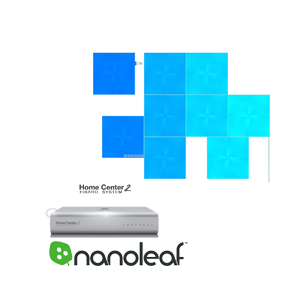
Nanoleaf Canvas VD standalone
By Sankotronic
Nanoleaf Canvas VD v1.0.1
(standalone version)
INTRODUCTION
Nanoleaf Canvas light panels https://nanoleaf.me/en/ brings new way of lighting experience. Nanoleaf Cavas VD enables Fibaro Home Center 2 to control this lights and show their status.
PREREQUISITES
Fibaro Home Center 2 with firmware 4.530 (can work on older versions same as Nanoleaf Aurora VD down to 4.120) Nanoleaf Canvas starter kit with firmware 1.1.0 or greater
FEATURES
Enables HC2 to control Nanoleaf Canvas lights and show their status
Control brightness, hue, saturation, color temperature and activate Canvas effects VD automatically updates list of the available effects when added or deleted with Nanoleaf mobile application Scroll with buttons through available effects on VD and activate Selected and running effect type can now be recognized by small icon in front of the effect name.
Canvas control light panel has built in Rhythm module and there is no AUX input available. Rhythm module is automatically activated when rhythm effect is activated Use Process button to control Canvas light by other scenes and VD Built in button for generating authorization token for easy connection to Canvas light Multilanguage support with 27 languages. VD will be automatically translated to HC selected language or user can select any other available language. Easy setup for VD icons with automatic setup of icons for buttons and sliders too. (UHAS™ compatible version has even more easier icon setup) User can setup VD to have separated on and off buttons or to have toggle on/off button Light can be turned on/off with buttons and brightness slider. Even if brightness slider is used to turn off Aurora light, VD remembers last brightness settings so if light is turned back on with button it will be turned on at last brightness level. Self adding and checking of global variable data integrity. Automatic repair of global variables without user intervention New approach to programming other code to control this VD enables future upgrades without needing to change that code. (See more about that in User Manual provided)
INSTALLATION
Please check provided User Manual where all steps are explained in detail.
PACKAGE CONTENT
Nanoleaf Canvas VD v1.0.1 (standalone) Icons for VD User manual v1.1 EN
CREDITS
Many thanks to @gucio1234 and @Bodyart from forum.fibaro.com for help with testing, translations and manual.
TERMS AND CONDITIONS
Permission to use, copy, modify, and distribute this software and its documentation for educational, research, personal use and non-profit purposes, without fee and without a signed licensing agreement, is hereby granted, provided that the copyright notice, with "Terms and Conditions" and "Disclaimer" appear in all copies, modifications, and distributions. It is strictly forbidden to sell, rent, lease and/or lend this software for profit without prior consent from the Author.
DISCLAIMER
This software is provided by copyright owner "as is" and any express or implied warranties, including, but not limited to, the implied warranties of merchantability and fitness for a particular purpose are disclaimed. In no event shall the author and distributor be liable for any direct, indirect, incidental, special, exemplary, or consequential damages (including, but not limited to, procurement of substitute goods or services; loss of use, data, or profits; or business interruption) however caused and on any theory of liability, whether in contract, strict liability, or tort (including negligence or otherwise) arising in any way out of the use of this software, even if advised of the possibility of such damage.
Fibar Group S.A. and their employees are not responsible for support of the Nanoleaf Aurora VD. Please contact the author Sankotronic, on the Fibaro Forum, for any questions or support required.
LEGAL NOTICE
Nanoleaf and Canvas are registered trademarks or trademarks of Nanoleaf Energy Technology ShenZhen Limited registered in PR China and other countries.
NEWS
1 April 2019
Nanoleaf Canvas light panels latest firmware update v1.2.0 is out. If you upgrade to this latest firmware Nanoleaf Canvas VD v1.0 functionality will remain intact and will continue function properly.
12 September 2019
Canvas VD is working flawlessly with Canvas latest firmware version 1.5.0
VERSION HISTORY
1.0.1 - Corrected bug in VD main loop that prevented saving updated effect
1.0 - First release of standalone version build on code of VD for UHAS™
Here is look of the Nanoleaf Canvas VD:
Enjoy coding and your new Nanoleaf Canvas virtual device!
Sankotronic
150 downloads
-

Checking devices connected to the WI-FI network Sprawdzanie urządzeń podłączonych do sieci WI-FI
By talar26
Checking devices connected to the WI-FI network
Checking devices connected to WI-FI
We create a global variable, for example TabletSony
Then we import the Tablet_Sony_WI-FI virtual device after loading the device, we change the name according to our own needs, e.g. phone of the wife, etc., enter the IP address and port of the device to be checked if it is connected to the local network
tcpSocket = Net.FTcpSocket ("192.168.1.009", 8071) - ip address and device port
bytes, errorCode = tcpSocket: write ("test")
local device = 743 - virtual device id
if errorCode == 0
then
fibaro: call (device, "setProperty", "currentIcon", 1181) - id of the ON icon
fibaro: setGlobal ("TabletSony", "1"); - we create a global variable called eg TabletSony
fibaro: log ("Sony ON tablet ..os.date ("% H:% M ")) - displays the status of the device and the time on the notification bar
else
fibaro: call (device, "setProperty", "currentIcon", 1179) - id of the OFF icon
fibaro: setGlobal ("TabletSony", "0");
fibaro: log ("Sony OFF Tablet" ..os.date ("% H:% M")); ")) - displays the device status and time on the notification bar
end
Sprawdzanie urządzeń podłączonych do WI-FI
Tworzymy zmienną globalną np. TabletSony
Następnie importujemy urządzenie wirtualne Tablet_Sony_WI-FI po załadowaniu urządzenia zmieniamy według własnych potrzeb nazwę np. telefon żony itd. ,wpisujemy adres ip i port urządzenia które ma być sprawdzane czy jest podłączone do sieci lokalnej
tcpSocket = Net.FTcpSocket("192.168.1.009", 8071) -- adres ip i port urządzenia
bytes, errorCode = tcpSocket:write("test")
local device = 743 -- id urządzenia wirtualnego
if errorCode == 0
then
fibaro:call(device, "setProperty", "currentIcon", 1181) -- id ikony ON
fibaro:setGlobal("TabletSony", "1"); -- tworzymy zmienną globalną o nazwie np. TabletSony
fibaro:log("Tablet Sony ON "..os.date("%H:%M"));-- wyświetla na pasku powiadomienie stan urządzenia oraz godzinę
else
fibaro:call(device, "setProperty", "currentIcon", 1179) -- id ikony OFF
fibaro:setGlobal("TabletSony", "0");
fibaro:log("Tablet Sony OFF "..os.date("%H:%M")); "));-- wyświetla na pasku powiadomienie stan urządzenia oraz godzinę
end
297 downloads
-
(0 reviews)
0 comments
Submitted
-
(0 reviews)
0 comments
Submitted
-
BLE Detector - Presence detector based on iNode LAN and BLE devices
By Guest macjoker
Features
The virtual device communicates with iNode LAN, receives and decodes information about all BLE devices available nearby. This allows tracking user presence if small BLE tags are attached to their belongings (like notiOne with a bunch of keys, e.g.).
What you need
iNode LAN - it can detect any Bluetooth 4.0/4.1 device (Bluetooth Low Energy = BLE) BLE tag (iNode Beacon , TrackR , notiOne , etc.) Installation
Configure your iNode LAN to use unicast or broadcast for sending datagrams (UDP packets) Go to the Setup page. For "BLE IP address" put your HC2 IP address (unicast) or broadcast address (192.168.1.255e.g.). For "BLE IP port" you may leave the default value (20000). Create a new virtual device (BLE Detector). Update IP Address and TCP Port (use the same values as for iNode LAN in step 1). Create a new scene (BLE Users). Update config values in the scene (provide names and MAC addresses of persons and their belongings).
That's all to make it work!
Now you can use global variables you have defined in Lua scene (users variable) to check if a person is away or home.
Want to tweak it? Sure!
There are more options. Please read all the comments in the source code.
You may try to:
define MACs of devices to ignore in discovery (your iNode LAN itself), define signal values for IN/OUT events (separately for each user), define the timeout value for each device (this also makes user away), turn on/off debug messages. Zip file content
Virtual device: "BLE Detector". Lua scene with user detection configuration: "BLE Users". Device icon for iNode LAN. FAQ
What are these scripts missing?
Only basic information is decoded from BLE datagrams (counter, MAC address, and signal strength). If you use iNode Sensors you will not get additional values (like temperature, pressure, magnetic or movement changes).
Why is it better than other solution (x) of presence detection?
It does not depend on any movement in your house, which can make many false positives - a running dog e.g. (x = motion sensors) It is independent of other devices. HC2 communicates directly with iNode LAN. (x = RaspberryPi to read iNode and press some virtual buttons in HC2) More stable results (x = python script from iNode website; explained below).
The Python script published by iNode manufacturer for presence detection uses only signal strength. That means to detect that someone is leaving we need to use some (lower part) signal range to have the record of going away. This additionally reduces the signal range for detecting "being home" (higher part of the signal range) and can give effect to the person appearing and disappearing all the time.
To avoid that we also check the latest timestamp of the device activity. Owing to this feature we may extend range signal for "being home" to all possible values, and use only timeout to decide whether a person is home or not (set "-100" to both signalIn and signalOut in users config to achieve that).
What messages should I expect to get from working device?
Here are some logs of the working device...
[DEBUG] 23:29:58: No: 35216 MAC: 00:12:6F:E0:BB:DB Signal: -16 dBm [DEBUG] 23:30:03: No: 35217 MAC: C0:36:A0:DC:87:99 Signal: -79 dBm [DEBUG] 23:30:08: No: 35218 MAC: 00:12:6F:E0:BB:DB Signal: -16 dBm [DEBUG] 23:30:09: No: 35219 MAC: C0:36:A0:DC:87:99 Signal: -79 dBm [DEBUG] 23:30:12: No: 35220 MAC: C0:36:A0:DC:87:99 Signal: -69 dBm and the scene:
[DEBUG] 23:30:21: MAC: C0:36:A0:DC:87:99 Signal: -79 (dBm) Time ago: 0 (sec) [DEBUG] 23:30:21: MAC: DF:12:45:F7:40:65 Signal: -84 (dBm) Time ago: 30 (sec) [DEBUG] 23:30:21: Gienia is home [DEBUG] 23:30:21: Zenek is home [DEBUG] 23:30:24: MAC: DF:12:45:F7:40:65 Signal: -84 (dBm) Time ago: 0 (sec) [DEBUG] 23:30:24: MAC: C0:36:A0:DC:87:99 Signal: -79 (dBm) Time ago: 3 (sec) [DEBUG] 23:30:24: Zenek is home [DEBUG] 23:30:24: Gienia is home Is it a stable solution? Can you share any experience about it?
For my configuration, I am using two pieces of notiOne. They are really tiny, the batteries are supposed to stay alive for about a year (from my experience it was usually about 6 months). Additionally, you can track them whenever someone with BLE and their App is near.
The results I get in my flat, where walls are made of silicate blocks, are quite stable. iNode LAN can detect these notiOnes with the weakest signal (-90 to -88 dBm) from a distance of 7-8 meters even through two silicate walls (24cm + 12cm thick). So placing iNode LAN in the middle of the flat covers the whole area.
My iNode LAN works with firmware version published in December 2017 ("FW date: Dec 14 2017/09:10:32"). I had no issues about it for more than 18 months right now. It is stable. I even use it as a power failure indicator: it is not plugged to UPS (whereas HC2 and NAS are), so when the device disappears from my LAN, I know there is something wrong with the power line.
Is there any way to extend Bluetooth range for iNode LAN? My house is too large for a single device of that kind.
Well, the device range is connected to Bluetooth limitations. If you need a larger area to be covered with BLE devices detection you could use more then one iNode LAN device. Each device should use a different global variable for storing detected BLE events (BleDevicesA, BleDevicesB, ...). The best way to merge these results would be an updated Lua scene, which could analyze more variables and properly select best data (i.e. select stronger signal if the same BLE tag is seen in many iNode LAN devices). This is not supported with the current version of Lua scene.
Another (not so nice, but quicker to achieve) workaround for that could be duplicating not only the BLE Detector VD but also the BLE Users scene. Each scene copy should have different global variables for users (like: isZenekHomeA, isZenekHomeB, ...) and additional code can interpret these variables to get final detection value (local isZenekHome = isZenekHomeA or isZenekHomeB or ...)
62 downloads
(0 reviews)0 comments
Updated
-
Download Statistics
-
New reviews
-
 By Bornheim · PostedI integrated two HUE bridges in my HC3. It works perfect (and much better and more powerful then the app integrated in HC3). In particular, also sensors, temperature measures etc. are available and can be used in Scenes. However, in both cases after installing and entering the IP adress of my HUEs I had to restart the HC3 to get the authentification running. So I assume to install one has to (i) upload / install the QuickApp, (ii) enter the IP address of the HUE in the local LAN, (iii) rest
 -

-

-

-
 By Sankotronic · PostedVery useful solution to help with gradually moving from HC2 to HC3. I have tested few of the QA and used them to test some of my new solutions on HC3 keeping HC2 still having main controll of our house. Thank you @cag014 for yet another excellent solution!
 -

-

-

-
 By SmartHomeEddy · PostedGreat QuickApp and excellent configuration manual. QuickApp works smooth. Thanks!
 -

-
-
Highest Rated Submitters
No ratings this week.
No ratings this month.
No ratings this year.
-
1

-
2

-
3

-
4
-
5

-