
Welcome to Smart Home Forum by FIBARO
Dear Guest,
as you can notice parts of Smart Home Forum by FIBARO is not available for you. You have to register in order to view all content and post in our community. Don't worry! Registration is a simple free process that requires minimal information for you to sign up. Become a part of of Smart Home Forum by FIBARO by creating an account.
As a member you can:
- Start new topics and reply to others
- Follow topics and users to get email updates
- Get your own profile page and make new friends
- Send personal messages
- ... and learn a lot about our system!
Regards,
Smart Home Forum by FIBARO Team

Virtual Devices
The category contains virtual devices submitted by users.
Downloading and submission terms have to be accepted.
Types of files accepted: LUA, VFIB, ZIP, TAR, RAR, JSON.
Virtual devices have to be described properly, screen shots are optional.
Support topics are created automatically here Virtual devices
Report topics and files that are no longer supported by authors.
All the files submitted have to be approved by administrators.
86 files
-
BleBox AirQuality Monitor
By Mieszko64
Poniżej pierwsza wersja kodu dla Fibaro VD odczytująca dane z Blebox AirSensor -dane dostępne po sieci lokalnej: adresIP.
- wymaga wpisania adresu IP urządzenia Blebox AirSensor dostępnego po sieci lokalnej WiFi
- wymaga wpisania miejscowości
- wymaga weryfikacji numeracji/ id ikon (ikony powszechnie wykorzystywane w różnych prezentacjach i VD, bedą też dostępne po zainstalowaniu Airly VD lub lookO2 VD. Można oczywiście wgrać też swoje własne projekty ikon.
VD umożliwia:
1. Prezentacje danych:
-indeks jakości powietrze 1 z 5
-indeks PM1
-indeks PM2.5
-indeks PM10
3. Zapis zmiennej globalnych "BleBox" indeksu jakości powietrza(IJP)- przydatna do wywoływania z innych np własnych VD
4 downloads
(0 reviews)0 comments
Submitted
-

Control McLighting v2 based on ESP8266 board
By Pcg
Control ESP8266 lighting gadget developed by Tobias Blum
Change light modes and control through HC2
Requirements:
ESP8266 board programmed with McLighting software For every button you should change "local led_pin = [your control pin]" Use your own ip address and port
Fell free use and modify,but let me have a copy please for improving my knowledge.
29 downloads
(0 reviews)0 comments
Updated
-

uhas UHAS (Universal Home Automation System) for HC2
By Sankotronic
UHAS v1.0.4 (Universal Home Automation System) for HC2
UHAS INTRODUCTION
UHAS is a set of scenes and Virtual Devices (VD) that provide the following capabilities:
Auto translation of all scenes, VD's, predefined global variables, and messages to 31 different languages (19 directly supported by HC2) (NOTE – not all languages are translated, and users are very welcomed to help with translations that are not yet done) Scheduled and repeating events based on time of day, week, month, and season including Scene FTBE which provides repeating and scheduled actions Advanced Notification Center (ANC) brings centralized notifications with support for most popular services like Pushover, Telegram, GroupMe, WhatsApp and Signal, Sonos TTS and LaMetric TIME smart clock notifications Advanced Lighting Control (ALC) with integration for Philips HUE, Nanoleaf, LIFX and Blebox devices (will be provided in separate package)
Very Smart Blinds (VSB) automation
Presence monitoring and control with geofencing and Netatmo presence
Weather state and forecast with notifications and integration for Netatmo weather station and WeatherFlow and Tempest weather stations
Home consumption monitoring and recording
Appliance monitoring - with notifications
Safety alarms fire and flood
Security alarm integration ready with provided global variables
Irrigation control based on FIBARO devices
Scenes ready to use with Fibaro dimmer 2, Fibaro keyFob, Fibaro Swipe, Fibaro Button and Remotec ZRC-90 central scene activation with built in support for ANC
HC2 system status notifications, automatic backups and many more...
UHAS OVERVIEW
UHAS has been developed for the Fibaro Home Centre 2 (HC2) home automation controller, as a series of modules, which are responsible for one particular action or job, and the user can interact with them as a group, or on their own. UHAS provides an advanced Home Automation (HA) set of features, ready to be used out of the box with minimum user effort to set up and run. Running code is provided as part of the system, doing most of the settings for the user or a systems installer. UHAS is primarily intended to be used by users of the Fibaro HC2 system who wish to have fully featured HA without the need to learn LUA programming and spending a lot of time with coding Virtual Devices and scenes. UHAS can also become a part of a mature Fibaro system installation which has developed with many modules to cover more advanced HA and more devices. UHAS Virtual Devices and scenes use proprietary code developed by author. This code is developed to minimise users involvement in installation and setting of the system. Most of the necessary setting is done by the UHAS components and other settings are simplified and minimised as much as possible. This was also possible because all UHAS VD's and scenes use role system that is used to find necessary components for actions to be performed. UHAS Virtual devices category is set automatically during translation or changing of the main icon. This means that most of the VD's should show in proper category in new mobile app as lights, blinds, gates, ambience, climate, safety, security, multimedia, remotes and other. The same goes for scenes, when scenes save their settings after first manual run then also category is set.
UHAS PREREQUISITES
Fibaro Home Center 2 (HC2) with firmware version 4.120 or higher (recommended but not necessary expanded RAM memory to at least 2Gb)
Configured and installed z-wave devices – I.e., light switches, motion sensors, lux detectors etc.
INSTALLATION AND UPGRADE
NEW USERS - Please download provided UHAS v1.0.3 Installation package and UHAS Installation and User Manual v1.0.3 EN and then UHAS v1.0.4 update package and install. EXISTING USERS - if your UHAS is: Not yet started with installation then please download full package UHAS v1.0.3 Installation package and install. Still on v1.0 or V1.0.1 then please first download UHAS v1.02. upgrade package and install. Lastly download and install UHAS v1.03. upgrade package Installed v1.0.2 then please download UHAS v1.03. upgrade package and install. Installed v1.0.3 then please download UHAS v1.04. update package and install.
ADDITIONAL NOTE - In UHAS Installation and User Manual v1.0.3 EN instructions for ALC scene upgrade say:
UPGRADE INSTRUCTIONS – This upgrade is recommended. To upgrade and keep your ALC Scene settings please copy new code from ALC Scene v1.3.3.lua from line:
-- NEW v1.3.3 - copy code from here to the end of scene code to keep your settings above this line
to the end of code.
The mentioned line I forget to add to the code before making upgrade package, therefore please copy new code from line:
-- THE CODE BELOW DOES NOT REQUIRE MODIFICATION BY THE USER to the end of code. Thanks goes to @MiZ for pointing that out 🙏
IMPORTANT NOTE
UHAS uses its own unique global code variables. This means that UHAS will NOT influence the current system scenes, scripts, or virtual devices in any way, even if any of Sankotronic’s earlier UHAS beta versions and standalone scenes or VD's (Virtual Devices) are being used. There is no need for any changes to be made to the existing code before the installation of UHAS. The UHAS global variables are created and controlled automatically by the system so that you do not need to maintain them manually.
UHAS INSTALLATION PACKAGE CONTENT (29.1Mb)
92 Virtual Devices 53 scenes Icon sets for all the above VD's and scenes
THANK YOU! ❤️
I want to BIG thank to @clowg for helping me with translations and writing manual these last days speeding up publishing UHAS.
BIG thank to @gucio1234 and his son Cyprian for making logo for UHAS and 3D printed with real gears! I just love it ❤️
I also want to thank many of you who helped during testing of UHAS beta versions and with translations! @clowg, @speedoxx007 ,@Bodyart, @jimicr, @gucio1234, @jompa68, @Sjekke, @robw, @rbhun, @lennypenny, @FunkFib, @MarcoT, @Orgli, @MarcoTorino71 and many others. Your help is greatly appreciated. Apologies to all other not mentioned nice people who contributed in making UHAS.
I also want to thank gurus of this forum @petergebruers, @jgab, @cag014, @SmartHomeEddy and others for help with coding in LUA.
And of course a BIG thank to Fibaro for providing Home Center 2 and Home Center 3 for developing purposes!
BIG THANKS! also to all UHAS users for their donations! Your support is greatly appreciated! 🙏
TERMS AND CONDITIONS
Permission to use, copy, modify and distribute this software and its documentation for educational, research, personal use and non-profit purposes, without fee and without a signed licensing agreement is hereby granted, provided that the copyright notice, with "Terms and conditions" and "Disclaimer" appear in all copies, modifications and distributions. It is strictly forbidden to sell, rent, lease and/or lend this software for profit without prior consent from the Author.
DISCLAIMER
This software is provided by copyright owner "as is" and any express or implied warranties, including, but not limited to, the implied warranties of merchantability and fitness for a particular purpose are disclaimed. In no event shall the author and distributor be liable for any direct, indirect, incidental, special, exemplary, or consequential damages (including, but not limited to, procurement of substitute goods or services; loss of use, data, or profits; or business interruption) however caused and on any theory of liability, whether in contract, strict liability, or tort (including negligence or otherwise) arising in any way out of the use of this software, even if advised of the possibility of such damage.
Fibar Group S.A. and their employees are not responsible for support of the UHAS. Please contact the author Sankotronic, on the Fibaro Forum, for any questions or support required.
1,773 downloads
-
LOQED Touch Smart Lock Virtual Device for FIBARO Home Center 2
By tinman
What features does the LOQED Touch Smart Lock offer with Fibaro?
The LOQED Touch Smart Lock & Fibaro integration is done via the local bridge API.
Currently, the following functionalities are supported:
Send real-time status changes of the lock (open, unlock, lock) and battery, Wi-Fi, Bluetooth state to the Fibaro HC2 gateway.
Receive commands from the Fibaro HC2 gateway to change the lock state (open, unlock, lock).
Only English language supported, however you can edit the VD code to add your own language.
Currently this VD can’t decode json data POSTed by the bridge, as FIBARO API simply ignores any unknown data and accept only JSON key args:[{}]. Therefore, one can’t decode who opened/closed the LOQED via App (or if it was manually, with knob).
Security consideration: the LOQED bridge sends any status change (e.g. "the door was opened") to Fibaro over an unsecure HTTP connection in your Wi-Fi network. There is no way to add digital signature (like used by LOQED QuickApp on e.g. Home Center 3) into the Home Center 2 VD. Note that this does not affect opening/locking the door, it is only concerns the status information.
Requirements
A supported gateway, such as:
Fibaro Home Center 2
Installation
Step 1: create API key
Go to https://app.loqed.com/API-Config and log in with your LOQED app e-mail address and password (note that you will be logged out of the LOQED app). Click on the “API Configuration tool" button. Click the “Add new API key” button. Set any name and create the API key. It is normal the “Remove unlocking/locking checkbox is greyed out.
After the key is created, click on the "view / edit" button. Leave this screen open.
Step 2: Install the Loqed VD on the Fibaro HC2 gateway
Login into your Fibaro gateway.
Download the VD, unzip the content, go to "Devices" -> "Add or Remove Device"->"Import virtual device" and click "select file".
Select the "LOQED.vfib" file and upload it.
Once uploaded, few things need to be set in the VD, go to advanced tab of the VD:
enter the LOQED Bridge IP Address into the VD "IP Address" field enter 80 for the VD "TCP Port" field
in each every Button (Lock, Unlock and Open) code window, change these two variables: local loqed_key_id = 0 local loqed_key = 'TE9RRUQgVkQgdi4wMSBmb3IgSG9tZSBDZW50ZXIgMiAoYykgdGlubWFu' to the values from the LOQED API Config website
loqed_key_id is LOQED API Config -> "API Keys (incoming webhooks)" -> "Local Key ID"
loqed_key is LOQED API Config -> "API Keys (incoming webhooks)" -> "Key"
Save the VD.
You should get now some values displayed in the VD,
if this is working please change the loop value in VD mail loop window to something like e.g. 10 minutes
fibaro:sleep(1000*60*10)
instead of the 10 seconds
fibaro:sleep(1000*10)
which are fine for test, but not daily use.
Step 3: Setup Variables on the Fibaro HC2 gateway
Go to "Panels" -> "Variables Panel"
Scroll down to "Predefined variables"
Click on "Add"
For variable name use "LOQED"
Add two extra values, you need totally 4 of them
For the values use following values:
open unlocked locked unknown
Click on save.
Later, you will be able to run your own block and LUA scenes, based on the LOQED variable values.
Step 4: Create webhook scenes on the Fibaro HC2 gateway
Go to scenes, and click on create -> new -> LUA
You need totally 4 scenes, the scene name does not matter, the scene ID is only important (for LOQED webhook).
For the vd_id please use the LOQED VD device ID, which you previously wrote down.
for "Open State" scene
--[[ %% properties %% events %% globals --]] -- change the xxx below to the LOQED VD ID on your HC2 local vd_id = xxx fibaro:call(vd_id, "setProperty", "ui.LabelStatus.value", "Open") fibaro:setGlobal("LOQED", "open")
for "Locked State" scene
--[[ %% properties %% events %% globals --]] -- change the xxx below to the LOQED VD ID on your HC2 local vd_id = xxx fibaro:call(vd_id, "setProperty", "ui.LabelStatus.value", "Locked") fibaro:setGlobal("LOQED", "locked")
for "Unlocked State" scnene
--[[ %% properties %% events %% globals --]] -- change the xxx below to the LOQED VD ID on your HC2 local vd_id = xxx fibaro:call(vd_id, "setProperty", "ui.LabelStatus.value", "Unlocked") fibaro:setGlobal("LOQED", "unlocked")
for "Unknwon Position" scene
--[[ %% properties %% events %% globals --]] -- change the xxx below to the LOQED VD ID on your HC2 local vd_id = xxx fibaro:call(vd_id, "setProperty", "ui.LabelStatus.value", "Unknown position") fibaro:setGlobal("LOQED", "unknown")
Write down the scene IDs, you will need them in Step 7
Step 5: Test VD / Scenes
Go to "Your Home" on your HC2 webpage, to be able to see the VD and scenes together.
Clicking on the Open, Unlock and Lock buttons of the VD should controll your LOQED Lock, additionally you should see in the VD "Lock state" label some messages,
e.g. when you click on "Unlock" the status will be "Unlock clicked" right after you clicked, and "Unlock executed" right after your LOQED Lock recieved that command.
Executing (simply manually click on start) of the 4 scenes, should change the VD "Lock state" label to "open", "locked", "unlocked" and "unknown position".
If all these tests are successful, you can continue with the next step.
Step 6: Create a user and set access permissions on the Fibaro HC2 gateway
Go to Settings->Access Control
Create new local user, e.g. loqed
Setup password for the user, please don't use any special characters
Change the user Access Control rights, give the user full access to the LOQED VD and these 4 LUA webhook scenes
Step 7: Create webhooks on LOQED bridge
The LOQED bridge can send any status change of the lock to your gateway as soon as they happen. For this, you need to set some URL's on the LOQED Bridge.
You need to create 4 webhooks on the LOQED Bridge to inform the gateway about the 4 different lock statuses.
Go to https://app.loqed.com/API-Config --> "Outgoing Webhooks via LOQED Bridge" --> click the button "Add/delete webhooks".
On that page, add the following URLs:
http://gw_user:gw_password@gw_ip/api/scenes/123/action/start
(only for the night lock trigger, change the 123 to the ID of the "Locked State" scene)
http://gw_user:gw_password@gw_ip/api/scenes/124/action/start
(only for the latch trigger, change the 124 to the ID of the "Unlocked State" scene)
http://gw_user:gw_password@gw_ip/api/scenes/125/action/start
(only for the open trigger, change the 125 to the ID of the "Open State" scene)
http://gw_user:gw_password@gw_ip/api/scenes/126/action/start
(only for the unknown state trigger, change the 126 to the ID of the "Unknwon Position" scene)
Above, "gw_user" and "gw_password" is your gateway's username and password created in previous step, "gw_ip" is the IP of ypur Home Center 2
Done
That's it! You can now control your LOQED Touch using Fibaro Home Center 2.
Questions?
If you have any questions regarding this VD, comments or improvements requests, please send me PM
tinman
15 downloads
-
CO_MANAGER
By lukasztylski
https://github.com/litepl/fibaro-heating-vd
Heating solution VD, based on Danfoss's thermostats and temperature sensors.
16 downloads
(0 reviews)0 comments
Submitted
-

Sonos API Player VD standalone
By Sankotronic
Sonos API Player VD v1.0 standalone
INTRODUCTION
Sonos is the ultimate wireless home sound system that brings brilliant sound to all parts of house, room by room. Sonos API Player VD enables Fibaro Home Center 2 to control Sonos Wi-Fi multi-room speakers and show their status using node-sonos-http-api as mediator between Sonos and Fibaro.
PREREQUISITES
Fibaro Home Center 2 with firmware 4.620 or greater
Node.js capable device such as Raspberry PI with installed jishi node-sonos-http-api
One or more Sonos Wi-Fi multi-room speaker
Sankotronic Lab. Emoji VD v1.1 or greater
FEATURES
Support for My Sonos stations and playlists. User can easily get list of My Sonos stations and playlist to VD and start playing from VD or other VD and scene code Support for grouping actions join and leave Support for Spotify, Apple Music and Amazon music Support for text to speech TTS for Google, VoiceRSS and AWS Poly Support for playing clips for e.g. doorbell or alarm functions Supports all standard audio commands PLAY, PAUSE, STOP, PREVIOUS, NEXT, MUTE/UNMUTE, SHUFFLE, REPEAT and CROSSFADE Support for all other functions available by jishi node-sonos-http-api Debug mode with different levels
Multi language support with 27 languages included (see APPENDIX 1 for the list). VD can use HC2 selected language or user can select any other available language. VD will be automatically translated to the selected language
Easy setup for VD icons. User can download HC2 Icon Preview VD to easily find icon ID number Global variables are automatically added, monitored and repaired and does not require user intervention
INSTALLATION
Please check provided User Manual
PACKAGE CONTENT Sonos API Player VD v1.0 User manual EN v1.0
TERMS AND CONDITIONS
Permission to use, copy, modify and distribute this software and its documentation for educational, research, personal use and non-profit purposes, without fee and without a signed licensing agreement is hereby granted, provided that the copyright notice, with "Terms and conditions" and "Disclaimer" appear in all copies, modifications and distributions. It is strictly forbidden to sell, rent, lease and/or lend this software for profit without prior consent from the Author.
DISCLAIMER
This software is provided by copyright owner "as is" and any express or implied warranties, including, but not limited to, the implied warranties of merchantability and fitness for a particular purpose are disclaimed. In no event shall the author and distributor be liable for any direct, indirect, incidental, special, exemplary, or consequential damages (including, but not limited to, procurement of substitute goods or services; loss of use, data, or profits; or business interruption) however caused and on any theory of liability, whether in contract, strict liability, or tort (including negligence or otherwise) arising in any way out of the use of this software, even if advised of the possibility of such damage.
Fibar Group S.A. and their employees are not responsible for support of this VD. Please contact the author Sankotronic, on the Fibaro Forum, for any questions or support required.
VERSION HISTORY
1.0 - First public release
LOOK AND FEEL
Peek in spoiler:
Enjoy coding and your new Sonos API Player VD!
Sankotronic
247 downloads
-

Hydrawise Control VD standalone
By Sankotronic
Hydrawise Control VD v1.0 standalone
KNOWN ISSUES - BUGS
VD constantly sending messages about watering delay if rain is detected and stops functioning properly.
SOLUTION - Please download Main loop code and paste it over current code in VD main loop ---> Hydrawise Main loop v1.1.lua
INTRODUCTION
Hydrawise Control VD provides seamless integration of Hunter Hydrawise irrigation controllers with Fibaro Home Center 2. It uses Weather State and Forecast module made by same author in its latest version to automatically delay watering depending on current and forecast rain precipitation.
PREREQUISITES
Fibaro Home Center 2 with firmware 4.620 or greater with devices added to the Sprinklers panel
Hunter Hydrawise irrigation controller with account and generated API key
Sankotronic Lab Emoji VD v1.1 standalone
Sankotronic Lab Weather State & Forecast suite v2.8.1 or greater
Recommended Sankotronic lab Netatmo Weather Station suite v3.3.1 or Netatmo Public Weather Station suite v1.0
FEATURES
Automatic watering delay - Works with Weather State & Forecast suite and 7 most popular weather services on the planet to automatically delay watering depending on current and forecast rain precipitation. It is also recommended to use Netatmo Weather Station suite or Netatmo Public Weather station for more accurate measurements of rainfall. Manual watering - User can activate any selected watering zone or all zones manually with preselected duration. Manual watering delay – user can manually set watering delay for one, several or all zones. Watering state at a glance - VD icon shows current overall status of the watering system by changing VD main icon and label accordingly. Weather history – VD is recording weather state and forecast measurements for last 7 days by default. User can change number of history days. Multi-language support - VD has built in multi-language support with 27 languages included (see APPENDIX 1 for the list). VD can use HC selected language or user can select any other available language. E-mail and push messages are also translated
VD Icons setup - Easy setup for VD icons. User can download HC2 Icon Preview VD to easily
find icon ID numbers
Global variables - are automatically added, monitored, repaired and cleaned and does not require user intervention
INSTALLATION
Please check provided User Manual
PACKAGE CONTENT
Hydrawise Control VD v1.0 Icon packs User manual EN v1.0
TERMS AND CONDITIONS
Permission to use, copy, modify and distribute this software and its documentation for educational, research, personal use and non-profit purposes, without fee and without a signed licensing agreement is hereby granted, provided that the copyright notice, with "Terms and conditions" and "Disclaimer" appear in all copies, modifications and distributions. It is strictly forbidden to sell, rent, lease and/or lend this software for profit without prior consent from the Author.
DISCLAIMER
This software is provided by copyright owner "as is" and any express or implied warranties, including, but not limited to, the implied warranties of merchantability and fitness for a particular purpose are disclaimed. In no event shall the author and distributor be liable for any direct, indirect, incidental, special, exemplary, or consequential damages (including, but not limited to, procurement of substitute goods or services; loss of use, data, or profits; or business interruption) however caused and on any theory of liability, whether in contract, strict liability, or tort (including negligence or otherwise) arising in any way out of the use of this software, even if advised of the possibility of such damage.
Fibar Group S.A. and their employees are not responsible for support of the ABC VD. Please contact the author Sankotronic, on the Fibaro Forum, for any questions or support required.
VERSION HISTORY
1.0 - First public release
LOOK AND FEEL
Peek in spoiler:
Enjoy coding and your new Hydrawise Control!
Sankotronic
65 downloads
-
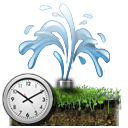
Irrigation Control standalone
By Sankotronic
Irrigation Control standalone
INTRODUCTION Finally a solution that brings seamless and easy Irrigation control to HC2. This solution overrides all limitations of the HC2 sprinklers panel. With this solution it is possible to set watering duration up to 100 minutes. Also no more overlapping zone watering times. Adjustment of watering is done according to current and forecast weather and rain amount and then zone watering start times automatically adjusted so there is no more overlapping and pressure drops in the system. Your beautiful garden will stay beautiful with this solution
PREREQUISITES
Fibaro Home Center 2 with firmware 4.600 or greater with devices added to the Sprinklers panel
Sankotronic Lab Weather State & Forecast suite v2.8.1 or greater
Sankotronic lab Netatmo Weather Station suite v3.3.1 or Netatmo Public Weather Station suite v1.0
FEATURES
Watering delays and duration adjustment - Works with Weather State & Forecast suite and 6 most popular weather services on the planet to automatically adjust or delay watering depending on current and forecast temperatures and rain precipitation Irrigation pump control – If irrigation system has water supply pump then user can setup pump device ID and irrigation control will take care to start pump before watering cycle starts and stop pump when watering cycle is finished. Sprinklers panel - Works with HC2 Sprinklers panel and overrides panel limitations of 15 minutes watering duration and eliminates overlapping of watering zones by recalculating and setting of zones watering start times depending on adjusted watering duration times. From version 1.2 it is also possible to setup each zone watering start times manually to overlap them and shorten time needed for watering cycle. Watering cycles - User can setup any number of watering cycles with VD and then save them to sprinklers panel with one press of the button. Cycle watering start time and zones watering duration and weekdays all can be setup with this VD and then transferred to sprinkler panel. Auto and Off mode - User can set all watering zones to auto or off mode at once with press of a button Manual watering - User can activate any selected watering zone manually with preselected duration. Great option for maintenance and check of the sprinklers. Watering state at a glance - VD icon shows current overall status of the watering system by changing VD main icon and label accordingly. Watering history – VD is recording all watering cycles times and durations per zones and weather state and forecast measurements. Separate VD is provided for displaying history data. Multi-language support - VD has built in multi-language support with 27 languages included (see APPENDIX 1 for the list). VD can use HC selected language or user can select any other available language. E-mail and push messages are also translated
VD Icons setup - Easy setup for VD icons. User can download HC2 Icon Preview VD to easily
find icon ID numbers
Global variables - are automatically added, monitored, repaired and cleaned and does not require user intervention
INSTALLATION
Please check provided User Manual
UPGRADE
Since v1.2 has a new VD layout to upgrade, first delete Irrigation Control VD and remove global variable "IrrigationMain_XX" where XX is ID of the old VD and then import new Irrigation Control VD. Irrigation History VD v1.0 can remain installed and users do not have to replace it.
PACKAGE CONTENT
Irrigation Control VD v1.2 Irrigation History VD v1.1 Icon packs User manual EN v1.2
TERMS AND CONDITIONS
Permission to use, copy, modify and distribute this software and its documentation for educational, research, personal use and non-profit purposes, without fee and without a signed licensing agreement is hereby granted, provided that the copyright notice, with "Terms and conditions" and "Disclaimer" appear in all copies, modifications and distributions. It is strictly forbidden to sell, rent, lease and/or lend this software for profit without prior consent from the Author.
DISCLAIMER
This software is provided by copyright owner "as is" and any express or implied warranties, including, but not limited to, the implied warranties of merchantability and fitness for a particular purpose are disclaimed. In no event shall the author and distributor be liable for any direct, indirect, incidental, special, exemplary, or consequential damages (including, but not limited to, procurement of substitute goods or services; loss of use, data, or profits; or business interruption) however caused and on any theory of liability, whether in contract, strict liability, or tort (including negligence or otherwise) arising in any way out of the use of this software, even if advised of the possibility of such damage.
Fibar Group S.A. and their employees are not responsible for support of the ABC VD. Please contact the author Sankotronic, on the Fibaro Forum, for any questions or support required.
VERSION HISTORY
1.0 - First public release 1.2 - please see change log for detailed list of changes
Look and feel:
Enjoy coding and your new Irrigation Control!
Sankotronic
316 downloads
- irrigation
- watering
- (and 2 more)
-

Netatmo Public Weather Station suite
By Sankotronic
Netatmo Public Weather Station suite standalone v1.1.1
INTRODUCTION
Netatmo Public Weather station suite brings local weather data to users that do not have their own personal weather station. It is must have in combination with Weather State & Forecast suite to provide better control of your beautiful garden irrigation system.
PREREQUISITES
Fibaro Home Center 2 with firmware 4.160 or greater
Sankotronic Lab. Emoji VD standalone (not required since v1.1)
Netatmo Weather station
FEATURES
Great solution for users that do not have personal weather station. Can be used together with Weather State & Forecast suite to provide necessary data to Irrigation Control VD for watering adjustments and delays.
Integration of nearest public Netatmo weather station with HC2 including rain gauge and anemometer
Support for multiple public Netatmo weather stations
Smart update system that follows Netatmo weather station cloud updates
Public Netatmo weather station measurements can be shown on Weather State VD and HC2 web GUI and mobile applications by means of Weather State VD and Weather provider plugin
VD has built in multi-language support with 27 languages included (see APPENDIX 1 for the list). VD can use HC selected language or user can select any other available language.
Easy setup for VD icons (on UHASTM compatible version is this even easier)
Global variables are automatically added, monitored and repaired and does not require user intervention
INSTALLATION and UPGRADE
Please follow the instructions provided in User manual
PACKAGE CONTENT
Netatmo Public module VD Netatmo Public Weather station scene Set of icons
UPGRADE PACKAGE CONTENT v1.1.1
Netatmo Public Weather station scene user manual
TERMS AND CONDITIONS
Permission to use, copy, modify and distribute this software and its documentation for educational, research, personal use and non-profit purposes, without fee and without a signed licensing agreement is hereby granted, provided that the copyright notice, with "Terms and conditions" and "Disclaimer" appear in all copies, modifications and distributions. It is strictly forbidden to sell, rent, lease and/or lend this software for profit without prior consent from the Author.
DISCLAIMER
This software is provided by copyright owner "as is" and any express or implied warranties, including, but not limited to, the implied warranties of merchantability and fitness for a particular purpose are disclaimed. In no event shall the author and distributor be liable for any direct, indirect, incidental, special, exemplary, or consequential damages (including, but not limited to, procurement of substitute goods or services; loss of use, data, or profits; or business interruption) however caused and on any theory of liability, whether in contract, strict liability, or tort (including negligence or otherwise) arising in any way out of the use of this software, even if advised of the possibility of such damage.
Fibar Group S.A. and their employees are not responsible for support of the ABC VD. Please contact the author Sankotronic, on the Fibaro Forum, for any questions or support required.
VERSION HISTORY
1.1.1 - Scene code changed to support Netatmo servers domain api.netatmo.com, since the other one will be removed 1.1 - Scene code changed to use new Netatmo API grant access by replacing username and password with tokens. VD since v1.1 do not need Emoji VD to be installed to work properly. 1.0 - First public release Here is look and feel of the Netatmo Public Weather VD:
Enjoy coding and your new Netatmo Public weather station suite!
Sankotronic
251 downloads
(0 reviews)0 comments
Updated
-
Shelly_IP101.vfib
By Theo
This VD is a interface to the ping_shelly.lua which can also be found here. The IP-address needs to be configured as shown in the image. The port value ("109") is used/misused to set the number of the lua script in your HC2 ("_lua").
As example here the code for the "on" button:
local _self=fibaro:getSelfId() local _addr=fibaro:getValue(_self,"IPAddress") local _lua=fibaro:getValue(_self,\"TCPPort\") fibaro:startScene(_lua,{_addr,"on"}) fibaro:sleep(1000) fibaro:startScene(_lua,{_addr}) fibaro:sleep(1000) local _slider = tonumber(fibaro:getGlobalValue("S" .. string.gsub(_addr,"%.","_"))) if (_slider <= 0) then _slider=10 fibaro:startScene(_lua,{_addr,_slider}) end fibaro:call(_self,"setProperty","ui.brightness.value",_slider)
69 downloads
(0 reviews)0 comments
Updated
-
(0 reviews)
0 comments
Submitted
-

Twinkly Light VD
By Sankotronic
Twinkly Light VD v1.0
(standalone version)
IMPORTANT NOTIFICATION!
If you plan to continue use this VD with your Twinkly LED then DO NOT update them to latest firmware 2.7.1 because it will stop working!
Some companies just refuse to understand importance of HA integration and it is just up to some geeks to publish unofficial API and make integration possible.
INTRODUCTION
Twinkly lights brings amazing effects and most stunning light animations to users fingertips. This beautiful Christmas lights can now be controlled by our Fibaro gateways.
PREREQUISITES
Fibaro Home Center 2 with firmware 4.120 or higher At least one Twinkly light (1st or 2nd generation) connected to home WiFi network with static IP address setting. VD is tested with 190 RGB LED icicle and 250 RGB LED strings of 2nd generation and also strings of 1st generation at the time of publishing
FEATURES
User can install multiple instances of VD for as many Twinkly lights he/she might have. Only one scene is needed to be installed for any number of Twinkly Light VD’s Uses local WiFi network connection for control. Provides turning on/off and changing brightness of the Twinkly light.
Provides control from other code and scenes by using global variable and Update button. Multi language support with 27 languages. VD will be automatically translated to HC selected language or user can select any other available language. Easy setup for VD icons with automatic setup of icons for buttons and sliders too. (UHAS™ compatible version has even more easier icon setup) Self adding and checking of global variable data integrity. Automatic repair of global variables without user intervention
INSTALLATION
Please check provided User Manual where all steps are explained in detail and video kindly provided by @MarcoTorino71:
PACKAGE CONTENT
Twinkly Light VD v1.0 (standalone) 2 icon sets for VD (icicle and strings) Twinkly Light Scene with icon User manual v1.0 EN
CREDITS
The Author wishes to acknowledge the help received from the Fibar Group S.A. in that they have kindly supplied the use of a HC2 for development purposes, free of charge.
The Author also wishes to thanks to Pavol Babinčák for providing unofficial API reference documentation for Twinkly – Smart decoration LED lights for Christmas. Big thanks to @MarcoTorino71 for video!
TERMS AND CONDITIONS
Permission to use, copy, modify, and distribute this software and its documentation for educational, research, personal use and non-profit purposes, without fee and without a signed licensing agreement, is hereby granted, provided that the copyright notice, with "Terms and Conditions" and "Disclaimer" appear in all copies, modifications, and distributions.
It is strictly forbidden to sell, rent, lease and/or lend this software for profit without prior consent from the Author.
DISCLAIMER
This software is provided by copyright owner "as is" and any express or implied warranties, including, but not limited to, the implied warranties of merchantability and fitness for a particular purpose are disclaimed. In no event shall the author and distributor be liable for any direct, indirect, incidental, special, exemplary, or consequential damages (including, but not limited to, procurement of substitute goods or services; loss of use, data, or profits; or business interruption) however caused and on any theory of liability, whether in contract, strict liability, or tort (including negligence or otherwise) arising in any way out of the use of this software, even if advised of the possibility of such damage.
Fibar Group S.A. and their employees are not responsible for support of the Twinkly Light VD. Please contact the author Sankotronic, on the Fibaro Forum, for any questions or support required.
LEGAL NOTICE
Twinkly is registered trademark of LEDWORKS SRL registered in Italy and other countries.
VERSION HISTORY
1.0 - First release of standalone version build on VD code for UHAS™
Here is look of the Twinkly Light VD:
Enjoy coding and your new Twinkly Light virtual device!
Sankotronic
210 downloads
- sankotronic
- lights
- (and 1 more)
-
ZeverSolar Monitor
By Mieszko64
Poniżej pierwsza wersja kodu dla Fibaro VD odczytująca dane z falownika ZeverSolar -instalacji fotowoltaicznej dostępne po sieci lokalnej: adresIP/home.cgi.
VD ZeverSolar wymaga tylko wpisania swojego adresu IP
VD ZeverSolar umożliwia:
1. Prezentacje danych: czas odczytu, wartość chwilowa pacW, wielkość produkcji dziennej.
2. Przycisk wymuszający odczyt on demand "Update?".
3. Zapis zmiennych globalnych pacW, etodayKWh.
76 downloads
(1 review)0 comments
Updated
-
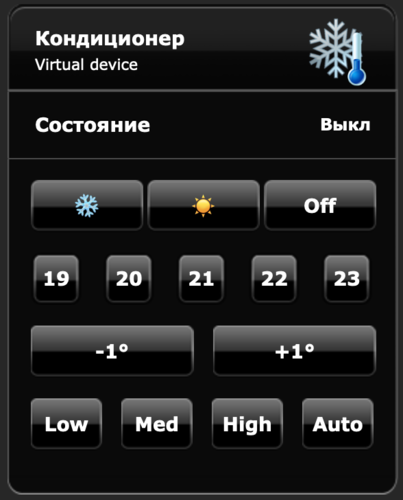
Samsung Air Conditioner
By szmyk
Since Samsung Plugin doesn't work I decided to write custom Samsung Air Conditioner VD.
Requirements:
Samsung AC Local PHP server (NAS, RPI, ...)
Installation:
Copy smarthome folder to your php server Edit/rename Bedroom.php, Living room.php files. For each device you need separate file. In each file: enter IP of your AC device enter token of your AC device To get token follow steps 3.1 - 3.5 from this site. Check if your PHP server is working: http://192.168.0.10/smarthome/samsung-ac/Bedroom.php
Of course change 192.168.0.10 with the IP of your PHP server.
You should see JSON result with status. Something like this: { "power": "Off", "mode": "Cool", "virusDoctor": "Off", "quiet": "On", "wind": "Fix", "temperature": 22, "currentTemperature": 23, "sleep": 0 } Install Air Conditioner VD Edit Air Conditioner VD:
Room name must be the same as your PHP file name without .php extension, e.g. Bedroom Enter Address IP of your PHP server, e.g. 192.168.0.10 Port number of your PHP server, usually 80 Add VD icons and enter icons ID at "refresh" button section:
Enjoy...
149 downloads
- air conditioner
- ac
- (and 1 more)
-
 (0 reviews)
0 comments
Updated
-

Dane ze stacji meteorologicznej UMK
By m4rlb0r0
Urządzenie wirtualne wyświetlające parametry pogodowe pobierane ze stacji meteorologicznej UMK. Najbardziej przyda się osobom z Torunia i okolic
Samo urządzenie wyświetla dane ze zmiennych globalnych, które są przy pomocy api fibaro aktualizowane przy pomocy skryptu php. Wymagane jest wobec tego posiadanie w sieci lokalnej serwera z apachem i php oraz dodanie skryptu do harmonogramu zadań cron dla cyklicznej aktualizacji.
Mam nadzieję, że komuś się przyda.
Pozdrawiam
m4fibaro_umk_meteo_php.zip
15 downloads
- opad
- wilgotnosc
- (and 4 more)
(0 reviews)0 comments
Updated
-
Watering - adjust and history
By szmyk
1. Adjust Watering Scene
Features:
adjusts watering time sends email/push about watering conditions saves historical watering conditions
This scene allows you to adjust watering time based on
current rain forecast rain (till noon) current temperature forcast temperature
You can change watering conditions as you like in adjustWatering() function.
For example:
if current rain >= 1 mm then turn off watering for 24h if forecast rain >= 2 mm then turn off watering for 24h if current rain >= 0.5 mm then decrease watering duration by 30% if current temperature >= 30°C then increase watering duration by 40% if current temperature <= 1°C then turn off watering for 24h if forecast temperature <= 1°C then send warning about frost
The scene requires Sankotronic's 'Weather State and Forecast VD'.
Tested with "Weather State and Forecast v2.7.1 standalone"
Supports almost all services supported by 'Weather State and Forecast VD':
OpenWeatherMap (only daily version) Dark Sky WeatherBit Weather HERE
You can change it as always at Sankotronic's 'Weather State VD'.
Customization:
local vdID = 476 -- ID of 'Weather State VD' from which we will take data local sendEmail = true -- change to false if you don't want to receive emails local sendPush = true -- change to false if you don't want to receive push messages local emailUserId = 2 -- user id to send emails local pushDeviceId = 0 -- mobile device id to send push messages Watering schedule should be set in sprinkler panel.
I scheduled running this scene everyday 15 minutes before planned start of irrigation.
The scene increases/decreases watering time of all sprinklers.
Optional modules:
2. Watering History VD
Features:
shows watering time for the last 7 days shows watering conditions for the last 7 days (gathered by Adjust Watering Scene) shows current watering state (on/off) shows current watering mode (auto/manual) shows watering plan allows to change watering mode (auto/off) allows to run watering once (15/30/60 min)
Customization:
buttons code:
local sprinklerNr = 1 -- sprinkler number (1, 2, 3, ...) VD supports only one sprinkler. If you want to see the watering history of more sprinklers then you have to create separete VD for every sprinkler. Remember to set sprinklerNr variable for every of them.
3. Netatmo Scene
If you don't have your own Netatmo Station, then you can use the neareast station in your location.
All public stations you can check here: https://weathermap.netatmo.com
The rain data from the netatmo are much better than the data from Forecast Weather Service. Especially if the rain Netatmo station is near your location.
All you need is:
a) copy the code from Netatmo.lua and paste it into Sankotronic's 'SA_Weather_Module_scene' at the end of file
b) sign up to get access data (https://auth.netatmo.com) and fill these fields in pasted Netatmo Scene code. Client ID and Client Secret token you can get when you create app on site https://dev.netatmo.com/apps/
local n_client_id = "" local n_client_secret = "" local n_username = "" local n_password = "" c) then change these variables values in the main loop of Sankotronic's 'Weather State VD' as follows:
local netatmoWeather = true local netatmoRain = true d) if Sankotronic's 'Weather State VD' doesn't show netatmo values then increase distance to find a rain gauge in pasted Netatmo Scene code:
local long_lat_adjust = 0.1 Enjoy...
304 downloads
- spriklers
- irrigation
- (and 1 more)
-
ZXT-120 AC control VD
By baskalex
This is a simple VD+Scene to control ZXT-120 AC controllers. I use it because of 2 factors:
1) You can control everything on one screen instead of 3 devices in HC2 interface
2) it is visible in Home Center app (ZXT-120 is not visible natively yet)
It supports heating and cooling modes and fan speed. You can see current status as well.
Setup is very simple:
VD - just put ID of the child device of ZXT-120 which controls temperature into the "Port" field of VD
Scene - You have to put IDs of three child deviced of ZXT in the triggers field annd the same ID into "Options" part of the scene. Also put VD ID inn the "Options" part.
Maybe it can be useful for some of you.
ZXT-120.zip
116 downloads
-
![More information about "[VD] Daily Triggers"](https://forum.fibaro.com/uploads/monthly_2020_04/trigger_none_today.thumb.png.ea533531744f63b48280506f7c5fc6d6.png)
[VD] Daily Triggers
By J3R3M
Daily Triggers
First release on french board in April 2018
INTRODUCTION
This VD was my first contribution on the french forum. I was so glad! I learnt to use LUA tables just before and I wanted to use them in a VD which can be useful.
This VD allows you to easily manage some one-time actions for each day in a week. With it, you quickly can change the time to trigg one or many actions, or see when an action will be done. It's possible to set one our per day, using a time shift if needed.
It's my first VD, I was learning how to program in LUA and I was beginning to work with time in LUA, so it's not perfect in the programming way, but it works! I used it for a long time and I have never met any issue!
INSTALLATION
Create a Global Variable called VD_TRIGGERS Import the VD Change the Icons ID in the Main Loop, using the icons below -- Icons IDs local icone_ok = 1156 local icone_wait = 1158 local icone_no_trigg = 1155 local icone_triggers_off = 1157 local icone_vd_off = 1160 Add your to-do actions for each day with the totrigg() function, into the Main Loop -- To do each day local function totrigg(day) -- Here actions for everyday if day == 1 then -- Actions for Monday elseif day == 2 then -- Actions for Tuesday elseif day == 3 then -- Actions for Wednesday elseif day == 4 then -- Actions for Thursday elseif day == 5 then -- Actions for Friday elseif day == 6 then -- Actions for Saturday elseif day == 7 then -- Actions for Sunday end end
VD CONFIGURATION AND USE
This VD is divided into 4 parts :
Information about the next trigger The Programmer View on all triggers set Enable/Disable VD
3 Sliders and the OFF button can be used to prepare trigger informations : Hours Sliders will convert 0-100 value to 1 - 23 in the programmer Minutes Sliders will convert 0-100 value to 1 - 59 in the programmer Time Shift Sliders will convert 0-100 value to -30 - +30 in the programmer Please take care to set 0 (Slider at 50) if you want to trigg your actions at the time set! OFF Button will replace all the programmer's informations by OFF If you want to set a new time information, you only need to click on any slider above After each slider move, check the Prog Label content to avoid any error Once the Prog content is correct and checked, you can affect its value for each day you want by simply clicking on its name! You will be able to see the affected times just 3 seconds after in the Triggers Views At this time, the actions set in the totrigg() function will be done Of course, if the VD is disabled, no actions will be triggered
ICONS
Waiting to trigg today's action Today's action triggered No action planned today (OFF) All triggers set at OFF VD OFF83 downloads
-

Ambient Weather Station VD
By Sankotronic
Ambient Weather Station VD standalone
INTRODUCTION
Ambient Weather station (AWS) VD reads measurements provided by Ambient weather stations which are connected to ambientweather.net service on internet. VD is tested with Ambient Weather station WS-1401-IP OBSERVER, but should also work with other similar types of Ambient weather stations.
PREREQUISITES
Fibaro Home Center 2 with firmware 4.560 or greater
Emoji VD standalone must be downloaded and installed for AWS VD to function properly.
At least one Ambient weather station connected to internet and user application key and API key
FEATURES
User can install multiple instances of VD for as many Ambient Weather stations he/she might have. Uses ambient weather cloud API to retrieve latest measurements. Provides measurements in imperial or metric units and also wind speed in m/s. Provides global variables for indoor and outdoor temperature, indoor and outdoor humidity, wind and gust speed, rain event, solar radiation, UV, outdoor and indoor PM25 and CO2 that can be used to trigger block or LUA scenes for specific user actions. Multi-language support with 27 languages included (see APPENDIX 1 for the list). VD can use HC selected language or user can select any other available language. VD will be automatically translated to selected language Easy setup for VD icons (on UHAS™ compatible version is this even easier) Global variables are automatically added, monitored, repaired and cleaned and does not require user intervention
INSTALLATION
Please check provided User Manual
PACKAGE CONTENT
Ambient Weather Station VD v1.1 Icon pack User manual EN
TERMS AND CONDITIONS
Permission to use, copy, modify and distribute this software and its documentation for educational, research, personal use and non-profit purposes, without fee and without a signed licensing agreement is hereby granted, provided that the copyright notice, with "Terms and conditions" and "Disclaimer" appear in all copies, modifications and distributions. It is strictly forbidden to sell, rent, lease and/or lend this software for profit without prior consent from the Author.
DISCLAIMER
This software is provided by copyright owner "as is" and any express or implied warranties, including, but not limited to, the implied warranties of merchantability and fitness for a particular purpose are disclaimed. In no event shall the author and distributor be liable for any direct, indirect, incidental, special, exemplary, or consequential damages (including, but not limited to, procurement of substitute goods or services; loss of use, data, or profits; or business interruption) however caused and on any theory of liability, whether in contract, strict liability, or tort (including negligence or otherwise) arising in any way out of the use of this software, even if advised of the possibility of such damage.
Fibar Group S.A. and their employees are not responsible for support of the ABC VD. Please contact the author Sankotronic, on the Fibaro Forum, for any questions or support required.
116 downloads
(0 reviews)0 comments
Submitted
-
![More information about "[VD+Scene] Advanced Alarm Clock"](https://forum.fibaro.com/uploads/monthly_2020_04/AdvancedAlarmClockScene.thumb.png.07237ec21a59b8fafc43c56a0e0c947d.png)
[VD+Scene] Advanced Alarm Clock
By J3R3M
Advanced Alarm Clock
First release on the French board in March 2019.
INTRODUCTION
This VD+Scene Bundle will help you to wake up in better shape by simulating a smooth dawn with any device in your HC2 : Roller Shutters, lights devices and VD.
After the ignition at the value that you have set up in the VD, the scene can fade one or more speakers. The curves for light and audio fade in can be choosen separately.
The scene manages itself if it's day or not. So, for each light you will set up in the scene, you can decide if it has to be active everytime, or only when it's day or only when it's night. For example, you can set up a Roller Shutter which is active only if it's day!
This Bundle can be used as much as you want, just by adding it again and creating a new Global Variable for each new bundle set.
THE SCENE IS ABLE TO MANAGE
Roller Shutters (FGR22, FGR223...) Dimmers (FGD211, FGD212...) Switchs (FGS211, FGS212, FGS213...) RGBW Devices (FGRGBW, RGBW Controller 1, RGB Controller 2) RGBW Programs (Any Fibaro's programs) Home Center Scenes Any Light VD (Philips Hue, Ikea TRÅDFRI...) Any VD clickable Any Audio VD (Sonos, Yamaha Multicast or any else...)
INSTALLATION
Most of explainations are in the scripts.
Create a Global Variable which starts with REVEIL_ (what means alarm clock in French ?) and import the Virtual Device you want (12h or 24h).
VD CONFIG
-- Manageable Alarm Clock Scene Id local SceneID = 193; -- Which room will this VD Manage ? Must be the same than the Scene local ROOM = "ROOM"; -- Days Off local DaysOff = {"Saturday","Sunday"}; -- By defaut, this scene will be launched to have full light at the time set up in the VD : Actual Hour - Dawn Time -- Change this var to anything else if you want to trigg the scene at the hour H. local StartScene = "DEFAULT"; -- Icon's ids local icon_ok = 1156 local icon_wait = 1158 local icon_off = 1160 SceneID : ID of the scene Advanced Alarm Clock ROOM : Value corresponding to the Global Variable you created DaysOff : List here all your days off within quotes marks, separated by commas. Take care of the uppercase at the beggining of the days names! StartScene : Start the scene to have the full ignition at the time set in VD (DEFAULT), or start to begin the dawn's simulation at the time set in the VD (anything else) icon_ok : ID of the icon which will be displayed when the scene is triggered and active icon_wait : ID of the icon ID which will be displayed when an alarm is set and waiting to trigg the scene icon_off : ID of the icon which will be displayed when the alarm is disabled Note: In this Virtual Device, you have to change 3 times the variable's value of ROOM, corresponding to the Global Variable you have created before : REVEIL_ROOM.
VD USE
Press on : will display 12:00 (or 07:30am in the 12h version). This can be changed by anything else with the variable ClickHour in the corresponding button Sound Volume is in percentage (Act on sliders) Audio fade-in is in seconds Light's Power is in percentage* Dawn's duration is in minutes Once button sets the alarm for the next avalaible scheduele, regardless of the day (DayOff or not). The alarm will automatically be disabled after the dawn's ignition Week of job sets the alarm for everyday, without the days set in the variable table DaysOff. Scene will automatically be launch until it's manually deactivated Recall will recall every parameters set before last VD deactivation Alarm OFF will save every actual parameters and disable the alarm * Rollers Shutters will open at the same time than others lights devices, but will not been affected by Light's Power parameter
I thought it was better to be able to choose the power of lights, without having a half opened roller shutter.
SCENE
local ROOM = "ROOM"; -- Room code corresponding to the Global Var created local StartVolume = 15; -- Which Speakers volume value the fadein will start at (percentage) local CurveLight = "linear"; -- Which function will be used to fadein light keys local CurveAudio = "linear"; -- Which function will be used to fadein speakers keys BASIC SETTINGS
ROOM The famous variable wich has to be the same in the Scene+VD StartVolume could be useful if you don't want to start audio fadein from 1. CurveLight & CurveAudio Curves that will be used to fade lights and audio. See the following image to have a better understanding Note1: If you comment a Curve Variable, the curve will be randomly choosen
Note2: The curves are possible thanks to the great work that Robert Penners made in 2001.
POSSIBLE CURVES : Linear + Robert Penner's Easing Equations
-- Debug Vars local debug = 1; -- 1 Enable / 0 Disable local lang = "en"; -- Debug lang local DisplayNamesorID = "ID"; -- Display DeviceName + RoomName (Names) or Type + ID (ID) on each Debug line local DisplayNamesAtStartup = 1; -- Display Rooms & Names at scene startup (1) or not (0) local DisplayRGBWValues = 1; -- Display RGBW Values increasement when fading in (1) instead of only multiplier (0) local DayLightDelay = 60; -- After sunrise/sunset, it's still daylight for .. mn local VolDiffMin = 5; -- Minimum difference between Start Volume and Volume set in VD (in case of Start Volume > Volume set) local LimitDebugLines = 1; -- Limit number of Debug Lines to 4 max per device and to 20 max per roller shutter -- Changing next var values may seriously impact the scene local CheckAlarmMode = 1; -- Check if the alarm is set and not just memorized before starting sthis scene local DisplayScenesNames = 0; -- Display Scenes Names in debug (1) or not (0)! Active this function may delay the script local tempo = 1; -- Pause between two actions in LightsAction and SpeakersAction functions (s) - It' not recommended to change this value DEBUGS SETTINGS
debug lang DisplayNamesorID DisplayNamesAtStartup DisplayRGBWValues DaylighDelay VolDiffMin LimitDebugLines CheckAlarmMode If this var value is set on 0, this scene will be able to be launched manually with stored values, even though the VD displays None DisplayScenesNames tempo Note: everything explained in the script!
ADDING YOUR DEVICES
Add a Roller Shutter (FGR) Parameter "steps" is needed to set how many steps this roller shutter will do to open (to protect motors of 100 steps) table.insert(LightsList, {typ="Shutter", id=279, steps=6}); Add a Dimmer (FGD) table.insert(LightsList, {typ="Dimmer", id=10}); Add a RGBW device (FG-RGB) : To fade a choosen color with RGBW parameters (Set this color at full range, scene will fade this value from 0 to the value set in VD) table.insert(LightsList, {typ="RGBW", id=20, r=150, g=100, b=0, w=255}); Add a RGBW Program : To set a RGBW program, just use "program" parameter Add "start" parameter to manage when this program will be started during the light fadein (in percentage) If no "start" parameter is set, program will be started at the beginning of the scene table.insert(LightsList, {typ="Program", id=20, program=3, start=50}); Add a switch (FGS) Add "start" parameter to manage when this turnon action will be done during the light fadein (in percentage) If no "start" parameter is set, action will be done at the beginning of the scene table.insert(LightsList, {typ="Switch", id=49,start=100}); To add a VD If it's a light VD : Parameter "slider" needed to manage brightness table.insert(LightsList, {typ="VD", id=298, slider=10}); "btn" paramater can be added to set a color preset before the fadein (Be sure that the VD brightness for this button is set et 1%) table.insert(LightsList, {typ="VD", id=298, slider=10, btn=6}); If it's not a light VD (with brightness slider) : Just indicate "btn" parameter table.insert(LightsList, {typ="VD", id=298, btn=6}); Add "start" parameter if you want to manage when this button will be pressed during the dawn fade in (in percentage) table.insert(LightsList, {typ="VD", id=298, btn=6, start=50}); Scene : To start a scene Add "start" parameter to manage when the action will be done during the light fadein (in percentage) If no "start" parameter is set, action will be done at the beginning of the scene table.insert(LightsList, {typ="Scene", id=254, start=50}); To add Speakers VD : One action per key Example for an action on the slider 15 of the VD 245 table.insert(SpeakerAction, {id=245, slider=15}); Example for an action on the button 6 of the VD 245 table.insert(SpeakerAction, {id=245, btn=6});
Note: This is an extract of the scene. So you will find it in the scene to help you if needed
One line = One device
LightsList typ = Shutter id Roller Shutter ID steps Number of steps which will be done by the roller shutter (to preserve shutter's motor). 2 mini / 20 maxi typ = Dimmer id Device ID typ = VD id VD ID slider Slider number to manage light power btn* Button to push start* When the button have to be pushed during dawn"s ignition (if not set, the button will be pressed just before acting on slider) typ = RGBW id Device ID r Red Value(0-255) g Green Value (0-255) b Blue Value (0-255) w White Value (0-255) Note: Please write the parameters for a full power. The scene will calculate the values needed from them
typ = Scene id Device ID start* At which percentage of the dawn's ignition this scene will be started. 1 will be use by default if nothing is set. typ = Switch id Device ID start* At which percentage of the dawn's ignition this switch will be turned on. 1 will be use by default if nothing is set. typ = Program id Device ID program ID of the program to launch start* At which percentage of the dawn's ignition this program will be started. 1 will be use by default if nothing is set. SpeakerAction id VD ID 2nd parameter = Button Type (One or the other) with this button number slider Number of the volume's slider btn Number of the button to push Note: This actions will be done in the order you declare them in the script
Note: items with * are not mandatory
MODE PARAMETER
This parameter is not mandatory. If not set, all your keys will be used to fade the dawn. You can mix modes and no modes keys!
For each light key, if you want to see it lighting only when it's day, just add mode="day", or mode="night" if you want to see a key lighting only if it's night.
To use a key everytime : no mode or mode="both".
WHERE CHANGE GLOBAL VARIABLE "ROOM" VALUE
At the beginning of the scene In the "Once" Button of the VD In the "Week of Work" Button of the VD In the "Alarm OFF" Button of the VD At the beginning of the Main Loop of the VD Note: Please take care of this changement of value. If the value is not the same everywhere, the scene could not be launched!
DEBUG EXAMPLE
SUPPORT
In case on any issue, please try again with defaults debug's values and post all your DEBUG lines to help me to understand what happens in your configuration.
CONTENT
Advanced Alarm Clock Scene v3.6 Multilingual Advanced Alarm Clock Trigger 12h v2.2 for people that have 12-hour clocks (am-pm) Advanced Alarm Clock Trigger 24h v2.2 3 Icons for the VD 1 icon for the Scene info.txt file
TRANSLATION
All Debugs texts are available in english and french. They could be easily translated in any other language without any LUA knowledge, by creating a new language condition and translating every DebugMsg vars.
Don't hesitate to contact me with the support thread if you want to translate them in another language. Only 37 sentences in the scene v.3.6! Your translations could be added in this official bundle.
173 downloads
- dawn simulator
- dawn simulation
- (and 5 more)
-

COVID-19 Stats suite
By Sankotronic
COVID-19 Stats suite standalone
INTRODUCTION
COVID-19 Stats suite consists of virtual device and two scenes. It is using free COVID-19 API released by Kyle Redelinghuys. VD is getting back details about global and regional coronavirus data, including latest numbers that are updated close to real-time by gathering information from Johns Hopkins CSSE.
PREREQUISITES Fibaro Home Center 2 with firmware 4.580 or greater
Sankortonic Lab. Emoji VD standalone
FEATURES
COVID19 Stats suite is getting details about global and regional corona virus spread and show them on Fibaro mobile app or browser connected to HC2 home page.
Uses COVID-19 API built by Kyle Redelinghuys to show latest data on corona virus spreading.
Provides total global pandemic numbers for total and new cases, total and new deaths and total and new recovered cases and total active cases.
Provides user to select default country to monitor corona virus latest numbers
Provides user to check corona virus latest numbers for 190 countries worldwide.
Provides global variable trigger that user can setup to be updated either by global total active cases or their default country active cases. This trigger can then be used to start scene that will send notifications using any available service.
Multilingual support with 27 languages included. VD can use HC2 selected language or user can select any other available language. VD will be automatically translated to selected language
Easy setup for VD icons
Global variables are automatically created, monitored and repaired.
INSTALLATION
Please check provided User Manual
PACKAGE CONTENT
COVID-19 Stats VD COVID-19 Stats scene COVID-19 Triggered scene Icon pack for VD and scene User manual EN Updated code for scene and VD main loop and Update button
TERMS AND CONDITIONS
Permission to use, copy, modify and distribute this software and its documentation for educational, research, personal use and non-profit purposes, without fee and without a signed licensing agreement is hereby granted, provided that the copyright notice, with "Terms and conditions" and "Disclaimer" appear in all copies, modifications and distributions. It is strictly forbidden to sell, rent, lease and/or lend this software for profit without prior consent from the Author.
DISCLAIMER
This software is provided by copyright owner "as is" and any express or implied warranties, including, but not limited to, the implied warranties of merchantability and fitness for a particular purpose are disclaimed. In no event shall the author and distributor be liable for any direct, indirect, incidental, special, exemplary, or consequential damages (including, but not limited to, procurement of substitute goods or services; loss of use, data, or profits; or business interruption) however caused and on any theory of liability, whether in contract, strict liability, or tort (including negligence or otherwise) arising in any way out of the use of this software, even if advised of the possibility of such damage.
Fibar Group S.A. and their employees are not responsible for support of the COVID-19 Stats suite. Please contact the author Sankotronic, on the Fibaro Forum, for any questions or support required.
219 downloads
(1 review)0 comments
Updated
-
Emoji VD standalone
By Sankotronic
Emoji VD standalone
INTRODUCTION
Emoji VD brings more than 950 nice small icons to Home Center 2. Emojis are sorted in logical groups and named with short names to make them much easier to find and use in user code. I’m using them in my work to reduce need for translations and also to enhance look and feel of virtual devices. Another reason why I made this VD is to avoid problems with listing code in some editors that might still have problems with displaying emojis due to different UTF coding.
IMPORTANT NOTICE
All my future work will require Emoji VD to be installed
PREREQUISITES
Fibaro Home Center 2 with firmware 4.580 or greater
FEATURES
Brings more than 950 emojis to HC2
Simple installation and setup.
Users can easily find any emoji needed because they are separated in logical groups and VD shows their names that can be used in code.
Global variables are automatically created, monitored and repaired and no user action needed. Just import Emoji VD, setup icon and room and start using it.
INSTALLATION AND UPGRADE
Please check provided User Manual
PACKAGE CONTENT
Emoji VD Icon pack User manual EN
TERMS AND CONDITIONS
Permission to use, copy, modify and distribute this software and its documentation for educational, research, personal use and non-profit purposes, without fee and without a signed licensing agreement is hereby granted, provided that the copyright notice, with "Terms and conditions" and "Disclaimer" appear in all copies, modifications and distributions. It is strictly forbidden to sell, rent, lease and/or lend this software for profit without prior consent from the Author.
DISCLAIMER
This software is provided by copyright owner "as is" and any express or implied warranties, including, but not limited to, the implied warranties of merchantability and fitness for a particular purpose are disclaimed. In no event shall the author and distributor be liable for any direct, indirect, incidental, special, exemplary, or consequential damages (including, but not limited to, procurement of substitute goods or services; loss of use, data, or profits; or business interruption) however caused and on any theory of liability, whether in contract, strict liability, or tort (including negligence or otherwise) arising in any way out of the use of this software, even if advised of the possibility of such damage.
Fibar Group S.A. and their employees are not responsible for support of the Emoji VD. Please contact the author Sankotronic, on the Fibaro Forum, for any questions or support required.
626 downloads
-

Gardena Status
By Guest macjoker
Main features
Watch and control Gardena Smart System devices.
Connects to your Gardena account, retrieves information about smart devices configured within that account and allows you to control them. Installation if fully automated: there is only a single scene to provide status gathering, sending commands and creating virtual devices in HC2.
Advantages
Detection of new Gardena devices and automatic creation of corresponding Fibaro virtual devices. Polish and English languages are supported. Easy installation: just put your account information and start the scene. Source code is easy to maintain and develop (rich debug information, separation of supported device types from data presentation, translation system included, etc.). Five categories of Gardena devices supported: gateway, irrigation control, watering valve, sensor, and mower.
What you need
At least Gardena Smart Gateway configured and access to your Gardena account. Any sensor, watering device or mower connected to that account will become available in Fibaro ecosystem.
Installation
Create LUA scene with the file provided in the archive. Put your Gardena account details (GARDENA_ACCOUNT and GARDENA_PASSWORD). Start the scene - it will automatically create global variables and virtual devices based on your account information. Update virtual device: set names, icons and categories as you wish. Optional configuration
Read comments in Lua scene.
Each configuration parameter is described there in detail.
FAQ
I don't want to import all devices from my account. How to achieve that?
You may do that by configuring IGNORE_CATEGORY variable if you would like to exclude all devices of a given type (like "sensor") or you may remove unwanted VDs manually and change CREATE_VIRTUAL_DEVICES to false so as not to recreate deleted devices.
Can I use two or more Gardena accounts in my HC2?
Sure. Just make a clone of the main Lua script, update account details and give a unique value to ACCOUNT_UNIQUE_ID variable.
Can I provide my own translation or change fields displayed in a virtual device?
Yes, it is simple. All language specific information is given in two variables: translations and repeatedTrans. Look for them in source code and that should make things clear. Also field definitions are provided in source code. Look for "TYPEconfig" variable (mowerConfig, e.g.) and change what you need. For labels the first value in each item is a number used for ordering elements, second is a default (English) label, third is a format ([d] is for timestamps, [u ] is for units retrieved from Gardena API). In the end, remember to use UPDATE_DEVICE_DEFINITION variable to apply changes in virtual device definition.
146 downloads
-

Heating
By szmyk
Heating VD, which I use especially when I go on winter holidays.
On the day of departure we have no time to adjust heating, so a few days before using this VD I set the date/time when the heating should be turned off and date/time when it should be turned on again. Of course you can use this VD everyday just to turn on/off heating or to set the heating timer on/off.
When it turn off the heating it just turn on vacation mode for every zone.
Features:
instant turn on/off the heating in all zones set the date and time when the heating will be turned off and/or turned on _ - change on/off setting time ❌ - clear timer ♻️ - refresh button - you don't need to touch it. It's called programmatically displaying the current state (on/off) sending push messages about changing heating state (by scheduler)
Customization:
change the VD labels to your own language set mobile device id to get push messages about changing heating state -- USER MODIFICATION local pushDeviceId = 0 -- mobile device id to send push messages local scheduleFreq = 1 -- [min] -- END OF USER MODIFICATION Screenshot:
Icon:
Enjoy...
143 downloads
(0 reviews)0 comments
Updated
-
Download Statistics
-
New reviews
-
 By Bornheim · PostedI integrated two HUE bridges in my HC3. It works perfect (and much better and more powerful then the app integrated in HC3). In particular, also sensors, temperature measures etc. are available and can be used in Scenes. However, in both cases after installing and entering the IP adress of my HUEs I had to restart the HC3 to get the authentification running. So I assume to install one has to (i) upload / install the QuickApp, (ii) enter the IP address of the HUE in the local LAN, (iii) rest
 -

-

-

-
 By Sankotronic · PostedVery useful solution to help with gradually moving from HC2 to HC3. I have tested few of the QA and used them to test some of my new solutions on HC3 keeping HC2 still having main controll of our house. Thank you @cag014 for yet another excellent solution!
 -

-

-

-
 By SmartHomeEddy · PostedGreat QuickApp and excellent configuration manual. QuickApp works smooth. Thanks!
 -

-
-
Highest Rated Submitters
No ratings this week.
No ratings this month.
No ratings this year.
-
1

-
2

-
3

-
4
-
5

-