
Welcome to Smart Home Forum by FIBARO
Dear Guest,
as you can notice parts of Smart Home Forum by FIBARO is not available for you. You have to register in order to view all content and post in our community. Don't worry! Registration is a simple free process that requires minimal information for you to sign up. Become a part of of Smart Home Forum by FIBARO by creating an account.
As a member you can:
- Start new topics and reply to others
- Follow topics and users to get email updates
- Get your own profile page and make new friends
- Send personal messages
- ... and learn a lot about our system!
Regards,
Smart Home Forum by FIBARO Team


Scenes
The category contains scenes submitted by users.
Downloading and submission terms have to be accepted.
Types of scenes: magic, block, LUA.
Types of files accepted: PDF, JPG, JPEG, PNG, LUA, TXT.
Scenes have to be described properly, screen shots are optional.
Support topics are created automatically here Scenes
Report topics and files that are no longer supported by authors.
All the files submitted have to be approved by administrators.
41 files
-
Print json string in readable format
By perjar
This function can come in handy if you want to print a json structure in readable form for debugging or inspection.
It takes a json string as input and returns a HTML formatted string which can be printed in the debug window using fibaro:debug();
Example
Input:
"{\"api_data\":{\"status\":\"online\",\"timestamp\":\"2019-01-18-18:01:32\",\"sensor_1\":[\"value_1\":125,\"value_2\":35],\"sensor_2\":[\"value_a\":34.5,\"value_b\":45]}}" Output:
{ "api_data" : { "status" : "online", "timestamp" : "2019-01-18-18:01:32", "sensor_1" : [ "value_1" : 125, "value_2" : 35 ], "sensor_2" : [ "value_a" : 34.5, "value_b" : 45 ] } }
50 downloads
(0 reviews)0 comments
Submitted
-

Location Tracker
By cag014
Many users are trying to use GPS feature, but the functionality and use of HC2 location data are very confusing and most of the time don't work correctly.
The major advance of this scene that there is no use of HC2 defined locations and localization.
The scene triggered by location change, which received by HC2 and tracks users' presence according to predefined places. The scene sends notification (and could announce on user location in case TTS system has been defined and set) in three conditions:
User arrived to one of the predefined places. User approaching to one of the predefined places. User leaves one of the predefined places. You can define as many favorite places as you need. For example: Shopping Mall, School and etc. to track your family members. It helps to know if your kids are actually at school, and your wife at work and not at shopping mall.
Please note that in most of the time there is a gap of few minutes between user's actually location (physical) to location received by the system. Unfortunately in some cases no update received at all. I'm using this scene for few years and still don't have full understanding how the GPS mechanism works... when, how and why the location is updated by Fibaro mobile application and I believe if the application closed on your mobile, no updates sent at all.
Based on above facts, I do not suggest to execute any actions based on user location (like to open gate, lights), but I do suggest to turn on heating system (gap of few minutes better than nothing, or you already at home and your system anyway is ON)
--=========================== USER CONFIGURABLE PARAMETERS ===============================
eMailId = {2} -- user IDs to send email. To include more users use: eMailId={2,5,20}
eMail = true -- if true, email will send
popupNote = true -- if true, popup notification will send to all users.
pushNote = true -- if true, interactive push notification will send to users, which can receive Push notifications as defined at "Access Control" panel at "Mobile devices list" section.
_TTS = false -- text to speech message. Please before setting to true, make sure to update locationTts() function with your TTS setup. Default code in function based on Text to Speech - Android phone/Tablet scene and could be downloaded from https://forum.fibaro.com/files/file/180-text-to-speech-android-phonetablet/
--list of users ID and names (the reason to include names, is because the name could be email address in the system). Set scene %%properties accordingly to IDs in list. Please update according to your system
GPSuser = {{2,"Alex"},{190, "Tammy"},{457,"Leon"}}
--list of points of interest to follow users' arrival, approaching or leave. Please update/add according to your favorite locations. Make sure that place coordinates are few times more accurate than locAcc variable below.
GPSplace = {{"Home","62.1747177;64.8820022"},{"Work","62.244312;64.842668"}}
ignoreGps = 1 -- Amount of hours to consider the location is too old and ignored. Default to ignore over one hour old user location.
locAcc = 300 -- Defined GPSplace area in meters, to assume presence in place.
distGap=150 -- Distance between current and previous locations to avoid messages in case same location received several times.
By executing the scene manually, table with users' last location and their distance from predefined places will be displayed.
Please use this feature to verify that the users' location data is receiving and updating by HC2. hasGPS column shows if user has GPS (means if location has been ever sent from this user) and how frequently GPS position is collected.
When the scene is triggered, follow information on debug window displayed:
User name, his previous and current location and timestamps. Current distance of the user from all predefined places
I hope it will do the job for you.
617 downloads
-

Text to Speech - Android phone/tablet
By cag014
First of all the entire credit goes to @davanha who has written this text to speech (and alarm control) APK for android and continues to maintain the code. Outstanding job.
Now, to my opinion, everyone should use this very simple and straight forward implementation. This is a great opportunity to give a voice to your home. I'm using TTS for years (UBI and EMIC solutions), but to have it on my phone at any place at home !!! sounds much better. Of course if you have tablet which runs Fibaro application and now you can make it speak... great feature for all your family, finally they can hear what you're doing. In my case the smart home is part of the family.
I know that many users use other solutions like SONOS, Google, but not one of them has this nice and convenience way to speak directly to you or any other member of your family at any place at home.
Please follow next installation steps:
1. Create TTS scene and copy the code (TTS scene v1.0-lua.txt) on your HC2.
2. Download zenitgatekeeper_0.1.651.txt to your phone or tablet. Change file extension to .apk and install the application.
3. Go to setting (initial password 1234) Application settings -> [check 'Autostart application after reboot' box] -> Http services [check all boxes on this page] see fifth screenshot-> go back till you see "Text-To-Speech mode" window (as displayed on third screenshot)
4. Usually we're cleaning our phones by killing background applications, so please lock this application on your phone.
5. To verify proper installation run on web browser follow line http://<ipadress of android device>:8080/tts=testing Your android device should now play the speech
6. You can add to play intro announcement before the message.. like "ding dong" or any other. To do so please click "Settings" button (default password to settings menu is "1234") -> Application Settings -> Http services -> Play speech on device.
7. New releases of the app are available at https://github.com/davandev/AlarmController/releases
8. Now if the setup is OK... open any code on your HC2 and execute
fibaro:startScene('ttsSceneID',{"testing my text to speech setup","<IP address of android device:8080"}) fibaro:startScene('ttsSceneID',{"testing my text to speech setup","<IP address of android device>:8080",<volume level>}) Usual volume level range is 1-15. Please notice that the volume level of your phone or tablet will be changed accordingly.
9. Another great feature of zenitgatekeeper application, it can receive "wakeup" command and it will turn on the android device screen. I've found this very useful for my tablet in living room. Till now the display was constantly on, now since I have motion sensor in the room, I'm able to turn on the display only if someone in the room. It extends my tablet display life cycle. To use wakeup just start TTS scene as shown below:
fibaro:startScene('ttsSceneID',{"wakeup","<IP address of android device:8080"}) For more information please visit this topic: https://forum.fibaro.com/topic/25004-using-an-android-device-as-a-text-to-speech-engine/
Notes:
This solution works on your local LAN- home network only. When your device is out of range, no message will be received. But when you back to your area the device connects automatically and starts to "speak". My suggestion is to assign fixed IP address to your device on your home network. Otherwise the IP address could be changed and you'll need to change it in the code. You will hear the messages even if your phone is on mute. To stop to hear the messages you need to reduce the volume or to kill the application.
Some ideas of messages could be seen on first screenshot. In addition you can install the apk application on other members of the family and you can redirect relevant messages of smart home directly to them only.
464 downloads
- cag014
- text to speech
- (and 3 more)
-
Scan variables and strings.
By cag014
Due to lack of global functions, we're adding more and more global variables. In some cases after a while we find a way to do it differently, but the global variables are still there. Usually we quite afraid to delete the variable because we're not sure if the variable is not in use somewhere in code.
So, this code scans scenes and virtual devices and finds where the variable is in use.
Scenes displayed (blue color) by name and scene ID. Virtual devices displayed (wheat color) by name, button name, device ID and button ID. The program execution has four options:
1. Scan for all variables and display scenes and virtual devices where every variable is in use. (make sure findVar=nil and findString=nil)
2. Find where specific variable is in use by defining findVar.
3. Find where specific string (phrase) is in use by defining findString.
Some characters, called magic characters, have special meanings when used in a pattern. The magic characters are
( ) . % + - * ? [ ^ $
The character `%´ works as an escape for those magic characters. So, '%.' matches a dot; '%%' matches the character `%´ itself. You can use the escape `%´ also for all other non-alphanumeric characters. When in doubt, play safe and put an escape. For example if you're searching for string "match(" you should use "match%(".
4. To find not in use variables only. Press "start" twice within 1 second.
--================= User configurable parameters ============================
findVar = nil --------- Name of specific variable to search.
findString = nil ------ Any string to search.
--============================================================================
Notes:
In case findVar and findString are both defined, the code will scan for findString. Make sure when findVar and findString are not in use to set to nil
As usual hope it helps...
281 downloads
(0 reviews)0 comments
Updated
-

Door and window monitoring
By jwi
Scene description:
The script reads the temperature of an outdoor sensor to extend or shorten the message interval.
The status of windows and doors is checked every minute. The shortest reporting interval ist 5 minutes.
It's also possible to use the temperature of a plugin like Yahoo or Yr Weather. In this case, the variable has to look like this:
813 downloads
- monitoring
- window
- (and 1 more)
-
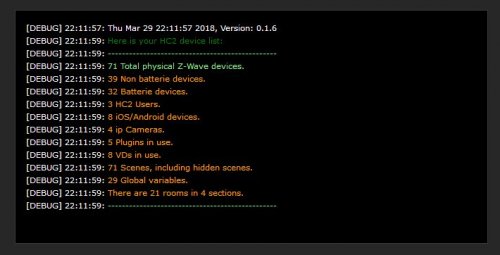
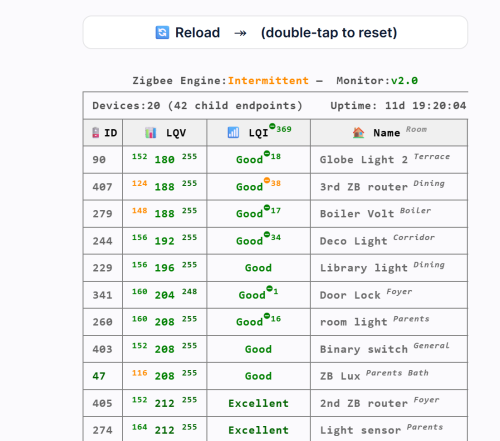
Device inventory scene v. 0.1.6
By jwi
Device inventory scene
Hello everybody,
this is a simple scene that shows you all the objects in the HC2 and their number, no matter if zwave devices, users, virtual devices and so on.
See the attached screenshot.
The script does not need an autostart or other triggers, rather it is meant to be executed ad hoc.
In any case, it is no longer necessary to count the devices by hand in the future.
247 downloads
(0 reviews)0 comments
Updated
-
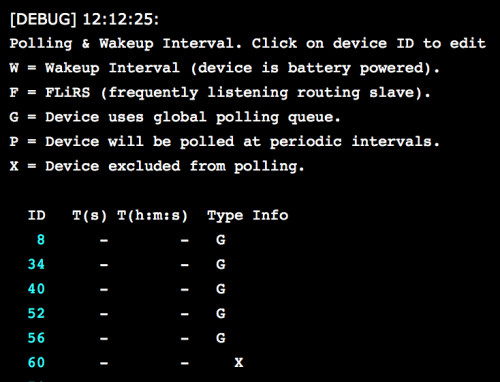
WakeUpAndPolling
Support topic for this scene:
Script to summarize "Wake up interval" and "Polling time interval" off all physical (master) devices.
Version 1.2, 2016-06-23.
* Improved detection: FLiRS & non-Zwave devices.
* Isolate "display" logic into table "printing", so
the detection logic (code) becomes clearer.
* Replace "*" with "-" because, well, I like that
* Handle more exceptional cases (missing data).
* Handle html special characters (ampersand, comparison).
* Implement tests (on my laptop only...). Version 1.1. 2015-06-27 Fix for: LUA error: /opt/fibaro/scenes/390.lua:70:attempt to perform arithmetic on local 'timeSec' (a nil value). Version 1.0. 2015-06-14. Initial version. Tested on HC2 V4.049. Description of the report
This is a example. The ID is clickable when you run the script. It takes you to the settings of the device in a new tab or window.
ID T(s) T(h:m:s) Type Info 299 - - X 333 7200 02:00:00 W 382 * * G 383 125 00:02:05 P 804 600 00:10:00 W For battery devices the script will say:
W = Wakeup Interval (device is battery powered). or
F = FLiRS (frequently listening routing slave). FLiRS are battery operated that can respond in 1 second to commands (unlike normal battery powered devices). Typically found on door locks. Battery is checked every 24h (non-configurable).
Polling comes in three flavors. The sentences used here are the same as in the HC2 device GUI. They are shown on the "Advanced" page of a device). The possibilities are:
G = Device uses global polling queue. P = Device will be polled at periodic intervals. X = Device excluded from polling. Global polling uses the settings of polling on the "Configuration, Z-Wave Network" tab.
So in the example: device 299 e'X'cluded from polling, 330 'W'akes every 2h, 382 has 'G'lobal polling, 383 has 'P'eriodic ('P'er device) polling set at 125 s.
* Background *
Wake up interval
This setting applies to battery devices. This is the time between wake up and "wake up" means the device exits "deep sleep" and sends a specific signal to controller. That WAKEUP-NOTIFICATION tells the controller that it is ready to exchange configuration information. The device stays awake for some time (timing is device dependent) to exchange data. Wake up is not to be confused with polling. Also, I'd like to note that a wake up can be forced through some specific button press sequence, but not by "using" a device. For example, breaching a motion sensor, or opening a door with a door sensor does not wake up the device. Such an event merely makes the device send a status change to the controller. After that, it immediately goes to sleep. This is necessary to minimize power consumption. When does this all matter? Suppose you have changed a device parameter. That request will be queued until the device wakes up. Suppose it's a Smoke Sensor, high up there against the wall and you can't push the button. In that case, you'll have to wait until the next "wake up interval" passes. And if you own a radiator thermostat? That kind of device will pick up the set point from the controller at wake up. And for a key fob: you probably wouldn't want it to wake up at all, because there's no interesting data to exchange.
Polling interval
This is the time between "polls" and a poll is the controller asking for the device to send information. Only mains powered devices have their radio switched on at all times, so they can respond to this request whenever the controller asks. But what with a battery device? If the controller ask something while the device sleeps (and that's almost always), it can't receive the poll. I don't know how Fibaro implemented it, but there are 2 possibilities: either the poll is queued or it is discarded. There is a hint how it's done: have you looked at the interface lately? Then you have noticed that a battery device does not have the "polling" settings. In my own opinion, polling indeed doesn't apply to battery powered devices.
What should we do with polling? Is polling necessary? First of all, I remember cases of users that where unhappy without polling, as it was disabled in the earlier 4.X versions. I once owned a device myself, that did not report status to the controller: a simple switch. No polling means: the controller doesn't know the state of the switch when operated locally. But if you have a look at the technical documentation of your device, you're likely to find a "reporting group". And if it's Z-Wave plus, having such a group is part of the standard. That means the device sends data to the controller, when something interesting happens.
What's the issue with polling? Polling causes network traffic. And that may introduce delays from and to your devices. It depends on network size, network design, code and device types. I have 37 mains powered devices (43 battery), and I can tell the difference between polling on and off. The polling traffic is very likely unnecessary traffic. I would disable polling. If HC2 is wrong about the status of a device, verify if "1" is in the reporting group (see device manual). To my knowledge, none of the Fibaro devices need polling.
One more thing. The "polling" and "wake up" interval can be put on the same report, in the same column, because they cannot occur together. If it's a battery powered device, it can't be polled because the device switches off its radio when it's sleeping. And when it's a mains powered device, its radio is always on, so "wake up" doesn't apply.
* FLiRS *
FLiRS are battery operated, but still can receive commands. Because they are "Frequently Listening Routing Slaves" meaning they briefly wake up once per second to check if the controller sends a special command. The Fibaro Heat Controller FGT-001 is such a device. You can also build your own FLiRS based on a Z-Uno. Technically they can be polled, but I think the HC interface does not allow you to do so (not on FW 4.150 anyway). FLiRS "do not wake up as a normal battery device" so there is no such configuration parameter.
* About the code *
Special thanks to forum users krikroff an A. Socha (Fibaro) for pointing me in the right direction for the API. Bits and pieces were gathered on this forum. Some parts were discovered by trial and error (by me). And an invaluable source of information is the book "Z-Wave Basics" by Dr. Christian Paetz.
One small warning: parts of the code uses features that are not (yet) documented. They were discovered by reverse engineering. I may be wrong. Or the code may break if Fibaro changes things in future firmware releases. Maybe the script barks at you. Please let me know if it does so, I'll try to learn from it. I last checked the code on my system, running FW 4.153 jan 2018 and it was still fine.
The code is available as an attachment to this post.
Please let me know what you think of it!
Thanks for reading this long post. And as always: have fun with Home Automation!
443 downloads
(1 review)0 comments
Updated
-
Multi-room Call for Heat
By Dave_H
I have a number of Danfoss LC-13 valves around the house, together with a Secure SSR302 to turn the boiler on and off. The Danfoss valves are controlled by the Heating Panels, and I also have a Fibaro multi-sensor in each room. I've noticed from a number of posts on the forum that there are other people with the same or similar setup, and need a scene to control the boiler switch. The idea being that if any room needs heat, then the boiler will be turned on, and once all the rooms have reached the required temperature, then the boiler will be turned off.
Setup required:
Modify the device id for the Secure SSR302 (or whatever device is used to control the boiler) here:
local boilerSwitch = 84 You might also want to tweak this value:
local threshold = 0.3 This is used to build in some hysteresis into the system to prevent the boiler from being switched on and off too frequently. The boiler won't switch on until the temperature has dropped below the target temperature by this value or more.
The scene is triggered by a global 'timer' variable to run every 5 minutes. There are a number of timer scenes on the forum, but this is the scene that I use.
You should also change your Danfoss valves so that the Wake Up Interval is 300 seconds. I find that this doesn't have a detrimental effect on the battery but allows the devices to respond more quickly to the temperature change requests.
The scene works off the temperature sensor and thermostat that have been defined in your Room settings, so ensure that these are correct:
Note that this method of controlling the boiler assumes that your temperature sensors are working to the same temperatures as your Danfoss valves - ie: the Danfoss valves turn off once they've reached the target temperature, and that the temperature sensors are also reading this same value. You may need to tweak the temperature offset for the temperature sensors so that the two devices are in sync with each other. If in doubt then set the temperature offset so that the sensors read a slightly higher temperature. That way, the scene will think that the room has reached the desired temperature and turn off the boiler. Otherwise you may find that the boiler is not switching off because the room has reached the target temperature, but the Danfoss valve has already turned itself off.
Other types of boiler switch might not use the 'mode' property to determine whether they are on or off. Consequently, the following line may need to be changed, for example to use the 'value' property instead of 'mode':
local boilerOn = (fibaro:getValue(boilerSwitch, "mode") == "1")
Side topic:
Note that there is a school of thought that boilers should be left on all the time even if there aren't any rooms that require the heat, and that the boiler's control logic will detect this and modulate the water temperature accordingly. I don't necessarily uphold this view, but then I'm not a heating engineer either, so I'm happy to be persuaded either way. In my case, I believe that my condensing boiler operates most efficiently when there is a 20C difference between the output and input water temperatures, and as a result it needs the radiators to be drawing heat from the system. I also have radiators that aren't controlled by Danfoss valves (bathrooms and other small rooms), and I don't want to be heating them all the time, wasting energy. After all, the whole point of the Danfoss valves is to avoid having to heat rooms that you're not using, and thereby save some money. Maybe the more intelligent boilers that can regulate the water temperature according to the system's needs and outside temperature operate differently, and as a result more efficiently, and can be left on all the time. The general opinion, in the UK at least, appears to be that the heating should be turned off if not needed. Just my tuppence worth, but I know that views like this can be contentious so please don't shoot me down in flames.
As another side topic, it looks as though the new Fibaro TRVs are far superior to the Danfoss TRVs with the built in algorithms and the ability to cooperate with another sensor in the room. They should certainly avoid a lot of the problems that we get with the Danfoss valves. Pity I can't justify replacing them.
393 downloads
-

List of device grouped by parent
By drboss
List of devices grouped by parentId (normally hidden). For check if device is good excluded or find subdevice of same parent device.
info='short' -- only device ID
info='full' -- device ID with name and list of phone
72 downloads
(0 reviews)0 comments
Submitted
-
Battery Check Scene
By Sankotronic
[SCENE] Battery Check scene v1.2.4
Hello all,
Here it is, scene that will check battery level on all your battery operated devices and inform you on time when replacement is needed. I wish to thank very much to @petergebruers and @szmyk for code that searches and sorts all battery devices included to HC! THANK YOU!
VERSION HISTORY:
28/09/2017 - v1.1 - first release 29/09/2017 - v1.1.1 - added translations for Dutch and Slovak 29/09/2017 - v1.2 - added possibility to define excluded and rechargeable devices. Added 3 new messages and added translations for German, Czech, Swedish, Danish and French, but need translation for new 3 messages. Also added emoji symbols to e-mail notification. 30/09/2017 - v1.2.1 - Corrected level for devices that report level 255 since Sensative strips can report battery level higher than 100%. Corrected translations for Polish, German, Dutch, Slovak, Croatian, Serbian, Bosnian, Slovenian, Chinese, Italian languages. Removed testing code that was accidentally left for checking devices with rechargeable batteries in v1.2 01/10/2017 - v1.2.1 - added Romanian translation 01/10/2017 - v1.2.2 - If HC reported battery level is 255 then it is shown as 0 % just to avoid any misunderstandings. 02/10/2017 - v1.2.2 - added missing Danish translation 10/10/2017 - v1.2.3 - added translations for Norwegian, French, Romanian, Russian and Ukrainian languages. 17/03/2018 - v1.2.4 - Corrected translation for Czech language.
SCENE DESCRIPTION:
This scene is searching for all battery powered devices included in your HC2 and then checks their battery levels. It will send one e-mail to users with list of all devices which battery level is as follows:
battery level 15% or lower will send WARNING to replace battery immediately battery level between 15% and 25% will send REMINDER that battery should be replaced soon battery level between 25% and 35% will send INFO to prepare or buy new battery for replacement rechargeable devices if battery level is 20% or less then will remind you to RECHARGE if all device batteries found with level above 35% then no e-mail will be sent
Above levels are set according to those used in most devices. Usually, battery is shown in red when device battery level drops to 35%, but there is still no e-mails sent by HC. Reminder 25% level is set according to my experience when it is last moment to order batteries if there are none in the drawer left. Replacement level of 15% is set because some devices can just stop working if level drops bellow. Since all battery operated devices most of the time sleep, it can happen that they might not be able to report back to the gateway due to rapid depletion of the battery at its end of life. Also, thanks to @I.Srodka to confirm that this levels are used by HC.
This scene supports multiple languages as in the list bellow:
HC included languages and for this you do not need to do setup English = "en" OK Polski = "pl" OK Deutsch = "de" OK Svenska = "sv" Portugues = "pt" Italiano = "it" OK Francais = "fr" OK Nederlands = "nl" OK Roman = "ro" OK Brazilian Portuguese = "br" Estonian = "et" Latvian = "lv" Chinese = "cn" OK Russian = "ru" OK Denmark = "dk" OK Finland = "fi" Czech Republic = "cz" US English = "us" OK Spanish = "es" Additional languages supported by this version: Set it up for local lng two letterrs between quotes Slovak = "sk" OK Croatian = "hr" OK Bosnian = "ba" OK Serbian = "rs" OK Slovenian = "si" OK Norwegian = "no" OK Ukrainian (NEW) = "ua" OK It is difficult for me to properly translate to all above languages so for now languages with OK are translated and the rest are still to be translated. I will really appreciate your help with translation for the rest of the languages. Please if you do translation of bellow messages you can post it here so that other know that it is already translated. I will also add OK for every language I receive translation and of course update scene code! THANK YOU!
Thanks to @gucio1234 for Polish translation!
Thanks to @Bodyart for Slovak German and Dutch translations!
Thanks to @MaTi for Dutch translation!
Thanks to @jakub.jezek for Czech translation!
Thanks to @sonnyboy for Swedish translation!
Thanks to @TurboWannaBe for Danish translation!
Thanks to @speedoxx007 for French translation!
Thanks to @Momos for Romanian translation!
Thanks to @olekenneth for Norwegian translation!
Thanks to @Momos for Romanian translation!
Thanks to @jack.daniels for Russian and Ukrainian translations!
NEW v1.2 (added 3 new messages marked with arrows) This are messages for translation in English. %s are insertion points for device names and battery levels:
["en"] = { title = "Battery check", subTitle = "Following devices need your attention:", info = "INFO! id: %s - %s %s battery is on %s %%", remind = "REMINDER! id: %s - %s %s battery is on %s %%", warning = "WARNING! id: %s - %s %s battery is on %s %%", ---> excluded = "EXCLUDED! id: %s - %s %s battery is on %s %%", ---> recharge = "RECHARGE! id: %s - %s %s battery is on %s %%", found = "Found %s battery operated devices", tobuy = "INFO! Please order replacement battery", soon = "REMINDER! Need to be replaced soon!", replace = "WARNING! Please replace battery as soon as possible", ---> charge = "RECHARGE! Please recharge battery!", lang = "English" },
SCENE SETUP:
This scene is very simple to setup. First select Scenes on main menu in HC web GUI and then add new scene. Select LUA scene. Download BC scene and open with PLAIN TEXT EDITOR (please do not use MS Word or similar programs because they will add formatting that will make scene inoperable). After you paste it to upper code window then you can check and set it up as follows:
LANGUAGE:
If your language is on the bellow list:
Slovak "sk" Croatian "hr" Bosnian "ba" Serbian "rs" Slovenian "si" Norwegian "no" Ukrainian "ua" You need to setup local lng with two letter abbreviation for your language:
local lng = "hr" but leave it empty of your language is set on HC.
USERS TO RECEIVE E-MAIL:
Scene by default is set to send e-mail to superuser ID=2, but you can add or replace it with other users. Users ID you can find with this link to your HC docs:
http://YOUR_HC_IP/docs/#!/users Just add users ID inside curled brackets separated by comma as in bellow example:
local userID = {2, 55, 128}
EXCLUDED DEVICES NEW v1.2
Now you can define devices to be ignored or excluded from report. Just add their ID numbers between curled brackets separated by coma:
local ignoreDevicesId = {100, 345} or leave brackets empty to check all devices.
DEVICES WITH RECHARGEABLE BATTERIES NEW v1.2
You can also define devices with rechargeable batteries by their type, like for example new Fibaro Thermostat which is by default already added in the scene:
local rechargeDevicesType = {"com.fibaro.FGT001"} You don't need to remove it even if you still don't have that thermostat. Scene is Fibaro thermostat ready!
RUNNING SCENE:
Scene is not set to automatically run so you need to setup whatever scheduling scene you use to start this scene once per day. If you use
then you can make following settings in Main scene FTBE:
-- SCHEDULED SCENES SETUP ------------------------------------------------ local runSceneSchedName = {"Battery check"} local runSceneSchedID = {Batt_check_sceneID}; local runSceneSchedHour = {{"10:00"}}; local runSceneSchedWeek = {{1, 1, 1, 1, 1, 1, 1}}; local runSceneSchedPushFlag = {0}; local runSceneSchedPushMessage = {""}; Of course, replace Batt_check_sceneID with ID number of this scene that will show up on General tab once scene is saved. And that's it! Enjoy!
HOW TO UPGRADE
From 1.1.1 or previous to 1.2 or higher: Just paste new code over previous one and setup as needed.
From 1.2.2 to 1.2.3: Upgrade only if you need one of the added translations. You can copy only part of the language you need or from line 120 to the end of code to preserve your settings.
From 1.2.2 to 1.2.Battery Check scene v1.2.4.lua4: Upgrade only if you need corrected Czech translation.
NOTE
LUA format of scene code is saved by ZeroBrane Studio v1.50. You can download it at this link: https://studio.zerobrane.com
TXT version please open with TextEdit on Mac or Notepad on Windows.
ICONS DOWNLOAD:
For battery icons please go here to download:
NOTE:
After installing this scene and make it running once per day you can remove battery low e-mail notification from all battery operated devices. Just remove tick for "Notify when battery low via e-mail" on Advanced tab and press save:
Battery Check scene v1.2.3.lua
Battery Check scene v1.2.3.txt
1,632 downloads
-
ALL-IN-ONE Message Scene
By jompa68
--[[ ----------------------------------------------------------------------------- -- ALLINONE MESSAGE SCENE -- TELEGRAM/PUSH/POPUP/API.POST ----------------------------------------------------------------------------- ----------------------------------------------------------------------------- 0.0.9 Started with Telegram and push function 1.0.0 Added popup and api.post functions 1.0.1 Added support for TTS to your MUSAIC player. You need to set right language for you TTS string. 1.0.2 TelegramMessage function does now support if you resend same message many times another scene. 1.0.3 Added support for Sonos remote VD -- SCENE DESCRIPTION -------------------------------------------------------- This scene will send message to your smartphone, which function that will run depends on what string you send and to which variable. Example: -- TELEGRAM ----------------------------------------------------------------- Drop your message to TelegramMessage variable and this scene will send it to you Demands a telegram token and chatid -- fibaro:setGlobal("TelegramMessage", "YOUR MESSAGE") -- -- PUSHSMARTPHONE ----------------------------------------------------------- Drop your message to SmartPhoneMessage variable and this scene will send it to your smarthphone as push -- fibaro:setGlobal("SmartPhoneMessage", "YOUR MESSAGE") -- -- SENDPOPUP ---------------------------------------------------------------- Will send an popup message to fibaro app in your smartphone -- fibaro:setGlobal("popUpMessage", "Info:Test:From fibaro HC2:Test of string") -- String translate : (typeInfo, windowTitle, header, contentInfo) typeInfo = available types: ('Info', 'Success','Warning','Critical') windowTitle = pop-up window title header = pop-up content title contentInfo = pop-up content text -- API.POST ----------------------------------------------------------------- If you want to send an api.post message to your smartphone with the possibillity to start a scene you send this example string to apiPostMessage variable. -- fibaro:setGlobal("apiPostMessage","Activate alarm?:Nobody at home:RUN_CANCEL:283") -- String translate: (message, title, category, data) message = the message title = the title category = the value for what to do, can be RUN_CANCEL or YES_NO data = sceneID to run -- SONOS TTS ---------------------------------------------------------------- Drop your message to sonosTTS variable and this scene will send it to your Sonos player as TTS -- fibaro:setGlobal("sonosTTS", "YOUR MESSAGE") -- --]]186 downloads
(1 review)0 comments
Updated
-
Netatmo Plugin - Restart Scene
By drboss
Due to the netatmo plugin often stop work without any info the attached scene reboot it. Please add the scene to any another time based scene (ex for 2 time call by day)
Explication of scene. After check mail.lua in plugin source:
if (netatmo:updateProperty('polling_time', config.polling_time) or netatmo:updateProperty('username', config.username) or netatmo:updateProperty('password', config.password) or netatmo:updateProperty('client_id', config.client_id) or netatmo:updateProperty('client_secret', config.client_secret)) then plugin.restart() end to force plugin restart the scene change pooling_time variable. It add to pooling time of netatmo plugin 5s or subtract 5s, alternately and after this check any change in plugin. Result of this is restart of netatmo plugin.
97 downloads
-
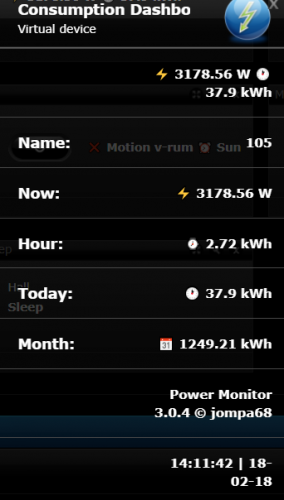
Consumption Monitoring Scene
By jompa68
Consumption monitoring™ v3.0.4
CHANGES 2018-02-18 Added support for send push every hour. Added more emoijs to VD 2017-04-04 Corrected day, line 115 2017-04-13 Corrected selfRun function. Added 2 more labels with info. Added emoijs.
Monitor your energy consumption and if wanted it will send a daily push and month report with consumed energy
Supports AEON Labs energy meter (and more...?) Supports Autofrank's Smart Message Hub
Create an empty vd(virtual device) with 7 labels. ID of the label should be Label1 to Label5. Name you can set what you want.
Update - 2017-04-13 - To show the new info in VD then add 2 more labels. Label1 to Label7 Create an empty LUA scene and copy the LUA code into that scene. Change line 22 to your AEON LABS HEM id local energyMeterID = 319 Change line 26 to your vd id that you just created local vdID = 464 Change line 30 to false (local selfRun = true) if you want to run the scene from other scene like @Sankotronic Time Based Events Control Supports @AutoFrank SmartMessageHub, set line 38 to false if you want to use standard push (local SMsgH = true) set id of the SMsgH scene at line 40 local SMsgHid = 262 Does also support @AutoFrank HomeTable setup if you set local SMsgH = false remember to fill in id of the smartphones you want to have the push local pushUsersHC2 = {"449"} Separated with comma change line 59 to false if you don't want to have an daily report pushed. local sendPushDaily = true change line 62 to false if you don't want to have an monthly report pushed local sendPushMonthly = true change line 64 to wanted time you want to have the report to be sent local sendPushTime = "06:30"
EXTRA INFO
Can support more then just AEON HEM but that depends if Fibaro have the power info from the device. You can check that if you run this in your browser http://HC2_IP/api/energy/now-86400/now/single/devices/power/ID_OF_DEVICE. Result should be like the below picture So for example if you just want to have info about the dishwasher, fridge, washing machine etc it should be supported.
Consumption_Dashboard.vfib
373 downloads
(0 reviews)0 comments
Updated
-
Room Thermostat Override
By Dave_H
Overview:
I have a Secure SRT321 room thermostat in my living room, and up until now the only function that it has performed is as a temperature sensor. Changing the temperature on the thermostat has had no effect. I haven't associated it with my boiler switch, as I've implemented a multi-room system. In theory, I should be able to associate the thermostat with the Danfoss LC-13 radiator valves in that room, but that doesn't seem to work. However, what I really wanted to do is to override the Heating Panel for that room. That way, any overrides will also be visible in my Heating Override Virtual Device.
This scene should work with any thermostat device (including the radiator valves), but is primarily designed to work with room thermostats. When the set point temperature on the thermostat is changed, then the corresponding Heating Panel for the room that the thermostat is located in will also be updated. If the temperature that is selected is not the same as the current scheduled temperature for that room, then it will put the Heating Panel in manual mode. If it's the same as the scheduled temperature, then the Heating Panel will revert to scheduled mode. By having it update the Heating Panel, then the radiator valves in the room will also be updated.
Setup required:
You will need to change the list of devices ids in the Scene Header, for each of the room thermostats:
--[[ %% properties 123 targetLevel 234 targetLevel --]] Ensure that you enter the device id for the thermostat and not the associated temperature sensor on the device, if there is one.
You can specify a fixed override duration (the number of minutes that the Heating Panel will be overridden) by changing this variable:
local overrideDurationMins = 0 -- Set to zero to override until next scheduled change However, if you leave this variable as zero, then it will override the Heating Panel until the time that the panel is next due to change, or for the Minimum Duration. The Minimum Duration can be specified here:
local minimumOverrideMins = 60 -- If the duration until the next scheduled change is less than this, then use this value Set the Minimum Duration to zero if you don't want use this feature.
You might need to increase the number of scenes that can run concurrently by changing the Max Running Instances in the scene properties. Changing the thermostat could trigger several occurrences of this scene. If there is a limit on the number of scenes that can run, then it's possible that the final setting of the thermostat will be ignored.
Code:
Download it from here: Room Thermostat Override 1.0.lua
96 downloads
(0 reviews)0 comments
Submitted
-
Presence Detector
By jompa68
Want to share my Geolocation and Presence Detector scene i use in my Fibaro setup
In wife's and my own smartphone i use both geofency app and wifi presence to check if we are home. A VD runs scheduled and will update a global variable with value "0" or "1" depends if smartphone is active or not.
Geofency app is the most reliable and correct app i use myself because the smartphones wifi turns into "sleep" mode often to save battery.. You could of course only run Geofency if you want.
Instructions for Geolocation setup
https://forum.fibaro.com/index.php?/topic/18383-tutorial-geofency-geo-location-based-fibaro-triggering-ioswindows-pc
This scene can be setup and scheduled in Sankotronics "Main scene timebased events"
https://forum.fibaro.com/index.php?/topic/23510-scene-main-scene-for-time-based-events-control-v-124/
Settings that can be changed by user:
-- USER SETTINGS --------------------------------------------------------- -- "PresentState" is predefined global value that determines if you are at home -- away or on holidays. This variable value is set by other scene or VD. -- Enter name of your global variable between "" or leave as it is local presentState = "PresentState"; local presentStateMapping = {Home="Hemma", Away="Borta", Holiday="Holiday"}; -- GuestState is predefined global variable with possible values: "Yes", "No". local guestState = "GuestState"; local guestStateMapping = {Yes="Yes", No="No"}; -- Geo is predefined global variable with possible values: "1", "0" -- and name of users. This variable value is set by other scene or VD. -- variable example setup: --> "Geo_Jonny_Home" local geoState = "Geo_"; local geoUserMapping = {User1="Jonny", User2="Mona"}; local usegeoState = true; -- Smartphone is predefined global variable with possible values: "1", "0" -- and name of users. This variable value is set by other scene or VD. -- variable example setup: --> "Phone_JL_Present" local wifiState = "Phone_"; local wifiUserMapping = {User1="JL", User2="ML",User3="SL", User4="SW",User5="MW", User6="DD"}; local useWifiState = true; -- Telegram settings local varTelegram = "Telegram"; local useTelegram = true;
192 downloads
(0 reviews)0 comments
Submitted
-
Simple Timer / Scheduling Scene
By Dave_H
Sankotronic's scene for scheduling time based events (Topic 23510) is a shining example of LUA coding and impeccably documented. It's very powerful and caters for just about every scheduling requirement that you could think of, as well as adding a lot of useful variables that can be used to check whether a scene is running at different periods in the day, week, month, year etc. However, with that power comes a little added complexity, and it's possible that your requirements are much simpler. If you're one of those people and haven't already implemented your own scheduling scene, then that's where this scene may help.
SIMPLE TIMER SCENE
This scene will simply update global variables, either on a periodic basis, or at selected times of the day. These global variables can then be used to trigger other scenes by adding them to the %% globals section in the header, eg:
--[[ %% globals fiveMinuteTimer --]] It will automatically create the global variables, so you don't need to worry about doing this manually.
At the beginning of the scene is a table that contains the timers that you want to create, and you should modify this table according to your requirements. For each timer, as well as the timer name, you also specify either:
The frequency in seconds that the timer will be triggered, or The set time(s) that the timer will be triggered, in HH:MM format.
Two special values for 'sunrise' and 'sunset' can be used to trigger scenes to run at these times.
This is the table that you should update:
local timers = { timer1 = {name="oneMinuteTimer", frequency=60}, timer2 = {name="fiveMinuteTimer", frequency=300}, timer3 = {name="fifteenMinuteTimer", frequency=900}, timer4 = {name="twelveHourTimer", frequency=43200}, timer5 = {name="garageDoorCheckTimer", setTimes={"20:00", "21:00", "22:00"}}, timer6 = {name="sunriseTimer", setTimes={"sunrise"}}, timer7 = {name="sunsetTimer", setTimes={"sunset"}} }
It is recommended that you set on the 'Do not allow alarm to stop scene while alarm is running'. If not, then whenever Fibaro's alarm is triggered, then all your scenes that depend on these timers will stop.
348 downloads
-
Download Statistics
-
New reviews
-
 By Bornheim · PostedI integrated two HUE bridges in my HC3. It works perfect (and much better and more powerful then the app integrated in HC3). In particular, also sensors, temperature measures etc. are available and can be used in Scenes. However, in both cases after installing and entering the IP adress of my HUEs I had to restart the HC3 to get the authentification running. So I assume to install one has to (i) upload / install the QuickApp, (ii) enter the IP address of the HUE in the local LAN, (iii) rest
 -

-

-

-
 By Sankotronic · PostedVery useful solution to help with gradually moving from HC2 to HC3. I have tested few of the QA and used them to test some of my new solutions on HC3 keeping HC2 still having main controll of our house. Thank you @cag014 for yet another excellent solution!
 -

-

-

-
 By SmartHomeEddy · PostedGreat QuickApp and excellent configuration manual. QuickApp works smooth. Thanks!
 -

-
-
Highest Rated Submitters
No ratings this week.
No ratings this month.
No ratings this year.
-
1

-
2

-
3

-
4
-
5

-